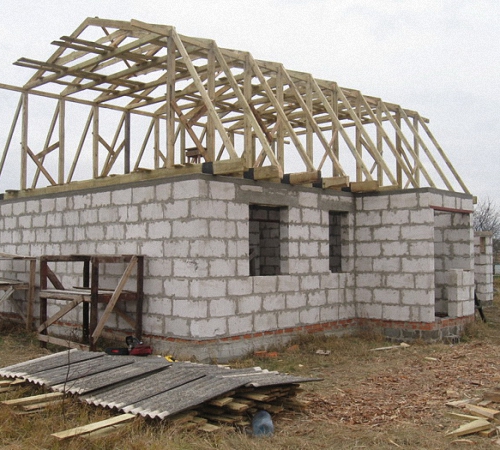
Do-it-yourself attic roof installation. Do-it-yourself attic roof construction. Single pitch mansard roof. Photos of successful projects
If necessary, you can arrange an attic under the roof of the building. This room is used as a residential or utility room. Installing an attic roof with your own hands is a difficult task, but doable, and the advice of our specialist will help you with this.
A little history
Francois MansartAn attic refers to a living space located under the roof of a house. The idea of adapting an attic for a living room or for household needs was born by the architect Francois Mansart in the 17th century. Somewhat later, they began to adjust the shape of the roof specifically for the intended use. They began to construct it so that the lower slope had an angle of 55-65 degrees, and the upper one was located at an angle of 15-25 degrees. Since that time, the architect's surname has been transformed into the name of the premises, which has an original architectural plan placement.
Attic and attic: fundamental differences
Attic space
In terms of insulation, the attic is distinguished as warm and cold. In most cases, it is left without insulation. Additional costs for insulation are required when it is intended to be used.
At the same time, attention should be paid to creating proper ventilation premises. This is due to the fact that moisture that is not removed leads to the formation of condensation, which negatively affects the durability of the rafter structure materials.
When constructing a cold attic, thermal insulation is created on top floor, and the ventilation ducts are led outside the building to the roof. This allows the used air to be completely removed.
A warm attic allows for heated air to remain in the room. Its removal is carried out by constructing an exhaust shaft or by organizing it at the ridge and in the filing of the exits.
 Attic
Attic In this case, the roof structure is initially equipped with ventilation, and air movement occurs from the lower horizons up under the roof. Places where heat loss is possible are insulated.
Attic
From a scientific point of view, an attic is a floor located in attic space, the fencing of the structure is the roof surface, which has a broken or inclined shape. The intersection of the facade plane with the roof should occur at a distance of no more than 1.5 m relative to the floor of the room.
The attic can occupy all or part of the area of the house, and can also be flush with the surface of the walls or beyond them. In the latter case, for support, the floor of the lower floor is cantilevered, or special supports are built.
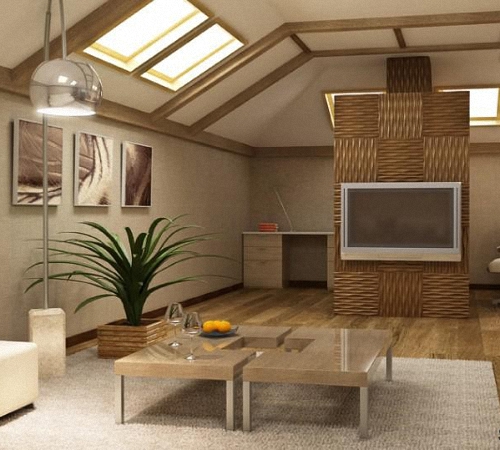
 Cozy attic
 Advantages and disadvantages of the attic
TO positive aspects attic premises include:
- maximum use of building space;
- existing infrastructure is used;
- the living space is increased due to the attic space;
- heat loss is reduced;
- the aesthetics of the house increases.
The disadvantages of the attic are:
- placing the ceiling at an angle leads to a decrease in its height and a decrease in air volume;
- additional hydro- and thermal insulation is required;
- changes in ventilation conditions reduce the durability of the truss structure;
- the need to install attic windows increases the cost of construction.
 Room under the roof
 Attic roof design
The roof of an attic differs from that in that the slope is divided into two parts, one of which is flatter and the other steep. It can be done in various ways and be:
- Gable, having one level. Represents a roof conventional design, which is located above the attic. Designing and calculating the roof of a mansard roof is not complicated, and the work can be done independently. In this case, the area of the premises is not large; they have low ceilings.
- Single-level gable with broken surface. The roof has four slope surfaces located at different angles. The complexity of the design and construction becomes somewhat more complicated, while the area of the room increases.
- Single-level console. It is similar to a pitched roof. In this case, the design and installation of the structure becomes significantly more complicated. The area of the premises increases significantly, window openings increase.
- Mixed type, located on two levels. The most complex structure in terms of calculations and design, as well as installation work, since its construction is only possible during the construction of a house.
 Types of roofs
 Mansard roof rafter system
Types of rafters
Due to the fact that the design of the attic roof is characterized by broken lines and rather steep angles, it is important to make the right choice of the rafter system. It should be understood that the specific roof configuration is determined by the following requirements:
- uniform distribution of loads on load-bearing walls;
- effectiveness of protection from the influence of atmospheric factors;
- reducing the influence of temperature changes.
 Attic drawing
 The most widespread types of rafter systems are:
- Hanging. The support occurs on the walls, distributed in a horizontal plane.
- Inclined. They are constructed during the construction of houses with small in size. In this case, either there is a load-bearing wall located in the center, or there are intermediate supports. In this case, the rafters are supported on the walls located outside, and the central part lies on interior wall or support.
Rafters of both types can be right triangles, the support of which is located outside the load-bearing wall. This design does not require the construction of a Mauerlat.
Rafter design
The structure of the attic roof looks like this.
The modular unit, which is the basis of the structure, is called roof truss. It is composed of two geometric figures: a trapezoid on which stands an equilateral triangle. The screed of this design represents the base of a trapezoid with large size, it is the ceiling beam. Its dimensions are selected in accordance with the loads it bears.
The main rafters act as the sides of the specified trapezoid.
At the main rafter-ceiling beam node, these elements of the rafter system are connected.
 Attic
Attic The tie beam of the attic floor acts as the small upper base of the trapezoid.
From the connection point between the main rafter and the attic floor screed there are vertical racks. They represent the basis of the walls of the attic room. From the same node, ridge rafters go up, converging at the ridge node, which is the highest point of the truss. At the breaking points of the roof there is a node, which is a connection between the ridge rafters and the screed and the post.
To achieve maximum structural rigidity, crossbars are installed.
The diagram of the entire structure is based on the most stable figure - a triangle.
Requirements for attics
When creating an attic space project, it is important to adhere to the following rules:
- when choosing a material and design solution for the attic, architectural unity with the main building should be observed;
- communications of the attic and the base building must be interconnected;
- the translucent fencing must correspond to the configuration of the premises and the general concept of the architectural style of the house;
- the layout of the attic must correspond to the existing layout of the main building;
- Work that takes place in the presence of residents requires the use of special methods to ensure the safety of people.
To comply with the rules fire safety When planning premises, an escape route should be provided:
- if the functions of the main building and the attic coincide, then the staircase adjacent to it is used;
- if the functions of the premises are different, then special communications should be organized.
Carrying out installation work
Construction of the rafter system
It is believed that the best material For this purpose, coniferous wood is used, the moisture content of which is less than 22%. The wood must first be subjected to protective treatment to increase the durability of the structure and the safety of its operation.
When installing an attic roof great importance attached to the implementation of diagonal connections and struts. To avoid deflection, a crossbar is installed, which is positioned horizontally.
The construction process consists of performing the following work in stages:
- The beams, which are the main structural elements, are laid. Their base must be properly insulated from moisture. When installed on a base made of wood, this step is not required.
- Racks made of timber are fixed to the beams. Waterproofing should be organized on their basis. The racks are installed at intervals not exceeding two meters. The racks are positioned strictly in one line, deviations are not allowed. Subsequently they will be lined.
- After this, the top beam is installed and secured with nails or staples.
- To construct the Mauerlat, which is a support for the lower beam, a beam or board is used. When installing it, you should remember the need for waterproofing.
- The rafter legs are installed at a distance of 1-1.2 m from each other. A board is used to make them rectangular section, in the structure of which there should be no knots. For correct installation legs, the outermost ones are secured first, then a cable or fishing line is pulled, and the rest are secured along it. Finally, they are connected to each other at the top by a board.
- If the rafters are less than 8 meters long, installing a ridge beam is not necessary. It is replaced, as a rule, with special braces that allow you to secure the ceiling of the attic room.
- The work on installing fillies is similar to installing rafters. The outermost fillies are attached first, and then all the rest. After this, a hem board is nailed to them, which will prevent wind from blowing and precipitation from penetrating under the roof.
 Construction of the attic
 In places where windows are installed, additional bars are installed in the transverse direction. At the completion of the roof construction, the sheathing is attached to install the vapor barrier.
Insulation of the attic roof
The roof structure of the attic room should be made in multi-layers.
The thermal insulation layer must be fire resistant. Most often, the material for this is mineral wool.
Violations of roof insulation technology can lead to extremely unpleasant consequences. On hot days, the indoor air will have high temperature, and in frosty times there will be difficulties in heating the attic space. In addition, thermal insulation measures must be taken with the walls.
Waterproofing device
As a rule, rolled material is used as a material for creating waterproofing. waterproofing material. It spreads under the roof itself on top of the counter-lattice. Before laying, the material is placed at its location, taking into account the overlap necessary for its fastening.
To create additional insulation from moisture, an SBS bitumen membrane and similar materials can be used.
 Waterproofing
 Ventilation device
High-quality ventilation requires compliance with certain requirements:
- there should be no obstacles to the movement of air from the eaves in the direction of the ridge;
- the air gap above the thermal insulation layer must be at least 500 mm;
- Air exhaust openings must be located at the point of the roof that has the maximum height.
 Small device option skylights
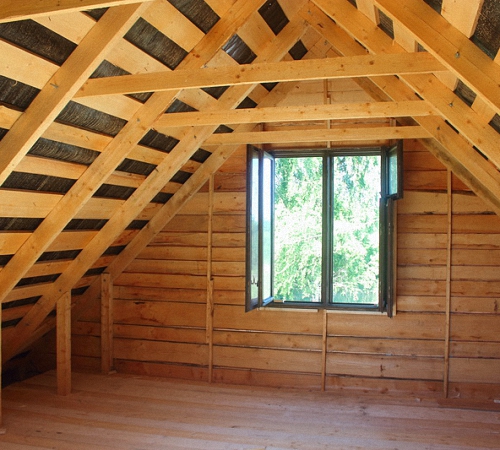
 Attic interior
  Interesting window from the inside...
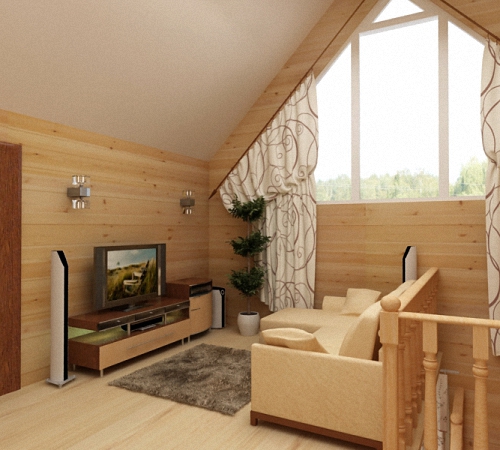
  ...and the same window from the outside
  House with a mansard roof
 Construction of an attic is a very important process that is performed both at the design stage of the entire house and after its construction. This room provides its owners with additional square meters of living space. Let's look at the features of the attic construction below.
Construction of an attic: project and its development
The attic is a rather difficult part of the building to construct. It is preferable to design it at the stage of building the house itself. Because building a residential attic on a finished building is not always possible. First of all, due to the fact that the attic space has considerable weight, and therefore loads the foundation.
The construction of an attic consists of a certain kind of stages, such as:
- attic construction drawings;
- dismantling old roofing materials, if the attic is being built on an already completed building;
- strengthening the walls on the upper floor, strengthening the foundation, if necessary;
- erection of attic walls;
- construction of the roof, its insulation, waterproofing and finishing;
- installation of window structures;
- interior finishing works.
Compliance with all technological nuances in the construction of an attic will allow you to obtain a reliable and durable building.
The first and most important stage- drawing up a project for an attic room. At this stage, you should take into account such features as the size of the room, the material used in its construction, the roof and the level of its slope and many other nuances.
There are three ways to design an attic. The first is the most budgetary, drawing up the project manually. However, minimal design experience is required to carry out this operation. The second way is to use ready-made design documentation; however, it is not a fact that someone else’s attic design will be completely suitable for your home, so you will still have to make some adjustments to it. The third way is to contact specialized organizations that, in the shortest possible time, will help you draw up an attic project that is ideal for your home.
In the process of independent design, you should take into account the wall loads on the building, its appearance and finishing materials used both inside and outside the premises. In addition, it is imperative to take into account the load from the building on the foundation; it may need to be strengthened. If the attic is too heavy, there is a risk of deformation or cracks in the house.
Experts will help you choose the optimal building materials, which, on the one hand, will ensure the attic's durability in operation, and on the other hand, will help reduce its load on the base of the entire building.
In addition, after drawing up the project, it should be agreed upon with special government agencies. If you have a competent project, this process It will go by pretty quickly.

Do-it-yourself attic construction in the house
We invite you to familiarize yourself with the option of constructing an attic in an already built and commissioned residential building. In this case, the first step is to dismantle the old roof. Thus, it will be possible to expand the under-roof space and increase the safety of the building under construction.
To dismantle the roof, it is not necessary to hire specialists; all work can be done with your own hands. To do this, you must first get rid of the external roofing finishing material. Next, you need to completely remove the sheathing and rafter system.
After this, it is necessary to strengthen the walls on the adjacent floor, since the attic will exert a certain pressure on them. The design features of the attic exert pressure not only on the surface of the base of the building, but also on its walls. Therefore, first of all, before constructing an attic, it is necessary to strengthen the walls close to it. To do this, you should use special calculations, according to which this process is carried out and the strength level of old walls is determined.
The next stage is insulation and waterproofing of the attic floor, which is also the ceiling on the previous floor. With the help of these actions it will be possible to ensure a healthy atmosphere in the room. To insulate the attic, you can use various thermal insulation materials in the form of polystyrene foam, mineral wool, etc.
Construction of the attic photo:

Next follows the process of erecting walls in the attic. The walls are made in accordance with the project developed in advance. Most often, wood or timber is used to build walls. To insulate the attic, it is recommended to use mineral wool or expanded polystyrene. When choosing a material for external and internal wall decoration, try to give preference to materials with a high level of fire safety.
The next process is the construction of the roof. In this case, calculating the correct roof slope angle is very important. Since a roof that is too flat will negatively affect the ease of use of the attic space. Please note that the roof must be properly waterproofed, since if there is the slightest leak on its surface, moisture enters the attic.
In addition, the shape of the roof should be as simple as possible; the presence of broken and shaped elements will only complicate the process of their construction. Also important is the issue of insulating the attic space. For these purposes, various types are used Construction Materials. When choosing insulation for the attic, try to give preference to materials that do not absorb moisture and are resistant to frost, temperature changes and rodents. In addition, the thermal insulation material should not allow heat to escape from the room.
It is best to focus on conducting internal thermal insulation works. To create it, follow a number of steps:
- install finishing in the form of plasterboard or plywood base;
- form a vapor barrier layer; special films are used for these purposes;
- lay thermal insulation material - perfect solution- mineral wool;
- ensure proper waterproofing of the roof using a special type of membrane;
- lay external finishing roofing material.
To erect a roof, you will also need to install a rafter system and install sheathing, the installation step of which depends on the type of roofing material. After the roof installation is completed, windows should be installed.
In order to ensure quality lighting In the room, several windows should be installed in it, the size of which directly depends on the size of the attic itself. The window in the attic ceiling must be of high quality. It must be resistant to precipitation, wind, and temperature changes. In addition, with the help of window structures, high-quality ventilation of the attic is ensured.
Further actions for the construction of the attic are related to the internal finishing works, heating organization, decoration and design of the premises. Strict adherence to all recommendations for attic construction will help ensure long-term operation of this room.
Frame attic construction technology
A frame attic is an excellent solution for any home, garage and even bathhouse. Among the advantages of attics frame type note:
- lightness of the structure, so it does not load the main building, there is no need for additional strengthening of the walls and foundation;
- affordable cost of the attic - in comparison with its stone options;
- high level of thermal insulation and sound insulation;
- the possibility of constructing an attic of almost any shape and configuration;
- ease of implementation construction work, since the materials for the construction are quite light and special equipment is not required to lift them to the surface of the house.
The construction of a frame attic allows you to get finished building with excellent heat and sound insulation properties. In addition, the roof will remain completely intact, and effective area the premises will increase significantly.
A simpler process is to build an attic on a building that has not yet been erected. Construction of an attic on an already finished house requires dismantling the old roofing. Work should begin by studying the characteristics of the soil on the site and determining load-bearing capacity foundation. If the foundation is not able to support the attic, then a series of works will be required to strengthen it.
Next, you should inspect the walls of the house for their susceptibility to additional loads. In this case, if necessary, it is necessary to strengthen the walls. After this, it is dismantled old roof and the ceiling is strengthened.
Construction wooden attic consists of the following stages:
- production of frame system;
- installation of walls;
- insulation of attic walls;
- installation work related to the installation of the roof;
- finishing the attic with roofing materials and insulating the roof;
- interior decoration of the attic.
In addition, the construction of an attic involves the installation of window and door structures, the manufacture and installation of stairs, etc.
In order to construct an attic from timber, you should prepare an edged board, plywood, screws and the timber itself. The frame structure should be of a height convenient for the average person to move around. The optimal height of the attic is at least two meters. The height of the ridge zone should be about 350 cm.
The easiest way is to assemble the frame on the ground and then lift it onto the roof. The top beam or frame frame will act as a hearth in the attic. To fix the frame structure on the surface of the house, special boards or plywood are used. In this way it is possible to obtain a special platform. The knots and quality of fastening depend on the material from which the attic walls are made. Self-tapping screws are used to connect the timber at the top of the structure. After production frame walls the roof should be thermally insulated and waterproofed. After this, the external and interior lining walls, windows and doors are installed, interior finishing work is carried out.

When planning an attic, you should carefully analyze the general condition of the main building. The attic can be one room or will consist of several rooms. At the design stage, you should also take into account the design and shape of the windows, as well as their location.
The attic should be constructed from light, but at the same time durable materials. Since the materials should easily rise to the roof and place minimal load on the base of the building.
The most optimal materials for constructing an attic are wood or steel profiles. An attic made of stone or concrete will load the main building. Roof finishing materials should also be light, but at the same time durable and reliable. It is preferable to use bitumen shingles or piece metal for roofing. We recommend using plasterboard for interior wall decoration and leveling.
Since the attic is located above the main building, it is in greater contact with cold air. Therefore, proper thermal insulation of this room should be ensured. Heated air in the room should not penetrate through the insulation. In addition, in order to prevent moisture from entering the room, it is necessary to ensure its waterproofing.
In relation to the design features of the attic, it consists of a rafter system, which is installed in increments of sixty centimeters. To fill the gaps between the rafter system, it is recommended to install thermal insulation materials, such as mineral wool, inside them. It is possible to lay the insulation in one, two or even three layers. To calculate the total thickness of the thermal insulation material, the total heat loss coefficient in the room should be taken into account. To protect the roof from inside the room, a vapor barrier should be installed. Next, you should finish the roof using plasterboard, lining or finishing panels.
Do not forget to leave a ventilation gap, the main function of which will be to get rid of excess moisture in the under-roof space. The width of this gap directly depends on the type of roofing material. A vapor-permeable wind barrier should be installed on the outside of the heat-insulating material.
Excellent vapor barrier material is a film made of polyethylene, glassine or roofing felt. The insulation is laid with an overlap of 15 cm. Construction tape is used to seal the seams. Please note that foil waterproofing is laid with a foil covering inside the room. Thus, the foil will reflect the heat that comes from the room.
Construction of the attic video:
Construction of the attic individual house- a fairly common occurrence. This construction method allows you to reduce the cost per square meter and create a rather interesting room in the under-roof space. In order to properly install an attic floor, you need to study the basic requirements for it and choose the right type of roof and its slope.
What is an attic
According to regulatory documents attic floor- this is the volume under the roof that is used to accommodate residential and utility rooms. In this case, the height of the external walls should be no more than 1.5 m in general case, otherwise the space will be considered a full-fledged residential floor.
Do-it-yourself attic is beneficial both during the construction and operation of a private house. In the first case, costs are reduced due to the fact that the height of the vertical enclosing structures is reduced. The roof takes on this function without ceasing to fulfill its original purpose.
An attic is an under-roof space that can be converted into a separate room for living.
During operation, cost reduction may include the following:
- The heated volume of premises is reduced, as a result, there is a reduction in heating costs, which are an impressive item of utility costs.
- After completion of construction, the house must be measured by specialists from BTI, after which a passport of the object is issued. It is based on the area values given in it that taxes are calculated and payment is made utilities(subject to connection to centralized systems and the absence of metering devices, which is now practically unheard of). The area of the marsard floor is included in the area of the entire house with coefficients of 0.7 or 0.8 depending on the height outer wall and the angle of inclination of the roof, which allows significant savings throughout the entire life of the facility.
Preparatory stage
Construction should begin with the development of a project or diagrams on which it will be drawn future design. Most often, the roof that is used for the attic floor is a gable roof, but it is also possible to use a four-slope hip roof. Gable design allows you to provide full windows in the gables.

In the case of using a hip for lighting rooms, it is possible to install only attic window openings. This option may become more labor-intensive in terms of installing roof elements and developing interior interiors. Reduced costs with hip roof achieved due to the absence of gables (savings will be especially noticeable in brick house, where the cost of materials and the work itself for installing wall fences is quite high).
Do-it-yourself attic construction begins with determining the geometric dimensions and shapes of the roof. We have already talked about choosing the type of rafter system for a house (gable, hip), after which you will need to decide whether the slope will be straight or broken. The broken design has such disadvantages as increased cost and labor intensity. Its use is justified by the need to increase the height of the room by changing the angle of the roof.
At the design stage it is determined optimal slope roofs. Its choice depends on ergonomic considerations and the roofing material used, which imposes restrictions.
Before making an attic, it is also necessary to calculate all its load-bearing elements for strength and bending, select the composition of the roof pie, perform thermal calculations and decide on materials. More on this below.
Main load-bearing elements
The design includes the following components:
- Rafter legs, which transfer the load from the weight of the roofing and the wall to the walls of the house. The section is selected depending on the angle of inclination, span, pitch and design load. A professional can perform detailed calculations correctly. For private construction, you can use approximate values, but it is best to provide a small margin.
- Narozhniki- These are rafter legs that rest on the slopes on one or both sides. The cross section is calculated in the same way as for rafters.
- Sloping legs- a structure that is used in a hip roof. This element serves as a support for the narodniks. The cross-section is taken depending on the load and span; in any case, it should be larger than that rafter legs.
- Mauerlat- an element that serves as a support for the footrails and transfers the load from the roof to the walls, distributing it evenly. It would be correct to choose a section with dimensions of 100 by 100 or 150 by 150, depending on the complexity of the object. Installation of the Mauerlat is not carried out during the construction of frame and wooden houses, since in this case its role is played by the upper crown of the walls or trim.
- Rigel- a beam, which also serves as a support for the rafters, but in the upper part. The crossbar is installed at the ridge of the roof or at a break in the slope, in the case of a broken structure. The cross-section should be taken depending on the conditions; the recommended value is 200 by 200 mm.
- Struts, racks, contractions– additional elements for securing elements. Used to reduce the cross-section of load-bearing structures. Their cross section is most often chosen constructively. It is important to consider the convenience of making connections.
A do-it-yourself attic roof must be erected starting with the selection of sections of all elements of the roof frame. The material for manufacturing is selected taking into account the following conditions:
- the wood must be coniferous (pine, spruce, larch);
- material grade – first or second;
- humidity no more than 15%.
Be sure to treat all boards and bars with antiseptic compounds before starting construction.
Thermal calculations

To keep the house warm, you will need to select the thickness of the insulation. Most often, mineral wool is used for attic spaces (more often in slabs than in mats). It is also possible to use polyurethane foam, polystyrene foam, extruded polystyrene foam and ecowool. Having determined what to make the thermal insulation layer from, select its thickness. It is important to consider the height of the rafters. It should always be equal to or greater than the thickness of the thermal insulation. For mineral wool, you will also need to provide a 50 mm thick ventilation gap between the top surface of the thermal insulation and the roofing. If the cross-section of the rafters is small, then in order to fulfill this requirement, a counter-lattice is installed.
Before you build an attic roof with your own hands, you can calculate it using heating engineering manually, guided by the joint venture " Thermal protection buildings." But it’s better to turn to special programs for help. To correctly calculate the thickness in the Teremok program (available for free on the Internet), you need to know the thermal conductivity of the insulation and the area where the house is being built, the program will find the rest itself.

A do-it-yourself mansard roof differs from a conventional pitched roof only in the presence of thermal insulation. More layers are also added to the cake to protect the insulation. The step-by-step instructions below will allow you to correctly install the elements of the attic roof.
The procedure is as follows:
- fastening the Mauerlat to the wall;
- installation of rafters and systems of struts and racks;
- installation of waterproofing and wind protection;
- sheathing;
- roofing;
- insulation;
- bottom trim.
Assembling the roof frame
Installation begins with the Mauerlat. It is laid on the inner grant of the outer wall. Fastening depends on the material of the load-bearing walls, but in general it can be done in several ways:
- on staples;
- on stiletto heels;
- on the anchor.


For fragile house wall materials, such as aerated concrete and foam concrete, trimming is carried out monolithic belt which will prevent the walls from collapsing. Mauerlat is not provided for wooden and frame houses.
Next, you need to install the crossbars, if provided. After being laid support structures, lay out the rafter legs. The fastening of the rafters to the mauerlat can be rigid and hinged. It is better to do it using a notch and fixing it with metal corners on both sides.

This is a fairly old album, so all the drawings in it use nails as fasteners. It is better to replace them with studs. The design of the roof of the house in this regulatory document is shown in great detail, so it is recommended that you familiarize yourself with it before starting work.
Before you begin installing insulation in a house, it is necessary to ensure its protection from negative environmental influences. To do this, spread a moisture- and wind-proof membrane over the surface and secure the sheathing. After this, the roofing covering is installed, taking into account the recommendations for the selected material. For example, bituminous shingles require a continuous sheathing, which is most often made of moisture-resistant plywood.

Installation of thermal insulation
To insulate a house, you need to install insulation without gaps or cracks. For mineral wool, it will be easier to install if the clear distance between the rafters is 580 or 1180 mm.
This will allow the material to be laid with a slight spacer, which will prevent cracks from occurring.
When using expanded polystyrene, the distance between the slabs and rafters is filled with sealant or polyurethane foam.
After laying the insulation, you need to attach a vapor barrier to it from below. After this, the lower sheathing and ceiling lining are installed. For an attic, it is best to cover the frame with two layers of 12.5 mm thick plasterboard followed by finishing.
A house with an attic is not only an additional living space, but also a respectable appearance for the entire building. Even if the room under the roof is made unheated and is used only in the summer, it still creates a powerful “air cushion” that helps retain heat inside the entire building.
And about that - read on our portal.
Attic project

When drawing up a diagram for the construction of an attic, it is best to do this in different projections in order to see and understand the placement of all elements of the rafter system. It is very important to correctly calculate the height of the roof ridge, since the size of the area under it will directly depend on it.
The minimum height from the floor to the ridge should be 2.5-2.7 m, but if this distance is less, then the room is not an attic, it can only be called an attic. This parameter is established by SNIP standards.

In order for all the elements to be drawn accurately and have the desired location in the overall system, you need to start from a figure with right angles, that is, a rectangle or square - a section of the attic room being created. Based on the sides (height and width of the future room), it will be almost impossible to make a mistake with the magnitude of the angles at which the roof slopes are located, with the location of the ridge, rafters and all supporting elements. When determining these parameters, they must immediately be entered into the drawing.
First you need to find the middle of the width of the front wall. Starting from this point, the parameters of the height of the ridge, the future ceiling of the attic, the location of the wall posts and the size are determined eaves overhang.
Due to the fact that each of the structures has a certain number of connecting nodes, which have different configurations, it would be a good idea to draw each of these connections separately in order to understand their features of interconnecting all the elements connecting at this point.

Any rafter system consists of basic elements and additional ones, which may not be present in every structure. The main components of an attic roof include:
- Floor beams, which are the basis for the remaining elements of the rafter system. They stack on capital walls buildings.
- A rafter leg, straight in a gable roof system or consisting of two sections - in a broken pattern. In this case, the top rafter is called the ridge rafter, since it forms the highest point of the roof - and the rafters that form the walls of the attic are called side rafters.
- A ridge board or beam is a mandatory element for a gable roof, but is not always used when installing a broken roof model.
- Mauerlat is a powerful beam attached to the main side walls of the building. Rafter legs are installed on this element.
- Racks are the supporting elements necessary to strengthen a gable and broken structure. In the latter case, the ridge and side rafters are attached to it, and in the first, the stand is a reliable support for a long rafter. In addition, the racks serve as a frame for insulating and covering the walls of the attic.
- Diagonal bracing elements or bevels further secure the posts or longitudinal beams and rafters, making the structure more durable.
- Beams attic floor They are used in all versions of the attic - they are used to connect the racks, and they also serve as a frame for constructing the ceiling.
- Inter-rafter purlins are installed in a broken roof for structural rigidity.
To be sure that the prepared project is developed correctly, you need to show it to a specialist. Only he will be able to determine whether the attic parameters are correctly selected for the width and length of the walls of the building.
Video: professional calculation of a mansard roof using special software
Material parameters for the construction of an attic roof
If the graphic design is ready, then, based on the dimensions marked on it, you can calculate the amount of materials required for the construction of the attic roof. Materials must be selected according to their characteristics, which must meet fire and environmental safety requirements. For wood, it is necessary to provide special treatment with fire retardants, which will reduce the flammability of the material. So, for construction you will need:
- Boards for rafter legs. Their cross section is selected based on the results of special calculations - this will be discussed in more detail below.
- A beam having a cross-section of 100×150 or 150×200 mm is for floor beams, depending on the chosen rafter system and the width between the load-bearing walls, as well as for purlins, diagonal legs or valleys - if they are provided for in the design.
- Beam with a cross section of 100×150 mm or 150×150 mm for laying the Mauerlat.
- For racks, timber 100 × 100 or 150 × 150 mm is usually used.
- Unedged board for laying the subfloor and some fasteners.
- Annealed steel wire with a diameter of 3-4 mm - for fastening some parts together.
- Nails, bolts, staples different sizes, corners of various configurations and other fasteners.
- A metal sheet with a thickness of at least 1 mm is for cutting out overlays.
- Lumber for sheathing and counter-lattens for roofing material - depending on the type of roof chosen.
- – for thermal insulation of the roof.
- Waterproofing and vapor barrier membranes.
- Roofing material and fastening elements for it.
What section of rafters are required?
Rafters are roofing elements that will support the main external loads, therefore, the requirements for their cross-section are completely special.
The size of the required lumber will depend on many parameters - on the step between the rafter legs, on the length of these legs between the support points, on the snow and wind load that falls on them.
The geometric parameters of the rafter system design are easy to determine in the drawing. But with the remaining parameters, you will have to refer to the reference material and make some calculations.
Snow load is not the same for different regions our country. The figure below shows a map on which the entire territory of Russia is divided into zones according to the intensity of the snow load.

There are eight such zones in total (the last, eighth, is rather extreme and cannot be considered for the construction of an attic roof).
Now you can accurately determine the snow load, which will depend on the angle of the roof slope. For this there is the following formula:
S = Sg × μ
Sg– table value – see the map and the table attached to it
μ — correction factor depending on the steepness of the roof slope.
- If the slope angle is me 25°, then μ=1.0
- With a slope from 25 to 60° - μ=0.7
- If the roof is steeper than 60°, then it is considered that snow does not linger on it, and the snow load is not taken into account at all.
It is typical that if the attic roof has broken structure, then for different parts of it the load can have different values.

The slope angle of the roof can always be determined either with a protractor - according to the drawing, or by a simple ratio of the height and base of the triangle (usually half the span width):
Wind load also mainly depends on the region in which the building was built and on the characteristics of its surroundings and the height of the roof.

And again, for the calculation, the initial data on the map and the table attached to it are first determined:
The calculation for a specific building will be carried out according to the formula:
Wp = W × k × c
W– table value, depending on the region
k– coefficient taking into account the height of the building and its location (see table)
The following zones are indicated by letters in the table:
- zone A - open areas, steppes, forest-steppes, deserts, tundra or forest-tundra, wind-exposed sea coasts, large lakes and reservoirs.
- zone B – urban areas, wooded areas, areas with frequent wind obstacles, relief or artificial, at least 10 meters high.
- zone IN– dense urban development with an average building height above 25 meters.
With– coefficient depending on the predominant wind direction (wind rose of the region) and on the angle of inclination of the roof slopes.
With this coefficient the situation is somewhat more complicated, since the wind can have a dual effect on the roof slopes. So, it has a direct, overturning effect directly on the roof slopes. But at small angles, the aerodynamic effect of the wind takes on special importance - it tries to raise the slope plane due to the resulting lift forces.

The drawings, diagrams and tables attached to them indicate areas of the roof exposed to maximum wind loads, and indicate the corresponding coefficients for calculation.
It is characteristic that at slope angles of up to 30 degrees (and this is quite possible in the area of ridge rafters), the coefficients are indicated both with a plus sign and negative, that is, directed upward. They somewhat dampen the frontal wind load (this is taken into account in calculations), and in order to neutralize the effect of lifting forces, it will be necessary to very carefully secure the rafter system and roofing material in this area, using additional connections, for example, using annealed steel wire.
Once the wind and snow loads have been calculated, they can be summed up and, taking into account the design features of the system being created, the cross-section of the rafter boards can be determined.
Please note that the data is given for the most commonly used coniferous material (pine, spruce, cedar or larch). The table shows the maximum length of the rafters between the support points, the section of the board depending on the grade of the material, and on the pitch between the rafters.
The value of the total load is indicated in kPa (Kilopascals). Convert this value into more familiar kilograms per square meter- not difficult. With quite acceptable rounding we can accept: 1 kPa ≈ 100 kg/m².
The dimensions of the board along its cross-section are rounded up to standard lumber sizes.
| rafter section (mm) | Distance between adjacent rafters (mm) | ||||||
|---|---|---|---|---|---|---|---|
| 300 | 600 | 900 | 300 | 600 | 900 | ||
| 1.0 kPa | 1.5 kPa | ||||||
| higher | 40×89 | 3.22 | 2.92 | 2.55 | 2.81 | 2.55 | 2.23 |
| 40×140 | 5.06 | 4.60 | 4.02 | 4.42 | 4.02 | 3.54 | |
| 50×184 | 6.65 | 6.05 | 5.28 | 5.81 | 5.28 | 4.61 | |
| 50×235 | 8.50 | 7.72 | 6.74 | 7.42 | 6.74 | 5.89 | |
| 50×286 | 10.34 | 9.40 | 8.21 | 9.03 | 8.21 | 7.17 | |
| 1 or 2 | 40×89 | 3.11 | 2.83 | 2.47 | 2.72 | 2.47 | 2.16 |
| 40×140 | 4.90 | 4.45 | 3.89 | 4.28 | 3.89 | 3.40 | |
| 50×184 | 6.44 | 5.85 | 5.11 | 5.62 | 5.11 | 4.41 | |
| 50×235 | 8.22 | 7.47 | 6.50 | 7.18 | 6.52 | 5.39 | |
| 50×286 | 10.00 | 9.06 | 7.40 | 8.74 | 7.66 | 6.25 | |
| 3 | 40×89 | 3.06 | 2.78 | 2.31 | 2.67 | 2.39 | 1.95 |
| 40×140 | 4.67 | 4.04 | 3.30 | 3.95 | 3.42 | 2.79 | |
| 50×184 | 5.68 | 4.92 | 4.02 | 4.80 | 4.16 | 3.40 | |
| 50×235 | 6.95 | 6.02 | 4.91 | 5.87 | 5.08 | 4.15 | |
| 50×286 | 8.06 | 6.98 | 6.70 | 6.81 | 5.90 | 4.82 | |
| total amount of snow and wind load | 2.0 kPa | 2.5 kPa | |||||
| higher | 40×89 | 4.02 | 3.65 | 3.19 | 3.73 | 3.39 | 2.96 |
| 40×140 | 5.28 | 4.80 | 4.19 | 4.90 | 4.45 | 3.89 | |
| 50×184 | 6.74 | 6.13 | 5.35 | 6.26 | 5.69 | 4.97 | |
| 50×235 | 8.21 | 7.46 | 6.52 | 7.62 | 6.92 | 5.90 | |
| 50×286 | 2.47 | 2.24 | 1.96 | 2.29 | 2.08 | 1.82 | |
| 1 or 2 | 40×89 | 3.89 | 3.53 | 3.08 | 3.61 | 3.28 | 2.86 |
| 40×140 | 5.11 | 4.64 | 3.89 | 4.74 | 4.31 | 3.52 | |
| 50×184 | 6.52 | 5.82 | 4.75 | 6.06 | 5.27 | 4.30 | |
| 50×235 | 7.80 | 6.76 | 5.52 | 7.06 | 6.11 | 4.99 | |
| 50×286 | 2.43 | 2.11 | 1.72 | 2.21 | 1.91 | 1.56 | |
| 3 | 40×89 | 3.48 | 3.01 | 2.46 | 3.15 | 2.73 | 2.23 |
| 40×140 | 4.23 | 3.67 | 2.99 | 3.83 | 3.32 | 2.71 | |
| 50×184 | 5.18 | 4.48 | 3.66 | 4.68 | 4.06 | 3.31 | |
| 50×235 | 6.01 | 5.20 | 4.25 | 5.43 | 4.71 | 3.84 | |
| 50×286 | 6.52 | 5.82 | 4.75 | 6.06 | 5.27 | 4.30 | |
Tools
Naturally, during work you cannot do without tools, the list of which includes:
- Electric drill, screwdriver.
- Building level and plumb line, tape measure, square.
- Axe, chisel, chisel, hammer
- Circular saw, jigsaw, hacksaw.
- Carpenter's knife.
Installation will be accelerated if the tools for the work are of high quality, and the work will be carried out with competent mentors and assistants, carefully and step by step.
Installation stages
It is necessary to strictly follow the sequence of work - only under this condition the structure will be reliable and durable.
Mounting the Mauerlat
Installation of any rafter system begins with securing a powerful supporting structure to the end of the side walls of the building. timber - mauerlat, on which it will be convenient to install rafter legs. The Mauerlat is made from high-quality timber with a cross-section of at least 100 × 150 mm. It must be laid on roofing felt waterproofing laid along the upper end of the wall (regardless of the material).
Due to the Mauerlat, the load will be evenly distributed over the walls and transferred to the foundation of the building.

The Mauerlat is secured to the wall using metal pins, which are pre-embedded in a concrete belt or crown running along the upper edge of the wall, or with anchor bolts with a diameter of 12 mm. They must go into the wall at least 150 — 170 mm. If the Mauerlat is installed on a wooden wall, then the beams are attached to it using wooden dowels.
Installation of truss structure
- Installation of the rafter system begins with the installation of floor beams. They can be attached to the mauerlat from above if the beams are planned to be moved outside the perimeter of the building and thereby increase the area of the attic. In this design, the rafter legs are fixed to the floor beams.
 Floor beams fixed on top of the Mauerlat (Fig. A)
 - In another case, they can be stacked on waterproofed walls and fastened with corners or brackets to the inner edge of the Mauerlat. This option is used when the rafter legs are planned to be attached directly to the mauerlat.
 Another option is that only the rafter legs are attached to the mauerlat
 - Next, you need to find the middle of the floor beam, since this mark will become a guideline for determining the location support posts and a skate.
- The racks should be located at the same distance from the marked middle of the floor beam. They will subsequently determine the location of the walls of the attic room, that is, its width.
- The bars for the racks must have a cross-section equal to size floor beams. Construction structures are attached to the beams using special corners and wooden overlays. However, to begin with, they are first nailed, then carefully leveled using a building level and a plumb line, and only then are they permanently secured, taking into account future loads.

- When the first pair of racks is installed, they are fastened together from above with a bar, which is called a tie. This tightening is also connected to the racks using special metal corners.

- After securing the tie, you will get a U-shaped structure. Layered rafters are installed on its sides, the second end of which is attached to the floor beam or placed on the mauerlat.
- On installed supports a special recess (groove) is cut out for the timber or in the rafters. With its use The rafters are tightly installed on the Mauerlat beam and secured with metal brackets.

- To provide rigidity to the structure, additional struts can be installed from the base of the rack to the middle of the installed side rafters. If this does not seem enough, and saving material is not in the foreground, then you can strengthen the overall structure with additional racks and contractions (they are indicated in the drawing, Fig. A, with translucent lines).
- Next, while tightening, the middle is calculated - the headstock will be attached to this place, supporting the ridge connection of the upper hanging subsystem of the rafters.
- The next step is to install ridge rafters, which can be fastened together different connections- this can be a metal plate or powerful bolts with metal plates or washers.

- After installing them, the headstock is attached to the ridge and the middle of the tightening.
- Having completed work on one part of the rafter system, you need to make all the rest according to the same principle. The distance between adjacent rafters in such a system should be no more than 900 — 950 mm, but the optimal interval would probably still be 600 mm - this will provide the necessary rigidity and stability of the structure, and will be convenient for insulation using standard mineral wool mats. True, this makes the structure heavier and will require more materials.

- First, the side parts of the system assembly are installed, and then the intermediate parts. They are connected to each other by purlins, which are installed between the upper ends of the racks and act as spacers. Thus, you will get a rigid structure of the attic rafters, in which the frame for wall cladding will already be ready.
Prices for various types of fasteners for rafters
Rafter fasteners
Waterproofing attic roof
When the rafter system is built, you can proceed to finishing it and accompanying materials.
- The first coating that should be fixed immediately on top of the rafters will be a waterproofing and windproof film. — it is attached to the rafters using staples and a stapler, starting from the cornice. The canvases are laid with an overlap of 150
- 200 mm, and then the joints are glued together with waterproof tape. — On top of the waterproofing, a counter-lattice is placed on the rafters, which will more reliably fix the film on the surface and create the necessary ventilation distance between the windproof and roofing material. The counter-lattice is usually made from boards 100 wide — 150 mm and thickness 50

- 70 mm.
- The sheathing is fixed perpendicular to the counter-lattice, on which the roofing material will then be laid. The pitch between the slats must be calculated depending on the type and size of the sheet roofing material, taking into account the overlap required for it If you select soft roof
, then plywood sheets are most often attached to the counter-lattice.
Roofing installation The roofing material is secured to the prepared sheathing or plywood. Its installation usually starts from the roof eaves and proceeds in rows, from one of the edges - depending on the type of roof. Roofing sheets are mounted with an overlap. If used for coating metallic profile

or metal tiles, then such material is secured with special self-tapping screws with elastic gaskets. Fastening elements are usually matched in color to the roofing material.
The most difficult thing in covering an attic sloping roof is the transition from layered side rafters to hanging ridge rafters. There may be certain difficulties if the roof has projections for installing roofs over balconies or windows.
In addition, if a chimney pipe goes onto the roof, it requires a separate design of the hole inside the rafter system and an insulating layer, and on the roof, reliable waterproofing must be installed around the pipe.
You can find out in detail how and what is the best way to cover a roof on our portal; there is a whole section where you can find answers to many questions, including recommendations for reliable insulation of an attic room.
Prices for popular types of corrugated sheets
Corrugated sheet
It should be noted that the work of constructing any roof, and especially one as complex as an attic roof, is not only responsible, but also quite dangerous and requires special, increased safety measures. If you have no experience in carrying out such construction processes, then it is better to entrust them to professionals or carry out all actions under supervision experienced craftsman, and with the utmost care and precision.
Thanks to the construction of an attic roof, it is possible to significantly increase the usable space of a low-rise private house. However, this is a very labor-intensive process that requires preliminary calculations and adherence to certain rules and techniques. A well-designed mansard roof truss system is the key to creating a comfortable, reliable, functional and durable residential building.
Before building an attic, you need a good design. Appearance the future roof should be in harmony with general view building. There are several types of design rafter frame, which depend on the type of roof, rafter pitch and mansard roof option. Having chosen a specific configuration, you should know exactly which structural elements consists of a rafter system. It is the supporting skeleton of the roof, and can withstand not only its weight, but also the effects of precipitation.

Correct installation of the rafter system ensures its reliability, functionality and durability.
When creating a mansard roof project you should:
- perform the correct calculation of the load on the supporting load-bearing walls and foundation, preventing it from being exceeded;
- choose high-quality thermal insulation to avoid uneven heating of the room;
- choose good sound insulation thanks to correctly selected roofing material;
- choose good waterproofing;
- choose light-weight cladding materials for finishing the attic space.
Mansard roof schemes
The rafter system can have an inclined or hanging structure. IN hanging structures the rafters rest on the mauerlat and ridge girder. To distribute the load on the rafters, lower and upper tie bars are installed. When the length of the slope is more than 4 m, to prevent sagging in the lower part of the structure, the rafter legs are supported with the help of racks and struts. The main advantage of this design is that all its elements are placed in unused areas of the attic, which creates more free space.

The inclined structure is used in houses where there is a load-bearing partition in the middle of the building on which the construction legs rest. A bench is laid on the internal supporting structure, which plays the role of a Mauerlat, and the racks that hold the ridge girder are mounted on it. This system used for large areas of the attic roof of a private house, the structure of which can be seen in the photo. Here you can use roofing materials with greater weight, such as slate or ceramic tiles.
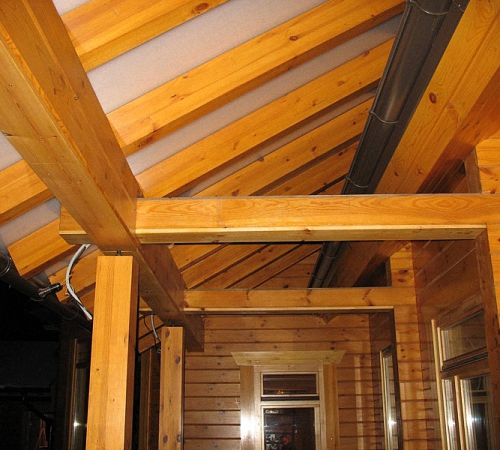
There are projects for attic roofs of private houses where both options of rafter systems are used. To free up free space, the frame elements can be moved to one side, where they will be used as a basis for finishing the walls, and the crossbar is suitable for cladding the ceiling. In some architectural styles, beams and posts can be used as decorative elements.
To arrange a large eaves overhang, the attic roof is made with emphasis beyond the load-bearing walls. The Mauerlat is not installed here. The system is mounted using beams. A strut must be installed, special racks are cut into the floor beams, and the rafters are secured using a reliable anchor connection and twisted wire.

Mansard roof design elements
The rafter system for an attic roof consists of the following structural elements:
- Mauerlat;
- rafter legs or beam racks;
- vertical racks;
- runs;
- ridge beam;
- lathing;
- additional beams, beams and purlins.
The basis of the entire roof structure is the Mauerlat, which consists of square-section wooden beams attached to external walls building. The remaining elements of the attic roof frame are attached to these boards. The main purpose of the Mauerlat is to absorb and uniformly distribute the entire load from the overall roofing system onto the load-bearing walls of the building.
Rafters or beam posts form the frame of the roof structure. For these elements, you should select boards that can withstand the load of the roofing pie together with the outer covering. To support racks of beams or rafter legs, purlins are used that are installed at an angle. Vertical racks hold the central part of the rafter beams, protecting them from bending. They also provide support for the ridge beam.

To ensure the rigidity of the future roofing structure, a ridge beam is mounted on long rafter systems. The sheathing is an additional wooden structure that is attached to the rafter system and serves as the basis for the future roof.
Types of mansard roofs
Today there are several roof options mansard type who have different design rafter frame:
- single-pitched;
- gable;
- broken lines consist of two or more slopes with different angles tilt;
- hip ones have two triangular slopes on the short sides of the roof and two trapezoidal slopes on the long sides;
- half-hip have two short end hips above the front of the roof;
- domed are characterized by a round or polygonal shape;
- vaulted have the shape of an arc in cross-section.

A pitched roof is the easiest option to implement. He is often turned to when it is necessary to make an attic on a small country house. The most popular among other types of attic roofs of private houses, photos clearly confirm this, is a gable roof. Designing and building it yourself is not difficult. Especially when it comes to a gable roof.
When choosing a sloping roof, it is possible to get a large, functional and comfortable attic space without additional work related to the construction of walls. Today many zealous owners In private houses, preference is given to a gable roof truss system under corrugated sheets, the construction of which does not require numerous technological and technical tricks and an unreasonably high expenditure of funds on building materials.
The most difficult to install are hip, dome and vaulted mansard roofs. Their installation requires a professional approach. These mansard roofs, photos of private houses clearly display this, they have an unusual and very aesthetic design. They are characterized by a large number of pitched fractures, for which valleys are installed. The diagram of the rafter system clearly shows the peculiarity and uniqueness of this design. The unsatisfactory condition of each of the valleys ( internal corners) may pose a potential hazard to the integrity of the entire roof.

Single pitch mansard roof. Photos of successful projects
The simplest, most reliable and cheapest option is a mansard-type pitched roof. The result is a non-standardly designed building. This type of roof is used for industrial and commercial buildings. Also, often used for one-story small private houses. All roofing materials can be used here.
The design involves creating a window in the high part of the attic roof. This design does not have a ridge, which simplifies its installation. Mauerlat is fixed on the walls with at different levels, due to which the bevel is formed. The beams rest on it.

The slope angle should be within 35-45 degrees. The smaller the slope, the more snow will accumulate on the roof surface, which will require the creation of additional supports and strengthening of the load-bearing beams. In addition, this will significantly reduce the attic space. The structure is able to withstand strong winds with the correct orientation of the roof slope, which is necessary to increase the stability of the structure.
Helpful advice! If the distance between opposing load-bearing walls is no more than 4.5 m, you can not mount supporting elements, but simply lay long wooden beams. This further reduces the cost of constructing the roof.
This type of roofing involves the use of simple elements to create ventilation for under-roof spaces. It is enough to cover two overhangs with perforated soffit, or install a ventilation grille.

However, you shouldn't choose pitched roof for narrow buildings where it is not practical to arrange the attic floor in this way.
Gable mansard roof: construction features
The gable roof is the most common and rational decision, which allows you to get a comfortable attic. Photos of houses with a mansard roof of this configuration confirm the demand for the design.

Designing and building a gable mansard roof with your own hands does not cause any difficulties. It is formed thanks to two inclined planes(slopes), which intersect in the ridge area at a certain angle. Thanks to the right choice optimal angle you can create reliable protection for a building from heavy precipitation, strong gusts of wind, and excessive snow pressure during heavy snowfalls.
There are different configurations of the truss system for gable mansard roofs:
- a symmetrical gable roof is a classic option, which makes it possible to evenly distribute the load on the load-bearing walls and roof support. The disadvantage of this design is the presence of sharp corners that take up the free space of the attic;
- an asymmetrical roof is a non-standard design where the ridge can move to one side. If one of the angles is more than 45 degrees, you will get a fairly spacious attic room. However, calculations should take into account uneven distribution loads on the mauerlat and load-bearing walls.
- a broken mansard roof has a surface of slopes that are bent in the middle, forming edges resembling two rectangles.

Mansard roof rafter system. Drawings of the classic version
When the question arises of how to make an attic roof for a house with your own hands, you should choose the option that is easiest to implement and practical for further use. Therefore, for private houses, preference is given to sloping roofs.
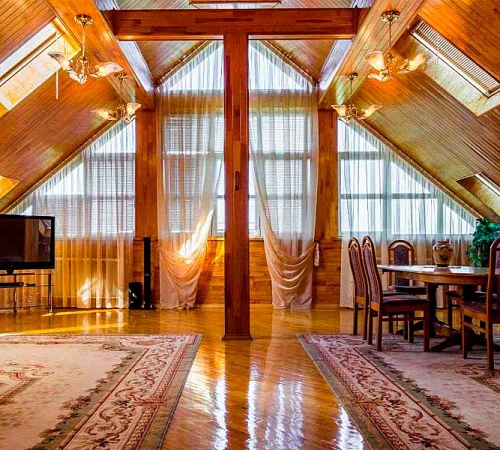
This design allows not only to create a large attic space, but also, thanks to the overhangs that go down quite low, to protect the upper part of the building walls and the foundation from precipitation. In addition, this is a good solution for creating an original exterior of a private house.
Related article:
How to choose the right material. How to avoid common mistakes at work. Phased implementation DIY work.
The angle of inclination of a sloping roof depends on the region, climatic conditions and choice of roofing material. The classic broken mansard roof, the drawing of which clearly shows this, has a slope ratio of the upper slopes to the floor plane of 30 degrees, and the lower ones - 60 degrees. The angle of inclination of the side surfaces can vary from 45 to 80 degrees.

Helpful advice! For regions where strong winds are typical, it is better to install flat roofs. Because the larger the slope, the greater the windage it creates.
Taking as a basis these data, the parameters of the house, and the fact that the ceiling height in the attic should not be less than 2 m, you can calculate all the parameters. In the classic version, the load on the side surfaces from precipitation can be ignored, since they will be held in the upper part of the roof.
Calculation of the attic roof
On specialized websites you can find a do-it-yourself drawing of a broken mansard roof for a small house. It can be taken as a basis for future calculations, which include the calculation of the attic space, loads, elements of the truss structure and the amount of building materials.
To calculate a mansard roof, you can take advantage of the many years of experience of specialists who have repeatedly erected a classic broken roof and can tell you what material to use. Many parameters of the rafter frame depend on this. Calculation required quantity lumber to create a rafter system comes down to determining the height and width of the spans, and, accordingly, the number of wooden blocks, which is multiplied by their heights.

The width of the insulation determines the pitch between the rafters, which should be 3 cm less than the width of the insulating material in order to reduce the amount of waste and simplify its installation. The boards for the rafter legs are also selected taking into account the thickness of the insulating material. In case of use basalt wool, 200-250 mm thick and creating the required ventilation gap of 20-30 mm, the minimum board width is 230 mm. The thickness of the rafters must be more than 50 mm.
For beams and racks, you should choose timber with parameters of 100×100 mm, which will create a strong and reliable structure even for areas in difficult weather conditions.
To calculate the amount of insulating and roofing materials, mathematical formulas are used to determine the areas of geometric shapes from which a certain type of attic roof is formed.
Today on the Internet you can perform an online calculation of a mansard roof. To begin with, indicate the type of attic roof, the diagram of the rafter system, insulation and roofing material, and enter the requested geometric parameters. To obtain a more accurate result, you should use the services of a specialist who will not only calculate all the loads and dimensions of building elements, but also tell you which material is best to choose.

Windows for mansard roof
The attic differs from ordinary rooms in that its walls are a rafter frame, which consists of certain roofing surfaces, which is clearly shown in the drawings of attic roofs. This also affects the design of the window for a given room, which should transmit well natural light, and at the same time withstand the load in the form of strong gusts of wind or heavy precipitation. This is due to the fact that the influence of weather conditions on the sloping part of the roof is much stronger than on the massive load-bearing elements of the building.
Important! According to SNiP, the window area must be at least 10% of the total floor area.
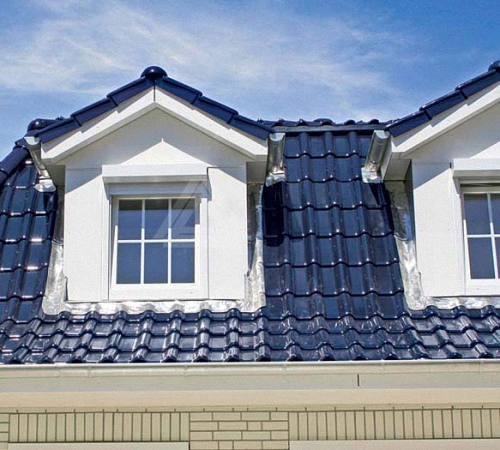
The window in the attic roof, the photo clearly shows this, can be located in the plane of the roof, inclined or vertical, or at the end of the attic. Vertical windows in the plane of the roof they can be protruding above it (dormer), or recessed into the room.

The most popular and easiest to install is a sloping window in the roof plane. It is able to let in the maximum amount of natural daylight. After its installation, the roof surface does not change, but remains flat. However, this option requires the creation of proper waterproofing of the junction. Here you should use special models with reinforced glass and a reinforced metal-plastic frame.
The area of the window opening is selected in proportion to the angle of inclination of the roof. The width of the window must be selected so that the element fits into the distance between the rafters without compromising the integrity of the structure. If the window is much wider, then you will have to install a reinforced beam that will connect the cut rafters to install the window. In this case, if one narrow window is not enough, it is better to install two adjacent narrow elements, which will ensure the integrity of the rafter frame.
To install a dormer window, a more complex roof geometry is required, namely, the installation of side and upper ends is required, followed by their careful waterproofing. Laying the roofing also becomes more difficult.

It is advisable to install a vertical window recessed into the room only when it will provide access to the balcony. In other cases, these are unjustified significant financial costs (complication of the roof geometry) with minimal effect (insufficient natural lighting).
The simplest, most practical and cheapest option is to install a window at the end of the roof. This is especially true for country houses with a mansard roof.
Methods for installing an attic roof
The installation of the rafter system of the attic roof can be carried out in two ways. The first option involves assembling the rafter frame on the ground, followed by lifting it in finished form to the top of the house and thoroughly securing it. The method is effective for small-sized structures.

How to properly make a mansard roof with the assembly of part of the rafter system on the ground? First, at the top of the building, the outer structures, which will later become gables, are vertically exposed and secured. They can be temporarily secured using long beams nailed to the wall. Recesses with a given pitch are created in the Mauerlat, where the assembled structure will be mounted. To ensure the correct geometry and create rigidity of the structure, its elements can be secured with spacers. When the installation of the side beams is completed and the entire system has acquired the necessary rigidity, the spacers can be removed. The installation video of the rafter system for a gable mansard roof will clearly show all the features of this option.
The second option is more traditional. It involves installing an attic roof on site following a strict sequence of actions. This method is most convenient and effective when constructing large-sized rafter systems. Because to lift the assembled structure to the top, you will need to use specialized equipment.
How to build a mansard roof in the traditional way?
Some subtleties in the technology of constructing attic roofs of private houses depend directly on its type. However, the sequence of actions is similar for all types of attic roofs.

Before making an attic roof, it is necessary to lay the mauerlat longitudinally on the load-bearing walls and secure it to the masonry or armored belt using pins or wire rod. Rafter structure the attic roof of a wooden house can be attached to the upper crown, which will act as a mauerlat.
The construction of an attic roof begins with the installation of floor beams. They are attached to the Mauerlat. Then the construction legs are attached to the beams. In the center of the beams, you should mark the installation locations of the supports and the ridge element.
Keeping the same distance, racks from boards should be mounted, securing them with corners. The first pair of racks is fastened with ties made of wooden blocks. Rafters should be mounted on the formed U-shaped structure. They can be installed on the mauerlat or by cutting a groove on the floor beam.
Next, you should proceed to the installation of ridge rafters, which are connected using metal plates or bolts with washers. To create the necessary rigidity of the structure, it is necessary to attach struts to the central part of the side rafters and the rack, and mount beams in the center of the tie. The installation of other trusses is carried out in a similar way with a distance of 60-100 cm. They are attached to each other using purlins.

With the help of staples, all nodes of the attic structure are fixed, and final strength is given to it. After this, you should install the sheathing, which can be solid or sparse, depending on the type of roofing.
If flexible tiles are used, asbestos-cement flat slate or roll material, should be done continuous sheathing. It is installed in two layers. The lower flooring consists of bars 20 cm thick, laid in increments of 30 cm. The upper flooring, consisting of boards measuring 20x50 cm, is nailed to the bottom layer at an angle of 30-45 degrees.
For clay tiles, asbestos-cement slate, steel, metal coverings, a sparse type is used. To do this, install bars with a cross-section of 5x5 cm and increments of 20-30 cm, from the eaves up perpendicular to the rafters. On the overhang it is necessary to install a flooring made of wooden boards about 70 cm wide. Next, you should fasten the bars along the ridge and the ribs, which are connected end-to-end. This process can be clearly seen in the photo of the rafter system of a gable roof under metal tiles.

Attic roof insulation technology
Insulating the attic roof of a private house allows you not only to insulate the attic, but also to create proper thermal insulation for the entire roofing system so that it lasts for many years.
The attic roof insulation scheme includes a set of measures, which include the creation of heat, hydro and vapor barriers. A roofing material is laid on top of this roofing pie, which protects the entire structure from negative environmental factors. To protect the insulation from the negative effects of condensation, which reduces it thermal insulation properties, it is necessary to protect it from the roofing material. For this, one of the proposed sheet materials can be used:
- waterproofing film, which is attached from the outside to the rafters. It should not touch the insulation material, so it is cut off from it by lathing or counter-battens;
- diffusion membrane ̶ is attached to the insulation and protects it from any exposure to moisture.
Helpful advice! Waterproofing material should be laid with slight sag, eliminating the possibility of tensioning it.

The waterproofing layer must be laid across the rafters. You should start from the bottom. The first row goes down into the gutter. Each next one must be rolled out with an overlap of 10-12 cm. This way you should reach the ridge. There, the material along the upper edge on both sides is cut and secured. A strip should be rolled out along the ridge, which goes down from both sides of the roof to the gutter, which ensures uniform drainage of water.
The vapor barrier layer in the form of a membrane is reliable protection insulation from penetration of steam from the room into its thickness. The material is also overlapped and attached to the joists using staplers. All joints and abutments should be carefully taped using special double-sided vapor-proof tape.
Helpful advice! On vapor barrier film a thick line is drawn from which the next layer must begin. Following it, the canvases are fastened with tape.

Important rules for insulating an attic roof
When the question arises, which insulation is best for an attic roof, there is no definite answer. However, due to the fact that the attic roof is characterized by a large angle of inclination, you should not use soft materials, which will cake and slide off the surface.
Roll insulation must be laid from bottom to top. To do this, use a construction stapler and lace. When rolling out the roll, the material is pressed against the slats. Using a lace and staples, the letter Z is drawn. Using this technology, each layer of insulation is attached.
It is better to give preference to slabs with a density of 30-50 kg per cubic meter. m. In this case, the pitch of the rafters will have to be adjusted to the size of the insulation, which should be 10-15 mm less than the width of the insulation board. This is required so that the material can be pushed apart without the formation of cracks and be well held between the beams. If the width is smaller or larger, it will be necessary to cut the material. It is not always possible to create an even cut, and moreover, a large amount of residue remains. The slabs should be positioned in such a way that the seams of the previous row overlap the next one.

The insulation is installed in such a way as to ensure a minimum number of cold bridges. Additionally, the remaining material can be laid on strips of the required width that are stuffed from the side of the room. A vapor barrier is laid on top of the insulation layer and lathing is made for future finishing. This option, where even the rafters overlap, almost completely eliminates the formation of cold bridges. Despite the fact that a little more insulation material will be required, the attic will ultimately be warmer, which will make it possible to reduce the cost of heating the room.
Important! Cold bridges contribute to the formation of moisture in the roofing pie. This can lead to rotting of the rafters, swelling of the insulating material, and corrosion metal elements design, emergence unpleasant odors indoors.
How to properly insulate an attic roof: progress of work
There are two ways to insulate a roof: from the inside or from the outside. When using the first option, you can postpone the completion of interior finishing for a certain period of time. The second option involves a full range of works, which allows for quick completion of construction.

How to insulate an attic roof from the outside? To do this, it is necessary to prepare the surface of the rafters, clearing it of protruding elements that can damage the hydro- and vapor barrier layer. On the inside of the room, across the rafters, it is necessary to fill the sheathing on which the insulation will be located. Instead of lathing, you can attach galvanized wire or cord.
On the roof side, a thermal insulation layer is mounted on this sheathing in compliance with the above rules. The thickness of the attic roof insulation should be more than 100 mm. A superdiffusion membrane is laid on top of the thermal insulation material. Next, you need to fill the sheathing on which the roofing will be laid.
Now on the inside of the room it is necessary to secure and glue the vapor barrier layer. Next you can start interior decoration. This option for roof insulation is considered the easiest to implement. Thermal insulation boards are easily laid on the previously created sheathing.

The technology for insulating an attic roof with your own hands from the inside is carried out in two stages. The first mandatory step is as follows:
- The waterproofing layer is rolled out and secured to the rafters.
- The sheathing is being filled.
- Roofing material is being installed.
After completing the mandatory list of work, you can postpone the insulation of the attic roof for an indefinite period of time, which may be due to the lack of financial opportunity at the present time.
The second stage is less convenient to perform. The attic roof will be insulated from the inside. Here it is necessary to create an enclosing structure that will hold the insulation and prevent it from being pushed out more than is possible. To do this, planks are placed between the lags in increments of 40-50 cm. They will not only hold the insulation, but will also create the necessary ventilation gap.
Next, the heat-insulating layer is installed in compliance with all rules. The sheathing is placed on it. Next you need to position and stick vapor barrier membrane. After this, you can begin finishing work. To do this, you can mount a sheathing, or you can do without it.

Types of insulation for attic roofs. Which insulation is better?
Today there are several options for insulation for an attic roof:
- mineral wool;
- expanded polystyrene;
- polyurethane foam;
- Styrofoam;
- glass wool;
- isovert;
- ecowool.
The most popular material is mineral wool, namely basalt. This relatively inexpensive material is available in a convenient thickness and sufficient rigidity. It retains heat well, is not flammable and does not rot. However, she is afraid of moisture. Therefore, in order to ensure the preservation of all technical and operational properties, it must be carefully protected from all sides.

Polystyrene foam has good performance characteristics, which enable it to create good thermal insulation. The price of the material is relatively low. It is easily mounted between the rafters by surprise due to its elasticity and due to the fact that you can purchase slabs of the required size. All joints should be sealed with foam.
Helpful advice! During combustion it is capable of releasing harmful substances, therefore it is better to give preference to self-extinguishing brands that use special additives.
The material is not afraid of moisture. It does not conduct steam, which is the main disadvantage of foam. In this regard, it is necessary to create a good ventilation system in the attic, which will lead to additional financial costs.
Extruded polystyrene foam has the best characteristics, the thickness of which is two times less than that of mineral wool, and one and a half times less than that of polystyrene foam. The material is equipped with a locking system, which eliminates the formation of cracks. Fungus and mold do not form on EPS; rodents and insects do not like it. However, it does not allow steam to pass through, which requires the creation of a good ventilation system. Another disadvantage is the high cost of the material.

Recently a new type of insulation has appeared - expanded polystyrene foam. It is applied to the surface in liquid form, filling all the cracks. At the same time, having reacted with oxygen, it increases several times in size, forming a monolithic coating.
Helpful advice! The use of expanded polystyrene foam will correct the situation in the absence of a waterproofing layer when installing the roofing.
Another new generation insulation material is ecowool, which has good characteristics. However, its use requires special technology. Loose cotton wool is fed under pressure into a closed cavity, filling all voids and forming a durable, integral layer of insulation. To organize a closed cavity, sheet material in the form of plywood, gypsum fiber board or fiberboard is nailed to the rafters from below and above.

A distinctive advantage of this material is its ability to conduct steam. Here the humidity is regulated naturally, which does not require the organization of a vapor barrier. However, a ventilation gap must be created between the insulation and the roof, where the movement of air masses occurs.
Today among possible projects houses with a mansard roof, you can choose the most acceptable and attractive option and implement it for your own private home. To make a house visually beautiful and aesthetically pleasing, you need to seriously consider the issue of choosing the type of attic roof, which should be in harmony with the structure of the building. A properly designed roof truss system is capable of flawlessly performing all its operational and protective functions, which will create a warm, cozy and comfortable room.


