What does the roof truss system consist of? Do-it-yourself rafter system for a gable roof: an overview of hanging and layered structures. Truss hanging timber trusses systems
Almost any modern roof low-rise building is built on a rafter frame system. In theory, the roof structure can be made in the form of a flat ceiling. But the simple manufacture of such a roof structure is offset by a lot of disadvantages; a significant increase in the thermal insulation layer will be required and provision of forced removal of snow and rain and melt water. Even when constructing garages or outbuildings, such a roof arrangement is resorted to in extreme cases, preferring a more complex rafter option.
Why rafter systems are so popular
The rafter system appeared as a result of natural selection among many various options building a frame. Modern device The roof truss system is based on several basic design elements:
- A rafter frame, which is a set of beams of equal length that form the plane of the roof slope. The rafters are laid symmetrically in a “hut”, with the upper edge on the highest horizontal part of the frame - the ridge girder, and rest on the mauerlat - a thick board sewn onto the upper horizontal plane brick box building;
- The base or system of fastenings on which the rafter frame rests consists of a mauerlat, beams and ceiling beams on the top of the walls of the building. Thanks to this device, the load from the weight of the roof and rafters is redistributed, leveled and transferred to the internal and external walls of the house;
- The roof sheathing, together with additional strength elements - struts, spacers, crossbars, serves to impart additional rigidity to the rafter beams.
For your information! In addition, the sheathing boards form the basis for laying roofing covering.
Pine logs and beams are traditionally used to construct the roof truss system of a low-rise building. This allows for a lightweight and at the same time rigid roof structure. Attempts to replace a wooden beam with a steel profile lead to an increase in the weight and cost of the rafter system by at least two to three times, and due to numerous cold bridges, an additional layer of thermal insulation will need to be laid.
One of the most popular rafter systems is a device in the form of two or hipped roof with a pair of rafters. In this case, the frame made of symmetrical load-bearing elements perfectly absorbs the load in the vertical and transverse direction in relation to the ridge girder.
If the predominant wind direction in a given area is approximately the same, then the longitudinal force on the roof structure resulting from the air flow is most often compensated by folding brick gables. In strong and changeable winds, it is more rational to use a hipped hip structure.
Design and features of the rafter system
It is clear that the use rafter technology is aimed at forming roof slopes with the most rational slope angle for the given area. The steeper the angle, the faster and easier it is to remove rainwater and snow.
To estimate the load, you can use information from the meteorological service about the thickness and maximum pressure of the snow layer on a square meter of a flat roof for different regions countries.
For a rafter system, the load on the elements of the rafter system is reduced based on the angle of inclination of the roof slope:
- For options with an inclination angle of up to 10-20 o, the reduction in snow mass pressure is extremely insignificant; on average, a low roof accounts for a force of 80-90% of the value for a flat surface;
- For roof slopes installed at an angle of 25°, the load will be 70% of the “flat” value, while for an angle of 65° the snow pressure will decrease by 70-80%;
- On steeper slopes, pressure is not taken into account at all; in this case, the strength of the rafter system is calculated based on the wind load.
Important! Even small cottage, with a roof slope of 45o, located in middle lane In Russia, with high levels of precipitation, it receives an additional load from snow, reaching 5 tons.
Therefore, even in small cottages and houses, a log or beam with a cross-section of at least 100-150 mm is used as a material for constructing a rafter system.
Types of rafter systems
The design of the roof frame rafter system is most often carried out according to the scheme with hanging or layered rafters. The use of a specific scheme is determined by many factors, among which the dimensions of the house and ceiling, the presence of internal walls or partitions, and the nature of the use of the attic space are of decisive importance.
The main differences between layered and hanging rafters boil down to the following:
In the case of a free fit of the end of the rafters on the ridge girder, each pair of beams gable roof They are not fastened together, but are cut into according to a sliding pattern. In the lower part, the rafter legs are attached to the mauerlat in the form of a rigidly fixed hinge, using bolted connection or nails. Under load, such a device works like a non-thrust rafter system, due to the fact that any vertical or lateral force on the rafter system does not lead to the appearance of horizontal thrust forces at the support points on the Mauerlat.
Important! Important feature This type of frame design results in a minimal bursting effect on the walls of the house, which is extremely important for wooden houses from timber or logs. But the practical assembly of such a structure requires the most accurate and careful adherence to the dimensions and accuracy of installation of the elements.
In the second case, the layered beams on the ridge girder are rigidly attached with reinforcing linings made of metal or boards, much like in the case of hanging rafters. The lower edge is installed on a mauerlat with a cutout in the rafters of the supporting surface and side guides that prevent the board or beam from twisting.

Knots of the rafter system
To ensure the necessary strength of the rafter structure, especially for buildings with spans of more than 8-9 m in length, it is necessary to use logs and beams of considerable thickness, which makes assembling the roof frame a very difficult and expensive task. It is easier and more efficient to install additional power elements that compensate for deflection or transfer the main part of the force to less loaded parts of the frame.

For example, to compensate for the deflection of a rafter leg, two main elements are used - struts and vertical racks. Depending on the design of the rafter system, power racks can be installed in the central part and support the ridge girder, taking on part of the load from the weight of the frame. The elements can be combined with struts in the middle part of the rafters, thereby transferring the load from the side purlins to the tie or beams - longitudinal beams resting on the ceiling or internal capital walls. The struts do not cut into the body of the rafters, but are fastened with nails, bolts, screws through steel plates or wooden overlays.
The second most popular element for strengthening hanging rafters is a raised tie. This element allows you to reduce the horizontal pushing action rafter legs and the entire system, unlike the previous ones, works in tension, so the device is attached to the side surface of the rafters using a cunning self-tightening unit called a half-frying pan.
For layered rafter beams, a similar element called a scrum is used. If the structure of the frame, the length and thickness of the rafter beams do not provide adequate stability of the triangle, in this case it is necessary to install an additional horizontal strut - a screed. This method of strengthening the system is effective for counteracting uneven asymmetrical loads, for example, heavy oblique rain or sudden gusts of wind.
To obtain a long ceiling beam or tie, more than 8 m long, it is often necessary to splice two six-meter pieces according to the diagram shown in the figure.
One of the problems typical for hanging rafters with a long span can be deflection in the center of the tension of the base of the ceiling. In this case, they resort to a suspension or headstock device. Despite the external similarity with the rack, this element works in tension, so its cross-section can be significantly smaller. When installing the headstock, it is necessary to provide a tension device that allows you to select gaps and equalize the deflection of the tightening.
Fastening the elements of the rafter system in nodes and connections is usually carried out using 150-200 mm nails driven under different angles and distance from the edge of the beam. On the reverse side, the nail is bent with a twist. This fastening device allows you to avoid the effect of “self-pulling” of the nail from being planted in a log or beam. If timber is used in the rafter system, it will be most convenient to make the connection using overhead profiled steel plates, corners and holders.
In some cases, the use of such devices makes it possible to perform temporary or preliminary assembly of rafter beams on self-tapping screws, accurately measure the dimensions and locations of cuts, and only after that make permanent fasteners.
Each roof is based on a large number of beams, rafters, posts and purlins, which are collectively called the rafter system. Over the centuries-old history, many types and methods of its organization have accumulated, and each has its own characteristics in the construction of nodes and cuts. Let's talk in more detail about what the rafter system of a gable roof can be and how the rafters and other elements of the system should be attached.
Design of a gable roof truss system
In cross-section, a gable roof is a triangle. It consists of two rectangular inclined planes. These two planes meet at the highest point at unified system ridge beam (purlin).
Now about the components of the system and their purpose:
- Mauerlat is a beam that connects the roof and walls of a building, serves as a support for rafter legs and other elements of the system.
- Rafter legs - they form inclined planes roofs and are a support for the sheathing under the roofing material.
- Ridge purlin (bead or ridge) - combines two roof planes.
- A tie is a transverse part that connects opposite rafter legs. Serves to increase structural rigidity and compensate for thrust loads.
- Lezhny - bars located along the mauerlat. Redistribute the load from the roof.
- Side purlins - support the rafter legs.
- Racks - transfer the load from the purlins to the beams.
There may still be fillies in the system. These are boards that extend the rafter legs to form an overhang. The fact is that to protect the walls and foundation of the house from precipitation, it is desirable that the roof ends as far as possible from the walls. To do this, you can take long rafter legs. But standard length 6 meters of lumber is often not enough for this. Ordering non-standard is very expensive. Therefore, the rafters are simply extended, and the boards with which this is done are called “fillies”.
There are quite a few designs of rafter systems. First of all, they are divided into two groups - with layered and hanging rafters.

With hanging rafters
These are systems in which the rafter legs rest only on the external walls without intermediate supports (load-bearing walls). For gable roofs, the maximum span is 9 meters. When installing a vertical support and a strut system, it can be increased to 14 meters.
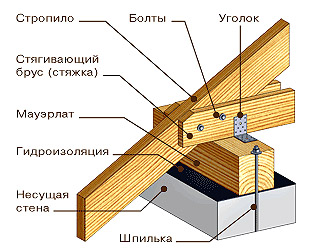
The good thing about the hanging type of gable roof rafter system is that in most cases there is no need to install a mauerlat, and this makes the installation of rafter legs easier: there is no need to make cuts, just bevel the boards. To connect the walls and rafters, a lining is used - a wide board, which is attached to studs, nails, bolts, crossbars. With such a structure most of bursting loads are compensated, the impact on the walls is directed vertically downwards.

Types of rafter systems with hanging rafters for different spans between load-bearing walls
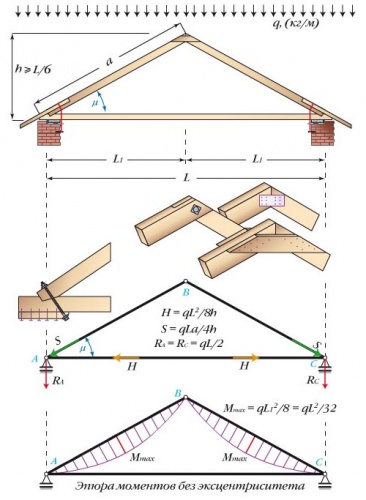
Gable roof rafter system for small houses
Exists cheap option rafter system when it is a triangle (photo below). Such a structure is possible if the distance between the external walls is no more than 6 meters. For such a rafter system, you can not make a calculation based on the angle of inclination: the ridge must be raised above the tie to a height of at least 1/6 of the span length.
But with this construction, the rafters experience significant bending loads. To compensate for them, either rafters of a larger cross-section are taken or the ridge part is cut in such a way as to partially neutralize them. To give greater rigidity, wooden or metal plates are nailed on both sides at the top, which securely fasten the top of the triangle (also see the picture).
The photo also shows how to extend rafter legs to create a roof overhang. A notch is made, which should extend beyond the line drawn from interior wall up. This is necessary to shift the location of the cut and reduce the likelihood of the rafter breaking.

Ridge knot and fastening of rafter legs to the backing board with a simple version of the system
For mansard roofs
Option with installing a crossbar - used when. In this case, it is the basis for lining the ceiling of the room below. For reliable operation of a system of this type, the crossbar cut must be hingeless (rigid). The best option- half frying pan (see picture below). Otherwise, the roof will become unstable to loads.

Please note that in this scheme there is a Mauerlat, and the rafter legs must extend beyond the walls to increase the stability of the structure. To secure them and dock them with the Mauerlat, a notch is made in the form of a triangle. In this case, with an uneven load on the slopes, the roof will be more stable.
With this scheme, almost the entire load falls on the rafters, so they need to be taken with a larger cross-section. Sometimes the raised puff is reinforced with a pendant. This is necessary to prevent it from sagging if it serves as a support for ceiling cladding materials. If the tie is short, it can be secured in the center on both sides with boards nailed to the nails. With a significant load and length, there may be several such belays. In this case, too, boards and nails are enough.
For large houses
If there is a significant distance between the two outer walls, a headstock and struts are installed. This design has high rigidity, since the loads are compensated.

With such a long span (up to 14 meters), it is difficult and expensive to make the tie in one piece, so it is made of two beams. It is connected by a straight or oblique cut (picture below).

For reliable joining, the connection point is reinforced with a steel plate mounted on bolts. Its dimensions should be more sizes notches - the outermost bolts are screwed into solid wood at a distance of at least 5 cm from the edge of the notch.
In order for the circuit to work properly, it is necessary to make the struts correctly. They transfer and distribute part of the load from the rafter legs to the tie and provide structural rigidity. Metal pads are used to strengthen connections

When assembling a gable roof with hanging rafters, the cross-section of lumber is always larger than in systems with layered rafters: there are fewer load transfer points, therefore each element bears a greater load.
With layered rafters
In gable roofs with layered rafters, the ends rest on the walls, and the middle part rests on load-bearing walls or columns. Some schemes push through the walls, some don't. In any case, the presence of a Mauerlat is mandatory.

Non-thrust schemes and notch units
Houses made of logs or timber do not respond well to thrust loads. For them they are critical: the wall may fall apart. For wooden houses, the rafter system of a gable roof must be non-thrust. Let's talk about the types of such systems in more detail.
The simplest non-thrust rafter system diagram is shown in the photo below. In it, the rafter leg rests on the mauerlat. In this version, it bends without pushing the wall.

Pay attention to the options for attaching the rafter legs to the Mauerlat. In the first, the support area is usually beveled, its length being no more than the section of the beam. The depth of the cut is no more than 0.25 of its height.
The top of the rafter legs is laid on the ridge beam, without fastening it to the opposite rafter. The structure results in two pitched roofs, which in the upper part are adjacent (but not connected) to one another.
The option with rafter legs fastened at the ridge part is much easier to assemble. They almost never push against the walls.

To operate this scheme, the rafter legs at the bottom are attached using a movable connection. To secure the rafter leg to the mauerlat, one nail is driven from above or a flexible steel plate is placed from below. See the photo for options for attaching rafter legs to the ridge girder.
If you plan to use heavy roofing material, it is necessary to increase the load-bearing capacity. This is achieved by increasing the cross-section of the rafter system elements and strengthening the ridge assembly. It is shown in the photo below.

Reinforcing the ridge assembly for heavy roofing material or for significant snow loads
All of the above gable roof schemes are stable in the presence of uniform loads. But in practice this practically never happens. There are two ways to prevent the roof from sliding towards a higher load: by installing a screed at a height of about 2 meters or by struts.
Options for rafter systems with contractions
Installing contractions increases the reliability of the structure. In order for it to work properly, it needs to be secured to them with nails at the places where it intersects with the drains. The cross-section of the timber for the scrum is the same as for the rafters.

They are attached to the rafter legs with bots or nails. Can be installed on one or both sides. See the figure below for attaching the screed to the rafters and ridge girder.

In order for the system to be rigid and not “creep” even under emergency loads, it is enough in this option to ensure rigid fastening of the ridge beam. In the absence of the possibility of its horizontal displacement, the roof will withstand even significant loads.
Layered rafter systems with struts
In these options, for greater rigidity, rafter legs, also called struts, are added. They are installed at an angle of 45° relative to the horizon. Their installation allows you to increase the span length (up to 14 meters) or reduce the cross-section of beams (rafters).
The brace is simply placed at the required angle to the beams and nailed on the sides and bottom. An important requirement: the strut must be cut accurately and fit tightly to the posts and rafter leg, eliminating the possibility of it bending.

Systems with rafter legs. The top is a spacer system, the bottom is a non-spacer system. The correct cutting nodes for each are located nearby. At the bottom - possible schemes strut fastenings
But not in all houses the average load-bearing wall is located in the middle. In this case, it is possible to install struts with an angle of inclination relative to the horizon of 45-53°.

Systems with struts are necessary if significant uneven shrinkage of the foundation or walls is possible. Walls can settle differently depending on wooden houses, and the foundations are on layered or heaving soils. In all these cases, consider installing rafter systems of this type.
System for houses with two internal load-bearing walls
If the house has two load-bearing walls, install two rafter beams, which are located above each of the walls. The beams are laid on the intermediate load-bearing walls, the load from the rafter beams is transferred to the beams through the racks.

In these systems, a ridge run is not installed: it provides expansion forces. The rafters in the upper part are connected to one another (cut and joined without gaps), the joints are reinforced with steel or wooden plates, which are nailed.
In the upper non-thrust system, the pushing force is neutralized by the tightening. Please note that the tightening is placed under the purlin. Then it works effectively (top diagram in the figure). Stability can be provided by racks, or joints - beams installed diagonally. In the spacer system (in the picture it is below) the crossbar is a crossbar. It is installed above the purlin.
There is a version of the system with racks, but without rafter beams. Then a stand is nailed to each rafter leg, the other end of which rests on the intermediate load-bearing wall.

Fastening the rack and tightening in the rafter system without a rafter purlin
To fasten the racks, 150 mm long nails and 12 mm bolts are used. Dimensions and distances in the figure are indicated in millimeters.
Roof structure
Any low-rise residential building is built so that when minimum costs materials to obtain a long service life and maximum usable space. From this point of view, of particular interest are attic spaces, allowing you to double usable area without any additional changes. On the other hand, the design of roofs, the rafter systems of which are designed to create a residential attic, will be more complex.
Today during construction country houses Several types of roofs are used:
- Mono-pitched. This is the simplest option, since here you can often do without a ridge beam and even without a number of other elements that are required in other cases. Usually similar solutions used in construction utility rooms, extensions and garages, but they are also suitable for residential buildings with a small area.

Roofs of this type are among the most economical. They require a minimum quantity roofing material and wood, which is used for rafter structures.
- Gable. This is the second most difficult type of roof to create, since only two slopes are required here, and the rafter system, as a rule, is no different. Roofs of this type are one of the most popular in modern suburban construction, because, despite their simplicity, they cope well with wind and snow load, and are also suitable for creating an attic.
- Four slopes. This category includes hip, tent and broken roofs. In the latter case, it is worth mentioning that we are talking about a type of gable roof, which, due to a fracture, received four slopes. Such structures are more complex than the two previous options, however, the aesthetics of the building along with them are higher.
- Gable and multi-slope. Complex rafter attachment points, special technology devices and the need for careful calculation are the reasons why such roofs are erected only by professionals. Of course, you can try to build something like this yourself, but only if you are an expert in this field.
The choice of roof type depends on the climate in this region and wind load. The second point is the angle of inclination of the slopes, which depends on the location of the building, the presence of nearby buildings or trees and the climate.
Slope angle
The ideal option for any roof is a design that requires minimal attention from the owner. Self-cleaning roofs are generally attractive because they allow you to avoid having to worry about large amounts of snow accumulating.
The accumulation of snow cannot be neglected, since its mass after intense snowfall can be up to 200 kg per m2, which means that only very strong rafters will withstand such a weight.

An alternative is the device original roof similar to alpine houses, with very steep slopes, often descending almost to the ground. It should be noted that to obtain the snow removal effect, an angle of 45 degrees is required. In this case, precipitation will roll down the surface under its own weight.
On the other hand, an increase in the slope of the slopes leads to increased consumption of roofing and building materials. Moreover, if you plan to build an attic, then the insulation will be expensive, because the higher the height of the ridge, the higher the consumption of this material. In addition to the cost of a pitched roof, the choice of slope is influenced by its type. For roofs that are not in use, it is not necessary to use a large amount of insulation, however, increasing the angle of inclination does not always justify itself.
The main sign of an unused roof is a different design of the rafter system and the absence of a gap between the ceiling and the external protective structure. These are usually flat roofs or those that have a very slight slope. Their main disadvantage is that during intense snowfalls, snowdrifts can form, which will not only create a load on the ceiling, but also cause a “flood” during a thaw.
The type of roofing material will need to be determined in advance, since it must be taken into account when calculating the angle of inclination of the rafters. Typically, for multi-gable structures, flexible materials and bitumen coatings. For example, metal tiles, corrugated sheets or galvanized iron. Other options, such as slate or tiles, are better suited for roofs that have a simple configuration.
Classic tiles are rarely used today, since they require a fairly large slope angle, ranging from 30 to 60 degrees.
Bituminous materials can be used even at small angles of inclination (from 8 degrees), and the limit value for them is 18 degrees. Metal tiles and asbestos-cement sheets are used at angles from 14 to 60 degrees. We will not dwell on the consideration of roofing materials in detail, since this issue has already been covered on our website.
Expansion and non-expansion layered rafters
These are two types of rafters, one of which is chosen taking into account the shape of the house, roof and size future design. Layered rafters are an option suitable for single-pitch or gable roofs. Their main feature is that they use two fulcrum points. On one side, the rafter leg rests on the ridge of the roof, and on the other, on the wall of the house.
Non-thrust layered rafters are mounted in such a way as to avoid bursting pressure on the wall of the house. Typically, roof trusses are created using one of the following options:
- The rafter leg rests on the mauerlat. It is hemmed with a block and fixed by cutting with a tooth. In addition, additional insurance with wire is performed. The upper part of the beam is mounted on the ridge girder. Fastening is carried out using the sliding support principle.
- The bottom of the rafter is secured using a movable joint. Not only the Mauerlat, but also piece bars can be used as an installation point. The upper part is fixed with a bolt, nails or another method after it is laid on the ridge girder.
- The third option involves installing layered rafters with rigid attachment to the purlin. Nails, pins or other fasteners may be used here.
If the thickness of the rafters that was initially chosen turns out to be insufficient, then during the work you can use supports that are mounted under elements that are too long in those places where maximum deflection is expected.
 Spacer rafters
 Layered rafters are spacer. In this case, it is assumed that a structure will be created in which a bursting force will be transmitted to the walls of the house. The installation method in this case is the same as in the previous one, however, the fastening of the rafter legs is fixed, so the entire system will receive internal tension. It is worth saying that this option is a transitional scheme separating non-thrust layered rafters and hanging rafters.
Hanging rafters
This design of the rafter system will be ideal when it is necessary to cover large spans, the length of which exceeds 7 m. In such a situation, there is only one support point for the rafter leg - the wall. The upper part of the beam is connected to the counter element located on the other slope. Several joint options are used: half-timber, slotted tenon, metal plates.
In order for the rafter legs to be securely fixed, it is necessary to connect them using a tightening. Usually this is a strong beam that is attached to the bottom of these elements. Of course, it can be placed higher, but in this case the load will increase, which means that the weight of the beam will need to be increased. In such a situation, one of the following options for installing rafter legs can be used:
- The rafter leg is connected to the mauerlat using an additional notch and is securely held with nails. The second option involves using metal corners. Then the upper parts of the rafters are butt-joined, and the lower parts are held in place by a tie. In this case, the top of the rafter legs can also be pressed against the ridge purlin, which will rest on the headstocks.
- The puffs are installed so that the heels of the rafter legs rest against the cut out tooth against the edges of the puffs, which, in turn, are attached to the mauerlat. The tops of the rafters are supported with wooden planks.
- Floor beams can be used as tie-downs. In this case, their ends must extend beyond the walls by at least 55 cm. The cutting of the tooth socket is carried out no closer than 25-40 cm from the edge of the wall.
- In houses made of logs, the rafter leg is attached to the upper crown through a tenon-socket connection. Special ones can also be used metal fastenings, such as sliders, sleds, etc. The latter option will allow structural elements to move and avoid the occurrence of additional stress.
The ties themselves can be solid beams or constituent elements. The splicing of bars is carried out by any in a convenient way, for example, oblique tooth, overlap, etc. Installation of tightening can be done not only at the level of the heels of the rafters, but also in any other place.
If roof rafters measuring more than eight meters are used, then we recommend creating a structure from the headstock and struts, as well as using racks and crossbars, which help increase the reliability of the rafter system.
Rafters for different types of roofs

The simplest option is the design pitched roof, the rafters of which rest on the walls of the building. The length of these elements cannot exceed 4.5 meters, but there is also a solution for overlapping large areas. In this case, it is recommended to use supports or racks that will support the extended structure.
Most gable roofs look alike like twins, but they internal structure may vary greatly. Today there are four options:
- A ridge girder is used, on which the legs of the rafters rest. The slopes are strengthened through the use of rafter legs, and the girder is supported by racks. The racks themselves are installed on a bench. The width of this type of roof can reach 10 m.
- The second option involves the use of rafter legs, the lower parts of which rest against the ridge girder post, and the upper parts in a grip (tightening) connecting the rafter legs closer to the ridge. In this case, the roof width increases to 14 m.
- There is no ridge run. It is replaced by a beam located under one of the slopes. In addition, a tie, rafter legs and a stand resting on a bench are used. The angles of inclination of the rafter legs vary from 45 to 53 degrees. This option, compared to the previous one, does not provide a particular gain in roof width, but is suitable in the case when the supporting wall is not located in the center of the building, but is shifted to the side.
- In cases where it is necessary to cover wide buildings, symmetrical structures can be used, using two purlins located parallel under the rafters of the slopes. Such gable roofs require the use of two ties, the upper of which connects the rafters, and the lower - the racks and rafter legs. The width of the structure in this case can reach 16 m.
The distance between the rafters is selected taking into account their length and cross-section. For example, for a section of 40x150 mm a step of 60 cm is required, for 50x150 - 90 cm, and for 100x150 - 215 cm.
A hip roof is another common option today that has proven itself well for country houses. It differs in that it does not have pediments, the place of which is taken by additional slopes - hips. IN general case the design assumes the presence of a purlin, and ordinary rafters on the main slopes and hip rafters on the side ones. Hip rafters rest on long diagonal elements, where they join the upper parts of ordinary rafter legs. For such roofs it is recommended to use reinforced piping.
The sloping roof completes the list, as it has a rather complex design. Here, a method is used that involves creating a frame for the rafter legs, consisting of a horizontal beam and vertical posts, after which the remaining elements are installed. Top bar The U-shaped frame acts as a ceiling for the attic, but the ridge post also rests on it.
In this case, the distance between the rafters of the rafter system should be selected taking into account the load acting on the roof, the thickness of the timber used and the angle of inclination of the slopes.
Above we discussed the main issues related to the design of the rafter system for various types roofs, so this material can be used as a short guide to quickly understand the issues of roof construction.
Roof installation is a complex multi-step process. To independently assemble and install a rafter system, you need to carefully study the methods of connecting elements, calculate the length of the rafters and the slope angle, and select the appropriate materials. If you don’t have the necessary experience, you shouldn’t take on complex designs. The best option for a small residential building - a do-it-yourself gable roof.

A standard roof of this type consists of the following elements:

Mauerlat is a timber laid on top of the walls along the perimeter of the building. It is secured using threaded steel rods embedded in the wall or anchor bolts. The timber must be made of coniferous wood and have square section 100x100 mm or 150x150 mm. The Mauerlat takes on the load from the rafters and transfers it to the external walls.

Rafter legs- these are long boards with a cross section of 50x150 mm or 100x150 mm. They are attached to each other at an angle and give the roof triangular shape. The structure of their two rafter legs is called a truss. The number of trusses depends on the length of the house and the type of roofing. The minimum distance between them is 60 cm, the maximum is 120 cm. When calculating the pitch of the rafter legs, you should take into account not only the weight of the covering, but also the wind load, as well as the amount of snow in winter.

Located at the highest point of the roof and most often represents longitudinal beam, connecting both slopes. The beam is supported from below by vertical posts, and the ends of the rafters are attached to the sides. Sometimes the ridge consists of two boards that are nailed to the top of the rafters on both sides and connected at a certain angle.

Racks are vertical beams with a cross section of 100x100 mm, located inside each truss and used to transfer the load from the ridge run to the load-bearing walls inside the house.
The struts are made from scraps of timber and installed at an angle between the posts and rafters. The side edges of the truss are strengthened with braces and the load bearing capacity designs.
Tie - a beam connecting the lower parts of the rafters, the base of the truss triangle. Together with the struts, such a beam serves to strengthen the truss and increase its resistance to loads.
A log is a long beam with a cross-section of 100x100 mm, laid along the central load-bearing wall, on which vertical posts rest. Lezhen is used when installing layered rafters when the run between the outer walls is more than 10 m.
The sheathing consists of boards or timber placed on the rafters. The sheathing can be continuous or with gaps, depending on the type of roof. It is always attached perpendicular to the direction of the rafters, most often horizontally.
If there is no more than 10 m between the external walls and there is no load-bearing wall in the middle, arrange hanging rafter system. With this system, the upper ends of adjacent rafters are sawn at an angle and connected to each other using nails, excluding the installation of racks and ridge beams. The lower ends of the rafter legs rest on the external walls. Due to the absence of racks, the attic space can be used for arranging an attic. Very often, the function of tightening is performed by floor beams. To strengthen the structure, it is recommended to install the top tie at a distance of 50 cm from the ridge.

If there is a central supporting wall, the arrangement is more justified layered rafter system. A bench is placed on the wall and attached to it support posts, and a ridge beam is nailed to the posts. This installation method is quite economical and easier to implement. If the ceilings are interior spaces are designed on different levels, racks are replaced brick wall, dividing the attic into two halves.

The roof installation process includes several stages: attaching the Mauerlat to the walls, assembling the trusses, installing the rafters on the floors, installing the ridge, and attaching the sheathing. All wooden elements Before assembly begins, they are thoroughly treated with any antiseptic composition and dried in air.
To work you will need:
- timber 100x10 mm and 150x150 mm;
- boards 50x150 mm;
- boards 30 mm thick for lathing;
- roofing felt;
- metal studs;
- jigsaw and hacksaw;
- hammer;
- nails and screws;
- square and building level.

In wooden houses The functions of the mauerlat are performed by the logs of the last row, which significantly simplifies the work process. To install the rafters, it is enough to cut grooves of the appropriate size on the inside of the logs.

IN brick houses or buildings made of blocks, installation of the Mauerlat occurs as follows:

The Mauerlat bars must form a regular rectangle and be in one horizontal plane. This will facilitate further installation of the roof and provide the structure with the necessary stability. Finally, markings are made on the beams for the rafters and grooves are cut along the thickness of the beam.

When choosing a hanging rafter system, it is necessary to assemble the trusses on the ground and then install them above the floors. First you need to draw up a drawing and calculate the length of the rafter legs and the angle of their connection. Typically, the roof slope is 35-40 degrees, but in open, heavily blown areas it is reduced to 15-20 degrees. To find out at what angle to connect the rafters, you should multiply the angle of the roof by 2.

Knowing the length of the run between external walls and the angle of connection of the rafters, you can calculate the length of the rafter legs. Most often it is 4-6 m, taking into account eaves overhang 50-60 cm wide.

The upper ends of the rafters can be fastened in several ways: overlapping, end-to-end and “into the paw”, that is, with grooves cut out. Metal plates or bolts are used for fixation. Next, the lower and upper ties are installed, and then the finished trusses are lifted up and installed above the floors.

The outer trusses are attached first: using a plumb line, the rafters are aligned vertically, the length of the overhang is adjusted and attached to the mauerlat with bolts or steel plates. To prevent the truss from moving during installation, it is reinforced with temporary beams made of timber. After installing the outer rafters, the rest are set, keeping the same distance between them. When all the trusses are secured, take a board with a cross-section of 50x150 mm, the length of which is 20-30 cm longer than the length of the cornice, and nail it along the upper edge of the slope. The same is done on the other side of the roof.


The first option: a rectangular groove is cut out on the rafter leg at the point where it contacts the mauerlat, 1/3 of the width of the beam. Stepping back 15 cm from the top of the box, a steel spike is driven into the wall. The rafter is leveled, the grooves are aligned, then a wire clamp is placed on top and the beam is pulled close to the wall. The ends of the wire are securely fastened to the crutch. The lower edges of the rafters are carefully cut off circular saw, leaving an overhang of 50 cm.

Second option: the upper rows of walls are laid out with a stepped cornice of bricks, and the mauerlat is placed flush with inner surface walls and cut a groove in it for the rafter. The edge of the rafter leg is cut to the level of the upper corner of the cornice. This method is simpler than others, but the overhang is too narrow.

Third option: beams ceilings are released over the edge outer wall by 40-50 cm, and roof trusses installed on beams. The ends of the rafter legs are cut at an angle and rest against the beams, secured with metal plates and bolts. This method allows you to slightly increase the width of the attic space.
Installation of layered rafters

Figure 1 shows the cutting of rafter struts into a beam laid along intermediate supports, and in FIG. 2 - resting the rafter leg on the mauerlat
The procedure for installing a layered rafter system:

When the main elements are fixed, the surface of the rafters is treated with fire retardants. Now you can start making the sheathing.

For the sheathing, timber 50x50 mm is suitable, as well as boards 3-4 cm thick and 12 cm wide. Waterproofing material is usually laid under the sheathing to protect the rafter system from getting wet. The waterproofing film is laid horizontal stripes from the eaves to the ridge of the roof. The material is spread with an overlap of 10-15 cm, after which the joints are secured with tape. The lower edges of the film should completely cover the ends of the rafters.

It is necessary to leave a ventilation gap between the boards and the film, so first stuff them onto the film. wooden slats 3-4 cm thick, placing them along the rafters.

The next stage is covering the rafter system with boards; they are stuffed perpendicular to the slats, starting from the roof eaves. The pitch of the sheathing is influenced not only by the type of roofing, but also by the angle of inclination of the slopes: what larger angle, the greater the distance between the boards.

After completing the installation of the sheathing, they begin cladding the gables and overhangs. You can cover the gables with boards, plastic panels, clapboard, waterproof plywood or corrugated sheeting - it all depends on your financial capabilities and personal preferences. The sheathing is attached to the side of the rafters; nails or screws are used as fasteners. Overhangs are also lined with various materials - from wood to siding.
Video - DIY gable roof
The rafter system of any object is equivalent to the value of the load-bearing structural elements of the house. The roof plays the role of a node under which the building's stiffening ribs are assembled. Accordingly, when installing a roof with your own hands, you need to pay maximum attention to all structural units, even when using simple option- gable.

Advantages of gable roofs
There are a lot of options for pitched rafter systems. Among them, the simple symmetrical one is especially popular. Why? Here are its advantages:
- Variations are created on the basis of a gable roof to reflect the special architecture of the building.
- Simple calculations that are easy to understand.
- One-piece design creates favorable conditions for dryness internal space and unimpeded flow of water, snow and ice.
- The maintainability, strength and wear resistance of a gable roof are much higher than other options.
Depending on the size, homeowners always have the opportunity to equip the under-roof space, turn it into a full floor or attic. In a word, a gable roof is the correct and profitable solution for any object, be it a residential building, a summer house or a bathhouse.
Elements of the rafter system
Depending on the type of roof, structural elements vary. Without knowledge of the purposes of each, it is impossible to arrange reliable coverage for your home. Let's look at it in detail:
Mauerlat
The basis of the rafter system. It is a beam with a cross-section of at least 150 mm, or an I-beam channel if the roof structure is metal. It is located on the load-bearing walls of the facility. Its purpose is to distribute the load of the system evenly throughout the entire structure of the house.

Rafter leg
The structural basic unit of a system. Together with others, it forms a truss system - strengthening the strength of the entire roof. It is made of wooden beams, not inferior in cross-section to the Mauerlat or profile pipes.

Rafter stand
Vertical beam or pipes. Depending on the gable roof option, the racks can be located in the center and/or sides. They take part of the weight of the entire rafter system, which is why the cross-sectional size is 150 mm.
Rafter purlins
Horizontal beams laid on the posts and under the ridge to support the rafter legs. They provide rigidity to the structure and relieve stress on the trusses.
Tightenings and struts
Connecting beam for rafters. The action is similar - relieving the tension of timber or metal and imparting rigidity to the structure.

Lezhny
Installation support for posts and struts. To reliably connect these two elements, a large cross-section beam is required - 150 mm or a thick-walled pipe of impressive diameter.
Lathing beam
Elements laid perpendicular to the rafters. They are used to install the selected roofing covering and create a multi-layer protective pie. The cross section is small - 40–50 mm.
If the intended roof structure is made of wooden beams, you should carefully consider the quality of wood when purchasing - the timber should not have any knots and be made of soft wood.
Also, the wood must have natural moisture, otherwise it will begin to dry right in the structure of the system, cracking, deforming the roof model, depriving it of reliability and safety.
Calculation of the rafter system
A gable roof is a complex structure. The project takes into account many factors - natural nuances, wind, constant and variable loads. It is extremely difficult to make calculations on your own, without special knowledge about the climate of the area, the characteristics of the material for the manufacture of the system, and the nuances of pressure distribution.
Ideally, the calculations are left to professionals; you can choose only the coating material yourself - the following parameter depends on its type:
Tilt angle
The minimum angle of inclination of the roof relative to the parallel of the ground is 5 degrees. However, its dependence comes from the selected roofing material. For this purpose, traditional slate, corrugated sheets, flexible and metal tiles are used.

They are guided by the following rule: the steeper the slope, the more textured the roof can be.
From 5 degrees for laying rolled protective roof insulation. The number of layers matters - up to 15 degrees three-layer coatings, above - two- and single-layer.
- From 6 – ondulin.
- From 11 – slate.
- From 12 – corrugated sheets.
- From 14 to 20 – metal tiles.
- From 15 to 45 – soft roofing.
Thus, the resulting precipitation - snow, water - will not linger on the surface, although complete cleaning requires your own efforts or the involvement of specialists to install the Anti-Ice system.
Determination of rafter parameters - pitch, length, cross-section
The smaller the step, the more impressive the cross-section of the timber or the diameter of the pipes should be. As a rule, for load-bearing structures, this parameter is at least 150 mm, 100 mm – for country houses and related construction - gazebos, bathhouses, outbuildings.
Next, you need to set the number of rafters per slope: its length is divided by the installation step, ranging from 60 to 100 cm + 1 outer leg. Multiply the result by 2 to get the total quantity. Depending on the cross-section of the beam, the amount of rafter legs and the installation pitch vary.
The length of the rafters is simply calculated if school knowledge about right triangle remained in luggage. The rafter leg is equal to the hypotenuse of the resulting figure. The calculation is as follows: A² + B² = C², where – A is the height of the roof, B is half the length of the pediment, C is the length of the rafter leg. To the resulting value always add from 30 to 70 cm for the eaves overhangs.
Types of rafter systems
Before getting to work, it is important to choose a rafter system option for a gable roof. There are few of them, each has its own advantages and disadvantages:
Hanging
Only suitable for standard width the roof is 6 m, respectively, this is the length of the rafter leg. Fastening occurs by fixing the ends to the ridge girder and load-bearing wall. Be sure to install a tightening that levels out the tension and pressure of the structure.
In addition, they will play the role of load-bearing beams. Without them, the structure will corrode under the weight. The advantages of this option are the absolute dryness of the roof surface during the off-season, and less deformation at the time of shrinkage.

Layered
The option is suitable for any roof width. Reliability and stability are ensured by fixing the bed to the Mauerlat. Thus, the pressure is leveled by the stand, causing the tension in the rafter legs to decrease. The advantage of the system is its simplicity, but the design requires large investments– additional lumber is required for arranging the beds.
Hybrid
These systems are typical for multi-slope roofs, where the transitions are accompanied by numerous reinforcements, beams, posts, beams, slopes and other elements for the stability of the entire structure. The device is expensive and complex, so only a professional should be involved in the design and construction. At least supervise it.
Do-it-yourself gable roof installation
So, when the rafter system option has been selected, lumber has been purchased, a roof design has been drawn up, you can begin to work. You cannot deviate from the sequence of stages. This threatens to delay installation and loss of structural reliability.
Mounting the Mauerlat
If the length of the timber for installing the Mauerlat is not enough, extensions are made. The ends are connected using the half-tree cutting method. Additional fasteners are anchor bolts. Do not use screws, dowels or nails - they are unreliable. Mounting to the wall is as follows:
- A distance from the edge of at least 5 cm is maintained.
- Holes are drilled along the wall to insert fasteners. Similar actions are carried out with timber.
- The Mauerlat is attached to the edge using steel pins. The fastening step is often 2 times the distance between the rafter legs. Subsequently, before installing the main units, they are guided by metal marks.
Important - before laying the mauerlat, the edge of the wall is protected with waterproofing. Spread one layer even if the house is made of wood.
Manufacturing and fastening of rafters
Roof trusses are convenient because they can be assembled on the ground in finished design and move it to the roof. This will reduce installation time, however, the model is heavy and lifting equipment will be required, which, naturally, will increase the cost of the project.
For budget construction Another method is suitable:
- A cut is made at the bottom and top of the rafter legs to connect to the mauerlat and ridge girder. This must be done separately with each unit, after first lifting the wood to the top.
- Places for fixing are marked on the Mauerlat and a ridge girder is installed: racks are installed along the gables, on which the timber is placed. If the length is not enough, it is increased, but in a different way, unlike the Mauerlat - a board is screwed onto the joint on both sides.
- Depending on the chosen model of the rafter system - layered, hanging - cuts are made in the ridge beam, mauerlat, or holes are drilled in them for fastening.
- Next, they begin installing the rafter legs from opposite ends of the roof, gradually moving towards the middle. It’s a good idea to pull a cord between the corners of the outer trusses to ensure that the entire horizontal part matches exactly.
- The rafter legs are connected to each other by ties and struts. Under the ridge part, at the angle formed by the rafters, wooden overlays are stuffed, and the ends themselves are tightened with bolts.
More recently, professional builders have begun using sliding fasteners to install roofing. Metal plates reliably hold the load-bearing elements and at the same time move due to shrinkage. This neutralizes its consequences.
The work of fastening the rafters is hard and long. You should calculate the time in advance - you cannot leave the roof unfinished during the rainy season, otherwise the rigidity of the structure will be lost in the future due to absorbed moisture.
Pediments and sheathing
The side parts of the roof - gables, are made in the form of ready-made panels from boards and are completely installed at the top. There shouldn’t be any difficulties - it’s just important to carefully cut them at the required angle. The sheathing should be fastened only after the final type of roofing is known. For example:
- Under corrugated sheeting, the pitch of the sheathing beam will be 440 mm.
- The metal tiles are fixed to the sheathing in increments of 350 mm.
- A soft roof requires a continuous plywood covering.
It is important to mark the passage places chimney– the sheathing should not come into contact with brick or metal surface. The distance to the hot unit is at least 15 cm. Before installing the sheathing finished roof covered with waterproofing with allowances extending beyond the edges of the walls. Then the timber is installed.
If you decide to make an insulation cake from above, then first strengthen the vapor barrier with inside, then put the selected material into the boxes formed by the rafter legs. Next, waterproofing and wind protection.
Then you need to again mark the contours of the rafter legs with a 20*20 beam and then fill in a new layer of sheathing, along which the roofing material will be laid - formation ventilation ducts. This method will preserve the capacity of the under-roof space if the owners intend to use it for a specific purpose.
Flooring roofing material
Regardless of the type of roofing material, installation begins from the edges of the roof and goes up, placing one unit on top of another. This way, rain moisture will not get under the material.
The method of fastening depends on the type of material - soft tiles or tiles with a bitumen or polymer base are fused. Solid profiled sheets - ondulin, metal tiles - are fixed into pre-drilled holes to the sheathing, using rubber linings to seal and preserve the anti-corrosion layer.
As a result: a description of the installation of the rafter system and roof is easy only on a screen or paper. In reality, the process is complex and multifaceted. Therefore, if knowledge is not enough, it is better to invite professionals to do the work - their work is always guaranteed.


