Alpine slide: step-by-step description of how to make a rock garden with your own hands. Children's slides: types and manufacturing instructions Component wall elements useful for the hall
Rock garden - enough new way decorations and furnishings personal plot, which came to us to replace the classic front gardens with flower beds and flower beds. Organizing this paradise of nature in your summer cottage will not be difficult even for a novice florist who has only basic knowledge in the field of landscape design and plant growing. Multi-tiered planting bright colors among the stones, artificial waterfall, beautifully played with evergreens ornamental shrubs can be perfectly combined in one place, creating a complete image of the site.
We make an alpine slide at the dacha with our own hands
When you see this picturesque corner with your own eyes, it seems that such a creation can only be created by resorting to the services of expensive landscape designers with extensive professional experience in this field.
We immediately hasten to dissuade you. Making such a floral decoration with your own hands is as simple a task as creating a flowerbed in front of your house in your yard.
It is clear that to create a multi-level alpine slide with an impromptu waterfall, which requires large stones and other material, more in-depth knowledge and experience in the construction of such structures will be required. But it’s quite possible to plan a small slide, consisting of one or two tiers, on your own; you just need to understand a little about the technology for creating such objects.
Important! When starting to develop the design of an alpine slide, it is necessary to take into account that the rock garden primarily imitates a rocky area of the mountains. Therefore, the main material for its creation should be natural unprocessed stone and low-growing shrubs, which are in perfect harmony with each other in the wild.


Having your own pond in your yard is the dream of any summer resident

Characteristic features and varieties of alpine slides
We all remember from school that any mountain or hill, regardless of its size and height, has:
- Top
- Slope
- sole
It is from these definitions that you should start when developing your own alpine slide project.
Alpine slides can be made in several variations, which will look like different areas of hilly and mountainous terrain. Considering all these design features, there are several options for alpine slides.
- rocky slope- has a characteristic rocky appearance, and consists largely of stones, among which only occasionally there are ornamental plants.
- mountain slope is a combined complex composition in which stones of various sizes are found. She's quite tall. For decoration, a variety of plants from the arsenal of low-growing and creeping crops are used.
- Terraced slope- has peculiar protrusions formed retaining walls, being built on different heights. They differ in configuration and length.
- Hill of stones– this element of garden art is the most difficult to perform. Recreate a living corner wildlife It will work if you harmoniously combine large boulders with low-growing perennial plants.
- mountain gully- a place where large and small stones, slightly protruding from the ground, are cordoned off various plants, blooming almost all year round.
- Gorge- an incredibly beautiful composition of stones and plants that looks very impressive. This design is the most complex. When creating, natural differences in the territory are taken into account. They select a hollow and decorate the slopes picturesquely with stones in combination with ground cover representatives of the flora.
- Czech rolling pin- features a complex layered structure. It is a multi-stage hill made of vertically laid flat stones, next to which there is a rich world of vegetation.
- Valley in the mountains- looks similar to a mountain ravine. It is constructed mainly from large stones, partially immersed in the ground. They are complemented by asymmetrically located ornamental plants, blooming profusely for a long time.
- Alpine lawn- is the most original and very stylish stone composition, decorated with plants from the mountainous area. Assumes the presence of a fountain or waterfall.


Rockery - a real garden made of ordinary stones

An original idea - to create a quiet corner among the stones with a natural landscape

The Czech rolling pin is an excellent alternative to the classic alpine slide
How to make a rock garden at the dacha
Today, the alpine hill can be found in city squares, in summer cottages, areas near social institutions and rich farmsteads. If you choose stones and a variety of plants with taste, you will create an atmosphere of peace and luxury in any, even the most modest summer cottage.
If you follow the right technology for arranging an alpine slide, you can create such a unique landscape element with your own hands.
Sometimes this is not the easiest process. It all depends on your tastes and preferences. But no matter what type of alpine hill you choose, you must take into account that you should get a decent imitation of natural rocky areas where the dominant integral part are stones. They are complemented by low creeping and various flowering plants. The concept of “slide” is defined general shape, representing a hill.


Preparatory stage
When starting activities to create an object, first develop detailed diagram, which is tied to the area taking into account the existing landscape.
By making the diagram to scale, it will be easier in the future to determine the dimensions and calculate the number of stones that will be needed to create this object.

A place is selected taking into account several criteria:
- Sufficient lighting;
- Absence of large buildings and trees nearby;
- Removal from other bright ones decorative elements- lush flower beds, artificial reservoirs;
- Protection from prevailing strong winds;
- Open location approximately in the center of the area, providing good visibility.
Important! In the area allocated for the construction of an alpine slide, aquifers should not be located close to the surface. Excess moisture can harm plants.

Step-by-step stage of work
- Having selected a site, the developed diagram is transferred to it on a scale. Mark the overall configuration with pegs and string. You can draw a boundary by pouring a path of chalk powder, ash or lime around the perimeter. After the breakdown, the site is cleared of debris and a pit is dug a little larger than the allotted area.
- Next, remove the top soil layer up to 40 cm, removing weed rhizomes in parallel. If the predominant soil on the site is heavy loam or clay, then arrange a drainage cushion using slag, crushed stone, and gravel. Construction waste, pieces of brick, and limestone are suitable. Drainage is necessary to protect the roots from rotting. It will prevent waterlogging and provide the necessary aeration. The minimum drainage layer is 30 cm.
- If there different kinds material, then you need to pour them in layers, for example, crushed stone, pebbles, and then sand. Water the drainage with water and compact it.
- The soil that was removed during the digging of the pit is cleared of rhizomes, debris, and stones. Add to it in equal volumes: wood shavings, sand, dry peat, crushed pine bark, humus. After mixing, place on top of the drainage layer. Leave the site for 3 weeks to allow the soil to settle.

Selection of stones for an alpine slide
The creation of an original image of an alpine slide depends on the competent selection of stones. It is recommended to use rocks that do not harm the environment due to their content heavy metals and do not acidify the soil.
The harmony of the stone scree will be achieved by the same type of stones, having different configurations and sizes. Rocks that have acquired an irregular shape under the influence of water and wind look organic.
For alpine slides, limestone, noble, granite, and sandstone are most often used. You can use travertine, reminiscent of marble, forest boulder, basalt, dolomite. A good option is serpentinite, quartz, jasper.


It is impossible to make a beautiful alpine slide on a site without stones. To find decent specimens, it is advisable to contact the nearest quarry. During transportation, it is taken into account that the weight of the stone can vary from 15 to 100 kg. Natural cobblestones have an interesting structure, among which there are stones with a heterogeneous surface structure, having grooves and various interesting inclusions.
Porous rocks such as tuff and shell rocks are not recommended, as they absorb moisture and quickly collapse. Acting color scheme stones and their shape. Less commonly used are specimens with a round shape. It is also not recommended to use boulders with big amount sharp edges.
Laying stones
After the base has settled, the most important stage begins - laying the stones. It is carried out according to a pre-planned plan.
- At the first stage, it is necessary to lay out the perimeter of the base from the most massive stones. For reliability, they are buried almost 60% into the ground. This will then allow you to place smaller specimens so that they will not move from their place even under the influence of heavy rainfall.
- Referring to the diagram, leave gaps where vegetation will be placed in the future. Soil is laid on each layer, which is then compacted and watered. The top of the hill is the most colorful conical boulder.
- During the placement of stones, constant control is carried out to ensure an aesthetic view from all sides. It is necessary to place cobblestones with defects in the inner layers of the structure, leaving the most advantageous specimens in terms of color and shape in the visible areas.

The finished structure is assessed from the point of view of acquiring integrity, being perceived visually at any distance as a harmonious natural object. Having finished laying, leave the slide for three weeks so that the stones are finally fixed in place.


Having a beautiful and harmonious landscape design at your dacha is the dream of every housewife
Plant selection criteria
The choice of vegetation is determined by the specifics of the type of alpine slide being created. This activity is still at the development stage. general scheme after studying photographs and descriptions of the created objects.
First of all, a predicted color palette is applied to the diagram, according to which seeds or seedlings of plants belonging to several groups are purchased. If the rocky hill is located in a sunny place, then drought-resistant plant varieties are selected for planting.
Many options for an alpine slide involve the presence of miniature woody and shrub species, as well as various flower crops and perennial herbs.
Solemnity and elegance are brought to the design conifers. Among their assortment, low-growing varieties are selected.
- Dwarf spruce- valued for its good resistance to dry seasons.
- Thuja- attracts attention with a beautiful crown, which is under sun rays takes on a reddish tint.
- Juniper- has juicy greens, a cone-shaped compact shape. It is unpretentious to environmental conditions.
- Cypress- demonstrates high stability to frost. Decorates any landscape with a crown, the top of which has a golden color, and the base is painted dark green.

From hardwood choose varieties that do not shed their leaves for a long time.
- Cotoneaster horizontal- is distinguished by a thick crown, which by autumn changes its green color to a reddish tint.
- Iberis- this subshrub is attractive in all periods. Its charming flowers are pink, white, and purple.
- Dryad- is a miniature shrub, covered with large white inflorescences from mid-summer. In autumn, fruits appear that resemble fluffy balls.


As experienced summer residents say, there can never be too many green plants in the garden.
Flowers for an alpine slide
Flowers for an alpine hill are selected from an assortment of creeping low plants. Preference is given to perennial varieties. The following varieties are recommended.
- Carnation short-stemmed- is unpretentious plant With abundant flowering preferring sunny places.
- Rock alyssum— the leaves of this perennial remain green even in the winter season.
- Rejuvenated- this one has leaves perennial plant They have a variety of colors - silver, green, pink, yellow, burgundy.
- Saxifrage- refers to plants traditional for alpine hills. Its flowering continues throughout summer season. The color of the flowers has a pink, white or yellow tint.
Among the stones, lavender, geranium, lumbago, sedum, and fescue also look excellent. By harmoniously combining these plants on the site you can create a real masterpiece.

The natural restraint of the stones is wonderfully set off by bulbous flowering plants, which are placed in small groups. These include hyacinth, crocus, tulip, hazel grouse. These plants bloom in spring period. Thanks to their bright buds, the colorful rock garden immediately takes on a presentable, picturesque appearance.
When selecting perennial flowering species, it is necessary to take into account that they should have different periods flowering. This will allow the alpine slide to look bright original object over a long period. The height of each type of vegetation is taken into account.
Low-growing varieties should not be shaded by taller specimens. Bright flower crops placed closer to the front edge, providing good zone reviews.

Low shrubs - blueberries and lingonberries - are often used to arrange alpine hills. Drooping reeds, bergenia, and daylilies are good additions. Herbaceous plants act as a decorative background. They allow you to fill the remaining voids after early flowering plants have already withered.
Important! When planning the location of vegetation, take into account that ground cover varieties will help prevent erosion of the slopes. Therefore, a place is selected for them on the inclined surfaces of the slide.

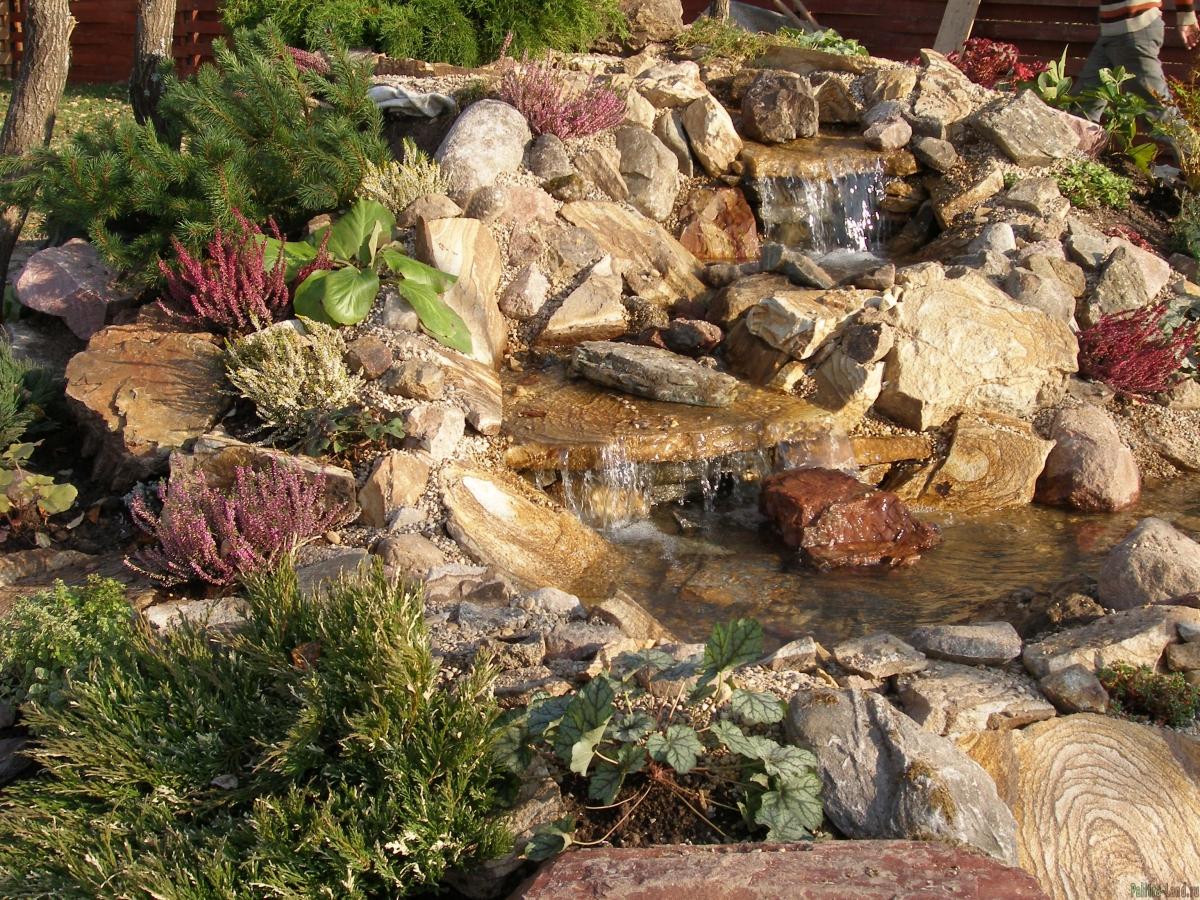
Waterfall - will add even more beauty to landscape design
Carrying out landing
Tree and shrub crops are planted first. The best option for their placement is an area near large stones, which are laid out along the edge of the hill. These plants can be maintained at a fairly large distance.
When planting in a designated area, dig a hole suitable in size for the dimensions of the roots, at an angle. Install the seedling, carefully straighten the roots, pour soil mixture and tamp down carefully.

Then flower crops are placed and sown lawn grass. After planting is completed, watering is carried out. They start pouring water from above. As it flows down, it saturates the entire surface of the slide.
Important! There is no need to place delicate rosette flowers next to ground cover crops. It is recommended to plant bulbous plants in some kind of limiter, the role of which will be played by a bucket with a cut out bottom or a large jar. This will prevent these plants from spreading over large areas.

Alpine slide care
In the first year, you should carefully inspect the alpine hill and, if necessary, add soil, which may be washed out after watering or rain. Also strengthens unstable stones.
Further care involves timely watering, pruning dry buds, damaged leaves, and broken stems. Feeding is carried out approximately once a month.
Do not use nitrogen types of fertilizers, so as not to cause strong formation of green mass. Also, when watering, it is necessary to ensure that the soil is not eroded. For these purposes, it is recommended to use a regular watering can.
Having noticed signs of diseases, immediately spray the plants with appropriate preparations and also treat them against pests.

The Alpine slide harmonizes wonderfully with various landscape design objects. It decorates the territory, makes it attractive and original. Brings the charm of a mountain landscape and serves as a place to relax after difficult everyday life.
Nothing brings more joy to a child than going down a slide. So why not put this play structure in your summer cottage so that children can climb on it whenever they want? Of course, it is easier to buy than to make. But there is no guarantee what manufacturers use to make slides quality materials and do not violate technology. Parents who think about the safety of their children take on the construction themselves.
Which slide to choose - metal or wooden?
The manufacture of slides mainly uses wood and metal. The selected material influences the manufacturing technology, because any construction raw material has its own characteristics.
Wooden slides in the classic version are built with an upper platform in the form of a house and comfortable steps. All parts of such slides are connected using fastening elements. Every detail must be polished so that the child does not get hurt. It is important that all boards used in construction are smooth and dry.
Metal slides usually look simpler: a small platform, a ladder made of pipes and a ramp. The supports for these elements of the structure are usually poured with concrete. Metal slides are most often painted.
Only those who know how to use a welding machine can undertake the creation of a metal slide. Alloy metal parts It is impossible to work with welding without skills - in inexperienced hands, the material heated by welding will bend and become unsuitable for construction.
A table will help you make a choice in favor of one material or another, indicating the pros and cons of using metal and wood when building a slide:
| Wooden slide | Metal slide |
| Advantages | |
| Wood - traditional material, which is convenient to handle and cut | The metal slope of the slide will not deteriorate during operation |
| Wood products are environmentally friendly | The structure will stand securely - no element will move away or become loose |
| The slope of the wooden slide is always warm, despite the cold weather | The slide will remain in its original form, even when the child grows up |
| Flaws | |
| Wood is susceptible to rotting and drying out | The metal is subject to strong heating in summer and cooling in winter. |
| Mold may appear on wood | It is better for school-aged children to ride on an iron slide, since small children can accidentally get injured by hitting it. sharp corner structures |
| The wooden slope gets wet and therefore becomes deformed. | A metal slide, the design of which has limited opportunities, can quickly get boring for a child |
The listed disadvantages of wooden slides can be combated if you periodically cover wooden parts slides with special protective agents and varnish.
The choice is yours. But manufacturers offer to purchase slides, some parts of which are made of metal, and others of wood. Thanks to the combination of different materials, the play structure seems more interesting.
Ideas for creating slides
Creative design of a wooden slide  Wooden slide under the roof
  Wooden slide with metal slope
  Wooden slide with a large platform and stairs on both sides
  Metal slide under the roof
  Low metal slide for children younger age
  Simple metal slide
  This structure has a simple wooden slope
  Thanks to the curved bars, this slide looks unusual
Step-by-step production of a wooden slide
Any construction begins with the execution of drawings. They will tell you what materials, in what quantities, will be needed, and most importantly, they will give a clear idea of the scale of the work. These drawings should reflect the dimensions of the base, descent and stairs of the structure.
A simple wooden slide with a long slope
The height of this structure is 3 meters, the length of the slope is 6 meters. The site is located at a distance of 2 meters from the ground. The length of the handrails, which are attached to the structure on the sides of the descent, depends on these numbers.
But if a wooden slide is being built for a child under 4 years old, then you need to sketch out on paper a drawing of a small structure with a short slope and a ladder of a couple of steps.
Among the tools you will need to arm yourself with a drill, saw, screwdriver and shovel. At the very beginning of the work you will need sandpaper, and upon completion - stain and color emulsion. Instead of paint, you can use wood varnish.
Necessary materials
To build wooden slide, you need to purchase the following materials:
- 8 boards;
- 4 thick beams 0.6 meters long and one 2 times thinner 0.8 m long;
- Several sheets of plywood;
- 2 round wooden profiles.
Instructions
- The process of building a slide should begin by cutting all the wooden elements, while being guided by the drawing. The beams and boards need to be sanded with sandpaper, and then the sharp corners must be rounded off;
- Now it’s time to make markings on the ground and drill holes in the ground to install the bases of the beams in them. The bars will not move from their place during the operation of the slide if their base is filled with concrete;
- Taking a saw, you need to create recesses at the top of the posts. They are needed for fixing planed boards. The supports must be attached to each other using self-tapping screws. The structure will become reliable once the cross beams or, in other words, sides that prevent a child from falling off a slide;
- To an almost finished structure, you can screw two bars onto self-tapping screws, to which a ladder and a ramp are attached. After this, you can lay floorboards on a small slide area and fix them with self-tapping screws. It is advisable to lay floorboards at a short distance from each other. Thanks to gaps of only a few mm, the wooden floor will dry out well if it gets wet by rain or snow;
- Then you can make the sides for the stairs. To do this, the edges of two boards must be cut down, positioning the saw at an angle of 45 degrees. These boards are attached to the racks, and then smaller boards are fixed to them - steps;
- The gap between steps must be calculated in advance. If the distance is too large or too small, it will be difficult for children to climb up. A comfortable step for climbing stairs is 35 cm +/- 5 cm;
- At first, the slope is created in the same way as a staircase, but instead of boards, sheets of plywood tightly pushed together are placed on the sides. WITH reverse side they are fixed wooden slats using screws;
- Lastly, the structure is coated with varnish or color emulsion. Wood and plywood must be treated, otherwise they will deteriorate under the influence of moisture, thereby reducing the service life of the slide.
Step-by-step instructions for creating a children's metal slide
Preparation: drawings and tools
One of the main tasks is to make a drawing of a future structure for children's games.
This slide is designed for older children
To work with metal you will need welding machine and pipe bender. The parts bent by it are needed to create a railing on the top platform of the slide. Although to make a simple metal slide you can do without them.
List of materials
To make a simple metal slide you will need:
- Galvanized sheets or stainless steel;
- Metal square profile pipes;
- Metal round pipes;
- Special corners.
To make a slide, you should choose metal with a thickness of 3 mm. Suitable size square profiles - 3x50x50 mm and 2x25x50 mm.
Stages of work
- First, you need to place four metal profile pipes in holes dug in the ground. Then you need to weld a smaller pipe to their tops, which will serve as a support for the base of the platform. Following this, handrails and stiffening ribs must be welded to the structure;
Railing - required element metal slide that protects children from accidental falls. There should be no jumper posts on them.
- The next step is welding guides for the future staircase and ramp to the structure. Later, metal sheets are attached to the base of the platform and the sliding surface by welding;
- Now we need to weld short profile pipes to the ladder guides, which will become steps. The second and subsequent pipes must be welded every 17.5 cm. With such a gap, the child will be able to easily free a leg that is stuck between the steps while playing;
- All that remains is to add handrails to the stairs, covering the distance from them to the guides with sheets of metal. All existing corners must be rounded to avoid injury to the child. The protruding edges of the pipes can be “closed” with hemispherical plugs.
Video instruction
Thus, the main advantage of a wooden slide is ease of manufacture, and the main advantage of metal structures is durability. To create a wooden play structure, you will need to sand, saw and screw the boards. Installation of a metal slide is based on the use of a welding machine.
A spectacular element in the landscape is a hand-created alpine slide. A rock garden is a small area in the garden, designed as a natural area.
Many owners of personal plots are interested in how to make an alpine slide with their own hands?

In order to create this corner of wild nature on your site, you need to become familiar with the intricacies of landscape design.

Usually this masterpiece is located in the most visible place. In addition, a rock garden requires a sunny place, so this corner is usually located in an open area.

Since an alpine slide has a calming effect on a person, it is best to place it near a place of rest.

The quality of the soil cover should not be discounted, since the most favorable soil for a rock garden is sandstone, but if the soil has a clay base, then it will be necessary to make drainage.
When is the best time to create a rock garden?
An alpine slide can be created at any time of the year except for winter, since in the winter cold it is impossible to plant plants or prepare the soil. However, experts consider autumn to be the most optimal time for creating a rock garden.

Since the natural shrinkage of an alpine hill can take several months, according to landscape designers, it is necessary to prepare for autumn planting in the spring.
Creation of an alpine slide
Landscape designers, answering the question of how to make an alpine slide, offer universal schemes and projects for arranging this natural corner, taking into account all the subtleties and scope of work.

However, knowing the basic rules for creating a rock garden, you can organize it yourself.

The first thing you should pay attention to is the location. So, the rock garden should be clearly visible. Most best option is the creation of an alpine slide in the shape of a pyramid, in which the maximum height is concentrated in the center.

In addition, all elements of the rock garden should be positioned freely; symmetry is inappropriate here. If it is possible to organize a rock garden on a natural slope, then it is best to mark its elements at the same level.

In terms of parameters, the height of an alpine slide should be proportional to its size, that is, 1 meter of area corresponds to a height of 0.2 m, thus, a flowerbed measuring 4 m² in height will be 80 cm, as in the photo of an alpine slide.
Preparatory work
Even the simplest alpine slide requires careful preparation. So, when creating a rock garden, you need to make drainage, the fact is that the use of stones causes the soil to sag, which means you can’t do without drainage.

The material for drainage can be fine gravel, pieces of red or white brick, small pebbles or crushed stone.

Before laying the drainage, it is necessary to dig a hole 1 m deep for a flower bed with an area of 8-9 m². Then drainage is laid out and the soil is filled with water. Next, a layer of earth is poured.

As soil for a rock garden, it is best to use a soil composition made from ordinary earthen soil, peat and river sand. All soil components must be in equal proportions.
Note!

Stones
The basic element of any rock garden are stones. Usually these are large stones of an original shape.

Most often, pieces of granite, sandstone, limestone are used to create an alpine slide; you can also use wild stone, as well as tuff.

When decorating a rock garden with stones, you must follow the following rules:
- It is best if the size of all stones is the same;
- The stones must be of the same variety;
- The stones must be of uneven structure and shape;
- You need to arrange the stones so that they are asymmetrical.

You can arrange the stones according to your own taste, however experienced designers can offer you several suitable projects. IN Lately A popular scheme is when massive stones are scattered around the site, with small pebbles between them.

An alpine slide looks interesting when the most spectacular stone is installed in the center, especially if the rock garden is located on a slope.

Note!

When laying out stones, especially massive ones, you need to make sure that they are stable; for this, some of them can even be fixed with cement or dug in a little.

A properly organized alpine slide at the dacha can become a favorite vacation spot for the whole family.
Green spaces
2 months after the preparatory work, you can begin planting green spaces. The most convenient plants for decorating a rock garden are low-growing spruce, thuja, mountain pine and juniper.

A small alpine hill is an excellent landscape solution for a small area. When creating such a rock garden, it is best to use low-growing, herbaceous plants, such as wild carnations, low marigolds, nasturtiums, pansies and bluebells.

If desired, the alpine slide can be combined with a small pond in the form small pond, however, in this case, the process of creating a rock garden will be even more labor-intensive, but it will be a real work of landscape art.

Photo of an alpine slide with your own hands

Note!


Every modern comfortable dacha necessarily decorate either the garden or various kinds of flower beds. At the same time, the size of the dacha plot does not have to be huge at all in order to realize even the most daring ideas. Nothing interferes with small area create something beautiful, unusual and elegant. For example, a miniature alpine slide, which you can easily create with your own hands when using available materials even for beginner gardeners.
Such a compact rock garden has several advantages over a regular flower garden. Firstly, it looks much more original. Secondly, it takes up little space, and thirdly, it does not require complex care. For those who want to master the arrangement of alpine slides, creating a miniature version will be an excellent practice.
Anyone can build an alpine slide with their own hands, even small areaWhat is the difference between a rock garden and a rock garden?
Rock garden and rock garden are two different ways of designing a flower bed, which have much in common. Due to the large number of identical characteristics, sometimes even gardeners with extensive experience are confused about these concepts. Both of them are a flower garden, for the arrangement of which flowers and stones are used. What is the main difference between them?
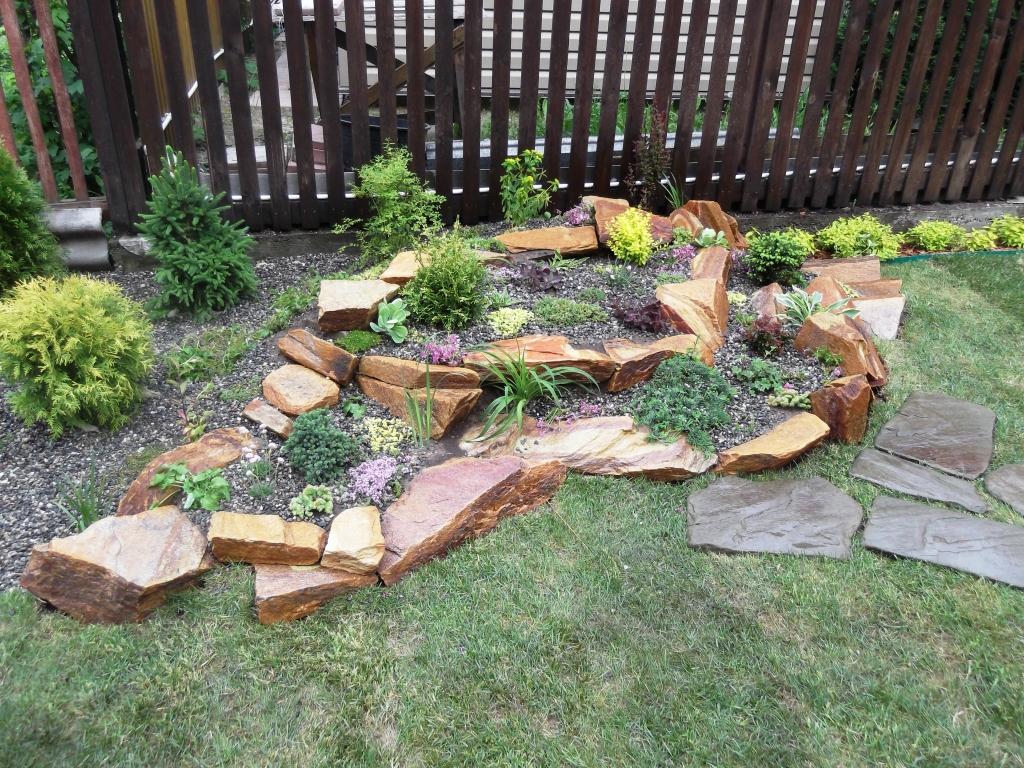
A rock garden is a garden made of stones in its pure form. When creating it, only one type of stone is used. They are laid in two ways: chaotically, without observing any order, or in parallel rows. This helps create visual effect wildlife. The secondary elements of the composition are plants and flowers, which in this case serve only as a natural floral background.
It is the role of plants in the flower garden that is the main distinctive feature between an alpine hill and a rock garden. In this type of stone garden, such as a rock garden or mini-rock garden, the main emphasis is on the plants. Its composition consists of various types of colorful, unusual flowers and their combinations, turning the flower garden into a small magical world from which it is impossible to take your eyes off.

 A rock garden differs from an alpine slide in its emphasis on the natural beauty of the stones; flowers in this case serve only as an addition
 An ideal place to create a small rock garden
When planning to create a small alpine slide with your own hands, it is important to choose the right place. For example, a one-sided mini-slide is best placed next to the wall of a house or near a fence, as an addition to a general flower garden or as a separate element of the garden. A round flower bed will look great in the center of the lawn. Thus, all its sides will be available for review. The ideal place for a mini rock garden in a flowerpot is a porch or terrace.

 An interesting idea: the roof of the cellar is gradually turning into an alpine slide
 Also, when choosing a place for a rock garden, it is important to consider not only how it will look, but also pay attention to other points related to its placement:
- Illumination. The place should be sunny so that the plants receive the necessary amount of light. A shaded location will cause the flowers to fade and become elongated.
- Lack of trees nearby drainpipes. When the flower garden is under a tree, the leaves from it will fall off and spoil appearance the entire composition. Rainwater from drainage system may cause erosion of the ground.
- In the flower garden you should place “neighbors” who get along with each other and have similar care and growing conditions.

 An open, well-lit clearing will become great place for the construction of a rock garden
 Options for small alpine slides
When starting to work on a miniature rock garden with your own hands, you need to think about the choice of style in which it will be decorated; it completely depends on the desires and imagination of its creator. Photos of the most spectacular and colorful mini-rock gardens can help you decide on a specific option, for example:
- The generally accepted alpine slide in miniature. It is a stepped structure that is installed directly on the ground. It can become a wonderful decoration for the entire flower garden as a whole.
- Mini rock garden combined with a pond. The amazing effect is achieved thanks to the presence of even a small bowl at the base of the stones, which will imitate a pond. This element of the composition will make it even more charming and attractive. An addition in the form of a mini-waterfall or fountain will make this place the most attractive in the entire dacha area.
- Small alpine slide in a flowerpot. Great solution in the absence of a free plot of land. You can always find many photos of such mini-rock gardens and not only in flowerpots, but also in other various containers.
 A rock garden can be completely different - from a mini composition in a pot to a large slide with waterfalls and a fountain
 Materials for designing a slide
To create a small, simple alpine slide, even novice gardeners do not need a lot of skills or much effort. The main thing is to get in a creative mood. The process itself will not take much time, since a mini rock garden is a completely small and not labor-intensive project.

 Organic stone placement creates the impression of a natural landscape
 Once you decide to set up a small rock garden with your own hands, you will need very little material, which is definitely available at any dacha:
- several large stones;
- gravel;
- ceramic shards.
Sometimes even old sinks or leaky basins can act as scrap materials. They can also be transformed into a genuine floral masterpiece.
To make the composition more interesting and original even with a minimum of vegetation, preference should be given to stones with unusual shape and colors. It is advisable to surround cobblestones of a common gray color with gravel of other shades or bushes with bright flowering.
Choosing plants for a small alpine hill
What plants will make up the composition of the mini-alpine slide is determined by the area that the latter will occupy. In the case of small areas, miniature plant species are also required. The most suitable are dwarf-sized conifers, as well as rock views, which grow slowly. Among them you can choose:
- boxwood;
- juniper;
- herbaceous erica;
- saxifrage;
- Phlox awl-shaped.
If we want to dilute the composition bright colors, you should plant low-growing plants that have small flowers, for example:
- creeping thyme;
- aubrietta;
- lobularia.
In the case when the mini-garden made of stones will not remain for the winter, then it is permissible to include cacti and succulents, for example, crassula or agave, in its composition. With the arrival of autumn, a miniature rock garden in a flowerpot can be simply removed from the street into the room.
 Plants for the slide should be unpretentious to environmental conditions
 The sequence of creating a mini rock garden for beginner gardeners
IN various sources you can find a lot of schemes and step by step instructions with photos on creating mini rock gardens. The simplest sequence of actions, which is easy to implement even for a beginner in gardening, is as follows:
- marking the area for a mini-alpine slide;
- placing stones and fixing them in the ground;
- planting plants between stones.
Site preparation
When starting to arrange a flower garden, you should remove all weeds and roots from the area intended for it. This will save time and effort in the future.
Since the mini-rock garden occupies a plot small sizes, a pit about 50 cm deep is enough. A similar hole should be dug in the place where you plan to place most of the stones and filled with drainage. The latter may be suitable for ordinary construction garbage, which is not toxic. After compaction, it is covered with earth. It is important to carry out intermediate watering of the soil with water, which is added in layers. This measure promotes better compaction and will prevent subsidence of your creation in the future. To mark the tiers of the rock garden, twine and stakes are used.

 When placing stones, you can be guided by your own taste and general form resulting rock garden
 Quite often, one of the most impressive stones is placed in the middle of the flower bed. It is installed on a special substrate, which is buried in the ground until its base is level with the ground. A plaster bowl or a substrate made of cement mortar can serve as a support. First you need to install the support in the right place, drowning it in the ground, and then lay a stone on it. You can make the placement of the stone reliable by using cement mortar or gypsum.
Next, using a similar principle, you should start arranging and securing smaller stones. When creating an alpine mini-slide, the most commonly used materials are shell rock, dolomite and tuff. Samples with natural colors and structure look especially elegant, although modern landscape design methods allow the coloring of stones, the appearance of which does not fit well with the overall composition. Usually, when designing miniature rock gardens, they try to use small samples of stones from one color range, but it is quite possible to use bright colors that create contrast to the main background. This will add gloss and elegance to the flower garden.
When installing stones, you must adhere to the descending rule, that is, arrange them in height that decreases downwards. The lower stones should act as a reliable and stable support for the upper ones. There is also an option for layering stones, which also looks very impressive.
Stones that have an even and flat shape should be laid out in layers, round stones should be placed one at a time or several together. The main thing is that the number of stones in the group is odd, and it is necessary to focus on one of them.
Disembarkation
 Before planting plants on a hill, flowers can be placed directly in pots and look at the general appearance of the composition; planting can be done after all the amendments have been made.
 In the process of placing and installing stones, it is important to leave space between them, which will later be occupied by the plants chosen for the mini-rock garden. These spaces between the stones must be filled with fertile soil. You can plant plants and flowers not only between, but also around the stones. The largest plants should be placed first. Concerning dwarf trees, which have quite a powerful root system, then they need to be planted when the first stones are still being laid. At the end, the middle and small plants. At the end of all the work, the flower garden should be watered. After this, all that remains is to apply the final design touches. To do this you will need sand, small pebbles and any elements of garden decor.
How to install a miniature pond
A miniature pond in the composition of a small rock garden will give it a special appeal. To create it, you will need a regular container designed for artificial reservoirs. You can buy such a device at any store specializing in garden supplies.
However, you can build such a container yourself from scrap materials, for example, an old basin. First you need to mix a cement solution with a consistency similar to thin sour cream, and add medium-sized crushed stone to it. The inverted basin should be covered evenly with the resulting mixture in a layer 1-2.5 cm thick.
 When creating a rock garden with a pond, it is not at all necessary to purchase expensive structures; you can use unnecessary containers, for example, a bathtub or basin
 It wouldn’t hurt to create additional decor. It may be a pattern scratched on outside, or laid out mosaic. Ceramic shards, broken glass, shells and pieces of tile are suitable for mosaics. Decoration should be done when the cement mortar is still wet. In this option, there is no need to add crushed stone to the solution.
Now you should prepare a place to install the dried container. To do this, a hole is dug, at the bottom of which expanded clay or gravel is poured as drainage, in a layer of 5-7 cm. The container itself is placed on top of the hole. You can beautifully lay small pebbles along the edge of the created pond.
- Choosing the right plants. While they play an important role in the composition, not all flowers are suitable for this type of flower garden. For example, ordinary garden flowers, such as phlox or daylilies, do not look their best among a pile of stones. It must be taken into account that for garden species flowers require vast open spaces, while a mini-rock garden has rather poor soil. As a result, plants simply will not be able to exist normally. When choosing plants for a miniature alpine hill, you should choose those species that are compact and winter-hardy.
- Final general view. When drawing up a plan for the future mini-flower garden, it is important to take into account how it will look in the end. The higher the slide, the more stones should be in its composition. Thus, plants, especially on the upper tier, will be protected from freezing. Everything turned out right if your creation resembles a mountain landscape with rocky stones, fertile gentle slopes and shaded hollows.
The Alpine slide is a fashionable attribute for arranging modern garden and park areas. Making a rock garden at your dacha with your own hands: step by step photos, diagrams, selection of plants.
When choosing a place for an alpine slide, it is important to provide for the following conditions:

In landscape design, there are many styles of garden design, including elements of a desert landscape, rocky gardens, ponds and bridges, which must be in harmony with the built hill.
Making a slide with your own hands is most preferable when decorating a garden. By doing the work yourself, you can avoid the high costs of hiring a landscape architect. Having step-by-step photos and diagrams for arranging the slide, it will not be difficult to complete the work of constructing a rock garden with your own hands.
 It is very important to do it right preparatory work so that the slide is stable
 Alpine slide - preparation
First you need to determine the location on the site where the slide will be located. Perennial shrubs and trees should not grow nearby, which could over time obscure the plants on the hill. A place that is open on all sides and accessible to view from all corners of the garden must be dry. A high groundwater level will adversely affect the durability and strength of the slide base. In this case, the groundwater level must be lowered using special drainage.
Do-it-yourself drainage under an alpine slide (step-by-step guide).
- The drainage installation begins with digging a pit, the dimensions of which are equal to or slightly more area slides. You must first make markings by installing pegs and pulling the cord. The durability and strength of the slide structure depends on the degree of reliability of drainage, so the depth of the pit should not be less than 0.8 m.


