Garden paths made from plastic bottle caps. An original landscape art object - paths in the countryside made of plastic bottles. a guide on how to use them to make a fence, rug, garden path and other decorations for the garden and home with your own hands
Time for beauty summer cottage There is always little left - all the energy is taken from the vegetable garden and garden. But in Lately many people spare no time and effort to make their site beautiful and unique. Take plastic bottles, for example. On every trip to the dacha, summer residents take drinks in bottles like these with them, and over the course of the entire summer a lot of this container accumulates. Of course, you can collect them in bags, take them away and simply burn them. But it's bad for environment. We offer another option and now we will tell you how to make a path from traffic jams plastic bottles. By the way, you don’t have to throw away the bottles themselves, but make a lot of useful things out of them.
 Advantages
 - cheap. There are a lot of plastic bottles everywhere, you can ask your neighbors and friends for corks, or simply remove them from those bottles that are lying ownerless in the bushes;
- quite simple to manufacture;
- look elegant, beautiful and cheerful;
- long service life.
 1. First of all, select the type of future track. Think about what kind of ornament you will lay out. Then prepare a place for the path. If necessary, dig a trench for one and a half shovels under the garbage.
2. Best to use cement mortar in proportions of one part cement and four parts sand. Some people, before laying cork mosaics, level the ground, moisten it a little with water and begin laying out the cork carpet. But it won’t last long; after a while the plugs will start to fall out one after another. Therefore, use cement mortar.
3. Make a base from small crushed stone and compact it. Then place about five centimeters of the solution, place it on it metal mesh with cell 3-4. Then there is another layer of solution about five centimeters. Strongly liquid solution not needed, otherwise everything will float.
4. Start pressing the lids into the solution. Press them onto the fresh mortar until it sets. They can be laid out in the form of a selected pattern or simply in random order. It will be easier to work if you do not pave the entire path at once, but do it in parts, in sections of about fifty centimeters. It is better to take multi-colored caps, the design of them will look very beautiful.
5. The lids pressed into the solution must be leveled using a sheet of plywood, which should be lightly tapped rubber mallet. To prevent the lids from being pushed back, place the same plywood and press it down on top with bricks along the perimeter and place one in the center. Then the load distribution will be uniform. The process is, of course, long, but the result is indescribable beauty!
 1. Make paths from the caps and bottoms of plastic bottles. You can involve children in this, let them cut off the bottoms of the bottles with scissors, and then help you make the path itself.
2. Prepare a place for the path and install box formwork there. On well-compacted soil, pour a layer of sand into the formwork. Level and water.
3. Now start pressing the lids and bottoms into the wet sand. You can lay out a flower meadow from the bottoms, and lay out any pattern or picture with the lids according to the cross-stitch pattern. Take your time and such original tracks will bring beauty to your site and joy to all family members.
More recently, plastic bottles were trash for the whole world, and it took several centuries to decompose.
Thanks to folk craftsmen, they found various creative uses and one of the directions was decorative country paths.
Using bottles in landscape design
Eggplants should not be underestimated, because they can be an excellent material for creating decorative element Location on.
This option can look creative and elegant if you apply your imagination and ability to work with your hands to it.
Main uses of bottles
The use of bottles for garden paths can be divided into several main ideas:
- using bottles completely;
- using the bottom of an eggplant;
- using a large number of lids from plastic containers.

Path of lids
Preparing material for work
To use plastic bottles as a track, first you need:
- Wash well from any remaining drink;
- remove all labels so that they do not spoil in the future appearance;
- Dry all material in the sun.
Also, before starting work, prepare all the necessary material:
- sand or ordinary soil;
- crushed stone;
- shovel;
- bucket;
- garden shears (they are more convenient to use when cutting eggplants, but if you don’t have them, then perhaps use household scissors);
- leveling boards;
- formwork - box.
Having prepared all the tools, you can start working. Let's take a closer look at the main options.
Option number 1 - use whole bottles
Step-by-step instructions for making a path from whole plastic bottles with your own hands.
We fill all the bottles with sand or earth. This is necessary so that in the future they do not press under your feet, so you need to compact the sand in the container thoroughly and periodically tap them on the ground.

Advice! Do this activity with your children, they will find it very interesting, and you will save your precious time.
We dig a trench about 1.5 times the size of a shovel.
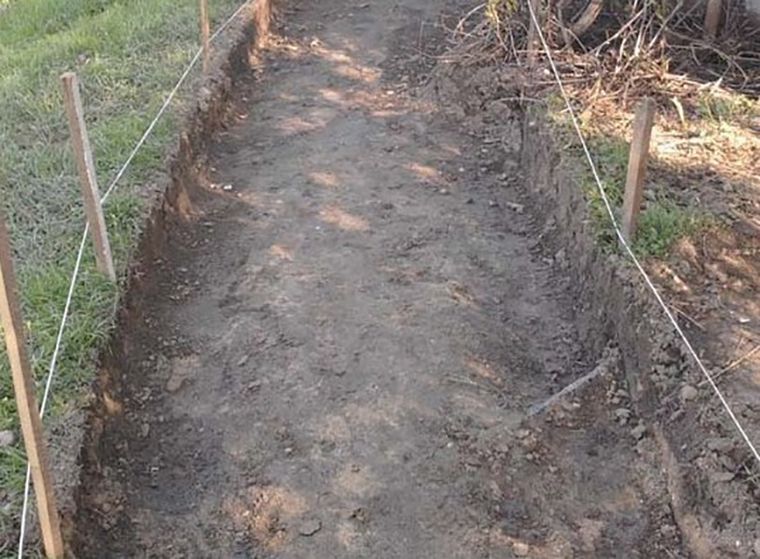
We install the formwork. We take boards of the required length and thickness of about 15 cm. They can be secured with wooden stakes on the other side of the path.

We put it in the trench household waste(sticks, broken bricks, dry leaves, etc.), then fill the sand cushion. This is necessary so that in the future the path does not go into the ground under your feet.

We lay the bottles horizontally, then lay boards on them so that they sink evenly into the ground.
Jump on the boards to make them compact more tightly; involve children in this part of the work.
We fill the empty spaces between the containers with sand and cement, then go over them with a board.
Using a sprayer, water the poured mixture and let it dry so that the cement hardens. The path is ready!
To make the garden path look more fun and interesting, initially paint all the bottles in different colors.

The photo shows a finished path made from whole plastic bottles, made by yourself
Path of large bottles
Garden paths can be used both for their intended purpose and for a creative appearance of the site.
For example, if you make a large number of eggplants beautiful flowers and plant them as a path on the site.

It will look unusual if you use 5-liter plastic bottles.
We wash the bottles, dry them and cut off the bottom part.

We insert one eggplant into another, and fill the voids between them with sand. We lay two or three rows in the trench, depending on how wide you want the path.
We pour the construction mixture between the rows and use a sprayer to fill it with water so that the cement hardens.
You can watch the video on how to make a garden path from cut plastic bottles.
Lids are also used
A more interesting version of a country path if you use bottle caps.
Call the children to create such a path. Making mosaics will lift their spirits. But first you need to prepare your workplace.
Lay out the future path. If desired, install formwork and thoroughly compact the soil in the selected area, first placing construction waste there.

We lay out all the plugs.

Place the boards on top and compact them so that the lids are on the same level.
For nice looking You can also fill the gaps with sand and walk again with a board, then with a brush, to remove unnecessary soil on the finished country path.
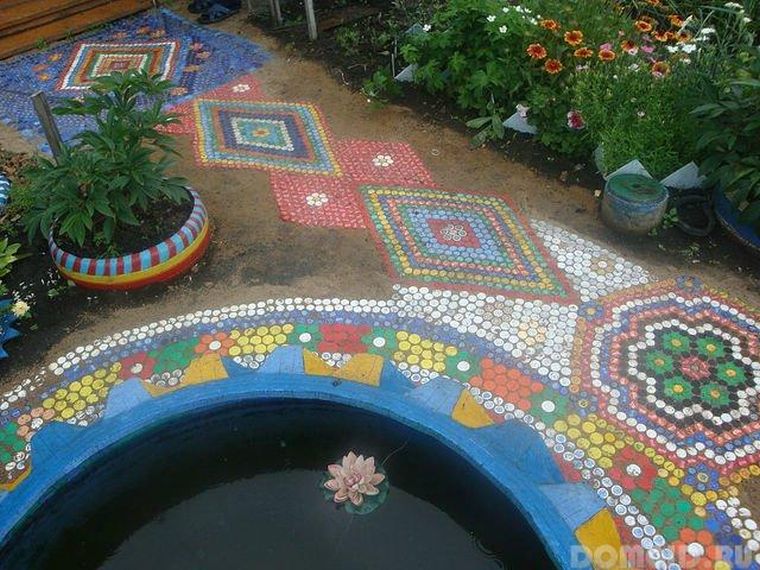
A path made of traffic jams will look more elegant if you lay it out like a mosaic, in the form of a beautiful pattern.
A path of inverted lids will be a pleasant foot massage. 
The principle of creating a path is similar, only at the end of the work you don’t need to fall asleep mortar.
This path is not intended for constant walking, only for medicinal and decorative purposes..
The use of bottoms is also encouraged!
A good foot massager can be made from the bottoms of eggplants.

To do this, you first need to wash the bottles and cut off the bottoms.
Sort by size and color.
If desired, you can paint it in different colors for greater brightness in the area. 
We prepare the trench in the same way as described above.
Then we lay the finished bottoms, compact them and get the finished version.
Additional decoration of the path
As an additional decoration you can use glass bottles.
After removing the formwork, voids remain in which you can install glass bottles upside down to ground level.
The result is a beautiful appearance. You can make a road fence if you install glass containers with the neck up, while burying only 15 cm in the ground.
More interesting option decoration will be the design of the area around the trail. By placing crafts made of the same plastic along it, for example, frogs or daisies. In this matter, the main thing is your imagination.

Paths made of glass bottles
Glass bottles are a dangerous tool and therefore should be used with extreme caution. Not everyone can decide to have glass under their feet, but if you do everything correctly, your health will not be in any danger.
The method is completely consistent with the plastic bottle trail.
Be sure to fill the bottles tightly with sand so that there is no air. Otherwise the bottle will crack under your feet. Next, place it in the trench upside down and fill the gaps between the bottles with the construction mixture.
Then you can put shiny paper or glitter with rhinestones in transparent glass bottles. It all also depends on your imagination.

conclusions
From all that has been said, several important points can be emphasized:
- Observe step by step instructions when laying a country path.
- If you are laying a groove from caps, then it is better to spend time and make beautiful pattern so that guests are delighted with your site. Or you can post some puzzles to make it more interesting for your friends to spend time at your home.
- When using glass bottles, think about safety.
- When arranging your dacha, always think about practicality, and a garden path made from plastic containers is just this option.
Bottle caps – excellent material for crafts and decoration. In the countryside they can be used in a variety of ways. You can decorate an old basin, a bucket, a fence, a flower container or mulch structure, an unsightly corner of the house, a table top, a rug for summer shower, and instead of the usual sign with the house number, make an inscription from traffic jams.
The most painstaking and difficult part, although it may not seem so at first glance, is the garden path. Definitely, such a decorative element in a summer cottage will be original and exclusive.  The main problem will be the number of lids; it will take a lot of time to collect them, even if all relatives, friends and neighbors help with this. Let’s leave the idea of making a garden path out of lids a “snack”, but for now you need to learn how to make simple patterns from them.
Yes, you can attach plastic bottle caps in different ways, the main thing is to learn how to work with them and you need to start with soaking to wash off all the inscriptions or use a solvent.
How to create simple patterns from plastic bottle caps
Before starting work, all the caps need to be sorted by color and a pattern drawn on the selected surface with chalk. If you don’t have success with drawing, then print out the drawing in full scale; it’s more convenient to compose it from several sheets, glue it together, cut it out along the contour of the drawing and trace it with chalk on the area.
Plastic plugs are laid out in rows, gluing to the surface or nailed, 1 nail per cap is enough.


 How to make a garden path from lids
To make it, select high-density lids, given that the load here will be considerable. The display can be done with an ornament, a picture, or randomly scattered; any method looks impressive, bright and fun, especially if the lids are multi-colored. 
If you do not plan to make a path from the caps on long term, then it is enough to level the soil and press the covers. Keep in mind that such a “carpet” on a quick fix is very short-lived, the grass will begin to sprout in the space between the lids and the lids themselves will gradually fly out or be pressed deep into the ground.
For a good garden path from plastic bottle caps, you first need to make a base: remove upper layer soil, dig a trench 10 cm deep, drive stakes along the edges and make formwork. Place on the bottom drainage layer from broken bricks, crushed stone or gravel, then mix the cement mortar (4 parts cement, 1 part sand, 1 part glue), pour it onto the drainage layer, lay the covers, pressing them into the mortar almost to the edge of the surface. When the cement dries and you see excess on the surface, take a stiff brush and clean it off. In summer, cement sets quickly, so do not do a large batch at once, do the work in parts.


Advantages and disadvantages of lids
The advantage of a track made from covers will be durability, brightness, resistance to temperature changes, ease of repair and cost-effectiveness.
The disadvantage of a continuous garden path or area in front of a house made of roofs is that they are slippery after rain or snow. But this can be compensated by partially laying out mosaics in the central part.
For a rough calculation: per 1 sq.m there are about 1100-1200 caps from 1-2 liter bottles.
Caps from plastic bottles can be combined with metal ones, as well as with a bat ceramic tiles or sidewalk. Along with plastic, wine corks are also popular.


Rustic hand-made
Let me delve into the domain of our beauty expert - - and talk about the features of rustic design. Recently I visited relatives in the village of Yarkovo Tyumen region and was shocked by the creative creations of a local resident, Uncle Misha: a former prosecutor, and now a pensioner, creates paintings from plastic bottle caps.
Why not hand-made?
Any waste can be put to good use. People make bags out of old newspapers and dresses out of tax returns, so why not make a painting out of corks?
The rural artist has them everywhere: on the doors of the bathhouse, barn, toilet, on the inside of the fence and gates.
He would decorate the house and street gate, but the wife is categorically against it.
Having learned about the pensioner’s hobby, they bring him new corks, throw them under the fence, send them by mail, and on holidays he receives packages with corks from relatives in Moscow.
It is clear that the pensioner’s drawings are unlikely to appear in museums around the world. Creating masterpieces requires practice, even more corks and nails; it is advisable to come up with a concept in advance.
But the idea of using traffic jams for peaceful purposes seems promising to me: recycling waste plus realizing creative potential. I wouldn't mind if on mine country house a similar pattern appeared. And you?
Photo: Galya Wood
http://f5.ru/galyavud/post/77883
Panel made of corks
http://stranamasterov.ru/node/134240
![]()
http://stranamasterov.ru/node/195172
Rugs.
Http://stranamasterov.ru/node/147044 ![]()

It is not education, but talent that makes an artist real. Bratsk resident Nikolai Petryakov creates paintings from plastic corks. 
Cork mosaic is a troublesome task. Only preparation of material for unusual paintings takes several hours, says master Nikolai Petryakov. First, remove all excess, first rinse, then select by color. It's like embroidery. Only instead of canvas there is a bathhouse wall, and instead of threads there are colored plastic plugs. 
I draw 30 mm into squares. Where black dots I mark it. Where the brown ones are, I put crosses. First you prepare the plugs, then you hammer them in,” says Nikolai Petryakov, a resident of Bratsk. 
This summer the summer resident has a creative anniversary. Five years since he mastered the art of cork. During this time, not only neighbors learned about Nikolai Petryakov’s unusual hobby. People from other cities come to take pictures with traffic jam paintings. Everyone is sure: the author of the works is a professional artist. But no special education Nikolai Pavlovich does not. And recently he calculated how many traffic jams he collected over 5 years of creativity. It turned out to be almost 40 thousand pieces.
Sometimes bottles of expired mineral water were thrown away at a landfill, so my family and I collected a whole bucket,” says Nikolai Petryakov, a resident of Bratsk. 

There is creative potential, but there is not enough material. Because of this, work on the painting he is currently finishing is delayed. Black, green and brown corks are in short supply. But, despite everything, the summer resident has grandiose plans - after all, there is one more free wall of the house.
http://ideidetsploshad.info/publ/stati_o_dploshhadkakh/plastikovye_butylki/nikolaj_petrjakov_sozdaet_kartiny_iz_plastikovykh_probok_bratsk_irkutskaja_oblast/25-1-0-475
A path made from plastic bottle caps.


If you wish, you can make the paths with your own hands, but this is suitable for this unusual material like plastic bottle caps. Use your imagination and use these tips to create a unique and practical art object at your dacha. And you need very little for this: hard work, free time and our advice.
When it comes to waste material, many believe that working with it is much easier with construction. This is not entirely true. If you want the garden path to become not only a practical element landscape design, but also his calling card, you need to follow some rules. They primarily relate to the selection of material and its preparation.
Selecting plastic bottles and caps (corks)
They say that plastic does not decompose sooner than after 100 years. This is wonderful! Indeed, in this case it is ideal for garden paths (for the garden). Palette plastic caps quite extensive.
To create beauty, you can use:
- caps from plastic bottles of different sizes;
- lids from tetra bags, eggplants, and jars;
- metal bottle caps;
- wine corks.
The main requirement for plastic lids is high density. After all, the tracks bear a serious load. And it will be a pity for the wasted effort if the coating does not last long.
For the path you will need a lot of this material. You can do the calculation yourself:
- measure the diameter of the plug, in 1–2 liter bottles it is 3 cm;
- 33.5 corks fit in 1 meter;
- for 1m2 you will need 1122.5 plugs;
- multiply this figure by the area of your path and you will get total number lids.
One family cannot handle this amount of drinks, even if you collect all the caps from bottles and cans, including water, beer, yoghurts and even medicines. Involve everyone you can in the project:
- announce your decision to create an extraordinary element garden design friends, acquaintances and neighbors;
- give a cry about collecting caps on social networks;
- try to negotiate the supply of material with the employees of the nearest cafe.

How to make it yourself at the dacha
Corks can be laid in different ways:
- face up (resulting in a flat surface);
- ribs up (this path can be used instead of a massager);
- the inside side up (the coating is textured).
The last option is only suitable for small plots under a canopy. Otherwise, during rainfall, water and dirt will accumulate in the recesses of the plugs. And for this uneven surface hard to care for.
He will introduce you to the varieties of crafts made from tin cans.
Mosaic laying scheme
This is the most creative part of the job. Before you start paving, you need to decide exactly what your path should look like. You can lay out the lids in even rows, regardless of color. The result is a colorful scattering of colored highlights in your garden. This path attracts the eye and looks impressive.
But if you want something more extraordinary, choose a pattern for your path yourself. Cross stitch patterns will help you with this. Paths with colored geometric patterns look good. If you are confident in your abilities, you can choose more difficult drawings. Some summer residents create real story panels under their feet in their garden. It is at the dacha that such decorations are popular. 
Tools and materials
Despite the cheapness of the material, the approach to creating tracks from corks must be serious. Sometimes it is advised to simply level the ground before laying cork mosaics and start creating by sticking the caps directly into the ground or a layer of sand.
This type of carpet will not last long. Not only will the lids not last long and will begin to fly out one after another, but also the grass will hasten to grow between them. It’s better to spend more time, but do everything well.
You will need:
- lids of different colors;
- cement;
- sand;
- construction or ceramic tile adhesive;
- wooden blocks and boards for formwork.

To build a path you need:
- determine the area of the path and make markings;
- remove the turf and topsoil;
- dig a trench 10 cm deep;
- drive supports along the edge of the recess;
- do wooden formwork, and the nails need to be driven in with inside designs;
- install spacers for reliability ( optimal distance between them – 1 m);
- fill in a layer of crushed stone, gravel, broken brick;
- prepare a solution of cement and sand (4:1) and add one part of glue to it, the mass should be of medium consistency;
- pour a small amount of solution onto the prepared area;
- quickly lay the covers according to the chosen pattern, lightly press them into the cement;
- the solution should almost completely cover the lids;
- After the cement has hardened, walk over the top layer with a stiff brush to remove excess cement.
The solution hardens quickly, especially in hot weather, and laying the mosaic takes a long time. Do not fill the entire path with cement. Work by sector. Break your drawing into parts or conditional squares and fill in small areas.
Advantages of garden paths
- The coating performs an aesthetic function without sacrificing a practical one.
- The material does not require material investments.
- Plastic tolerates temperature changes well.
- Such paths do not lose their aesthetic appearance for quite a long time.
- Paths made from unusual mosaics are easy to repair: any cover can always be replaced.

Disadvantages and methods to combat them
But such paths are not ideal; they have serious drawbacks. But knowing in advance what difficulties may arise with them, you can easily avoid them.
- Plastic paths made from lids become very slippery after rain. Such coverings should not be installed on central paths. Their place is in the garden and near recreation areas.
- An icy path becomes dangerous. If you need to walk on it in winter, it is better to combine a mosaic of plastic covers with designs made of cement, ceramics or wood.
Other options
Coverings made from combinations of plastic lids with broken ceramic tiles look good. Small sizes elements allow you to lay out fancy and extraordinary patterns. The result is a distinctive path of bright elements. Such garden patchwork will decorate the garden and place accents on the site.
Drawings can be varied and metal lids. And adherents of eco-design will like the paths made of wine corks. Cork is a noble material with unique properties. 
Health track made from different caps
Homemade massage paths in the garden have become quite popular. Children and adults love them. After all, walking barefoot on a textured surface is not only pleasant, but also useful. For such paths you will need a cement base on which various materials are laid.
Lids from juices, glass jars, corks, buttons, and sticks are suitable. All this stuff is sorted by color and size. Then a sketch is developed. Here you can play not only with color and texture, but also with the styling method. Covers placed on the end will create a convex surface, while those glued with the recess down will give a smoother surface.
From bottles
This material can serve as a wonderful material not only for making, but also for arranging exclusive paths in the garden. For this purpose, whole bottles or parts thereof are used.
How to make from plastic bottles
Empty bottles cannot withstand heavy loads. Therefore, before building a path, they need to be filled with sand, fine gravel or dry soil. If you want to make a colored path, then put it inside the bottle colored paper, foil or pour a little dye, and only then add sand. When the material is ready, start laying it. 
Without cement pad can't be avoided in this case either. Only the hole for it needs to be dug deeper - 1.5 shovel bayonets.
- Gravel is poured onto the bottom and formwork is constructed.
- The bottles are placed sideways in a trench and filled with cement mortar.
- Compact the masonry. To do this, place a board on the path and walk along it.
- After drying, the formwork is removed.
- Decorate the edges. Any mosaic is suitable for this.
You can make interesting paths from the bottom parts of the bottle. To do this, prepare a trench about 15 cm deep.
- Cut off the bottom of the bottles (leave 1/5 of the height).
- Make formwork and concrete pad.
- IN wet solution lay the bottom.
From the remains of bottles you can build interesting garden sculptures or greenhouses for seedlings.

Greenhouse for seedlings from a plastic bottle.
About how to put paving slabs told .
How to make from glass bottles
The technology is in many ways similar to the previous one. Only glass bottles do not have to be filled with sand, although sand will give them additional strength. It is better to take champagne or wine bottles, but beer bottles will also work.
They are generally installed with the neck down. For such a path you need a fairly deep trench. Therefore, bottles for paths are often cut and only the bottom part is used. The laying technology is the same as for plastic.
This illuminated path looks very cool. To do this, you need to install small light bulbs under the bottles. It is better to take LEDs - they are durable and economical. Bottles are also suitable for building walls, fences and borders.
Video
In the video: DIY traffic jam paths.
Regular caps - cheap and practical material. They are well suited for paving paths of varying degrees of tortuosity. Surfaces decorated in this way look cozy and colorful. And in order for them not to get out of general style plot, complement the garden with bright mosaic sculptures and panels in the same color scheme.


