Technology and main stages of laying paving slabs on sand. Laying paving slabs with your own hands: step-by-step instructions Technology for laying paving slabs in the garden
Owners summer cottages And country houses in their possessions they want to create for themselves an atmosphere that will both please the eye and promote active recreation. Gone are the days when a piece of land was perceived solely for growing agricultural products. The garden beds have made room a little and given way to gazebos, green lawns where children can frolic, as well as beautiful garden paths that are both pleasant and convenient to walk on.
Paving stone paths undoubtedly look the best and are the most functional, but when site owners begin to consider the prices for paving services, all interest often disappears. But in vain. In this article we will try to prove that there is nothing impossible in such a process as laying paving stones with your own hands. Step-by-step instructions will help readers of our portal bring this process to life.
What are paving stones? What is it like?
Paving stones comes from the word whetstone. Granite, basalt or other hard rock was previously split into fragments (bars) of approximately equal size and shape, then a covering was assembled from them - paving stones, which is why it is called chipped stones. Such technologies are still used today. Such coatings look very interesting, although the surface can hardly be called perfectly smooth and installation requires a highly qualified craftsman. Over time, due to the passage of a large number of people and passing vehicles, the surface wears out, grinds naturally and becomes smoother. It is precisely these paving stones that are loved by tens of millions of tourists visiting the old cities of Europe, paved hundreds of years ago.

The next step in the development of paving stones was the use of sawn stone, when all the bars have the same geometric dimensions. Such paving stones are also called full-sawn paving stones, since all edges were processed. It became easier to lay such stones, roads and sidewalks became smoother, and it became easier to walk on them. And now sawn paving stones made from natural stone are most widely used, even despite their considerable cost.

Another variety of paving stones is chipped paving stones, when a stone blank is first sawn into blanks of equal thickness, and then split into pieces the right size. Sidewalks and paths look very advantageous, where full-sawn and split-sawn paving stones are successfully combined.

Also in the 19th century, clinker paving stones began to be produced in Germany, obtained from natural slate clay, from which bars were molded into the desired size and shape, and then fired in a kiln at high temperature. This technology is still simpler than cutting or splitting natural stone, so clinker paving stones began to be produced in large volumes. It is still being produced, as it has proven its worth. Some clinker sidewalks have been successfully used for more than 150 years and are not at all about to “retire.”
Prices for paving stones
paving stones

IN modern world, with development construction technologies, produced good replacement natural materials– concrete paving stones. With a very high interference fit, it can be called pure concrete, since in addition to high-quality cement and mineral fillers, it contains a mass polymer additives, which increase strength, wear resistance, frost resistance and also allow the paving stones to be painted in any color. This gives unlimited scope for the implementation of any idea for decorating your site. Concrete paving stones can be made into any shape, so all path curves, transitions and various other curved elements can be laid without labor-intensive trimming.

Concrete paving stones can be vibrocast or vibropressed. The second is preferable, since its performance properties are much higher. Manufacturers' statements that concrete paving stones are in no way inferior to natural granite or clinker stones are only partly correct, if only because artificial paving stones have not yet passed the test of time. The authors of the article do not wish to offend any manufacturer or seller concrete paving stones. If in a ridiculous 150 years we are shown a sidewalk in good condition from artificial stone, which is due today, we will sincerely apologize for our words.
What are the advantages and disadvantages of paving stones?
Residents of cities built not in the 20th century, but much earlier - in the 18th and 19th centuries, seen at least once, as if from under the “shabby” asphalt pavement old paving stones peek through. A reasonable question arises: why does the “younger” asphalt “live” much less than the road surface that our great-grandfathers and great-great-grandfathers made? And this fact is far from uncommon. It turns out that well-laid paving stones can serve load-bearing base for other coatings.

If you believe historical sources, then even in ancient times not all cities could afford paving stones, but only with a substantial budget, since this coating was very expensive even then. It is still very expensive. But it’s still too early to write off paving stones. Despite the fact that such covering of roads and sidewalks is very expensive, fortunately, it will delight our eyes for a long time. Why does humanity stubbornly continue to use paving stones, what are its advantages?
- Paving stones are very durable, wear-resistant and frost-resistant.
- Due to the fact that the paving stones are always laid on a drainage pad, water will never accumulate on the paths.
- Paving stones are always easy to repair, because you can partially disassemble them and then reassemble them. You can also change individual elements.

- When the soil moves, no cracks form on paving stones.
- Paving stones do not melt in the heat like asphalt and do not emit vapors of various petroleum products.
- Paving stones look very beautiful. They indicate good taste and the wealth of the owners.
- Laying paving stones does not require the use of special heavy road equipment, that is, all work can be done independently.
If paving stones are such a wonderful covering, then why not pave all the roads and sidewalks with it, and then live and rejoice in the fact that there is enough for our lives, and possible problems let the grandchildren or great-grandchildren decide. Paving stones still have disadvantages.
- Paving stones are a very expensive material. Covering roads and sidewalks with asphalt or concrete is much cheaper.
- The work of laying paving stones is also one of the most expensive, as it requires serious preparation of the base and skilled labor. It takes much more time to build a road made from paving stones than from other materials.
- Paving stones require good construction measures, since excess water will simply wash away the base.

- Paving stones have a large mass, so they are prone to subsidence, especially if the laying was carried out in violation of technology.
- Driving a modern car on cobblestones is a dubious pleasure, and in wet or frosty weather the surface can be very slippery.
- For reasons “unknown” to science, for some reason women who wear heels do not like crushed paving stones.

Nevertheless, owners of country houses and summer cottages should very seriously consider the use of paving stones for paving yards or arranging paths in the garden. And if you do it yourself, the money saved will more than cover the cost of purchasing the material. However, you can even make paving stones yourself, which you can read about on our portal.
What is the difference between paving stones and paving slabs?
If we consider various sources, then this issue can become very confusing. When some say that paving stones are only a natural stone, others argue that it’s not this, but the size - the paving stones are much thicker. We propose to clarify this issue; to do this, we suggest considering the following table.
Prices for paving slabs
paving slabs
 Paving slabs are paving stones that regularly visit a nutritionist
 Horizontal thicknesses are typical paving slabs or paving stones, and the vertical length is the greatest, because tiles or paving stones can be not only square, but also rectangular. If the ratio of maximum length to width is less than or equal to four, then we can say that it is a paving stone. In the table, such ratios are indicated in red-brown color. If the indicated ratio is greater than four, then such products can be classified as paving slabs; these ratios are highlighted in blue cells.
Paving stones are superior to paving slabs in their bearing capacity. Obviously, if you put a 160*100*62 mm paving stone on the sand and run over it with a KAMAZ wheel, then nothing will happen to it - it will simply be pressed deeper into the sand. And if you take a 420*420*62 mm tile and place it in the same conditions, then most likely it will crack. It turns out that with equal thickness, the fracture strength will be higher for paving stones.
My name is Rostislav, I am 37 years old, and I am a builder with twelve years of experience. I started at a construction site as a helper, like many others. He worked according to the rule: “bring it, serve it, hold it and don’t interfere.” But time has passed - I have grown over the years and professionally, acquired a personal instrument and started working on my own.

My first rule when carrying out any project is to carefully prepare the material and tools to achieve a good final result.
We will talk about the technology of laying paving slabs.
Paving slabs have confidently occupied their niche in the decoration of personal plots, gradually displacing their direct competitors - asphalting and concreting.
And the most important advantage is the natural drainage of precipitation into the ground, without its retention on the surface.
Before you get started, read this article to the end, because at the end there will be calculations from which we will need to begin preparing for implementation.
So, materials and tools:
Materials
1. Paving slabs.
2. Curbs: road, sidewalk.
4. Cement grade 400.
6. Crushed stone, fractions 5x20mm.
7. Screenings, medium-grained
8. Geotextiles
Tools
1.Hydraulic level.
2. Pegs (wooden or reinforcement).
4.Roulette.
5. Angle grinder (grinder)
6.Manual tamping or tamping machine.
7. Concrete mixer.
9. Shovel.
10. Rubber hammer, weight 400 grams.
11. Guide pipes 20 – 30mm in diameter.
12.Rule or flat strip 50x50mm
So, when starting work on a site, you first need to carefully calculate the square footage of the area where the work will be carried out. This can be done using a calculator, which
Selection of paving slabs and curbs for the path
It should be taken into account that when ordering or purchasing paving slabs, you need to purchase material that is 5-7% larger than the calculated area, because during laying and transportation, very often chips may appear on the tiles. You also need to take into account the undercuts, and if after installation you have 10-15 pieces left, they may be useful to you in case of repairs or in other unforeseen situations. We will also calculate the footage of curbs and gutters.
I want to focus on why paving slabs “ Old city" This tile has a number of advantages.
Firstly: the tile size is four-component, that is, the set consists of four different sizes.

Using this, we can calculate the width and length of the area being developed as approximately as possible, avoiding cutting the tiles as much as possible.
Secondly: the tiles have different colors. This allows us to approach the issue more broadly design project developed area.
Thirdly: depending on the purpose, these tiles have different thicknesses in the range of 40, 60, 80mm. For example, in areas of the developed territory that are intended only for pedestrians, it is recommended to use tiles with a thickness of 40 mm. Where short-term traffic is expected Vehicle– 60mm. And where the constant load from vehicles and other factors is projected - 80mm.
The tiles are also divided into types according to the manufacturing method: cast, vibro-cast, and vibro-pressed.
Cast- this is a tile prepared by pouring liquid concrete mortar into forms. Without affecting the workpieces by a mechanical process, the tiles are brought to readiness by solidifying the solution in molds under favorable conditions. It is characterized by a low price, but low performance properties - it is afraid of constant exposure to serious weather and mechanical factors.

Vibrocast – involves the same preparation process as cast, but with the use of an electric vibrating table, with the help of which a more compacted texture and composition of the component materials used in the preparation of tiles are achieved during production. At the same time, the amount of water in the prepared mixture for making tiles is much less than that of cast tiles. This affects the operating time during the operational period.

Vibration pressed. Unlike the technologies of cast and vibro-cast tile production, during vibro-compression concrete is compacted not only by vibration, but also by compression. Installations for the production of vibropressed tiles provide vertical pressure on the form with concrete (compression, pressing) and at the same time subject the form to vibration. Due to this, the density of the finished tile is higher than the density of cast or vibrocast tiles. The difference from vibrocast tiles is the amount of water. For vibrocompression, “dry” mixtures with a minimum amount of water are used. The mobility of such concrete is low, so vibration without additional pressing will not force the mixture to completely fill the mold. The minimum amount of water in the mixture for vibropressed tiles increases its strength, abrasion resistance and reduces the ability to absorb water (frost resistance). Strength, abrasion and water resistance are increased by additives and additives.

Curbs also differ in type:
- Road curb. The most popular - road curb 1 m long. Height and width vary depending on the location of application. To separate roads from sidewalks and lawns, a curb 30 cm wide and 15 cm high is used. At public transport stops, a curb also 30 cm wide and 18 cm high is used.

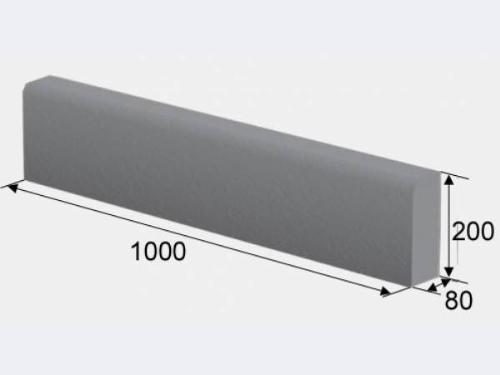
- Sidewalk curb. It has dimensions of 1000x200x80mm, and also 500x200x80mm. It is used for landscaping sidewalks, paths, blind areas, lawns, and various sites; it can serve as an element of landscape design, enclose structures and give them a finished look. The most important thing is that the curb is a stop for the road or tiled surface, and it is with its installation that the preparation of the base begins.

Today, the color range of borders is very diverse. In principle, color and even size can be discussed with the manufacturer or supplier when purchasing equipment for the construction site.
Gutter. The main purpose of the gutter is to drain rain or melt water to a drainage well or storm inlet, and in a simplified version, to the discharge point. Concrete gutters consist of separate ready-made gutters, and they differ in shape:
- for small ones - open semicircular gutters, have dimensions of 250x160x40mm, 500x200x65mm, and also 340x155x60mm.
- to in-depth – having in cross section rectangular shape and closed at the top with a lattice. They have dimensions: length -1000mm, width -165mm, and height can be 80,100,165,190 and 215mm.
Open gutters are quite safe and easy to maintain, but in the event of heavy rainfall they cannot cope with the flow of water. Recessed concrete gutters are covered with metal protective grilles to prevent injury and to allow unimpeded passage of vehicles.
The grates protect the gutters from large debris getting inside, but the gutters need to be cleaned periodically.
Concrete gutter can perform additional function– decorative. Often used when laying sidewalks different types, shapes and colors of tiles. In this case, the drain can become a kind of separator.


Gutters, like curbs, can be matched to the color of the tiles, or vice versa, to highlight certain sectors in the area being developed.
When calculating gutters and curbs, you also need to take into account a 5 percent margin for trimming areas and installation complexity.
We begin installation work before installation
When approaching a project and having completed all the calculation work, we first carry out a breakdown of the territory. We determine, according to the project plan or the plan agreed with the customer, into which sectors the territory will be divided, which areas need to be allocated in the high-rise plan - that is: areas for gazebos, barbecues, ramps or parapets, slopes, places for gutters and water discharge points. From my own experience, I will say that if the work is carried out on the territory of a private residential sector, then all slopes are arranged at the maximum distance from the buildings, that is, after the work has been done, it should visually appear that the buildings are located above the sidewalk or roadway of the site. This is done in order to remove moisture from buildings as much as possible.

Preparing the foundation
All work begins with preparing the foundation. At the site where the work will be carried out, it is removed upper layer soil to remove as much as possible root system plants (no more than 40cm) and go deeper to the depth we need to fill the base under the tiles. You must understand that all slopes on the site must be started when leveling the roadbed. Then the added layers will lie in an even layer, creating and correcting the slope we need. If you are paving a small area and you have enough strength to remove the required thickness of soil, you can do this with a pick and shovel. After removing the soil, clean the bottom of the trough to remove tubercles and hummocks. After this you need to compact it thoroughly roadbed using a tamper or vibrating plate. Without these tools, it is impossible to properly compact the surface of the earthen trough. Laying underlying layers and tiles on uncompacted soil will lead to subsidence of individual sections of the coating.
To find out at what depth we need to remove the soil, we need to drive stakes around the perimeter of the site. If the area is large or has hidden areas, then you need to divide one large area into several small visible ones. On these stakes, using a hydraulic level, we beat off the “horizon” (I wrote how to do this correctly in the article “Design of an armored belt under mansard roof"). When we have horizontal marks, we determine the slopes of the areas. The slope is necessary so that precipitation does not accumulate in one place, but is diverted away from buildings and pedestrian areas. The most optimal slope is “Road slope”.
Road slope is the slope that is used in the construction of the roadway and is equal to 1 meter = 1 centimeter. That is, the deviation from the horizon at one meter is one centimeter.
Example: if the length of the area is 10 meters, then at the beginning and at the end of the area we hammer in a peg. Using a hydraulic level, we mark horizontal marks, and where we need (at the beginning or end) to lower the area, on this peg we mark down 10 cm from the horizontal mark.

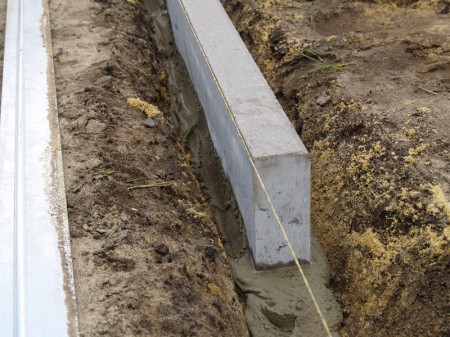
When the slopes and grading are finished, you can begin installing curbs. To do this, in the places where the curbs will be installed, we hammer in guide stakes and set an altitude mark on them, tighten the fishing line or string. This will be the High Altitude Lighthouse.
It should be noted that if the tile area is laid with a slope, then the curbs should be installed with the same degree of slope.
From the elevation mark down, we mark the height of our border, plus 10 cm for the bedding and concrete on which the border will be installed and, if necessary, remove excess soil. Next, we prepare the base, tamp the bottom, sprinkle it with crushed stone in a 5cm layer, and tamp again. Preparing concrete. The concrete should be thick, prepared in a ratio of 1/3. One portion of cement and three portions of sand and crushed stone. Evenly, with a shovel, on top of the compacted crushed stone, apply concrete along the entire length of the curb, in an approximate layer of 6-7 cm, and install the curb so that the top of the curb is along the line, touching.
So, when all the curbs are installed and the concrete has begun to set, we begin installing the gutters. In principle, the technology for installing gutters is almost the same as installing curbs. We agree on the place where the water will drain, take it as the lowest point and, using pegs and a hydraulic level, make markings for the installation of gutters. It should be remembered that the top of our gutter is already the top of the future tile. The gutters must be placed very carefully under the fishing line, since the slightest failure at the junction of the elements will lead to inhibition of water drainage and subsequently to freezing of ice and destruction of the concrete elements of our site. Sidewalk gutters must be connected to the pipes of the drainage system of buildings on the site, since during rain or other precipitation the roofs of buildings have a large area for water intake, and when water flows from the roof, it will first wash out tile joints, and in the autumn - spring period freezing stage - freezing will destroy concrete elements. For safety reasons, meter-long gutters should be covered with a special grill, which is included when purchasing gutters.


Rolling out geotextiles for paving slabs
The next stage of our work is rolling out geotextiles. Geotextiles are roll material. As a material, it has recently appeared on the market, but has very useful functions. With the help of geotextiles, we prevent the appearance of weeds, which with their roots destroy the structure of the base under the tiles, prevent sand from being washed out, and protect from ant holes and other beetles and insects. Geotextile is also a drainage material in our design.
It rolls out very simply, directly onto the ground surface - where the tiles will be laid, with an overlap of 15 cm over the previous section, and with small vertical flaps. As a rule, 10 - 15cm. Immediately sprinkle with a small layer of sand.
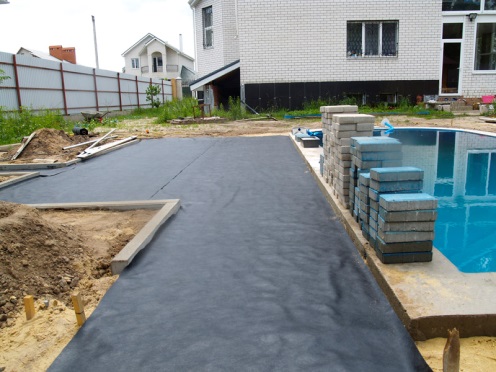
Installation of sand and crushed stone base for paving slabs
Using a wheelbarrow and a shovel, scatter sand over the rolled out geotextile. Layer thickness 4-6cm. We compact it using a hand tamper or vibrating plate. Large areas It is better, of course, to compact using a vibrating plate, since it not only compacts, but also levels the surface of the area. You need to tamp so that there are 5 blows or passes of the vibrating plate in one place.
When the sand is leveled and compacted, we lay a layer of crushed stone with a fraction of 5 – 20mm. The thickness of the crushed stone layer should be 15cm. This is quite enough for sidewalks and pedestrian areas with average traffic. Crushed stone also needs to be compacted, and as practice shows, manual compaction is ineffective here; a vibrating plate is better. When compacting crushed stone, it is recommended to do the so-called “clinging”. Decluttering is a mixture of dry sand with screenings in equal parts. That is, we take sand and screenings in equal proportions and use a concrete mixer to mix until homogeneous, and when the vibrating plate has filled one pass over the entire area, we take a shovel, scoop up the mixture and spread the mixture over the area with a fan. Thus, sand and screenings clog all the cracks that form on the surface of the crushed stone base. After decluttering, we go through it again with a vibrating plate. Vibration and pressure will help the decluttering mixture sink to the bottom of the crushed stone cushion. We repeat these operations until the lining mixture lies in a thin layer on the surface of the crushed stone base. The final stage of preparing the base is watering with water from a hose. You need to pour thoroughly and using the “falling water” method, lifting the tip of the hose up. After watering, tamp again. If the preparation is done correctly, the base becomes level and dense.
If there is asphalt concrete on the site where we are going to lay the tiles and it is not of poor quality and visually there are no dips or bumps, and we are satisfied with the hydraulic level height, then we can assume that our preparations are ready, the tiles can be laid using only a leveling screening layer of cement.
And also, sandy - crushed stone base Applies only to sidewalks and pedestrian areas. In places where there is traffic and constant heavy load, paving slabs are laid on a prepared concrete base.

Preparing the prance
Gartsovka is a dry mixture of screenings and cement in a ratio of 1:3. One part cement and three parts screenings, without adding water.
On the compacted surface we make markings for the top of the tile. To do this, we hammer in pegs, in pairs, at the beginning and end of our site and stretch the fishing lines along the visual top of the tile. When this operation is done, lower the fishing line down to the thickness of the tile, minus one centimeter. For example: if our tile is 6cm thick, then we lower the fishing line 5cm from the level of the top of the tile. Do not forget also about the longitudinal and transverse slope. Checking all slopes building level, applying it to the fishing line or using a hydraulic level. We set up our lighthouse pipes along these lines. It is advisable to choose a round pipe - this makes it easier to position. The pipes are placed at a distance from each other so that our rule applies to the pipes with a margin of length. For example: if our rule is 2 meters long, then the pipes are placed at a distance of no more than 1.7 meters from each other. We backfill the pipes where the pipes will lie, lay the pipes so that the top of the pipe touches the fishing line. Then, using a wheelbarrow or shovel, we fill the space between the pipes with a prance and usually pull it towards ourselves, so that the prance stretches out in an even layer over the entire grip.

If we are making paths that are no more than 1.5 meters wide, we can use a wide but even board, having previously cut grooves in it for the border to the thickness of the tiles being laid. In this situation, the use of pipes is not necessary.
After aligning the trample with our grip, it is necessary to compact it using a manual tamper in one pass, without removing the pipes. The garter will immediately thicken and show the gaps where you need to add more. Using a shovel, we make some bedding and pull it together again.
rule. And we ram it. We repeat this operation two to three times until a perfectly flat, compacted area is formed on our grip. Only after this do we take out the lighthouse pipes and fill the grooves after the pipes. Compacting rubber mallet and level it using a trowel.
Important point: When preparing the leveling layer of the tile, you need to use the entire prepared mixture, that is, lay, tamp and lay the tiles. Since the prancing consists of cement and screenings, and the screenings have a certain degree of moisture, the cement reacts with this moisture and a ready-made prancing left, say, for tomorrow will no longer perform its functions.
Laying paving slabs with your own hands
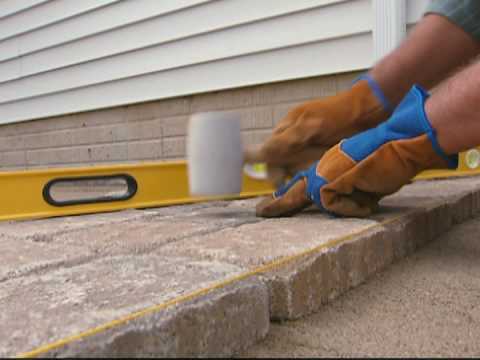
Paving slabs "Old Town" have an advantage when laying in that it has different design. That is, there are a lot of design and styling options. But the process itself has some rules. Firstly: the evenness of the seams. Every three to four rows, check the direction of the seam with a stretched fishing line; if necessary, straighten it with blows of a rubber hammer. Secondly: flatness on the plane. Also, every three to four rows, take a level or rule and apply it on top of the laid tile and look through bottom gap. It should hit the minimum, if this is not the case, then we will also trim it with hammer blows, only from above. And thirdly: when laying tiles, each one should be tapped a little with a hammer. This provides additional compaction of the underlying layer of the garnet.


At the beginning of the article I gave information that the calculations will be at the end. So, when we start working on paving slabs, we ask ourselves the question: to what depth should we remove the soil and prepare the base? So, now we can calculate it. To do this, we need to know the “anchor points”, the thickness of the tiles, the features of the territory (where there will be garden paths, platforms, and most importantly - the races).

Anchor point – These are places on the territory where the top of the paving slabs must coincide with the elements of the building on the territory. For example: the threshold of a house, the bottom of a step, the bottom of a designated area, etc.
When we have all this data, we summarize the construct: thickness sand cushion, plus the thickness of the crushed stone base, plus the thickness of the bedding, plus the thickness of the tiles. The thickness of the tile can be taken minus one centimeter. This centimeter is compensated when compacting the laid tiles with a vibrating plate. It should be taken into account that the thickness of the tiles may vary throughout the area, depending on the technological purpose.
So, when we have the tiles laid, if there is trimming , (trimming is places where a whole tile does not fit) Then we perform the trimming using a grinder with a diamond-coated disc, not forgetting about personal safety equipment (goggles, gloves), and sprinkle the finished areas with sand. The sand must be dry, finely calibrated and clean. Using a broom or garden brush, distribute the sand along the seams so that it fills the seams as much as possible; we do not sweep away the remaining sand, but leave it in an approximately even layer on the tiles.

Tamping tiles
And the last stage is the compaction of the finished areas using a vibrating plate. The vibrating plate must have a rubber sole, which comes complete with the vibrating plate, otherwise the metal sole can simply destroy the elements of our work. If the preparatory base for the tiles is well compacted, one pass of the vibrating plate over the area will be sufficient. At the same time, the sand that we swept into the seams will sag a little and become compacted. Here the sand that we left on the square will help us, especially since it is well high. After compaction with a vibrating plate, the tiles are leveled over the area, sag slightly, and compacted into a single monolithic platform. After this, we sweep the sand over the area again, but now we sweep away the remaining sand so that the pattern on the area gains brightness.
How to lay paving slabs with your own hands. Step-by-step instructions, video.
It is well known that with the development of mini-productions, paving slabs are becoming more accessible a large number population. More and more owners of country cottages and summer cottages are arranging paths using ready-made cement-sand tiles.
Paving slabs will last for decades
If you choose a thicker option, you can line the entrance and parking area with them. And you can simply lay out the yard and pedestrian paths with them in an original way. Perhaps it will even occur to you to lay out your dacha with paving slabs?
But is it possible to do this on your own? We will give you some tips on how to lay paving slabs correctly.
Laying paving slabs
Currently, tiles, otherwise called paving stones, have become widespread. Paving stones are rectangular or any other shaped tiles. Most often, rectangular tiles are found in sizes 20x10xh cm. Such tiles can be laid using a variety of patterns. The simplest and most popular are “brickwork”, “herringbone” and “column”. What is so attractive about paving stones? It is very easy to install and is well suited for arranging any type of path. There are also schemes with a paired arrangement of tiles. In such paths it is better to use two or more colors of tiles. Such schemes are most suitable for car parks and sites.
Laying paving slabs is a difficult task that requires serious attitude and a certain amount of skill. The service life of paving slabs is quite long and depends on the quality of the work performed. Therefore, if you want to save on tiles, you should not save on laying them. The basis for laying tiles is always a mixture or cushion of crushed stone and sand. This is done regardless of whether you plan to lay the tiles on a dry mix or mortar. In some cases, a concrete screed is installed over the sand and gravel base to strengthen it.
How to lay tiles. Technology for laying paving slabs
Paving slabs are laid using the following technology. As already mentioned, paving slabs are laid on a concrete sand or crushed stone base. The type of base depends on the requirements for the tile and the thickness of the tile.
Let's consider general case technologies for laying paving slabs.
- The turf is removed to a depth of 15 centimeters. At the same time, there should be no roots or seeds of plants or debris left at the bottom.
- It is necessary to carry out longitudinal and transverse leveling of the bottom of the trench with calculation of the slope for water drainage. It is desirable that the bottom of the trench has a slight slope. If too much clay soil you need to make drainage in the part where the trench is deeper.
- The next step is to compact the bottom of the trench. You can do rolling and vibration compaction, if available. necessary equipment. The tamper can be made with an ordinary piece of a small log, nailing a handle to it at the end, which will serve as a handle.
- If a geometric path is being made, grooves are dug for the side stone or curb.
- The bottom of the ditch is compacted and a five-centimeter layer of sand is poured onto the bottom.
- The side stone is installed in the groove on the concrete pad. A small amount of liquid concrete is also poured into the bottom of the trench and stone is laid.
- To avoid deformation road surface, we cover the subgrade with geotextiles. This method is mainly used if the soil is slightly heaving. 2 layers of black mulch material Agril, Spandbond or Agrotex are used as geotextiles.
- We fill the bottom of the trench with crushed stone, a small fraction from 5 to 20 mm thick, take a layer of 20 cm, taking into account the arrival of vehicles. Then pour water directly onto the surface and tamp it down. If the soil is not heaving, you can cover the bottom of the trench, after slightly moistening it with coarse sand, a layer thickness of 15 cm, you can use 3 methods:
- pouring moistened sand 5 cm thick onto the compacted layer of crushed stone and leveling it with a lath;
- We moisten the sand surface, roll it, level it and cover it with reinforcement mesh 50 x 50 mm without a binder. Fill the dry mixture with a thickness of 3-4 cm and moisten it using a watering can.
- the tiles are laid on a mortar 2-3 cm thick, directly on uncompacted crushed stone, without covering it with sand. The solution is prepared from M150 cement (cement: sand, 1:3). There is an option using tile adhesive, which of course will be a little more expensive, but will also be more reliable. But in this case, the glue is applied to concrete screed 5-10 cm thick.
- Paving slabs are laid on the prepared layer and compacted using a vibrating plate or a heavy wooden or rubber mallet. You need to carefully monitor the level of laying paving slabs or immediately give the path the required profile. Basically with a slight slope from the center to the edges for water drainage.
- A dry mixture of cement and sand is scattered onto the surface of the laid tiles and distributed along the seams between the tiles.
- The surface of the laid tiles is carefully and thoroughly swept with a brush, cleaned of any remaining dry mixture and watered so that it penetrates into the cracks. It takes some time for the mixture to harden.
Small tricks when laying paving slabs
When purchasing paving slabs, make calculations in such a way as to take into account the waste that will be generated when laying and cutting the tiles. The amount of waste depends on the shape and size of the surface, as well as on the installation method. If laying is carried out diagonally, there will be more waste than if laying is done in parallel.
It will be easier to split paving slabs if you first cut them with a grinder. It should be taken into account that when cutting, a large amount of dust is released. It is to avoid dust that you only need to cut the tile and then break it.
A path made of paving slabs laid on a dry mixture or a solution on a crushed stone bed can support the weight passenger car. The slabs laid on a concrete base and a 1.5 times reinforced cushion will withstand the load from truck. The most important thing to remember when laying paving slabs is to lay the tiles strictly according to technology and to properly prepare the base. The service life of the tile depends on these factors.
Paving slabs High Quality, laid in compliance with all recommendations and rules, with drainage installed, will serve you faithfully for several decades without losing its aesthetic qualities. Enjoy your walks on beautiful and durable paving slabs!
Do-it-yourself country path
In terms of the livability of a summer cottage or country house, an important role is played by beautifully designed paths connecting the house with other buildings or recreational areas. The path not only provides ease of movement, but also becomes one of the most colorful decorative elements of the backyard landscape.
In order to lay out paths on your site, you can invite specialists who will do their work competently and competently, but sidewalks made with your own hands and according to your own ideas will always please your eyes and remind you how diligently and with soul you took this work .
- To create a straight path, its boundaries are easy to mark taut rope. If you have planned a winding path that runs between plantings or trees, then you can use a rake with a marking strip attached to it for the selected path. The nails leave a uniform mark that will be used as a marking line.
- You make the width of the sidewalk according to your idea and desire, but usually a width of about 70 centimeters is enough. The soil is removed from the markings of the future path and a trench 30 centimeters deep is made, maintaining the relief gradient of the site.
- To construct the drainage necessary for the outflow of water during rains, the bottom of the trench is lightly compacted and filled with crushed stone. It is best to use large crushed stone that can easily pass moisture and filter the soil. Instead of crushed stone, you can make drainage from construction waste, such as stone, expanded clay, concrete residues, paying attention to the fact that this waste should not absorb moisture, but easily allow it to pass through, and also have increased strength.
- Having finished arranging the drainage, you can begin to cover the path. In this work, you can use all your creative abilities, or look at samples in construction catalogs. Material for country paths can be very diverse. This could be the popular rubble stone or paving slabs. A mosaic of various hard materials, or maybe just filled with concrete.
In any case, the sidewalk paths on your site, created with your own hands, will delight your eyes for a long time and will even become a source of pride in your own creation.
Pebbles in the garden

Nowadays you won’t surprise anyone with paths made of paving slabs on summer cottage. Another thing is decorative pebbles, which look very beautiful and original. When working with such material, you will discover your talent as a designer. Pebbles allow you to lay out non-standard ornaments and do not restrain your creative impulses.
In addition, to give your site even more attractive, it is possible to use stone elements with a variety of patterns. So what procedures should you start with when laying pebbles? Firstly, you need to responsibly select required material. There are two types of pebbles on the market: river and sea. It can be rough, polished, processed or in its natural state. Natural stone is an alternative to pebbles and is artificially polished to give a rounded shape.
When selecting color range You should opt for contrasting shades. Typically, pebbles come in white, black and brown colors. You can also find burgundy, gray and red-orange shades. It is necessary to follow some rules in order to correctly line up the fragments of the ornament. For posting simple drawing You will need: rope, wooden pegs and tape measure.
More complex ornaments need to be drawn in advance on a sheet of paper on a one-to-one scale, and then transfer this drawing to personal plot. After these steps, work is carried out on the site itself. It remains to determine what will be needed for them:
- Accurate marking of the perimeter of the paths;
- Prepared walking paths three hundred millimeters deep;
- Carefully spilled and compacted soil;
- Waterproofing;
- A compacted layer of sand of one hundred millimeters on the surface of the soil;
- A layer of crushed stone of two hundred millimeters, and the crushed granite fraction should be from twenty to forty millimeters;
- After falling asleep, the crushed stone must be compacted taking into account the slope for the outflow of precipitation;
- The final layer is filled with a pre-prepared solution of cement and sand in a ratio of 1:3.
After this, we proceed to leveling using a long level, taking into account that a certain amount of the prepared composition should penetrate into the spaces between the granite pebbles, and the remaining part should protrude above the surface by about half a millimeter. It is intended for attaching pebbles to it, taking into account the selected ornament. During installation, special attention should be paid to maintaining neat rows, and the size of the pebbles should be the same.
After you finish paving the path, thoroughly water it and let it sit undisturbed for about three to four days until the pebbles have completely settled. Now you just need to check whether the ornament is securely fixed. If this is not the case, and you find loose stones, then the procedure must be done again.
Arrangement local area- this process is very important. And maximum attention should be paid here not only green spaces, but also pedestrian paths, which will not only improve the external aesthetics of the site, but also make it more comfortable in all respects. IN Lately Special tiles are used as a material for walkways - the material is reliable and practical, and also quite easy to install.
Choosing paving slabs
Paving slabs are distinguished by high quality characteristics- she is much stronger than concrete, and under intensive use and heavy loads, unlike other materials, it does not crumble and does not lose its attractiveness.
Laying tiles is not a quick process, but it is simple enough to do without the involvement of specialists. It is enough to purchase a sufficient amount of paving slabs in advance, prepare the necessary tools and Consumables, and you can start arranging the yard area. If you do not have experience in construction and do not know how to lay paving slabs, a video on the Internet will help you understand the details in more detail.
If you are interested in how to properly lay paving slabs with your own hands, then first you need to find out how to choose tiles so that the end result does not disappoint you. On modern market There is a huge variety of paving slab samples, varying in:
- size
- volume
- pattern
- quality characteristics
Before purchasing material, you must carefully measure the area of the sidewalk and calculate the number of tiles based on its size. The most difficult thing to buy is tiles with figured elements or complex patterns. Here you need to not only calculate its quantity, but also approximately determine its consumption, taking into account undercuts. Since its design will need to be combined, quite a lot of scrap will be generated in the process, which can also be used in the future.
When calculating the number of paving slabs, you need to take into account the laying method. For example, with the diagonal technique, material consumption increases significantly. Therefore, it is much easier and more profitable to install the sidewalk in the traditional way.
When choosing paving slabs, the main criterion is its strength, determined by its thickness. For example, for a walkway, tiles with a thickness of forty millimeters are quite suitable. And if you plan to pave a path to the garage along which passenger vehicles will travel, then it is better to choose tiles at least five centimeters thick.
What is required to install tiles?
Before you study the instructions on how to properly lay paving slabs, you need to prepare the tools that you will definitely need in the process. The list is quite long:
- building level(you can use modern laser models that allow you to make markings as evenly as possible)
- rubber hammer- necessary for adjusting the tiles to each other during the laying process
- wooden pegs(spacers) and nylon thread - markings are made with their help
- Master OK- needed to level the sand layer
- rammer- necessary for compacting layers
- sand and small stone- from them you will need to make a mixture that serves as a “pillow”
- angle grinder- tool for adjusting the size of paving slabs
Also, do not forget to prepare the paving slabs and curbs themselves - with its help you can design the path better.
How to lay paving slabs evenly?
When all necessary tools and the consumables will be ready, you can begin installation sidewalk path. But, even if you have an idea about the procedure itself, still watch at least one video on the Internet about how to lay paving slabs - the video will become your best assistant. By the way, on how to lay paving slabs correctly, there are a lot of literary sources and visual aids that you can also use.
So, laying paving slabs with your own hands begins with preliminary preparation territories. Professional craftsmen Usually they draw up a plan of the territory, measure out all the dimensions, transfer them to paper, and only after that they begin to work.
- nylon thread
- pegs
- hammer
With their help, you will need to mark the boundaries of the area where you plan to lay paving slabs. Within the designated boundaries, you need to carefully remove the turf to a depth of approximately twenty centimeters, and then remove the soil. Be careful to ensure that no debris or grass remains remain in the prepared area.
After the soil has been evenly removed, it is necessary to make a cushion of small stone, which is filled in, leveled and thoroughly compacted. Then you need to start laying the next layer of sand or sand-cement mixture. Sand is laid up to forty centimeters thick. If you lay a sand-cement mixture, a layer of twenty or thirty centimeters will be enough. Sand is mixed with cement in proportions 3:1. To make the layer dense, you can slightly moisten the mixture of sand and cement with water. If you want paving slabs to last their maximum lifespan, you need to ensure that plants do not grow from the soil. This can be done using a layer of geotextile, which is laid between the paving slabs themselves and a cushion of sand and cement.
We mark the site
If you are interested in how to lay paving slabs correctly, you should know that laying paving slabs must be done strictly according to the markings. To do this, you need to measure the level of slope of the area where the path will be built. It is better to do this in the direction from the house to the street.
Drive two pegs along the line and stretch a nylon thread between them. Make sure the thread lies evenly in horizontal plane. This can be done using a level. Next, tie the free end of the thread to the third peg and pull it perpendicular to the first. The third peg needs to be driven in higher than the first two. Then the fourth peg is driven in, the thread is pulled, resulting in a rectangle - this is the area for laying paving slabs with your own hands.
Laying paving slabs
After preparatory work will be completed, you can begin direct installation paving slabs. There are several ways to lay tiles with your own hands, for example:
- traditional
- diagonal
- combined
If you are not a professional, then it is better to use the traditional one. First, prepare a solution - mix six parts sand with one part cement. It is important that the sand is sufficiently wet. If the sand is dry, moisten it a little and lay the mixture on the prepared area for laying paving slabs.
Compact the layer thoroughly. Place two pipes on the sides - at this stage they will act as limiters. To make sure that the layer is absolutely even, take a fishing line or thread, pull it over the pipes and move it a little to the side - this way you will see where you need to remove a little, and where, on the contrary, you need to add.
How to lay paving slabs correctly with your own hands: tile inspection and installation
Before laying tiles with your own hands, you should carefully inspect the material itself. Take the tiles and carefully check that they do not have cracks, chips or other defects that could negatively affect the final result and quality of use of the paving path.
Laying tiles correctly is not difficult. Simply lay them on the prepared base with minimal clearance. Use a rubber mallet to push the tiles closer together. Do not forget that paving slabs, although durable, are susceptible to defects, so tapping with a rubber hammer should be light.
If tiles need to be trimmed, use an angle grinder. To do this you need:
- make a mark
- cut tiles
- lay the tiles flush with the rest
Periodically check the level of the masonry - the tiles should be located evenly and in one line.
After you have laid all the tiles yourself, you need to sprinkle the paths with fine gravel and rub them thoroughly using a stiff broom or brush. Then you can start grouting the joints. To do this, it is better to use special grouts that are sold in stores. At this point, the process of installing the paving tiles can be considered complete. The only thing you will need to do next is install the curb.
Installation of curb slabs
It has already become clear how to lay paving slabs correctly. Now you need to figure out how to install the border. Here you should pay attention to the fact that the curb can be laid flush with the paving slabs, or raised slightly.
The main task of the curb is not the aesthetic appeal of the path, as many people think, but to prevent the tiles from spreading on soft ground. To install them, you need to dig special trenches, the width of which will be slightly larger than the size of the curb itself. Next, you need to lay a sand cushion in the trenches. A layer of five centimeters will be enough. The sand is carefully compacted and a slab is installed on top, which must be leveled and secured.
Do you want to improve your yard? In this case, you should figure out how to organize the laying of paving slabs. You may think that this will take a lot of time and effort, but in reality everything is quite simple. You can pave the paths literally in a weekend, and you don’t even need a helper. Today there are many types of tiles for paving the sidewalk, so choosing the right color and texture is not difficult.
Deciding on the tiles. Assembling the tool
When choosing tiles, focus not only on your preferences, but also on the performance properties of the material. What part of the yard do you need to landscape? Ask the manufacturer: can paving slabs withstand heavy equipment, such as a car? Or is it designed solely for human weight? This is important because the path on which your car will drive must be especially durable, unlike the usual garden path, on which only the human foot will step.
To successfully pave paving slabs you will need the following tools and building materials:
- Cord-ordering.
- Master OK.
- Mallet made of wood or metal.
- Manual or mechanical ramming.
- Building level.
- Pipe of any diameter or I-beam.
- Wooden or metal pegs.
- Broom and rake.
- Sand and cement.
- Watering hose or watering can.

Before you purchase required quantity paving slabs, calculate the dimensions of future paths and platforms, and also think about the layout of the site. To do this, you may need a drawing of the tracks. The easiest way to create it is to transfer the plan of the territory adjacent to the house onto graph paper, and then draw the proposed paths on it.
It is very important that the paths made of paving slabs are paved at a certain slope, with the calculation of 0.5 cm per meter. This way, water will be freely drained onto the lawn or into wells.
Marking the paving area

After the drawing is ready, and the necessary construction material and the tool has been purchased, you can begin marking paths and areas.
Try to stick to the created project as closely as possible. If we are talking about paving paving slabs in the garden, then it is better to make the path winding.
To avoid cutting the tiles, make the length and width of the paving plane multiples of the dimensions of the tile itself. This way you can create a more durable paving surface. Then mark the paths. Use pegs, tape measure and cord. Don't forget to leave a margin that matches the width of the curb. Now you should dig a small ditch around the perimeter.
Walk along the intended route and think about whether you are completely satisfied with such moves around the site. Then you can proceed to the next stage.
Let's start laying out the foundation

First of all, it is necessary to remove debris, stones and a layer of turf from the marked area. To level the area of the outlined paths, you should remove excess soil in high places and add it to the depressions. While working, do not forget about the slope required for rainwater drainage. It is better to do it towards the street, and not towards the house. Level the base using a rake. Then tamp it down. If you have to work with soft soil, moisten it with water before compacting. This will help you avoid uneven settlement of paving slabs.
Calculate the depth of the base with a margin, because during the compaction process the sidewalk will shrink. Usually, for paving tiles, a 20-30 cm recess is made, based on the layer of sand and the thickness of the tile. The angle of the track can be longitudinal, transverse or longitudinal-transverse. At this stage, if necessary, carry out all communications. To prevent the growth of weeds, place geotextiles on the base before pouring sand.

Now you need to measure the height of the sand embankment, which cannot exceed 7 cm. Stretch a string cord between the stakes. Fill the entire area of the path with sand, and then level it using a rake. Fill it with water so that puddles form on it. If you are lucky and it is sunny on this day, then you can start leveling the surface after 3 hours; do it with a profile. In gloomy weather, leveling should be started only after a day. As a result, you should have a smooth and even surface.
At the next stage, you need to prepare a sand-cement mixture in a ratio of 8:1. The height of laying this mixture should not exceed 4 cm. For convenience, measure the indicated height of the mixture on the pegs and pull the cord again. Fill it in and level the surface using a channel. As a result, you should have a flat surface again. Compact each layer thoroughly!
Installing a curb. Laying paving slabs

Even at the marking stage, you had to dig a trench along the entire perimeter of the path. This way you can emphasize the accuracy of the geometric shape of the laying area. 40% of the total height should fit in the ditch curb stone, where the five-centimeter layer of sand at the base of the trench is also taken into account. To improve the strength of the curb, install it on a concrete solution, carefully pouring the base.
And again, before starting the installation process, you should pull the cord along the chamfer at a predetermined height. Start laying paving stones from the curb. Pay special attention to the first row, strictly adhere to the height of the cord. Stick to the diagonal direction. To avoid trampling the base by the layer himself, start the work “from yourself”.

Strictly monitor the tightness of the tiles; gaps of more than 2 mm are unacceptable. Of course, it is impossible to comply with these requirements on turns and bends, however, even here you need to make minimal gaps. Press each tile firmly into the base; you can use a rubber mallet to do this.
When paving paving slabs, you can use crosses, this will allow you to create perfectly even spaces between them. If you notice any unevenness during the process, use a trowel to remove or, conversely, add a layer of sand under the tile and tamp it down. To carry out these processes, use a mallet and a building level.

Once installation is complete, check the path for unevenness. If there are any, correct the deficiencies immediately. Now remove the crosses from the gaps and sprinkle them with a mixture of sand and cement. Sweep the paths and water them with water. Inspect the masonry again, and if the mortar in the joints has sagged, add it until it is completely filled.
It is unacceptable to use sand with salt impurities, because during operation white stains will appear on the paths and platforms, which will spoil appearance masonry
The laying of paving slabs is now complete! After three days, you will be able to begin active use of the new tracks! Now you can think about starting a business, because you have already gained a certain amount of knowledge about paving paths from paving slabs!
Do you have experience working with paving slabs? Did you encounter any difficulties during the work process? What helped you cope with them? you came up with innovative way masonry, simplifying the process? Share your experience with us! We appreciate your skills and work! Write your comments on the article.
Video
You can see how to lay paving stones along a string below:
Photo


