Plastering with cement-sand mortar. Do-it-yourself technology for plastering walls with cement mortar. Working with bricks
Rough leveling of walls using plaster is the most reliable and durable option starting finish. The durable solution adheres well to concrete and brickwork, fills even the deepest cavities and forms an even, durable coating. How to properly plaster walls cement mortar, what mixture to use and how to avoid annoying mistakes - our detailed instructions.
Cement plaster is a heavy material, and given the considerable thickness of its application, it may not stay on the wall if the preparation is poor. Peeling can occur both at contact with the rough surface, and as a result of partial destruction of the base itself under the weight of the plaster layer. To prevent this from happening, the walls must be properly prepared for plastering. This can be done in different ways:
- On top brickwork metal is attached plaster mesh, which will hold the solution. In addition, it partially compensates for shrinkage deformations, which will avoid cracking.
- A cheaper, but more labor-intensive option is to wind the wire sheathing with your own hands onto nails driven into the rows.
- Sufficiently flat surfaces without sharp changes in height under a thin layer of plaster are covered with strips of tile adhesive. It is convenient to do this with a notched trowel to form horizontal grooves on the wall.
- It is enough to scratch concrete walls and cover them with soil so that the cement mortar adheres well to them.
It is better to knock down all large protrusions with a hammer drill or an ax to make it easier to install beacons and reduce cement consumption. If there are remnants of old plaster, it can be left, but it must remain firmly in place. To determine which layers should be removed, tap the wall lightly. Where a dull sound is heard, the plaster of the walls has already peeled off - we knock it down without pity.
You can do without any complicated preparation if you are planning to plaster walls made of cinder blocks or shell rock on your own. These surfaces are simply moistened with water so that they do not “drink” moisture from the solution, weakening the very bottom layer.
Preparation of the solution
When the walls are completely ready for plastering, the reinforcing mesh and/or beacons have been installed, you can start mortaring. It is easier to purchase dry mixtures for plastering walls based on cement, but if the amount of work is small, it is cheaper to do everything yourself. The technology for preparing the composition is simple, the main thing is to maintain the proportions.
The plaster mixture consists of only 2 dry components - cement and sand, taken in a certain ratio and diluted with water to form a paste. The sand must be clean (without clay and debris), sifted through a coarse sieve. The composition of the plaster solution will depend on the selected brand of cement. To M400, four buckets of sand are added to each bucket; for M500, the ratio is 1:5.
If your cement is not fresh or you are not sure of its quality, it is better to reconsider the proportions of the solution - reduce the amount of sand by one bucket. This ratio will cost more, but the strength of self-prepared plaster will not suffer.
A composition of greater strength will also be required for leveling surfaces experiencing high mechanical loads:
- basement of the house;
- external corners;
- deep doorways.

After mixing the dry components, add water in small portions, thoroughly stirring the cement solution. As a result, the consistency of the mixture should be such that, when heaped up, it holds its shape, but at the same time spreads well on a vertical surface. To improve the mobility of the plaster, you can add liquid soap in the proportion of one spoon per bucket of mixture.
For those who don’t have time to figure out how to make a mortar for cement plaster with their own hands, it will be much easier to spend a little more money, but make it easier for yourself preparatory work. It is enough to buy a special plaster mixture or factory-produced sand cement in bags, and then fill it with water. The manufacturer indicates all instructions for preparing the solution and application guidelines on the product packaging. Follow the recommendations step by step and everything will work out.

Applying plaster
Do-it-yourself plastering of walls with cement mortar is carried out according to instructions standard for all types of plasters. The only difference is cement-sand mixture the most “tenacious”, so that all work can be done step by step and slowly, eliminating flaws in time.
To throw the solution, you can use the tool that is more familiar, but for a thick layer it is better to take a ladle. In all other cases, a trowel will be sufficient.
Work order:
- Prepare the wall for plastering according to the chosen scheme, reinforce it with mesh and prime it.
- If you plan to plaster along the beacons, install the slats using nails, putty or special fasteners. Align the beacons by level.
- Spray with more liquid solution plaster to improve adhesion of the finish to the surface. The bottom layer is thrown with a ladle with force so that the mixture better fills the pores of the surface. Spray spots may not be continuous, but you do not need to smooth them out yourself.
- After a couple of hours, you can apply the main solution - in continuous slaps, directed from bottom to top. This work is best done by visually dividing the wall into small sections up to a meter high.
- When part of the wall is completely filled with plaster to the level of the beacons, it is pulled out using the rule. To do this, you need to rest the tool on the side rails at a slight angle and move it from bottom to top several times, performing zigzag movements. Excess solution is scraped back into the mixing container.
- Pour small portions of the mixture from the tip of the trowel into the remaining unfilled recesses and level them again using the same rule.
- Using the same scheme, plaster the next section of the wall. Continue working like this until the ceiling, after which you can move on to the next strip between the beacons.
Plastering walls with a thinner layer up to (20 mm) without the use of beacons is performed using a different technology. The solution is simply spread with a politer on top of the spray in the direction from bottom to top.
To obtain a surface more High Quality The plaster layer is being covered. All wall finishing manuals recommend using a liquid mixture for this purpose, with a CPU proportion of 1:1 or 2:3. When cement-sand mortar it will set slightly on the surface and will no longer be pressed through when lightly pressed; it is smoothed with prepared grout using a polisher or a wooden trowel. The covering layer finally fills all the recesses in the wall and small pores.
After 3-4 weeks, when the plaster has completely hardened, it can be puttied for further finishing.

Plastering walls along beacons is very convenient, but when the work is done under the ceiling, it is usually not possible to create a flat surface. Leave 10-15 cm uncovered - top part can be leveled the next day. To do this, pour fresh mortar onto the uncovered section of the wall and trim it with the rule, turning it vertically. In this case, the support for the tool will not be the beacons, but the main layer of hardened plaster.
If a cement-based mortar hardens too quickly, it can become cracked and even peel off. To prevent all the work from going down the drain, it is necessary to slow down the drying of the mixture by any available means:
- eliminate overheating and drafts;
- water or spray the plaster with water from a spray bottle;
- re-grout according to the scheme described above;
- Protect the surface with waterproof materials.

When leveling the walls in difficult corners, narrow niches or places where pipes pass engineering communications, the rule is inconvenient to use. Instead, you will have to make a template of a suitable shape, for example, weld it from pieces iron corner, and place the beacons closer to each other.
To use plaster to make perfectly even internal corners, you will need a wide one metal corner. After applying and trimming the solution, you can use it to smooth the surface of the walls and get an excellent result.
Possible mistakes
When preparing walls for plastering, you need to correctly determine whether to leave the old finish under the leveling layer or not. If the surface has retained traces the same cement plaster, and it holds securely; you don’t have to bother with removal. But cement cannot be applied over gypsum and lime layers. Firstly, weak foundation may not stand it excess weight, and secondly, chemical reactions between dissimilar compositions will lead to the appearance of bubbles.
Incorrect proportions of cement and sand for plastering walls can also negatively affect the result. Due to non-compliance with the preparation technology, the mixture may acquire completely different properties:
- Increased fat content - this type of solution is obtained if too much cement is added to it. The coating will be durable, but completely inelastic. As a result, the slightest shrinkage will cause cracks to appear.
- A lean solution is the other extreme to which those who like to save money fall. Excess sand weakens the plaster and can result in serious dust formation.
You can determine the fat content of your solution at the mixing stage. Thin mixtures practically do not stick to the instrument; too fat mixtures do not stick to it.
Errors are especially noticeable when plastering facades for painting. Different Construction Materials without preliminary spraying, they will require the application of a plaster layer of variable thickness. Drying of such a coating occurs unevenly, which manifests itself in slight shrinkage. If you look at the facade of such a house after painting, it will look like a quilt. The same effect occurs when plastering brick walls is done in too thin a layer.
Plastering walls and ceilings is an essential part of the renovation. The surface is prepared and leveled, most often using cement-sand mortar. It perfectly hides wall defects. Has a moderate cost.
Technology of plastering walls with cement-sand mortar
Plastering is an integral stage in renovation.
Cement-sand mortar is the most common, and also has thermal insulation and fire resistance.
So, how to properly prepare the solution and what is the application technique?
When is plastering of walls and ceilings done?
Plastering walls and ceilings is done to level the surface and protect it. To apply any finishing material, such as paint, wallpaper, parquet or laminate, a flat wall or ceiling is required. Otherwise, they will not look good, and some will not even be installed on a curved surface. Therefore, plastering the walls and ceiling is an important stage in the renovation.
The feasibility of using cement-sand mortar
It is advisable to use this mixture in rooms with high levels of humidity, especially for further finishing with tiles or paint. Plaster of this composition is resistant to dampness.
If you need to level out severe surface defects: deflections, blockages and seal seams, then a cement-sand mortar is perfect. Plus, if you cook it yourself, you can save money.
Technology
 You can prepare and apply the composition to the surface yourself, without having specific skills, following the recommendations and general rules.
Stages of work:
- Initially, prepare the surface: you need to knock down all the protrusions, clean off the previous coating (paint, whitewash, etc.).
- Remove dust and before starting to apply the composition, moisten the surface with water using a spray bottle. This is necessary for better grip.
For wooden surface, from a concrete monolith and facing brick, before plastering you need to install a lath or mesh to improve adhesion.
How to prepare CPR for plastering walls
To prepare the solution you need:
- first sift the sand, remove any lumps;
- Next, prepare the cement mortar, following the instructions on the manufacturer’s packaging;
- all components are placed in a container and mixed with a mixer;
- Water is gradually added, the result should be a thick composition, like sour cream.
The cement in the composition is sometimes replaced with slaked lime, which can be prepared at home:
- Lime must be poured with warm water.
- When the reaction is over, strain and leave for a day. Afterwards you can use it, the proportions are the same as with cement.
How to plaster correctly
 A mesh or lathing is installed on the surface, if necessary. If this is not the case, then markings are made on the wall and in places of large defects, beacon guides are installed using dowels or screws, they fasten the profile along the edges, and in the middle it is installed on the mortar.
The finished surface is sprayed with water and a layer of plaster is applied between the beacons using a spatula or trowel. Edge margins are processed last. Next, the rule is to level the layer. Its sharp edge is applied to the profile ribs perpendicularly and is leveled with zigzag movements up and down. The bubbles and dips are filled with plaster. The procedure is verified if the surplus is happy again.
If several layers are required, then you need to wait for the previous one to dry, then apply the next one.
When the solution on the surface hardens, the edges are processed.
Plaster doors and window openings better overlap!
When the solution sets, but not completely, grout is done to achieve a perfectly flat surface. The solution is diluted again, but not so thick, and applied using a metal iron, achieving the desired effect.
When can you putty
You can putty the surface after the plaster has completely dried, no earlier than a day later.
Plastering is one of the important stages under repair. Follow the recommendations to properly treat the surface.
Useful video
If we talk about internal finishing works ah, then plastering walls is the most common type of rough and finishing walls made of bricks, blocks of various compositions. The process of plastering walls is not very complicated, but there are many professional tricks that will not only make the work easier, but will also significantly increase the performance of the finish. You may be thinking “I’ll buy cement, sand, and then plaster...”. But it's not that simple. Let's try to understand the intricacies of this stage construction work.
Surface preparation
The walls must be prepared, regardless of how long ago they were erected and the quality of the surface. The preparatory stage comes down to ensuring the best adhesion of the wall to the mortar. This is necessary primarily so that a few weeks after drying the plaster does not crack or fall off.
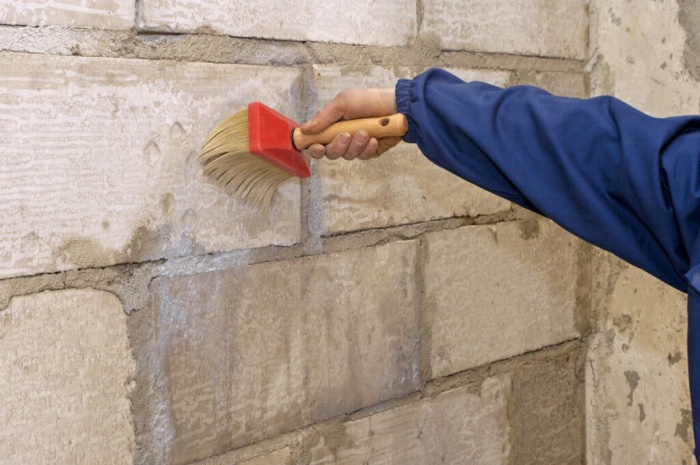
A freshly built brick wall is practically not subjected to preparatory processing, but attention should be paid to the humidity between the rows. As a rule, experienced plasterers wet the dry surface with a brush or roller. If the wall has defects, then they should be eliminated, for example, protruding masonry bricks are trimmed with a grinder or chopped off with an ax. This will provide a fairly smooth surface and allow you to apply the plaster in as thin a layer as possible.

The concrete block does not adhere well to the mortar. Therefore, it is pre-primed tile adhesive, and then a plaster mesh is applied. Cinder block behaves well in the plastering process; it is enough to just wet it.
Difficulties may arise when processing previously plastered walls. In this case old layer the solution is removed, and then preparation is carried out according to the principle described above.
Plastering of walls is carried out only if all preliminary work has been completed.
Beacons: installation and its features

Plastering of walls occurs using beacons. With their help, a level is set to create a flat surface. These guidelines can be slats that are installed according to the level, or special metal products.
Preparation of the solution and application features

In order to prepare a high-quality plaster mortar, it is not enough to buy cement; you need to know in what proportions to add it in a given case, what brand of cement is needed.
The ratio of components of the plaster solution depends on the type and brand of cement:
- M400 sand to cement ratio 4 to 1;
- M500 – 5 to 1, etc.
Cement grades below 400 are usually not used for this manipulation.
The consistency of the plaster solution should be such that the mixture does not slide off the wall.

The mortar is poured onto the wall using a trowel or construction bucket in the direction from bottom to top. In this way, a small section of the wall is thrown over. Next, the rule of 60 cm or more in length comes into play, depending on the size of the wall and the task at hand. Using the rule, the solution is leveled along the wall according to the previous installed beacons. Next, the manipulation is carried out with the neighboring area.
Final stage: grouting

After the plaster has dried, you should proceed to the final stage. Tools such as a polisher or a grout board will come to the rescue. With their help, we level the wall in a circular motion, as if sanding it. You should get a smooth surface.

- The tools with which the work is carried out: a trowel, a trowel, a ladle and others must be regularly moistened with water. This is done so that the cement mixture does not stick to the tools.
- After finishing work, the tool should be washed. The cement solution hardens very quickly and this can lead to its deterioration. The same applies to the container for the solution: a trough or a concrete mixer.
- If cracks appear after the solution has dried, it is recommended to re-grout. In this way you can achieve complete smooth surface.
One of the most popular types of finishing work during the construction or renovation of buildings is plastering walls with a cement-based mortar. Although such work seems to be one of the simplest, many people still wonder how to properly plaster walls with cement mortar, even if more labor-intensive work is well known to such people. Why is this happening? All because most of construction work (except plastering) is described in detail in construction and repair manuals or on the Internet.
Plastering with a cement-based solution allows you to make the wall smooth and even, thus preparing it for finishing.
Plastering walls with your own hands requires the following tools:
- concrete mixer or mixing container;
- trough;
- glanders;
- shovel;
- buckets;
- trowel;
- rule 2 m long;
- large building level;
- foam grater;
- beacons (their number depends on the length of the rule and the size of the wall);
- fishing line (cord);
- axe;
- perforator (for removing the old layer);
- brush (for wetting the wall).
Well, some simple materials:
- sand;
- water;
- cement.
Preparatory work

Installing a plastering mesh is the most reliable way to prepare a wall for further plastering work.
Even a newly erected wall requires preparation before plastering with a cement-based mortar. The essence of the preparatory work comes down to one simple rule: the plaster should not fall off! And all the work is aimed precisely at this.
To prepare a wall built from new ordinary brick, practically nothing needs to be done, you just need to pay special attention to the moisture content of the masonry. In the case when the masonry is dry, the wall is generously moistened with water. If this is not done, the plaster based on cement and sand will simply slide off the wall.
When the brick lies sloppily, that is, there are strongly protruding places in the masonry, they must be leveled with an ax. Otherwise you will have to sketch thick layer plaster.
The preparation of walls made of facing bricks is more complex. Usually, facing brick no need to plaster. But if for some reason this is necessary, for example, there is a need to lay tiles on a brick wall? How to get out of this situation?

Before starting to prepare previously plastered surfaces, you need to remove a layer of old plaster from the wall using a hammer drill, ax or other tools.
- The most in a simple way is the preliminary installation of the sheathing on the wall surface. Lathing is easy to do. To do this, nails are driven between the bricks. Then aluminum wire is wound onto them.
- When the area to which the plaster will be applied has small sizes, you can coat the brick with a thin layer of tile adhesive using a notched trowel. After about a day, the glue will dry, then plastering can begin.
- The most reliable way is to install a mesh for plaster (this will be described in more detail below).
Preparatory work for subsequent plastering of a wall made of concrete blocks can be done in two ways (processing such a wall is quite difficult; it simply does not stay on it, gradually sliding):
- Prime the wall with a notched trowel and apply a layer of tile adhesive.
- Install the mesh for subsequent plastering.
If the wall is based on cinder blocks, then they are simply wetted abundantly. As a rule, this is enough for the plaster to adhere tightly.

Beacons for plaster help to level not only relative smooth walls, but also facilitate the alignment of walls with large differences.
If the wall is made of sawn shell rock, then you can prepare it in the same way as a cinder block wall - by wetting it generously.
In order to properly apply a layer of plaster on wooden walls, they must first be treated with a primer, and then a mesh for plaster must be installed.
When it is necessary to plaster a plasterboard wall (this also happens), for example, when finishing bathrooms to cover a sewer riser, etc., it will be enough to simply apply a layer of primer to the plasterboard.
Preparing previously plastered surfaces is one of the most difficult preparation options. The most difficult thing is that before starting the above procedures, you need to remove a layer of old plaster from the wall. As a rule, this is done with a hammer drill and (or) an ax. If the old layer of plaster is based on sand and lime, then chipping will not cause big problems. This plaster is easily removed, falling off in whole plates.
It is much more difficult to remove plaster from cement. Of course, it also flies off in plates, but only in some places, and in other cases even a hammer drill cannot pick it up. But despite this, the work must be completed, otherwise old plaster will interfere.

Grouting the dried mortar on the wall is done in a circular motion using a grout board or trowel.
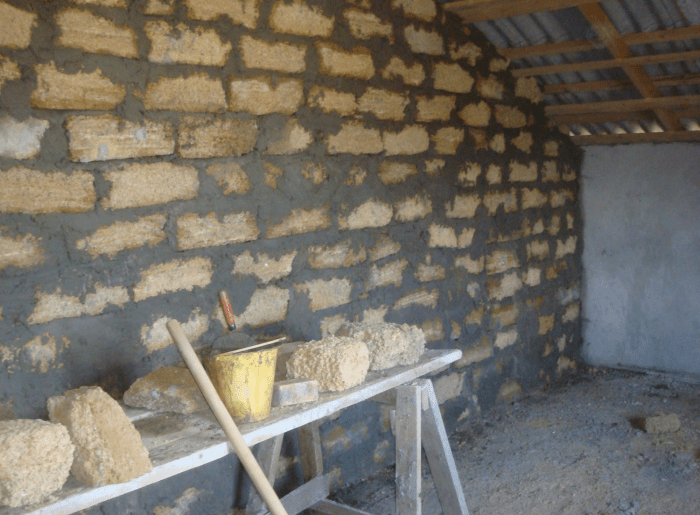
Prepare walls made of various materials, for example, in the private sector, where you can find heterogeneous walls made of brick, rubble, limestone, etc., it is also not easy. The differences in such walls can be up to 20 cm, so it is very difficult to install beacons on them. The wall must first be leveled. This can be done with the same cement-sand mortar. Before starting leveling work, the wall is primed and a plaster mesh is installed.
The most difficult of all types of preparatory work is removal from concrete wall layer of paint. Only possible way– scrape or beat off the coating sharp object. For example, gradually using a small hatchet. The work is very tedious and tiring, but you can’t do without it.
Grid installation
The mesh is needed to give strength and elasticity to the plaster layer. It prevents the appearance of cracks that occur during the drying period of the layer and during shrinkage of the structure, and increases the resistance of the surface from mechanical stress. The most popular mesh is with a cell size of 2.0x2.0 cm.
A correctly installed plaster mesh must have an anti-corrosion coating. To attach the plaster reinforcing mesh, special metal dowels are driven into the wall with a pitch of 0.3-0.4 m between each other in a checkerboard pattern. After this, using metal scissors, a piece of mesh of the required size is cut.
Installation begins from bottom to top. We put the reinforcing mesh on the installed dowels. Then we wrap each dowel with knitting wire on top. The pattern of the wound wire should resemble the letter Z.
It is also possible to use pieces of beacons. This is done as follows: the prepared plaster mesh is straightened along the wall by one or two people, and the other begins shooting, using dowel-nails together with pieces of beacons.
The joining of two pieces of mesh must be done with an overlap of 15 cm on each side. This ensures the integrity of the structure and its resistance to mechanical damage.
Beacons for plaster
What is a lighthouse? As you know, a lighthouse is a landmark for something. Such guidelines during plastering of the wall can be any hard marks that are set according to the level.
The beacons can be based on boards, nails, or dried mortar tubercles applied to the wall. But the best are perforated metal profiles, which construction stores That’s what they’re called – lighthouses. They can have different thicknesses. It all depends on what layer needs to be plastered. In addition, it should be taken into account that the thicker the beacon, the tougher it is.
Installation methods
First way. Dots are applied to the surface of the wall using a mortar of cement, tile adhesive or putty. It is glued to each point and then aligned using building level perforated metal beacon. It should be noted that a short level is inconvenient for proper plastering (deflections occur in places of pressure). But don’t despair if you only have a short level available. First, a rule is applied to the beacons (without it it is impossible to plaster, so it must be at hand). Then the building level is applied to the rule.
Second way. Using a hammer drill, holes with a diameter of 10 mm or more are drilled strictly along a vertical line. The holes are filled with wooden choppers; it is better to make them cone-shaped so that the lighthouse profile can be attached to them more easily. Using a cord or fishing line, each row of choppers is leveled. You can trim the row along the marking thread using a hammer or a hacksaw. The beacons are attached to the already leveled chopiks using screws 2.5 cm long. The gaps between the chopiks are filled with a solution based on cement and sand. This is done to ensure that the rule does not bend under pressure. This method of placing beacons is used for very uneven walls with big differences. The first method is not suitable, since the layer of plaster will not stick.
The length of the rule used for work must be at least 10 cm greater than the distance between the beacon profiles.
When choosing the first method of installing beacons, you must first let them dry and only then start plastering.
Preparation of the solution
Plastering with cement mortar is possible only after completion of all the above work. After completing all the preparatory work, you need to wait a day for the beacons to harden. Then you can start making cement-sand mortar. The proportions of sand and cement in the solution are determined mainly by the grade of cement (for example, if the cement is grade 400, then put 4 buckets of sand per bucket of cement, if grade 500 - 5 buckets, respectively).
If there is no confidence in the manufacturer, then the amount of cement is increased. When using old cement grade 400, the ratio is 1:3.
It is better, of course, to mix the cement-sand mortar in an automatic mixer, however, if plastering is carried out on a small surface, its rental and installation will be unprofitable. In such cases, kneading is done using improvised means (trough, old bath and so on.).
The consistency of the cement-sand mortar must meet the following requirements:
- when the trowel is tilted vertically, the solution should not be retained on it;
- on the trowel in a horizontal position, the mixture should remain heaped.
Throwing material
You can throw the solution onto the wall with a trowel or a ladle - whichever is more convenient for you or depending on what tool is available.
The mixture is thrown onto the wall, starting from the bottom and moving up. It should look something like this: the hand, moving towards the wall, turns so that the trowel or ladle is parallel to the wall. Then, immediately in front of the wall, the trowel or ladle is sharply turned at an angle of 45°, slightly moving upward. In this case, when thrown, the solution will not scatter in all directions, and the direction, if necessary, can be changed in any direction.
The cement-based mortar is thrown onto the wall to such a level until it aligns with the beacons or slightly covers them. Having covered a small area in this way, for example, 0.5 m in height, they proceed to work using the rule.
Working as a rule
Applying the rule to the installed beacons, it is pulled along the solution, starting from the bottom and moving up. When moving the rule, they perform simple movements - sharply pull from left to right, and then in the opposite direction. These manipulations are carried out until the entire mortar on the sketched area is completely leveled.
Then a new section is sketched and again leveled using the rule. Irregularities and resulting grooves are eliminated using a trowel. The mortar is placed on the tip of the trowel and then thrown. All this is again corrected by the rule.
Grouting mortar
After it dries, start grouting. The degree of readiness is checked by lightly pressing the cement-sand mortar with your finger. If no indentations remain when pressed, then you can start. Grouting is done using a trowel board or trowel. The wall is sanded in a circular motion until a smooth surface is obtained. If the plaster has any imperfections, they are repaired with mortar and then rubbed down again. It is possible to carry out the grouting even after 24 hours; you just need to first moisten the surface a little with water.
To prevent cracking of the plaster, do not allow it to dry quickly (especially if the weather is hot). To do this, water the wall from time to time. With skill and desire, you can achieve a completely smooth surface without cracks, but this requires additional grouting.
A couple of tips:
- all equipment used (ladle, trowel, usually a grater, grater), in order to prevent the mixture from sticking to the tool, must be constantly treated with water;
- After finishing the working day, all tools need to be cleaned and washed. This also applies to the stirrer or container in which the solution was mixed.
In conclusion, it should be noted that plastering with cement mortar is a responsible and complex task. And in order for the surface to be smooth, you need to purchase everything in advance necessary tools, inventory, materials for plaster mixture and wall primers. You shouldn't save money. And, of course, you should be patient, and skills and dexterity will appear as the work progresses.
Plastering is an important construction process that helps level walls and insulate a home. It also masks wires and increases the level of sound insulation.
There are many solutions that are used for plastering walls. But the most popular is cement. He has many useful properties seems like a good resistance high level moisture. It is also worth noting the durability.
We prepare walls made of different materials for plastering
The preparatory stage is extremely important if you want to achieve a smooth wall surface without flaws. Before applying plaster, you must determine what material the surface is made of. The list of necessary actions will depend on this.
Working with bricks
Despite the many modern materials When creating walls, brick is used in most cases. This is not surprising, since the material has many positive qualities, which explain its high popularity.
If you have a wall made of ordinary bricks, then before applying cement mortar for plastering with your own hands, you need to assess the degree of humidity of the surface. In the case of a new building, no preparatory actions are necessary.
Dry masonry is found in houses that are already for a long time are in operation. In this case, before applying the cement mortar for plaster, it is necessary to spray the surface with water. If you don’t do this, the composition will slide off the walls.
Advice ! If there are protruding bricks, cut them off using a chisel and hammer. This will save on plaster mortar.
If facing bricks are used in the wall construction, then the algorithm for preparing for plastering with cement mortar will be somewhat more complicated. First of all, you need to worry about installing the sheathing.
There are many technologies for installing high-quality wall sheathing before starting plastering with cement mortar. The following is considered one of the most reliable and fastest:
- Drive nails into the mortar between the bricks.
- Wrap aluminum wire around the nails.
- Check tension.
Sometimes you have to work with in small areas walls In this case, you can use a trick with tile adhesive. Take a notched trowel and use it to apply a thin layer of glue.
Attention ! Typically, the glue drying period takes about a day. Exact date must be indicated on the packaging.
There is another important stage in preparation brick wall for plastering with cement mortar. This is priming. Only after it will you be able to do basic work with a predictable result.
Preparing walls from other materials
To Work with concrete blocks quite difficult, since the cement mortar simply slides down. Fortunately, the two methods described above will allow you to secure the plaster in place using glue or lathing.
If you need to apply plaster to a cinder block wall, be sure to thoroughly wet the surface before starting work. This will allow you to achieve a good and reliable fixation.
In reality, there is whole line materials that require treatment before applying plaster using cement mortar:
- Sawed shell rock. The preparation algorithm is the same as for cinder blocks.
- Wooden wall. Before plastering with cement mortar, treat the surface with a primer and install a special mesh.
- Drywall. Primer treatment is sufficient.
- Inhomogeneous coverage. Sometimes it is necessary to plaster walls made of cement with cement mortar. different materials. In them, differences can reach 20 centimeters. Therefore, it must be leveled before doing anything. Cement mortar is ideal for leveling. But before you start pre-treatment, prime the wall and install a special mesh.
- Plastered walls. Often, under the influence of time, old plaster becomes unusable and you have to take care of a new layer of coating. But to apply it, you need to remove the old layer. This procedure is most conveniently carried out using a hammer drill. In extreme cases, you can use a chisel and hammer.
If you properly prepare the walls before plastering, the cement mortar will lie on them in an even layer and will last for a long time. The surface of what was just made brick house does not require preparatory treatment.
Apply the solution
Reinforcing mesh

In order to apply cement mortar to the walls, a special mesh is best suited. It will increase the strength and elasticity of the plaster, and this, in turn, will extend its service life.
Attention ! Another important property of the reinforcing mesh is its ability to prevent the appearance of cracks when drying.
Typically, when working, a mesh with cells of 20x20 mm is used. It is ideal for fixing cement mortar. But to achieve a truly good result, you need to take care of the anti-corrosion coating.
Dowels are usually used for installation. They need to be separated from each other at a distance of about 35 centimeters. One of the most correct arrangements is considered to be chess. It saves a lot of time. After the dowels are installed, you need to cut the mesh to the desired size.
It is best to install the mesh from bottom to top. The elasticity of the product makes it easy to put the product on the dowels and fix it. In this case, you need to wind the wire on top. More precisely, it needs to be stretched to each dowel. The result should be the letter Z.
When joining several pieces of mesh, they need to be placed on top of each other. This will increase the strength of the plaster. In addition, the level of resistance of the cement mortar to mechanical damage will increase.
Lighthouses

Lighthouses are important element when applying cement mortar, which allows you to make the plaster even and smooth. Usually nails are used as beacons.
There are several methods for creating beacons. For example, you can make key points using a cement mixture. As an alternative, tile adhesive or putty is often used.
A beacon is installed at the points. In order for it to be installed accurately, you need to use a level. Use a rule to prevent bending. You need to apply a level to it while applying the beacons.
Now you need to drill holes along a vertical line. The patches get clogged in them. A beacon profile is subsequently screwed onto them. 25mm screws are ideal for this task.
The gaps from patch to patch are subsequently filled with cement mortar. This will avoid sagging under the weight of the rule. This method allows you to perform high-quality work even with large irregularities.
Advice ! It is advisable to set the distance from beacon to beacon at a distance greater than the rule of 10 cm.
Application

In order to apply cement mixture on the walls you will need a number of tools:
- plaster ladle,
- putty knife,
- ironer,
- as a rule,
- trowel,
- grater.
With their help, you can apply high-quality cement mortar, thereby ensuring the walls good thermal insulation and a beautiful view.
Before you start applying the mixture, prime. If this is not possible, just wet the walls. Apply cement composition until they are completely dry.

A ladle or trowel is used to throw the composition. After this, alignment is done using a rule and two beacons. This procedure also allows you to evenly stretch the substance over the surface.
Advice ! Leveling the walls must be done from bottom to top.
When the walls are dry, grouting is done. To do this, you can use the same solution, but in a much more liquid form. Application is done using a polisher. You need to rub until a smooth surface is formed. You can see how to plaster walls with cement mortar yourself in the video below.
In order to increase the service life of the plaster, you can use etching. This procedure increases the resistance of the cement layer to mechanical damage and avoids the formation of fungus on the surface.
To etch the walls, a special solution with neutralizing acid is used. In this case it is necessary to use personal protection to avoid chemical burns. Full set consists of gloves, gown, respirator and goggles. Special shoes will also not be superfluous.
Attention! All etching work must be carried out in a well-ventilated area.
Results
Plastering walls with cement mortar allows you to insulate a house with your own hands. In this case, the surface of the walls becomes suitable for applying paint or wallpapering. But in order for everything to go as expected, it is necessary to carry out preparatory work. It is especially important to moisten the surface before application.


