Facade cladding with siding. Do-it-yourself vinyl siding installation: detailed instructions Where to start installing siding
Siding is one of the most inexpensive and practical materials for finishing the facade of a house. Installation of such cladding is quite simple; even a novice builder can master the installation. The material is strong and durable and is not afraid of rain, frost, wind and sun. It will protect the walls of the house from mechanical damage and prevent their premature destruction.
Another argument in favor of the material under consideration is the designer’s freedom of imagination. Wall cladding can be done in the most different colors and invoices. There are a huge number of options, some of them are designed to imitate natural stone, bricks, wood of various species.
Types of siding for cladding
Siding is a special cladding panel. Products for external cladding usually lamella-shaped, but larger varieties are sometimes found. These elements are produced in the form of fairly large panels.
The siding itself can be made from different materials:
- Plastic. Made from vinyl or acrylic polymer. Finishing the facade with this type of material is the most affordable option. The material does not rot and is resistant to moisture. In this case, the plastic does not crack and does not support combustion. The disadvantages of this type of siding include low impact strength.

- Metal. Panels made of galvanized iron or aluminum are absolutely fireproof. They are also characterized by high strength. But there are several disadvantages that can cause inconvenience during installation and operation. These disadvantages include increased weight and instability of steel to corrosion. To prevent damage, it is better to choose aluminum models, but their price will be significantly higher.


- Tree. The material is called “planken” and is highly expensive. Wood is capricious and requires special attention and care during operation. But the advantages of such cladding of houses include an attractive appearance, good thermal insulation and sound insulation properties.


- Fiber cement. Relatively the new kind, which is just gaining popularity. The material belongs to the group of non-flammable materials and is not susceptible to mold and mildew. Other positive characteristics include moisture resistance, strength and durability. Special fastenings are provided for installation.


Decorating the exterior of a house with siding is not difficult, but painstaking. Considering the cost of professional workers, it will be much easier to do this work yourself. To do this, you just need to study the technology and carefully review the recommendations of the manufacturer of a particular finishing material.
Material calculation and preparation
The technology for finishing a house with siding is almost the same for all types. To cladding a house, you will need to prepare some tools for the job:
- a universal hacksaw with small teeth;
- scissors for cutting metal;
- screwdriver;
- pliers;
- hammer;
- construction plumb line;
- roulette;
- pencil.
 Full list the necessary tool
 It's easier to do the job with two people. They start with calculating the material. This is necessary in order to immediately purchase required amount and avoid additional transport and time costs during the work process.
The amount of material can be calculated approximately. To do this, calculate the area of the external walls, plinth and cornices. To calculate the required number of panels, the result must be divided by the area of one element. In order to think over the location of the joints and more accurately calculate the quantity, it is worth making a sketch of the external walls of the building. It is recommended to add 5-10% to the amount of siding received for trimming and various unforeseen expenses.
 Calculation of surface area for cladding
 Wall finishing begins with surface preparation. It includes the following actions:
- cleaning from dirt and dust;
- removal of plants, dried lime;
- removal of worn-out plaster and other finishing materials;
- dismantling drainpipes, window sills, various decorative elements, which may interfere with the work process.
Frame installation
If the house is built of brick or lightweight concrete, it is recommended to use lightweight lathing metal profile. For a timber or frame building, it is wise to choose a timber frame.
The wooden sheathing is made from slats measuring 50x50 mm. They can be attached to the wall with nails or self-tapping screws. When installing wall siding, the sheathing is placed vertically. When finishing the base, both vertical and horizontal frames can be used.
 The frame slats are installed in increments of 30-40 cm, as well as around the openings. There should not be any slats at the very bottom
 First of all, the corner elements of the frame are installed. Their evenness is checked using a building level. To secure the frame posts, you should use nails with an anti-corrosion coating (zinc, aluminum). The distance between the frame slats depends on the type of siding. For metal panels it will be 40 cm, and for vinyl - 30 cm. But this information should be clarified with the manufacturer.
Are you planning to insulate your facade?
In order for the house to maintain its ability to breathe, it is recommended to choose mineral wool. This is especially true for wooden buildings. The thickness of the heat insulator is selected depending on the climatic region.
Insulation of the house mineral wool implies the presence of a ventilation layer between the wool and the siding. If the height of the sheathing is not enough to provide a gap of 1-3 cm, then a counter-lattice is provided.
 Installation of insulation with a counter-lattice to create a ventilation gap
A hydro-windproof film is attached on top of the insulation using a construction stapler. Wall cladding will breathe well if you use modern vapor diffusion windproof membranes. You should be careful with insulation, since the wrong choice of materials at this stage can lead to problems with room temperature and ventilation.
How to work with siding
Finishing begins with the installation of the starting profile. It is attached to the sheathing using galvanized nails or self-tapping screws. The second step will be the installation of corner elements and a connecting profile (if necessary). Door and window openings must be edged with a special j-profile.
 Installation of starting and corner profiles
 Installation of the first siding panel is carried out on the starting strip. It snaps into place and is secured with self-tapping screws (or nails). The assembly of the cladding begins from the bottom up. The panels are secured to each other using a tongue-and-groove system.
Attention! When installing plastic, wood or fiber cement panels, rigid fixation is not allowed. After correct installation the element can be moved to the sides. Rigid fixation is used only during installation metal siding.
 Installation of ordinary, connecting and end elements
 When working with plastic, a gap of a couple of millimeters should be left between the trim and the head of the nail or screw. Tight fastening can damage the material when humidity and temperature change (plastic expands).


Finishing the facade with siding is quite simple. Plastic elements have special elongated holes for fastening. Nails or screws are placed in the middle.


To finish finishing the house with siding, you need to install a finishing strip at the top of the wall. The last panel is inserted into this bar from below and snaps into place.

To finalize the finishing, it is necessary to install all facade elements (eaves, window sills, pipes, etc.) in their place.
A house finished with siding is reliably protected from any weather conditions!


Siding – large group facade finishing materials, the name of which comes from a wooden board fixed to the wall in a certain way. The principle of covering a house with siding was borrowed from the roof, when the upper element hangs over the lower one. Thanks to this, the main materials were protected from weathering, fading in the sun, and most importantly, from getting wet. Rainwater flowed down the panels without getting inside to the wall. Nowadays siding is used in curtain walls and for insulating a house.

This is what a house covered with classic siding looks like in the USA - its historical homeland
Types of siding
There are several types of materials that fall into this category:
Classical wooden plank for the facade, which is mounted overlapping each other. Nowadays this method of cladding is rarely used, and more often they use imitation in the form of a profiled wooden lining to separate the façade – “American”.
Modern wood siding. The panels are not solid wood, but pressed wood fibers bonded together binder resins. The structure resembles dense fiberboard, protective covering– several layers of paint.
Wood-polymer composites. They are produced by companies that specialize in the production of WPC decking boards. The composition is clear from the name; the panel is made profiled with a tongue-and-groove connection or a “lock”. It has the largest thickness among modern siding options - over 10 mm, taking into account the internal stiffeners. One of the most durable options, but is more expensive than some types of natural wood siding.

One of the profile samples of modern wood-polymer siding
Cement siding for cladding a house. Composite material, but the binder is not polymers, but cement. The filler in this case is cellulose fibers, which reinforce the panel and provide its fracture strength. It also has a large thickness - 8 mm.
You can cover your house with metal siding. They produce aluminum and steel. In the second case, it is a galvanized cold-rolled profiled sheet with decorative polymer coating or coloring. The thickness varies between 0.5-2 mm.

Usually siding is “flat”, but a metal profile can imitate a log
Vinyl siding for house trim. The most popular “economy class” material for facade finishing. Available in two versions of use - for the plinth or for the facade.

Basement siding is often made to look like brick or stone
Note. Plinth panels released thicker. They are often used to cover facades when they want to make the cladding more resistant to mechanical damage or create the illusion of facing with stone.
Features of choice and cost of siding
If we talk about mass demand, many people want to cover their houses with vinyl siding. It has an excellent combination of advantages: low price and good decorative properties, easy installation and surface care, low weight and high stability to climatic factors.
In second place is solid wood siding, if in this category we count both boards and “American” lining in all its modifications. Of course, thanks to the simple installation technology, profiled panels are more often used. This traditional look siding for a wooden house or cottage in an ecologically clean area.

This is what the profile of an “American woman” looks like
If you want to get an almost reliable imitation of wooden cladding with a long service life, minimal costs for maintenance and repair, then the best choice would be composite panels. Especially if there is a WPC terrace next to the house. They perfectly tolerate temperature changes, high humidity, and are resistant to adverse factors even in big city or proximity to the road.
Sheathing a house with metal siding is rare. Aluminum profile does not withstand mechanical stress well, which is inevitable for a low-rise building. Steel panels are durable, but their price is higher than vinyl, and the decorative capabilities are the same. Durability is determined by the thickness of the sheet and the properties of the protective and decorative coating. The price depends on the combination of these factors.
Cement siding is used if fire resistance of the finish is a priority. And this is perhaps the only advantage of the material. Heavy, rather fragile during transportation (despite the reinforcement) and difficult to install - it loses in popularity to other types.

Cement siding can replicate the texture of wood, but it is not so easy to install
Price square meter depends not only on the material. Many factors have a greater influence on the price. And one of them is the manufacturer and the country. Even vinyl siding has a price range of 150 rubles. up to 600 rub. for 1 m2.
WITH wood panels It’s even more difficult - for example, pine and larch differ in price several times, and there are also more expensive wood species. Plus factory processing, which improves resistance to high humidity, but also significantly increases the cost of the board. For example, domestic larch costs from 300 rubles. per 1 m2, heat treatment of wood domestic manufacturer raises the cost by 2-3 times, and imported heat-treated boards cost 4-5 times more than regular wooden siding.
Video about choosing siding:
How to calculate quantity
There are two simple methods calculation: by area and by the number of panels.
First method:
Calculate the areas of the sheathed planes. For ease of calculation, a surface with complex geometry is “broken” into simple shapes.
The area of window and door openings is subtracted from the resulting amount.
Multiply the result by a correction factor that takes into account trimming waste. For simple planes it is taken equal to 1.07-1.1, for complex ones – 1.15.
Divide by the useful (not total!) area of one panel.
Round the result to a whole number, and get the number of siding panels for installation with a margin.
Visual calculations in the video:
The second method is only convenient for “ simple figures» planes of the façade or plinth. In this case, each subsequent plane is calculated taking into account the possible use of scraps from the previous one. The calculation method for a “blind” wall is as follows:
Measure the height of the wall and divide it by the useful height of the panel. Round to the nearest whole number.
Measure the length of the wall, divide by the length of the panel. If after the decimal point you get 5 or more, round up to big side, less than 5 – less.
The results obtained are multiplied.
When rounded up, this will be the required number of siding panels. If the second figure was rounded down, then they calculate how much additional siding will need to be purchased in order to increase each strip in length.
When determining the number of stripes for walls with openings, the planes between the corners and boundaries of the openings are calculated separately from the “blind” areas.
Additional profiles are calculated individually for each type, depending on the size of the areas where they are used.

The most common types of additional profiles
Preparatory stage
Cladding using lathing does not require leveling the surface to an “ideal” state. But this does not mean that the walls do not need to be prepared for work. Moreover, when siding is only part of the overall installation activities curtain façade with insulation.
Therefore, it is necessary to clean the surface of old finishing materials and remove hanging elements engineering communications, remove signs and lamps, dismantle ebbs and canopies. The facade must be completely free.
If the facade is plastered, then it must be cleaned of crumbling areas, primed and, if necessary, leveled with mortar.

It is sometimes difficult to clean old plaster
Brick walls must be checked for cracks, their nature must be determined, the causes must be eliminated and repaired with a repair compound.
The walls of a house that was built a long time ago should be checked for fungus and moss damage. This is especially true for the basement, first floor and canopy area on the north side or in “solid” shade.
The scope of work to prepare surfaces for cladding determines whether cladding can be carried out in winter. Sheathing a wooden house with metal siding or vinyl and WPC can be done in winter if the house is new. If “wet” testing is required repair work with solutions and liquid compositions - not possible.
And of course, you can’t install paintable cement siding and wooden siding in winter without factory approval. protective treatment special compounds.
Lathing materials and installation tools
The sheathing can be made of wooden blocks or metal profiles.
The timber is easier to fit, it is easier to attach siding to it, it does not serve as a cold bridge between the cladding and the wall, and does not change geometry when temperature changes occur. But the tree does not tolerate high humidity. Therefore, the timber must be seasoned (dry) and treated with an antiseptic.
Installation of siding on a wooden sheathing can be seen:
It is more difficult to work with a metal profile; it has high strength and durability (if it is galvanized). The only operational drawback is high thermal conductivity. Therefore, the supporting brackets must be mounted to the wall through heat-insulating gaskets.
To install sheathing and siding you need:
-
twine, chalk for marking;
stepladder, ladder, scaffolding.
a set of tools for marking and level control;
a hacksaw for metal or wood (depending on the material of the siding and sheathing);
metal scissors for fitting panels (for metal siding);
hammer drill or drill (depending on the material of the walls and base);
hammer, pliers, screwdrivers or screwdriver with attachments for the hardware head;
Visually about installation metal frame for siding on video:
General principles of vinyl or metal siding
To have an idea of how to properly cover a house with siding, it is enough to know general principles installation:
Cladding occurs on the principle of filling the contour panels from additional profiles.
Install the sheathing with a spacing of vertical purlins of 250-300 mm.
They make markings for the starting strip, the correct installation of which largely determines the quality of the cladding.
First, beat off the low tide fastening line. If the entire façade is sheathed around the perimeter, then it should converge “to a point.”
The starting bar attachment line is above the low tide plus a gap to compensate for thermal expansion.
Installation of the ebb, starting strip and all cladding parts to the sheathing occurs according to the general rules:
the fasteners must be positioned strictly vertically relative to the sheathing;
the fastener head must be in the middle of the perforated hole (except for the upper fastening of corner profiles);
tighten the screws or drive the nails in not completely, but leave a gap between the head and the surface of the part of about 1 mm.

Installation of the first load-bearing strip of siding
After the starting bar, corner profiles are attached, hanging them vertically at the top attachment point. Install window strips or J profiles around the openings. Finish the “framing” of the contour with a finishing strip or J profile.
Installation of the first panel begins with fixing the starting strip in the lock. Before attaching to the sheathing, a temperature gap is set between the end of the siding and the corner profile. Its value depends on the time of year when the work is carried out and the length of the panels. In winter - about 12 mm per 4 m of length, in summer - half as much.
The siding is increased in length either by overlapping by 20-25 mm (by trimming the perforations of the bottom panel), or through a connecting profile with an internal gap at each end, as in a corner profile.
Every 5-6 rows control the level.

Example of metal siding installation
Features of cladding a wooden house
When covering a wooden house with siding, it is necessary to take into account the characteristics of the materials:
finishing of the facade, as well as interior work, you need to start after the house has settled;
It is advisable to use it for sheathing wooden beam(aged and treated with antiseptic);
It is mandatory to treat the surface of the walls with an antiseptic, since after installing the sheathing it is impossible to control the condition of the wood and promptly carry out preventative measures for areas affected by fungus;
Can be stacked for added protection waterproofing membrane;
even if the walls are smooth and the siding is installed without insulation, the panels cannot be attached to the wall - for correct operation wood needs a gap, which is created by the sheathing.

Wooden house cladding
The ease of installation of siding does not exclude care and accuracy when carrying out work. An error when installing the starting profile, fasteners that are “tightened” or incorrectly installed in the hole, non-compliance with recommendations for the size of the temperature gap - all this can lead to serious consequences for the skin, which will not be so easy to eliminate.
I would not like to start the article with banal phrases like: the facade is the face of the house and the like. Everyone already knows this, but when faced with the need for finishing, many questions immediately arise, the first of which, of course, is what material to use.
In this article we will talk about how to lay siding with your own hands, and what you can save on without compromising quality.
What is siding

If we talk scientific language builders, then siding is a hinged ventilated facade system. A distinctive feature of all is their installation at a distance from the facade itself. Thanks to this technology, there is always an air layer under the coating, which does not allow condensation to accumulate on the surface.
As a result, if properly treated with antiseptics, mold and harmful fungus will never appear on the walls, which often cause a lot of problems for homeowners. But since our article is not devoted to the material itself, but to the question of how to properly lay siding, we will simply briefly list the advantages and disadvantages.
Advantages over other types of facade finishing

So:
- Covering a house with siding is a very simple process that does not require specific skills and knowledge. Installation can be done easily with your own hands.
- Modern manufacturers produce a whole the lineup siding panels. Today, these are not just horizontal lines, but also imitations of various natural materials.
- The light weight of the entire siding does not require additional reinforcement of the walls and does not create a significant load on them.
- External siding is installed in the shortest possible time and without the involvement of specialists. In principle, all the work can be carried out by one person, and, in extreme cases, the help of one assistant will be needed.
- A facade covered with siding is very easy to care for. He is not at all afraid of water and even strong detergents.
- Thanks to the air gap between the siding and the wall, you can use any type of insulation (see).
- If the facade is damaged, one panel can be replaced, and the rest of the siding will remain intact.
- The final price of the entire siding finish is significantly lower than most popular types of finishes.
Before choosing siding in a store, you need to carefully study the entire assortment presented in stores. This will not be an easy task, so we will present a short video in this article that shows several options appearance siding.
Disadvantages of siding

So:
- The light weight of siding often becomes a disadvantage, since strong winds can simply tear it out of its fastenings.
- Siding is quite easily damaged mechanically, any blow from a hard or sharp object, can not only leave a scratch on the panel, but even break through it.
- If you don’t take spare segments when purchasing siding, then later, if necessary, replace the damaged area; you simply won’t be able to find the same color or shape.
- Siding, like any plastic product, has, albeit insignificant, thermal deformation. That is, when high temperature in summer, the panels expand. This fact must be taken into account during installation.
Important! When purchasing siding, always purchase 5 to 10 percent more panels than may be needed. This is necessary to cover the defects that often occur when self-installation, and part should remain in reserve, in case you have to change an accidentally damaged area of the finish.
Installation

The axiom of all builders and finishers says: always start repairs by preparing materials and tools, so as not to waste time searching for the right screwdriver or nail.
Our instructions will not violate the postulates, so below is a list of tools that we will need:
- Pencil and tape measure.
- Construction knife with a set of additional blades.
- Electric jigsaw or, as a last resort, a fine-toothed hacksaw.
- Self-tapping screws or nails, depending on what it was decided to make the sheathing from.
- Hammer or screwdriver, again, depending on the material of the sheathing.
- Building level. Of course, ideally, if you have laser device, which will greatly simplify and speed up the process. But if you don’t have one, then a water level with vertical and horizontal eyes will do.
- Hammer with drill, with a diameter corresponding to the purchased mounting dowels.
Additionally, you may need painting supplies such as a roller and brushes, but this is only if you chose wood to make the sheathing. This material itself is very malleable to high humidity, and besides, bugs love to burrow into it and eat it from the inside.
Therefore, to extend the service life wooden sheathing and improving it quality characteristics, each block must be treated with special impregnations or deep penetration primer.
Interestingly, many professionals do not advise using wood, since a galvanized profile is much more practical in this regard (see). That is why our siding installation instructions will describe metal guides, not wooden ones.
Marking

This stage requires a particularly careful and thoughtful approach, since the quality of the entire finish will depend on it. The fact is that if at the very bottom of the facade there is a slight distortion of just a few millimeters, then when you reach the top panel it will be already several centimeters, which is naturally unacceptable.
Therefore, we arm ourselves with a pencil, a tape measure, a level and patience, and go ahead. First of all, it is necessary to calculate the so-called “dead point”. This is the lowest mark from the base, from which all further markings will go.
Having found this point, we draw a horizontal line along the entire perimeter of the house. It is this line that will serve as our starting point.
Advice! In order not to have to worry about attaching the first panel, you can attach a wooden block around the perimeter of the house, which will serve as a support on a horizontal line. You can simply lay the siding on this block and securely attach it without fear that it will become distorted somewhere.
Now that we have the zero mark ready, we need to find the points from which the vertical guides will go. The distance between them should be at least 20 and no more than 50 centimeters.
The easiest way to do this is to divide the wall exactly in half. Then each segment is cut in half again, and so on until the distance between the nearest points becomes optimal.
From the obtained points we draw strict vertical lines, focusing on building level. It is along these lines that the guide profiles will pass.
Now all that remains is to mark the points for installing guy wires for the profile. The ideal distance between fasteners is 50 centimeters, so we simply put dots through this distance on each line, and our marking is ready, we can move on to the next stage.
Lathing

Covering a house with siding is always carried out on a pre-prepared sheathing, although in some cases it can be abandoned.
For example, if your house is built from aerated concrete blocks, and there are several reasons for this:
- Aerated concrete has increased moisture permeability. Therefore, it can function normally without an additional air gap.
- Aerated concrete blocks are very soft, and ordinary carpenter's nails are easily hammered into them, so there will be no difficulties in attaching the siding directly to the wall.
- In the southern latitudes of our country, houses made of aerated concrete are not insulated at all. The heat capacity of the block itself is sufficient, so there is no need to leave space for tile insulation.
But in all other cases you will have to make a sheathing. In fact, there is nothing complicated here, we just pick up a puncher and a hammer and boldly go into battle.
Our wall already has marks for attaching guy wires, so we just drill holes in the marked places. It is important to correctly calculate the diameter of the drill and the depth of the hole. The dowel should be completely immersed in it and tightly press the metal guy.
If the hole is not deep enough, the dowel will hit the bottom and bend. In this case, it will be very difficult to pull it out. When all the guys are installed, we bend them perpendicular to the wall and attach the profiles to them, not forgetting to frequently check the building level.
An important point at this stage is to install an additional guide under the H-profile, which connects the two siding panels along the length. You need to find a place where it will pass, if of course there is a need for it, and install it, just like the rest of the sheathing elements.
Now you need to check the entire structure for strength. It’s enough just to twitch each profile and calculate the weak points. It is advisable to install additional fasteners here. As a result, we should have a sheathing, as shown in the photo at the beginning of this section.
Siding

If all the previous stages went smoothly and efficiently, then installing the siding will not take much time, and by the way, we can say that this is the easiest stage in the entire finishing process. The easiest way to install siding is with simple horizontal lines. Although, if you have some experience, you can lay it in a herringbone pattern or in a running pattern, but this is a topic for a separate article.
We start laying with, which is slightly different in configuration from the other segments. If you followed the advice and attached a wooden beam horizontally, simply place the panel on it and fasten it with self-tapping screws along each guide.
Exactly from launch pad the following segments will go, which are simply attached to it with grooves at the bottom, and at the top also with self-tapping screws to the guides. There is nothing complicated here, but it is important to remember that the fasteners should not press the panel tightly, since the plastic has thermal deformation.
The self-tapping screw does not tighten completely, leaving a small gap, which allows the siding to expand in the horizontal and vertical directions, while the panel itself hangs tightly on the cap, and the wind cannot tear it off.
After attaching the starting panel, we attach the decorative elements. In this case, these are corners and H-profile. In addition, you need to make a frame for windows and doors (see). The panels themselves are simply inserted inside the decorative elements and fastened with self-tapping screws to the guide profiles.
Now all that remains is to simply add strips of siding to the very top. The only difficulty is the last panel at the top, which will have to be cut along its entire length. The finishing panel completes the finishing, now you can step aside and enjoy the work done.
Now, knowing how to install siding correctly, you can safely get to work, and the main thing here is not to rush and do everything thoroughly and efficiently. After all, repairing a facade is a very labor-intensive task in itself, and redoing the defect will be difficult and costly.
Siding is a dry type of exterior finish and is suitable for most types of residential and outbuildings, especially from foam concrete and sandwich panels. Its light weight will not put a significant load on the foundation, which is why such cladding is also used on old wooden houses.
The growing popularity of siding is explained not only by its low price, but also by its durability, because it will not crumble like plaster over time, simple care, excellent protective properties and a rich selection of shades and textures. The undoubted advantage of siding is that you can give a modern look to even an old house with your own hands, significantly saving on the services of builders.
Tools and materials
Before covering your house with siding, you should check the availability of the following tools:
- or a fine-toothed saw, metal scissors,
- screwdriver and screwdriver,
- hammer,
- tape measure, square and level (a laser tape measure will greatly simplify the work),
- a stepladder that is high enough to reach the roof of the house.

Siding manufacturers offer a full range of elements and panels for covering a house, even complex configuration. As a rule, the buyer should indicate the area of the walls of the house and their dimensions, the type of roof and the number of windows, and the seller himself will calculate the required number of certain parts; a schematic plan of the house from the outside will facilitate this process.
Knowing some points will help you control or check the calculation. So, the components for installing siding include the following elements:
- External corner - the height of this element is 3 m, and if the house is one-story, it is worth using entire elements for each external corner of the house; if the height of the walls is more than 3 m, then sum up the length of all external corners in meters and divide it by 3, taking into account that there should be a margin for margin when joining. Corners are used not only for decorative purposes, but also due to the fact that the ends of the siding must be closed.
- Internal angles are calculated using the same principle. If the roof eaves are finished with siding, they are also used in the areas where they connect to the wall. internal corners. In cases where the finishing of the cornice was done earlier or will not be done at all, use a finishing strip.
- To finish the cornice, elements such as soffits and wind boards are used.
- The required length of the starting strip is equal to the perimeter of the house minus the width of the doors and gables.
- In areas connecting extensions, height differences and roofs different levels use J-profile.
- The perimeter of the windows is covered with a window strip; it must be taken with a reserve so that the joining points are not visible. Also, to frame the windows, flashings are needed, which also should not have visible joints.
- A drain plate or drip sills are installed around the perimeter of the base if its width of 40 cm is not enough.
- If the length of the house wall is more than 3.66 m - standard length siding panels - the connection occurs using an H-profile. It is necessary to think about the location of its installation so that the proportions of the building are maintained.
- The number of siding panels themselves is approximately calculated using the formula: “((area of all walls of the house – area of windows and doors)/panel area)*1.10”. A reserve of 10% is needed to cover scraps and waste.
- For installation, it is preferable to use galvanized self-tapping screws 25-35 mm long, since their use makes it easier to maintain the recommended gap of 1 mm. For 1 sq.m. Approximately 2 self-tapping screws are consumed, they should also be taken with a reserve. If possible, then you should choose self-tapping screws with a rubberized head, which will definitely not leave rusty stains after a few years.
Preparatory work
Before covering with siding, it is necessary to carry out preparatory work. First, all protruding parts are dismantled: doors, trim, grilles, etc. Close up or polyurethane foam all the cracks in the walls, around windows and doors. The walls of an old house are cleaned of dirt and dust, chipped plaster and paint, mold and rotten areas. Wooden houses are treated with antiseptics and antipyretics; foam concrete walls can be treated with a deep penetration primer.

Installation of sheathing
The first step is to mount the sheathing from a metal profile or wooden slats, since it is strictly forbidden to attach the panels directly to the wall. Galvanized profile is the only option for metal siding and for brick and concrete walls. As a profile, you can use a CD profile for drywall. If the vinyl profile is attached to wood or frame house, you can use 60*40 mm slats with a residual moisture content of 15-20%, treated with an antiseptic and thoroughly dried.
Using a tape measure and level, mark straight lines on the walls of the house so as to obtain a closed contour. Having carefully measured the distance in the corners of the house from this line to the base, they find the minimum, and, putting it down, draw another contour. Subsequently, a starting bar is installed along this line, and if it deviates from the level, the cladding panels will warp.

Then, using U-shaped fasteners, vertical guides are mounted, starting from the corners. It is necessary to ensure that they fit tightly to the wall, for which you can put pieces of wood or dense foam. The distance between them is 30-40 cm; in those places where the siding will bear additional load, for example, street lamps, as well as near corners, windows and doors, you need to add guides. The vertical guides should not be connected by anything so that there are no obstacles to ventilation, since the lack of air flow will lead to the appearance of mold.
Waterproofing and insulation
For wooden aerated concrete walls installation is required, and a layer of insulation is optional. As a material, preference should be given to a water- and wind-proof membrane. If insulation is not performed, then the film is fixed directly to the wall of the house in order to maintain the distance necessary for ventilation of the siding. When installing an insulating layer, waterproofing is laid over it, and then the sheathing is rebuilt to provide a gap for ventilation.

Fastening the guide elements
Installation begins by installing the drainage system on the base, placing its upper edge along the previously marked line. It is a rigid structure and is easier to keep level than a flexible starter bar. Then a series of corner profiles. They must be firmly secured with self-tapping screws in the upper part of the first hole. Subsequent screws are screwed into the middle of the hole.
If it is necessary to increase the length, the upper profile should be laid overlapping the lower one with an overlap of several centimeters. Afterwards, along the previously marked line, a starting bar is attached to the top of the drainage basin. It should be 5 mm above the bottom edge of the corner profile.

Window strips or J-profiles are attached around the windows so that the outer bottom edge is a few centimeters lower than the inner one. Door openings are edged with J-profiles. The corners of these elements can be filed at 45 degrees, or they can be overlapped, placing the top planks on the side ones.
At vertical installation H-profiles in predetermined places, a level is used. As with the installation of other vertical elements, you need to leave a gap of 5-6 mm to the cornice and base so that the planks do not bend when expanding. A finishing strip is installed under the roof or where the area provided for siding ends.

Installation of panels
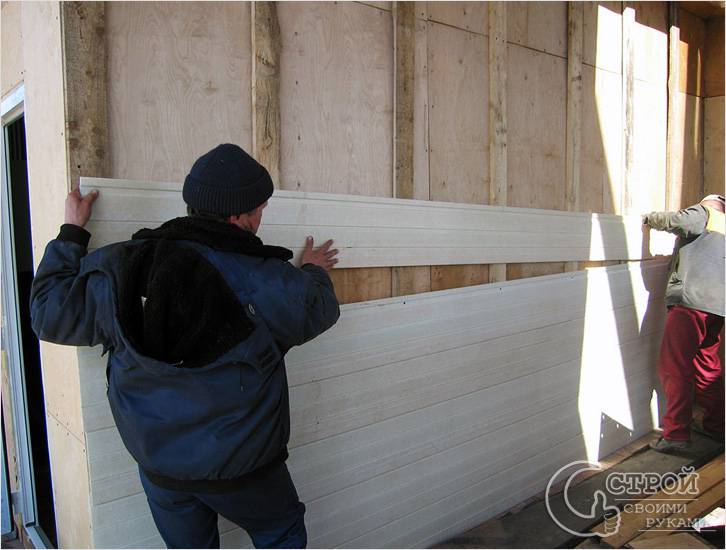
When all the guide elements are installed, you can proceed directly to the installation of the panels. The first row is attached to the starting bar until the lock clicks from below; at the top, the panel is secured with self-tapping screws in the center of oblong holes every 40 cm. All other panels are installed according to the same principle, row by row rising to the roof or window. You should not pull the panel up and fasten it rigidly; it should move slightly to the sides. The top row of siding ends with a finishing strip.

What should you consider?
Rule #1. Under no circumstances should siding panels be firmly secured. The material from which they are made contracts when cold and expands when heated, length fluctuations can reach 1%. This is what causes the elongated shape of the mounting holes. Fasteners cannot be screwed or driven through the panel, but only into the center special hole, and the screw is not screwed in all the way, with a gap of 1 mm between the plates and the head. If this rule is violated, the siding may simply burst under extreme heat.
Rule #2. There should be a gap of about 10mm between the planks and the guides (less when installing in hot weather), so that the siding does not bend when it expands. When covering a house in the summer, it is worth protecting the material from the sun.
Rule #3. Siding can be installed at any time of the year, but please note that at temperatures below -10 degrees, elements may crack when cut, so you should be careful and use an angle grinder.
With the help of siding, if you follow the rules and installation technology, you can renovate your house and protect it from atmospheric influences for 30-40 years, this is exactly the service life that manufacturers promise.
Do you want your home to look new without large investments? Then excellent and, most importantly, modern version is finishing the facade with siding. It is used for finishing a wide variety of buildings: the facade of a bathhouse, garage, house and others. It prevents direct sunlight from hitting the walls, protects from rain, protects the house from temperature changes, and is also excellent protection from the wind. Moreover, it is easy to operate. It can be easily cleaned by washing and wiping with a damp cloth. These are just some of the benefits of choosing wall siding. Now let's look at how to install siding with your own hands, find out what tools you will need for this, and how to prepare for the work.
Tools and equipment
Before the beginning preparatory work Make sure you have all the tools. To install siding you will need:
- tin scissors,
- Bulgarian,
- sharp knife,
- hammer drill,
- punch,
- jigsaw,
- stapler,
- level,
- hammer,
- roulette,
- protective glasses.

In addition to the tools, you should purchase in advance all construction material. In addition to the siding itself and its components, you need to stock up on nails, screws, staples, etc. Now that you have everything at hand, you can begin the preparatory work.
Preparatory work
Please note that you cannot install the siding yourself. Therefore, take care of a reliable partner. Together, using a water level (or its laser variation), you can mark the facade. An exact mark is made at each corner of the building.
Note! It is extremely important that the last mark matches the first mark. If the marks do not match, then the measurements are inaccurate. Accordingly, the procedure must be repeated. If you ignore this, you will end up with uneven walls.
Then you need to find the highest mark using the base as a guide. Next, a mark is placed at each corner from the base, which will show the level of the first strip.
We make sheathing for siding
One of important stages work is the manufacture of lathing. For this you can use wooden blocks.
Note! If the siding will be laid horizontally, then the sheathing should be installed only vertically, and vice versa.

To make the frame, it is necessary to prepare a sufficient quantity of bars with a cross-section of 50×50 mm and 25×80 mm. When purchasing, make sure that they are perfectly level, otherwise after installing the siding the wall will repeat the shape " sea wave" When installing the lathing, you need to ensure the distance between the bars, which should be 30-40 cm. If you want to pre-insulate the facade, then the lathing is first made according to the width of the insulation. The frame for the insulation will be made perpendicular to the sheathing for the siding. It is also necessary to cover the windows with wooden blocks. After laying the insulation, the surface must be covered with a waterproofing film using a stapler. This film must be laid with an overlap of ten centimeters wide.
When everything is ready, you can begin making the frame directly for the siding. You can also use a metal profile for this. This has its advantages. For example, wooden blocks need to be treated with an antiseptic against corrosion. Moreover, under the influence of weather conditions, the bars can become deformed or dry out. Because of this, the siding may not hold up well. As for the metal profile, this does not threaten it.
Siding installation. Technology

When installing siding, one mandatory condition must be met. It is to ensure that the siding moves under the influence of temperature changes. For this purpose, nails should be driven into the provided holes in the center. It is also important to drive nails carefully. Do not use excessive force to drive them in.
Note! Do not nail the nail head close to the sheathing panel. It is recommended to leave a gap of 1.5 mm. This also applies to self-tapping screws if you use them to secure siding.
Under no circumstances should the panel be allowed to stretch. Otherwise, the subsequent panel may become uneven, resulting in warping. There can be a distance of up to 400 mm between nails.
Sequence of installation work
Finishing the window opening

The first step is to line the window opening. For this purpose, you should take the window trim and cut it to the desired size.

The strip, which is mounted on the inner perimeter of the slope, is installed to the final strip. To begin with, the plank is installed on the lower slope, then on the side and only lastly on the upper slope.
Basement siding installation

Before installing siding on the facade, first decide whether it will be installed on the plinth. If yes, then this work needs to be done first. To do this, a starting bar is set. It is extremely important to install it exactly horizontally. To accurately fit the first panel to the corner, its edge is trimmed. Next, the next panel is installed. When it comes to the last panel, it needs to be cut so that there is a small gap between the panel and the corner.
Installing siding on a wall

The first step is to mark the base ebb line using a level. It is on top of it that the starting bar will be installed. Next, the H-profile is mounted. It is necessary for beautiful joining of siding. Some decide to do without it. However, over time, dust can accumulate there, and moisture can also accumulate there.
Accordingly, the joint will be visible. Moreover, with strong gusts of wind, this joint may not withstand and tear off. For this reason, it is best to use an H-profile to connect siding. Next, the assembly of the panels begins. Naturally, installation begins with the lower starting strip, onto which the next regular strip is snapped. And so row after row, until the very top. As for the last row, then last panel must be adjusted to the exact size.
This method is used to install siding panels. The main advantage of the technology is that this work can be done without the help of specialists.
If you have already done this work, you can share your opinion. Perhaps you encountered some problems while working, tell us how you dealt with them. If you have questions, please ask us.
Video
This is how it works correct installation siding:
And this typical mistakes installation:
Photo


