How the last panel of the suspended ceiling is attached. Procedure for installing plastic on the ceiling and walls. Fitting plastic panels and installing ceiling plinths
Among all the options for inexpensive finishing, there are probably no more universal material, how . They are suitable for decorating ceiling surfaces, walls and at the same time have a fairly impressive list positive qualities. But not everyone knows how to cover walls or ceilings with plastic. This article will discuss in detail the installation of plastic on walls and ceilings, and will also provide a video demonstrating the installation process.
What is required for work
It’s easy to assemble a plastic wall or ceiling with your own hands, and at the end of the material there is a video that demonstrates this. To make preparation and work easier, there is also detailed instructions, having familiarized yourself with which, there should be no incomprehensible moments left.
Before attaching plastic to the ceiling or walls, you need to calculate required quantity material. This is not difficult to do - you need to divide the surface area by the area of one plank. They come in different varieties and specific information on the selected varieties is on the packaging or on the product price tag.

In addition to the material for the coating, it is necessary to prepare the material for assembling the frame. It can be made from wood or metal profiles. The number of components depends on the type of structure, its complexity and is calculated individually in each case. After the components necessary for installation have been purchased and are ready for installation, you need to check the availability of the necessary tools. Not too many devices required:
- Hacksaw for metal
- Screwdriver
- Construction or laser level
- Roulette
- Hammer
- In some cases - a construction stapler and a plumb line
Once the materials and tools are ready, you can move on to the next stage of work - surface preparation. In videos that show how to line a ceiling with plastic, this stage of work is often omitted, but it is necessary.
Preparation
This is a simple operation and consists in the fact that the entire area that will be hidden under the plane of the new coating must be treated or impregnated with a bactericidal effect. This treatment is carried out so that mold does not appear under the future coating or fungus does not develop. Before this, all traces of the old finish and flaking fragments of plaster or putty are removed using available tools, such as a spatula.
Frame
To fix the casing it is necessary. Regardless of where the plastic will be mounted - on the ceiling or on the wall, such a frame is required. Without it, there will be nowhere to attach fragments of the covering, and in the video below, which demonstrates how to line a ceiling with plastic, attention is also paid to the frame.
The distance between the sheathing elements is from 30 to 40 centimeters. Moreover, if installation is carried out on a ceiling, the distance should not exceed 30 centimeters - otherwise, the coating may sag under its own weight.
Installation of panels on the wall
After assembling the base or sheathing, you can begin to secure the parts of the outer covering made of plastic panels. This process differs slightly from how plastic is installed on the ceiling.
It all starts with the corner or final part. Typically this is plastic corner or special element, covering the end of the part. The first covering strip is inserted into it. If the length of the plank reaches the ceiling and a continuous surface is assembled, a decorative plinth a special shape into which the end of the plank is inserted.

When the first part is installed, it needs to be fixed. This can be done using self-tapping screws, clamps or staples from a stapler. Next, the next covering element is inserted, with the protrusion into the groove of the previous panel. You need to insert it tightly until it stops. This is how the entire coverage area is assembled with the obligatory fixation of each part.

It is inserted with force, one side into the final corner or end piece, and the other into the previous panel. If necessary, the fragment is adjusted in size to the required dimensions by sawing off or cutting off the excess part. Below there is a video that shows how to attach plastic to the wall and ceiling - after assembling the sheathing, these processes differ slightly.
Floor mounting
When wondering how to make a plastic ceiling, you need to take into account some aspects of this work. Firstly, it is better to do this work with an assistant - it will be much easier, since everything will have to be done by weight, but otherwise, you can assemble a plastic ceiling with your own hands and there is nothing complicated about it.
Secondly, you need to consider the distance required to install the lamps. Their ceiling part should not touch the ceiling. This - important point, since everything should be taken into account when marking, even before hemming the ceiling with plastic and assembling the sheathing.

Typically, this distance is about 10 or 15 centimeters. It may be slightly larger or smaller, in accordance with the dimensions of the room and design lighting devices, but, in any case, no less than the lighting required for installation.
Next comes the assembly of the frame. It is assembled in approximately the same way as on the wall, differing only in the shape of the parts used - the end part of the panels is inserted into a plinth fixed to the wall, in which there is a special groove for this. It is installed first, strictly horizontally, according to pre-applied markings. Here you will need a construction level, or even better, a laser level.
After the lathing is installed, you can sheathe the ceiling with plastic, and to make it easier to understand the intricacies of this process, below are several videos that discuss in detail all stages of the work.
Plastic ceiling panels are a good alternative to plasterboard structures. Easy to install, durable to use, they perfectly mask defects ceiling surface and give the room an attractive look. Installation will not be difficult if you carefully study the technology.
Tools and materials for work
In order not to be distracted by searching while working, all the necessary tools and materials should be prepared in advance:

It is better to use a water level, so the marking will be done faster and with greater accuracy. A slatted frame can only be mounted in a dry room; it is better to mount an aluminum profile in a bathroom or kitchen. If the length of the ceiling is longer than the length of the panels, an additional H-shaped connector molding will be required. Its design allows you to securely fasten two adjacent panels and avoid sagging at the joints.
Calculation of the quantity of materials

When planning, it is very important to correctly calculate the amount of materials needed. This will help avoid unnecessary costs and reduce waste after renovation. First you need to calculate the area of the ceiling by multiplying its length by its width. In the same way, determine the area of one panel, and then divide the ceiling area by the panel area and round the resulting value up.
Since panels will be cut during installation and there may not be enough material, it is recommended to increase the ceiling area by at least 10% when making calculations. If the ceiling surface has complex configuration, it is better to add 15% for pruning. In addition to the panels, you will also need slats for the frame; to find out the total length of the slats, you need to divide the width of the ceiling by 0.3 and multiply by its length.

When attaching slats to the ceiling, dowels and screws are placed at a distance of 40 cm from each other. The starting profile is attached every 0.5 m. Knowing the length of all the slats and the profile, it will not be difficult to calculate the number of fasteners. The total length of the UD profile is equal to the perimeter of the ceiling plus 10% for joints. The ceiling plinth should be the same length. The consumption of the primer mixture is usually indicated by the manufacturer on the packaging, so when purchasing you need to know the area of the ceiling.
An important point: when buying plastic panels, you should immediately check their integrity in the packaging and the absence of defective elements. It often happens that after printing a purchase at home, people discover defective, bent or broken panels, the replacement of which is very difficult to obtain free of charge.
Installation technology for plastic ceilings

The connection of the panels is quite tight, but not airtight, and therefore the smallest particles of dust, lime and plaster from the ceiling surface can penetrate through the seams. In addition, mold often appears on the ceiling, especially in the corners, and fungal spores also enter the room and are inhaled by people. To avoid such troubles, you need to prepare everything correctly.
There is no need to level the ceiling, but it is necessary to remove peeling whitewash or plaster. It is best to go over the ceiling with a brush with stiff bristles, and then wipe off dust with a damp cloth. Cracks and through holes or cement mortar. Finally, the ceiling is primed twice with a deep penetration antifungal compound.
Prices for mixtures for leveling walls and ceilings
Mixtures for leveling walls and ceilings
Marking for the starting profile

In order for the ceiling to be level, the panels must be located in one horizontal plane. To do this, precise markings are made along the perimeter of the walls. starting profile. Depending on curvature work surface and the thickness of the wiring from the ceiling recedes downwards by 5-10 cm. Mark a point on the wall with a pencil and start marking the level from it. Marks are placed in each corner and in the middle of the walls, and then connected using bevels.
UD profile mounting


TO concrete walls the starting profile is secured with dowel nails or anchor bolts, having previously drilled holes along the marking line. TO wooden surface the frame is screwed long screws. The fastening step is 50 cm. The profile is applied to the markings, leveled horizontally and screwed. At the joints, as well as along the entire length, there should be no gaps between the wall and the profile.
Frame installation

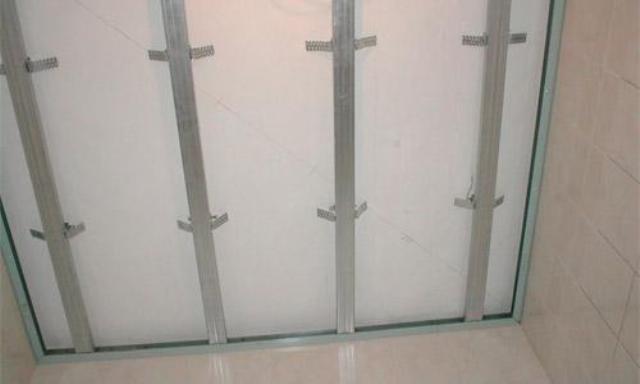
The sheathing slats are arranged in parallel rows every 30-40 cm. First, straight lines are drawn, 30 cm away from one of the walls. Metal hangers are screwed to the ceiling along these lines in increments of 35-40 cm. A sheathing made of profiles or slats is mounted on the hangers, the ends of which are inserted into the starting profile around the perimeter, then the structure is checked building level. All elements must be strictly in the same plane; any unevenness and deviations from the horizontal will lead to deformation of the ceiling.

Laying electrical wiring
When the frame is securely fixed, installation begins. Carefully consider the location of cables, luminaire outlet points, ventilation ducts. Each system should be isolated from the rest as much as possible, and cables, hoses and wires should be neatly bundled plastic clamps. It is desirable that the wires be corrugated and firmly attached to the ceiling; sagging of wiring elements is unacceptable. Where the lighting device will be installed, the sheathing must be additionally reinforced with guides. At the end, they once again check the horizontality and strength of fastening of the sheathing, and the absence of parts protruding beyond the boundaries of the frame.
Prepare the L-shaped strip and the first panel: measure the distance between the walls and cut the plastic with a hacksaw. The ends of the outer planks are cut at an angle of 45 degrees. It should be taken into account that the panels are attached perpendicular to the guide profile. The L-shaped strip is installed first; it is secured with self-tapping screws to the slats located along the perimeter of the ceiling. Stand on the side where the trim will end; you don’t need to screw the strip on yet. Next, the first panel is inserted on one side into the profile, holding it in a horizontal position along its entire length.


If the ceilings have large area, it is better to work with an assistant, since holding the panel suspended and at the same time attaching it to the sheathing is quite inconvenient. The free side edge of the panel is fixed with self-tapping screws to the supporting profile or slats. Thin plastic can be attached to wooden guides using a construction stapler. Each subsequent panel is mounted in the same way, carefully inserting the ends into the L-shaped strips.

When using panels of short length, it is recommended to stagger the transverse seams. This will make the ceiling look more attractive. Each element is trimmed sequentially as soon as the previous one is secured. This helps reduce material consumption and more precise fit of joints.

When installing panels in places where electrical wiring exits, holes are pre-cut in the plastic. required diameter. This can be done using a sharp stationery knife. The last strip is first adjusted to the width of the hole, then inserted into the L-shaped profile, and its edge is coated with glue and inserted into the ceiling. If you plan to use a ceiling plinth instead of a profile, the edge of the panel can be fixed with self-tapping screws - they will not be visible under the baguette.

When gluing the baguettes, you should very carefully apply them to the ceiling so as not to stain the plastic. If this happens, you must immediately wipe the glue with a clean cloth, because it is quite difficult to clean it after drying. At this point, the installation of the plastic ceiling is considered complete.


Prices for popular finishing wall panels
Video - DIY plastic ceiling
Ceiling made of plastic ceiling panels is one of the options for suspended ceilings. Such ceilings are usually installed in bathrooms, corridors and kitchens.
A room decorated with a plastic ceiling does not look very cozy. Installation of plastic ceiling panels in the bedroom is undesirable. No matter how manufacturers claim that the material is absolutely harmless, finishing the ceilings with plastic in the rooms in which you are long time- not the best the best option. In addition, if the length of the room is more than 3 meters, you will have to join the panels, and this looks ugly.
How to choose the necessary materials
Selection of plastic panels for the ceiling
Light-colored panels are usually used to decorate ceilings.
There are panels available for sale in colors that imitate slatted ceiling. In terms of cost, plastic ceiling panels are much cheaper than aluminum slats for finishing the ceiling, and it is sometimes difficult to distinguish by appearance plastic ceiling from aluminum rack.

Such panels have standard sizes— width 240 mm, length 3000 mm.
The photo shows plastic panels imitating a slatted ceiling.
 The advantages of finishing the ceiling with plastic panels include speed of installation. The ceiling does not need to be leveled plaster mixtures. Possibility to insert into suspended ceiling Spotlights allows you to create cozy lighting in the room. The price of plastic ceiling panels is affordable for economy class renovations.
Calculation of materials
You will need:
- panels
- aluminum profile
- dowels
- galvanized self-tapping screws with press washer
- ceiling plinth
- electrical cable
Standard panels are 24 cm wide and 2.7 m or 3 m long. Divide the width of the room by the width of the panel. When planning the finishing of ceilings in two rooms, calculate how best to mount the panels so that the scraps can be used in the toilet or on the balcony.
Buy panels designed specifically for ceilings. Wall panels are stronger and heavier in weight. Strength is not required for ceiling panels, but excess weight will create unnecessary load on the ceiling frame.
To install the panels you will need an aluminum profile. It is allowed to mount plastic ceiling panels on a lathing made of wooden beam, but in wet areas It's better to use a profile. Over time, the timber becomes deformed due to humidity and the panels may warp.
A U-shaped guide profile with a cross section of 27-28 mm is mounted around the perimeter of the room. It is marked PN, or marked PNP - ceiling guide profile.
To figure out which profile serves what purpose, look at the photo. The number of guide profiles is easy to calculate. The profile is produced in a length of 3 m. Divide the perimeter of the room by 3 and round to the nearest whole number.

To form the frame you will need a ceiling profile - PP. This profile is installed perpendicular to the panels every 60 cm. Based on the width of the room, you can calculate how many ceiling profiles you will need.
To attach the ceiling profile, hangers are needed.
The hangers are attached at a distance from the wall - 30 cm, then - after 60 cm. Based on the length of the profile, calculate how many hangers are required for each profile.

Dowels are used to attach the guide profile to the wall and hangers to the ceiling. The profile is attached to dowels in the corners and then every 20-30 cm. For each suspension, at least two dowels are required. Don't try to count exact amount dowel-nails. Take it with a reserve - dowels and nails will always be useful for subsequent repairs, so it’s not scary if two or three dozen are left over.

To attach the panels to the frame and connect the guide and ceiling profiles, you will need galvanized self-tapping screws - a 4.2x16mm press washer. The price of self-tapping screws is small - buy 150-200 pieces.
Ceiling plinth for plastic panels is used in two types - PVC plinth or regular polyurethane. The PVC skirting board is installed before the installation of the panels begins. If the walls in the room are uneven, it is better to cover the joint between the wall and the suspended ceiling with a polyurethane plinth.
PVC skirting boards bridge the gap between the wall and the ceiling, and at the same time serve for the installation of plastic panels.

The ceiling plinth is installed around the perimeter of the room. The amount of plinth can be easily calculated by dividing the perimeter of the room by the length of the plinth and rounding the resulting value.
Buy required amount lamps and electrical cable for connecting them.

When installing panels on wooden sheathing you will need timber, slats and brackets to attach the panels.
How to properly install plastic ceiling panels
Tools
- level
- pencil or marker
- roulette
- hammer drill
- metal scissors
- screwdriver
- hacksaw or jigsaw
- drill with crown
- construction or stationery knife
Operating procedure
Using a water level, mark a horizontal line around the perimeter of the room. You can use a regular building level, but a hydraulic level gives fewer errors. Make sure that there are no air bubbles in the connecting hose. The easiest way to make marks is with a laser level, but a laser level is an expensive tool and not everyone has it. home handyman it is in stock.
Secure the guide profile to the marks. The profile is attached to dowels at a distance of 30-50 cm. Cut the profile to length. The profile can be cut with a grinder, but it can be cut quite well with metal scissors. It may be faster with a grinder, but it’s easier with scissors.
Use a hammer drill with a concrete drill to make holes in the wall. Secure the profile with dowels.

Attach hangers for the ceiling profile. Suspensions are necessary for reliable fastening frame to the ceiling and to adjust the level at which the profile will be mounted.

Attach the PVC skirting board to the guide profile.
Install the ceiling profile to which you will attach the panels. The PP profile is attached to the hangers and to the PN profile with self-tapping screws and a press washer. The ceiling profile is attached perpendicular to the direction of the plastic panels.

When using PVC plinth, secure the plinth with self-tapping screws to the guide profile around the perimeter of the room. At the corners, the plinth is cut at an angle of 45°.
Route out the electrical cable for installing the lamps.
Cut the panels to length. The panel is cut with a hacksaw or an electric jigsaw.
Place the edge of the panel into the groove of the baseboard. Secure the panel shelf with self-tapping screws to ceiling profile. The next panel is inserted into the groove of the previous one and secured with self-tapping screws in the same way as the first. The photo shows the installation of panels without a PVC baseboard; a hole for a lamp is cut along the edge of the panel.

Holes for lamps are cut before installing the panel using a drill with a crown or a knife.

When installing the last panel, cut it to width.
Install and connect the lamps. The lamps are connected in parallel.

Glue using liquid nails polyurethane baseboard, if you did not use PVC plinth.
When installing panels on a wooden sheathing, the principle of operation is the same. The panel is attached to a block or slats using staples.

Answers to frequently asked questions
How to mark the flow level - correctly or beautifully?
When installing plastic ceiling panels, it is important to install the suspended ceiling evenly along the entire plane. It happens that the tiles that line the walls are placed incorrectly. It turns out that if the ceiling is mounted strictly according to the level, errors in laying the tiles will become noticeable. It is permissible to mount the ceiling parallel to the last seam of the tile. It won’t warp too much, but it won’t be visually noticeable that the tiles are not laid quite level.
How to secure the last panel?
The last panel is not fastened with self-tapping screws; it is inserted into the groove of the previous panel and into the groove of the PVC skirting board or guide profile. Due to its light weight, the panel is firmly held in its position.
How to install polyurethane ceiling plinth?
Polyurethane or foam ceiling plinth is glued with liquid nails. The corners are cut according to the miter box. If a gap forms between the wall and the baseboard, it is sealed with acrylic sealant.
Video instructions for installing a plastic ceiling.
Citizens who want to acquire an inexpensive and functional decorative element should study the question of how to make a plastic ceiling with their own hands. The design gained its popularity due to its versatility. You can install it in the restroom, living room, bedroom or hallway. At the same time, there is no need to allocate significant funds for a full-scale renovation. Another “plus” is quick installation, which does not require construction qualifications.
In addition to the characteristics mentioned above, a design of this kind is not susceptible to moisture. Thanks to this, it can be installed in country house or in a building where there are changes in humidity levels.
Even if there were signs of flooding from neighbors in the restroom or bathroom where the plastic ceiling is planned to be installed, a beginner can handle the installation without any problems.
Thanks to the use of unpretentious materials, it is easy to care for the ceiling. It is enough to wipe it with a dry cloth from time to time.

Among other advantages of the design, builders highlight the following:
- The ability to hide even significant ceiling defects. This includes construction errors, communications, wiring, etc. At the same time, panels made of PVC make it possible to integrate, for example, a spot lighting system.
- Universal nature of the design. This means that the plastic ceiling can be assembled in a room with any architectural style without harming it.
Another argument in favor of purchasing a plastic ceiling will be its durability. If you follow the manufacturer's recommendations and there is no emergency at home, the structure will last at least 15 years.
Recommendations: how to make a plastic ceiling yourself
As soon as the parameters of the room where you plan to hang the plastic ceiling with your own hands are written down, you can safely go to the store for building materials. In order not to make a rash purchase, you need to understand the various modifications of suspended ceilings. Firstly, they can be rigid and heavy - the wall type, and lightweight and at the same time fragile - the ceiling type.
The second type needs to be acquired only when a person has sufficient experience. Even slight pressure with a tool on a plastic surface will cause a noticeable indentation to appear.

If we talk about other varieties plastic structures, then designers highlight the following:
- With applied decorative varnish;
- Cheap - represented by processed PVC (do not contain external coatings);
- More expensive ones are presented on the market in panels with printed patterns.
It must be remembered that ceiling coverings differ in a number of other parameters. We are talking about color, surface texture and width. Because of this, it is important to carefully examine your potential purchase.
Choosing a plastic ceiling with your own hands in a store
Not everyone can boast of having a construction education, but this is not a reason to refuse a thorough inspection of plastic ceiling panels. This can be done without special tool. First, the geometry of the outer surface is studied.
Irregularities, chips or unevenness when applying a design are all reasons to refuse the purchase.

In addition to the listed nuances, the buyer should check the following:
- The number of stiffening elements used - the more there are, the stronger the fastening of the plastic structure.
- Take 2-3 panels and check how tightly they fit together.
- Squeeze the PVC panel tightly and check its strength. If the product has retained its shape and appearance surfaces, then finishing ceiling walls will prove to be durable.
The analysis of plastic panels ends with a bend test. This is done using the example of one of the two corners. The appearance of a chip or even a slight crack is a reason to look at another panel.
High-quality installation of a plastic ceiling on your own
You can only attach a plastic ceiling with a building level in your hands. First you need to make sure that the ceiling profile is relatively level. After this, 10 cm is retreated from it. You can retreat even more. It all depends on the height of the particular room.
The next step is to install the transverse profile. It acts as the basis for fastening the PVC panel.
Once the profile is fixed, you need to attach the L-shaped fasteners to it. This is done using a self-tapping screw.

The further procedure is as follows:
- Internal communications are being laid;
- Filling the space with PVC panels;
- Create holes for installing the lighting system;
- Installation of the first panel always starts from the wall;
- Each is cut with a hacksaw in accordance with the parameters of the ceiling;
- After installing the first panel, it is fixed with self-tapping screws, and each subsequent one is inserted into the previous one.
If you have plans to use plastic skirting boards, then in this case you need to insert the edges of the installed panels into the L-shaped fasteners located at end walls. The installation process is completed by “adjusting” the width of the last panel. It’s worth preparing yourself for the idea that you’ll have to tinker with this. You will need a ruler and a fine metal hacksaw.
DIY plastic ceiling (video)
So, what can we say in the end about the plastic ceiling - it’s inexpensive and beautiful. Interesting ideas And necessary tool will do their job. All that's left to do is to put in a little effort!
For finishing and upgrading the walls and ceilings of bathrooms and kitchens, it was mainly used tile, paint, whitewash, washable wallpaper. Or the simultaneous use of two or three of the above coatings was proposed.
But for about 15 years, plastic plates made of polyvinyl chloride have been used for these purposes, which have become very popular. Plastic plates have many positive qualities:
- Relatively easy installation which even a non-professional can perform alone. The main thing is to be able to handle conventional and power tools well.
- Fast installation. Ceiling cladding can be completed in a few hours.
- Color solution. Nowadays you can find slabs of classic and completely unimaginable colors on sale. This will help you find what you were aiming for.
- External finishing of slabs. The arsenal of plastic coatings is varied. There are wood colors different breeds, mirror coating. The panels are matte, shiny, glossy.
- Relatively inexpensive when compared to common species coverings (for example, with tiles).
- Easy to process. Cut with a knife or scissors.
- Helps reliably disguise wiring, pipes or surface irregularities.
Characteristics of PVC plates
- Width: 25-50 cm.
- Thickness: 5-10 mm.
- Length: 2.7-3.0 m or 6 m.
Polyvinyl chloride as a covering material:
- strong enough - it is difficult to tear it apart with your hands;
- very plastic; not afraid of water;
- does not darken in the sun;
- does not conduct sound;
- environmentally friendly;
- has some thermal insulation due to air channels inside;
- some species can withstand temperatures of 70-80 degrees;
- easy to clean;
- has no smell.
Newfangled LED lamps can be directly mounted on PVC panels.
Negative qualities include the fragility and flammability of the material.
If it is bent too much, it breaks, and if there is an accidental impact, a dent may appear on it.
Selecting panels and calculating the amount of material
For a room with a height of 2.70 m and above, you can choose panels of any color, but it is better to choose pastel, neutral colors. For a low room you need to take light colors or mirror plates. They give a visual effect of increasing volume.
Advice: Do not confuse ceiling and wall panels.
This is a mistake made by many individuals who carry out repairs themselves. It's better to ask the seller. At the very least, it is useful to know that ceiling tiles weigh less than wall ones.
- Calculation of PVC plates, crossbars and plinths
It is easy to calculate the number of panels. It is enough to divide the area of the entire ceiling of the room being repaired (the product of the length of the room by its width) by the area of one PVC slab. Then add another 15-20% necessary for sealing various kinds ruptures.
For example, let's say you are renovating a bathroom. It has a riser installed, and under the ceiling there is a horizontal pipe. For this option, which is not uncommon in old buildings, a special calculation is required and 15-20% of the excess will come in handy.
Advice: Place the panels parallel front door.
Moreover, if you start installation from the far wall, then each subsequent slab will hide the seam, which will allow you to get the effect of an almost seamless coating.
To calculate the length of the crossbars (metal profiles or wooden slats), it is necessary to draw a plan diagram of the ceiling, reduced proportionally.
The main metal profiles (or slats) should be positioned perpendicular to the entrance door. A gap of 50-60 cm should be maintained between them. Based on the drawing, we determine the number of crossbars, taking into account 4 pieces of rigid profiles fixed around the perimeter of the room.
Ceiling plinth is much easier to calculate. We measure the perimeter with a tape measure and buy the required quantity, taking into account the length of one strip of plinth - 3 m.
If the ceiling needs to be lowered, then the number of U-shaped fastening plates must be calculated.
For example:
The room measures 2.6 x 2.4 m and the door is on the long side.
You have chosen slabs 3.0x0.3 m.
To calculate this option, you don’t have to divide the area of the slabs and ceiling, because the length of the slab covers the length of the room. You just need to calculate how many PVC strips will fit in the width of the room.
2.4 / 0.3 = 8 stripes.
A room drawing might look like this:
Option 1 – strengthening the profiles directly on the ceiling of the room;
Option 2 – the crossbars are secured to U-shaped fasteners (depicted as squares).

From the first picture it is clear that there are only 8 profiles (including 4 along the perimeter).
To strengthen them on the ceiling and walls you will need 16 dowels (two for each). Self-tapping screws are calculated based on the number of strips and profiles. PVC panels are secured to each crossbar with two self-tapping screws.
We got 8 stripes, 4 crossbars. The side ones can be ignored. The panels are simply inserted into a special groove near the wall. We calculate:
8x4x2 = 64 screws + 36 for reserve (for good measure) = 100 pieces.
In the second picture, 2 dowels are needed for each U-shaped fastening and for the side profiles on the walls
For fastenings: 8x2 = 16.
On the sides: 4x2 = 8.
Total - 24 dowels.
To strengthen the strips, it is necessary, as in the first option, 64 self-tapping screws. But besides this, you need 16 more screws to secure the profiles to the U-shaped plates - two for each.
Panels and types of plastic profiles
The strips themselves are hollow and divided into sections. This is why they weigh so little. Vertical stiffening ribs add strength to PVC sheets.

But the panels can only be fixed on a plane. When you reach the wall, if no measures are taken, a gap will remain. To eliminate this problem, there are PVC profiles. They are different types, but the following options for plastic profiles are most quoted and used:

- Starting. Attached to walls (perimeter) to seal the ends of the coating.
- F-profile. Seals ends at protruding corners. For example, in some combined bathrooms, the toilet is separated from the bathtub by a wall. This profile will close the corners when moving from one part of such a bathroom to another.
- N – profile. Serves for joining two panels (extension).
- Plastic outer corner. It is used to eliminate cracks, both on internal and external corners.
- Ceiling plinth. Used for decoration and for sealing ends, just like the starter.
- Corner PVC universal. To eliminate cracks in corners. It's just glued on.
Preparation for installation and marking
First you need to clean the surface of the old ceiling from plaster and chips. After all, crumbling elements, such as whitewash or putty, can damage the new surface or add pressure to the slabs. It is necessary to carefully prime the old ceiling.
When lowering the ceiling, you need to take into account the standard sizes of the used lighting fixtures, the presence of various types of communications (pipes), projections (beams), hidden wiring or unevenness. Only after taking these values into account is the lowest point of the ceiling determined. From there they begin marking the planes and frame.
- We attach a ruler to the found point, lower it to the required distance and put a mark.
- We draw a working line on the walls (along the perimeter, starting from the mark), indicating the level of the frame of the plastic surface. This operation is performed with twine (cord) painted with colored chalk. You can use a homemade water level or
- purchased - laser.
- Next, we mark the locations of the support guides located on the walls. They should be mounted on walls perpendicular to the front door. Then, when installing PVC strips, the seams will not be noticeable.
- Then we draw lines (retreating by 40-60 cm) for the remaining profiles or, if the ceiling level is to be significantly lowered, for the U-shaped elements.
After this, we move on to constructing the frame and strengthening the panels.
We install a suspended ceiling made of plastic panels
We start by securing the support guides. We install one profile along the drawn line and drill the wall through it in two or three places, preparing holes for dowels.

To connect lamps (if there are several of them), it is desirable that the profiles are 1-1.5 cm away from the ceiling; in extreme cases, it is necessary to cut holes in them.
Having secured all four support guides to the walls, we proceed to installing the auxiliary profiles. If the ceiling is to be lowered, then U-shaped ceiling fasteners must be installed on its surface.

They are installed on one or two dowels or on anchors with wedges (depending on the design) every 50-80 cm and bent slightly from the ceiling. You cannot bend them completely - they will interfere with the installation of profiles.
We insert the additional profile at a certain angle with one end into the main guide. Then we insert the other end into the profile opposite, align it along the drawn line or along the U-shaped plates and screw it with self-tapping screws, first to the wall guides, and then to the fasteners on the ceiling.


Jumpers can either not be installed at all or mounted only in places where heavy objects are secured (chandeliers, etc.).

Having thus strengthened everything metal profiles carry out wiring (lighting and power cables). For reliable insulation and fire safety, they are pulled through rubber or PVC hose. At the attachment points of future lighting elements, hinges (15 cm) are lowered.
Installation of slabs
Advice: Before installation work Remove the film from the PVC elements, if any, otherwise you will have to tear it off along with the finished ceiling.
Let's get down to the main part of the work. The strips must first be cut to the size equal to length rooms minus 5-10 mm. This is necessary to ensure easy and quick installation. The installation process itself goes like this:
- Either a U-shaped profile or a ceiling plinth with the same groove is screwed to the main guides with self-tapping screws. On side walls You can strengthen the PVC corner with a universal or starting profile.
- A strip of polyvinyl chloride is inserted into a U-shaped PVC element. Many people cut off the latch, thinking that it will not fit tightly into the PVC profile. But this is a misconception.
- Strengthen the other side of the first PVC plate with self-tapping screws with an enlarged head or using special homemade fasteners cut from tin. These fasteners hold the strip with their tongue, which has a clearly larger area than the head of any screw and will not interfere with the next strip.

They are fixed as follows:
- insert the tongue into the groove of the PVC strip;
- press the element together with the panel against the guide;
- secure.
Advice: When pressing, it makes sense to pre-drill the wings of the homemade element and the guide with a thin (2-2.5 mm) drill. Then the screw will screw in easily.
If you used wooden slats for the sheathing, then the wings of a homemade fastener are screwed to both sides. If you have plasterboard profiles, then you can either screw the fasteners to the sidewalls or simply bend the protruding parts of the wings and press them tightly against the plane of the sides of the guide with pliers.
The mating part of the second strip is inserted (along its length) into the open groove of the first strip. Moreover, first insert the corners of the second strip, so that one of them fits into the lock of the first plate, and the second into the side PVC profile. Next, with light pressure, insert the entire strip into the groove, so that its second end fits into the PVC element (starter or corner) located on the opposite side wall.
You must act carefully, otherwise you risk breaking off part of the lock clamped by screws or fasteners.
If the strips are closed unevenly, then you should insert a thin block, a wooden ruler or a piece of the mating part of the same PVC panel into the locking groove of the last strip. Move this part along the groove by gently tapping with a hammer, or wooden block Gently drive the strip in until it stops.
If according to the plan it is planned to strengthen a lamp (spot) on the strip, then the hole for it can be cut in any way cutting tool immediately after installation. You just need to cut carefully so as not to overdo it. Next, the wires are brought out into the hole and the lamps are connected, although this can be done later.

You can also perform this operation on the floor before installation. First, attach the panel to the ceiling, mark the holes, lower it to the floor, cut it, and then secure it. But this takes up extra time.
- Installation of the last PVC panel
This is worth talking about specifically. In the manner described above, all longitudinal elements except the last one are strengthened.
Some inexperienced craftsmen suggest gluing it to make installation easier. liquid nails. But “the game is not worth the candle.” To do this, you need to trim the last fragment of the ceiling very evenly. But due to the design of the panel, this is very difficult to do.

When cutting using a ruler or slat, even with light pressure, the plastic bends and the knife wiggles to the sides. It is very difficult to obtain a high-quality cut. Therefore, you need to cut from the P-profile side. But in this case there is a noticeable seam between the panels. After all, nearby there are incoherent lock and mate parts.
Therefore, it is better to install in the usual way. Let's talk about him specifically. This process is confusing to many. After all, you need to simultaneously insert the strip into four grooves:
- penultimate panel lock;
- gap in the U-shaped profile;
- two grooves on the side walls.
Oddly enough, but there are no difficulties. First you need to prepare the PVC element for installation. It is necessary to set the width of the future ceiling fragment. This can be done with a ruler, which is inserted into the U-shaped profile on the wall perpendicular to it and the divisions are counted to the penultimate strip. This will be the width of the last fragment.
Some people will ask a reasonable question that we did not take into account the width of the groove (5 mm) of the penultimate PVC element, and the last fragment of our ceiling will dangle. But this is precisely the “trick”, especially since you have done this process one or several times at home when you inserted glass into bookshelf or to the sideboard.
The depth of the U-shaped profile on the wall is 1 cm, and the depth of the lock is 5 mm. Therefore, if you insert the last fragment into the profile and then pull it out by snapping it into the lock, the entire structure will be assembled properly.
A second question arises. What about the side grooves? The answer is simple. This is why we cut the strips. It is necessary to slightly bend the last strip in an arc and insert it into one of the side grooves until it stops. Then gradually push it along its entire length into the U-profile.
- Attach construction tape to the strip in two places. By pulling it you can pull out the panel and lock it in the lock. Just try to pull it parallel to the surface of the ceiling, otherwise the tape will simply break off.

- Before installing the last fragment, wrap two thin strips of dense material over the edge. After sliding the panel into the P-element, pull the ribbons. The friction force and tight connection will not allow them to jump out immediately, and the strip will move forward. When it snaps into place, use a screwdriver or knife to slightly bend the edge of the U-profile and the tape will come out. As a last resort, just cut it off.

At the end of the work, install skirting boards or other decorative and hiding elements. Clean the ceiling from adhering chips, dirt, and fingerprints. Connect and insert the lamps into the holes if you did not do this during installation. This completes the installation of the ceiling from pvc panels finished.


