Installation of entrance door slopes. Slopes for entrance doors How to make internal slopes on the front door
The front door forms the first impression of your home, so it must be both reliable, aesthetically attractive, and well-installed. At the same time, the full installation cycle includes stages that are often neglected out of ignorance. These include finishing slopes front door, which is necessary not only for the beauty of the design, but also for high-quality operation over time.

What it is?
As practice shows, slopes are often confused with platbands, since platbands are their external, decorative part. By themselves, they serve only an aesthetic function. But the slopes are involved in ensuring tightness, sound insulation and thermal insulation, and increase the resistance of the front door to burglary.

By definition, slopes are the internal and external parts of the wall that “surround” the door frame. Slopes are also considered to be the left, right and top sides of the doorway in which a door is supposed to be installed, but is not installed. Not all types of doorways have slopes on both sides. Sometimes they may be absent from outside, but from the inside there is in most cases.

The design of the door slope is quite complex. High-quality slopes are not just parts of the wall protruding beyond the frame, they are optimal combination materials, each of which is necessary to perform a separate function. Materials are applied according to the “layer cake” principle.
The first layer is rough. To create it we use:
- Primer. It is applied to the cleaned wall surface as a pre-finishing coating. Primers are necessary to level out the absorbent properties of the surface, as well as for improved “adhesion” of the following materials to it.

- Styrofoam. This layer is not required, but is desirable in cases where the wall needs to be insulated. This is true for apartments on the lower floors and private houses.

- Plaster. The primer improves the adhesion of materials to the wall, but does not level the surface. Plastering is necessary to fill irregularities, depressions or cracks in the wall. This process is the most labor-intensive and time-consuming and requires certain skills and abilities.

As an alternative, you can use a material that is easier to use - drywall. This option allows you to quickly prepare the surface for further types of finishing, but it is not suitable in all cases. In the Russian climate, it is more often used for interior decoration or in warm regions with high humidity.
- Reinforcing corners. These are thin but durable metal corners necessary to protect plaster on slope corners. The front door is a place with a lot of traffic, and the corners of the opening are often touched, hit, or scratched. Without proper protection, plastered corners will quickly begin to crumble and lose their presentable appearance.

- Putty. With its help, all defects are smoothed out after installing the corners. Putty compounds are laid down in an uneven layer, so after they dry, the surfaces of the slopes need to be cleaned. For this purpose, fine-grained sheets of sandpaper or low-power sanders are used. Furniture is also suitable if it reaches hard-to-reach places.

- Re-priming before application decorative covering.


The second layer is finishing, or front. Strict rules There is no choice of finishing options. It depends only on individual preferences and financial capabilities. The only condition that must be met is to choose a finish that is harmoniously combined with the door leaf and wall decoration.

How to decorate the inside of the apartment?
Slopes protrude from both the outside and inside of the door. Accordingly, there are two types of finishing - external and internal. The external one, as a rule, is less variable. The main focus is on design door leaf, and the slopes echo either it or the wall decoration. More often these are practical and concise options that do not attract attention.


Inside an apartment or house, the finishing of slopes becomes part of the interior. It plays a decorative role, so the types of materials and methods of decoration are of great importance.
Finishing with facing materials from the inside can be of the following types:
- Plastering the surface.
- Gluing finishing materials.
- Frame sheathing.
- Coloring.

For the first type, plaster, primer, water and that’s it. necessary tools. This process takes a lot of time, but makes it possible to fill up all the unevenness, insulate the structure, and make a layer of the required thickness. Decor from other materials is often applied on top of the plaster, but in itself it is already considered a finished finish, and therefore refers to the basic techniques in repair.


“Clean” slopes after plastering can be easily painted in any color. suitable color, while they are polished until smooth or, on the contrary, left in relief.
Can be used for decoration following materials:
- Ceramic tiles (tiles). It is distinguished by its rigidity, moisture resistance, hygiene, low price and a wide range of colors, shapes and textures. Behind ceramic surface easy to care for, however, the tiles can crack or break off due to mechanical damage, and during the replacement process you will have to work hard so as not to damage neighboring elements.


The undeniable advantage of tiles is the many possibilities for design. The mosaic looks especially original. It can be made from solid tiles small size or from small pieces. Mosaic fragments are received artificially from tiles by cutting them into pieces of the required size, and handymen can use broken tiles, which are considered unsuitable, for this purpose. The result is original and unique, and the cost of materials is minimal.
Any construction adhesive is suitable for gluing tiles. Apply it evenly with a plastic spatula, and the seams are rubbed down after a day with a rubber spatula.
- Porcelain tiles. This material is often confused with ceramic tiles. Indeed, in the manufacture of porcelain stoneware, the same composition of the substance is used as for tiles, but the production technology is very different. As a result, the tile has a colored coating only on top and becomes unsightly when chipped, while porcelain stoneware has a uniform color throughout the entire thickness of the slab and damage to it is less noticeable. Also, its structure is denser, so it is more resistant to damage. In addition to being moisture-resistant, environmentally friendly and durable, it is also frost-resistant. In appearance, this material is more noble, but the color spectrum is very limited and its cost is higher than for ceramic tiles.


- Decorative rock. It is truly an interior decoration, although it is not always appropriate and is expensive. The peculiarity of this material is that it can be used to imitate real masonry. He has an attractive appearance, adds zest to the interior, impeccable in terms of performance characteristics. The stone does not chip, is easy to clean, is durable and safe materials. To fix it on the surface of the slopes, construction glue is used, but there are also ways to “cover” the surface with decorative stone.

- Wallpaper. Wallpapering is perhaps the easiest and most budget-friendly way to decorate. It is most convenient to stick wallpaper on slopes with plasterboard trim. The glue will “grab” on the plaster, but the surface will have to be leveled especially carefully so that “bubbles” do not form on the wallpaper.


Considering the large traffic at the entrance to the room, it is better to choose wallpaper that is washable and in dark colors.
The openings are sheathed using the following materials:
- MDF. Panels made from fine particles are very popular in all types of finishing. They are universal for any interior, look aesthetically pleasing and have a number of other advantages: durability, variety of coatings that imitate different breeds wood, ease of installation, improved sound insulation and thermal insulation in the room.

- Chipboard. Finishing chipboard is the easiest way to tidy up part of the doorway if, after installing the door, it looks bad. In this case, you won’t even need a primer or putty. It is enough to sheathe the surface with even sheets that match the tone and pattern of the door leaf.

- Laminate. Laminate siding is widely used for two reasons: it is inexpensive and looks much more solid than non-laminated materials made from reclaimed wood. The basis of the coating is fiberboard or chipboard (therefore, “sewing up the slopes with chipboard” means the same as laminate), and on top it is decorated with a polymer film. The most common option is wood styling valuable species, but there are also other shades in the dark and light palette. It has a number of advantages inherent in all wood-based materials, as well as certain disadvantages. Thus, among the most common disadvantages are hydrophobia (the material can delaminate and swell from water) and average wear resistance.

- Extras. Covering internal slopes with additional wood is more of a necessity than a decorative element. Extensions are narrow plates made of different materials, which are necessary for masking slopes whose width is more than 7 cm. As a rule, they are used when the door and slopes must be sheathed in the same style and with the same materials.

- Drywall. The choice of drywall is relevant when you need a high-quality and budget-friendly result that is convenient to work with your own hands. In addition, drywall perfectly levels the surface for decorative finishing in the future and enhances the insulating properties of the entrance door.


- Plastic. No matter how versatile MDF, laminate and similar materials are, plastic door requires decoration of the adjacent space with PVC-based materials. The use of sandwich panels is especially popular. They have variable widths - from 5 to 150 cm, which allows you to cover each side of the slope with just one piece.

The performance characteristics of the product are also excellent: aesthetic appearance that lasts for a long time, biostability, resistance to humidity and temperature changes, the presence of air sections inside the panels that ensure the preservation of heat in the house, hygiene.

Modern technologies plastic manufacturers guarantee it environmental safety and non-toxic.
- Siding. The characteristics of siding panels are very diverse, because they are made from various materials– from aluminum to plastic. Aluminum, copper, wood, basement and vinyl siding are used for finishing slopes.

The best option is vinyl. It is a monolithic PVC panel, main feature which is flexibility. It can be given absolutely any shape, ideally adjusted to corners without joints or gaps. Vinyl is not subject to rotting and burning, is not afraid of water, does not crack due to temperature changes, is easily cleaned of dirt, and is not of interest to fungi and insects. The front side of the panels can be plain, with a pattern, stylized as stone, wood or brick.

Frame cladding involves the preliminary installation of a metal (aluminum) or wooden profile around the perimeter of the doorway, to which any material is subsequently attached using self-tapping screws. This method is considered the most labor-intensive, since before attaching the profile it is necessary to prime and level the slopes with cement mortar.

Some types of materials (plaster, chipboard, MDF and plasterboard without a decorative coating) need to be painted to blend harmoniously with the interior of the room.
For these purposes the following are used:
- Acrylic paints. They are convenient to add to the composition for plastering the surface. This simultaneously reduces the number of finishing steps, since surface leveling and painting occur simultaneously, and makes damage less noticeable, since the entire layer of plaster is painted over;
- Water-based. Such paints can be added to the plaster or painted on the wall over the leveling layer. Using acrylic and paints on water based, it is important to remember that they must be primed from above, otherwise the surface will get dirty. You can dilute the primer yourself using PVA and water in a ratio of 1:5;
- Latex based paints can also be used in two ways, but their advantage is that a final primer is not needed. Latex compounds are not hydrophobic and are easy to clean;
- Alkyd and oil. These compounds are indispensable in conditions high humidity. They are more wear-resistant and dense, but they are more difficult to work with due to their thick consistency and toxic odor.
How to insulate?
Thermal insulation and sound insulation are the functions of the front door, which partly depend on the type of finishing of the slopes. To insulate a room, you don’t have to run to the store for a heater. First you need to take care of maximum tightness, and you should start with the front door. This will not only increase the level of comfort in the house, but will also help in the future to save money on utility bills.

Insulation of slopes from the inside is carried out step by step:
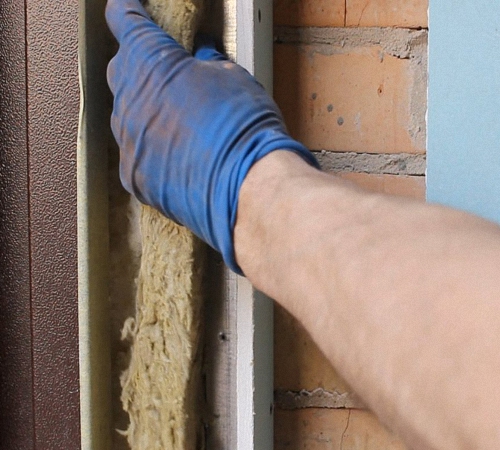
- Selection of materials. The leading positions are occupied by sandwich panels, plasterboard, polystyrene foam, mineral wool, and polystyrene. Experts recommend choosing polystyrene, which is superior to other materials in many respects. At a relatively low cost, it is capable of thermoforming and vacuum forming, is resistant to moisture and chemical treatment, does not smell, is environmentally friendly, and is amenable to various types of processing. If there is no polystyrene, it can be replaced with a mineral slab (wool).


- Preparatory work. They include all measures to clean the work surface. It is necessary to cut off the polyurethane foam, remove the old coating, if any, and eliminate as much unevenness as possible. After removal old plaster the surface must be dusted with a vacuum cleaner and a damp sponge.

- Primer and putty. It is necessary to prime the surface of the slopes. This will ensure high-quality adhesion of subsequent layers to the wall, and also minimize the likelihood of fungi and bacteria appearing on the wall. Any deep soil will be suitable for this purpose. After applying it, the surface should be allowed to dry for 3-4 hours. Repeated application of primer to plaster is acceptable.

It is not necessary to putty the slopes, but it is advisable, especially if the surface has many defects, chips and depressions. All these minor gaps greatly affect the insulation properties of the front door.
- Installation of insulation. At this stage it is the turn of the insulating material. Polystyrene boards and mineral wool glued with specialized adhesives. The glue is applied to the slab with a spatula, then it is applied to the surface of the slope and adjusted to the level. The drying time for the glue is at least 24 hours. After this, the plates are secured with dowels.

- Fastening the insulation. Ideally, polystyrene or mineral boards should be covered plastic mesh for internal finishing works. This will protect against cracks and unevenness in the future. The glue is applied to the mesh in layers, each layer dries to hardness in 6-12 hours.

- Leveling the surface. Here again you will need putty. You can level the surface with up to 2-3 layers. Then you need to let it dry for the time indicated in the instructions on the container, and treat it with fine-grained sandpaper. The grain number on the sandpaper package is at least 100.

- Final finishing. Includes the application of a colorless primer followed by painting or any other method of decoration.

It is important to consider that finishing materials have not only their own characteristics that affect thermal insulation, but also their weight. It is necessary to calculate in advance whether the insulated slope, for example, will withstand the weight of porcelain stoneware or lining, or whether it is worth giving preference to paint, plastic, or wallpaper.
To learn how to make a slope for the front door from MDF panels with your own hands, see the following video.
Colors
Slopes are a small detail that can either support the style in the interior or completely break out of it. An inappropriate color of decoration will become an element that violates the integrity of the overall picture, so it is important to choose the right color in accordance with the design of the door and the decoration of the walls, floor and ceiling in the room.
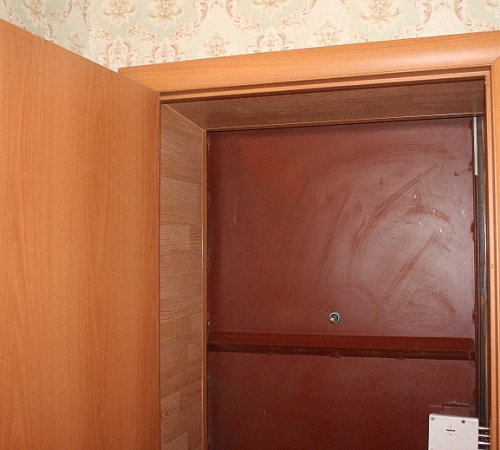
As a rule, renovations in an apartment affect almost everything. It may also include replacing windows and doors.
In order for the doors to look neat, it is necessary that the finishing of the slopes from the inside of the front door be done with high quality.
Since indoors it is possible to constantly maintain the same temperature regime, then the finishing of the entrance doors from the inside can be done in any way finishing material.
For this they often use:
- Plastic panels.
- Siding.
- Plaster.
- Decorative rock.
- Wooden lining.
Decorating the front door with plastic panels

On this moment plastic panels are very popular. All this is due to their high technical characteristics.
They are quite easy to attach and give a neat look to any surface.
Plastic properties:
- Practicality.
- Durability.
- Easy installation.
- Easy to clean.
- Moisture resistant.
- Not subject to temperature changes.
- Resistant to high temperatures.
- Do not fade in direct sunlight.
But these are all the properties that plastic panels have. In order to fix them on the surface, you will not need to pre-level it, which cannot be said about the application decorative stone in finishing doorways(see Beautiful decoration of doorways with decorative stone).
Installation of plastic panels on the internal slopes of the entrance door

To install PVC panels on the entrance door slopes, you will need some tools and additional materials:
- Wooden bars.
- Self-tapping screws for wood.
- Screwdriver.
- Plastic panels.
- Internal plastic corners.
- External plastic corners.
- Sealant.
- Construction stapler.
- Starting guides.
For reference. Plastic is considered a universal finishing material that can be used in any interior.
So:
- The plastic is attached to the sheathing. Initially, you will need to evaluate the surface; if there are significant irregularities on it, then they are eliminated using a spatula or sandpaper to ensure even attachment of the sheathing to the surface.
- The lathing for mounting plastic panels is made of wooden blocks. Each element is fastened to the other using self-tapping screws and a screwdriver.
Box with polyurethane foam and other details that should not be conspicuous. As a finishing touch to the installation. To carry out this procedure it is not necessary to resort to assistance construction companies– you can make and install slopes yourself and at home. This will require building materials, tools, patience and free time.
Why are slopes needed?
Installation door slopes It begins not with acquisition or manufacture, but with an understanding of the main function. or wooden detail, which hides the fastenings of the door frame and other elements of the entire structure. It serves not only a decorative role, but also a protective one - hinges and other parts hidden under the panels make it difficult for intruders to break into the door, thereby increasing the door's burglary resistance.
What are they?
Slopes of entrance doors can be divided into two types according to the material from which they are made. The following types exist:
- Wooden. Panels made of wood have an attractive appearance, high strength and reliability. Disadvantages include sometimes high cost, as well as partial unsuitability for installation in wet areas.
- Plastic slopes. A cheap and no less common option, unpretentious to the conditions of use. Plastic slopes are not very durable, but with proper use they can last for decades. Door slopes made of plastic can be made in different designs - they will suit any interior.
You can make panels not only from plastic and wood, but also from plasterboard and MDF. All these materials have features, advantages and disadvantages that should be taken into account when choosing to make slopes for entrance doors yourself.
The choice of slope material should be based not only on personal preferences, but also taking into account the conditions of use and other factors (for example, the available budget).
Getting ready to do the job
Before you start installing slopes on the front door, you should carry out preparatory work. You need to prepare a tool that includes:
- Electric drill.
- Wide spatula (you can also use a narrow one).
- Building level.
Let's start making slopes
A popular method by which slopes for the front door are made with your own hands is plastering. Before doing so, do not forget to clean the surface on which installation will be carried out, and also prime it. Next follow the instructions:
- Install beacon profiles along which the plaster will be leveled in the future. The position of the beacons is adjusted using building level.
- Using a solution prepared in advance (one part cement to four parts sand), fill in all the potholes and the deepest places on the surface. Wait for it to dry.
- Focusing on the position of the beacons, level the slopes, while stretching the solution along the beacons. Repeat this step for each side and wait until dry.
- After the plaster has dried, treat the surface with putty and walk over it with fine sandpaper to even out the texture.
At this point, the plastering of the door slopes is considered complete. After completing the work, you can apply varnish, paint or wallpaper to the surface to give it an attractive look.
From plasterboard
You can make front door slopes with your own hands without plastering, using ordinary drywall. There are two paths here, one of which you can take:
- Attach sheets of drywall with glue.
- Screw plasterboard panels onto wooden or metallic profile.
The first option is widespread, so we will consider it in more detail. The second one will not cause any difficulties - it won’t be difficult to figure out how to use it.
To install plasterboard slopes, you will need the following materials and tools:
- The required amount of drywall and glue for it.
- Stationery knife.
- Construction level and rule.
- Perfangle (special metal corner)
- Putty.
The installation process for plasterboard panels is as follows:
- Pick up required dimensions sheets of drywall, mark them and trim off the excess.
- Dilute the glue in water according to the instructions (usually given on the package).
- Apply a sufficient amount of prepared glue to reverse side leaf.
- Attach a sheet of drywall treated with glue to the wall and press firmly. Do not forget to ensure that the slopes are located exactly at the desired level.
- Repeat steps 3-4 with each sheet, adjusting to size during installation.
After the drywall adhesive has dried, you can trim off excess pieces, if there are any, and then putty the surfaces. At this point, the installation is considered complete.
Made of plastic
Installation plastic slopes is in many ways similar to installation using drywall, but has its own characteristics. In any case, the installation process will not cause problems. It contains the following actions:
- Secure the slats at a distance of 20-30 centimeters from each other (they are necessary for attaching plastic panels).
- Install plastic elements with snap locks. If horizontal installation is carried out, you should start from the bottom, after which panel by panel move to the top.
- Fasten the strips along the edges to the uppermost horizontal slope.
- Attach longitudinal strips along the edges and in the center.
You can make slopes with your own hands from plastic in a couple of hours. In this case, installation should be carried out carefully - plastic is a fragile material that can be damaged if subjected to strong pressure or even if dropped on the floor. Be careful.
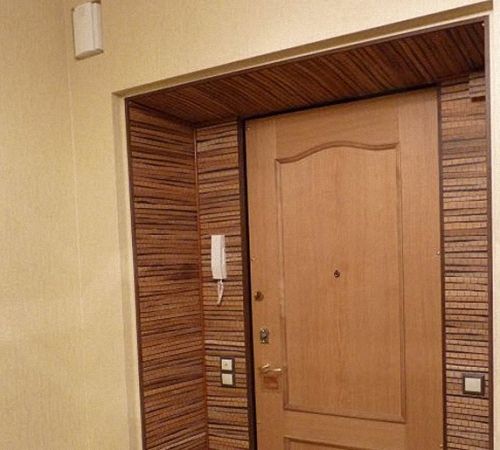
The front door will look complete only in one case - if the walls next to it are finished. As a rule, it is installed in a small recess in the opening in the wall, and on the sides of it completely ugly elements are formed, which need to be covered with something or somehow finished off. But the design process often depends on what shape the doorway is in the apartment.

Table. Types of doorways.
| Type | brief information |
|---|---|
| This is the usual rectangular entrance that is most common. Any option for finishing slopes is suitable here, and various materials can be used, which will be discussed below. Despite the general simplicity of finishing such a doorway, many are faced with certain problems, which are most often associated with the choice of the most suitable and easy-to-use material. In general, designing a classic doorway is not so difficult, since there are no complex or curved lines here. |
| This version of the doorway looks much more impressive than the usual classic one, and is a rectangle with a rounded top in the form of an arch. Doors that fit it are more difficult to install and technically more difficult to design. Typically, sufficiently elastic materials that can be bent or plaster are used to finish slopes. Often, the door comes with special linings that precisely match the shape of the door. In general, finishing such an entrance is much more difficult than a regular one. |


Advice! If you want to have an arched entrance to your apartment, but install an ordinary rectangular door, then there is a way out. Can be easily installed from inside arched shape trim at the top of the doorway, but the door will look like a regular one from the outside.

Drywall slopes are a very common type of slopes.
What are slopes?
The door frame is usually called jambs, but not everyone knows that the end part of the wall where the door (or window opening) is located is called slope. By the way, some decorative overlays that are used to finish the opening are also called slopes.

The slopes themselves may have various sizes, but in any case, according to their parameters, they must fit the end part of the wall where the entrance door is installed. In general, they can have different thicknesses, but if we are talking about decorative overlays, then in order to avoid deformation and damage to the material, its thickness should be at least 1 cm.

The easiest way to design a slope is to use “L”-shaped panels
The purpose of finishing and installing slopes is to achieve a beautiful frame for the door. In any case, when the door itself is installed, the slopes will be damaged, and in general the end part of the wall does not look beautiful - it is either concrete, or brick, or any other material that becomes visible to everyone. Usually the ends are quite uneven, and simply covering them with wallpaper will not work - some preparation will be required. The slopes will also help to hide the mounting foam, anchors and other elements and substances that were used directly when installing the door. Only if there are slopes or proper finishing you can ensure that the door looks beautiful and the doorway looks finished and neat.

On a note! Slopes will help achieve a certain level of heat and sound insulation - apartment residents will hear less sounds coming from the entrance. Do not assume that slopes are just a decorative component.
Basic information about door installation and design
In general, finishing the front door includes three stages:
- threshold design;
- finishing of slopes;
- installation of platbands and additions.

All this work is carried out after the installation of the door leaf itself. As for the threshold, it must be strong enough and resistant to various types of loads. It is usually made of wood, metal, concrete. These types of materials are much more stable than the now so common PVC and can last for many years until the next door replacement.
As for platbands and extensions, they are usually used to achieve neatness in the design of the doorway. Thus, they help to hide imperfections and irregularities when the physical parameters of the wall and the door frame that is being installed do not match. Without them, the door will look crooked and sloppy. Quite often, these elements are made from MDF, and then you don’t have to think about leveling the slopes themselves with putty. The voids between the extensions and the wall are simply filled with polyurethane foam.

On a note! Platbands and extensions will also help protect the door from subsidence that may occur in the future.
The slopes are finished after the door is installed. This can be done in various ways:
- sheathing;
- finishing;
- plastering.

The last option is considered the best, as it allows you to achieve ideal evenness of the end of the wall and seal the doorway. Also, if you use your imagination, you can create an interesting unique design. And excess dust will not accumulate on top of the finishing materials.
Find out in a special article on our portal.
Prices for various types of door frames
Door frames
Selection of materials
Yes, slopes are performed protective function, but no one took away the decorative work from them either. And you can use a lot of different materials to decorate them. The main requirement for them is the absence of fragility and tendency to mechanical damage. The slopes must be finished so that they can last for many years without the need for repairs, not even major repairs, but cosmetic ones. Moreover, it is worth considering that the doorway is the place where all family members pass every day, and more than once, something constantly falls here, the door and the slopes themselves can be subject to impacts. So the material for finishing them needs to be taken that is capable of for a long time withstand all these loads and not deteriorate.

Plastering
This is a classic and the most common design option for a doorway. This method probably originated back when the very first front door was installed. A slope finished with plaster will serve faithfully for many years without complaints. The material is not afraid of temperature changes, damage, and it will perfectly hide and fill all the unevenness of the end of the wall (no other material can compare with it in this regard). Using this material you can achieve a perfectly flat plane at the end of the wall.

Plastering slopes - a method proven over the years
You can paint the plaster for beauty, cover it with wallpaper, or put some kind of pattern on it. In general, there is a lot of scope for imagination here. The main disadvantage of this method is the appearance of a large amount of dirt during the work. Also, the disadvantages include high labor costs, and it will also take time for the material to dry. If you have no experience working with plaster, then it is recommended to carefully study this issue or even invite a specialist - working with the material is not easy for a beginner.
Advice! In order for the slopes to look finished, after plastering they need to be sanded and puttied.

Prices for popular types of plaster
Plaster
This material is loved by many craftsmen, and it is readily used in construction and repair work. It is universal and easy to use, and therefore can also be used for finishing slopes. This option is also called dry plaster.

The main advantages of using drywall are increasing the speed of work and simplifying it. If necessary, drywall will perfectly hide all the shortcomings. In general, the work on using it to design slopes looks like this:
- The surface is primed after cleaning it of debris;
- is being formed metal carcass from profile;
- moisture resistant wall plasterboard cut into pieces of the required sizes and fixed on the frame, forming a box;
- after installing the sheets, the cracks and the sheets themselves are puttyed (glue something on the untreated sheets of drywall or cover them with some kind of decorative composition will not work);
- when the putty dries, you can decorate the doorway.

On a note! If necessary, under the frame on which the drywall is fixed, you can lay insulation - then the apartment will be warmer.
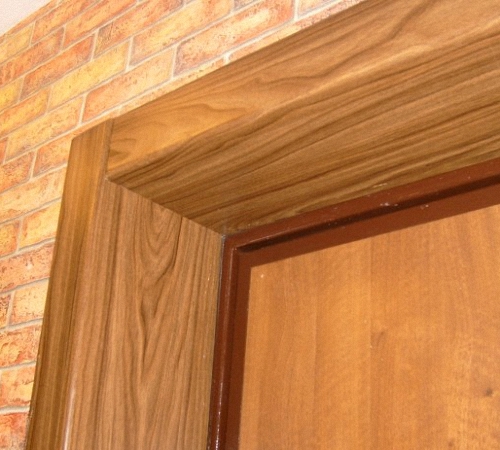
This is also a very popular option for decorating a doorway. For now MDF finishing is considered perhaps the most common. The material is resistant to various influences, does not require additional decoration, has a lot of color variations and can be matched to installed door. Veneered MDF as a whole is indistinguishable from natural wood.

Advice! If the door slopes are designed not only inside the apartment, but also outside, then it is worth purchasing a moisture-resistant MDF version.
Installing this option is simple - even a beginner can handle it. You can buy materials in advance - all that remains is to adjust them to required sizes, assemble the box and install. The cavities are foamed with polyurethane foam.
Prices for polyurethane sealant
Polyurethane sealant

Unfortunately, it is not cheap, and it is easy to scratch. So you need to handle slopes made of this material carefully. Plus, it tends to absorb odors, and fat on it easily leaves stains.
Cladding
An excellent option for those who want as much natural wood as possible in their home. By analogy with MDF paneling, you can decorate the ends of the walls near the front door. They will look very beautiful and noble.

Installation must be done on top wooden sheathing. So narrow slopes cannot be covered with clapboard. Natural wood is not cheap, so you need to be prepared to shell out more money.
It is also worth considering that with changes in humidity and temperature, natural wood tends to deform. Before installation, it must be coated with protective compounds to prevent rotting and the spread of insects. It is also better to impregnate it with a fire retardant to reduce the level of flammability.

Advice! Instead of varnish, it is better to coat the lining with a special wax-oil composition. She will look better and more noble.
PVC slopes and polyurethane linings
Wherever PVC is used now! So the front door can be framed with it. Installation is quick, and the price of PVC slopes is quite low. But this stuff is no different big amount advantages.
PVC is fragile and easy to break. Sometimes it’s enough just to lean your elbows on him and that’s it. work will go down the drain. The slope cannot be repaired; it will only have to be replaced. And in general, the service life of the material does not exceed a couple of years. Some people cover plastered slopes with plastic, but in reality it looks ugly and cheap.

By the way, you can also decorate the slopes with polyurethane overlays, which can imitate stucco. This option looks decent. But the price for such overlays is high. You need to glue the overlays on a flat surface, so you will still have to pre-plaster or cover the ends of the walls with plasterboard.
How does the process of decorating slopes with MDF panels take place?
Step 1. The first step is to prepare all the tools. This is a tape measure, a square, a pencil, a miter saw, sharp knife, hammer, masking tape, screwdriver, drill. You also need fastening materials and polyurethane foam.

Prices for popular models of screwdrivers
Screwdrivers
Step 2. Next you need to take measurements. The procedure is carried out after installing the door - you need to measure the width of the end part of the wall, as well as the width of the doorway. It is better to take measurements at several points vertically and horizontally.


Step 3. Now you need to make markings on the MDF strips according to the obtained dimensions. The edge along which the cut will be made must be taped with masking tape. If this is not done, unsightly chips may appear on the panel during sawing.


Step 4. Using a square, you need to draw an even cutting line.

Step 5. Taking advantage miter saw, you need to saw the workpieces.

Step 6 Now you need to collect the received additions into one design. Use a drill to drill holes for the screws. It is not recommended to screw them in directly with a screwdriver - the fasteners can damage the panels. The holes are made in several pieces at a distance of 10-15 cm from each other.


Step 8 Now you should make about 10-12 spacer elements from a wooden block.

Step 9 Spacer elements must be hammered between the wall and the box. About 3-4 pieces are hammered vertically, and 2 pieces along the upper and lower borders of the box. The block should not stick out; it must be hammered in tightly.

Step 10 Now you can install the platbands. First you need to attach the trim and measure the desired length.


Step 12 Before installing the platbands, the gaps between the wall and the frame must be foamed with foam. It will help further secure the box and provide sound and heat insulation. Excess foam can be cut off with a knife after it hardens.


Step 14 Now you need to measure and saw off the casing at the top and bottom, and then secure it with nails.

Step 15 After the structure has been assembled, you need to fix it on the door frame with masking tape for about a couple of hours. Once the foam is completely dry, the tape can be removed.

Video - How to make slopes?
Video - Finishing narrow slopes
After the main work on finishing the slopes has been completed, you can begin additional decoration. If they were plastered or decorated with plasterboard, then there is a lot of room for creativity. You can cover the slopes with paint, decorative plaster, wallpaper, draw patterns, attach laminate, stone, tiles and use other materials. The main thing is that they fit the overall style of the interior and meet all the wishes of the home owner.
The slopes on the doors are not only an insulating element of the door decoration, but also perform an aesthetic function. The process of installing slopes on doors requires special attention, because there are different ways and finishing technologies. In this article we will consider issues related to installing slopes in various ways.
Methods for designing slopes
Exist different variants for the installation of door slopes, which are determined by the type of material, work technology, etc. When installing it yourself, it is important to follow the recommendations of specialists and detailed instructions on installation. It is important to ensure that the materials used are practical and durable, and they must also perform insulating functions, especially when finishing the slopes of the front door.

The installation of door slopes must meet certain tasks, which include reliable fixation of fasteners, as well as performing a decorative function. When determining variations in the finishing of slopes, experts identify surface cladding with different materials, which are attached to the base with the assistance of mortar and plaster. Some elements can be attached to the frame base using a drill or other devices.
As finishing objects, you can veneer door slopes made of laminate, plasterboard, plastic or wood panels, MDF and the like. All materials are perfect for finishing, as well as for interior doors, and for input. In the latter option, it is necessary to ensure reliable sound insulation and complete sealing, which requires careful sealing of the slopes.
The slopes for the front door should not have any voids, which increases the strength and reliability of the cladding. Can be used over putty or mortar different materials for finishing. The main thing is that they are combined with interior design apartments or houses. If a huge amount of mortar is needed for finishing, for example, to level corners, then a frame can be installed on the slopes. Its base can be wooden slats or a metal profile on which facing materials are installed.
It is worth noting that finishing the slopes under the frame will create a smoother surface than plastering. Moreover, finishing with wooden or plastic panels looks more attractive than painting the surface and so on. In particular, it is much easier to carry out telephone, electrical and other communications through frame slopes.
It is important that the doorway has a maximum service life, is durable and practically resistant to mechanical and other damage. To do this, you need to know the rules and technologies for installing slopes on doors yourself. No less importance is given to the choice facing material, which are distinguished:
1. Finishing with drywall. Such material will hide all the unevenness of the slopes. Using this option, you will get rid of unnecessary waste on purchasing putty and other solutions intended for leveling certain area. In this case, there will be no possibility of installing a frame base.
2. Plastering the slopes on the door. This method is considered the most economical and practical, and all the work can be done independently. For this, it is important work surface cover with plaster, after which you can start finishing.
3. Plastic panels. Very often used for decoration window openings. They are rarely used in door openings, because plastic materials will stand out from the background wooden product. Moreover, this option is not reliable and durable.
4. Wooden slopes. This finishing option is the most popular. Wood is a durable and reliable material that will last for a long time. This finish will suit different interior rooms.

Drywall door slopes
Drywall is not used for finishing, but is the basis for slopes. This option is used to save money on purchasing different mixtures for leveling walls. Installation work should begin with preliminary preparation surfaces, which includes cleaning the walls, as well as priming:
1. After the surface has dried, you need to take all measurements and prepare materials for finishing the slopes on the front door with your own hands. When cutting the material, make sure that some parts are cut at an angle. This is necessary for attaching parts to a tilted surface.
2. After cutting the sheets, check that all elements fit under the doorway.
3. Next, you should wait for the primer layer to dry completely, after which you can install the panels. Special glue or dowels can be used as fasteners. It is recommended to use the first option, which will allow you to fasten the sheets of drywall more evenly.
4. The installation process should begin with the installation of the side parts of the opening, and finally, the upper area can be finished.
5. Glue can be applied in a continuous strip or in separate dots, for example, every 15 centimeters.
6. After securely fixing the drywall sheets, it is necessary to finish the surface using fasteners perforated corners by applying putty.

Finishing door slopes with plaster
This type of work does not present any particular difficulties and requires minimum costs. The process of finishing slopes with plaster has the following sequence:
1. First, the working surface must be cleaned and primed.
2. After the primer layer has dried, it is recommended to begin applying the solution to the surface of the slopes. It is recommended to use a spatula for this work.
3. To ensure that the corners of the opening are even, it is important to use perforated metal corners. They are attached to the surface using a layer of plaster and carefully covered.
4. After the plaster has dried, the surface of the slopes should be cleaned using sandpaper.
5. The last step is to treat the walls using paints and varnishes that will add aesthetics.
Finishing slopes with plastic panels
You can make door slopes with your own hands from plastic panels. The work is performed in the following sequence:
1. First, you need to take measurements of the door slopes and cut plastic panels that would correspond to these parameters.
2. You should use electric jigsaw, not a regular knife. This is necessary so that all parts in the cut areas are even.
3. After cutting, all panels must be checked against the doorway.
4. First, install slopes on the sides. For this purpose, a special profile is fixed to the opening using self-tapping screws.
5. Wooden slats must be attached to the edge of the wall. It is important to check the evenness of the installation elements with the assistance of a building level. Plastic panels will be attached to such slats using staples.
6. In the lower area, a plug is installed on the plastic panels, and the finishing item is inserted into the slopes on the sides and into the initial profile. The same procedure applies to finishing the slopes above the doors.
7. The last step is processing and sealing the seams using silicone. To install plastic slopes, it is recommended to choose PVC sheets, as well as special sandwich panels.

Finishing slopes with wood
Wood finishing is perfect, as well as for slopes metal door, and wooden. Of course, in your work you can use materials made from natural wood, or use laminated or MDF panels. If you want to choose a material that has excellent insulating properties, then it is recommended to use MDF boards. If their parameters do not fit the dimensions of the slopes, then laminate can be an excellent alternative.
At first, installation work begin with careful sealing of the seams between door frame and the surface of the wall. After this, the remaining foam must be removed, cleaned and carefully primed. Slopes can be made at right angles or with a slight slope. After determining the shape of the slopes, it is necessary to fix all the panels. When working, you must carefully monitor the correct selection of wooden planks. It is important that they have the same thickness and dimensions on both sides.
The slats or frame must be attached to the wall with the assistance of dowels, which refers to the fixation of all parts. The slopes can be attached using glue or using self-tapping screws. All gaps must be sealed with silicone sealant. Slopes made of wooden panels look very aesthetically pleasing in any interior.
Detailed instructions for installing slopes for entrance doors
Finishing work must be carried out taking into account the size of the doorway and the materials used. If when installing slopes in interior openings there is no need to do insulation, then for entrance doors a similar procedure is important element. To the question: how to make slopes on the front door, it is necessary to pay important attention to sealing the openings from drafts and sounds coming from the landing.
Slopes must be strong and reliable. In this case, experts suggest finishing with plaster or using different combinations. For example, you can plaster the walls on top of which MDF panels are mounted. Everyone uses items for decoration according to their own preferences. To carry out the work you need to prepare similar materials and accessories:
- polyurethane foam;
- lime, cement;
- putty, primer;
- sand;
- glue, dowels, if necessary, “liquid nails”;
- electric jigsaw;
- building level;
- brushes, spatula;
- perforated corners.

To answer the question: how to make door slopes even? - we recommend studying detailed instructions performance of work.
1. First of all, it is important to seal all the cracks. After installing the door, it is important to carefully fill all the gaps between the frame and the wall with foam. Next, you need to wait until the foam hardens. All remains must be cut off with a regular knife and the cracks carefully smoothed out.
2. Surface preparation is important for further plastering of the wall. All work takes a long time, so it is recommended to treat the surface in several layers. First, a layer of primer is applied to the wall, which will better strengthen the plaster solution. To achieve a perfectly flat surface, you need to use a beacon profile, which is fixed with dowels.
3. Next, we carry out plastering of the slopes. To make the solution, you must use cement, sand, mortar. The technology for applying the mixture to the surface must begin from the upper area of the slopes. First, the putty is applied in a thick layer, after which the excess is removed by leveling the wall. To ensure even slope angles, it is recommended to use a perforated profile. They are fixed on the surface of the applied plaster mixture. Next, a finishing layer of plaster is applied, which should be thin. This process will remove all unevenness and roughness.
4. The final stage is attaching the MDF panels. The base for such panels should be made of lime-cement mortar. After it dries, a layer of primer is applied to the surface. The panels must be divided into three parts, each of which must correspond to the door slopes. A layer of glue must be applied to the surface of the wall, after which the panels are applied to the wall. Such work must be done with all the details.

To understand the scheme of work, we recommend watching the video about finishing door slopes, presented at the end of the article. When finishing, you need to pay due attention to cutting the slab. To do this, all angles are carefully measured, and it is important to cut the panels at a certain angle. After cutting the plastic or wooden panel, all the parts need to be connected to check whether they correspond to the door slopes. The ideal combination of finishing slopes would be the use of wooden panels and a door made of this material.


