How to make a plasterboard ceiling. Do-it-yourself suspended plasterboard ceiling: description of the process from start to finish Is it possible to make a plasterboard ceiling
September 28, 2016Specialization: master of internal and exterior decoration(plaster, putty, tiles, drywall, lining, laminate and so on). In addition, plumbing, heating, electrical, conventional cladding and balcony extensions. That is, renovations in an apartment or house were done on a turnkey basis with all necessary types works
Now I will tell you how to install suspended plasterboard ceilings with your own hands in four stages, correctly prepare materials and select the necessary tools. You may have already come across such information, even on this site. But the fact is that each master brings his own installation nuances, making the work easier and improving its quality. If you are interested in my methods, then stay with me on the page. You will also have the opportunity to watch an interesting thematic video in this article as a supplement.
Single-level gypsum board ceilings
In most cases, installation of a plasterboard ceiling on one level is done in rooms up to 250 cm high to level the plane. Occasionally, too high ceilings in old-type houses are lowered in one tier, although in such cases several levels are most often made.
GCR parameters table
| Abbreviation | View | General characteristics | Where is it used? | Surface color | Marking color |
| GKL | Ordinary | Does not stand out with special properties | For rooms with normal humidity conditions | Grey | Blue |
| GKLV | Moisture resistant | Covered with impregnated cardboard, has antifungal and hydrophobic additives in the core material | For rooms with normal and high humidity conditions | Green | Blue |
| GKLO | Fire resistant | Has special reinforcing additives in the core material | Near heating devices and open flames | Grey | Red |
| GKLVO | Moistureproof and fireproof | Combination of properties of GKLV and GKLO | Combination of use of GKLV and GKLO | Green | Blue |

As I said above, you will need four steps to install a single-level gypsum board ceiling:
- First of all, you need to prepare the rough surface, and also select necessary tools and materials;
- The second stage will be marking for installation of galvanized profile sheathing;
- Then you will need to mount the frame from UD and CD profiles;
- And at the last one, final stage, you will begin installing drywall.
Ceiling plasterboard is used to level ceilings in 99% of cases. In special situations, such as high humidity, the presence or possibility of having an open fire, or both, GKLV, GKLO or GKLVO can be used.
Preparation

It would seem that if the surface is covered with gypsum board, what should be prepared there? But nonetheless. Those who live in old-type houses will immediately understand what I mean - this is a rounding at the junction of the wall and ceiling, which was made instead ceiling plinth as a decorative decoration.
So, with a room height of 250 cm, this element will interfere with the installation of the UD profile around the perimeter, therefore, it needs to be knocked down. In addition, the instructions require removing plaster that does not adhere well, and in some cases you will also have to seal the joints between concrete floors, but you will already determine this yourself.

Tools you will need:
- hammer drill for knocking down plaster and making holes for dowels;
- electric or cordless drill (screwdriver) for frame assembly and installation plasterboard sheets;
- special nozzle with lampshade to rest against a surface that does not allow the screw head to push through the paper;
- metal scissors for cutting galvanized profiles;
- drywall knife(or ordinary, construction);
- water or laser level, rule;
- chockline(painting cord);
- construction square, metric tape, pencil, nylon threads
- possible (if you install recessed lights), set of hole cutters for drywall.

You also don’t need a lot of materials, these are:
- ceiling plasterboard 6.5 mm or 8 mm thick;
- CD and UD profiles, perforated hangers;
- dowels and screws.
We mark the ceiling and walls for sheathing

If you live in an apartment or house where the ceilings are no more than 250 cm, then, naturally, space in height will be expensive for you, which means, first of all, you need to find the lowest point on the ceiling. Of course, this is easiest to do with a laser level, but, if desired, you can do it “by eye”, if, of course, you have a good eye.
And from it you will need to go down at least 2.5 cm and put a mark at this level in one of the corners. Next, using a level, this mark is transferred to each corner, or rather to each of its sides, and then the whole thing is connected by a chockline into one continuous line for reference.
We will make the load-bearing part of the sheathing from the CD profile, which is located in increments of 50 cm, that is, 5 profiles across the sheet. But to do this we need to pay attention to the corners in the room. If they have 90°, then all problems disappear automatically - we simply mark the ceiling every 50 cm for the supporting frame and that’s it. But if the angles are not right, then you will have to “play around” a little.

We choose the most flat wall, along which the gypsum boards will be mounted and relative to it we find sharp corner, from which we will begin the marking. Step back from this angle 50 cm and continue to the end with the same step. Then, from the first mark, using a construction square, make a line towards the opposite wall - this way you can move this mark, and from it mark the opposite line.
Now all you have to do is connect the placed marks with a chockline through the ceiling, and you will get markings for installing hangers, but more on that a little later. For a visual understanding of what is happening, pay attention to the schematic drawing above - the step between the sheathing profiles in any place should not exceed 50 cm (less is possible). If you are planning to install a chandelier and/or built-in ones, then it’s time to make markings for them.
Installation of sheathing

The next step in installing plasterboard ceilings involves installing UD profiles along an approximate line (along the perimeter) - the profile itself must be above the line so that you can see it. In general, UD manufacturers make holes with a pitch of 300 mm, but sometimes this does not happen. But you should not drill them separately from the wall.
Just put marks on the control line every 30 cm, apply the profile and make two holes at the same time - in the “hook” and in the wall.

If the plaster on the walls is good, then impact dowels can be used for fastening, but as usual, dowels with a diameter of 6 mm and screws 50-70 mm long are used. At the joints, you can not connect the profiles in the form of a seam, but simply put one into the other (edge) - this way you will get the most even line.

We have already marked the ceiling, so you need to install hangers along these lines at a distance of 60-70 cm, but if an increased load is meant on the ceiling, then after 40-50 cm. By increased load we mean gypsum board with ceramic tiles- this option can be used on or in the bathroom.
Pay attention to the photo above - the suspension should be fixed inside the letter P, under the crossbar, but not behind the ears, since the suspension will be pulled back under load and this is inevitable.

Now you need to measure each CD profile - its length will be equal to the distance from wall to wall minus 5 mm by the thickness of the UD partition and the clearance for free installation. Just don’t cut all the profiles according to the same template - the wall may be uneven and you may have problems (and it’s good if the CD turns out to be longer than necessary!).
Insert all the CD profiles into the UD and pull them up with the ears of the hangers a little higher than the level so that the thread can be pulled under them.

The thread is stretched approximately in the middle of the ceiling along the sheathing - screws for the profiles are screwed into the lower shelves opposite UD (their length is 9-11 mm, for which they received popular name"fleas") A nylon thread is tied and pulled onto these screws, along which all CD profiles are aligned.

The distance between the thread and the profiles should be maintained at about 0.5 mm so that there is no contact under any circumstances, otherwise the level will fail. The ears of the screwed hangers are bent upward or to the sides so that they do not interfere with the installation of gypsum boards in the future, although you can cut them to use for other purposes, and it is not necessary to remove the thread - you can leave it.
If you plan to have any wiring in the ceiling cavity, then do not forget to install it - preferably, pack the wires in a corrugated plastic or metal hose and attach it to the rough ceiling.
Drywall installation

So, the installation of a plasterboard ceiling is coming to an end and all you have to do is install the gypsum board on the sheathing profiles, which is not so difficult if everything else is done correctly.
But at the same time, certain rules must be followed. First of all, all fixed edges must be joined in the center of the profile - this is why correct markings for installing the sheathing are so important. You may, even most likely, have to trim the corner gypsum boards - don’t be shy about doing this - this is quite normal.

Remember, on the list necessary tools we talked about the need for a special nozzle with a lampshade (size PH-2), which will not allow the hat to push through the paper. So, look at the image above - you see three options and only one of them is correct, and the most convenient way to achieve this result is with the help of such an attachment.

Installation of gypsum boards on the ceiling - works experienced master
Do not try to repeat what you see in the top photo - this requires considerable experience and skill - I am showing this only so that you understand what an experienced craftsman can do. Even experienced drywall workers prefer to work with two or three people, and construction companies use special lifts, but this is for very large areas installation
The distance between the screws in one row (along the profile) should be no more than 30 cm, but always at the edges of the sheets, and if the assembly is made from pieces, then this distance will certainly decrease. Don’t be discouraged when you assemble the pieces and there are gaps of about 2-5 mm between them - this is quite normal and such gaps are subsequently sealed with putty and reinforced with sickle, but this is the next stage of work.

When installing gypsum boards, do not forget to make holes for recessed lamps and route wiring under them (if provided). But they can be provided only if the ceiling cavity allows it. For LED devices, a distance of at least 4 cm is required, and for others - at least 7 cm.
Conclusion
In conclusion, I would like to draw your attention to the fact that Chinese drywall, which has 6.5 mm instead of the usual 8 mm, behaves no worse without load, but its price is lower. I invite you to discuss this topic.
September 28, 2016If you want to express gratitude, add a clarification or objection, or ask the author something - add a comment or say thank you!
What better help you figure out how to make a suspended ceiling from plasterboard with your own hands - video instructions or detailed description with pictures and diagrams? Perhaps it wouldn’t hurt to study both, which is what we suggest you do.
Types of plasterboard ceilings
Drywall is a universal building material, which allows it to be used to create the most unusual and varied interior designs. Plasterboard suspended structures will easily fit into any project made in any style.
So how to make a suspended ceiling from plasterboard yourself? Next, we will analyze all the stages in detail, and now a little about what plasterboard ceilings are.
Conventionally, suspended plasterboard structures can be divided into the following types:

- Regular single-level, which are designed to hide all sorts of imperfections of the rough surface;

Conclusion
You can additionally watch the video in this article to better understand the technology for installing such ceilings. Even better is to watch the process “live”, having the opportunity to ask the master questions.
But in principle, an ordinary single-level suspended ceiling can be installed with your own hands from plasterboard by anyone who can hold it in their hands. Building tools and not afraid of dusty work.
We continue our traditional series of articles from Yuri Voedilo (professional builder and repairman). Yuri writes: 
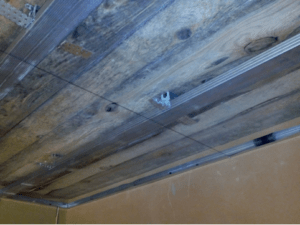
In old houses, little attention was paid to beauty during construction, since the main task was to build quickly and reliably. Therefore, ceilings, as a rule, have different irregularities: protruding beams in wooden floors and differences in seams between slabs in reinforced concrete floors, as well as various distortions and notches. It’s good if the defects on the ceiling are not large and can be eliminated with putty, but what if it’s simply impossible to putty them? What if this is a new building and you need to cover the rough ceiling? Here sheets of drywall, which we have known for a long time, will help us out. From these we will make a suspended ceiling from gypsum plasterboard sheets, which will cover all defects and it will also be possible to hide electrical wiring and other communications behind it. In this article, let's take a closer look at what we need to install such a plasterboard ceiling with our own hands and the sequence of its installation from marking the ceiling to puttying. We will also look at the technology and device for installing a gypsum board ceiling in step-by-step instructions with photos.
And in the process of work we cannot do without such a tool as:
- Percussion electric drill or hammer drill
- Tape measure, pencil and building level
- Water construction level (transparent hose 5-10 meters long)
- Cordless or electric screwdriver
- Ladder
- Thread or fishing line (preferably yellow)
- Tin scissors and construction knife
Material for work:
- Ceiling profile for plasterboard CD-60
- Guide profile for plasterboard UD-30
- Suspension plates
- Wood screws 32 mm
- Dowels 60 by 40 mm
- Metal screws 10 mm (fleas)
- Ceiling plasterboard sheets (GKL) 9 mm thick
- Metal screws 25 mm
- Fiberglass reinforced tape (serpyanka)
Stage 1. Marking for installation of profiles
How to properly make a plasterboard ceiling with your own hands? First, we need to make sure that the ceiling comes out without distortions and is strictly horizontal. To make this happen, you need to knock out the zeros of the room. To do this, we will use a water level. It is difficult for one person to make such markings, so ask someone for help. In any corner of the room we put a mark with a pencil at a height of one meter. We apply a water level to this mark so that the water level coincides with our mark. And at this time your assistant should move from corner to corner of the room with the opposite end of the hose. In each corner he will have to leave a mark at the water level. At the same time, you need to make sure that your mark doesn’t get lost! All these marks (zeros) in the corners of the room will be the horizontal level of the new ceiling. From the zeros, use a tape measure to measure upward the same distance to the height at which we want to make our plasterboard ceiling. In this case, it will be necessary to take into account the thickness of the plasterboard of 9 millimeters and the thickness of the guide profile ud 30 millimeters. Also do not forget that the minimum that will have to deviate from draft ceiling 10 cm, because a standard built-in lamp will take 10 centimeters in height.

Stage 2. Installation of the ceiling frame
Let's start with the fact that along the perimeter of the entire room, at the height at which we decided to make a plasterboard ceiling with our own hands, we need to nail the ud guide profile to the wall using a hammer drill and dowel-nails measuring 60 by 40 millimeters and with a pitch of 450-500 millimeters from each other .

Having secured the guide profile ud, let's take the ceiling profile cd. First you need to cut it to the length or width of the room, then choose for yourself which is more convenient for you. The main thing is that it fits easily into the ud guide profile; if it is too long, it will begin to bend. If it's too short, it won't stay on. Ideally it should be 5 millimeters shorter than the dimension from one ud guide profile to the opposite one.

Having cut the ceiling profile cd to the required length, it must be inserted perpendicularly into the guide profile ud. They are twisted together with special metal screws, popularly called fleas. CD profiles are placed every 60 or 40 centimeters, this is necessary so that the distance is a multiple of 120 centimeters. Since this is the width of a sheet of drywall. And with this arrangement, the joints will fall strictly on the profile.


To ensure that our ceiling does not sag, but is level, we need to screw the cd ceiling profiles to the rough or old ceiling using mounting hanger plates. Strictly above the profile to the ceiling we screw the hangers with self-tapping screws 30 millimeters long, or if you have reinforced concrete floors, then with dowels 60 by 6 mm. Suspensions are placed on each CD profile at intervals of 50-60 centimeters.

After that, through the middle of the room across the cd profiles, you need to stretch a thread (preferably black, it is better visible) attaching it to the outermost opposite ud profiles, which are screwed to the wall. Having bent the suspension plate to the bottom, with one hand we hold the cd profile so that it barely touches the stretched thread and fix it to the suspension with the flea already familiar to us on one side and the other. Please note that you need to fasten it with a dowel or self-tapping screw closer to the edge of the profile bend in order to prevent sagging under the weight of the plasterboard sheets.
Using this method, you can make the hangers longer or shorter, and the gypsum board ceiling can be raised or lowered to the desired distance.
Note: While working, make sure that the other profiles do not touch the thread, as they may distort it.
Very often CD profiles are installed not only along the drywall sheets, but also across them. Practice has shown that transverse profiles should be installed only during installation multi-level ceilings. In this case, such a profile must be installed only at the joints of plasterboard sheets. In this way, you can significantly save on material, and in this case you will also have to refuse to buy crabs ( special fastenings, intended for connecting a longitudinal with a transverse profile).

Stage 3. Screwing plasterboard sheets to the ceiling frame
If the suspension plates are too long, then this is not a problem. They need to be turned up again so that they do not interfere with screwing the sheets. Before you start attaching sheets of drywall to the ceiling frame, you need to think about the future lighting of the room! Think about where the lamps will be located and in what quantity, since the wiring for them must be done before screwing on the gypsum board.
A design such as a plasterboard ceiling is ideal solution for arrangement of premises of any type. This material is extremely popular in construction and repair work. A gypsum board ceiling has many advantages over other types of finishing. First of all, it is an opportunity to hide the curvature and other defects of the floor slab.
Ceiling plasterboard is environmentally friendly clean material, which is completely harmless to humans. The finished surface is perfectly flat, without the slightest hint of sagging or differences in height. The opening between the drywall and the supporting board can accommodate electrical wires, telecommunications cables and a ventilation system.
At correct processing plasterboard ceilings can not only be painted and wallpapered, but also finished with ceramic tiles and mirror panels. Let's look at how to make a plasterboard ceiling with your own hands, without hiring hired labor?
During construction and repairs, any type of gypsum plasterboard can be used for the ceiling. However, it is advisable to stop at ceiling version. Plasterboard for the ceiling has a smaller thickness (9 mm), which makes the sheets lighter and easier to work with. The decision about which plasterboard is best for the ceiling should be made only after assessing the conditions in which the suspended structure will be used.


Types and use of gypsum boards for ceilings
When finishing various rooms, you can sheathe the ceiling with the following types of plasterboard:
- ordinary. This material is used for cladding office, residential and service premises where constant temperature and humidity are maintained. The outer coating of such products is gray in color and blue markings. This sheet is lightweight, which allows you to save on frame material and reduce the load on the floor slab. Standard ceiling plasterboard is available in the form of slabs 120 cm wide, 250 and 300 cm high. Ordinary plasterboard bends well when wetted and retains its given shape after drying. A figured box and steps made from it look very impressive;
- moisture resistant. Silicone and antifungal drugs are used in the manufacture of filler for this material. To resist dampness, the mixture is placed in special impregnated cardboard. It must be taken into account that waterproof boards do not absorb moisture at all. Therefore, it will not be possible to give them a curved shape. Install waterproof slabs in rooms with high levels of humidity or in apartments where there is a high risk of flooding with upper floors. The outer surface of this finishing material has a green color;
- fire resistant. Fire resistance is achieved by adding special reinforcing additives to the material and impregnating it with antipyrine. A suspended ceiling is made from fire-resistant material in rooms where there should be an increased level fire safety. These can be cash registers, archives, panel and bank vaults. Manufacturers paint fireproof sheets in pink color or gray with red markings.

Having considered the plasterboard models that can be used in work, it is worth dwelling on how a plasterboard ceiling is made. It's pretty simple work, which even a beginner can do, it is important to review the manual for working with the material.
Tools and materials
The manufacture of a suspended structure from plasterboard sheets is an activity that does not require the use of professional equipment.
To install gypsum board on the ceiling you will need the following tools:
- perforator;
- screwdriver;
- metal scissors;
- building level;
- hammer;
- roulette;
- plane;
- square;
- marker;
- wide and narrow steel spatula;
- mixer for mixing the solution;
- set of drills and crowns.

In order to protect your respiratory organs and eyes from dust, you need to purchase a respirator and safety glasses. Since the work will be carried out at height, you will need stable trestles or a stepladder.
To find out required amount material, we advise you to use our
Calculation building materials carried out on the basis of a prepared project. It indicates the type of structure (single-level, multi-level), frame diagrams, electrical wiring, location of plasterboard sheets and insulation, location and type of lamps, sensors and other devices.
To make plasterboard ceilings with your own hands, you will need the following materials and equipment:
- starting and finishing putty;
- mounting plastic tape;
- metal screws;
- breaker cord;
- sandpaper;
- abrasive mesh;
- liquid primer;
- plasterboard sheets.
Before making a ceiling from plasterboard slabs, they must be allowed to lie indoors for several days. This is necessary so that the material acquires humidity and temperature appropriate for working conditions.
Preparatory activities
Despite the fact that gypsum boards completely cover the floor slab, it is necessary to take measures for its preventive repair and conservation. If this is not done, then leaks and the development of fungus and mold are quite possible. Underestimating the preparation of the load-bearing slab for installation can lead to the most unpleasant consequences, such as the colonization of the space between the ceilings by rodents and insects.
Before you start making plasterboard ceilings, you must complete the following steps:
- If you are renovating your house, check the condition of the roof and rafters. If necessary, restore the roof;
- remove from the room all interior items that may be damaged during the renovation process. Cover the remaining items with plastic protective film;
- Remove all communications, sensors and lighting fixtures from the base plate. Assess the condition of the electrical wiring. If necessary, replace it;
- remove dilapidated finishing and fragments of the floor slab that are not firmly attached to it. Clean out cracks and holes;
- repair all existing defects in the load-bearing slab cement mortar or synthetic sealant. Treat its surface with an antiseptic and primer deep penetration.

Immediately after the primer has dried, you can begin further work. During their implementation, it is necessary to strictly perform all stages of activity in a certain sequence. Step-by-step instruction for each phase of work will help to make repairs efficiently and quickly.
Construction of a frame for drywall
The most practical and reliable option for creating a frame is to use a steel profile. The profile is equipped with extensions and connectors of various configurations and purposes. This allows you to assemble both smooth and complex suspended structures on the ceiling.
We make the frame from galvanized steel profile in the following sequence:
- The height of the walls is measured in all corners of the room. In the lowest corner a mark is made 10 cm from the floor slab. From this mark a horizontal line is drawn along all walls. On load-bearing plate lines are drawn parallel to the wall at intervals of 60 cm;
- Holes are drilled along the drawn line in increments of 30-40 cm. After the plastic dowels are inserted into them, the UD profile guides are screwed to the wall;
- is being secured to ceiling slab vertical hangers. The fastening pitch should be within 60-80 cm;
- blanks of the CD-bearing profile are sawed. Their length should be 35-40 mm shorter than the distance between the edges of the supporting profile;
- the supporting profile is inserted into the openings of the guide profile. One end of it is rigidly fixed with a self-tapping screw. The supporting profile is secured in the hangers. After fixing with self-tapping screws, the edges of the suspension bend upward or break off. The self-tapping screw is screwed on the other end of the supporting profile;
- The transverse parts are sawed and secured. A cross connector (crab) is used to secure them. The result of the work is a steel grid with cells 50x60 cm.
After checking the frame for strength, electrical wiring and communication lines are laid. Electric wires must be placed in plastic PVC tube, rigidly fixed to the floor slab.
Covering the frame with plasterboard
To secure a plasterboard ceiling with your own hands, you will need an assistant, since the sheets have quite big size and weight. The work begins with installing a whole slab in one of the corners. Installation of gypsum boards is carried out in rows. Each subsequent row is fastened with an offset of 100 cm or 120 cm, depending on the choice of fastening direction. The last row is trimmed so that the cut edge faces the wall.
When covering a frame with plasterboard, you must adhere to the following rules:
- joints of plasterboard sheets should be located only on the frame, otherwise sagging and cracks are inevitable;
- Self-tapping screws must be screwed into the frame through the sheets over its entire area. The fixation interval should be 15 cm. The caps of hardware should be recessed into the surface of the gypsum board by 1 mm. In this case, it is necessary to control the screwing process so that the screws do not break through the cardboard shell of the plate;
- It is necessary to leave a 2 mm gap between the masonry fragments. It is necessary for thermal expansion of the material;
- It is best to cut drywall with a sharp utility knife. The cut is made along the front side of the slab. After this, it is moved to the edge of the table, where the excess is broken and cut off. Torn edges are smoothed with a plane.
After the installation of the plasterboard on the frame is completed, the quality of the work performed is checked. The protruding screws are tightened, and new hardware is screwed in next to the self-tapping screws that broke through the cardboard.
Plasterboard ceiling putty
Drywall itself cannot be the basis for finishing. Its surface and structure are too fragile for such a purpose. After attaching the slabs, there are many seams and indentations left by the screw heads.

Technology for applying putty between gypsum board sheets
We putty the drywall in the following sequence:
- The surface of the plasterboard is cleaned of dust and small parts of gypsum. Identified defects are eliminated. The seams are treated with a primer;
- The plaster solution is mixed. It is pressed forcefully into the joints and screw holes. Serpyanka tape is applied over the joints and embedded in the solution. It will prevent cracks from appearing;
- The leveled surface is treated twice with a deep penetration primer. This is necessary in order to strengthen not only the outer shell of the gypsum board, but also its filler;
- drywall is coated with a solution starting putty. The solution is taken from the container with a narrow spatula and applied to a wide tool, with which the putty is applied to the surface with wide sweeping movements. All protrusions are smoothed out immediately;
- The hardened starting putty is primed. After the soil has dried, the solution is applied finishing putty, which removes all irregularities;
- the surface is treated with an abrasive mesh and sandpaper. The quality of grinding and polishing is determined by the type of finish. Before painting, the surface must be leveled with pinpoint precision;
- the ceiling is cleaned of dust and coated with primer. After this it is ready for application finishing cladding, which can be used as paint, wallpaper or tiles;
- connection and fastening is carried out lighting fixtures, fans and various sensors. The joints between the drywall and the wall are covered with skirting boards. If wide baseboard glued to the wall 5 cm from the suspended ceiling, it will serve as a good basis for attaching lighting in the form of an LED strip.
How to do plasterboard ceiling on our own, it is known that it is important to consistently complete all stages of the work.
Photo gallery of finished gypsum board ceilings
Not everyone can and, especially, not everyone wants to pay a lot of money to a team for installing a frame, which you can attach with your own hands. When ordering plasterboard ceilings in a bedroom, hallway or hall, you will spend a lot more money for their installation than when buying materials in a store. Is there really no way out? Just learn it yourself! And we assure you that a plasterboard ceiling is not as scary as it is described on the Internet!
Having spent only 20-25 minutes of time, you can make suspended ceilings from plasterboard without outside help. Therefore, right now we will steal a “piece of bread” from professional installers and screw this thing in place with our own hands!
Why do you need a plasterboard ceiling?
Many people believe that this design is only for beauty. In fact, everything is completely different and appearance rooms - the last reason to make a suspended ceiling. Let's take a closer look at why you need to make a plasterboard ceiling.
- Saving on heating: you you will pay 10-25% less money for heating, this is especially true for tall buildings. From a ceiling of 320 centimeters ( a private house, Stalin) you can make 240-250 cm, therefore, do not heat excess and warm air will be closer.
- Ceiling leveling. Some emergency rooms require significant repairs. With the help of drywall, the problem with the ceiling is solved - you will smooth out any unevenness.
- The problem of laying communications and utility networks. Sometimes it’s easier to hide them under drywall than to saw through the entire ceiling and walls with a wall chaser.
- Sound isolation. The best way“get rid” of neighbors and retire to your own house or apartment. At high-quality insulation You can even live at the airport.
There are other minor advantages: plasterboard ceilings allow you to make multi-level structures and dry quickly, which significantly speeds up construction and moving into new house possible much faster.
Marking the ceiling for plasterboard - the first stage
Let's start with purchasing materials and counting money. To know how much material will fly onto the plasterboard ceiling in the bedroom, you need to mark it and calculate it using a calculator. Let's take a closer look at how to mark the ceiling for plasterboard.
STEP 1: calculate the lowest point of the ceiling. You need to take a tape measure and measure all the angles. Take the smallest distance as a basis, step back 7 centimeters from above and apply a mark with a marker.
STEP 2: Marks other corners. We take a laser level (you can also use a hydraulic level, but the work is more difficult) and “punch” a straight line to the other three corners, make marks. 
STEP 3: draw a line on the wall. We hammer 1 nail at one mark, another at another, stretch the paint cord between them (lubricate it a little with grease), then move it to the side and release it. He hits the wall, leaves a smooth mark - the line is ready. You can also simply draw a line using a ruler (level, profile) and a pencil. 
STEP 4: fastening the guides. We will start counting from them. We apply a metal profile 28x27 mm and drill holes through it in the wall every 10 centimeters. We take the sealing tape (sold as a set), glue it to the profile, apply it to the wall and fix it with dowels on the holes made. 
STEP 5: mark the wall for the main profiles. The plasterboard has a width of 120 centimeters and there are 3 profiles per sheet, that is, every 40 centimeters (at the edges of the sheets). We mark marks on any side of the wall every 40 cm and draw a line. We draw perpendicular jumpers every 250 centimeters (sheet length). The first suspension will be placed at a distance of 25 centimeters from the wall, then every 40-50 centimeters. 
Important: do not forget to make marks on the wall where the profiles will be located under the drywall. This will greatly simplify the search during the process of screwing the drywall, because the sheets are large and you will have to poke holes in it for a long time until you find the jumper in the middle of the sheet.
Now you can safely count all the lines on the wall and multiply them by the length or width of the room, respectively. There’s no need to scribble “in reserve”, since it’s impossible to spoil a metal profile and even a bent one can be safely aligned and screwed onto dowels. Additionally, at this stage we will need the following items for the plasterboard ceiling:
- Metal profiles 28x27 mm (guides) and 60x27 (main) according to the calculations.
- "Crabs" for connecting profiles.
- Sealing tape.
- Anchors and dowels (you can take 50 pieces to start with).
- Level.
- Plasterboard sheets (10 mm, moisture resistant)
- Putty (3-4 bags per medium-sized room).
- Screwdriver.
- Drywall self-tapping screws (25 mm for 10 mm sheets).
- Spatula and standard tools (ruler, tape measure, stationery knife, hammer).
After purchasing all this slop (most of the tools are probably already on the farm), you can start working.
The second stage is the installation of a metal frame for the ceiling
The materials have been purchased and now the most boring, but important part of the work awaits - fastening metal profiles and creating a strong frame for the ceiling. In principle, this is not much more difficult than, only in this case the work is carried out with raised hands. Remember that the accuracy of the work depends on whether your plasterboard ceiling will sag in 2-3 years or not.
STEP 1: We attach the profile hangers to the ceiling. This must be done with anchors, since a dowel for a vertical surface is much worse. 
STEP 2: building up profiles. Since 1 profile is not enough for the entire room, they need to be fastened together. To do this, you need to purchase special connecting fasteners and fasten the profiles with it. The joints should be close to the profile suspension. 
STEP 3: fastening profiles to hangers. You need to evenly lift the profile by 2 edges (a helper would be helpful here), screw one, rearrange the stepladder and attach the other edge. Next, following the mark on the wall (where the profile is located), “grab” the profile over the entire area. We start fastening from the corners. 
Important: never leave the profile unsupported by 1 or two screws, as it weighs a lot and can break the attachment point with its weight or simply bend. Minimum 2 points per different angles profile, or preferably 3-4 points.
STEP 4: after screwing the corners, you need to check the profile with a level. A tool 250 centimeters long will do. If you somehow managed to screw it crookedly, unscrew it and adjust it with hangers in the required place. 
STEP 5: in exactly the same way we attach all the profiles in the middle of the room, moving from the corners to the center, we attach the jumpers (joining points of 2 sheets of drywall every 250 centimeters). This can be done with a special metal crab. We cut the jumpers from the profile and screw them together. 
STEP 6: sound insulation and insulation. If installation metal frame implies the installation of insulation and insulation, then it’s time to take care of it at this stage. We cut the mineral wool into large pieces and attach it over the lintels. 
Important: use goggles, a respirator and gloves when installing mineral wool, it may get into the eyes and cause severe skin irritation.
Installing a frame under drywall is the most complex and time-consuming process; all subsequent work is done several times faster and will seem much easier (however, they are easier).
Attaching drywall to profiles
When the steel is already hanging on your ceiling, another field for creativity opens up... After installing the frame from the metal profile, you can move on to the drywall itself. After purchasing the material, it must be placed in room temperature With relative humidity no more than 85%, let sit for several days. Remember that sheets cannot be placed vertically and stored that way– they can become deformed under their own weight, especially if they were a little damp. Let's move on to the fastening process.
STEP 1: Use a utility knife to cut the edges of each drywall at an angle of 30-40% to make it easier to seal them with putty later. This only applies to cut sheets, since pasted sheets already have such a chamfer from the start. 
STEP 2: we lift the sheet (an auxiliary worker will not hurt) and attach it in the corners, then look for a profile along the line marked on the wall and screw the drywall there. If you ignored such tags in the first section, you will have to search for the profile at random. You must retreat at least 15 centimeters from the edges so that the sheet does not crack, remember this! 
STEP 3: we check all the screws so that the heads are flush with the surface of the material, otherwise it won’t be possible to putty normally, and “obliquely, crookedly, as long as it’s quick” will not suit us. 
Fastening the HA sheets takes no more than an hour per small room, since your frame is already level and all that remains is to grab them to the profile using a screwdriver. The frequency of tightening the screws is 20 centimeters.
Sealing seams, leveling and counting materials
After the sheets are attached, it is necessary to prepare the putty and apply it using a large spatula, making sure that the corners are even, so that there is no excess of finishing material at the junction of the walls and drywall. If you apply more, it will take a long time to straighten the corners.
After the putty has dried (6-8 hours), you can take a trowel tape or paper and remove all the “smudges”, level the surface and prepare it for use. finishing. The ceiling can be painted in desired color, do suspended ceiling, decorative plaster and everything you need.
For a room at 20 square meters You will need approximately the following amount of materials:
- 19 ceiling profiles standard size;
- 110 hangers (attaching the profile to the ceiling);
- 8-9 sheets of GC 10 mm;
- 10 guide profiles (they stick to the wall);
- 24 crabs;
- 0.5 kg self-tapping screws for attaching drywall.
- 30 dowels.
Having made simple calculations of the cost of hiring a work team, we can state that we saved 11,500 rubles by making a plasterboard ceiling with our own hands. Whether it makes sense to spend a couple of days and save this amount is up to you to decide.
- The joints connecting 2 metal profiles cannot be placed on the same line; they must be done at random, like laying bricks with a “bond” in construction.
- The use of sealing tape significantly reduces the noise level in the apartment, since sound is not transmitted through the metal.
- Buy moisture-resistant drywall from famous manufacturer, its cost is a little higher, but you will be sure that it will not “lead” and the edges will not break.
- Use a screwdriver to screw the sheets; using a screwdriver is simply unrealistic. Immediately buy an additional battery so that you can work continuously.
- Finishing putty hides only small irregularities, so sand and apply the first layer as evenly as possible - it is actually the last.
If everything is done correctly and according to the instructions, the plasterboard ceiling will be no worse than the one made work crew and 100 times better than would-be migrant workers make it at “half price”! We also suggest watching a video of how experienced builders make a plasterboard ceiling:


