How to install a door at home. Installing an interior door without unnecessary problems with your own hands. The final stage. Do-it-yourself installation of platbands
From the quality of installation interior doors depend functionality designs and aesthetic appeal: in any home or office with doorways inspection of the premises begins. Experienced specialists They will promptly take measurements, offer the most optimal options, and carry out installation in accordance with the design features.
It is also important to eliminate gaps by foaming with high-quality sealants, leveling the walls at the initial stage of installation and choosing suitable model domestic or foreign production.


Installation features
Installation of door frames is carried out on final stage repair. After wallpapering, work is carried out to install the door frame in accordance with technical rules and safety requirements. Installing a door in a large opening without anchors and additional elements requires a professional approach: experts recommend not to carry out this work yourself. Once upon a time, damper installations were used as door structures to prevent cold air and moisture from entering the room.
Nowadays, doors serve not only as an entry and exit area, but also as an effective addition to interior design, capable of serving for many decades with proper use.


Knowledge of technology allows you to organize installation at a high technological level.
To install the structure you will need:
- form a block and arrange the canvas;
- prepare material for use in conjunction with fittings;
- select hinges (with a regular handle or with an automatic latch).


A block is mounted in the opening on which the canvas is installed. Experts recommend pre-adjusting the mechanism. Finishing with platbands – great way give the design stylistic completeness and constructive unity, while it is advisable to use modern materials And Newest technologies. Activities are carried out in strict sequence: during installation, actions are coordinated in accordance with building codes.
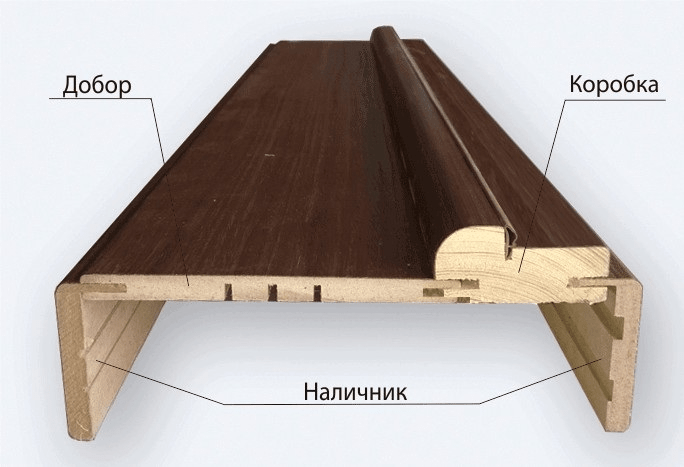
Plastic and metal-plastic installations are sold in complementary form, prepared for the fastening process. The frame is a collection of wooden blocks of different parameters, door leaves and special parts (slats) for platbands.


Assembling the box is a process that requires a professional approach:
- compliance of the activities carried out with operational requirements;
- use of proven materials and technologies;
- using a P-base with a threshold.
For this purpose, bars (stand, loop beam) are used. A base with a threshold requires the installation of lower material of a certain thickness, and the assembled block must have a strictly geometric configuration. Craftsmen determine the dimensions of the doors, fix the format of the pillars and lintels, taking into account the voids, cut out and construct special bars.


Kinds
The dimensions of the boxed material should differ from the dimensions of the canvas. Measurements are made with simple tools, most often a ruler. The canvas is measured along the perimeter: you should not count on the external effect, since distortions are observed during the shrinkage process. Deviations play a big role in measurements.
The sequence of work is as follows.
- The parameters of the external sides of the loop material are analyzed;
- The operating parameters of the ceiling and cover material are measured;
- The condition of the surfaces in contact with the planes of the opening is diagnosed;
- Provides space for gaps (within 0.2-0.4 cm).

When installing glass structures, additional measurements of the decor parameters are carried out, and the design is applied using modern methods, if provided. Installation of sliding and double door installations is carried out in accordance with technical requirements, recorded in GOSTs. Doors on rollers will require additional measures related to the selection of a suitable model, installation of a structure that meets the standards and design requirements.
Hinged and sliding options – great option for those who are accustomed to saving space and relying on modern design. Specialists will take preliminary measurements, select the most effective models and promptly carry out all stages of installation. At the request of the customer, non-standard door structures and classic double doors are installed.
Using these models you can create original design interior design, to arrange any type of premises (office, residential, warehouse). If you follow the installation parameters, you can place large furniture in your apartment, room or office, which always looks fashionable and stylish.


Frames with a threshold have slotted holes around the perimeter in the plane of the door block without a threshold. Experts will calculate points to eliminate vertical racks, will provide sufficient parameters for the opening.
When arranging the box, you should pay attention to the following points.
- Correspondence size ranges configuration "P";
- Quality plasterboard materials;
- Competently washing down the timber.


A cross-cutting machine is effective in creating cuts; a hand saw or self-tapping screws are often used. When installing doors, innovative technologies are used: the method of cutting down vertical posts involves adjusting the parameters of parts and lintel, while maintaining strict rules, the design is adjusted to an angle of 45 degrees.
Properly carried out joining of parts gives the installation the required external format. The holes must be through, perpendicular to the cut.


Dimensions
When installing interior blocks, the question often arises of how to calculate swing doors for a niche. For small-sized partitions similar to the parameters of the door frame, Finishing work carried out using platbands. The formed set is installed on the sides of the box. This installation is designed to mask the foamed seam. Wooden or laminated trims, if they are not treated, are installed using hardware, after which they resort to painting. Platbands may differ in shade from the plank, because contrasting options are always in trend.
The door frame made of wood is designed in accordance with the requirements in the field of construction using cement-sand plaster. It is not recommended to install wood panels together with fiberboard boxes: different levels moisture resistance can lead to deformation and cracking.


Structural blanks for screws in an MDF installation are made on preparatory stage, drilling is carried out with a tool with optimal diameter. The size of the internal vertical bar level is calculated as the sum of the dimensional parameters of the canvas (usually 3 * 3 mm), if the structure has a threshold. The ceiling part is installed to special devices.
The use of self-tapping screws ensures high efficiency of work. The parameters are determined by such indicators as false and loop materials, the distance is determined as the sum of the parameters used for the side voids.
The timber is manufactured in accordance with technical parameters at a right angle, as this is required by the arrangement of the threshold. The block is formed on a direct base (for example, on the floor).
The arrangement of door fittings must be carried out in such a way as to ensure evacuation measures. You can choose universal door hinges with right or left mounting. Devices with a laminated surface are manufactured taking into account the hinge parameters. Typically, 20 cm is left as an indent from the top and bottom edges. The installation area of the hinge to the box structure is determined taking into account technological voids.


What material is better to install it from?
Door products are presented in a wide range model range. Modern interior doors are made using MDF panels and advanced materials (WPC, eco-veneer, natural wood).
- Fiberboard– an excellent option for creating an inexpensive and effective door. The wooden frame is covered with laminated fiberboard sheets. These economical designs, easy to install and compact, popular in the construction market. Experienced specialists will help increase the structure’s resistance to impact high temperatures and humidity, using special compounds.
- MDF allows us to produce inexpensive and durable door blocks with optimal sound insulation properties.
- Wood It is characterized by high strength and resistance to aggressive environments and mechanical stress. The porous structure of the material ensures the creation of an optimal microclimate. Such designs are great for custom design and perfectly complement classic interior, while the parameters of interior doors must correspond to the specifics of the opening.


All-glass doors, metal-plastic structures, and steel parts are non-standard products that require an individual project.


Reference door installations placed in a durable box, the quality of which determines the durability and reliability of the entire structure.
- Fiberboard box is a durable installation that can be deformed under mechanical influences.
- Wood box, not subjected to processing - structures made of profiled timber. They are distinguished by their super strength and reliability. During installation you will need to use additional materials for final finishing activities.
- Box made of laminated materials. This installation does not require final finishing. The defining point is the nature of the lamination. The use of thin paper is not recommended, since in this case abrasions and cracks may appear, affecting the external parameters of the product.


The doorway may need to be pre-treated. This determines the specifics of the opening, its parameters, and the interior features of the room. Processing can be carried out using additional parts and platbands.
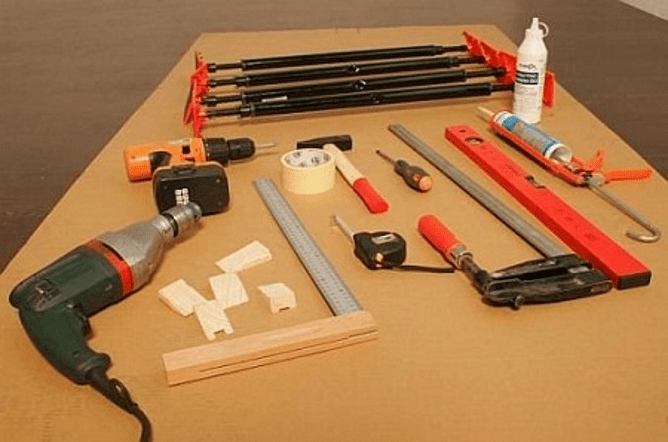
What tool do you need?
Installing a door requires the use of certain knowledge and equipment: a vacuum cleaner and Miter saw are considered indispensable attributes of the kit. Experts recommend thinking through an action plan at the initial stage: you will need to organize markings, insert hinges, and arrange door slopes.
Manual equipment and electrical equipment are used at the main stages of work. The question of how to use a router will be answered by experienced craftsmen with many years of experience, under whose guidance all major activities will be carried out.


Using a hammer drill, the working surfaces are leveled and the opening is expanded. This tool allows you to make special recesses for dowels. The drill helps to drill holes with the required parameters for fasteners. The start of work is accompanied by a check of the equipment. The tightness of the drill fixation is very important, because the part can fly out during the work and damage the working surfaces of the doors.
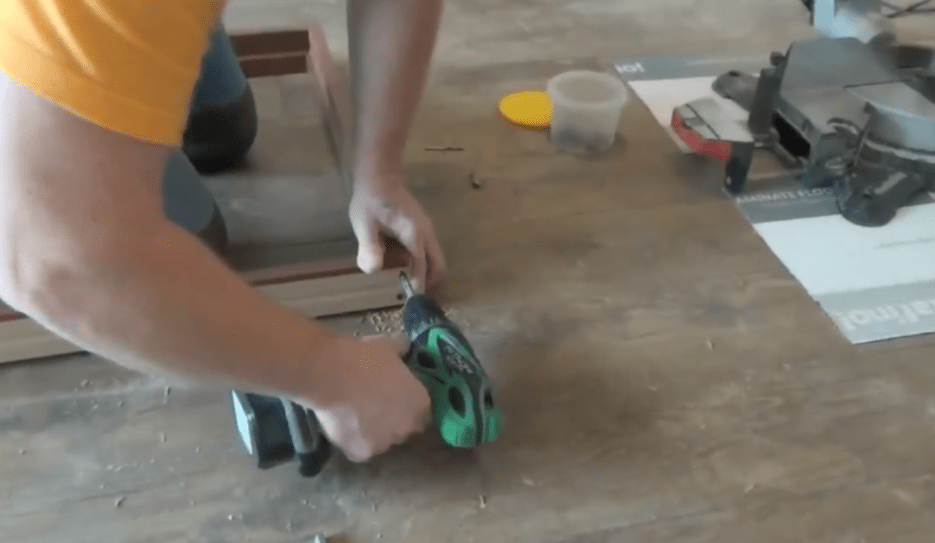
The screwdriver allows you to securely fix hardware in the hinges. A jigsaw can be used to process complex surfaces that are difficult to cut. A hand-held electric router helps install the locking mechanism and embed the hinges. The pencil allows you to make special marks in areas that require treatment. A marker is used for the same purpose (provided that it does not leave marks on surfaces).
A three- and five-meter tape measure or a steel ruler together with a straightening square ensure the accuracy of measurements. Using a caliper, the depth of the cut is measured, which is done using a chisel.


The slope of the surfaces must be measured using a bubble level with parameters within 50 cm. Using a set of screwdrivers, hinges and canopies are attached, and locks are installed.
A miter saw is an excellent tool for cutting structural parts - bars and trim at an angle of 45-90 degrees. A circular saw helps format dimensions door leaf. The gun can be loaded with high quality sealant to fill gaps.


What is included?
Self-tapping screws allow you to fix the elements of the device ( mounting strips, hinges, platbands, locking mechanism). The kit also includes liquid and finishing nails and micropins, fixed with an air gun. With the help of these devices, the fastening becomes extremely strong and reliable. The mounting microstud is a compact hardware element without rivets, which ensures a solid surface. You can measure the length and width using a tape measure or metal ruler.
Interior doors are sold without fittings, which are known in domestic and foreign production.


Our specialists will help you choose high-quality systems (hinges and locks) that are not subject to mechanical stress and corrosive deformation. By adjusting the hinges using fasteners and a screwdriver while working with slopes, it ensures high density adhesion of the canvas to the box, while using special devices that allow you to measure parts, insert structural elements at a high professional level.
The solution bath is made from special material, providing an optimal mixing format building mixtures and ease of cleaning after work. The kit includes brushes and rollers for finishing work. The grout kit provides a reference look for the surface of the door block.


How to install correctly: step-by-step instructions
Interior structures are installed from scratch using step-by-step recommendations posted on Internet portals. Experts recommend not doing the event yourself unless you have sufficient knowledge and experience.
Experienced professionals will tell you at what stage you should carry out the preparatory activities, and on which the structure is installed.
- Determine the specifics of the means and quality Supplies for installation of the structure.
- Outline the installation diagram of double-leaf interior door blocks with extensions.
- Carry out constructive measures to install the door frame without screws. Hinges are attached to the door block, a cutout is made in the structure, a durable frame is assembled, after which all the elements are assembled together. Metal bases must be structurally sound. The plank is fastened using self-tapping screws. The U-shaped design is the key to competently carried out work.

- Mount the structure in the opening. The frame is inserted into the doorway and alignment is performed. The end decorative part is drilled on both sides.
- Install door structures on hinges. A lightweight fiberboard door allows you to hold events yourself.
- Foam the seams, thereby eliminating the voids between the wall surface and the frame. Complete hardening occurs within 24 hours at room temperature.
- Carry out finishing work. Determining the type of finish will help create the optimal design.
See the following video to see the installation process.
How to install the fittings?
Experts do not recommend carrying out installation work yourself door design, replacing the lock and arranging thresholds, as these activities require high professionalism. Experienced craftsmen will help you purchase a set of high-strength materials, determine the order of work, install the structure correctly, insert door frame into the opening. Assemble the structure, ensuring high quality assembly can be done using special tools.
It is necessary to insert fittings using modern technologies and installation methods with preliminary measurements using a tape measure or ruler. High-quality hardware is used as fastenings. At the initial stage, a work plan is formed, a set of necessary tools, insertion of the box into the opening and installation of hidden hinges is ensured.


Successful examples and options
Before you start installing the door, you need to familiarize yourself with successful examples and design options. On the websites of companies engaged in licensed activities, samples of doors in a Khrushchev-era building, a modern apartment, and a equipped kitchen are presented. It is important to pay attention to quality installation, made in accordance with technical specifications: holes are carefully made in the wall, structural parts are inserted at the required angle.


The ability to handle carpentry and measuring tools is already a reason to try to solve such a problem. not an easy task How to install interior doors with your own hands. The work is simple, but tricky in its own way. It will take scrupulousness and even tediousness in marking and adjusting, otherwise it will not be possible to install the interior door with the frame correctly.
Features of installing interior doors
At first glance, nothing complicated, but this is only a superficial impression. We are talking about not just installing the frame and door leaf into the interior opening, but doing it beautifully, without distortions, scratches or sagging hinges. If this is your first experience, then it is best to make detailed step-by-step instructions for installing interior doors yourself before starting work. This is not shameful for beginners. Even experienced craftsmen often make notes with their own hands - what not to forget and what to pay attention to when installing a door frame on a specific interior partition.
During the installation process, you will need to solve two of the most difficult problems yourself:
- Correctly assemble and install the frame of interior doors, align and secure it so that the frame does not sag under the weight of the door leaf;
- With your own hands, mark and cut out the mounting grooves on the vertical post of the frame and on the end of the interior door leaf.
It takes an experienced craftsman 2-3 hours to install an interior door; a beginner will need at least a day to completely install the frame and hang the door leaf.
Advice! It is not necessary to stupidly follow the instructions for installing interior doors, which recommend sequentially installing lock fittings, attaching hinges, and only at the very end solving problems with hanging interior doors. The main thing is to install the frame and door leaf with your own hands with a fresh mind, and you can put off the trim, locks and handles with trim for the next day.
There will be a lot of measuring and sawing. All cuts are made by hand hand hacksaw, therefore, in addition to fresh forces, you will need to stock up on quality tools.
Tools for installing interior doors
A day or two before the start of work, you will need to assemble a working arsenal for working with lumber. You can collect it from friends or rent it. Why two days before installation? Because well before starting work, you will need to check with your own hands the serviceability and functionality of each tool:
- Construction levels - small, 70-100 cm, and large, 150 - 200 cm, with a working bubble indicator. Usually they don’t pay attention to the condition of the camera and beacon, considering them to be in good working order, but at rental stores you can sometimes find bent and even broken copies, these are the most important tool in the installation of interior doors;
- Marking tool - carpenter's corner with a ruler, tape measure and meter metal ruler. We check for the presence of angle marks at 90° and 45°;
- A screwdriver or electric drill with a bit attachment for cross-head screws. We check with our own hands how the cartridge holds, and the serviceability of the wiring - batteries;
- Cutting tool, you can cut the timber of interior doors with a jigsaw, but it is best to stock up on a pair of hacksaws - carpentry and metal. The first is used for cutting box parts, the second is used for fine cutting of platbands.
In addition to the tool, you will need a hammer, a clamp, a carpenter's chisel, foam in a can, tape and gloves. There is little dust and waste generated when installing interior doors, but you will still have to periodically remove it with your own hands so as not to spread it throughout the apartment.
In addition, it would be correct to have a hammer drill with a bayonet blade in stock, because when installing an interior door frame, problems may occur with the doorway in the wall. Ideally, the gap between the frame posts and the ends of the opening should remain 10-20 mm, for normal alignment and foaming of the cracks. In reality, the opening may be uneven, and you will need to knock down part of the concrete or stone with your own hands, a hammer drill or a hammer and chisel.
How to assemble an interior door frame
The best option would be to purchase a ready-made door kit, which usually includes:

In this case, the entire process of installing the interior frame box comes down to transferring the second parts of the hinges onto the frame parts with your own hands, assembling the hinges with self-tapping screws and installing them in the opening.
The entire job will take less than two hours. One of the options for installing interior doors with your own hands in the video
The only drawback of the above scheme is that not all manufacturers of modern models of interior doors produce their products in kits designed for do-it-yourself installation. Most often, the customer buys a door leaf, and the trim and frame parts are purchased with the expectation of installing an interior door with a frame on their own.

How to install an interior door with your own hands
First of all, you need to lay out the door leaf on a flat area. Next, the selected pair of beams is laid to the left and right ends of the sash. Using a tape measure, we measure the width and expected height of the future supporting frame. Then, using a building level and a tape measure, check the dimensions of the interior passage.
Important! This is done in order to determine whether the platbands will cover the edges of the hole in the wall, and what thickness of additional elements should be used.

If you “miss” the height or width of the frame, you will have to redo the trim yourself or, even worse, you will need to raise the interior door in height.
Assembling a door frame frame of any size
In order to install the interior door without distortions, it is important to choose the correct distance between the left and right posts so that the door leaf fits into the frame with a small gap, no more than 2 mm on each side. In this case, the door will open freely without jamming in the hatch.
The easiest way to assemble the frame with your own hands is using a clamp, a saw and two blanks. Vertical posts, as in the case of preparation, are placed at the ends, leveled and secured with clamps.
On the side of the upper and lower edges of the canvas, an allowance equal to the thickness of the timber is left on the workpieces. At the same time, on the left allowance, a line is applied with your own hands at an angle of 45° for further joining with the horizontal crossbars of the frame. Without disassembling the structure, markings are applied to cut out the grooves for the canopies, lock and handle.
If the interior door is too wide or complex shape, then usually at this stage they check the conformity of the configuration of the frame with the door to the shape of the interior opening. To do this, a pair of nails are driven into a wooden plank at a distance from each other equal to the outer width of the frame. The plank must be secured above the opening, and a couple of plumb lines are hung on the nails. If the gap between the frame and the wall is 10-15 mm, then the calculation is correct.
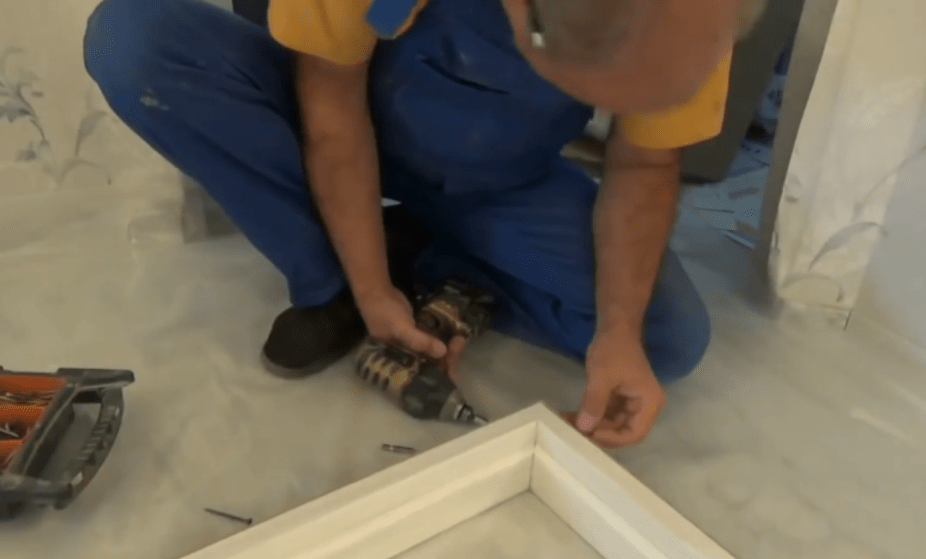
Installing hinges on an interior door
After all checks have been completed, it is necessary to cut out mounting grooves for the awnings in the canvas using a chisel or carpenter's knife and hammer. The easiest way to mill a niche is using a hand router, but, as practice shows, the work can be done with your own hands and without expensive power tools.

If this operation is difficult, then for interior doors you can use overhead hinges or models for drilling. For installation you only need to drill holes for screwing in the fasteners.
We fix the frame in the doorway
- We mark the level of the upper horizontal cross member of the frame with a marker on the steppe, this will help to perform the correct installation horizontally and vertically;
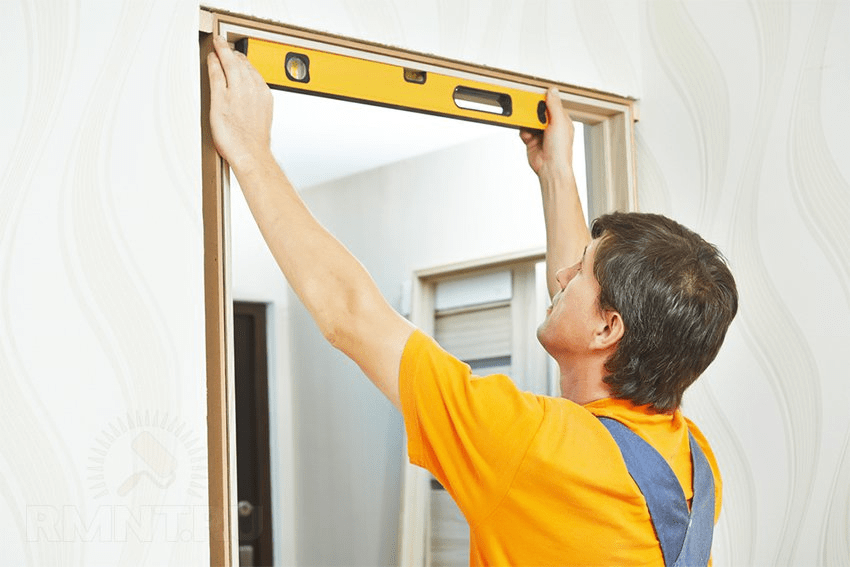
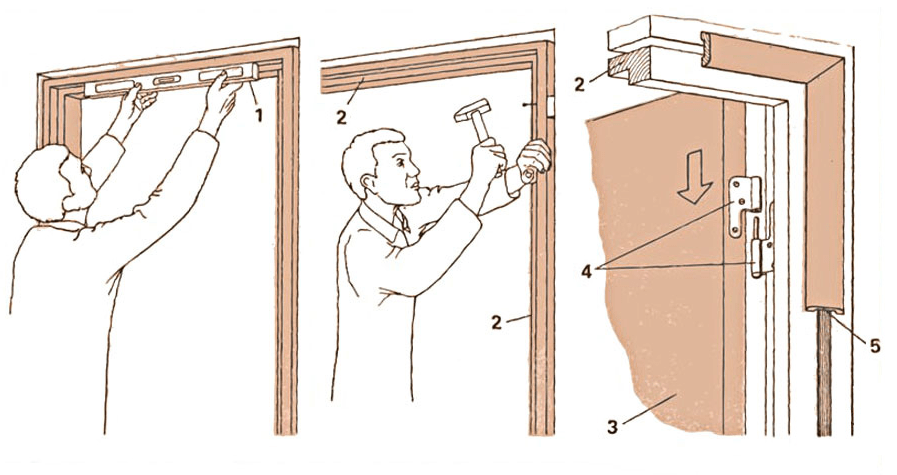
- Using wedges and a building level, we level the frame vertically and horizontally with our own hands. We fix the position of the frame in the opening with wooden plugs and wedges.

Advice! If the frame and door leaf are light in weight, then the frame can be fixed with mounting perforated petals to the wall of the interior partition.

Next you need to blow out polyurethane foam The space between the frame and the wall, while installation is being carried out on the polyurethane foam, must be checked again and, if necessary, finally leveled vertically using a long building level. Apply a small amount to the top mark building level and, if necessary, we adjust the frame to the required height.

Installation of door leaf
After the loot is firmly fixed with hardened foam, it is necessary to install the mating parts of the canopies. To do this, initially the door leaf is raised with wedges so that there is a gap of 1-2 mm between the threshold and the lower edge.

All that remains is to install the sash on the awnings, and you can move on to decorative finishing interior doors.
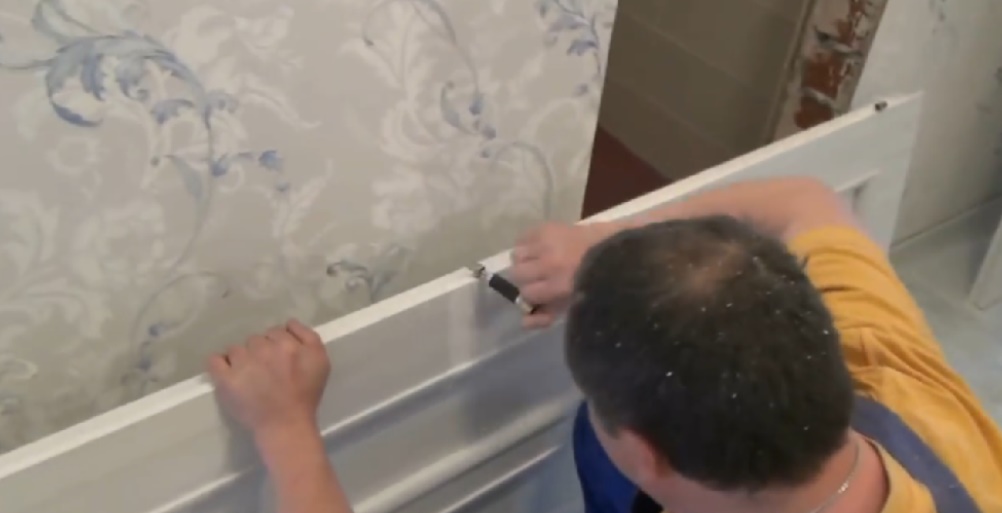
Installing trim on an interior door
Covering the frame with platbands is not particularly difficult. First of all, install vertical slats platbands. The height of the plank is measured according to the mark made earlier, after which the platband is applied to the frame and the cut line is marked at an angle of 45 degrees.
Advice! It is best to make an undercut with your own hands using a thin hacksaw blade on metal. First apply tape to the cutting line. The plank is nailed with wallpaper nails or placed on glue.
The second vertical casing is installed in a similar way. After the installation of the vertical parts has been completed, you can mark the cut line on horizontal bar, and install it on the door frame in the same way.
What are the sizes of extensions for interior doors?
Additional strips are used as an additional element to increase the width or thickness of the door frame. Most often, installing extensions on interior doors is required in a situation where the wall is much thicker than the canvas, and there is a gap between them that needs to be closed.
The width of additional slats ranges from 10 mm to 200 mm, for interior designs the most popular size is 10-20 mm, and often, due to the non-standard profile of the slot, the extensions have to be ordered or cut out with your own hands from the trim strips.

How to install extensions on an interior door
If, after installing the box, the unpleasant fact is discovered that the vertical plane of the frame is recessed into the space of the interior opening relative to the wall surface, then the only way to correct the situation is to use additional strips.

You must first determine the size of the extension; to do this, place a building level on the wall and use a ruler to measure the distance to the front edge of the box. Thin strips are nailed with wallpaper nails, wide extensions are glued to the frame.
Professional advice on how to install interior doors
Among the features of installing home doors are the following: problem areas.
Before installing the trim, you need to make sure that the frame or additional strip is located in the same plane with the surface interior wall. Otherwise, even if you do it perfectly with your own hands, a gap will definitely appear between the platbands.
The second problem that we have to face is the sagging of doors when incorrect installation. To correct the position, you need to remove the door leaf, add washers, or trim the edge and put the door in place.
Conclusion
Installing interior doors with your own hands will require a little practice in installing awnings and extensions, but in general case The work is not difficult, and with the right skill, the canvas can be hung in a few hours. The craftsmen claim that with each installation, the quality of their DIY work doubles.
– the procedure is troublesome and time-consuming. But if you have minimal woodworking skills and the necessary tools, you can still handle the installation.
Not only the aesthetics, but also the strength of the structure depends on whether the door frame was installed correctly. But before you get started, you should familiarize yourself with the main parameters that you need to pay attention to during installation.


Construction plans

There are two schemes for fastening the door frame, which differ in the execution of cuts:
- to make a cut at an angle of 90ᵒ, you need a saw with small teeth, accuracy and minimal knowledge of woodworking technology;
- for an angle of 45ᵒ you will need a miter box or miter saw.
The second mounting scheme is described below, as it is simpler to implement. Now - directly to the installation.
Stage 1. Door frame elements

You should first purchase necessary details designs. Here is a list of all components:
- door leaf;
- self-tapping screws with dowels;
- a pair of vertical bars 2 m long;
- one horizontal block;
- wooden platbands;
- anchor bolts appropriate size;
- iron hanging bars;
- platbands;
- wedges of a size corresponding to the width of the opening between the block and the wall surface;
- polyurethane foam;
- foam spray gun.
Stage 2. Equipment

Installation will require a lot of tools and materials. Every owner should have some of them, others need to be bought or rented. So, For work you need to prepare:

Stage 3. Dismantling the old box
Preparation for installation often begins with dismantling the old door. This must be done in this sequence.
Step 1. First of all, the trim is removed and the door frame structure is disassembled. All this must be done very carefully so as not to damage the wall.


Step 2. Anchor bolts and other fasteners are unscrewed or, in extreme cases, cut down.
Step 3. The wall is checked for strength and, if necessary, further strengthened.
Note! Do not neglect the strength of the wall, because the reliability and durability of the box directly depends on this. If strengthening is necessary, it is better to make reinforcement and finish cement mortar"problem" areas.
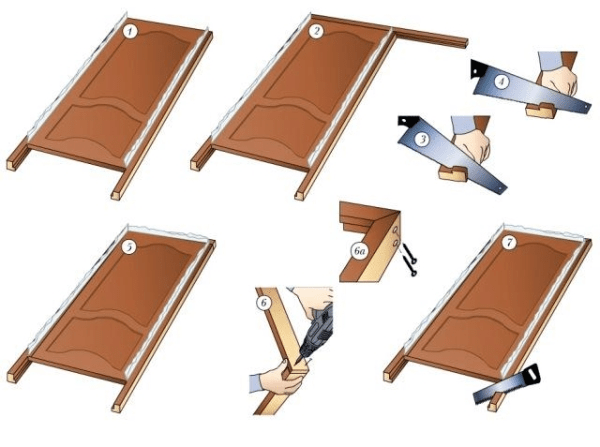
Stage 3. Installation of the door frame

Before starting, it is advisable to lay out all the components on the floor at a single level, having previously placed cardboard or other soft material. The structure can also be placed on two tables or four stools.

Step 1. When finished dismantling works measurements of the resulting doorway are taken. It is important that the width and height of the structure are at least 5 cm less than the opening - this will allow the installation of spacer wedges.
Note! The wedges must be 0.5 cm larger than the gaps, otherwise the fastening will not be strong enough.
Step 2. The ends of the bars are cut off with a miter box at an angle of 45ᵒ.
Step 3. Holes are made at the joints of the bars. The bars are tightened with self-tapping screws. When tightening, you need to be extremely careful, because if you overdo it, the wood may crack.

Bottom bars in modern designs not provided.
Step 4. Determine which side the door hinges will be attached to, after which their outlines are outlined. The door leaf is tried on and the presence of a small gap between the floor and the frame is checked. Using a chisel, the fastening points for door hinges are prepared. The hinges are screwed with self-tapping screws to the canvas and block.
Step 5. Where the box will be adjacent to the wall, hang the hanging strips with self-tapping screws. The bar of each frame is equal to the width of the wall, and the tendrils extend 5-7 cm onto the inner and outer sides. There should be two similar strips horizontally, and three vertically.

Next, the door frame (only without the leaf) is installed in the opening. Using a level and plumb line, the horizontal/verticality of the structure is checked. A spacer frame of the same size as the bar located on top is installed at the bottom.

The frame for the doorway is almost ready.
Step 6

Step 7. All that remains is to secure the box with anchors. Through holes are made at equal intervals along the entire perimeter of the beam, and points for drilling the wall are marked in parallel. Then the wall is drilled with a hammer drill, and anchor bolts recessed into the block are inserted into the resulting holes. The fasteners are tightened with a wrench.

Step 8. At the end, the door leaf is hung, after which the axes are aligned. If everything is done correctly, the door will open and close easily. All cracks are filled with polyurethane foam.

Note! The amount of foam needs to be controlled, because an insufficient amount will reduce the strength of the structure, and an excess can cause deformation of the box.
After this, platbands with pre-cut corners are installed. For fixation, small nails without heads are taken, all joints are covered with wax-based mastic.
Video - Assembling the door frame
Methods for fastening the box
If the width of the opening is greater than the width of the box, then instead of wood you can use jambs made of MDF - a building material used in last years very popular. In this case, the fastening technology is almost the same as described above.
Various types of additional elements are used to increase the distance from the beam. Such items can be purchased at finished form in the store or pre-cut at the preparation stage. In most cases, MDF is used with a special trim strip located in the center. This strip is removed, and the required number of holes for anchors is made in the groove located under it. Then the groove is closed with a bar and a reliable and aesthetic design is obtained.
Door frame in a wooden house

Wood - excellent construction material, the main disadvantage of which is subsidence after construction. For this reason, you need to know how to make a door frame in this case.
In this case, there can only be two options.
- If the width of the opening corresponds to the size specified in the project, then grooves are made at the ends and timber is driven into them. A box is nailed to the beam (it is better not to nail it directly to the walls, because the notorious subsidence will continue).
- If the opening is not formed, the hole must be made slightly smaller than that specified in the project. In this case, the timber is made with a groove.
The sequence of actions should be as follows.
Step 1. First, the outline of the future opening is marked, using a building level and plumb line.
Step 2. Then the opening is cut out, the upper and lower parts are planed.
Step 3. The diameter of the log house is measured and the dimensions of the door frame jambs are determined from the resulting figure. Shoals are made from blocks.
Step 4. The decks are split into blocks and hewn.
Note! It is not at all necessary that the profile of the jambs be rectangular - it can be, for example, trapezoidal.
Video - Door frame made of wood and MDF
And one last thing. During repair work the humidity in the room usually increases, which is very important, especially when assembling the door frame. After some time, the door, which was previously sitting tightly, begins to loosen. At the same time, many craftsmen also prefer to save on accessories. This is not necessary, because weak fastening usually causes the fragility of the door.
If you decide to renovate a room, you should not save money by leaving the old door. This element of the interior can greatly influence the impression of the design. Therefore, experts recommend taking care of replacing the interior door along with the new design of the space. This must be done after finishing finishing, then all the nuances will be taken into account (for example, flooring will slightly reduce the actual height of the opening), and the canvas or frame will not suffer from finishing operations.
It should be noted that the services of specialists installing doors can cost no less than the door installation itself. To avoid such costs, many people prefer to perform installation work on one's own. How to do this efficiently? This will be discussed further.
Measurements
To do this, if you have an old door, you need to remove the trim. This can be done using a nail puller and a hammer. You need to insert a nail puller into the gap between the platband and the door frame, give several blows with a hammer to widen the gap. And then you should apply efforts in different places along the length of the casing in order to tear it away from the door frame.
The best way to take measurements is to focus on the dimensions of the old box. If it is not in the opening, then it is necessary to measure the width and height in several places. Choose the smallest value. Experts recommend subtracting about 10 cm from this value to get the dimensions of the door leaf.
When taking measurements on an old box, remember that modern samples are somewhat thinner. As a rule, the thickness is 1.5 cm. It turns out that the width of the canvas together with the box is calculated as follows: the width of the canvas plus double the thickness of the box (left and right) plus a small gap between the box and the canvas. For example, the canvas has a width of 80 cm, then we get the following calculation:
80 + 1.5 x 2 + 0.4 x 2 = 83.8 cm.
Fabric preparation
We believe that we have already received the door leaf and door frame, based on the measurements taken. Now we need to move on to active action. And it’s worth starting with the canvas.
To work you will need the following tools:
- sharp chisel;
- hammer;
- roulette;
- drill with an attachment for screwing in self-tapping screws, with a wood drill, the diameter of which smaller size self-tapping screw
We will not use expensive milling equipment, using only standard tools that are available to a wide range of people. And if you have the opportunity to use such a machine, the task at certain stages will be simplified and speeded up.
You will need the following accessories:
- loops;
- latch with handles.
So, let's inspect the door leaf. Most often, damage can be on the edges, so you need to inspect them carefully. If there are any problem areas, you should consider how best to position the canvas in relation to the opening and frame in order to hide the shortcomings.

Door hinges are hung at a distance of 20 cm from the top and bottom edges of the door leaf. We apply overhead hinges alternately in these places (use the smaller, inner part of the overhead hinge). Making notes. A pencil is suitable for this. If a dark material is used, for example, wenge, which is now popular, then you will have to select an alternative. For example, use ballpoint pen, pressing the marks.

Using these marks, using a drill, we make holes, having first placed the door horizontally, end down. You can make them very small in length, this will be enough. Now you need to try on the hinges and secure them using two self-tapping screws (from the kit). This is best done with the same drill with a cross-head bit or a screwdriver. You should not screw in all the screws, since the hinges will still have to be removed.
If mortise elements are used, then recesses will have to be made in the canvas.
Next, we will prepare a place for installing the latch in the canvas. It is believed that it is placed at a distance of 90-120 cm from the floor. We choose the optimal height for ourselves and family members. If you have small children, it is likely better to place the latch higher.
So, the canvas needs to be turned over (we can imagine how it will work in the end, so as not to confuse the top and bottom). We apply the latch to the end, you need to outline its dimensions. Next, using a chisel and a hammer, we make a recess, making sure that the actions are vertical. You can pre-drill it. As a rule, in the place where such an element is supposed, manufacturers add a piece of wood. This is the case if not an array is used, but, for example, MDF.

We check that the core fits well. Next you need to make a recess for fastening. We make its outline and, observing the thickness of the metal, create such a shallow cell. All that remains is to insert the latch core and check. If everything is fine (it fits into the canvas and does not protrude beyond the edge), you can fasten it with self-tapping screws (included in the kit), having previously drilled holes. We will install the handles later so as not to interfere with the assembly of the box.
Box assembly
We will need tools:
- chisel;
- hammer;
- a drill with an attachment for screwing in screws, with a wood drill whose diameter is smaller than the size of the screw;
- hacksaw for metal.
One of the most critical stages that requires special attention. Since we do not use expensive equipment, we do not use a circular saw, which means that it will not be possible to efficiently cut the elements of the box at 45 degrees, even if you use a miter box. We will do things differently. Protruding elements will be cut out in the upper and lower slats to secure the vertical slats.

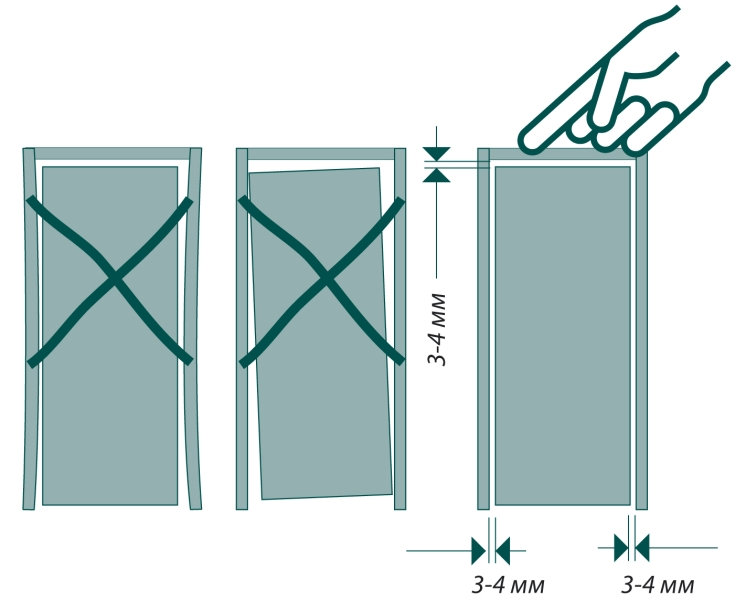
You need to start with the bar on which the loops should be. Cutting off top part at right angles using a hacksaw (this will provide better edges). We apply it to the end to determine the location of the “return” loops. The bar should be placed so that it extends slightly above the top edge of the canvas - about 4 mm.
We make marks along which we apply the loops. We mark where the screws will be located and drill holes. We secure the hinges using 2 self-tapping screws.
Now you need to cut off the top strip of the box. This is where you will have to cut off the protrusion. First, we cut the edge of the plank so that it is even and perpendicular to its length.
We apply the top bar to the bar with loops strictly perpendicularly, mark it. According to the mark, carefully cut off the protrusion at the required distance from the edge, and then cut it out with a chisel to get flat base. We try it on so that there are no gaps during assembly.
We make holes so that we can then use two self-tapping screws to fasten the vertical and horizontal strips of the box. You need to do the assembly carefully so that the corner does not move out. We proceed in the same way with the remaining corners, remembering the necessary gap - a distance of about 4 mm should be maintained from the door leaf. It may be larger from below, since the door may sag over time.

When the box is assembled, we check the gaps and the quality of opening and closing of the canvas. Now you can remove the hinges from the box and install a convenient canvas to secure the handles for the latch. To do this, you first need to make marks for the screws, and then make holes. We fasten the handles. Please note that in most cases it is possible to additionally secure them with through screws. This strengthens the handles and prevents damage to the door leaf due to careless use or excessive force when opening the door.
Removing the old door
First, remove the canvas by unscrewing the screws that secure the hinges, if they are permanent. Next you need to make cuts with a saw in the middle of the vertical posts. This is usually enough to break the box piece by piece using a nail puller and a hammer.
Preparing the opening
It is necessary to clear the opening from the remains of the box, finishing materials so that nothing interferes with the installation. Next you need to use a tape measure to measure the dimensions of the resulting new box and correlate them with the dimensions of the opening. If there are inconsistencies, they should be eliminated.
Installation of the box
Another difficult stage. The frame must be installed to the edge of the side of the opening where the door will open. The effect should be achieved so that the box maintains its level and does not protrude or fall in relation to the plane of the wall. If the level is not maintained, the door will open or close spontaneously, which experts try to avoid. If the plane of the box does not coincide with the plane of the wall, there will be problems with installing the platbands.
We will look at how to install the box using hidden way. It's easy to implement. Fastening with self-tapping screws is carried out in three places:
- in the area of fastening two hinges (holes are made so that the heads of the screws are covered with hinges);
- in the “return” area of the latch (the recess where the tongue will go).
So, first we make holes in the hinge area, secure the box, keeping an eye on the level. Then you need to hang the door and make a “return” using a chisel and hammer. We make a hole in this place to secure the box.

It is necessary to insert wooden pegs between the frame and the opening, which will allow the structure to be more firmly fixed. After fastening, we check how the door opens and closes.
Installation of additional strips
Now you need to install additional strips. Most often they have to be cut to width. You need to accurately measure the distance from the box to the edge of the wall in several places. These values may be different, which means the width of the edges of the additional trim will be different.

When the additional strips are installed, it is necessary to fill the space between the frame and the opening using polyurethane foam. It is better to choose a composition that does not expand much in volume in order to avoid distortions in the structure if the foam suddenly expands, bending part of the structure.
Installation of platbands
After this, you can begin installing the platbands. There are several ways to install them so that the fastening elements are invisible. You can take nails (2-3 cm long) and cut off the heads. Drive them into the wall (if it is wooden) and into the box with the cut side. And then use them to fix the platbands. This method is dangerous due to the appearance of cracks in the material, so it is safer to make chamfers for self-tapping screws and use them to secure the platbands. Hats can be easily hidden using special accessories (in the right color), available at every hardware store.

The upper horizontal bar and two vertical ones can be combined at 45 degrees. If you don’t have a machine or miter box at hand, you can make it 90 degrees, cutting the products at a right angle.

Now you can enjoy the result of the work both aesthetically and practically!
The decision to replace an old interior door can be put off by the owner of the house for a long time until “tomorrow”, since, having the desire to carry out this procedure on his own, he does not have knowledge of the nuances of installation and the confidence that he will be satisfied with the result. For high-quality and trouble-free door installation, a newly minted master must follow the advice of professionals with extensive experience in this field. This article contains all the important details of choosing and installing an interior door, and includes detailed photos and video instructions.
The market for interior doors is replete with variety; the quality and noble appearance of the door often corresponds to the price. The cheapest doors differ from, first of all, expensive materials, from which they are made. The door leaf exists in the following types:
- From fiberboard. These are paintings that represent wooden frame, covered with laminated fibreboard. The advantages of such doors include light weight and the lowest cost on the market, but this affects their low suitability for everyday use: such doors have high sound permeability, they can be deformed from humidity, and a careless push from a hard object can leave an unsightly hole.
- Made from MDF (finely dispersed fraction). These are fiberboard doors medium density. They are the most popular on the market today due to their average cost coupled with good quality: such doors do not swell from moisture, are wear-resistant to scratches and rubbing, have good sound insulation and will last a very long time.
- Made of wood. These are the heaviest and most expensive doors, but they are the most environmentally friendly and beautiful, thanks to their rich decorative possibilities. They also have durability and excellent sound insulation. The choice of the type of wood from which doors are made is very wide; it can be oak, ash, or even exotic polysandra.
Door frames are made in pairs with leaves from the same materials and also have their own characteristics. For example, a fiberboard box, although it looks quite reliable, is very inconvenient and flexible to install, and from frequent opening and closing of the door, the colored film peels off from it in places where it touches the canvas. Wooden boxes are sold without any exterior finishing, you will have to paint them yourself, but you can decorate them with wood carvings and varnish them.

The market for interior doors is so wide that, despite strictly defined standards from manufacturers, you will probably be able to choose a door to fit your existing opening without any problems. Russian swing doors are manufactured in widths starting from 600 mm in increments of 100 mm. At the same time, doors imported, for example, from France will have lengths and widths of 690 mm with a pitch of 100 mm.
As can be seen from the table above, when choosing the width of the door leaf, it is necessary to take into account the width of the frame, which should fit freely into the opening, as well as the evenness of the bare opening: if it is uneven, then it is necessary to choose the width of the door leaf based on the width of the opening width itself. If this minimum width is, for example, 89 cm, then the most suitable door for installation will have a width of 80 cm. It will be impossible to insert a wider one into such an opening, and a narrower one will not stand securely.
If the standard for the height of doors in a residential area is obvious and stable: 2 meters from the floor, then the width of not all doors in the house must be the same size. In accordance with common standards, the width of the door varies depending on the purpose of the room to which it leads:
- V living room The door should lead from 60 to 120 cm.
- the door leading to the bathroom should be no narrower than 60 cm.
- the kitchen door should be no narrower than 70 cm.
If the owner of a residential premises wants to increase or decrease the door opening, he can do this without obtaining additional permits, but without compromising the strength and stability of the wall.
In stores, sellers offer several types of door configurations to choose from. The maximum of them is a door block, that is, doors ready for installation; they come with an assembled frame with hinges attached. The craftsman will only have to cut the sidewalls to the height, align them evenly and secure them. And vice versa, the minimum configuration includes only the door leaf, the frame and cladding will have to be purchased separately, as well as hanging hinges and filing corners and connecting it together.
If you are installing an interior door with your own hands for the first time or do not have a carpenter’s miter box to properly cut the corner, consider the first option. Despite the highest price, you will save nerves and time.
Step-by-step installation of interior doors

There are many subtleties in installing an interior door, the consideration of which will determine how long the door will last to the delight of the owner-master. The most important nuances will be presented in step by step diagram in photos and videos.

One of the most critical moments affecting the quality of the result is the assembly of the door frame. It consists of two long posts located on the sides of the doorway and one of the shortest crossbars at the top, called the lintel.
Connection methods.
You can choose from at least two ways to connect the racks and lintels to each other:
- At an angle of 45°. This is the most aesthetic option, but also the most difficult. It is necessary to cut the beams so correctly at the required angle that no gaps arise when joining the beams. To achieve such high accuracy, you can use special tool: carpenter's miter box. An important nuance is that when sawing laminated material with a hacksaw, the blade leaves small but noticeable chips on it. To avoid this, use only well-sharpened tools.
- Butt joint at 90°. This option is much simpler, but will not look good in delicate and classic interiors.
Before installation in the opening, it is necessary to dock the door frame on the floor to check the correctness of the connection. If defects in the joint are noticeable somewhere, you can eliminate them using sandpaper secured to a block.
Determining the dimensions of the box.
Another important nuance is that racks can often be different sizes. This has the right to happen due to the unevenness of the floor in the opening. You can determine whether there are differences between the right and left sides of the opening using a building level. If the floor is perfectly level, then the racks will be the same. If there is a deviation, then it must be taken into account: make one of the racks shorter. Despite the fact that the deviation can reach only a few millimeters, this is enough for the future door to warp.
Also, when calculating the height of the racks, it is necessary to take into account that the racks should be 1–2 cm higher than the door leaf (including cuts). A gap of 1 cm is made if there is no rug under the door. Accordingly, if there is a carpet under the open door, then the gap should be increased. Gaps are also necessary for normal ventilation in the room. Please note once again: the height of the stand is measured along its inner part - from the lower edge of the cut. The prepared rack must be used in doorway.
Next we work on the lintel. It must be cut to length and filed on both sides (if the 45° joining option is selected). It is important that the length of the lintel is of sufficient length to ensure the difference in the width of the frame and door leaf, between which a certain gap must remain. The minimum gap is 7 mm, but it can be larger. This minimum gap is required for installing hinges - 2 mm, and 2.5–3 mm are considered compensation gaps, since any interior door, regardless of its constituent material, can change its dimensions. In wet areas there is a high risk of the door swelling by large amounts; in such cases, the gap should be increased in order to avoid troubles with the operation of the door in the future.
Conclusion on minimum gaps when installing interior doors:
- for hinges - 2 mm;
- at the top, bottom and sides - 3 mm;
- below - 1–2 cm.
Assembling the box.
Regardless of what material the box is made of and how it is connected, holes for fasteners are pre-drilled in the opening. This is done in advance so that the material does not rupture during fastening. The diameter of the drill should be 1 mm less than the diameter of the screw.
The box folds and angles are set to 90°. Using a drill, holes are drilled in the racks and ceiling. An assistant will be very helpful here. If the work is carried out by one person, a correctly aligned box can be temporarily secured with two cross bars at the top and bottom. This will save the technician from correcting errors.
If the connection is made at an angle of 45°, three holes are made on each side. Two are located on top, a centimeter from the edge, and one on the side - in the center. The connection is made with self-tapping screws, the direction of their installation is perpendicular to the connection line.
If the connection is made at an angle of 90°, then simply drill two holes from the top, the drill is directed straight down.

Often the door leaf is hung on 2 hinges, but more can be used, depending on the weight of the door and the reliability of the hinges themselves. They are installed at a height of 200–250 mm from the edge of the door leaf. If used wooden box and the door, you need to choose a place so as not to get caught in a knot with a loop.
First of all, the hinges are attached to the door leaf according to the following instructions:
- The loops are applied to the location selected on the canvas and outlined either with a finely sharpened pencil or, as experts advise, with a knife blade. The knife allows you to outline the hinge more accurately; accordingly, the gaps between the suspended door and the frame will be smaller.
- If the door is not fiberboard, then inside the outlined space part of the material is removed strictly to the thickness of the hinge.
- Next, the loop is installed in the prepared recess. The plane of the hinge should not protrude from the plane of the door leaf.
- The inserted loop is fixed with self-tapping screws.
- IN assembled box the door leaf with fixed hinges is laid, the necessary gaps are set: 5–6 mm on the side of the hinges, 3 mm on the side opposite the hinges and between the leaf and the lintel. When the gaps are set so that they do not get lost, the door leaf is fixed with wedges. At the same time, the canvas is aligned exactly in the vertical and horizontal planes.
- Next, mark the places on the racks in which the counter parts of the loops will be located. Perhaps for this procedure, in certain circumstances, it is convenient to remove the loop already installed on the canvas and then install it back. In the racks, a recess is also made inside the marked area, quite deep, so that the loop does not extend beyond the plane of the rack.
More details on how to hang a door with your own hands are described in the video.
 The door frame is installed in the opening in an assembled state. This task is extremely responsible. Before placing the box in the opening, it is necessary to knock off the falling plaster and trim off the protrusions. If the surface of the wall crumbles easily when touched, it is treated with a primer deep penetration with an astringent effect. Large holes in the opening are sealed with plaster. There will be no complications when installing the door into the prepared opening.
The frame is displayed without the door leaf. It must be oriented strictly vertically. For this reason, during the installation process, not only a building level is required, but also a plumb line, since it has no errors.
To avoid skewing of the box, temporary spacers are installed on the floor, and slopes are placed in the corners, providing a high degree of rigidity. In order for the door to be able to swing open completely, it is installed flush with the wall.
After precise definition position of the box, it is fixed. This is done using mounting wedges. First they are placed on both sides of the lintel, then above the racks. This allows the position of the box relative to the doorway to be fixed. Next, the verticality of the racks in two planes is re-checked; they should not be tilted either forward or backward.
Then the wedges are installed at the bottom, and then after 50–60 cm, while it is still necessary to check the accuracy of the location of the box. An additional transverse strip is wedged in the middle. It is important to check whether the box elements are bent in some places and adjust if necessary. Next the box is secured.

There are two ways to attach the box. You can mount it directly to the wall, or use mounting plates. The first method may not look aesthetically pleasing due to the presence of screw heads on the plane of the stand, but this method is the most reliable.
For an interior door, two screws screwed into the cutouts for the hinges and two screws on the other side - under the plate of the lock mate - are sufficient. Additional holes are drilled in the cut out plates. They are made so that they do not coincide with the holes for attaching the hinges or mating part. It is necessary to ensure that the head of the screws is recessed deep into the surface, otherwise it will interfere with the installation of the hinges and lining.
The video shows the installation of an interior door according to this diagram. It also outlines several subtleties associated with installing the door frame.
It happens that such a quantity of fasteners seems insufficient in terms of reliability, then the holes are drilled through and closed on top with decorative washers matched to match. For convenience, there is a special MDF molding with removable slats. It is distinguished by the installation of fasteners: it is installed in a prepared groove and closed with a bar.
You can install the fasteners in another way - secretly, so that the fasteners are not visible. For this purpose, they are initially attached mounting plates from the back of the box. To install an interior door reliably, the plates used for...

The gaps formed between the fixed frame and the wall are filled with polyurethane foam. The wall is moistened with water from a spray bottle for better polymerization of the foam. The foam is squeezed out in such an amount that 1/3 of the gap space remains free; it will be filled after the foam hardens. If you overdo it with foam, it can deform the fragile door frame. To prevent this from happening, you can install temporary spacers in the opening of the box.


