Installation of small plastic windows. Guide to self-installation of windows. Incorrect distance between the window frame and the slope
If you or someone you know has previously used the services of companies installing double-glazed windows, then you know that installation can be normal and in accordance with GOST. The second option is more expensive, but if all the requirements are met, the quality will be much higher than in the first (you can read more about the standards in GOST 30971-02).
Consists of several stages.
Note! Manufacturers do not provide a guarantee if the measurements were not carried out by their employees. If installed incorrectly, the windows will soon begin to freeze, and if even the slightest mistake, then the structure simply will not fit into the opening.
However, if you study all the intricacies of the process, then no difficulties will arise during installation. Moreover, this way you can save a decent amount of money.
Video - Installation of PVC windows according to GOST
Stage 1. Measurements
In most apartments there are openings without a quarter.
Note! A quarter is an internal frame 6 cm wide (or ¼ brick, hence the name) that prevents the window from falling out and strengthens the structure as a whole.
If there is no quarter, then the frame will be installed on anchors, and the foam will be covered with special covers. Determining the presence of a quarter is quite simple: if the internal and external widths of the frame are different, then there is still a quarter.

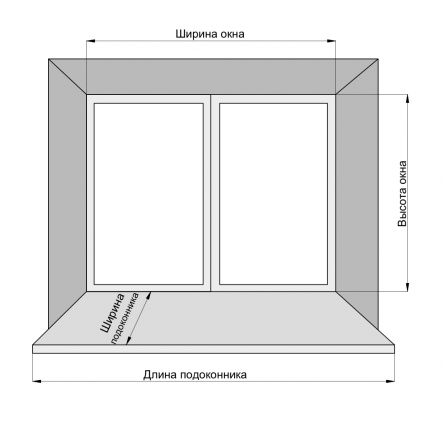
- First, the width of the opening is determined (the distance between the slopes). It is recommended to remove the plaster for a more accurate result.
- Next, the height is measured (the distance between the slope above and the window sill).
Note! The measurements must be repeated several times and the lowest result taken.
To determine the width of the window, two installation gaps are subtracted from the width of the opening. To determine the height, the same two gaps plus the height of the profile for the stand are subtracted from the height of the opening.

The symmetry and straightness of the opening are checked, for which a mounting level and plumb line are used. All defects and irregularities must be indicated in the drawing.
To determine the width of the drainage, add 5 cm to the existing drainage for bending. Also, the width of the insulation and cladding is taken into account (subject to subsequent finishing of the facade).

The dimensions of the window sill are determined as follows: the width of the opening is added to the size of the overhang, and the width of the frame is subtracted from the resulting figure. Regarding the offset, it should cover the heating radiator by a third.
Note! measured after installation is complete.
Stage 2. Order
After measurements finished drawing should be taken to the window manufacturer, where all the necessary fittings will be selected. It is worth remembering that installation can be performed in one of two existing ways:

In the first option, you will have to pull the package out of the frame, insert it into the opening and install the glass back. In the second case, the entire structure is attached as a whole. Each option has disadvantages - if you pull out the package, it can; and vice versa, if the window is installed assembled, it can be damaged due to its heavy weight.
Prices for a popular line of windows
Stage 3. Preparation
This stage of installation begins only after delivery of the ordered windows. Released first workplace, all furniture is covered plastic film(there will be a lot of dust).


Step 1. If required, the glass unit is removed from the window. To do this, the glazing bead is slightly pryed with a staple and pulled out. First of all, the vertical beads are removed, then the horizontal ones. They must be numbered, otherwise gaps will form after installation.


Step 3. The bolts are unscrewed after the plugs are removed from the canopies. The handle is turned to the “ventilation mode” (in the center), the window is opened slightly and removed. All that remains is the frame with imposts.
Note! Imposts are special jumpers designed to separate the sashes.
Then you need to make a marking for the anchors and make holes along it - two on the bottom/top and three on each side. To do this, you will need ø1 cm anchors and a drill of the required diameter.
If the material from which the walls are made is not dense (for example, cellular concrete), then the fastening is carried out using anchor suspensions. The latter should be fixed to the wall and frame with hardened self-tapping screws (eight pieces for each).
Note! To avoid the formation of a thermal bridge in the window sill profile, it should be filled the day before installation. This way the element will not freeze.
Stage 4. Dismantling work
This procedure is recommended to be carried out immediately before installing a new window. In most cases, the old ones are thrown away, so the structure can be torn out along with the fastening, and if necessary, the frame can be sawed.


Step 1. First, the seal and thermal insulation are removed.
Step 3. The window sill is removed and the cement layer underneath is cleaned off.
Step 4. Adjacent surfaces are treated with a primer material (by the way, many installers forget about this). In the case of a wooden opening, a layer of waterproofing material is laid around the perimeter.


Note! Installation can be carried out at a temperature not lower than -15ᵒC. Polyurethane foam must be frost-resistant.
Stage 5. Installation of a plastic window

Step 1. First, wooden wedges are placed around the entire perimeter, a window is installed on them (this will make it easier to level the structure), only after this is it fastened to the wall. You can leave the backings - they will serve as additional fasteners.


Step 2. The absence of a support profile can be considered a gross violation of GOST standards, since it is not only needed for stability, but also makes it possible to install a low sill with a window sill. In the absence of a profile, they are attached directly to the frame, which violates its tightness.
The correct location of the stand profile is shown in the diagram.

Step 3. Next, the evenness of the window is checked in three planes, for which a mounting level and plumb line are used. It is typical that traditional bubble levels are not suitable for this due to insufficient measurement accuracy, so it is better to use.


Step 4. If the window is level, then it is secured with anchors. To do this, a wall is drilled using a hammer drill through pre-prepared holes in the structure (approximately 6-10 cm). The lower anchors are fixed (not completely), the evenness of the package is checked again, after which the remaining points are attached.
Note! The final screed is made only after the final inspection. Do not tighten too much, otherwise the structure will “skew”.
Prices for mounting foams and cleaning gun cleaners
Polyurethane foams and cleaners for construction guns
Stage 6. Drainage

From the outside, the ebb is attached to the stand profile with self-tapping screws. The joints are carefully sealed with sealant to prevent moisture from penetrating into the structure.

The edges of the ebb are recessed several centimeters into the walls, having previously made indentations using a hammer drill.
Note! Before installation, the bottom gap is also sealed.
Stage 7. Window assembly


After attaching the anchors, the glass unit is inserted back.
Step 1. The glass is inserted and fixed with glazing beads (the latter should snap into place, for which you can lightly tap them with a rubber hammer).
Step 2. The doors are opened and their tightness is checked. In the open position, arbitrary opening/closing of the sash cannot happen if the window is installed level.
Step 3. The assembly seam is sealed on the sides. Polyurethane foam will provide high-quality waterproofing and prevent glass fogging. Before and after sealing, the seams are sprayed with water to improve polymerization.
Note! The seams are filled no more than 90%, otherwise the structure will “sink.” If everything is done correctly, after drying the foam will protrude out a few centimeters.
Step 4. The perimeter of the window is glued with a special vapor barrier tape, and material with a foil surface is used underneath.
Stage 8. Installation of the window sill

Step 1. The window sill is cut so that it fits into the opening and at the same time rests against the lining profile. There remains a small gap (about 1 cm) for thermal expansion. Subsequently, the gap is hidden by plastic
Step 2. Wooden wedges are placed under the window sill. It needs to be laid with a slight slope towards the room, and then applied with something heavy until the foam dries. Additionally, the window sill can be fixed with anchor plates.

Video - Instructions for installing plastic windows
conclusions
Now you know how plastic windows are installed, so you can safely get to work. The final check of all elements can be carried out only 24 hours after completion of installation (then the foam will have already “set”).
The described technology is also quite applicable to, although it also has its own nuances - such as, for example, installing a parapet to create a partition.


Find out how to do it correctly from our new article.
In this article I will tell you in detail how the installation is performed. plastic windows with your own hands. I will give a semblance of instructions for installing windows, which includes dismantling the old window and all the subtleties of how to properly install plastic windows in an old or new window opening.
Does it make sense to install plastic windows yourself?
I’ll say right away that there is nothing complicated about how to install a plastic window yourself. This does not require special skills or expensive professional equipment. The technology for installing plastic windows is quite simple and consists of dismantling the old window and installing a new one. In terms of time, dismantling an old window takes from 30 to 90 minutes, and installing a new plastic window in its place takes on average another 2 hours (an average window up to 2x2 m in size). In total, it will take you 2.5-3.5 hours to replace one window. Agree, this is not much. So, if you wish, in approximately one weekend, you can replace the windows yourself, changing 2-3 windows a day. The savings will be about $40-60 per window. This is how much window replacement services cost today. Sometimes the price for installation is set as a percentage of the cost of new windows and amounts to different regions and companies from 10 to 40% of the cost of new metal-plastic windows. Dismantling the old window and delivering a new one, as well as finishing the slopes, if you order installation of new windows from them, are most often done free of charge.
If you nevertheless decide to entrust the installation of windows to builders, then below I will list the guarantees that you have the right to demand:
- if you buy windows yourself and not from an installation company, then you can only be given a guarantee on: seams, their filling (foam, silicone), verticality and horizontality of the corresponding parts and the operability of the window for about a year after installation;
- if you buy windows at the same place where you order installation work, then you will also be provided with a warranty on the fittings, on average it is 1 year, maximum 3-5 years for luxury expensive windows.
When you install windows yourself, you have the right to request a warranty on the fittings from the organization where you buy the windows. And the responsibility for the seams and their filling remains with you.
I will say one thing for sure, if you have one free weekend, hard work and a desire to save money, then following the recommendations that I will describe below, you will be able to replace the windows in your home no worse than any installation team. Moreover, the word “crew” is applicable to the installation of windows, which is very conditional. Since, in fact, the installation is carried out by 1 person, and another one simply supplies the tools and holds the window at the right moment.
Correct measurement of a plastic window
To order plastic windows from the seller, you need to make preliminary measurements.
To do this, you first need to determine what kind of window opening you have - with or without a quarter. For clarity, in the figure below I show a schematic view of the opening with a quarter (A) and without (B).
Scheme of a window opening with and without a quarter
We measure windows without a quarter
Installation of windows without a quarter occurs as follows. If your house is new, then the windows are installed in an empty window opening. And in order to order a window, you need to subtract 5 cm from the vertical size of the opening - this will be the height of your window. And subtract 3 cm from the horizontal size of the opening - this will be the width of your window. Subsequently, when self-installation These 3 cm of windows will be filled with polyurethane foam (1.5 cm on each side of the window). And 5 cm is 1.5 cm from the top of the window to fill with polyurethane foam and 3.5 cm to the window sill under the window.
You also need to take measurements of the length and width of the window sill and the external ebb and add at least 5 cm to these dimensions so that the window sill “crashes” a little on the right and left into the wall. For an inexperienced installer, you can take 20-30 cm as a reserve; the excess is cut off during installation. In general, window sills and ebbs come in a standardized width (10, 20, 30, 40, 50, 60 cm) and length (up to 6 m), but in any case you must provide minimum dimensions so that they bring you the most suitable window sill and ebb available.
We measure windows and quarters
We measure the size of the window opening horizontally between the quarters at the narrowest point. Add 3 cm to this size (1.5 cm on each side of the window). This will be the width of our window. And vertically we simply measure the distance from the bottom of the opening to the upper quarter, we do not add or subtract anything to it. This will be the vertical size of our window. We measure the window sill and ebb in the same way as in the version of the opening without a quarter.
Thus, we get 6 sizes:
- window height;
- window width;
- window sill length;
- window sill width;
- tide length;
- low tide width.
Plastic window sizes
If your house is not new, and an old window is still installed in the window opening, then measurements are made in the same way. Only for the window opening, you take the outer dimensions of the window frame, since it will need to be dismantled.
When ordering a window, be sure to check whether the package includes:
- windowsill;
- Plugs are provided for plastic window sills. When ordering them, you must indicate what the width of the window sill (overhang from the wall) will be. There are 300 and 600 mm, but this is the total length, this includes two ends on one leg, and if, for example, the total length of the overhangs does not exceed 300 mm, then a plug will suit you - a 300 mm plug;
- installation profile (also known as mounting profile, sweet clover, heel, window sill profile, etc.);
- fastening elements for windows - anchor plates.
If not, they must be ordered separately.
Also, when ordering a window, in addition to its dimensions, you will also be asked such important characteristics, How:
- type window profile: 3, 4 or 5 chamber;
- type of double-glazed window: 1, 2, 3-chamber;
- window opening method: blind, with opening, tilt-and-turn with ventilation, tilt-and-turn with ventilation and micro-ventilation.
Methods for installing plastic windows, their pros and cons
Today, there are two ways to install metal-plastic windows: installation of windows with unpacking and installation without unpacking the window.
.png)
Diagram of a plastic window
So, the method of installing a window with unpacking involves preliminary disassembly of the window: the glazing beads are removed, the double-glazed windows are removed from the frame and put aside while the window frame is being installed, then the frame is attached to the wall through dowels, after which the double-glazed windows and glazing beads are installed back.

Installing a window with "unpick"
Installation without unpacking does not require the removal of double-glazed windows and glazing beads, since the frame is not attached to the wall through and through, but with the help of pre-fixed frames. outer surface fastening elements.
Installing a window without “unpacking”
At the same time, the unpacking window installation method has several disadvantages.
For example, installation with unpacking sometimes leads to fogging of the glass unit during operation. Removing and reinstalling glazing beads, especially without such experience, often affects their appearance (visible scratches, chips). During the installation of windows, double-glazed windows must be placed in a place that is safe for their integrity, otherwise they can be accidentally broken, especially if left near the installation site. The installation method itself is more labor-intensive and takes longer than installation without unpacking (on average, installing each window will take 30 minutes longer, and if you are installing plastic windows for the first time, then about 60 minutes).
Installing plastic windows without unpacking does not have the disadvantages listed above, since the double-glazed window does not need to be removed from the frame.
Now, regarding the strength of the fastening. The unpacking method is considered more durable, especially if you fasten the frame right through to the wall with large, long anchors. Therefore, it’s worth stopping at if:
- Are you planning to install windows on the 15th floor? multi-storey building and higher. On such high floors there is a lot of windage and gusts of wind, especially if the house borders on lower buildings. Below 15 floors you don't need to unpack the windows.
- Your windows are very large (2x2 m or more), then it is better to choose the unpacking or combined method of fastening. The balcony block can be attached without unpacking.
In private houses, where windows are usually installed in standard medium sizes, and the number of storeys rarely exceeds 4 floors, of course, it is better to choose the method of installing metal-plastic windows without unpacking. The fastening strength without unpacking will be more than enough.
And given that our site is dedicated to issues of private construction, then we will analyze in detail a method of attaching a plastic window, which is more suitable for low-rise construction - without unpacking.
Window installation tool
- screwdriver;
- level;
- gun for polyurethane foam;
- polyurethane foam at the rate of 1-3 cylinders per 1 window (it’s difficult to say exactly, as it depends on the size of the window and the filling of the cylinder);
- perforator;
- silicone gun;
- set of hexagons;
- jigsaw;
- stationery knife;
- pencil;
- roulette.
Sequence of installation of plastic windows
In order to understand how to install a window correctly, go to I will briefly list the main stages of installation, after which we will dwell in detail on the main stages:
- dismantle the old window (with a window sill, if necessary);
- preparing something new metal-plastic window to installation;
- apply markings to window frame in places of subsequent fastening;
- We attach fasteners to the window frame;
- we make recesses in the window opening in the places where the fasteners will be attached;
- We level the plastic window;
- we attach the window to the window opening;
- we attach the ebb (it can also be mounted at the very end);
- pre-adjust window fittings;
- foam the gaps between the frame and the window opening;
- install a window sill;
- We make final adjustments to window fittings.
Removing an old window
- On blind windows, remove the glazing beads, then the glass. On opening windows, remove the sashes from their hinges. If the glass in the sashes holds tightly, then the sashes can be removed directly with them. If the windows are very old, the frames move diagonally, then for safety reasons it is better to remove the glass from the sashes first.
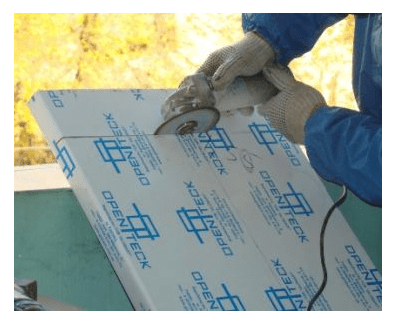
- We make cuts in several places of the frame. For this it is better to use a regular saw. Sometimes for such purposes they use a grinder with a circle on concrete (this will produce a lot of smoke). Very important! In this case, it is categorically impossible to cut with a regular circle on metal, as it can jam or even break. And considering that the disk spins at an average speed of about 7000 rpm, this is very, very dangerous. It is also strictly forbidden to insert a disc with teeth for wood into the grinder.

Making cuts when dismantling an old wooden window frame
Then we take it out piece by piece with a crowbar, a hammer drill with a spatula attachment, or other available tools.
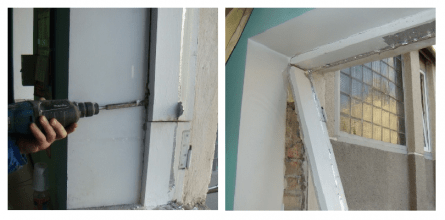
Dismantling an old wooden frame using a hammer drill and a crowbar
Sometimes the wooden frame is left if it is in good condition. But it is better to dismantle it and attach it to the wall material. Then the size skylight will be larger, and the fastening will be more reliable than to wood, and will rot wooden frame over time it won't.
- Dismantling old window sill. If it is wooden, then we treat it in the same way as with wooden frame: make a cut and remove it piece by piece with a crowbar. If it is concrete, then we break it with a jackhammer, if there is such a tool, if not, then with a hammer and a crowbar or, again, with a grinder with a circle on the concrete. If your window sills are concrete, in good condition, and they suit you, then you can leave them. But it is important to remember that a plastic window sill is “warmer”. Also, if you leave the old window sill, it almost always remains big gap between him and window frame and even if it is sealed with a mixture using a mesh, cracks are inevitable. In this case, there is only one way out - to cover the top of the window sill with tiles.
- We clean the window opening from debris and dust.
Preparing a plastic window for installation
If the window is opening (not fixed), then during installation, the window must be in the closed position. This is very important, because if the window is open, for example, for ventilation, then the foam, which we will later fill the space between the frame and the window opening, will bend the frame in a semicircle. The window must remain closed for at least 12 hours after foaming. Then you can open it. To ensure that the window is definitely closed, it is advisable simply not to install the handle until the installation of the window is completed. Otherwise, one of your household members may unknowingly open the window when you leave for a couple of minutes. If there is no handle, then there will simply be nothing to worry about.
Do not remove the protective tape from the surface of the window until the window installation process is completed, and if you are finishing the slopes, then until the finishing work is completed.
Installation of a plastic window
- We apply markings to the window frame in the places of subsequent fastening. Fastening is carried out on all 4 sides of the window frame every 70 cm. Sometimes they are fastened less frequently, but we do not recommend more than 100 cm. The indentation of the extreme fastener from the corner of the window frame is usually made in the range of 5-15 cm.The only thing is that you don’t have to attach the frame from below if you have a window with a stand profile.

Diagram and photo of the appearance of the stand profile
- We attach fasteners to the window frame. The fasteners are attached to the window frame in such a way that the self-tapping screw is secured in the metal located inside the frame (a bent metal channel). For this purpose, it is better to take special screws - for metal (diameter 4 mm). They come with a drill at the end. If you use regular self-tapping screws, then first you need to make a hole in the frame with a drill with a diameter of 4 mm (4-5 cm long), and only then you can fix it fastener using a regular self-tapping screw with a diameter of 5 mm.If the windows are large (2x2 m or more), then the drill is 8 mm in diameter and the self-tapping screw is 12 mm in diameter.Special anchor plates can be used as fastening elements. Sometimes they are also mounted on U-shaped drywall hangers.
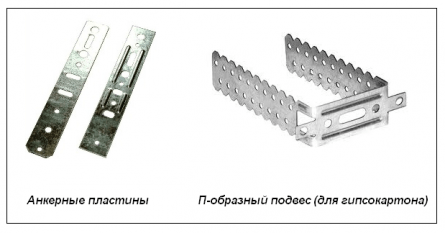
Fastening elements for installing a window into a window opening
But their cost is approximately the same - from $0.05 (for wholesale purchase) to $0.15, and the thickness of the metal is often different: the anchor plate is usually 1.1-1.5 mm thick, and the U-shaped suspension from 0.5 to 1 mm. The thicker the metal, the better, of course.

Fastening elements for a plastic window made from U-shaped hangers
- We make recesses in the window opening in the places where the fasteners will be attached. To do this, we insert the frame with fasteners already attached to its surface into the window opening. In those places where the fasteners will be attached to the opening, we knock out recesses according to the size of the fasteners and to a depth of 2-4 cm (to the wall - brick or stone). We will drown the fasteners in them. We do this so that it will be easier to finish the slopes later. There is no need to add an extra layer of plaster to hide the fasteners.

Recesses knocked out in the window opening for fasteners
Important: If you have a window without a mounting strip, then when inserting it into the opening, you need to raise it to the height of the window sill, so that later the window sill can be placed under the frame, and not attached to the joint with the window frame. To do this, place blocks of wood, pieces of foam or brick under the frame. If the window has a mounting strip, then this is not necessary. The mounting strip just raises the window frame to the height of the window sill. fasten mounting plate it is not necessary on the frame; it is usually supplied already attached.
- We level the window. To do this, we place, for example, wooden wedges (blocks) under the frame in the right places. the right size). The wedges are always located strictly under the transverse parts of the frame: under the horizontal part along the line of the vertical ones, and vice versa. We place the wedges in the following sequence: First, the lower two, which will expose the lower edge and, accordingly, the upper one to the horizon.At this stage, it is convenient to temporarily secure the top anchor plate to prevent the window from dangling. Then two on top that will secure the frame up and down. And only then, the remaining wedges left and right, and always on both sides, both below and above the window. If there is an impost, then it must also be wedged, and it is also necessary to control that everything vertical racks stood in the same plane. The longest part of the installation is setting up the wedges. As a result, the frame should be level both vertically and horizontally. This work is easier to do with two people: one holds the window, the other places wedges under the frame.

Installing a window by level
- We attach the window to the window opening. After we have the window perfectly level, we can finally fix it in the window opening. Windows are usually secured with dowels, sometimes with anchors. Fastening with anchors is considered more durable, but also more expensive. So the choice is yours. I will say one thing - a dowel driven into concrete can withstand a load of 60 kilograms. So in this case, as for me, it is more than enough. Dowels are used with a diameter of 6-8 mm and a length of 75-80 mm. For attachment to such wall materials, like hollow brick, shell rock and foam concrete, anchors with a diameter of 6-8 mm are used. For fastening to wood - self-tapping screws with a diameter of 8 mm.
- We attach the ebb (it can also be mounted at the very end). It is advisable to install the sill under the window to prevent water seepage at the junction of the sill with the window frame. But if there is no way to fix the ebb under the frame, then we attach the ebb to the window frame with metal screws with a diameter of 4 mm and a length of 9 mm.
- Pre-adjust window fittings. Window adjustment is done using hexagons in the area of the window hinges. As a result, the sash should open and close freely without touching the rest of the window. Plus, if you slightly open the door, it should not close on its own (as usually happens with a refrigerator door) or open, but should remain in the position in which you left it. Sometimes, when closing/opening a window, it may scratch in the places where the locking hardware is installed. To fix this, you just need to unscrew the screw on this element and move the element itself 0.5-1 cm higher or lower.
- We foam the gaps between the frame and the window opening.

Filling construction foam space between frame and window opening
It is very important here that the filling is 100%, without voids or interruptions. At the same time, if the gap between the window and the opening is more than 2 cm, then it is advisable to foam it several times with a break of 1-2 hours. Then the expansion of the foam is not a “disastrous” factor. And it saves foam that would have to be cut off. If windows are installed at temperatures lower than +5 degrees, then winter or all-season foam should be used. If the temperature is above + 5 degrees, then regular one will do summer polyurethane foam.
After the foam hardens, it must be protected from ultraviolet radiation. Since this can already be called part of the work on finishing the slope, this work can be postponed until the finishing of the slopes. But if you do not plan to finish them at all, or if you do, but later than in a month, then it is better to close the foam immediately, since under the open rays of the sun the foam will become unusable. We close it either strong cement-sand mortar(cement: sand - 1:2), or tile adhesive (for example, Ceresit SM 11), or with a special tape PSUL(vapor permeable self-expanding sealing tape). The only thing is that the tape is quite expensive (about $3 per sheet), so the first two options are more often used.
Window sill installation
- Usually the window sills go standard length and width, i.e. with a reserve in length and width. Therefore, first you need to trim it. To do this, you can use an electric jigsaw, grinder, or saw with small teeth.
Trimming the window sill to the desired level
- Then we move the window sill to the stand profile (there should be one). Then we level the window sill, placing wooden blocks, pieces of eps, brick, or even laminate cuttings under it.

Installing a window sill by level
It is better to install the plugs so that they go into the wall. And it is advisable to glue them with super glue, since acrylic and silicone do not glue them.
As a result, your window sill should be level in two horizontal directions and not sag anywhere (check by pressing with your hand). Sometimes the window sill is installed with a slight slope away from the window. This is done so that condensation that may form on the window does not flow under the window. And if you do such a slope, then it is very small, only about 3 degrees.

Load plastic window sill heavy object
If the window sill is not weighted down, the foam will bend it upward.

Blowing construction foam into a cavity under a plastic window sill
- 24 hours after foaming, cut off the remaining foam protruding from the cavity under the window sill with a regular stationery knife.
- Sometimes, due to the unevenness of the window sill, after its installation there remains a small gap between the top of the window sill and the window frame. It needs to be filled with silicone. Immediately wipe off any remaining silicone with a rag. But considering that silicone sometimes turns black over time from fungus and spoils appearance windows and window sills, it is better to prevent the appearance of such a gap. This can be done by screwing Z-shaped galvanized plates to the window sill profile before installing the window sill. By rehearsing with trimming the window sill, you can achieve a snug fit of the window sill. Also, such plates simplify the installation of the window sill.

Z-shaped galvanized steel plates to ensure a tight fit of the window to the frame
Final window adjustment
Now you can screw the handle to the window and remove the protective tape from its surface. If you still have to finish the slopes, then it is better to remove the protective tape after finishing them.
The most common mistakes when installing windows
There are few of them, but they all ultimately affect the service life of the window, as well as the ease of its use:
- The window is mounted with glazing beads facing outwards. This mistake leads to the fact that you can easily and silently enter the house by simply removing the glazing beads from the window and removing the double-glazed windows.
- The window is not leveled. As a result, the window opens and closes poorly.
- The polyurethane foam is not covered with anything and is left open under the influence of ultraviolet radiation. As a result, the foam becomes unusable.

Open polyurethane foam
- The measurements are taken incorrectly, or the window is simply mounted low, and the window sill ultimately does not fit under the window. It has to be joined to the window frame.
- The window is not secured with anything, simply filling the space between the window frame and the opening with polyurethane foam. If the opening is a quarter, then this leads, at most, to the appearance of cracks on the slopes, since fastening “on foam” cannot even be called fastening. Such a connection is mobile, especially over time. If the window is without a quarter, then as a result the window may simply fall out; I am personally familiar with one such example. So it’s important to remember - foam is not fastener. The window must withstand loads without foam.
I hope that this article will help you save on installing plastic windows in your home, and also do this simple work correctly and without errors so that your windows serve you for a long time. If you decide to turn to the services of an installation organization, then it will be easier for you to understand what the builders do at each stage of installation, which will allow you to control the process competently.
Please note: All prices are for 2011.
The new-fashioned Euro-window boom has today embraced the majority of the inhabitants of our planet. You can argue for a long time about the pros and cons of plastic windows, but if you purchased them, you will have to start installing them. Do the installation yourself or trust the professionals – it’s up to you. Before you make your choice, we suggest that you familiarize yourself with the material on how to correctly insert plastic windows so that they long time provided your family with reliable thermal protection.
First, let's look at the stages preparatory work, which you can easily do yourself:
- measure window openings;
- dismantle worn-out window structures;
If you are not too confident in your abilities, it is still better to entrust the installation of PVC windows to specialists.
Measurements
The process of taking measurements should be taken responsibly. Be sure to keep in mind that window openings come in 2 types: with and without a quarter.
In the first version you need to measure the width of the opening in its narrowest place between the quarters and add 30–40 mm to the resulting value - this is how you get width measurements window design. Next, make sure that the calculated width of the window unit exceeds the maximum distance between the vertical quarters. To determine the height of the window, you need to measure the distance from the horizontal top quarter to the bottom quarter of the window opening. The dimensions of the window block you receive must be larger than the outer window opening so that gaps do not form between the edges of the opening and window box.
For the second option to obtain the overall dimensions of the window unit follows from the size vertical size subtract 50 mm from the opening, and 30 mm from the horizontal one. In this case, you need to decide on the size of the window sill and ebb, taking into account the following points:
- The width of the flashing is calculated taking into account the intended method of insulating the opening or cladding the enclosing structures (usually the flashing protrudes outward by 50–100 mm from the plane of the wall).
- The width of the window sill is determined based on its functional purpose(will it be decorated flower pots or not, etc.). Often the protruding part of the window sill slightly covers the heating radiators.
- The length of the window sill should be approximately 100 mm greater than the width of the window opening (the edges of the window sill are recessed into the cavity of the slope by approximately 50 mm).
Ordering a window block

After the measurements have been taken, the next stage is ordering a new PVC window, in addition to determining overall dimensions design, it is important to consider the following indicators:
- type of double-glazed window (one, two, three-chamber);
- type of window profile (three, five chamber);
- availability and quality of fastening elements and other related fittings for the window structure.
Window dismantling

Steps to dismantle the replacement window unit:
- All existing obstacles, be it furniture or household items, should be removed from the location where the window is being dismantled.
- The window block must be freed from opening windows and sashes.
- Next, the glass and the glazing beads holding them are removed from the window structure.
- Using a hacksaw or a concrete grinder (with a cutting wheel) available on the farm, cuts are made in the horizontal and vertical bars of the frame.
- Using available tools at home (hammer, crowbar, crowbar), the old frame is removed from the window opening. In addition to the window frame, the window sill and ebb should be dismantled.
- The window opening is cleaned and leveled.
- Then the room is cleaned of any debris that has formed.
If desired, you can dismantle the window frame without destroying it, while maintaining its integrity, but this requires the performer, in addition to knowledge, experience and significant time investment. All operations to remove the old window unit should be done very carefully so as not to injure yourself, while eliminating the possibility of the window accidentally falling out.
Installation process

This process consists of a number of steps:
- Purchased plastic windows should be freed from hinged sashes, and double-glazed windows should be removed from blind sashes.
- Next, preliminary marking and drilling of holes for fasteners is carried out.
- Then, the window frame is installed in the opening and aligned along the perimeter (horizontally and vertically).
- With help anchor bolts the frame should be securely fixed in the opening. Each side of the frame should be fastened in increments of 70 cm.
- Next, you need to install external ebbs. They are adjusted to the required dimensions, and then mounted in the place intended for them.
- After the new PVC window is installed and securely fixed, and the ebbs are installed, the installation seams should be sealed with special mounting foam. That is, foam fills the entire space formed between the walls of the opening and the window frame.
- Next, the window sill is installed. Using a grinder, a fine-tooth saw or a jigsaw, the dimensions of the window sill are adjusted to the required size. After this, it is leveled on prepared wooden supports and foamed with polyurethane foam. But before foaming begins, to eliminate the possibility of deformation of the window sill (as the foam expands), it is necessary to install some kind of weight weighing about five kilograms at three points on its surface.
- After a day, the protruding remains of the foam are cut off. This can be done with a stationery knife.
- The slopes of the internal opening can be covered with plasterboard, puttied, or decorated plastic panels. The joints between the panels are closed with special corners and then sealed with liquid plastic.
- The final step involves installing double-glazed windows and installing the sashes into the frames. Handles are attached to the hinged sashes, the fittings are adjusted, and the window hinges are closed with special decorative caps.
Now you can remove the accumulated construction garbage and organize a presentation to the family of a self-installed plastic window.
Video
Below you can see the most detailed instructions for installing plastic windows:
Photo


The PLASTOK company manufactures windows and installs them to the highest standards in accordance with GOST and with a 5-year guarantee. We offer installation of plastic and aluminum windows as well as glazing of balconies
Prices for installing plastic windows
* Dismantling is free only when ordering and installing windows
** Minimum installation cost is 2500 rubles.
** Installation costs for windows of non-standard shape are calculated individually.
To get a durable and quality installation you need to call a surveyor who will measure the window opening, not only taking into account your wishes, but also taking into account the characteristics of the building itself and the increase in the opening after dismantling. If you follow all the rules for dismantling and installing a plastic window, you will receive durability, quality, reliability, warmth and comfort in your home.
Video of the installation process
Main stages of installation of plastic windows
The PLASTOK company performs high quality installation using modern instruments and materials. Installation teams consist of trained qualified specialists. The company conducts systematic training courses for employees.
PLASTOK is quality assurance installation work performed.
Preparing access to the window opening
Checking the size of new PVC windows and preparing them for installation
Before starting installation, it is mandatory to check the compliance of the window dimensions with the window opening, check the complete set of the order and its compliance with the technical specifications.

The sashes are removed from their hinges and the blind windows are unglazed. Holes are drilled in the frame or anchor plates are secured in accordance with the requirements approved by GOST, taking into account the type of house and the indicators specified in the measurement sheet. When determining the locations of fasteners, installers are guided by the following requirements:
- distance between fastening elements - no more than 700 mm,
- distance from internal corner window block boxes to the fastening element - 150-180 mm (but not less than 2 fastening elements on one side),
- the distance from the impost connection to the fastening element is 120-180 mm.
Removing old window frames
After knocking down the slopes, the old frames are removed from the window opening. During installation working space kept clean and large construction debris removed.

Before installing the frame in the opening, 3 types of tapes are installed on it, which provide hydro, heat and sound insulation of the room.
- PSUL tape- self-expanding pre-compressed sealing tape. The material is a self-adhesive polyurethane foam tape, which is impregnated with a special neoprene composition. It glues easily and has the ability to expand, filling all the defects and unevenness of the window opening. The tape not only hides these defects, but also perfectly protects the assembly seam from exposure to weather conditions. PSUL tape is glued to the side and top parts of the frame, taking into account the quarter turn.
- Vapor barrier tape made from aluminum foil, reinforced with high-strength synthetic thread, designed for internal vapor barrier of assembly joints.
- Waterproofing tape will reliably protect the external assembly seam from aggressive atmospheric influences. It is made on a polypropylene base with a butyl adhesive strip that firmly adheres to the opening or slope, and the adhesive mounting strips are easily fixed to the window or door profile.

Preparing the window opening and installing the frame and sashes
Before installing a new window, the opening is thoroughly cleaned and prepared. Then, using technological wedges, taking into account the gaps on the sides, the frame is aligned relative to the vertical and horizontal. Plates or dowels are fixed on the sides of the window frame. During the installation process, control measurements of deviations must be carried out. Installed window sashes and the blind parts are glazed.

When the frame is fixed, the installation seam between the frame and the wall is sealed with foam sealant.

back
Installing plastic windows yourself is possible if you are not going to glaze large areas or install a large window (from 2x2 m). The editors insist: it is better to install windows with a partner, since working alone will be both difficult and boring.
Instructions for installing plastic windows: taking measurements
Rectangular window measurements:
1. Measure the width of the opening (L ave. - opening width in mm).
2. Calculate the overall width (L − width in mm) using the formula L = L ex. - 2 q.
3. We measure the height of the opening (H ave. - opening height in mm).
4. Calculate the overall height of the window (H - height in mm) using the formula H = H ex. - 2 q.
q is the size of the installation gap; according to GOST 30971-02, its value should not exceed 20-30 mm.
 Photo 1 - Balcony plastic pair KBE (double-hung window)
 IMPORTANT! The size of the mounting seam cannot be arbitrarily increased or reduced: in the first case, mounting foam placed in a thick layer in the gap may not withstand the weight of the structure, and in the second, you will not be able to install a window sill or even a window.
Almost all plastic windows have stand profile extending beyond the level of the window frame. It is designed for reliable installation of the window sill to the window. When calculating the dimensions of a structure, it is important to take into account its height.
Formula for calculating window height:
 Photo 2 - Finished plastic single-leaf window 600 x 750
 Perfectly even window openings are rare, so when measuring a structure it is important to measure not only one length and one width, but also the entire perimeter of the window and its diagonals (from the lower left corner to the upper right and from the lower right corner to the upper left).
5. We measure the thickness of the walls of the house (G - wall thickness in mm).
6. During installation, the structure will be located no further than 2/3G from inner surface walls, i.e. will not be greatly shifted towards the street.
IMPORTANT! Shifting towards the street reduces the thermal insulation of the room, but increases sound insulation performance.

7. Measure the length of the ebb (Lo – length of the ebb in mm). If you do not plan to install end caps, use the formula Lo = L approx. + 50 mm, where 50 mm is the allowance for the end seams of the casting. If there are end caps, then Lo = L ave. - 20 mm.
IMPORTANT! When measuring, be careful: the width of the window opening at the extreme points may not match.
 Photo 3 - Rehau 2050x1415
 8. Calculate the width of the ebb (Ho - width of the ebb in mm) using the formula: But = G ext. + (30 mm or 40 mm), where G ext. − this is the width of the wall from the point of attachment of the window frame plane to the outer horizontal of the wall.
9. We measure the length of the window sill (L under. - window sill length in mm) using the formula L under. = Lpr. + 2x, where x is the amount of launch of the window sill onto the wall.
IMPORTANT! The length of the window sill should not be equal to the width of the window.
 Photo 4 - Velux Optima 78×118 (GLP MR06 0073B, attic)
 10. Measure the width of the window sill (H under - window sill width in mm). To Ginternal You need to add the amount of “overhang” of the window sill and subtract the thickness of the PVC box (in the standard it is 60, 70 and 86 mm, but it is better to focus on a specific rather than a standardized indicator).
IMPORTANT! A window sill with a long overhang can interfere with normal circulation warm air from battery. The window sill should not cover the battery by more than 1/3.

11. We measure the length of the slopes using the formula L open. = Lpr. max + 30 mm, where 30 mm is the adjustment allowance, and Lpr. max − maximum length horizontal of the window opening.
12. We measure the width of the slopes using the formula N open. = G internal + 30 mm or 40 mm, where 30 mm and 40 mm are mounting allowances.

Window installation methods
There are several installation methods:
- with unpacking
Before installation, the structure is completely disassembled: glazing beads, double-glazed windows, and casement windows are removed from their hinges, and only the window frame is mounted in the opening, securing it with dowels and self-tapping screws to the wall on anchor mounting plates. After installing the frame, the structure is assembled.
- without unpacking
 Photo 5 - Economy 1180x1415
 The window frame is fixed in the opening with external fasteners.
The latter method is not suitable for high-rise floors - the procedure for installing plastic windows above the 15th floor requires more reliable way fastening the frame after disassembling the window.
All this can be done faster if you install the structure in a sandwich panel.
Installation of windows in a brick house
Designs are chosen depending on the type of building. U brick houses wide walls, good heat and sound insulation, therefore windows for apartments in brick house You can choose from economy class.

IN frame house designs are placed according to standard technology. Pay more attention external waterproofing. When installing windows in such structures, it is convenient to use installation pads.
IMPORTANT! Due to the high probability of shrinkage of the new wooden building, windows in timber house must be fixed so as not to interfere with the natural deformation of the walls.
You can extend the service life of windows if you make large installation gaps, statically fix the verticals, and the horizontals in a “floating” way.
 Photo 6 - Single-leaf tilt and turn
 Technology for installing plastic windows: tips from EtDom experts
IN technological map There is not only a detailed drawing indicating all the constituent elements, but also the volume of materials for installation.

Installation of windows according to GOST
Installation of plastic windows according to GOST involves the use of:
- PSUL for waterproofing,
- tapes for protecting polyurethane foam from ultraviolet radiation
- additional layers during installation so that the mounting foam does not come out of the seam onto the outside of the wall.
Work progress:

1. Treat the window opening, cleared of debris and dust, with a primer.
2. Glue the vapor barrier tape to the frame along the semi-perimeter (we bend the protruding edge of the tape as the polyurethane foam hardens, closing the seam).


3. Glue the tape onto the frame without breaking external waterproofing− PSUL.
4. Install the frame in the opening (G), level it horizontally and vertically using wedges.
5. We attach the frame to anchor plates or right through to the wall in increments of no more than 70 cm, starting at window opening from the top fasteners. The extreme fasteners should not be more than 15 cm away from the corners of the frame.


6. To organize low tide with outside We attach diffuser tape and PSUL to the frames.
7. Assembly seams fill with foam and after 15 minutes close the flap with film.


8. We attach the ebb to the frame and go under it. We also install a window sill (set according to horizontal level, we use wooden wedges for leveling).


