Construction of a wooden staircase. Selecting the angle of inclination of stairs
Today there are many types of stairs. Therefore, each owner decides independently what suits him best, guided by his own taste, taking into account his financial capabilities and the peculiarities of the housing layout. It is very important that it fits harmoniously into the already formed interior. Naturally, stairs are used only in multi-storey buildings or in the case of an attic, basement or attic. It is not at all difficult to build such a structure yourself. And in this article we will look at options for how to make a staircase in a house, varieties of such structures.
What is the best way to start arranging a staircase?
Before you start building it, you need to familiarize yourself with the basic recommendations and rules to avoid the most common mistakes. We are talking about the following information:
- Absolute accuracy must be observed in all calculations and measurements. You can’t rush, you need to double-check each number several times so that you don’t have to start all the work again.
- Remember, the main thing is that the design is safe. Even the smallest mistakes can lead to fatal consequences. This design is very important, so you cannot sacrifice such an important aspect for the sake of beauty and design.
- The main advantages of your staircase should be practicality and convenience. Comfortable movement along it is the key to peace of mind and minimizes the likelihood of accidental falls. You cannot ignore the established standards, otherwise the ascent may be too difficult and the descent may be dangerous.
- Before starting work, it is imperative to prepare a project that would comply with current standards and requirements.
Types of modern stairs
Before you make a staircase in your house, you need to decide on the most suitable option for you. And they come in such varieties.
Marching stairs
These are structures that are continuous rows of steps (flights) held together by support beams. They are the most popular today because they are quite practical, safe, and designed to withstand significant loads.
Important! Their only drawback is that they require a lot of free space to provide optimal height slope and steps.
By design, they are rotary and straight. Naturally, the most convenient in terms of execution is the second option. If there are more than ten steps, then the flights are divided into several platforms, as a result of which the staircase turns.
Important! Rotating structures are attached along the walls, and various utility rooms are equipped directly below them.

Spiral staircases
They differ from their counterparts in a more complex frame, because the winder steps are located along their radius. They are used mainly in places where there is not enough free space and it is impossible to form a slope the right size for a regular flight of stairs.
Important! Screw structures are often located in corners.
Their big disadvantage is the difficulty of lifting and the inability to move large objects. But such beautiful staircase can become a connecting element of the interior, even if you install it right in the middle of the hall.
What materials are used to make stairs?
Naturally, planning the arrangement of such important detail, one cannot help but wonder what stairs are most often made of in a private house. Already by tradition wooden houses equip wooden structures. But the choice is not limited to this material alone, unless, of course, you have enough money.
Important! Oak stairs can easily be called the most durable and durable. But the most popular and affordable in terms of price are linden, beech and pine structures.
You can also use:
- glass;
- metal;
- concrete.
The main thing is to match your taste and interior.
Important! If the house is equipped with wooden floors, then it is better to choose a solid staircase made of high-quality wood.
Features of installing a marching staircase with your own hands
Once you decide on suitable option construction, you can begin arrangement of the structure. Read more about how to make a staircase in your home yourself:
- First, attach a board to the floor at the point where the lift will begin.
- Now we determine the angle of inclination, but this value should not go beyond 30-45 degrees.
- It is better to make the steps not too high - about 14-17 cm, and their width should not be less than 30 cm and more than 50 cm. Based on this, the number of gangways and the dimensions of the stringers are calculated.
- Now you need to prepare a pattern for marking the prepared boards. The teeth should be cut with a jigsaw or hacksaw. At the junction of steps and risers it is necessary to cut off the corners.
- Next you need to prepare one support beam so that you can use it as a template.
- The steps are attached to the stringers using screws or nails. IN in some cases fixation occurs special elements called fillies. They are considered to be as durable as possible.
- In order to avoid creaking of the structure during operation, it is necessary to additionally use “liquid nails” for fastening.
- Then install support pillar and risers. If necessary, the turning steps can be adjusted to size.
- After forming the base and attaching the gangway, the stringers are attached to the wall with self-tapping screws.
- At the final stage, the installation of railings, balusters and decorative elements provided for by the project takes place.
How to equip a spiral staircase yourself?
To make the staircase to the second floor more original, it is better to use a screw version. In the classic version:
- The system consists of a support column located in the center and cone-shaped steps attached to it.
- The narrow side of the gangway is mounted to the rack, and the wide part is fixed with a bowstring or directly to the wall.
- The width of the steps in the narrow part is 20 cm, and in the wide part 40 cm, while their length can reach one meter.
Installation screw design looks like that:
- First, the supports are installed. They can be made from a durable metal or tin pipe with a cross-section of 5 cm.
- You should first make a drawing with precise calculation number of steps.
- Then steps are cut from the boards. Through holes are made in the narrow side corresponding to the diameter of the rack.
- Using a sleeve, the steps are strung onto the pipe. Then they can be fanned out.
- Now each step needs to be connected with support brackets located near the outer edge.
- Next, the railings are made.
- At the last stage, handrails and balusters are installed.
In this article we told you how to make a marching and spiral staircase with your own hands, given as an example standard parameters. To ensure that your structure is truly safe, even though you have little or no skills in performing such work, it is better to order drawings with the project from a specialized company. And according to these calculations, being extremely careful and attentive, you will collect lifting structure with your own hands.
Building a staircase, even a small one, is not an easy task. It requires precise measurements and accurate calculations.
From a technical point of view, there is nothing particularly difficult about making stairs for a terrace, porch or shed. Anyone with basic tinkering skills can make necessary details and assemble the ladder. And yet, creating a staircase may be the most challenging task, which you will have to decide.
The staircase must comply with certain building regulations and rules, guarantee safety and ensure comfortable lifting. We are accustomed to the standard of professionally built stairs, and the slightest discrepancy with these standards creates the danger of losing balance. Too high steps make your ascent difficult, and small steps are inconvenient and dangerous - if you step too often and too small, you may stumble. It is very easy to make mistakes when building stairs. Therefore, it is necessary to design in detail and make accurate calculations staircase design. First, study the building codes and regulations. Take the time to design your staircase. As they say, it’s better to measure 7 times and cut once than vice versa. We divided the work into three stages. Let's look at an example of building a staircase for a backyard deck.
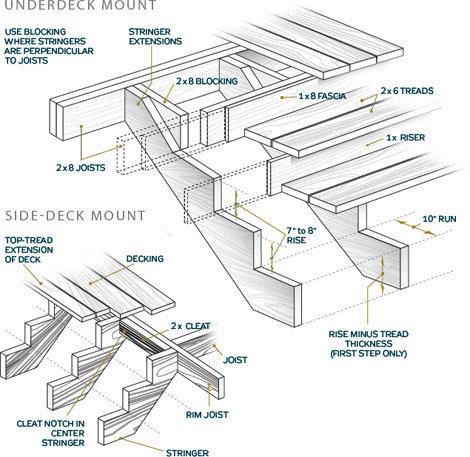
Basic terms used in the construction of stairs.

A typical staircase has three main components: stringer, steps, risers and handrail. The bowstring (stringer) is a load-bearing board that supports other components and bears the weight of people walking up the stairs.
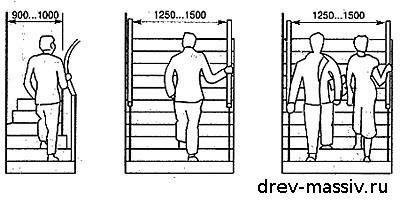
Designing a staircase begins with answering three questions: 1 - what will be the width of the staircase, 2 - what will be the height of the riser, 3 - what will be the width of the steps. When determining the width of the stairs, remember that the wider the stairs, the better. "Wide staircases are easier and safer to walk on," says contractor Paul Mantoni, of Exteriors Plusin Terryville. "I rarely build stairs less than 120 cm wide, and prefer to make them a little wider." In our example, the width is set by the terrace overhang.
Step 1: Calculation of the Height and Width of the Steps
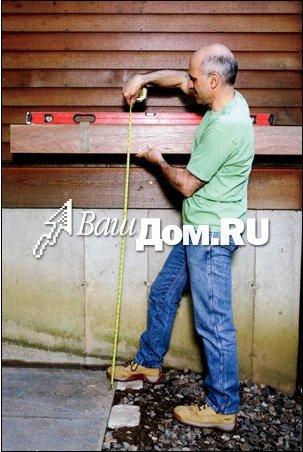
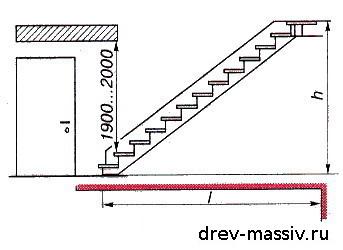
The first step in making a staircase for a terrace is to figure out how tall the staircase will be. Attach a straight board to the top of the terrace so that it overlaps with a margin the intended place from where the stairs will begin to rise. Check with a level as shown in the photo that the board is fastened horizontally, and adjust if necessary. A little trick to prevent the level from falling is to attach it to the board with tape. Then measure the total height of the stairs. Let's say full height- 145 cm.
Having received the height of our stairs, we proceed to calculations. And we will start them by calculating the height of the riser.
In Russian practice, to calculate the width of the step and riser (riser), the following formulas are used: (1) 2a + b = 64 cm or (2) a + b = 47 cm, where a is the height of the riser, b is the width of the step.
For example, if the height of the riser is 12 cm, the width of the step will be 64 - (2 * 12) = 40 cm (not counting the protrusion of the edge of the step). This solution gives too wide a step. In such cases, use formula (2), according to which the width of the step is 47 - 12 = 35 cm.
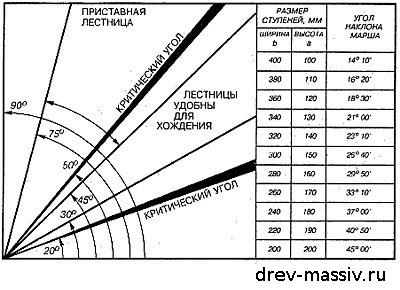
In practice, the most convenient for climbing are stairs with a riser height of 140 to 170 mm and a step width of 340 to 370 mm. Thus, to determine the width of the step with a riser height of 140 to 170 mm, it is recommended to use the first formula.
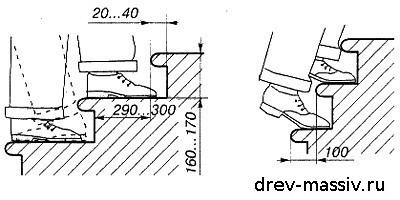
The height of the riser should be no more than 200 mm and no less than 120 mm. The edge of the step (protrusion) should be about 20-40 mm. The higher the riser, the narrower the step should be, and vice versa. The width of the step should be at least equal to its height.
Calculation 145:17 = 8.52 cm (we took the typical riser height value of 17 cm) and got 8.52 cm, round it to 8. And then 145:8 = 18.125 cm or 181 mm is the required riser height.
Important note! The figure below shows the minimum recommended height between the staircase and the structures (balcony, ceiling of the next floor, etc.) located above it.
Now let's decide on the width.
Using the formula, we calculate the width of the step 47-18.1 = 28.9 cm, rounded to 29 cm. You can use this table to select the width. According to the table, with a riser height of 180 mm, a step with a width of 240 mm is recommended. It is desirable, of course, that the step corresponds to shoe size 42 or 28-30 cm.
Let's settle on a step width of 29 cm.
Now we need to calculate the fulcrum of the ladder or its beginning. To do this, we will calculate the horizontal size of our stairs. Attention, trick. In our example, the staircase has eight steps, but for the calculation we will use 7. Why!? Because the eighth step is the surface of the terrace. 7x29=203 cm.
Important note! The tread serves as a support when walking on the stairs, and the riser is installed directly under the front lip of each step. Some stairs do not have risers; this is a mistake, according to many experts. "Risers protect the exposed end grain of the stringers from the elements," explains award-winning Stairmaster Scott Padgett, Idyllwild, Calif. "Without risers, the stringer's lifespan is significantly reduced."
If you are making a staircase for a high terrace, it makes sense to make a landing. " Practical advice If you're limited to about 14 steps, you can reduce the height of the step and add a landing," says Andy Engel, author of Building Stairs (Taunton), I prefer to add a landing after every seven or eight steps of the staircase."
Step 2: Preparing the Stringer

Before placing the steps, decide how the stringers will join the deck. It is attached directly to the terrace beam or to the structure under the platform, so that the last step is the surface of the terrace.
Make a pattern. And use it to mark the stringer. Cut out the steps using circular saw. Be careful not to go beyond the lines. Better finish the segments hand saw. Then, using the finished stringer as a pattern, mark the remaining stringers.
Do not skimp on stringers; they should ensure the rigidity of your stairs. Do not allow the steps to sag; this leads to loosening of the entire structure. Using a plane, chamfer the corners on the stringers where the tread and riser meet. For better contact.
Step 3: Installation of Stair Steps and Riser

Cut steps and risers. Please note that we cut the steps taking into account the thickness of the risers and do not forget to take into account the overhang of the step above the riser by 20-40 mm.
After installing the stair risers, secure the steps with screws. Having finished installing the steps, you can proceed to installing the balusters and handrails. It is required to ensure safe descent and ascent of stairs.

Types of stairs:
- a - single-flight straight staircase;
- b - two-flight straight staircase with an intermediate platform;
- c - L-shaped staircase with a corner intermediate platform
- d - two-flight U-shaped staircase with an intermediate platform;
- l - three-flight staircase with two corner intermediate platforms;
- c - single-flight curved staircase located near the wall;
- g - single-march curvilinear messenger placed in a rectangular volume;
- h - spiral staircases;
- and - single-flight staircase with lower winder steps and rotated 90 degrees;
- k - single-flight staircase with upper and lower winder steps and a 90-degree turn;
- l - single-flight staircase with middle winder steps with a rotation of 180 degrees.
Material taken from www.popularmechanics.com
By Joseph Truini
Photographs by Susan Pittard
Illustration by Gil AhnPublished in the October 2007 issue
Provided by Drev Massiv
A staircase in a private house with two or more floors is necessary structural element, which you can’t do without. In many houses, stairs look like a foreign body among general design, and also take up a lot of usable space. If you are familiar with this situation, know that, most likely, the type and installation location of the staircase was chosen at the last moment, when the frame of the house was already ready and the internal partitions were erected. How to make a staircase in a house correctly so that it fits harmoniously into the interior? This is what we will talk about today.

Oddly enough, developers seriously think that by saving on a house project, they save their money. As a result, everything is quite the opposite, and one of the striking examples is the situation with the stairs. It is when developing a project that you can choose the most suitable place for it, where it would occupy a minimum area, and also select its type, main characteristics (width of the flight, height and depth of steps, etc.), materials for the frame and finishing, decorative elements etc. Using design plans and sections, it is easy to calculate the parameters of the staircase and the consumption of materials for its manufacture.
With the correct calculation of the design of the staircase and its proper placement, it can become a real “highlight” of the interior even in a small room, not to mention spacious living rooms. If you build a staircase “by eye”, there is a high probability of making a number of mistakes, which are then difficult or even impossible to correct.

So, let's consider the dimensions of the stairs in a private house. According to building regulations, steps must have a depth (length) of 300 mm and a height of 150 mm. These values correspond to the average width of a person’s step and are the most comfortable. Even small deviations of 10 mm are noticeably felt when walking, which can be checked by walking along non-standard steps. With a tread height of 160 mm, it is already more difficult to climb, as if you were walking on steep slope. If it is equal to 140 mm, it seems that you are walking in small steps - mincing. A lower height is usually adopted when constructing stairs in rooms with children. The high height allows you to reduce the number of steps, and therefore the dimensions of the staircase. This technique is used precisely in cases where there is already finished house begin to decide where to place the ladder and at the same time maintain usable area. Sometimes the height of the steps of such an “economy” staircase reaches 200 mm. Of course, it is smaller in size, but it can be used Everyday life very uncomfortable.
As for the length of the step, small deviations from the standard are acceptable, although they create inconvenience. If the length is more than 300 mm, you have to step on one step twice or take wider steps. Typically, such steps can be found in public buildings.
The width of the flight of stairs is taken to be within 0.9-1.2 m. You can do more, but it will take up more living space. The average width is 1 m.
Thus, the main parameters of the staircase are accepted: width of the steps - 300 mm, height - 150 mm, width of the flight - 1 m. If the room area is very small, you can reduce the values by taking the width of the step 280 mm, height in the range of 140-160 mm, but not more.

Now let's look at the main types of stairs.
Among the most popular are:
- staircase with straight flights and an interfloor landing;
- corner staircase;
- U-shaped staircase with two landings;
- staircase with a straight flight without a platform;
- screw;
- combined.
When choosing a staircase, you need to take into account the layout of the room, the total area, the cost of construction and compliance with the overall design style. The simplest and smallest staircase with two straight flights and a transition platform between them. A corner staircase is also often used. Although it takes up more space, it has one advantage - such a staircase creates a “second light”, illuminating the lower floor and visually expanding it.
What to make a staircase from? Material for stairs
Wood, metal, reinforced concrete, stone and other materials or combinations thereof are used as materials for stairs. The optimal solution is the staircase with metal frame, covered with wood. A frame of almost any shape can be made from metal, taking into account the design features of the room; the metal is strong and durable, can withstand significant loads and does not lose its qualities over time. Wood as a finish looks great from the outside, but does not sag or creak due to the metal frame.

Now let's look at how to do it metal stairs in the house, using the example of a corner staircase. First you need to prepare the foundation. To do this, a hole is dug in the place where the stairs rest on the floor of the first floor. The foundation depth will be about 0.8 m, the length will be 0.4 m, and the width will be slightly larger than the width of the lower step. Concrete is poured into the hole, but not to the very edges, but a little lower (approximately 0.15 m). Then it is laid reinforcement mesh, knitted from rods with a diameter of 12 mm. Two rods (anchors) should protrude outward from the mesh to a height of 250 mm. The mesh is filled with concrete to the edges of the pit.

As a result, we get a hemp foundation, from which two anchors protrude outwards - they will subsequently be attached to flight of stairs.

To create an interfloor platform, 3 channels 140 mm wide are used, fixed at the edges in the wall. For better fixation, the attachment point is filled with concrete immediately or after installing the entire structure. In this case, two channels are inserted into one wall, and one into the second, forming three rigidly fixed consoles in the shape of the letter U with an extended top bar. The advantage of this design is its strength, which allows you to do without additional columns and supports.
There are cases when, to save space, the interfloor platform is turned into a step, cutting it diagonally. The resulting triangles are on at different levels in height. Although this solution seems good, it is actually quite inconvenient. You need to get used to such a turn in the direction of the stairs, and if you walk along it for the first time, you can stumble and injure your legs.

The first flight of stairs is made of two channels 140 mm wide. At one end they are attached by welding to the anchors protruding from the foundation, and at the other to the interfloor area. The march does not have to be mounted flush against the wall, especially if it is not yet covered with finishing.

The gap left between the wall and the stairs will provide an opportunity to sheathe the wall with plasterboard or apply another finish.

The steps and treads for the stairs are made from 50 mm corners.

The second flight is also made from two channels 140 mm wide, which are welded with one end to the transition platform, and the other rests on the ceiling between the floors. The steps and treads are the same as on the first march.

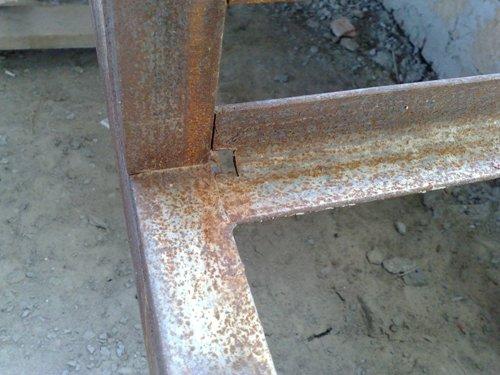
Electric welding is used to connect metal elements. The joints during welding may turn out lumpy. To prevent the protrusions from interfering with the sheathing, it is better to make seams with inside designs.
The excess ends of the corners are trimmed.

It is worth paying special attention to the material from which the walls into which the channels are inserted are made. If it is foam concrete or aerated concrete blocks, shell rock or other relatively light material, it may not withstand the load. In this case, holes are left in the places where the channels are attached in the walls during construction, and the base below is laid out of bricks. This is another reason to determine in advance the installation location of the stairs in the house.
After completing the assembly of the frame, it is sheathed with wood. The sheathing can cover the entire staircase or just the steps. In the latter option, the staircase will be open, and metal elements covered with paint to match the trim - this is a more economical option.
Railings and balusters can be metal or wood, depending on general style room decoration.
Mistakes when building stairs
Separately, we will focus on typical mistake, which is often allowed when building stairs. The mistake is that the number of steps and their height are calculated based on the distance between the finished floors of the floors. It is correct to take the distance between the floors, taking into account the thickness of all floor coverings, this is especially true for heated floors, which significantly raise the height of the floor. If this is not done, after installing the stairs and installing the covering, the lower and upper steps will differ in height from the rest, creating inconvenience when walking.
And one more piece of advice. If you choose a staircase, pay attention not only to its appearance and dimensions, but also on how convenient it is. It is best to find the staircase you like in an already finished form and try it out by walking up and down on it. It would be a good idea to consult with those who already have stairs in their home and find out what disadvantages they have. The stairs in the house will be used every day for long term, and if you make it uncomfortable, you will have to suffer from it for a very long time.


