How to build a rectangular gazebo made of wood. How to build a gazebo with your own hands: let's look at how to build a beautiful gazebo step by step, choosing the appropriate option. Preparatory activities - choosing a project
About the summer gazebo - cozy corner every summer resident dreams of for relaxation and feasting.
At the same time, not every owner of a country plot has the financial capacity to make this building luxurious and capital.
A roof over your head and protection from the wind are the two main tasks that an inexpensive gazebo for a summer house should perform. How to build this structure with minimal costs Money and personal time we will discuss in this article.
What materials can be used?
The simpler the design, the cheaper material and the less its consumption, the more profitable the construction. Following this golden rule, we will consider options for making the foundation, frame and roof of an inexpensive summer summer gazebo.
Wood for all construction purposes
The most affordable and easy-to-work material is wood. In a few days you can assemble the base, frame and roof of the gazebo from it. In passing, we note that a support frame made of timber, which requires a columnar foundation, is not necessary for a budget gazebo.

A light canopy can be built without it by burying oak or larch posts 40-60 centimeters into the ground. To increase the resistance of wood to rotting, the ends of the pillars are treated with bioprotection or simply burned over a fire for 5 minutes. After such heat treatment, the service life of the racks increases significantly.
Anyone who objects to this option should remember the history of wooden architecture in Rus'. In those days, not only were they built on wooden columnar foundations simple log cabins, but also boyars' mansions.

A cheap gazebo can do without a plank floor. To do this, the area allocated for construction must be filled with fine gravel mixed with sand and compacted well. If you want to place a gazebo on the lawn, then there is no need to remove the grass cover. Soft grass underfoot - no artificial surface can replace it. There is enough sunlight for normal plant growth under such a canopy, and rare watering of the “living floor” will not bother you.
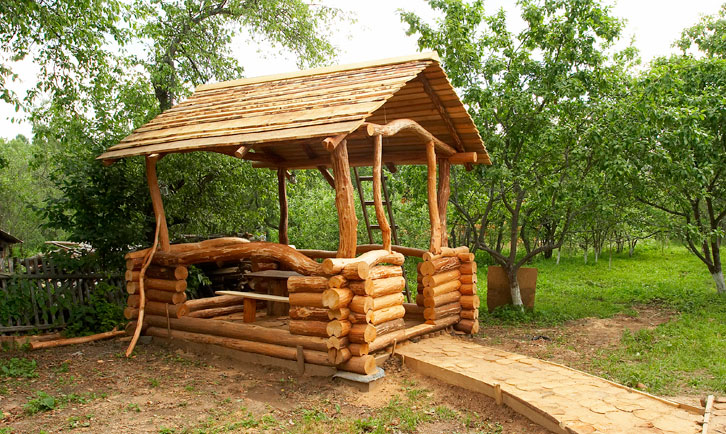
An inexpensive wooden gazebo can be made not only from lumber. If you are going to cut down a couple of old fruit trees, do not rush to use them for firewood. Parts of the trunk of an apple or pear tree, cherry plum or cherry tree are excellent stands for a summerhouse.

A picturesque frame made of trunks will look great under a roof made of wooden boards. To ensure tightness, thinner boards need to be placed on the seams between them, and then cover the entire roofing decking leave-in antiseptic. Stumps uprooted after cutting trees can be used as foundation columns.

A good owner has no waste. Therefore, all commercial wood (boards and trimmings of logs) remaining from the construction of a log house can be successfully used to build a summerhouse.

Metal is expensive, we only use it for racks
Anyone who is used to doing everything thoroughly can refuse wooden posts for the frame and buy four square steel pipes (50x50 mm, wall 3 mm) suitable length. Even without pouring a concrete columnar foundation, they will remain in the ground for at least 20 years. To save money, the roof trim, rafters and lower stiffener in this case can be made from wooden blocks, attaching them to the pipes using self-tapping screws.

A more expensive capital option is drilling wells for installing scraps of asbestos-cement pipe with a diameter of 100 mm, pouring it with concrete and installing it wooden frame We don't rule it out. It can be used if you want to make a plank floor in the gazebo, raising it from the ground surface by 15-20 cm.

A prefabricated metal gazebo is ideal for installation on a grassy lawn. If you are satisfied with the price, then feel free to buy such a structure and place it on your site.

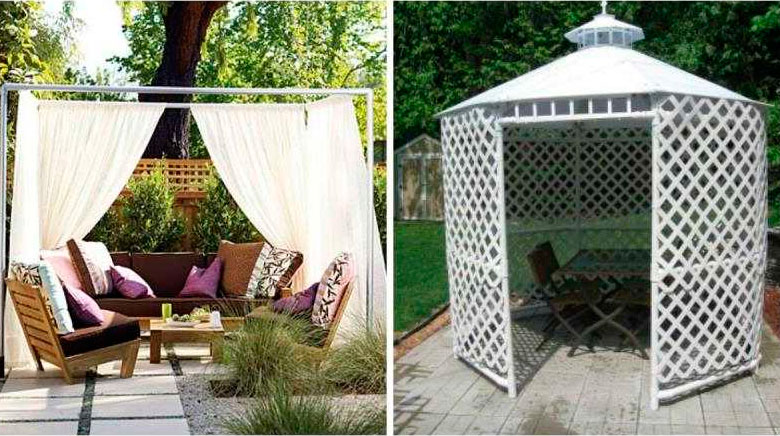
Two pipes and a piece of fabric - the gazebo is ready!
Continuing the “pipe” theme, let’s give another example of an inexpensive gazebo. Two bent pipes and a piece of durable fabric are all that is required to make an original summer canopy.

The fabric canopy here replaces both the roof and the walls. It can be moved in any direction, adjusting the level of illumination in the gazebo and covering it from wind and rain. Stationary table and benches are not needed here. But a set of portable country furniture will come in handy.
When considering materials suitable for constructing an inexpensive gazebo, one cannot help but. It can be used to make not only the roof, but also the walls of this structure. By bending a sheet of polycarbonate in the form of an arch and securing it to a light frame, we get a “barrel” gazebo - a popular a budget option for the dacha.

The roof of the gazebo is the head of everything!
An inexpensive roof for a light shed can be made from metal tiles, polycarbonate, boards or asbestos-cement slate. All of the listed materials can be easily and quickly mounted on a metal or wooden frame.
Those who want to build an original shingle or reed roof over a gazebo will first have to carefully study the technology and the nuances of its installation.

With proper installation, wooden and thatch roofs will last 10-15 years without replacement.
Side fencing - lattice or wattle fence?
Having dealt with the foundation, posts and roof of an inexpensive gazebo, you can move on to its side fencing. One of the profitable options here would be cellular polycarbonate.
Except him, garden gazebo may have fencing made of openwork wooden lattice. It is attached to the frame posts and the top roof trim.

If you plant climbing plants (grapes, ivy or hops) next to such a structure, then in a few years the summerhouse will look very picturesque.

Nature will generously fill an inexpensive frame made of wooden blocks with beautiful green “curtains” and will more than reward you for your efforts.
The side fence of the gazebo can be built from straight, not very thick branches, using rustic fence technology. They are woven between steel posts made of thin pipes or ready-made branch “screens” are made and secured to the main frame.

Can't build a cheap gazebo? Grow her!
Despite the strange sound of this call, the most cheap gazebo not built, but grown. You can use willow seedlings for this. This tree is characterized by its high growth rate and flexibility.
Anyone who wants to build a gazebo cheaply and can wait until it grows should plant willow branches (diameter 5-15 mm, length 2-3 meters) along its perimeter in the fall. This is how you take the first step in organic architecture. This fashion trend is now actively developing not only in the West, but also in Russia.

Having tied together a kind of spatial frame from living branches, all you have to do is control their growth and periodically trim the willow shoots growing in and out.
3-4 seasons and your dacha will be decorated with a free living structure, and neighbors will start coming for consultations and bringing their friends on excursions.
We will consider the most “expensive” option for building a summerhouse, its main stages and total cost materials.
As already mentioned, the most expensive structure is one that stands on a columnar foundation, has a wooden support frame and a plank floor.
Its construction includes several stages:
- Marking points for drilling wells for pipes;
- Drilling 4 holes with a diameter of 150 mm and a depth of 60-70 cm using a hand-held hole drill;
- Cutting asbestos-cement pipes “weave” into pieces and installing them in pits;
- Installation of reinforcing bars with a diameter of 14-16 mm in holes. At one end they need to be threaded to attach the frame;
- Concreting columns for the upper cut;
- Marking, cutting and installation of support frame beams;
- Plank flooring;
- Installation of gazebo frame racks;
- Installation of timber for the top frame and roof rafters;
- Installation roofing covering(polycarbonate, metal tiles, slate);
- Making a side fence from wooden slats.
The approximate estimate for materials for the construction of a budget gazebo measuring 2x2 meters looks like this:
- Cement M500 – 210 rub. (1 bag);
- Small crushed stone – 60 rubles. (1 bag);
- Sand – 200 rub. (3 bags);
- Reinforcing bars diameter 14 mm, length 0.8 meters, 4 pcs. – 96 rub.
- Beam (section 10x10 cm) for the support frame, frame racks and roof trim - 1,440 rubles. (0.3 m3 at a price of 4,800 rubles/m3);
- Edged floor board – 720 RUR. (0.12 m3 at a price of 6,000 rubles/m3);
- Timber for the roof frame, sheathing and side railing – 672 RUR. (0.14 m3 at a price of 4,800 rubles/m3);
- Sheet material for roofing (8 wave slate) – 960 rub. (4 sheets for 240 rub./sheet);
- Self-tapping screws for wood – 380 rub. (2 kg for 190 rub./kg).
Having summed up all the costs, we get 4,738 rubles. This is the approximate amount it will cost you to make a summerhouse.
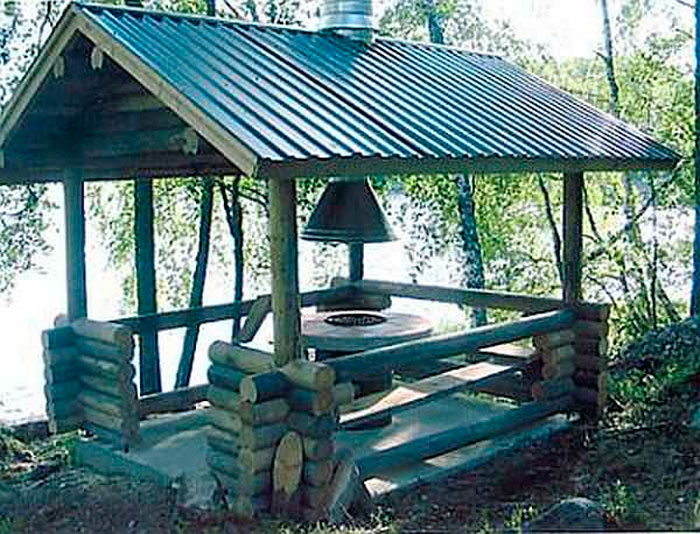
Almost all owners of dachas or private houses set up a wooden gazebo in their yard, where they can sit and relax in the summer. If you make a permanent gazebo of medium size, then you can actually install a barbecue inside it. Then here you can not just relax, but organize any celebration with your family or friends. If it is also closed on all sides, then you can spend time here in winter, especially since the grill will serve as an additional source of heat.
The decision on which gazebo is best to build is made by the owner of a summer house or private house based on his financial capabilities. In this regard, most often you can see fairly simple designs made by yourself.
The article is aimed at helping owners of summer cottages and private farms build some kind of gazebo, depending on the available capabilities.
There are summer gazebos, open type and closed gazebos, all-season. In addition, there are combined options, when the gazebo is opened in the summer, and with the arrival of cold weather it is insulated. But these are intermediate options that deserve attention. As a rule, such options are somewhat cheaper than completely closed ones, but they take away some of the precious time for manipulation.
Gazebos with and without floors
There are gazebos with a floor, as well as gazebos mounted on an open area or area where a concrete screed is made or paving slabs are laid. If you just build a gazebo on the ground, especially a wooden one, then you need to take measures to protect wooden structures, especially in places that are in contact with the ground. If the gazebo is made of metal, you will have to protect it from rust.
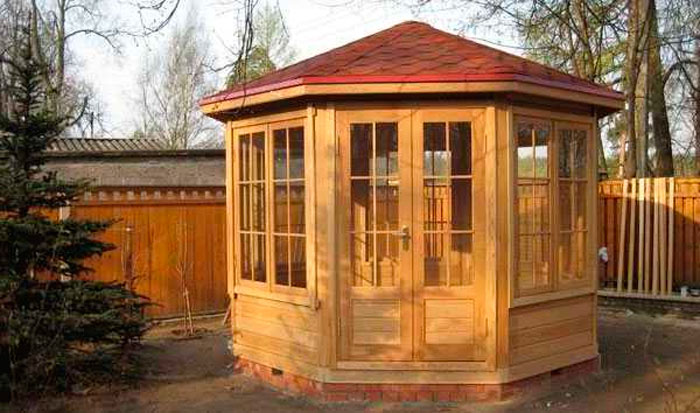
 A wooden gazebo without a floor, made of wood. It has one feature: the roof is quadrangular, and the gazebo itself has beveled corners.
 Building a gazebo with a floor involves installing a foundation. Basically, they are limited to a columnar foundation, which is made of brick or rubble, poured with concrete, or mounted on foundation blocks. Alternatively, you can use large stones (boulders) and support the entire structure on them, if available. This foundation is suitable for light frame buildings made of wood or metal. If the building is capital, made of brick, then it is unlikely to be limited to a columnar foundation: you will have to pour a concrete strip foundation, albeit in a simplified version. It is enough to deepen the foundation by 20-30 cm.
 A gazebo made of wood, but with a wooden floor, mounted on supports.
 To lay tiles in the gazebo, you will have to pour the floor with concrete, but first insulate the floor with foam plastic, for example, and also lay a layer of waterproofing. After this, you can lay tiles, and frost-resistant floor tiles. At the same time, you should make sure that the floor extends 50 centimeters beyond the gazebo and these 50 cm should be laid out at a slope so that moisture does not remain on the tiles. If the gazebo is not closed, then all the tiles should have a slope. If moisture does not linger on the tiles, the tiles will last quite a long time.
Materials used
The following materials are suitable for frame buildings of this type:
- A wooden beam or round timber of small diameter.
- Steel profile pipes.
- PVC pipes.
Of these three materials, only the last does not require additional protection. Polymer materials do not rot and are not afraid, both tall and low temperatures. Therefore, such structures can withstand winter quite easily. The only thing that is accompanied by a certain complexity is the selection of PVC pipes for making the frame, since they do not have such high strength as wooden beams or metal pipes. In this case, you will have to decide on the design of the gazebo so that the installed furniture does not load the PVC structure, and the barbecue will have to be installed away from PVC pipes.
 PVC pipes can serve not only as a frame, but also act as a decorative finish.
 In order for a wooden gazebo to delight others with its appearance for a long time, you will have to treat the wood with a protective compound more than once.
As an option, you can use impregnations such as SENEZH or ESTATE. Reviews about these protective compounds are not bad. In addition, this manufacturer supplies the market with coloring compounds.
If the frame of the gazebo is made of metal, it should also be protected from atmospheric influences. To begin with, the pipes are primed, and then the welding areas are treated with a primer. Although this option is not optimal: it is not at all difficult to coat an already welded structure with a primer. If on metal elements If rust is detected, it is better to clean it off with sandpaper. This approach will allow you to maintain the acceptable appearance of the gazebo frame for a long time, which means that it will last a long time.
 Gazebo made of plastic. Nothing to do with the environment, but there is no need for additional treatment against fungi or rust.
 You can sheathe a gazebo with any material, but wood is considered the most popular: after all, natural material. The materials used for cladding are processed boards, blockhouses, clapboards (wooden), thin round timber, as well as pallets, which are disassembled, the boards are processed (sanded) and the lower part of the gazebo is sewn up. It takes a lot of time, but it's very economical. In addition, such wood is quite dry and after additional protection can last a long time.
Gazebos of any design can be sheathed with the following materials:
- Polycarbonate, but this will be quite expensive.
- Corrugated sheeting, somewhat cheaper, but not very comfortable.
- Tempered glass is, well, very expensive.
- Ordinary fabric, which is very economical, but not very modern.
- Transparent PVC film.
- Bamboo, expensive, but stylish.
 A gazebo made of metal combined with translucent polycarbonate cladding.
Frameless gazebo options
Frameless gazebos are capital buildings on strip foundation, lined with brick or foam block, lined on the outside with decorative tiles or artificial stone. Moreover, building options can have all walls to the ceiling, or several main walls(for example, two), and the rest of the gap(s) remains open. Similar designs characterized by large capital investments. To build them, it is better to hire craftsmen or seek help from a construction company. If you do it yourself, the construction of the gazebo may take an indefinite period of time.
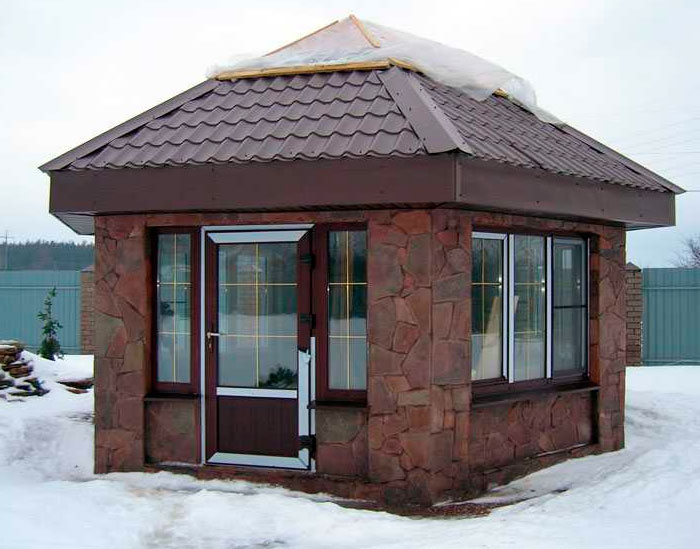 A capital gazebo, trimmed with wild stone, in combination with glazing. Both brick and other modern materials can be used as the main building material.
 If you plan to build a gazebo made of brick, then it is better to hire good masons to lay out the frame of the gazebo with high quality. Then, you may not have to spend additional money on finishing the outside of the building. Building a gazebo from foam block will require exterior finishing. There are many finishing options. In this case, you will first have to level the walls and only then start finishing. Since capital buildings are intended for their operation in winter time, then they should be warm. Alternatively, you can build a wooden frame on the outside, insulate it with ursa and cover it with siding.
Roof structure
The design of the roof depends entirely on how complex the shape of the gazebo is. If the gazebo is rectangular, then the roof structure will be quite simple: single slope option, gable or four-slope. Such forms of gazebos are also considered one of the simplest, requiring a minimum of time and money. The process of constructing a single-pitch, gable or hip-pitch roof is almost the same in technical terms.
 A rectangular gazebo made of round wood, equipped with a gable roof.
 With more complex forms gazebos, the process of building a roof also becomes more complicated. If the gazebo is pentagonal, hexagonal or octagonal, then the most suitable option roofs are a roof in the form of a tent (tent). In technical terms, these are the most complex structures, since you have to think about how to connect all the rafters at one central point.
 A dome-shaped roof is technically difficult to implement. If you have no experience working with wood, it is better to refuse this option.
 The availability of modern building materials, including roofing, makes it possible to make the roof generally round, without edges. In this case, you need to be able to work with metal pipes and welding. The pipes are bent according to a certain pattern and the sheathing is attached to them. It is desirable that the sheathing be continuous. Flexible roofing material is installed on top of the sheathing.
 The simplest version of a garden gazebo: two curved pipes, to which polycarbonate is attached.
 Simple designs of gazebos, especially in Lately, are very popular. Some summer residents set up gazebos under the same roof as their house. They are usually called verandas. In fact, this is also a simple and affordable option, with a minimum of costs.
There are a huge variety of gazebo designs, so it’s simply unrealistic to talk about them all. Moreover, each of them is the result of hard work and broad imagination.
How to make a gazebo with your own hands
It just so happens that most often they build gazebos with their own hands from wood. This is due to the fact that working with wood does not require special tools. The second place is occupied by metal gazebos, but their construction requires skills in working with metal. It is very rare to see gazebos made from other materials. This is associated with some difficulties, as well as increased costs, which the family budget cannot support.
If a gazebo is built from wood, first of all it will have to be treated with preparations that protect the wood from bacteria and fire. Work can begin after the impregnation has completely dried. Firstly, this is necessary for quality, and secondly, it is problematic (inconvenient) to work with wood that has not yet dried.
Availability of drawing
The presence of a drawing with dimensions significantly simplifies the process of building any structure, and a garden gazebo is no exception, despite its small size. Without a drawing, it is very easy to get confused in the parts being manufactured, although there are not many of them at all.
The figure below shows two options for gazebos: one of gable roof, and the other with a 4-slope roof, although both gazebos are 4-slope.

Step-by-step instructions with the presented photo
All work begins with preparing the site for the gazebo. As a rule, a certain ball of soil is removed along with fertile layer. This is necessary so that in the future this organic matter does not rot under the floor of the gazebo. If the soil is sandy or sandy loam, then construction waste, crushed stone, broken brick etc., after which everything is carefully compacted. After this, a layer of sand is poured on top. If the soil is clayey and there are problems with water drainage, then it is better to pour a layer of clay into the pit and compact it. If the hole is filled with something else, then moisture will accumulate in it. Under the influence of heat, the water will begin to emit bad smell, which is completely unnecessary.
Arrangement of the foundation and lower trim
The easiest way is to install concrete blocks on the prepared cushion so as not to delay the construction of the gazebo. If you lay out brick columns, it will take a lot of time (this takes into account not only the work, but also the time to strengthen them). The distance between blocks is selected from 1.5 to 2 meters. If the gazebo is built from wooden beams 100x100 mm, then the distance is chosen to be 1.5 meters, and if from profile pipe 60x60 mm, then 2 meters is enough.
The supports must be aligned in the same plane. To check this, you will have to use a level and a long, straight rod. After this, waterproofing is laid on top of the columns (2 layers of roofing felt or bitumen mastic). And only after that the bars are mounted bottom trim. The beams are connected to each other using nails 150 mm long. To strengthen the frame, each connection is duplicated with powerful metal corners. Despite the fact that this is a summer gazebo, extra strength will never hurt, since the structure will quickly become loose under the influence of wind.
 The lower harness is assembled.
 Installation of racks
The next stage is attaching the racks. Racks are provided at the corners of the gazebo, in the center, on both sides of the entrance, and also where the supports (foundation) are installed. The racks on top have the same strapping as on the bottom.
Installation of racks is carried out strictly vertically, with control of this process at the building level. Many argue that building levels have a large error. This may be true, but for the construction of a garden gazebo the error does not matter much. In addition, when purchasing a level, it is advisable to check it. Alternatively, you can use a regular plumb line, but it is very difficult to use alone. One person should use the plumb bob and the other person should attach the posts. Using a building level, you can do without outside help.
Fix the position of the racks with jibs. In the future, having fixed and secured everything thoroughly, the jibs can be removed if they interfere. If the lower part of the gazebo is not transparent, then the jibs can be left. They can simply be permanently and reliably secured using metal corners. At the same time, it is advisable to check the racks for verticality each time.
 Two options for attaching racks with bevels. On the left are temporary jibs that are planned to be removed, and on the right are permanent ones that will be used in the future.
 Installation of the top trim and floor boards
After the racks are finally secured, they are also secured from above, installing the top trim. Technically, it looks the same as when installing the lower trim. For reliability, metal corners should be used. This is especially important if the structure does not have permanent jibs.
After the frame is almost assembled, begin laying the floor boards. They are like everyone else wooden structures, treated with antibacterial impregnation. For such purposes, Senezh or Senezh-Ultra impregnation is suitable. They differ from each other in that “Ultra” does not color the wood, but gives it a greenish tint. If the entire structure is covered with a dark stain, the greenish tint will disappear and remain unnoticeable.
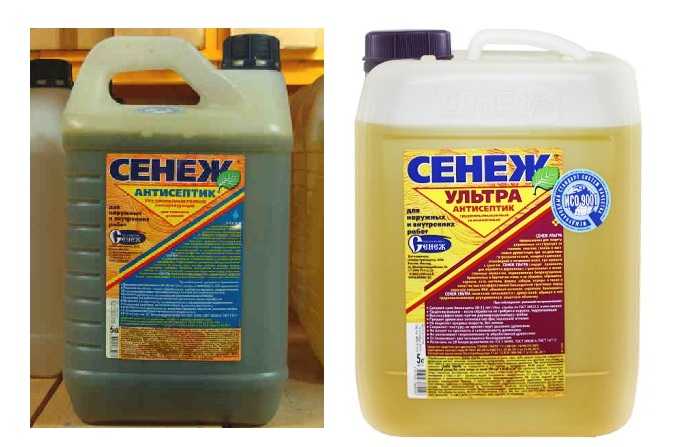 Means for impregnating wood that may come into contact with the ground.
 After the boards are secured with nails, it is better to paint the wooden floor, otherwise the wood will become dirty before construction is completed. It is better to paint outdoor wood with varnish or oil-based tinting paints. Moreover, these are not classic oil paints, but special compounds to protect wood from precipitation. The basis of these compositions is oil, to which protective elements and color pigments are added. As a result, the wood takes on a completely different shade, while maintaining its texture.
Strapping the structure in the middle of the frame
The middle frame binding, in most cases, is simply necessary, since the frame is divided into an upper and lower part, which is always (almost always) sewn up. It is better to secure the beams that should be installed using metal corners or make recesses for them in the racks, up to 25 mm in size, if the thickness of the beam is 100x100 mm.
 Option for attaching the middle harness.
 After this, you can begin the final painting of the frame of the garden gazebo.
Roof arrangement
The next stage is assembly rafter system, as shown in the photo below. The rafters are similar in appearance to triangles.
 Rafters (triangles) for arranging the roof.
 These elements are attached to the frame of the gazebo. Since there is no roof overhang, they are attached directly to the beam of the top frame. The triangles are installed vertically and secured with nails. To fix them in this position, you can use bevels.
If the structure of the gazebo has an overhang, then it is necessary to cut out seats in the rafters. The attachment points look like triangles.
 Options for correct fastening of rafters.
 Of these two options, the first one is more suitable, since the roof is not large. In order not to adjust each rafter leg individually, it is better to use a template. To do this you need to take a segment regular board and cut out the opening required size. This will not only simplify the task, but also provide the necessary accuracy. To make the work less of a burden, you can use a power tool, for example, a jigsaw.
Before final fastening of the rafters, be sure to check the correctness of their installation, both vertically and horizontally.
After the final and reliable fastening of the triangles, the sheathing is filled. The nature of the lathing depends on the nature of the roofing material. Soft types roofing materials require continuous sheathing. If it is slate or corrugated sheeting, then regular sheathing will do.
Decorative finishing
After arranging the roof, when the entire structure is closed from rain, they begin finishing the lower part.
 The gazebo with your own hands is ready.
 This design falls into the “simple, fast and cheap” category. Taking it as an example, you can experiment by doing something of your own with your own finishing elements. In the following example you can see how the gazebo, made according to the same design, has changed: the lower part is covered with a blockhouse painted in a light tone. And the rest of the frame has a dark tone.
 This is another version of the same project.
  On next photo, another option. Using this project as a basis, you can get many options.
 Below in the article are drawings with all dimensions. Below are interesting photos, but without drawings. There is hope that someone will use them.
Sketches of gazebos with drawings and dimensions
All dimensions indicated on the drawings can be increased or decreased to obtain the design required sizes. With a significant increase in size, the dimensions of the wooden elements (section) should also be increased for the required strength. If everything is done correctly and in the right sequence, then you can count on a positive result.
Classic wooden gazebo
The project is almost the same, but some dimensions have been changed: the top point of the roof has been raised, making it seem lighter. The gazebo is quadrangular with a hip roof.
 An ordinary square gazebo for a garden or cottage made of wood.
 Roof installation has problem areas fastenings indicated in the figure by circles. The picture below shows how to do this correctly.
 Options for fastening problem units when arranging a hip roof.
  Option for distributing space in height and option for attaching the sheathing to the roof.
 Chinese style gazebo
All dimensions are indicated on the drawing, and the project includes marking for the foundation, installation of the rafter system, etc. The project is arranged in the form of a photo gallery.
Many people seek to purchase a country plot. But after the implementation of the plan, many questions arise regarding the arrangement of this space. How, where and what to place is a personal matter for everyone. But almost everyone considers it necessary to have a gazebo on the territory of their dacha or country house. In the summer they spend a lot of time there. The whole family gathers to have breakfast, lunch and dinner in a cozy gazebo. Therefore, the construction of such a facility must be taken seriously.


If you wish, you can build a gazebo with your own hands that will suit you and your family in all respects. Before starting work, create a building project on paper; you will need it to calculate the consumption of materials and other important things. It is also important to take into account the features and price of building materials. A gazebo is considered economy class if the material for its manufacture was used at a budget level. Let's understand all these subtleties.


Location
The location of the gazebo on the site depends on the goals that the owners pursue when installing it. Many people treat the gazebo as a place for feasts. This is far from true; it is pleasant to read fascinating literature in the gazebo, and women like to do handicrafts there.
If you want to have family meals, feasts in the gazebo, or just have breakfast together in the morning, then it is better to choose a place close to home. The path between the house and the gazebo should be level, without obstacles, so that it is convenient to carry dishes and dishes.


If we consider a gazebo as a place where you can relax, retire, and escape from the hustle and bustle, then in this case it is better to place homemade design closer to the garden. Hanging tree branches comfortably darken the space - just what you need on a hot summer day.


If the family has small children, then it would be better to combine a small playground on the site with a gazebo.
This makes it much easier to keep an eye on the children; you can watch them play while doing your hobby in the gazebo.


In the case where the dacha was recently purchased and the owners are just deciding on a recreation area, it is important that the gazebo is located in the recreation area.
Materials
When constructing the structure, only coniferous wood is used.


Carefully select the material for the load-bearing parts, they are the most important. For their construction, pine and larch are usually used, since these species are less susceptible to rotting. In Rus', log huts, bathhouses and other structures have long been built. To this day, logs as a material do not lose their relevance. Technologies continue to develop, the material is produced in greater quantities, while maintaining quality. Log buildings are distinguished by their durability, beauty and unusualness. Rounded logs are actively used for the construction of closed and open gazebos; there are no restrictions here. Accordingly, there are logs with different diameters


for different buildings. The timber is made from coniferous wood. The cross-section of the bar used for the gazebo is usually 100 by 100 mm or 150 by 150 mm, the length of the bar is up to 7 meters. For construction, summer residents use timber for the foundation, vertical racks . The roof base is also formed wooden beam

. For the remaining parts of the gazebo, an edged board is better suited.


This material has its advantages:
Profiled timber is distinguished by its geometry and is connected to each other through tenons and grooves.
- The advantages of this material:
- Simple assembly of the structure. It is much easier to build a gazebo from profile timber; the elements are assembled like a construction set.


Does not require grinding, the material is processed at the factory.
- But it also has disadvantages:
- Over time, the wood dries out and cracks appear on it. This spoils the appearance of the gazebo.
- Due to the cracks, channels appear for insects or fungus, which are very difficult to remove.

The carriage, or gable beam, has a special Norwegian connection, thanks to which the structure becomes very durable. It also has side cuts that increase the space from the inside, unlike ordinary timber.
Gable timber has its disadvantages:
- Assembly. The carriage is not easy to assemble.
- Cracks. As wood dries over time, it will darken and cracks will appear.


Metal gazebos Many summer residents like it, and this is not surprising. The material is considered inexpensive, given that metal is durable. From it you can create elegant decor, metal pavilions complement the overall exterior of the house well.
A person who has worked with welding machine and has experience. The simplest design is a frame made of pipes, the roof surface is tiles.
Visually, metal structures, despite their strength, look very fragile and light. Metal gazebos can be built on any surface of the earth. Such gazebos are often moved from one place to another. The ability to move the structure is a definite plus.


If, nevertheless, the owners of the site are embarrassed by the rough appearance of the metal, then in this case original ideas related to artistic forging come to the rescue. But forging various patterns and parts is expensive, but such beauty will last a long time. Another advantage of metal is that it can be combined with other materials. As an example, there is a gazebo with metal carcass, and the roof is made of polycarbonate.
Please note that under the influence of hot summer sun the metal quickly heats up to high temperatures, which can cause some discomfort. But this design definitely has more pros than cons.


Gazebos made of brick or stone can be either open or closed. Often brick gazebos They are multifunctional and usually have a barbecue, smokehouse or fireplace installed in them. Gazebos from natural breeds stone, but the cost of such a design is very high. There is no point in talking about the strength of stone and brick - everyone knows that these materials are very durable and last a very long time.


Polycarbonate gazebos are becoming increasingly popular; they compete with structures made from other materials. Such summer pavilions look very modern.
Let's consider its advantages:
- Strength. The material acquired this desired characteristic due to its cellular structure.
- Light transmittance. Transparent polycarbonate transmits approximately 90 percent sunlight, but summer residents prefer colored polycarbonate. So shaded inner part gazebos, which is necessary on a hot sunny day.
- UV protection.
- Flexibility of polycarbonate sheets. This is what allows structures to be given any shape.


- Weight. Due to its lightness, transportation is inexpensive. The light weight also makes installation much easier.
- Wide choice of colors. IN color palette you can easily find the shade you are interested in. It often happens that other gazebo materials do not match the house precisely in terms of color characteristics, then you should pay attention to polycarbonate.
- No additional processing.


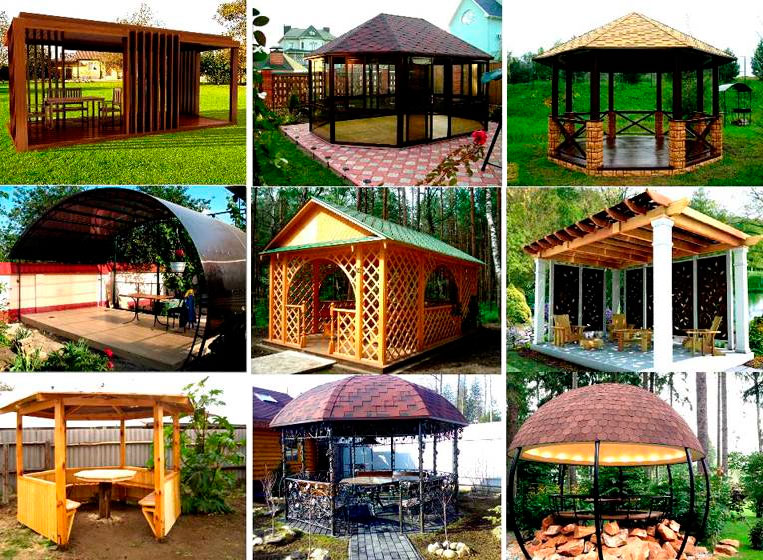
Types of structures
There are many options for gazebo designs. By the way, gazebos differ from gazebos in that they have enough high foundation, gazebos are built practically on the ground.
Open gazebos are the most popular in Russia. The classic type of gazebo is the most ordinary pitched roof on support pillars. For the foundation it is better to choose stone, brick or massive logs, this applies to heavy structures. Usually it is enough to fix the posts deep in the ground. The space between them can be decorated with beautiful grilles and boards, depending on the general view plot. A canopy can be used as a roof.
Typically, summer residents limit themselves to a gazebo, in which three walls are fenced, and the fourth wall is the entrance. There are benches inside and a table between them. But there are more original ideas - you can install a fireplace or barbecue inside the gazebo.


Open gazebos may differ, be made of different materials, with different roofs etc. However, they have the same advantages and disadvantages.
Advantages:
- Low costs. Open gazebos do not require glazing, most of them do not require a foundation, and there will be no cost for this.
- Protection from sunlight and rain, while still providing access to fresh air.
- Portable structures allow you to change the environment at the request of the owner.
The main disadvantage of open gazebos is that they protective characteristics practically absent. Such a gazebo will not save you from the coolness of a late summer evening. Insects easily penetrate inside. Strong wind also causes discomfort; it is impossible to hide from it in an open gazebo.


A closed gazebo is essentially a small house.
The advantages of such a gazebo:
- Weather protection. You can spend time in it both on warm days and on rainy days.
- There are many more options for arranging the space. This is the same as equipping own house, choose furniture, decorate, etc.
- Year-round use. If heating is installed, then in any weather conditions it is possible to stay there, even in the winter season.


Now let's look at the cons:
- Finances are of considerable importance; a closed gazebo performs almost the same functions as a house, and accordingly, the financial costs for it are the same as for a small house.
- Laying the foundation is mandatory.
- The area must be quite large. If the area is small, then a closed gazebo will look out of place on it. It will be inconvenient for the owners to live on such a site.


Glazed closed gazebos are considered the most beautiful. It's nice to be in them in the evenings, watching the sun go down. However, glass is a fragile and quite expensive material, which can cause a lot of problems for owners.
Open and closed gazebos are very different from each other, and they are installed for different purposes. Before purchasing materials, drawings and calculations for the future structure, consider the type of gazebo. What is important about it is only dinners with family outdoors in summer or year-round use of the gazebo? Once you have decided on this, proceed to the rest of the work.


Shape and dimensions
It is difficult to single out any specific standards. Each owner independently selects the shape, size, and decor of the gazebo. But basic forms still exist.
The construction of a hexagonal gazebo must be treated with particular responsibility. If there is a need to slightly increase the free space, then benches can be built into the structure. This way they will take up much less space.
The oval shape of the gazebo is interesting; it is rarely used by summer residents.


With a rectangular figure there are much fewer difficulties; it can be set to absolutely any length and width parameters. A significant advantage of rectangular gazebos, in contrast to hexagonal and oval ones, is that they are more spacious.
Having chosen the dimensions of the garden house, create drawings and diagrams. They will make it easier to understand the structure of the structure.


Step-by-step manufacturing instructions
Made of wood
The work will require the most common building materials, which any gardener or summer resident can find:
- sand;
- crushed stone;
- cement;
- impregnation, paint, protective coatings;
- roof covering material.


It is imperative to visualize the future gazebo graphically; without a drawing it will be impossible to build a gazebo. This way you will see the overall picture, what material you will need and in what quantity. The image will also simplify calculations, because it is visually easier to navigate the structure.
Draw a general plan of the site along with the house and other objects located on the territory. This way you will calculate the installation location of the structure.
Using a square, mark 4 right angles, taking into account the desired length and width of the structure. You can check how right the angles are by measuring the length of the diagonals. In a rectangle they are equal.
You can use the well-known Pythagorean Theorem. A diagonal squared will be equal to the sum of the two sides whose length is squared. If the equality is satisfied, then the right angles are marked correctly.


When building a hexagonal gazebo, the order of work will be slightly different.
Place a peg in the ground and tie the end of a rope to it. Take the second peg and tie the other end, the stretched rope between the pegs is the radius. By changing the length of the rope, change the radius. Use the second peg to outline a circle.
Now it is important to mark the vertex points of the hexagon. Draw a straight line through the center of the circle, at the intersection of which with the circle two points are formed; in the figure these are M and P. The line can be positioned as you like, but be guided by your preferences. If the gazebo will be located along the fence, then this line should be parallel to the fence.
We drive the same stake that was in the center into one of the points. Don't remove the rope, otherwise you will change the radius and no regular hexagon will come out. For example, we put a stake at point P, then with another stake we mark points on the circle O and T. We do the same with point M.
When all six points are found, you need to drive a peg in place of each. This way the point marks will not be lost.


As mentioned earlier, a foundation for a lightweight gazebo made of wooden material is not necessary. Its role can be brick, stone or tile laying.
There are still very unusual option a foundation made of wheels, or rather, tires. The tires are filled with cement and can be secured with a large metal pin.
Wooden stumps are also used as a foundation. But if the soil is clayey and often wet, then this method will not work.


Important points when pouring the foundation:
- A sand and crushed stone cushion is required. This applies to all types of foundations, except piles.
- Concrete should dry gradually, preferably in a damp environment. Moisten the coating periodically, otherwise it will only dry out. top part and then it will crack throughout the entire foundation.
- The finished foundation must be protected from external influences. Roofing felt or other more expensive materials will cope well with this task.


If you want to make a gazebo with a barbecue, then the foundation of the structure must support the weight of the barbecue. Then it is better to use a slab foundation, which will carry such weight and the corresponding load well.
To tie along the bottom of the vertical posts, use a beam that is attached to the logs. Next, the racks that will hold the roof are attached. Fastening to the joists is carried out with nails. The posts must be exclusively perpendicular to the ground.
After installing the racks, work on the flooring begins. For this purpose, boards are used that are resistant to rotting and other external influences. To fasten the boards you will need screws or nails. A pair of screws or a pair of nails are attached to each end of the board. If they are fastened with nails, it is recommended to make holes for them in the board in advance. This makes the wood less likely to crack.


The roof starts with the frame. Best suited for square gazebos hipped roofs, but the easiest way is to build a single-slope one. Cut from timber rafter legs, they are attached in pairs at an angle. Auxiliary struts are symmetrically attached to each of the legs.
A sheet of plywood is usually used to cover the roof. Self-tapping screws are used for connections, after which the plywood itself is covered for protection with roofing felt, then with bitumen shingles.
The tiles are very light, and working with them is also quite simple. The covering is attached to the flooring using large nails. Used for eaves tiles construction hair dryer. Next comes the installation of ordinary tiles. Nails must be long in order to secure plywood, eaves and ordinary tiles.


Before laying out the tiles, the film is removed from it, it is laid overlapping, each time overlapping the seams. The nails must go through all layers of the shingles, otherwise they will come loose over time.
The tiles are cut off along the edges of the roof, and these places are coated with bitumen glue. A ridge tile is laid across the ridge with an adhesive layer, securing it with nails.
When buying flexible tiles, keep an eye on the lot number, it should be the same. It happens that in different batches there are different shades of material.

Made of metal
Pay attention to the soil, level and compact it. Craftsmen advise laying the surface with paving slabs. Thus, metal structure it will be more stable, there will be no distortion of the structure, and if you want to remove the gazebo, then in its place there will be a flat platform made of tiles (for the collapsible type).

A gazebo built at a dacha creates a special atmosphere of sincerity, comfort and warmth. This is where you can sit and have tea with your family or spend time with friends, having leisurely conversations about life. This structure takes on special significance in summer time when it's time kebabs and barbecues. At the same time, the gazebo is also a decoration of the site, emphasizing the advantageous aspects of the landscape. Of course, you can buy a ready-made structure, but we’re not looking for easy ways, are we? Considering that making such a house is quite within the capabilities of a skilled owner, we will tell you how to build a gazebo with your own hands.
As you can see, the designs of such gazebos are really very simple, taking into account the concrete screed as the floor. If you plan to operate the building in winter, then you need to build a columnar foundation, on which logs made of 50x100mm timber are installed, and then the floor is laid.
A do-it-yourself gazebo, drawings and diagrams of which you can use in your work, must be processed protective agent and coated with paint or varnish to protect the wood from weathering.
We are building a wooden gazebo. detailed instructions
Although it is not difficult to build a gazebo made of wood, in order for the structure to be strong and durable, certain construction requirements must be met. We will tell you how to build a gazebo out of wood and give step by step instructions, following which you can not only quickly build it, but also get a beautiful, reliable structure.
The very first thing that needs to be done is to clear the area for future construction from debris and rubbish, cut down unnecessary trees and remove bushes. Next, we carry out all the work step by step:
- We are drawing up a project . To do this, we determine the capacity of the structure. Next, we draw up construction drawings. You can take ready-made diagrams or adapt the drawings to suit your needs.
- Marking a site for future construction do-it-yourself gazebos at the dacha. For this purpose, we drive pegs in the corners at the required distance, pull the cord and check the diagonals. To maintain the rectangularity of the structure, they must be equal.
- Dig a shallow pit for pouring the foundation and using building level we install the formwork. An edged board with a thickness of at least 20mm is best suited for these purposes. Let us remind you that to build a gazebo at the dacha with your own hands from wood, you do not need a serious foundation, just enough monolithic slab up to 20cm thick.
- Filling the foundation with concrete . To ensure that the base is level, we use a broad rule, and for large foundation sizes, we additionally install beacons.
- On concrete base laying down ceramic tiles . Remember that it will be used year-round, so you need to purchase frost-resistant floor tiles.
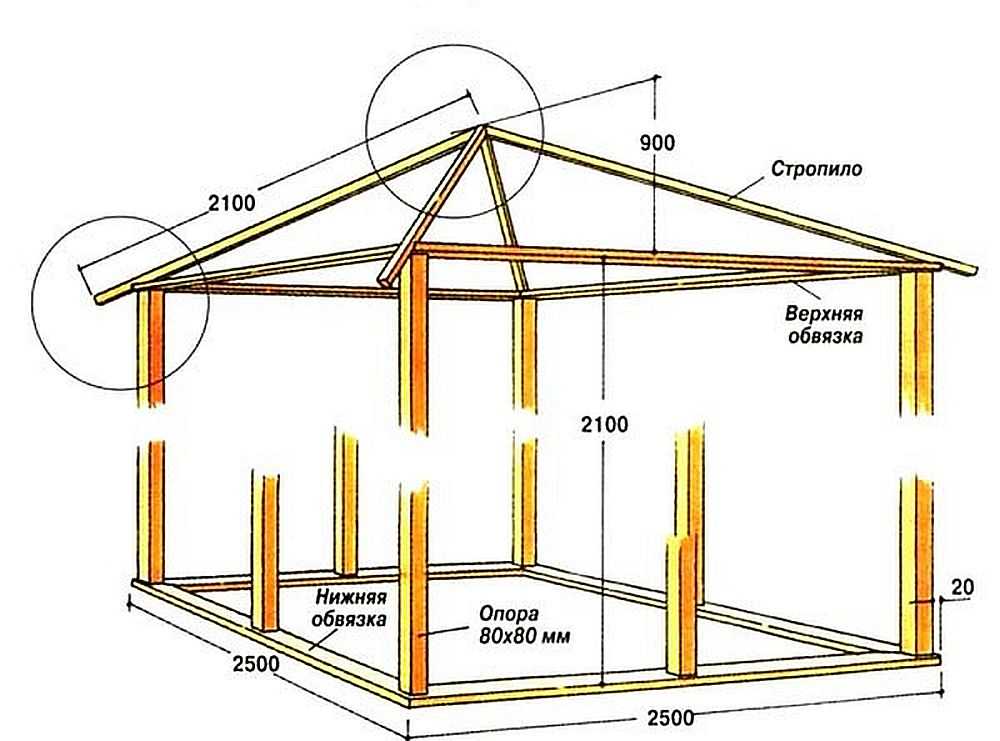
- We deliberately did not dig the corner posts into the ground. A do-it-yourself wooden gazebo at the dacha will last much longer if you install the support beam directly on the foundation. To do this, we stock up on a U-shaped bracket with an internal size of 100mm. We fasten it with dowels or anchors at the corners of the structure and in the middle of the long sides.
- We install vertical supports and secure them with self-tapping screws to the U-shaped fastener. It is best to use 4-5mm screws with a length of at least 30mm. If the gazebo at the dacha with your own hands will have pitched roof, then the pillars placed on the rear side must be at least 40-50 cm lower than the front supports to create the required roof slope.
- At a height of 100 mm and 900-1000 mm from the floor install longitudinal beams size 50x50 mm. They are intended for fastening side elements, so they must be additionally reinforced with vertical or cross spacers. We attach the same timber with appropriate jointing in the front part of the gazebo at the height of the rear supports. You may want your dacha gazebo, created with your own hands from wood, to have a ceiling. It can be attached precisely to these structural elements.
- At the top of the vertical posts (with inside) make gashes 120mm long by 30mm deep. Using M8x120 bolts we install the rafters. A 30x120mm board of the required length is quite suitable for this.
- We strengthen the frame under the roof with transverse elements , which we attach to support posts and rafters, and then strengthen them with corner bars.
- We put batten boards on the rafters with a frequency corresponding to the type of roofing material. For slate and ondulin, three sheathing boards under the sheet will be enough. In case of use ceramic tiles the sheathing is filled so that each tile rests on the frame in two places. If a do-it-yourself wooden gazebo is covered with bitumen shingles, then the sheathing boards should be installed solidly, and it is better to use plywood or OSB boards for these purposes.
- Don't forget to install a wind board . Without it, the roof will not look complete.
Don't forget to treat the wood with a protective agent and coat it with paint or varnish. This will protect the wood from weathering and preserve its beautiful appearance for a long time..

Wooden gazebo. Option two
The do-it-yourself gazebo, drawings and diagrams of which are presented below, has a more complex design, with a curved perimeter and a tent roof. However, we note that such a structure looks much more impressive. To build it you will need:
- Wooden block 100x100 mm;
- Slats 25x30 mm;
- Edged board 25 mm thick for roof sheathing and 40 mm for flooring;
- Fasteners;
- Roofing sheets.
And, of course, how to build a gazebo with your own hands without tools?! Therefore, we stock up on a circular and bow saw, an electric plane, a screwdriver, as well as fastening materials and measuring instruments.
In order not to run far to the grill or barbecue, we decided to make a gazebo with a nook where they can be installed.
We choose a place for construction at some distance from the house. Firstly, one of the guests or owners may want to take a break from the noisy company, and secondly, in this case, the smoke from the barbecue will not get into the open windows. And purely aesthetically, it’s not worth starting construction under the windows themselves.

So, do-it-yourself gazebo, drawings and dimensions plus detailed instructions according to its construction:
- Using a construction drill, we select the soil under the pillars of the columnar foundation . We lay reinforcement strapping in the holes, install sheathing boxes and pour concrete posts. 11 of these posts were needed, according to the number of corners and in the center of the building.
- Assembling the frame . To do this, we lay 100mm timber, fastening it with corners, and for additional strength we use fastening “into the floor of the tree”. We install logs (a board placed on the end) under the future floor of the gazebo.
- We treat the frame with an antiseptic and lay the floorboards . At the same time, do not forget to leave free space in the place where the barbecue oven will be installed. A lot has been written about how to build a gazebo from wood, but not a word has been written about the fact that for this you need to use only planed lumber, without leaving this process “for later”. Keep in mind that “later” is unlikely to come, because doing so will be disproportionately more difficult.
- Let's start building the roof . Believe me, by laying out its elements along the contour of the floor, making a gazebo will be much easier than if the roof is installed at a height. Therefore, we lay the base of the roof along the perimeter of the floor, install a support for the rafters in the center and attach U-shaped fasteners to it for these elements.
- Installing rafters , making cuts on them at the point of contact with the frame, and securing them with self-tapping screws. After this, we mark all the roofing elements and put them aside.
- The do-it-yourself gazebo, the drawings and dimensions of which we present, as you can see, has 11 vertical posts. They can be secured using construction corners. In this case, it is very important to maintain verticality, so constant monitoring with a level or plumb line will be required.
- We install horizontal ties along the upper contour of the building . You can fasten them to the supports with nails or self-tapping screws, and metal strips bent at the desired angle will help to fasten them together.
- We install and fasten all roof elements in place . After this, the central support for the rafters can be sawed off flush with them.
- Laying the sheathing .
- Since we decided to build a gazebo under the same roof with a barbecue oven, we select soil in a nook (where there is no floor) and begin to prepare the framework for the foundation. To do this, we install a sheathing (you can use slats from under containers for it) and cover the walls with roofing felt for waterproofing purposes. Next, we create a harness from the reinforcing mesh attached to the reinforcing pins.
- We prepare concrete in a ratio of 1:1:3 (sand, cement, granite screenings) and pour the foundation .

The walls of the gazebo can be sheathed with blockhouse or clapboard, and the roof can be made of soft bitumen shingles. A do-it-yourself gazebo at the dacha made of wood can have any interior decoration. It is only important to treat the wood well, remove sharp corners and sand the surfaces to remove splinters.
After completing all the work, do not forget to treat the wood with protective compounds.
Video of gazebos built by hand
Sometimes a do-it-yourself gazebo, a video of which you saw on the Internet, has such a fabulous appearance that you can’t believe how such an airy structure can be created from ordinary wood. The videos we present tell you about all the stages of construction of various gazebos in such detail that they sometimes represent real video instructions. For those who have not yet decided what their future gazebo will be like, a video containing a slide show of the most original designs, will help you make your choice faster.
Photos of gazebos
An original garden gazebo can transform the whole country cottage area. Photos of modern buildings can serve as proof of this. Some of them are real masterpieces worthy of a place in the best gardens and parks of the world. We suggest looking at some original gazebos that can make your garden unusual and attractive, and make your holiday with friends comfortable and memorable. Maybe after watching you will want to pick up a saw and a hammer?

Neither the cottage nor a private house cannot be comfortable without a beautiful gazebo. A summer gazebo allows you to have a pleasant time and enjoy the coolness on a hot summer day. The sizes and shapes of the gazebo can be very different. The most important thing is that it fits into the interior of your territory and is similar in size and design. summer gazebos can be decorated in different styles; it can be a classic gazebo or in the modern style. The shape can also be different, hexagonal, round or quadrangular.
The idea of building a gazebo in our dacha belongs to my wife Svetlana. After not long advice the decision was made. Let's build it ourselves! They entrusted me with the financing, the project, and the design... The project!? It turned out that not everything is so simple, even with such an unlimited source of information as the Internet. I thought that on the World Wide Web I would easily find a bunch of detailed drawings, drawings, photographs and instructions, but alas... Either I was looking poorly, or... The result: I didn’t find what I wanted. Although I learned a lot of interesting things. Ready-made gazebos in the Moscow region are sold for 250-300 thousand rubles. per piece (albeit with on-site installation). At first I even doubted whether we could afford this idea. I did some math and it turned out that I could do it in 5 thousand.
Selection and preparation of a site.
It was decided to make the gazebo hexagonal... which means we make a compass and draw a circle. Dimensions of the gazebo: diameter 3 meters, height 2 m. In the center there is a round table on a leg (we will make it at the very end, from the rest of the material), a roof - that’s the question for now? I want some natural tiles.... I haven't found anything yet.
When making initial calculations, we use all our knowledge of geometry and a specially brought calculator.
They decided to make the foundation from half-meter oak columns... You can already see how the gazebo will be located. We tried to dig the pillars exactly to the level.
The assistant must be well fed...
There was a break at the construction site. The children were in camps, and my wife and I were engaged in the selection and delivery of building materials. For construction, the following items were specially purchased: an electric planer (950 rubles), a jigsaw (630 rubles), a saw (100 rubles), various nails (about 300 rubles), a hammer (120 rubles), a tape measure (75 rubles) . In the absence of our son, my wife and I built the necessary carpentry workbench(I won’t describe how to do this, but it’s already clear that we can’t do without it - all the building materials need to be planed, sawed out, hollowed out...).
The process has begun... first processing six pillars...
We thought for a long time about how to secure the pillars and cross bars to the “foundation”... We decided so (see photo), we’ll build it and see whether it’s correct or not. (I note that none of us have a construction education and did not turn to the help of consultant-neighbor Dmitrich).
Friday. We continued to prepare the pillars; on each one it was necessary to make grooves for the bench and railings (photo below.
To install six pillars, it was decided to temporarily dig a pillar in the center and tie it to it. Each pillar is set strictly according to level.
Hooray! We finished the skeleton of the gazebo. They removed the temporary structure - it's standing, but not quite strong. I hope the roof rafters and floor will finally “tie” the structure together.
We started preparing the mounts for the benches. This standard design (photo below) holds the bench very securely. Using one template, six “jibs” were immediately prepared.
It was decided to cover the bench with a “gap” so that the structure would not look heavy and the material consumption would be less. We attach the prepared (planed board, length - 39 cm, width - 10 cm, chamfer - 1.5 mm) to the bench. We will align and chamfer when everything is nailed down.
The weekend plan is complete.
Friday evening... We finished installing the benches.
The homemade workbench was modified... with such “clamps” it became more convenient to work with material of different widths...
Saturday. Roof structure: 6 bars (100x50 mm) attached to the central hexagon (diameter - 150 mm). Until recently, I did not believe in the reliability of this design.
The roof was first assembled on the ground, and then the whole family lifted it up (and that’s the only reason why there are no photos of this moment).
We make cuts on the rafters, which will not allow them to move apart... We nail them on top to the post.
Friday. Purchased lining (26 boards, length - 2.5 m, width - 80 mm, for 1350 rubles). It turned out to be very convenient with the clapboard: they brought it all at once on their “ten” and the length of 2.5 m after cutting into 80 cm pieces gave a minimum of waste.
A strip was previously nailed under the armrest to secure the lining.
Roof. The rafters are ready...
From unedged boards we make sheathing for flexible tiles. Friends advise covering it with "Catepal" material.
I decided to first make a table and then cover the roof... I really wanted to sit in the gazebo and have a barbecue. Here is a rough sketch round table. The round one in the center of the sketch is a fresh oak pillar (no need to buy, it was left over from the old owner), then everything is clear - a skeleton made of a 100x50 block and cut planed board. In conclusion, we draw a circle and cut it with a jigsaw... How easy it is in my words... I’ll try it in practice on Friday.
We bought the material: 12 meters of timber (50x70) and 12 meters of 25-piece board - for only 400 rubles. Oak table dug in more than a meter - so you can dance on the table...
We are making the table octagonal, not round as planned. There is a lot more fuss with the round one... The diameter of the table is 1.4 meters.
This is how the skeleton of the table turned out...
The gazebo has already been coated with the first layer of clear varnish... One left 3 liter jar(450 rub.). Will buy another one for the second layer and table.
The first evening was spent in the gazebo having a barbecue... My wife's rating was 5+. All we have to do is cover the roof. And the floors. Here it is definitely not yet decided what to do. If at first you thought it was a floorboard, now different options are offered: from sand (grandmother’s option) to paving slabs... We think! If you recommend anything, I will be grateful.
Yes, that one-year-old grass that is in the photo on the right has nevertheless outgrown the gazebo, but we started with it together.


