Do-it-yourself change house for a summer residence, step-by-step instructions. Do-it-yourself change house - step-by-step construction instructions. Internal and external walls
Many novice summer residents often wonder: what is the best thing to do, buy a ready-made change house or make it yourself? As practice shows, finished goods often turn out to be of low quality and short-lived. Therefore, we definitely recommend self-construction. You can learn about all its nuances and subtleties from this article.
Why do you need a change house?
Before you start designing and building a shed, you need to decide on its purpose, because its dimensions, layout and other aspects largely depend on this. As a rule, a change house performs the following functions:
- residential premises - the building can be used as housing during the construction of the main house. Subsequently, it will not be difficult to convert it to other economic needs, in addition, the change house can serve as an additional summer house, for example, to meet guests;
- household - you can store garden equipment, work clothes, etc. in the room;
- sanitary and hygienic - the change house can be equipped with a bathroom, for example, here you can perform Summer shower and install a dry closet.
If desired country house can be equipped with a bathhouse or other functions. The main thing is to think carefully about all your needs and wishes in advance, so that you don’t have to deal with alterations later, as is often the case.
Design - creating a change house on paper
Having decided on the requirements for the change house, you need to create a plan on paper and indicate the dimensions of the structure. Most often, the structure is a trailer 2–3 m by 5–6 m. Of course, it is not at all necessary to make it elongated. The main thing is that the shapes and sizes allow the implementation of all intended functions.

In order not to rack your brains over the layout, you can use ready-made drawings as a basis. Adjust dimensions if necessary. The only thing we note is that it doesn’t make sense to build a building that is too large, since it will no longer be a change house, but a permanent structure with completely different construction costs. As a rule, a building measuring 6x3 m is quite sufficient for all household needs.
Next you need to decide on the design and materials. Since a change house is an inexpensive and lightweight structure, which, if necessary, can even be moved from one place to another, we recommend making it from wood. Next, we will consider two construction technologies using this natural material:
- frame - this is the cheapest, fastest and easiest way of construction, but keep in mind that the strength and durability of frame cabins is not their strongest point;
- from timber in the form of a log house - just like timber houses, such cabins are strong and durable, but more expensive than frame analogues.
Basis frame structure, as you might guess, is a frame made of timber. It consists of racks located at intervals of 600 mm, and connected to each other by lower and upper trim (horizontally located boards or beams). To strengthen the racks, braces and horizontal jumpers are additionally used. The space of the frame is filled with insulation and sheathed.

The distance of 600 mm between the racks is indicated for a reason - it is for this step that thermal insulation boards, as well as OSB, are designed. If desired, the step can be changed, but in this case you will have to cut the insulation and sheathing.
Before you start building a frame shed, draw up a diagram of the walls and ceilings indicating the dimensions of all parts. This will allow you to calculate the amount of lumber and make an estimate. We'll talk more about the materials that will be used during construction below.
Calculating lumber for a timber shed is even simpler: to find out the number of crowns, simply divide the height of the wall by the height of the beam section. The length of each crown is already indicated on the plan. Therefore, you don’t even have to do an additional project.
Foundation – even a cabin needs a good foundation
If you are installing a change house for a month or two, then it is not necessary to build a foundation for it. A backfill of crushed stone leveled horizontally will be sufficient. To protect the bottom of the building from moisture, several beams or bricks/blocks should be laid on the bedding.
If the change house will be used as a permanent structure, it will not be possible to do without a foundation. Of course, in our case there is no need to construct a massive ribbon structure. It is more expedient to make a lightweight base in the form of separate columns connected to each other by beams (grillage). We begin construction by preparing the site: we get rid of the plant layer of soil, after which we mark the site according to the design dimensions of the building.

Then you need to prepare holes for posts about 40 cm deep, located at a distance of one and a half meters from each other along the length and width of the building. Cover the bottom of the holes with a layer of sand and crushed stone 150–200 mm thick. Be sure to compact the bedding well and level it horizontally. Then build posts from blocks or bricks 30-40 cm high above the soil level. Treat the surface of the posts with bitumen, then cover with several layers of roofing felt.
Next you need to lay beams (beams 150x150 mm) around the perimeter columnar foundation. To attach the timber to the posts, use special fasteners, the so-called studs. When laying the grillage, be sure to ensure that the beams are horizontal. If necessary, you can level the position of the beams by placing blocks or boards under them, but in general try to ensure horizontal plane still at the stage of erecting the columns.
The beams can be connected to each other “in half a tree” - in this case, at the joints of the beams, even grooves with a depth of half a beam are made. The grooves must be reciprocal, i.e. in one beam the groove is cut from the top, and in the second, accordingly, from the bottom. Additionally, the joints can be strengthened with self-tapping screws and steel corners. The floor beams are laid in the same way and cut into the outer beams.
We build a change house quickly and cheaply - the nuances of frame technology
To build a frame shed you will need the following materials:
- timber 100x100 mm;
- boards 35x100 mm;
- mineral mats with a thickness of 100 mm and a density of 25–35 kg/m3;
- vapor barrier;
- wind and moisture insulation;
- finishing material - lining, block house, etc.
We begin the construction of walls with installation corner posts, which are made from timber 100x100 mm. To fix them, use corners and screws, reinforce them with braces. After making sure that all the posts are vertical, connect them with the top strap, for which use a 35x100 mm board.
If the roof of the cabin is pitched, do not forget to make one long wall 30-40 centimeters higher than the other.
Then you can install intermediate racks made of boards. To the top and bottom harness they are attached with metal corners. To give the structure rigidity, secure horizontal jumpers between them in a checkerboard pattern. Besides, horizontal strips Install from the same boards above and below the openings.
If the roof of the structure is gable, lay floor beams on the wall frame. Since the beams will not carry virtually any load, you can use the same 30-100 mm boards. Place them with the edge on the harness and secure in this position using the corners. The pitch of the boards can be made about 40 cm.

After this, you can begin insulating and covering the frame. It is better to start with the roof, but we will consider this stage separately, and now we will insulate the floor and walls. Thermal insulation of the floor begins with laying the rough flooring on the floor beams. Since it will not perform a load-bearing function, any boards can be used for these purposes. Waterproofing is laid on top of the subfloor, and then the floor joists are installed. Don't forget to align the joists horizontally.
All roll materials, i.e. vapor barrier, wind protection and waterproofing, are mounted with an overlap of 15-20 centimeters. Moreover, it is advisable to glue the joints of the canvases with butyl rubber double-sided sealing tape, which will ensure complete tightness of the joints.
Next, the lag space needs to be filled thermal insulation material, for this you can use either mineral wool or any other insulation. The surface of the logs and thermal insulation must be protected from moisture with another layer waterproofing film. Then you can install the plank flooring.
The ceiling ceiling is insulated in approximately the same way - the space between the floor beams or rafters is filled with insulation (if the roof is pitched). To fix the slabs, you can stretch a wire or nylon cord in a zigzag pattern between the beams. Then a vapor barrier film is stapled from below to the floor beams. On top of the vapor barrier, a lath of 20x30 mm is made, to which the lining or other finishing material is attached.
If the thickness of the rafters is not enough to secure insulation between them, build them up using timber or boards.
One of the most important points is wall insulation. Not only the comfort of staying indoors and the energy efficiency of the building, but also the durability of the entire structure depends on it. We start thermal insulation with installation vapor barrier film, which is attached to the frame with inside walls It is advisable to first stick a sealing tape onto the racks to prevent subsequent depressurization of the circuit in the areas where the film is attached to the frame. The vapor barrier is fixed using a stapler - the staples are hammered in increments of 100-150 mm.
Then the space of the frame must be filled with mineral mats. During the insulation process, follow one main rule - there should be no cracks anywhere in the walls. If cracks have formed, they need to be filled with scraps of mineral wool, otherwise cold bridges will form. Upon completion of the thermal insulation of the frame, secure with outside moisture and wind protection. The membrane is installed according to the scheme described above.

A sheathing is attached to the frame over the windbreak. As a rule, the slats are located vertically. To fasten the sheathing, use self-tapping screws, screwing them in at 25 mm increments. Then the walls are sheathed on the outside with OSB. The slabs are also attached to the sheathing with self-tapping screws. In order not to cut out the trim in advance, door and window openings can be cut in place with a jigsaw, i.e. after installation of the slabs. Keep in mind that between the slabs it is necessary to provide expansion joints 5 mm thick. Be sure to fill these seams construction sealant or polyurethane foam.
Next, you need to finish it with clapboard, corrugated board, siding or any other façade covering. Install doors and windows immediately. On the inside, the sheathing is attached to the frame in the same way as on the outside, after which the walls are sheathed with clapboard or even plasterboard.
You can add more as needed frame structure, expanding its area, or even build another shed nearby and connect it to the first. In this case it will work whole house from cabins that can be used for any of your needs.
Making a Russian folk log cabin
If you want to make not a temporary structure, but a change house “for centuries,” then it is better to build it from a log or timber in the form of a log house. For this we will need the following materials:
- timber 150x100;
- wooden dowels;
- interventional insulation.
Place the first crown of the house on the grillage. Be sure to align the beam with the grillage, and also make sure that the angles are 90 degrees. Connect the beams to each other “in half a tree” according to the scheme described above. Immediately lay the first crown of partitions, and in the same way cut it into the first crown of the outer walls. Then secure the inter-crown insulation to the first crown using a stapler.

Lay the second crown in the same way. To connect both crowns to the grillage, drill vertical holes according to the diameter of the dowels. To do this, use an electric drill and a special long drill. The holes should reach the middle bottom beam and be located in the walls in increments of one and a half to two meters. Carefully hammer the dowels into the resulting holes with a hammer.
Then two more crowns are laid and connected with dowels to the lower pair of crowns in the same way. The only thing is that the pins are installed offset, i.e. in a checkerboard pattern, as shown in the diagram above. According to this principle, the walls, together with interior partitions"rise" to the designed height.
The result was a box without windows or doors. Therefore, you need to mark the door and window openings on the walls, and then cut them out with a chainsaw. First, temporarily fasten all the beams with boards to the left and right of the opening. After completing the openings, immediately install window boxes made from boards. They will fasten the cut beams of the crowns together, preventing them from falling apart.

It must be said that openings can be made during the construction of walls. In this case, the beams are fastened to the left and right of the openings with dowels. You can use any option you like.
As for the floor and ceiling, all work is performed in the same way as during the construction of a frame cabin, so we will not repeat it.
If you decide to decorate the change house, keep in mind that you can begin this operation no earlier than one and a half to two years after the completion of construction, i.e. after the structure shrinks. The exception is the cabins made of profiled laminated veneer lumber, which practically do not shrink.
Roof installation, or how many slopes do you need for complete happiness?
The type of roof structure depends on the purpose of the cabin. If it will be used in the summer, it is better - it is easier to implement and cheaper. For its construction you will need the following materials:
- timber 50x150 mm;
- superdiffuse moisture-proof membrane;
- slats 20x30 mm;
- boards 100x20;
- roofing material.

Step-by-step installation instructions pitched roof looks like that:
- 1. The rafters are laid on long walls who have different heights. They need to be placed vertically, i.e. to the edge. To fix the rafters in the mauerlat (the upper crown of the walls or frame), you can make grooves. Additionally, use corners and screws. Since a pitched roof will carry a large snow load, do not make the distance between the rafters more than 40–50 mm.
- 2. Fix a moisture-proofing membrane on top of the rafters, and then fasten the counter-lattice - 20-30 mm slats. The counter-lattice should be parallel to the rafters.
- 3. Next, boards are mounted on the counter-lattice perpendicular to the rafters. The sheathing pitch depends on the type of roofing material, but in any case the distance between the boards should not exceed 15-20 cm.
- 4. Now we lay roofing. Since the roof will be flat, overlap the sheets more; for example, when installing slate or tiles, it should be not one wave, but two.
If you plan to use the change house not only for warm time year, but also in winter, it’s better to do it. It is based on roof trusses, i.e. isosceles triangles formed rafter legs. From above, i.e. At the top of the triangles, a ridge girder is mounted - this is a beam that connects all the roof trusses. In addition, every roof truss strengthen with ties - horizontal jumpers connecting two rafter legs.
Waterproofing and laying of roofing material is carried out according to the instructions for a pitched roof. The only thing is that if the change house is winter, it is advisable to insulate not only the ceiling, but also the roof itself. This operation is carried out on the same principle as.
So we built the change house with our own hands, now all that remains is to install communications to it. As you can see, there is nothing super complicated in this work. Yes and not in vain folk proverb says: it is not holy pots that are made.
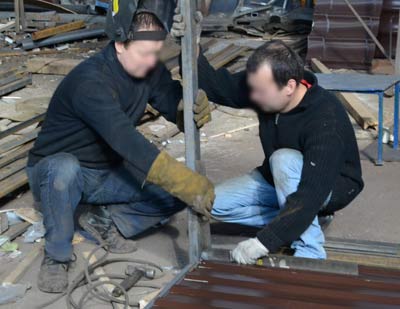
Construction work is a complex and multifaceted process, for which it is necessary to provide for literally every little detail, including temporary housing for a team of workers. Great option in this case, it can become a household construction trailer. It can be used in many ways, including a kiosk, a small cafe or even a mobile office in the future. Moreover, small trailers converted into houses are often found on suburban areas. They are transported several times a year, and this is the main advantage of temporary housing.
By building a household trailer for yourself, you can turn it into real home with everything you need: kitchen, bedroom, bathroom. And if you still doubt whether it’s worth investing in a change house, then make up your mind - there’s nothing to think about here. If the design is made with sufficient quality, it will pay for itself very quickly. Moreover, in the future it can even be rented out.

For the manufacture of cabin cars, only two materials are used:
- metal;
- wood.
Of course, wooden structures are cheaper, and if the cladding is properly treated (this is often lining), then the change house will last at least ten years. If we talk about metal, it looks more modern, is characterized by strength and the ability to withstand heavy loads, but compared to wood, this material is significantly more expensive.

Often trailers are produced at metal frame, so installation on a pre-built foundation is not required - any leveled surface or special blocks will do. The trailer can perform one of three functions:
- be temporary housing for construction workers;
- to be a guard post;
- serve as a warehouse for building materials.
The rooms inside the car can be separated or combined, but in both cases it is desirable to have a vestibule - it is necessary to protect against cold air from outside.

Entirely wooden trailers are found less frequently, and then mainly on sea coasts or suburban areas. A wooden cabin is an excellent conductor of heat, so it can be heated quickly. In addition, the weight of such a structure is much less than that of a metal one. But regardless of the frame you choose, you can equip your trailer with wheels and an axle at any time, “taking” some living space with you on the road.

By using modular designs you can create a whole town of cabins in the immediate vicinity of the construction site. You only need to take care of water supply and electricity. If there is not enough space in the building area, you can resort to vertical installation– the main thing is that the structure can withstand.
Pros and cons of cabin cars
Compared to a household container or rented apartment, then a change car costs much less and has smaller dimensions. Here are the main advantages of trailers:
- acceptable quality;
- multifunctionality;
- no need for assembly;
- low cost;
- possibility of multiple transportation.
And now the disadvantages:
- limited equipment;
- necessity permanent place for storage;
- a large number of cracks and connections (increased heating costs);
- low fire safety.

Buying, renting or building?
Having decided on a trailer, you will probably ask yourself this question. Let's look at the strengths and weak sides each of the options.
Buying a trailer
The cost in this case depends on the size and whether the car is new or used. Here standard sizes: 250x250x600 cm. This design can accommodate from six to eight people, and the cost will vary from 40,000 to 60,000 rubles.
Smaller cabins are cheaper, but their comfort level is quite low. For example, in a carriage measuring 230x240x400 cm, no more than four people can fit, but it will be cramped for them. Such designs will cost from 24,000 to 32,000 rubles.
Rent a cabin

If the construction work will take no more than six months, then you can choose to rent such a cabin. This option has some advantages:
- you will not waste precious time searching for a suitable product;
- the trailer will be delivered and installed at the construction site by employees of the company leasing it;
- the cabin will already have everything you need for living;
- At the end of the agreed period, the trailer will be dismantled and taken away, also without your participation.
If the site has already been prepared and a place for installing the trailer has been selected, then do not forget about one thing important point: after assembly, the change house also needs to be raised. To do this, take care in advance foundation blocks size 20x30x30 cm.
First stage. First, decide which frame will be used. The best option is a ready-made frame, which can be a metal container.
If you don’t have this opportunity, start building the structure yourself. To do this, take wooden beams 5x5 cm 6 m long and build a frame from them (its dimensions depend on your needs).

Note! If the size of the cabin exceeds the average (we talked about average above), then take care of auxiliary fastening with runners - this will make the structure more reliable.
Second phase. Next, mark the windows and doors on the wall blanks, build a roof (it is better to use metal tiles or galvanized steel for the covering). On the lower part, install runners made of beams measuring 20x20 cm or 15x15 cm and lay the subfloor. It is very important to check it diagonally after this.
For the floor you can use any available material, but a board 5 cm thick is best suited. Insulate mineral wool.

Third stage. Then swipe outer skin

using sandwich panels, lining or corrugated sheets. At the same stage, you will have to lay the finished floor (it can be laminate, plywood or the same board). Fourth stage. The next stage of work is
Note! In parallel with the sheathing, insulate the walls, waterproof the floor and roof. Although you can refuse to carry out this procedure if your plans do not include operating the cabin in the winter.
Cover the inside of the trailer in stages, do not try to take over the entire area of the room at once. Do it this way: first choose one wall, cover it completely, and only then proceed to the next one.

Fifth stage. The final stage installation work is the installation of windows and doors, power supply. Then, if everything is done correctly, you can start operating the construction trailer.

To use the shed all year round, you should definitely insulate it. To do this, build a sheathing and insert insulation boards into the openings of the structure. This material, as already mentioned, can be mineral wool (it is laid in a 5-centimeter layer), but you can also use polystyrene foam, fiberglass, etc. Cover the insulation boards with special insulating material.

Pay special attention to your purchase finishing materials, inquire whether the seller has a quality certificate. If you decide to trim the car with wood, you can additionally purchase paints and varnishes. To finish smooth plasterboard surfaces, use wallpaper. When laying a wooden floor, first install logs of appropriate sizes (pre-treated with tar), lay insulation and a layer of waterproofing, and then lay the boards. You can cover the boards with linoleum.

If desired, a household trailer can easily be turned into a cozy bathhouse. To do this, insulate the entire room and decorate it with linden lining, then treat the surfaces with antiseptic and moisture-repellent agents. A standard trailer can easily accommodate both a steam room and a dressing room - you just need to build partitions with a door between them.
Note! Be sure to take care of drain hole next to such a bathhouse!
The stove can be either a regular heater or an electric model.
As a conclusion
As a result, I would like to note that cabin trailers are best option not only for temporary housing, but also for such architectural forms as a medical center or a bathhouse (this use of carriages was successfully practiced back in Soviet times). Today, in such structures you can not only sleep, but also quietly spend your leisure time or even cook food.
Video - Do-it-yourself household construction trailers
Almost all publications addressing the issue of the number of repressed people can be classified into two groups. The first of them includes works by denouncers of the “totalitarian regime”, citing astronomical multi-million dollar figures of those executed and imprisoned. Having studied archival documents, such a researcher is surprised to see that the scale of repression that we “know” about thanks to the media is not only at odds with reality, but is exaggerated tenfold.
After this, he finds himself faced with a painful dilemma: professional ethics requires him to publish the data found, on the other hand, how not to be branded as a defender of Stalin.
According to this certificate, during this period, in total, 3 people were convicted by the OGPU Collegium, the NKVD “troikas”, the Special Conference, the Military Collegium, courts and military tribunals, including, of them, sentenced to death penalty person, and to detention in camps and prisons for a term of 25 years and below - 2 people, to exile and deportation - one person. About the allegedly repressed command staff of the Red Army from May of this year to September of this year in the amount of 40 thousand people.
It was precisely this round number that was first named by the magazine Ogonyok (No. 26, Moscow), followed by Moscow News and then by other publications. Where did this figure come from? And here's where it comes from. In May of this year, due to mass appeals from citizens, the People's Commissar BERIA was forced to issue order No., defining the procedure for issuing certificates to the relatives of the repressed. People's Commissar of Internal Affairs BERIA Lavrenty Pavlovich. Order of the NKVD of the USSR No. “On issuing certificates of the whereabouts of those arrested and convicted” The establishment of this order in 2017 was motivated by the fact that during the period of mass repressions a large number of people were unjustifiably convicted, therefore the message about the actual fate of the repressed could negatively affect the situation of their families.
Memo by the USSR Prosecutor General R.A. Rudenko, USSR Minister of Internal Affairs S.N. Kruglov and USSR Minister of Justice K.P. Gorshenin on the number of reports by the Prosecutor General of the USSR R.A.
Rudenko, USSR Minister of Internal Affairs S.N. Kruglov and USSR Minister of Justice K.P. Gorshenin on the number of people convicted by the OGPU board, NKVD troikas, the Special Meeting, the military board, courts and military tribunals for counter-revolutionary activities in the years. People often think that repression is when a commissar in a leather jacket and a dusty helmet shoots another hundred “political” people at the wall. But in reality everything is a little more complicated. When talking about the time frame of repression, they often take a period of up to a year. That is, from the Revolution until the death of Stalin.
A small question arises for such researchers: How the hell are you losing? civil war did you think?!? A small number of repressed people is enough for the rest of the people to live in fear. Is it normal that design bureaus appeared in prison? Why does the history of domestic aviation begin with prison? The figures given in this document are not disputed (openly) even by the Memorial Society. Liberals act differently - they constantly cite vastly inflated figures for those sentenced to capital punishment.
And instead of people executed by court sentences from February 1 of this year, they are everywhere trumpeting about “tens of millions executed.” Now my articles can be read on the Yandex.Zen channel. PERCENTAGE of “repressed” from the total number of inhabitants of the GULAG: Composition of the NKVD GULAG camps for counter-revolutionary crimes ().
Year number % of the entire composition of the camps. Total, REFERENCE on the number of people convicted of counter-revolutionary crimes and banditry held in camps and colonies of the Ministry of Internal Affairs as of July 1 (26). By nature of the crime In camps In colonies % Total %. Total number convicted "These are documents of the NKVD, and therefore they are falsified. - they say. “Where did the figures given in them come from?” Well, especially for these incredulous gentlemen, I’ll give a couple specific examples, where “these numbers” come from. In this case, the total number of “repressed” does not exceed 3 million.
However, to finally clarify this issue, it is necessary extra work with sources. Let's now see what percentage the “repressed” made up of the total number of inhabitants of the Gulag. REFERENCE on the number of people convicted of counter-revolutionary crimes and banditry held in camps and colonies of the Ministry of Internal Affairs as of July 1.
Categories Post navigationA metal shed today is practically a necessity in most summer cottages. In addition, such a structure serves as an indispensable location for various rooms at the construction site. In addition, it is easy to make a change house yourself, since it consists of blocks, which, in turn, are made of a frame, and metal plates. Of course, such a building will be difficult to use for a long stay, but it is an indispensable option for a summer residence.
Project of a modern metal shed with windows and air conditioning
Such a trailer can often be found at construction sites. Considering that the majority construction work can last much longer than one year, a small building for workers can temporarily replace housing.
In such cases, a metal change house may have the necessary minimum of amenities, which will allow you to relax a little after a hard day at work or even provide the opportunity to take a hot shower.
 metal cabins are a fairly simple matter, but at the same time it must be taken with due seriousness.
 Layout of a homemade metal shed
To do this, you should adhere to the basic rules when constructing such premises and use the material and tools that are listed below.
If you comply with all the conditions, you can be sure that the building constructed from metal blocks will serve you for many decades. And its high functionality and usefulness will pay for all costs in a matter of months of operation. In order to make a high-quality change house from containers and blocks with your own hands, you will need the following tools: Before starting work, make sure that you have all the required material
, as this will significantly speed up the manufacturing and assembly process, and will also help avoid unexpected difficulties during construction.

Materials required for the manufacture of metal cabins
Do-it-yourself construction of a metal shed To carry out all the preparatory and construction work, you will need a little time, from several days to two weeks. The timing usually depends on the number of workers and their experience in the construction business. When fully independently conducting all work you need to be prepared for more. Therefore, it is worth carrying out all stages of construction correctly, which will help significantly save both time and finances.
If you want to build a quality block structure, you will need to make some financial investments. But it is worth noting that such costs usually completely compensate for themselves in a few months.
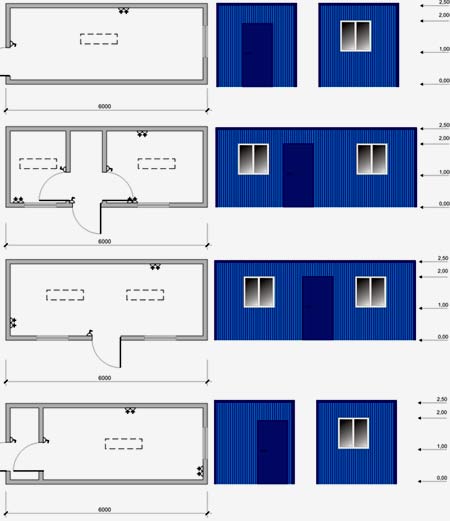 Layout options for a shed made from a metal container
 One of the most quality materials For the construction of such a structure, a construction container is considered. The metal shed is different high performance strength and durability of the structure, which is easy to assemble with your own hands.
Before starting work, it is worth carrying out the planning mentioned above. This type of work is a necessity when building a metal shed with your own hands. Compliance with this condition will help to build not only a room such as a change house, but will also be useful for or.
 Installation of a metal cabin on a columnar foundation
 In addition, with experience in construction planning, you can easily carry out renovation work almost any metal structures, containers, etc. Therefore, before installation, try to lay out all your thoughts, requirements and intended purpose of the change house on paper. Using this method, you can accurately calculate the total area of a metal shed for a summer residence or construction site, which will allow you to find out the exact amount of material. Such calculations will help you save money when building with your own hands, especially when compared with buying a metal shed.
A change house is an indispensable thing for storing construction or country tools, while you can hide in it from the rain, take a nap or just relax. You can even spend the night in it if necessary. And if you have a team of construction workers working on your site, then you can place them in a homemade cabin for an overnight stay, saving on transportation costs and extending the working day.
Self-assembly according to drawing
Easiest to do wooden structure using frame construction technology. A frame change house differs from an ordinary small one frame house will be the lack of foundation and size. The role of a columnar foundation can be performed by placed bricks.

First of all we will make the floor panel. It will consist of chipboard panels or OSB-3, boards, between which we place insulation and waterproofing. You can save money on a vapor barrier, since this room is not intended for permanent residence.
Instead of expensive synthetic insulation (mineral wool), you can use sawdust. Instead of waterproofing - a regular film.
When the floor is ready, we proceed to the walls. We make the frame of the cabin from timber or boards 100x150. The easiest way is to make a wall separately on the ground, in this case it is much easier to check the geometry, the evenness of the corners and diagonals. When the wall frame is ready, we install it and check the verticality again. The angle between the wall and the floor should be exactly 90 degrees.

We install all 4 walls one by one according to the drawings. Ready frame The cabins must be connected into one structure using the top trim. We perform the strapping with a board or timber. For it to be level, the walls must be the same height. If some wall is lower, we place a wooden sliver, block or part of the board under the lining board.
After installing all the walls, we begin to make the roof. The roof can be gable or single-pitch, for which we attach several boards or beams to the top of one of the walls. Thus, by raising one of the walls, we form a roof slope.

If you plan to use the change house only in summer period, the roof can be made flat without slope.
Tip: Use foam sheets along with mineral wool. They will serve not only as insulation, but also as complete wind protection.
The roof must be insulated with foam sheets or mineral wool. For waterproofing we use cheaper roofing felt. Roofing material for a change house can be as follows:
- slate
- ondulin
- tiles
- metal
If the building will be used for overnight accommodation in winter, it is recommended to install a stove with a chimney. Instead of a stove, you can use a potbelly stove.

Equip the building with a simplified drainage system, planted on bars. Exterior finishing can be made with lining, followed by painting with an antiseptic, or siding.
How to choose a plan and build it yourself
Since before any construction starts, a drawing of the future building is required, let’s consider the most attractive shed projects. So what is the plan?

Frame cabins usually have one or two rooms and a vestibule. Since the building is small, most often rectangular shape, it is necessary to arrange all rooms functionally. It is better to place the entrance and vestibule in a one-room wooden cabin on a short wall.
If you need 2 rooms, the vestibule is located in the center of the cabin on the wide side. Thus, from the vestibule you can go to both rooms.

More complex cabins with big amount rooms have the plan of a small frame house, and are rarely called change houses - rather, they are a temporary or permanent house for equipment or builders.
So, frame cabins can be:
- one-room with vestibule
- two-room apartments
- with flat roof
- with pitched roof
- with gable roof
- complex cabins - with awnings, extensions, etc.
- cabins for summer living
- for year-round use

Sequence and time of work
When you have a project for a future change house in your hands, it’s time to purchase materials and do the installation. Let's take a step-by-step look at what you will need to do during construction. We will also find out whether it will be possible to build the most ordinary, simple, wooden cabin based on a frame in a month.

- We buy and transport to the site the blocks that will serve as the foundation for your shed.
- Mark the area, clear the area, install blocks.
- Purchase and bring boards and timber.
- Treat the boards with a septic tank.
- Buy OSB or chipboard (chipboard is preferable, as it is stronger).
- Put together a base from boards or timber, insulate, waterproof, and attach chipboard.
- Lay linoleum on the floor.
- Process timber or boards for the frame of the cabin and roof.
- Assemble and install walls.
- Make roof rafters or a panel for a pitched roof.
- Cover the roof with wind protection
- Lay sheathing and counter-lattice
- Cover the roof roofing material– tiles, slate or others.
- Buy and transport clapboard to the site.
- Secure the windbreak.
- Treat the lining with protection and cover the walls.
- Buy and bring a stove, purchase a chimney.
- Assemble the chimney and install the stove.

Each of these actions takes one day, except for covering the walls with clapboard and installation rafter system. Thus, a frame change house can be installed in 1 month.
How to make a small inexpensive switchboard country house for temporary residence, read.


