Do-it-yourself drainage hole in a private house. How to make a drainage hole in a private house - important nuances. DIY cesspool system
One of the most important stages of arranging a bathhouse is the organization of timely disposal of wastewater into a treatment facility. Most affordable option sewer system - drainage pit for a bathhouse.
To provide safe use drainage system, before starting work it is recommended to carefully study its design features and carry out necessary calculations, and at the construction stage - follow the basic recommendations of experts.
Types of drainage pits
There are three types of sewage pits: a sealed tank, a drainage type pit and a multi-chamber septic tank.
A sealed cesspool is the simplest and most safe option structures that prevent the penetration of polluting effluents and household chemicals into the soil and aquifer. It is being built on land plots With high level occurrence of groundwater.
The design is represented by a simple sealed tank dug into the ground to the required depth. Feature cesspool is the need to regularly pump out accumulated water runoff. TO significant shortcomings sealed tank can be attributed to the complexity and high cost of maintenance.
A drainage pit for drainage is the most popular option for private baths that do not have bathrooms. In this case, an open container is installed that does not have a sealed base. A gravel-crushed stone mixture is used as a bottom filter. The design of the drainage pit provides for the presence special holes necessary to release the purified liquid into the soil.
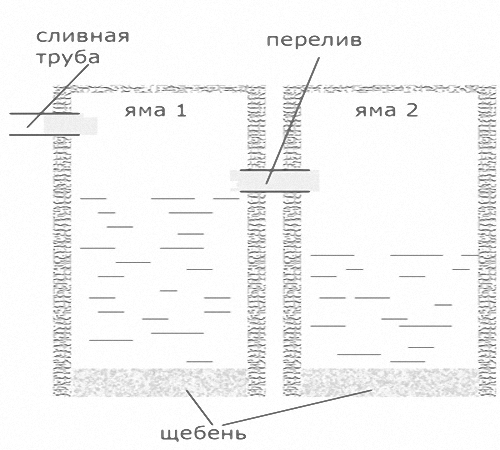
The primary sealed chamber ensures the collection and initial filtration of wastewater: solid waste sinks to the bottom, and the liquid undergoes additional purification by aerobic microorganisms. The reservoir is connected to the second compartment by an overflow pipe, which provides the supply of purified liquid. The second chamber serves as a drainage pit, where water undergoes secondary purification and is discharged into the soil.
If the septic tank consists of three compartments, then the drainage chamber is installed last. In this case, a deeper cleaning of impurities and pollutants occurs in the second chamber, after which the purified liquid enters the drainage tank.
Available materials for building a drainage pit
Choice suitable material for the construction of a drainage pit under the bathhouse depends on design features structures, wastewater volume and financial capabilities of the site owner.
Barrel pits
Tanks can be constructed from barrels, metal and plastic, of various sizes. Such a system involves the use of one or two drainage containers:
- One container. The bottom of the prepared pit is covered with a drainage mixture of crushed stone and gravel, then a plastic container without a bottom and with a perforated surface is lowered into it. The distance between the barrel and the pit is filled with drainage. A waste pipe is connected to the barrel at an angle. Some of the liquid will flow through the drainage holes into the soil for further cleaning.
- Two containers. Such a system involves the use of two barrels, with the first being installed 25 cm above the second. The containers are connected to each other by an overflow pipe. The wastewater enters the first container, in which foreign impurities and solid waste settle. Next, the purified liquid is poured into a second tank, to which perforated pipes are connected for drainage. Drainage elements are installed in trenches filled with drainage material and a dense layer of soil.
Brick pits
To construct drainage pits, ceramic bricks are used, the masonry of which is carried out with small gaps - they ensure the drainage of wastewater into the drainage pad and soil. The operating principle of such a drainage system is no different from the previous one, the difference lies in the material used. Distance between brick tank and earth foundation filled with drainage material designed to clean wastewater and distribute it around the perimeter of the pit.
A brick pit is considered more durable and practical compared to a structure made from plastic barrels.
Concrete pits
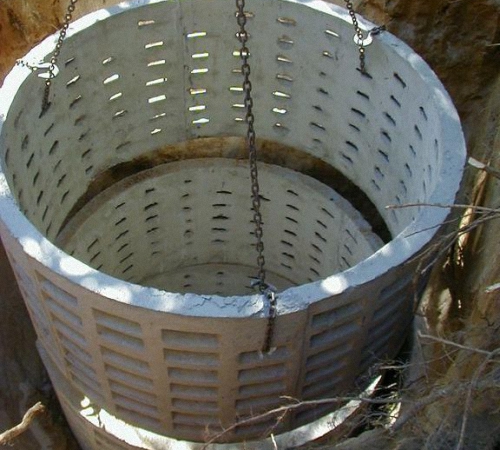
At technical equipment and financial capabilities, you can build a drainage pit from concrete rings with a perforated surface, which are mounted in a prepared pit. After the installation of the rings is completed, the bottom of the structure is covered with a drainage cushion of gravel and crushed stone.
In the case when the depth of the pit is at least 2 meters and the bottom of the tank is concreted, such a structure can be used both for drainage of wastewater from a bathhouse and for sewerage of a residential building.
Tire pits
Cesspools made from used tires are designed to drain liquid waste, so they are well suited for the needs of a bathhouse.
The arrangement of a drainage system during tire installation can be carried out different ways, including side perforation of walls, maintaining a technological gap between installed slopes, cutting off the outer walls while maintaining internal structure tires
This is the simplest and most popular option for organizing drainage under a bathhouse, according to which the work can be done with your own hands.
Step-by-step arrangement of a drainage pit for a bathhouse
Now let's look at a question that interests many - how to make a drainage pit for a bathhouse with your own hands. The easiest option for beginners is a drainage hole made from a barrel. A metal barrel with a volume of up to 250 liters is used as a drainage tank.
First you need to select appropriate place under the pit. The distance from the foundation of the bathhouse to the treatment device should be from 3 to 7 meters. When determining the depth of the sewer pit, it is important to take into account the total volume of waste and groundwater. The optimal value is no more than 7 meters.
The process of arranging a pit for drainage involves phased implementation works
Pit preparation and pipe laying
- Preparation construction site under the pit. An earthen ditch must be dug from the base of the bathhouse, having the necessary slope for convenient drainage of wastewater. The average slope is 4 degrees per linear meter. The bottom is insulated and covered with drainage made of gravel and sand. A drainage pipe connecting the steam room and the waste pit is laid on the pillow.
- Next, they dig a pit and also insulate it. A drainage cushion made of gravel and crushed stone (thickness up to 25 cm) is installed at the bottom.
Preparing the drain container
- The side surfaces of the barrel are perforated with a grinder in increments of 18 cm in a checkerboard pattern.
- A hole is made in the bottom for mounting a pipe, which will be connected to the drainage pipe with a fastening coupling. The connecting joint is treated with sealant from the inside and outside.
- The barrel is wrapped in geotextile material, which will ensure reliable drainage of wastewater and prevent foreign objects from entering the container. Geotextiles are fixed over the entire surface using twine or construction tape.
Installation of the tank in the pit
- The barrel is placed on a drainage pad so that the pipe is located on top.
- All formed voids between the walls of the pit and the barrel are filled with fine gravel.
- The pipe is connected to the drain pipe laid earlier.
Features of laying a sewer pipe
Pad drainage pipe – important stage in arrangement. According to building regulations The pipe is laid at the stage of foundation construction. It is located at the bottom of the base with a slope towards the drainage hole. When pipe laying is required for a finished building, installation is carried out under the floor of the steam room.
To properly install the pipe, you must follow the following rules:
- Bends, turns and joints are not allowed when installing the product. This can lead to blockages in any part of the pipe.
- After completing the installation of the drainage system, concrete screed bath floors with a slope towards the drain hole. After the screed has completely dried, the floor is covered with tiles or porcelain tiles, on top of which removable wooden gratings are installed. They will provide protection against burns in direct contact with heated flooring. In addition, the gratings can be easily dismantled for drying and treatment with antiseptic compounds.
- The drain is closed with a protective grille to prevent possible clogging of the sewer pipe.
Important! Bath floors are not required additional insulation. With high-quality concreting and cladding, such a base warms up during the combustion process and prevents the penetration of cold from outside.
How to make a drainage hole for a bathhouse is a question that will not take the owners of such buildings by surprise. After all, organize reliable system drainage of wastewater from scrap materials and without the involvement construction crew It’s not difficult, the main thing is attitude and a serious approach to business.
A cesspool or drainage pit is an invariable attribute of a dacha or private house that does not have a system centralized sewerage. A properly equipped cesspool makes it possible to process waste and allow liquid ingredients to be absorbed into the soil without harming it.
The demand for this structure is due to the fact that its construction does not require specific knowledge and skills. Depending on the construction model, one person can complete such work within 2-6 days without much effort.
Of course, there are some problems with subsequent exploitation drain hole. You need to decide how to pump waste out of the pit and who to hire to carry out such a mission. Means a lot and volume of constructed drainage pit It depends on how often the sewage will need to be pumped out of it.
IN rural houses or in their dachas many people use simplest design drain hole. They simply bury old tanks or barrels that have served their time in the soil. With such a design collection of sewage and their filtration is possible provided that their number per day is no more 1 m³. The sanitary inspection has a negative attitude towards such drainage systems, since they poison environment and harm the environment.
You can build the simplest cesspool on your summer cottage in a short time. By drain pipe, waste straight sent to the container the bottom of which is covered with a layer of gravel or pebbles. To release the methane generated during waste processing, a gas outlet pipe is placed on the tank lid.
This system is not applicable in houses for permanent residence, After all, their approximate water consumption per day for an average family is more than 1 cubic meter. m. They need a way to drain waste and fecal matter into the ground and subsequent filtration. This system has become widespread among those living in dachas, country houses and cottages.
Its construction does not involve any difficulties, but it is worth considering some nuances:
- The walls of the pit must be strengthened, since water entering it will destroy the building. To prevent this, a tank or container is placed, the wall is laid out of brick or concrete rings are installed.
- The average volume of the drainage pit is calculated based on approximately 3 m³ per day, or calculate that water consumption per day for each family member does not exceed 1 cubic meter. m.
- Mandatory installation ventilation system in a pit to speed up waste recycling.
When building a cesspool of this design, keep in mind that it requires almost no cleaning. In such a system they put multiple cameras To process sewage, it is first poured into the first pit where it is collected. Then when they get ready overflow lintel, sewage will go into the second chamber and liquid waste will be absorbed by the soil. The solid waste in the first pit will be processed by septic tank bacteria and used for fertilizer.
Types of cesspools
According to the manufacturing method, drainage pits are made into categories:
- Storage tanks made of monolithic concrete.
- With brick walls.
- With receiving container.
- Temporary, dug in the ground.
- With wooden formwork.
- Without bottom with exhaust outlet liquid waste into the ground.
According to the regulations of SNiP, which determine location of drainage pits on the premises, you must adhere to the following rules:
- Residential buildings and outbuildings should be located at a distance of about 20 meters from drainage pits.
- The distance from the cesspool to the nearest fence must be at least 1 meter.
- The distance to the nearest natural source of water (well or spring) from a drainage pit without a bottom should be within 30 meters.
Selection of material for construction
The following building materials are used to make a cesspool tank:
- ceramic or ordinary brick;
- plastic material in the form of containers, barrels;
- reinforced concrete rings.
For the tank, you can use various containers that have become unusable: a casing from a washing machine, barrels without bottom or tires from car wheels stacked on top of each other.
Typically, the shape of the cesspool depends on the container used. But the most suitable shape is cylindrical, which has greatest strength and makes it possible to evenly distribute loads on the walls of the tank. Cubic containers are significantly inferior to cylindrical ones in strength due to uneven distribution loads on the walls.
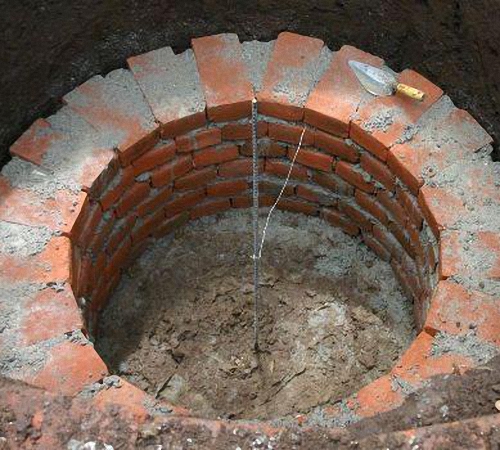
Brick cesspool
 Ceramic bricks are most suitable for making a cesspool. He has significantly more long service life, than usual, and he is not so afraid of dampness. First of all, you need to dig holes according to the previously made dimensions.
At the bottom of the pit you can build small foundation, made from broken bricks or stones. The walls of the pit are laid out in half a brick to save material; it is advisable to leave between the ends of the bricks small cracks, for filtering and releasing wastewater into the ground.
After laying several rows of bricks, it is necessary to carry out drainage bedding, consisting of crushed stone and pebbles between the walls of the pit and the brickwork.
Brick walls are raised to a height below ground level approximately 60 cm, at this height the well made must be covered with a strong lid made of any available material ( a metal sheet, reinforced concrete slab).
The lid must provide hose hole sewer truck, you need to make a reliable cover for the hole. On top of the lid you can pour the remaining earthworks soil and plant a flower bed on it.
Pit made of concrete rings
Cesspool in country house or a dacha can be made from ready-made reinforced concrete rings. The construction of a drainage pit from reinforced concrete rings is carried out using special equipment, so without the involvement of specialists you will not be able to build this structure.
The sequence of work is as follows:

It is also often used when constructing cesspools. old tires from Vehicle. Tires from heavy trucks or tractors are most suitable for this purpose.
The tire sidewalls are cut using a grinder or jigsaw, do not forget to cut hole for pipe entry for draining. After preparation, the tire rings are installed in the pit one on top of the other, and drainage from crushed stone and gravel is poured at the bottom.
The tires are covered on top metal lid with a pipe for ventilation, and is covered with earth to insulate and improve the area.
Little tricks when arranging a pit
When constructing a drainage pit, it must be taken into account that sewage must drain by gravity, and for this it is necessary to provide for a slight slope of the sewer pipes when laying them.
Sewer pipes must be laid with a slope of at least 20−30 mm per meter of pipe length. At greater slope Maybe break the water lock and that's all unpleasant odors will go straight to your premises. Even when large slope the pipes will form an accumulation of dirt. If the slope of the sewer pipes is low, sewage stagnation and clogging can occur.
Pit ventilation system. A constructed cesspool is required must be ventilated the upper edge of the ventilation pipe must be located at a height of at least 4-5 meters. For device forced ventilation you can apply in an original way. Paint the ventilation pipe black And Sun rays when heated, the pipes will provide the necessary draft.
Sewer pipes. The most suitable pipes for these purposes are with a diameter 100 mm. For a drainage hole, a shallow depth of 20 centimeters is sufficient. bury the pipes to protect them from freezing in winter.
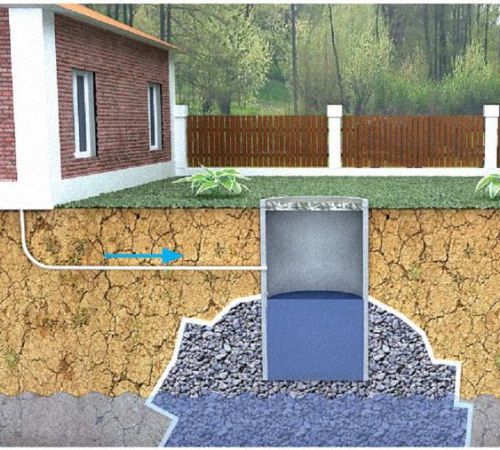
Have you thought about the issue of making a country water supply system? Then you should know that in addition to it you will also have to make country sewerage. By and large, it differs little from the system of sewage conduits that are laid in the city - the difference between them lies only in the point of discharge of contaminated water. If in the city all sewer pipes lead to treatment facilities (at least, this should be ideally the case), then at the dacha they are used as a drainage pit. It is about her, or rather about her self-construction, and will be discussed in this article, in which, together with the site, we will understand its structure, manufacturing technology and materials that can be used to create it.
How to make a drain hole photo
Drain pit: structure and principle of operation
Structurally, the classic drainage pit is simple device, which almost every person can make at the dacha - you don’t even need special skills here. Moreover, it can be made from a fairly large number of available materials. This is on the one hand, but if you look at this device from the other side, then, like everyone else, technical devices, the drainage pit has its own subtleties and nuances that you need to know. First of all, this is the structure and principle of operation - if you understand these points, then there will be no problems either with the selection of materials for the pit or with its direct construction. A classic drainage pit consists of the following elements.

More details about the design and principle of constructing a drainage pit in a dacha can be seen in this video.
In principle, this is the whole device - as you can see, a do-it-yourself drainage pit is not distinguished by its design complexity. The principle of its operation looks even simpler - wastewater entering the pit is simply absorbed into the soil. This concerns the liquid part - with solid waste things are somewhat different. First, they accumulate at the bottom and do everything to clog the channels in the soil and prevent the rapid absorption of liquid - they seem to set themselves the task of making sure that they are constantly in the water. In the end, this will happen - when this happens, you just need to start adding special bacteria to the pit, which will liquefy solid human waste.
Do-it-yourself drainage hole at the dacha: what to make it from
As you already understood, the main element of the drainage pit, which, in general, will have to be built, is a persistent wall that prevents the destruction of the pit. It can be made from various materials, of which we can collect quite a lot - naturally, we will not do this and will consider only the most common options. The task is not to poke your nose in, they say, make it out of this, but to clarify the principle, understanding which, you can independently select the material needed for the drainage pit from what is available at the dacha.

In general, the principle is simple - you need to create some semblance of a container. How and from what you make it is now your business. We need to thoroughly comb through the dacha and other warehouses– you’ll see that something suitable comes along.
How to make a drain hole correctly: bottom filter and its purpose
Bottom filter - without it, not a single pit can serve long time- it is for this reason that the question of how to make the bottom of a drainage hole needs to be given special attention. There is nothing complicated here, you just need to know a couple of points that, in general, extend the life of the drainage pit in the country.

In principle, these are all the nuances associated with the manufacture of a bottom drain filter. You shouldn’t disdain them, even when building a drainage pit small size– as mentioned above, it is capable of increasing the service life of an individual by two or even three times.
To conclude the topic about how a drainage pit is made, I will say a few words about its close relative - the septic tank. What distinguishes them from each other is the presence of several chambers in the second one, in which solid and liquid waste are separated. As a result, only one liquid reaches the chamber in which water is absorbed into the soil, as a result of which the channels in the soil practically do not become clogged. Consequently, such a pit serves very well without pumping. for a long time– if you make a septic tank correctly, you can use it for almost half a century. Read about how to do it in another article on our website.
In most cases, sewerage is not provided at the dacha. Instead, a cesspool is used. There are quite a few options for its construction, and each has its own advantages and disadvantages. Next we will consider in detail standard designs cesspools and discuss how to install them.
What is a drain hole and why is it needed?
Drain pit, or as it is also called a cesspool, is necessary for private houses that do not have a direct sewerage supply. A proper drainage pit processes waste, allowing some substances after treatment to be absorbed into the ground without harming it.
Popularity of this type treatment plant due to the ease of installation and speed of work. One person without assistants is able to complete all the work within 3-5 days, depending on the type of structure.
On the other hand, there are certain difficulties associated with further exploitation cesspool. First of all, this concerns the issue of pumping out sewage. The correctly selected volume of the pit is no less important.
Drain pit device
The simplest designs, which are most often found in rural houses and simple summer cottages, are digging into the ground old barrel or a tank that has served its useful life. Such a design will allow for the collection and partial filtration of wastewater, provided that its daily amount does not exceed 1 m³. Such schemes have not received approval from sanitary services, since they can harm the surrounding ecology.
The simplest drainage hole in a private house is a simple design. Through the sewer pipe, although direct entry is often found, sewage enters a container whose bottom is covered with silt. The drainage pit must be equipped with a gas outlet pipe through which the methane generated during waste processing will escape to the outside.
Such a system is completely unsuitable for those houses in which it is planned permanent residence. Considering that the average daily consumption water for a family of four is up to 1 cubic meter, this leads to the need for frequent cleaning of the cesspool, and, accordingly, to financial costs. Previously, there was a widespread method of removing sewage into the soil with its subsequent natural filtration, but in the current realities this method is, for obvious reasons, prohibited by the sanitary service.
Nevertheless, similar design is quite common, and will not have any special alternatives for summer cottages with infrequent attendance. It is not difficult to equip it on your own, but you need to consider the following points:
- The walls of the pit will require strengthening, as the water will gradually begin to collapse the structure. To prevent this, they install a tank, or build walls from brickwork or concrete rings.
- The volume of the cesspool must be at least three cubic meters. The correct calculation is made taking into account the fact that each person will require at least one cubic meter of space.
- Installed ventilation will increase the rate of waste recycling.
- If an overflow pit is installed, it practically does not need to be cleaned, since its design involves the presence of several chambers for waste processing. In this case, sewage enters the first chamber, where it accumulates. After the level of sewage reaches the overflow partition, it will flow into the second pit and there it will be absorbed into the ground. Solid waste remains in the first pit and is processed by bacteria.
Types of drainage pits
According to the type of execution, cesspools are divided into:
- concrete storage,
- brick,
- with receiving container,
- temporary,
- with timber formwork,
- without a bottom, with waste moisture discharged directly into the ground.
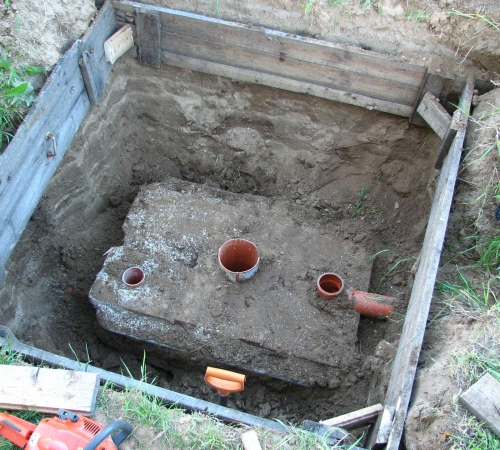
Making a drainage pit from concrete
It is a quickly constructed solution for receiving sewage and has the following advantages:
- Construction speed. In fact, with a set of factory-produced concrete rings, such a structure can be built in one day. There is only one drawback - for work you will need crane or an excavator.
- Reliability and durability of concrete.
- Minimal installation complexity.
Such a structure is erected quickly:
- First, a hole of the planned depth is dug.
- Next, the site is leveled.
- The first ring is installed using a tap.
- The soil from under the ring is evenly removed, while placing signal supports that prevent the structure from skewing.
- After the second ring has been installed on the first ring, they are fastened together using metal staples.
Installation continues in the same way to the planned depth.
When all the rings have been placed, use a tap to install concrete floor with holes made in it for the hatch and ventilation pipe. The finished structure must rise above the ground at a level of at least 30 cm.
To ensure better tightness, all seams and junctions with sewer pipe carefully sealed with bitumen mastic.
The problem with a sealed structure will be its rapid filling, and the need to frequently call sewage disposal services to pump out sewage. In the same case, if it is allowed to discharge water into the ground, then purchase rings with holes made. The installation technology is no different from that described above.
To give finished design For a more complete look from an aesthetic point of view, you need to sprinkle earth on the part of the drainage system protruding above the ground surface, while providing plantings that will serve a decorative function. For example, planting a Moorish lawn that is undemanding to conditions will allow you to turn a wastewater treatment plant into a flowering flowerbed. 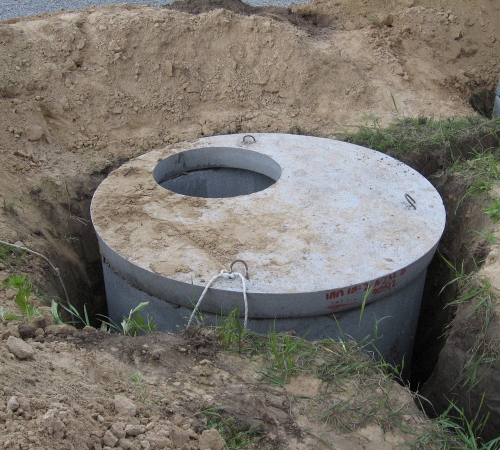
Brick drain pit
According to experts, the best option will be the application ceramic bricks which will ensure the strength and durability of the structure. The process of constructing a brick drainage pit is conventionally divided into several stages:
- placed in a hole dug to the required depth drainage layer 20 cm thick, consisting of sand and crushed stone of different fractions,
- after this, they begin to build the walls, laying bricks in a checkerboard pattern, taking into account a gap of 5 cm between them for better filtration of waste substances,
- on all sides the bricks are covered with crushed stone of large fractions as the masonry grows,
- make the necessary gap in the masonry for inserting a sewer pipe.

There are often conflicting recommendations about the final stage. For example, to reduce costs, it is proposed to make masonry half a brick thick, but it is important to remember that such a structure will hardly take on the weight of the concrete closing cover.
The design itself provides two options for laying bricks:
- to ground level
- 80 cm below ground level.
In the case of laying bricks to ground level, space must be left taking into account the thickness of the covering concrete cover. The recommended design with the completion of the masonry not reaching the ground surface by 80 cm raises some doubts about its feasibility for a number of reasons:
- since the design will require the installation of a closing cover, in the end the drain will still be deepened into the ground by at least 50 cm - which is dangerous due to the possibility of falling into a hole,
- It is recommended to fill the lid with earth up to the surface level, but in this case, either access to the hatch will be blocked, or another pipe with a larger diameter than the size of the lid will have to be installed on the installed lid - and in this case, the system will be subject to additional load.
Masonry is inferior to concrete in a number of factors:
- a concrete structure is erected noticeably faster and ultimately requires less funds for the construction
- brick is more susceptible to moisture,
- To evenly distribute the load on the walls, the cesspool must have a cylindrical shape.
The feasibility of erecting brickwork appears only when it is not possible to call in heavy cargo equipment.
Plastic receiving containers
If the question is how to make a drain hole without resorting to special expenses, is urgent - then you need to pay attention to the option of installing a polymer tank of the required capacity. In this case, all the work boils down to digging out the required amount of earth under the tank, and then placing the collection in the prepared hole. After this, the remaining space is filled with soil. It is important to remember that sealed structures necessarily require the installation of a gas outlet.
The advantages include the following:
- ease of construction,
- minimal costs in terms of labor intensity,
- protecting the air from the release of unpleasant odors,
- durability of the polymer material, which is up to 50 years,
- During use, no waste substances enter the soil.
Among the disadvantages, you need to pay attention to the need for periodic pumping of sewage and the small capacity of the tank, so this option is optimal for use under low load conditions. For example, if the dacha is visited once a week, and a small amount of waste goes into the drainage pit.
Temporary drainage pits
They are made from those that have served their time. car tires. It is important to consider that inner diameter should be at least a meter, otherwise the pit will quickly become clogged with sewage. In fact, the structure is easy to erect: a hole of the required depth and diameter is dug, after which it is filled with tires, laying them one on top to ground level.

The advantages of the design include the following:
- simplicity of work,
- low price of used tires,
- after installation, the empty space is filled with earth, and no additional finishing is required.
It is worth remembering that the design is suitable for a toilet placed outside and not connected sewer system with the house. Since it is assumed that the load on the pit will be negligible. Despite its name, with infrequent use, such a pit will last up to 25 years.
Drainage pit with wood formwork
Like the previous design, the use of wood is suitable as a temporary solution. In fact, this option is still sometimes used in rural areas and at some dachas, but due to the fact that wood, even with high-quality processing, will not withstand more than ten years - use wooden formwork doesn't make much sense. Nevertheless, this is a drainage pit, the price of which will be most reasonable and will not exceed 3000-4000 rubles.
Of course, the speed of construction and isolation of the soil from sewage are advantages of the design, but nevertheless, it is inferior to all types of cesspool and for the most part serves as a relic of the past.
Drain pit without bottom
It is a cesspool constructed of brick, with the difference that the bottom of the drain is not treated. In some cases the bottom is covered metal mesh, but in a chemically aggressive environment it quickly rusts and loses its suitability. Sewage evenly falls into the ground, but due to heavy silting of the bottom of the pit, additional cleaning is periodically required.
In addition to the above, when arranging a cesspool, you need to pay attention to some tips to increase recycling efficiency and ensure greater durability of the structure:
- It is better to drain the bottom of the pit using coarse crushed stone to prevent premature silting. The layer thickness must be at least 10 cm.
- To improve drainage, asbestos pipes are inserted at the bottom, which are installed with a protrusion at a level of 50 cm from the bottom.
- It is better to finish the walls with clay to reduce the concentration of ingress harmful substances into the ground.
- In the event that there is one cesspool on the site, but its volume is not enough, it is more advisable to build another one nearby and connect it PVC pipe from the first. In this case, the structure will become overflowing and will need cleaning much less frequently.
- From the first moment of use, it is necessary to use special preparations containing bacteria. They speed up the natural recycling process and reduce unpleasant odors.
- The overlap should extend above the ground level so that in the event of heavy rain, the drainage hole does not overflow with water and its contents do not fall onto the site.
- In any embodiment, the design must include exhaust pipe to remove accumulations of methane and other hazardous substances.
- Inorganic substances, including low-quality toilet paper- can significantly reduce the service life of the structure and contribute to heavy siltation of the surface.
When it comes to arranging a cesspool, the first task that one has to face in this case is the choice of material.
Commonly used plastic containers or concrete rings, because in this case the structures are strong and reliable and are highly airtight.
But there is more economical ways sewerage system installations in a private house, for example, a wooden drainage pit.
Wooden drainage pit
Of course, we immediately note that wood is a material that is susceptible to moisture (rotting). And even if all the boards used in the construction of the cesspool are treated with a special protective composition, they will last no more than 10 years.

Life time wooden pit no more than 10 years
Conclusion: a cesspool made of wood will pay off if it is built for temporary use, for example, in a country house. You can also consider this option if you plan to make a better drainage pit over time, but for now there is simply no way to solve this problem.
Construction of a wooden cesspool
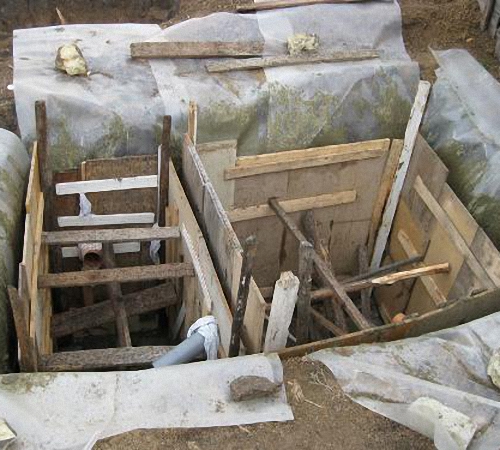
Construction of a drainage pit made of wood is a very simple procedure, so it is almost always done with your own hands.
The work will be divided into several stages:
- dig a pit of the appropriate size. This can be done manually, because the size of wooden cesspools is quite small;

Digging a pit for a hole
- make formwork from boards, knocking them together into shields. It should be remembered that the height of such shields cannot exceed 1.5 meters, width - 1 meter;

Wooden formwork for drainage pit
- dig beams into the hole, to which wooden panels are subsequently nailed;

We nail the shields to the beams
- install special spacers to strengthen the structure;
- put a few on top metal pipes to increase structural rigidity;

stiffening the structure
- cover the top of the pit with boards or logs.
The bottom of such a cesspool can be anything. This could be a cushion of crushed stone, through which more or less pure water will be able to go into the ground, maybe the bottom is made of the same wooden boards.
Of course, you can fill the surface and concrete mortar, but given the fragility of the design, this is not necessary.

The bottom of the cesspool can be concreted
In order for the formwork to last longer, it should be provided with additional protection from moisture.
For this purpose, you can use moisture-resistant polymer materials, for example, polyurethane foam.
It will not only perform the function of waterproofing, but will also be able to protect the contents of the pit from freezing in winter, because it is characterized by fairly high thermal insulation properties.

This is what polyurethane foam looks like
How to divide a cesspool
If you need to consider how to divide a cesspool, then there will not be too complicated actions here.
You just need to knock down another wooden box from the panels, install it in the pit next to the first box, only a little lower.
To add strength to the structure, both boxes can be knocked together with boards and then protected with reinforcing mesh.
This way the cesspool will last a long time without requiring repairs.

This is what a knocked down wooden box looks like in a drainage hole
Separation of the cesspool may be necessary in two cases: when the drains from the shower, bathhouse, and kitchen are discharged separately from the drains from the toilet; when it makes sense to equip a kind of septic tank to improve the quality of water purification.
In the latter case, both containers are connected by a pipe through which wastewater will flow.
Advantages and disadvantages of a wooden cesspool
The advantages of a drainage pit made of boards include the following points:
- high speed of installation - construction of the structure will require no more than 1 day;
- affordable cost of the material - certainly not used for a cesspool quality wood. And damaged boards are very cheap;
- no need for special skills - in order to understand how to do the work, just read the relevant instructions and watch a thematic video;
- ease of dismantling if necessary.

Easy installation of a drainage pit made of boards
As for the shortcomings, there are them too. These include the following factors:
- fragility of the cesspool - depending on the quality of processing and protection of the logs, it will last 5-10 years;
- small pit volume - one side can measure up to 1 meter, the height of the pit cannot exceed 1.5 meters.


