Extension to the house of a living room. How to make an extension to a brick house: nuances of joining walls. Creating a construction project
Overall size of the extension - 6000x3000
Walls - foam block 20x20x60 wall thickness 20
Interior finishing - plaster
Roof type is a complex envelope.
Doors - 890x200cm.
Windows - optional.
Foundation - strip foundation (calculated separately).
Paid separately:
Delivery
Insulation - Knauf mini-slab (knauf) house 50mm; 100mm or similar (if available).
Pile foundation or foundation blocks
Installation of soft roof
Replacing the floorboard
Window replacement
Replacing doors
Replacing the floor with larch
Hemming the roof extension
Extension of a boiler room to a 3x4 house price: 155,000 rub.

Overall size of the extension - 3000x4000
Floor - dry tongue and groove floor board 28mm.
The walls of the boiler room are foam block.
Exterior finishing - finishing brick
Interior finishing - tiles
The ceiling of the extension is finished with plaster.
The roof of the extension is painted 0.4mm corrugated sheet.
Roof type - hipped.
Doors - 80x200cm.
Windows - optional.
There are no extension partitions.
Paid separately:
Delivery
Installation of soft roof
Replacing the floorboard
Window replacement
Replacing doors
Replacing the floor with larch
Hemming the roof extension
Extension to the house 8x8 price: 190,000 rub.

The basis of the frame extension is timber 150x100
Overall size of the extension - 8000x3000
Floor - dry tongue and groove floor board 28mm.
Frame - timber 100x100.
Finishing - impregnation with a composition against rotting and fungus
Interior finishing - no
The ceiling of the extension is finished with softwood lining.
The roof of the extension is painted 0.4mm corrugated sheet.
Roof type - pitched.
There are no doors.
No windows.
There are no extension partitions.
Foundation - foundation blocks 20x20x40.
Paid separately:
Delivery
Insulation heat Knauf (knauf) house 50mm; 100mm or similar (if available).
Pile or strip foundation
Installation of soft roof
Replacing the floorboard
Window replacement
Replacing doors
Replacing the floor with larch
Hemming the roof extension

Two types of foundations are used for extensions:
Block:
1. Clearing of the area for construction is required;
2. Digging recesses for blocks up to 20 cm deep;
3. A pillow (sand or crushed stone) is poured in, and then carefully compacted;
4. Concrete blocks measuring 20x20x40 cm are laid;
5. Waterproofing with roofing felt is required;
6. The floor is laid on logs supported by blocks.
Pile-screw foundation:
1. Pile - a hollow pipe made of durable steel, treated with epoxy compound with a pointed tip and blades on it;
2. Installation is carried out by manually screwing the pile into the ground;
3. Pipe concreting with parallel alignment;
4. Installation of the harness.
Our advantages:
. We accept payment after completion of the work;
. Delivery by our transport;
. We use high-quality materials;
. We work under a contract.
Sometimes there is a need to modify your home. There are different goals - to expand the kitchen, add a veranda, equip Utility room or additional living room. Then the question arises for the home owner. What to do? A common option for expanding the area is to add an extension to the house yourself. It's cheaper than building whole house. Allows you to avoid credit loans for years, which not everyone can afford. In general, it may not be very expensive. This refers only to the construction itself. A house equipped with properly executed extensions becomes more comfortable and beautiful.
Organizational aspects
Read also: Terrace attached to the house: 150+ Best photo ideas of 2018


Veranda with glazing
During any construction, they begin with preparatory work. The site is thoroughly cleared of debris and everything necessary for construction is prepared.
A drainage system is required under the structure. To do this, the earth is compacted and a slope is made in this place to allow water to drain.
Foundation
The foundation for the construction of a structure can be strip or columnar. Everyone has their own qualities. To choose the most suitable one, you must first study each one.
Strip foundation
Read also: Foundation: description of the device, types, complete step-by-step instructions for making your own bookmarks (Photo & Video) + Reviews
Strip foundation
This basis is performed in the following order:
- Markings are made with a rope and the construction site is traced. It is pulled and fixed. Using this marking, a trench is dug to the depth of the base of the main building and 10-15 cm wider than the wall
- The bottom of the trench is covered with a 10-12 cm layer of sand. All this is thoroughly compacted. Next comes crushed stone, which also needs to be compacted. Broken bricks may be used
- The next step is to lay a waterproofing film along the trench. It extends 40-50 cm above the ground. It closes the foundation from the inside and the formwork above the ground. Then the reinforcement is fixed. Its design in shape should be a repetition of the foundation at full height
- The concrete solution should consist of cement with gravel. It fills 1/3 of the trench height. This layer must harden completely. Next comes another layer of concrete. It will fill half of the remaining height
- Having installed the formwork, a base is formed. The waterproofing remains in the formwork, spread along its walls and secured on top. The film should not slide into the concrete. The formwork is completely filled with concrete. The solution must be pierced with a shovel so that there are no air cavities inside. The formwork is also lightly tapped so that the resulting vibration compacts the concrete solution well.
- Upon completion of pouring, the concrete is leveled and left to dry completely. It is sprayed with water every day. This makes it more durable. When it hardens, the formwork is removed
- It is recommended to additionally cover the foundation with waterproofing compounds or materials in rolls. This liquid rubber, tar, bitumen mastic and roofing felt. After this they begin to build walls
- The internal space of this foundation is equipped various options. For example, using concrete screed or flooring made of floor beams and joists, with subsequent installation of a wooden floor
Columnar foundation
Read also:

Columnar foundation
This type of foundation is built from brick or concrete. Possibly from both materials. This base is used for the construction of verandas and living rooms, with plans to install boardwalks in the future.
The foundation is carried out in the following order:
- First, markings of the selected site for construction are also applied.
- The pillars should be placed 1.5 m from each other. For them, pits measuring 50x50 cm and a depth of 50-60 cm are dug. The dimensions of the pit at the top expand by approximately 10 cm on each side
- Next, the bottom of the pits is strengthened with sand and gravel. Waterproofing is being laid
- A layer of cement mortar is poured under the brick supports. It should freeze completely. After this, brickwork is done
- For concrete pillars reinforcement and formwork are installed in the pit to the height of the future pillar. The waterproofing film is laid inside the formwork and secured on top
- The formwork is being filled concrete mortar layers, each of which is allowed to dry
- The top of the column is leveled and sprinkled with water every day until the concrete has completely hardened.
- After this, the formwork is removed. Using warm bitumen mastic the pillars are covered with roofing felt
- The void around the pillars is filled with earth and crushed stone. Every 10-15 cm it must be compacted
- Roofing material is laid on the pillars in several layers. It will be waterproofing protection wooden blocks. They will be installed on top
Floor Basics
Floors made of wood and concrete are laid on a strip foundation. The tree is also laid for a columnar foundation without lintels.
Concrete base
Read also: Canopy over the porch: what types are there, design, drawings, step-by-step instructions for making it yourself (80 Photos & Videos) + Reviews

Concrete base
For reliability and warmth of the floor screed on strip foundation work is carried out in stages using a specific technology:
- First, the soil is removed from the foundation. It is loosened and removed. The depth of the pit should be approximately 25-35 cm
- The bottom is filled with 10 cm of sand. It compacts well. Next, crushed stone or expanded clay is laid at a depth of 15-20 cm. The second material makes the screed warm
- Everything is well leveled and the reinforcing grid is laid. A beacon system is installed on it horizontal level. Some rooms require a surface slope. For example, in a bathroom or on an open terrace, water from the floor should flow freely to the drainage system
- The next step is to pour cement and level it. After a day it is recommended to cover it plastic film. This will make it more uniform, durable
- When the structure is ready, it can be laid on a concrete base. flooring or wooden floor
Wooden beam base
Read also: Place for a fire in the country: we maintain safety, maintain ergonomics, create comfort with our own hands (60+ Photos & Videos) + Reviews
Wooden beam base
- To ensure durable floors, choose high-quality crossbars.
- Wooden blocks, 15x10 cm thick in cross-section, are placed on the foundation, on a roofing felt backing.
- They are attached to concrete using through connections or corners.
- The beams are also fastened to each other with powerful corners. All this will hold securely.
Wall materials
Construction materials additional building any are used. The walls are built of brick, frame, or foam blocks. The main thing is that all this has good combination with the main house.
Repeat external finishing It won't be a big deal at home. Wood, for example, goes well with all materials and looks good without additional processing.
Frame walls
Read also: Fence: main types, made of wood, brick, corrugated sheets, plastic, chain-link, concrete. DIY construction instructions (105+ Photos & Videos) + Reviews

The construction of a frame structure is a good option:
- construction is fast, in a matter of months
- due to the ease of construction, no capital foundation is required
- you can do it yourself
- inexpensive in price
The basics of the house and self-construction are done on the same level. The connection should not be capital, because The extension will sag after some time. Done expansion joint. Frame structures They do not shrink vertically, which makes them very attractive.
The frame for the walls is made of timber and attached to pre-assembled crown beams. The beams can be fastened separately. But it will be easier to put all the pieces together special fastenings, and then install them together.
To connect the frame to the main building, vertical markings are made. Precision is required here. After installation, to make the frame stronger, it is immediately upholstered.
The upper beam along the house is attached to the main wall with anchor bolts. The walls are insulated after the roof is installed.
Brick walls
For brick walls An ideal, flat foundation surface is required. Everything is checked. If there are any irregularities, they need to be corrected. Otherwise, this will lead to cracking between the bricks when the structure shrinks.
For the most part, brick structures are attached to a house made of the same material. They tie him up metal frame, which is placed in the prepared holes. They are made in the main wall at 2/3 depth. Repeat every 2-3 rows. The reinforcement should protrude from the wall by at least half a meter and be in the joints of the masonry. It is important to take thin rods. Otherwise, the seams in this place will be very wide. Or you will have to make a recess in the bricks for the reinforcement.
Read also: Barn: device with and without a foundation, step-by-step instructions on how to build it yourself (50+ Photos & Videos) + Reviews
The brick extension is also attached to the tree with a frame. It is placed in through-drilled holes. Transverse stops are made on the reinforcement. They will keep them in the wall.
To follow the rows horizontally, you need to pull a cord along the future wall. A plumb line is used to check vertically.
The thickness of the wall will depend on the functionality of the attached structure. For a living room, bricks are laid in 1-2 layers. For a terrace or outbuilding, a layer of half a brick will be enough.
Upon completion, the brick walls are surrounded with concrete on top. To do this, establish a form in which the reinforcement is placed. All this is concreted. When the solution has hardened, the form is removed and the roofing begins to be installed.
Laying brick walls is not as easy as it might seem. This requires experience. The best option will entrust the work to a professional. Or make walls from a different material.
Extension made of foam blocks
Foam concrete has its own distinctive qualities among building materials:
- The work does not require any special skills. Construction is possible on difficult soil
- Due to the fact that the blocks are large and lightweight, assembly takes less time and effort compared to laying brick or timber
- The material is durable, environmentally friendly, non-flammable and meets all standards fire safety. It also has low thermal conductivity and “breathes” well, which creates an optimal indoor climate
- Inexpensive, easy to assemble and easy to drill
- An extension made of foam blocks practically does not shrink and has a fairly long service life.
- Additional protection is required because... the material is soon lost thermal insulation due to its high hygroscopicity
- It is necessary to start laying from the corner points
- The blocks are moistened from below to increase adhesion. The initial row is covered with several layers of protection against capillary moisture
- The quality of the assembly is affected by the horizontal and vertical position of the first row. Therefore, strict adherence to all rules is required. Horizontal irregularities are corrected using a solution
- Used between clutches adhesive composition. The connections are no more than 1 mm, which minimizes their space, in other words, “cold bridges”
- The composition is prepared strictly following the rules. It is applied on top and sides of the blocks. Each brick is aligned horizontally and vertically
- Using a sanding float, the horizontality of each row is leveled. The debris that is generated must be thoroughly swept away
- The corners and every 5 rows are reinforced with rods that will bind the structure and prevent cracking. For what circular saw Make cuts 3 cm wide and 5 cm deep. Then the recesses are knocked out with a hammer and chisel. They need to be cleaned. Welded rods are laid in the middle of the recesses and filled with adhesive
- Place the block with the support cut out on the sides of the opening. Next, check the horizontality of the supports using the hose level. All irregularities are corrected with a sanding float.
- The U-block is installed on the glue with the hole facing up. Afterwards, a structure of reinforcement is placed so that there is a large number of rods below. It is secured with spacers
- The block is moistened. Concrete layers are laid on top. They are carefully compacted with a trowel
Almost finished extension made of concrete blocks
Construction of foam concrete requires a strict sequence of stages:
For window and doorways install jumpers no more than 1.75 m wide. They are made using formwork - removable or permanent. The strength of foam concrete is not designed for large openings. It’s better then to choose a cinder block or sand-lime brick. It's more solid foundation. The height of the lintel will depend on the thickness of the future floor.
For removable mold, weld first metal constructions the right size. On the sides of the opening, bars are nailed for support, and a form is installed on them. Shields are attached to the sides. Foam blocks are cut into narrow blocks. They arrange the form from the inside. The end result will be something like a trough.
The reinforcement frame is placed so that the side with the a large number twigs All this is secured with spacers. Then the blocks are moistened, filled with concrete solution around the perimeter of the walls and compacted. The poured concrete is leveled to the level of the blocks in the formwork and smoothed well.
For non-removable form useU-shaped blocks. Installation of the form itself is not required. Less time is spent on work.
To lay such blocks you need:
It is very important to install a reinforced belt on the building. This will make it resistant to different types deformation, wind loads, will increase the load-bearing capacity. Reinforced belt insanely heavy. They do it right on the walls.
Ceiling and roofing
When the walls are already erected, they begin to work on the ceiling. Crossbars are used for this. They are installed on the walls 60-70 cm from each other. They are fastened with special corners.
When installing crossbars on brick extension, they are embedded in a concrete belt. The sides of the crossbars are wrapped in roofing material. Then all this is hemmed with boards or thick plywood. Insulation material is laid between the sheathing and the crossbars.
Without first obtaining permits, adding an extension to a house yourself is an illegal increase in the area of the home. It cannot be legitimized in fact if it violates the interests of neighbors, is built from materials that do not meet SNiP standards, and is located near underground utilities. The optimal solution is registration before the start of work with preliminary design by specialists.
According to current legislation, a do-it-yourself extension to a house is any residential, functional room, loggia or balcony. Any room (from a winter garden to an additional bedroom) falls under this definition. The required elements of the extension are: Unlike the main building, there may be no floors here; the roof can have several design solutions: If necessary, door and window openings in the main walls of a home are made using a special technology: At the design stage, it is important to choose a rational combination of functionality and the exterior of new facades. The new premises should not impede access to communications passing through the site. Uneven-height structures increase snow retention; additional loads from snow bags must be taken into account in the strength calculations of the elements. With an increase in the working area of the building being used horizontally, deep slab and strip foundations are not economically viable. The best options are the following types of designs: In all of the above methods, adding a house extension with your own hands will be cheaper. When choosing a columnar or pile foundation, you will have to additionally protect the lower part of the structure, which does not have contact with the surface, from freezing. For this purpose, basement siding with an inner layer of insulation (basalt wool or extruded polystyrene foam), fixed in the same way as a ventilated facade in the cells of the sheathing, is suitable. Before making an extension to the house, you should rationally select the wall material. In frame and panel technology this is usually a sandwich: A more expensive method is masonry from lightweight blocks (foam, aerated concrete). When choosing foam concrete blocks, an ordinary developer, who usually does not have construction experience or special education, should take into account the features of this material: This is due to the structure of foam concrete; the cracks are not through and do not reduce the strength characteristics. In addition, foam and aerated concrete weakly hold embedded parts and fasteners, therefore, the Mauerlat requires careful fixation in the following ways: Walls made of foam concrete have insufficient strength for heavy roofing materials (slate, ceramic, cement-sand tiles). It is better to cover the building with flexible or metal tiles, ondulin, and corrugated sheets. Before making an extension to the house, you should carefully design, calculate the configuration and strength of the elements of the trusses, and choose the right step when placing them on the mauerlat. With the same height of the walls, the trusses can be based on existing load-bearing structures. It is recommended to support the rafters of low extensions to two-story cottages on columns located near the existing walls. In 50% of cases, one existing roof slope is dismantled, and the legs of the trusses are dismantled. After which, these elements are replaced with new, longer ones. In another case, after dismantling the roofing pie, the used rafters remain in place, adjacent to them is the pitched roof above the new room. To strengthen the rafter system, it is recommended to strengthen the existing rafters with racks. The most difficult thing in this option is the search for roofing material that is completely identical to what was used previously. Typically, corrugated sheeting and metal tiles fade over time; the manufacturer may stop producing roofing cladding with the profile that was originally installed. A complete roof replacement causes a significant overrun of the construction budget. The main task with a horizontal increase in working space is to reduce the construction budget. The best option is an extension to a house made of timber, which provides the following advantages: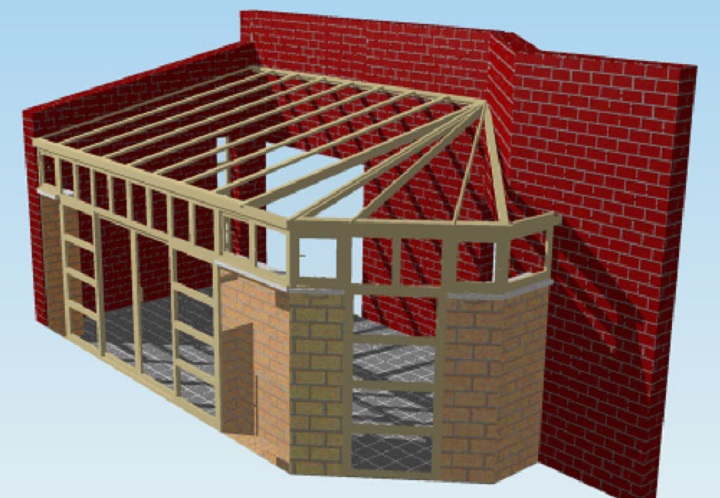
Making the foundation of the extension
What material should the walls of the extension be made of?
Changing the rafter system
Frame structure of the extension
Everything is changeable in this world, including our ideas about the reality around us. And what seemed yesterday to be sufficient and satisfying all our ideas about housing, for example, today, according to our understanding or due to truly changed circumstances, turns out to be insufficient, cramped, and small in area. What can be done in this case if it is not possible to build new house? One thing I can recommend is to expand usable area home by making an extension.
What will the extension do?
The extension is expansion of space your house. What can be placed on these newly appeared square meters? There are a lot of options here. It could be:
- summer cuisine;
- winter Garden;
- library;
- living room and so on.
It all depends according to your needs, either desire or necessity. But when you have already decided what you miss most, it arises question about material which must be prepared in order to make your plans a reality.


Usually, for the construction of an extension, materials are used that will not burden the attached segment, but will make it warm enough. Most often the choice falls on timber and sandwich panels. However, if we are talking about an extension where a winter garden will be located, then it should be taken into account that glass walls will create enough heavy construction, which will require strong foundation. A solid foundation is absolutely necessary even if the extension is made of brick, for example, to the same brick house.
Options for extensions to a residential building
There are many options for extensions, but the following are taken as a basis:
- side extension with combined roof;
- side extension with separate roof;
- addition of a second or more floors;
- extension mansard type.
 If we talk about the first type of extension, it should be noted that this the most budget friendly option, since the roof of the main house remains the same, only slightly extended by the size of the extension. Basics the building is being completed on one of its sides (if necessary, on both sides), then a passage is made between them and the total area of the building increases exactly by area size extension.
The second type of extension is identical to the first with the only difference being that it has own roof, when it is not possible to arrange a common one with the main house. This, of course, increases material consumption, volume necessary work, and, accordingly, the cost.
In the case of planning work on the addition of a second or more floors, it should first of all be borne in mind that not on every building you can make an add-on. In this case, we are talking primarily about the capabilities of the foundation of the house. If the possible multi-story building was not initially planned, then its foundation may be not strong enough. Therefore, such a foundation simply cannot support a structure of several floors. In this case, you need to consult with specialists about the possibility strengthening the foundation in order to enhance its strength. If the answer is negative, it may be worth considering other types of extensions.
What material is the extension being built from?
- Extension made of timber.
- Frame extension.
- Brick extension.
- Extension made of foam blocks.


Timber extension
The timber is considered one of the best materials, used for these purposes. Moreover, it doesn’t matter what kind of timber it is - glued, rounded or planed - thanks to its parameters, work will be carried out in significantly shorter terms. Its advantages:
- produced at woodworking factories, which provides its sorting according to wood quality;
- exposed special treatment, which ensures the timber’s resistance to rotting and excludes infestation with a wood beetle;
- heat treatment is possible, through which the timber is given necessary color for the customer;
- any type of timber - material eco-friendly, capable of creating a natural ecological system in the house.
Beam - natural construction material, from which an extension can be made as wooden house, and brick or block, at least as a veranda or.
Frame extension
 This a budget option
extensions, as it does not require significant investments in Consumables. In addition, it can be erected on the basis of a pre-prepared foundation with minimum cost time. Frame construction assumes creation of an extension based on a frame made of metal beams or wooden blocks erected around the perimeter and over the entire area of each of its walls.
This a budget option
extensions, as it does not require significant investments in Consumables. In addition, it can be erected on the basis of a pre-prepared foundation with minimum cost time. Frame construction assumes creation of an extension based on a frame made of metal beams or wooden blocks erected around the perimeter and over the entire area of each of its walls.
After completing the frame external and internal the plane of each wall is sheathed with special slabs used in construction - chipboard or OSB - between which a any insulation. As such, mineral wool, wood processing waste - sawdust, polystyrene foam, etc. can be used. Insulation on the street side is mandatory pre-insulate from moisture.
In general, this type of design easy to install, and with a certain amount of effort, almost any householder can build it.
Brick extension
The construction of such an addition to the main building, of course, requires certain knowledge and skills, but the extension will also be more thorough and durable. Several points are important here:
- In order to preserve the style of the main building, a brick extension as a permanent structure should be built from the back of the house.
- Since the brick structure has significant weight, it foundation under such an extension there should be lasting.
- Expenses for obvious reasons will increase taking into account the cost of the brick, the cost of the foundation, as well as the internal plastering of the walls.
- The method of joining the main building and the extension will require special care.
Extension made of foam blocks
Such an extension is no less durable than a brick one. Very profitable In many respects, modern building material - foam blocks:
- does not require building such strong foundation, as in brick construction, since it average density several times smaller in comparison with brick, which means it is lighter;
- for the same reason of low density, and therefore the presence of air pores, foam blocks retain heat better;
- due to the large dimensions of foam blocks compared to bricks faster a building is being erected;
- In financial terms, such an extension is much more profitable.
The only drawback of this material is need for protection it from the effects of aggressive external environment, usually for this purpose the walls are outside lined with siding or covered with bricks.
We build the extension ourselves
So, we looked above types of extensions, and from what materials they are actually built. Let us now try to develop a common one for all types of extensions algorithm for its construction, so that if necessary, you can start working on your own.

How to properly legalize an extension?
 So on family council It was decided to expand the living area and build an extension to the main building. However, so that later, upon completion of construction, it would not be necessary run around the courts and prove your ownership of this building and the legality of its construction, you should act in accordance with established law in order. Which means you need to go to your local government get permission for the construction of an extension and contact a licensed design organization to develop an appropriate project and determine the type of materials for the work.
Here they will make a decision on water and electricity supply for the future facility. Next comes approval of planned construction with supervisory authorities and the city architecture department. After these activities, construction can begin. Upon completion, the inspection is carried out by supervisory authorities, and only after their verdict on recognizing the object as meeting all standards, the owner receives building commissioning act into operation. This means that the extension can be registered at Companies House.
If you decide that your house or dacha lacks a veranda, then you can always complete it. But first ask yourself: why do you need an additional extension? If it’s purely for relaxation amidst nature, then it makes sense to get by open terrace or a gazebo. The veranda is erected to increase the thermal insulation of the house, because it plays the role of a vestibule between the street and the front door, blocking the direct entry of cold masses into the premises. The secondary function of the extension - to be a place of rest - will only be fulfilled if the room is spacious and insulated. Then in winter you can sit with a cup of tea, contemplating the winter landscapes. Let's try to figure out how best to attach a veranda to the house so that it is warm in winter and maximum air in summer.
Since the veranda will become part of the main building, its style should match the design of the house itself. It is recommended to use the same materials that make up the walls and roof of the house so that the structure looks harmonious.
If used in home decoration modern materials, then the glass veranda looks quite appropriate
You can also combine materials, connecting the house and the veranda with the help of finishing. For example, if the house is brick, keep the same roofing, and make the walls of the veranda from blocks, but do the external finishing decorative plaster and use it to finish the foundation of the main building. To wooden country house It’s definitely worth adding a wooden veranda.
WITH best ideas for decorating a veranda, you can read the material:

The wooden house and the veranda look like a single ensemble
Planning and legalization of the project
The veranda is always built to cover front door. Therefore, already finished house you won't be able to place it on the side you want. Without an entrance inside, this room will be cut off from the house, and you will have to carry food and tea into it from the kitchen across the street.
The owners themselves come up with the dimensions of the veranda, taking into account the number of people who could relax in it at the same time. For the needs of a family of 5-6 people, a building of 3x4 m is sufficient. But here it is worth taking into account general form from the street. If you plan a small veranda, and the dacha itself is two-story, then it is unlikely that your architectural ensemble will look harmonious. But for small houses you can just add a veranda along the entire width of the building wall. This will increase the usable area, and from the outside it looks quite decent.
But no matter the size, you will have to officially legalize the building. And not after construction, but before! When you come up with a veranda design and figure out its general appearance, go to a special department that deals with building design and order a veranda project. After its manufacture, you need to go to the city’s architectural department to obtain a building permit and make changes to the house design. Why is it important to do this in advance? It takes about 2 months for the design and approval, so it is better if they happen in the winter, when the construction season has not yet begun.
Marking and layout of the site
Before starting work, it is necessary to prepare the site. For this they remove fertile layer(about 15 cm) and take it out to the garden or flower beds. The site is leveled and the layout begins. According to the dimensions specified in the project, the boundaries of the future veranda are marked. To do this, drive iron pins or wooden pegs into the corners of the building and string the twine tightly around the perimeter.

The outer edge of the layout should coincide with the dimensions of the veranda, and the inner edge should be set back to the width of the foundation
Creating a foundation: pouring rules
Most often in Russia, a strip or columnar foundation, equal in depth to the foundation of the main building. At the same time, it is recommended not to connect them into one monolith, because the house and veranda have different weight, which means different degrees of shrinkage. And to prevent a heavy building from dragging down a light building, place the veranda on a separate base. To do this, a gap of up to 4 cm is left between the foundation of the house and the veranda.
Attention! When creating the foundation you should take into account the soil characteristics in your area and total weight the buildings. Lightweight foundations heaving soils can “play”, and then the veranda will move away from the wall of the main building. In addition, they are not designed for heavy walls, for example, made of brick, and can shrink under their pressure.
It is used for the construction of large verandas made of bricks or blocks, which are covered with a heavy roof (slate, metal tiles, etc.). The easiest way to build a strip foundation for a veranda to a house is from concrete.

The heaviest veranda will stand on a strip foundation
For this:
- A trench is dug (calculate the dimensions according to the foundation of the house).
- The formwork is placed at a height equal to the height of the future foundation (or slightly higher). It is made from boards, knocked down into shields.
- Concrete is prepared in the following proportions: 1 part cement, 3 parts sand and 6 parts crushed stone.
- The first layer of concrete is poured onto the bottom and reinforced with stones to make it about 10 cm.
- Next, pour in the next portion, add stones again, etc.
- For the top layer of concrete, stones are not used, but the surface is leveled with a trowel and left until it hardens (3-4 days).
- If it’s hot, then water it a couple of times a day to avoid cracking of the foundation.
If the veranda is frame or wooden, then you can put it on a columnar foundation. To protect against soil heaving, dig holes to a depth below the freezing point of the soil in your area (more than a meter). For a small and light veranda, it is enough to place posts only in the corners. For a large one, it is worth making a series of intermediate columns with a step of 50-60 cm between them.

A columnar foundation can be made of concrete, blocks or red bricks
Work progress:
- Holes are dug.
- The bottom of each of them is covered with a 20-centimeter layer of sand.
- Pour concrete to the surface of the ground and wait for it to dry.
- Coat the finished post with bitumen and fill the gaps between it and the ground with sand.
- The above-ground part of the column is created from brick or block masonry, bringing it to the height of the main foundation or slightly lower. Make sure that there is about 30 cm left to the finished floor of the veranda.
Installation of subfloors
Work order:
- We fill the underground space with expanded clay for insulation.
- We cover the foundation with a double layer of roofing material (both strip and columnar).
- We fix the logs to the foundation, having coated them with an antiseptic in advance.
- Laying edged boards(thickness 5 cm).

The logs are pre-impregnated with an antiseptic composition
You can also make a concrete floor, but in this case you will have to carry out additional thermal insulation work, because the base will draw cold from the ground, and the floor on the veranda will be constantly cold.
Construction of a wooden veranda frame
Let's look at how to build a veranda made of wood. To do this, install a frame of beams measuring 10x10 cm. Work order:
- Beams are placed on the finished subfloor for bottom trim, connecting in the corners with a “straight lock”.
- Cut grooves in the beams every half meter for vertical racks.
- Place the racks, securing them with nails and staples.
- A beam for the top trim is attached to the racks on top.
- Near the slope of the roof of the house, a girder is nailed on which the rafters will lie. She must be taken to anchor bolts(and all racks adjacent to the building).
- The rafter system is being installed.
- All wood is treated with an antiseptic.
Material on the construction of a veranda at a frame-type dacha will also be useful:

The beams for the bottom trim are laid on a foundation waterproofed with roofing felt.

The rafter system is attached to the beams of the upper frame
Design features of the roofing pie
Most often, roofs are made pitched. Moreover, they are more sloping than the roofs on the house. Creation roofing pie on the veranda is carried out according to the same scheme as installing the roof of a regular house.

Continuous or intermittent sheathing is placed on the rafters, depending on the roofing covering
Only if you have an attic-type house, then you made a vapor barrier with one of the layers. In the veranda, vapor barrier is not needed, because the under-roof space will not be used. In addition, when high-quality insulation walls and floors, a vapor barrier layer is contraindicated. After all, a couple needs to leave the room somewhere. And it will seep through the ceiling into the attic, and from there it will evaporate outside. To do this, it is worth laying a special super-diffusion membrane as a waterproofing layer, which does not let moisture in from the outside, but steam can pass freely from the inside. True, for steel and metal coatings it is not used because they can rust from condensation. For metal tiles, a special condensate film is purchased.

The superdiffusion membrane consists of microscopic pores that resemble funnels
Wall cladding and window installation
After creating the subfloors, you can sew up the frame, leaving openings for windows and doors. For this:
- In the locations of the windows we install a window sill board, which should be approximately half a meter from the floor. We fix the board to the vertical posts.
- We sew up the frame with materials that will retain heat and match the main building. On the inside it can be plywood, and on top of it - lining, on the outside - or wood. But be sure to lay a layer of insulation between them and waterproofing film(on both sides of the insulation) so that moisture from the street and steam from inside do not penetrate into it. Don't forget to leave window openings.
After you have made the frame of the veranda to the house, insert windows and doors.

When installing vertical racks, take a step between them equal to the width of the windows

It is better to sew up the walls on both sides, laying insulation inside
Also, please note that the door should not be located opposite internal door leading into the house. Otherwise, drafts cannot be avoided. It is best to do it from the end so that cold air, which flew in when opening, did not find a way into the living quarters.
Features of creating a brick or block veranda
If a veranda is attached to a brick house, then it is logical that its walls are made of brick or blocks, decorating them with decorative plasters.

A brick veranda should have solid foundation, since the construction will be difficult
Installation tips:
- It is better to place the extension on a strip foundation.
- Only undertake masonry work yourself if you have construction skills.
- Since the building will not be large, half-brick masonry is sufficient, and inner side lay out in blocks.
- Fill the voids with expanded clay.
- Such a veranda is finished with plasterboard or plastered, and then painted.
Pay special attention to the insulation of each structural element. Even those owners who first install an uninsulated veranda, after a couple of seasons look for ways to make it warmer. Because freezing corners and frosted doors are not very pleasing to the eye. And in Russia, harsh winters are not uncommon.


