How to lay tiles on a wooden floor? Tiling a wooden floor in wet rooms Laying tiles on a wooden base
This type finishing material for the floor is very popular and there are no serious problems with its installation today.
Fortunately, manufacturers produce a lot of adhesive compositions characterized by high adhesive qualities.
There are, however, difficulties with installation, only in private households.
And the most important ones are the presence of floors made of... Here the question of whether it is possible to lay tiles on a wooden floor is especially acute.
And, if this is possible, then how is this done correctly, what is the emphasis, what nuances should be taken into account, and what should not be done? detailed instructions and warnings for novice masters are fully outlined below.
The use of tile flooring in private homes is also justified by the fact that under it you can install a heated water floor or an electric one.
This will save you money cash in terms of payment, as well as in view of a number of advantageous qualities of the material:
- High wear resistance
- Long service life
- Fire resistance
- Tiles can withstand high loads
- Ease of care
- Easy to install
Preliminary work and calculations
After everything has become more or less clear with the choice of material, you need to make the correct calculation of the tiles. There won’t be any particular difficulties in this if you have at least the slightest idea about the costs of laying tiles. And it happens:
- Straightforward
- Diagonally (oblique)
- Herringbone
- With offset
It’s worth focusing a little more specifically on the choice of tiles for a private sector bathroom.
Here preference should be given to non-slip ones. Is it possible to lay tiles on a wooden floor in a bathhouse in principle? You can read more about the installation process below, in the following subsections.
Formulas and nuances of calculating the number of tiles
- calculate the area of the room
- add 7% to the resulting figure
- divide the calculation result by the area of one die
- divide the result by the number of tiles in one package
- round to whole number
If the “diagonal” laying method is chosen, then approximately 12% is added to the final result (for trimming). With the herringbone layout method - 15%. The simplest and most economical is “straightforward”. If a floor with a pattern is laid out, then the materials for it are completely different and more complex.
Proper preparation of wooden floors

This is the most important stage work, since the quality and final result as a whole depend on it.
There are several ways to prepare wooden base for laying tiles, the choice of one of them directly depends on the condition of the floor at the moment.
A wooden floor is a complete structure, not just the upper floorboards.
This includes: joists, beams and underlayment.
And they all need to be double-checked before installation.
Floor check
Experienced craftsmen recommend using exclusively tongue-and-groove boards for new floor coverings, which means complete disassembly designs. Even if, at first glance, the floor looks perfect, it doesn’t make any squeaks, the floorboards are securely fastened and don’t wobble at all.
Note! If the logs are installed at a distance from each other in increments of up to 50 cm, it will need to be additionally redesigned; in this form it will not be able to withstand the weight of the new flooring.
Algorithm verification work in wooden base:
- Floorboards are removed
- Beams and joists are being inspected
- The level checks the evenness and horizontality of supporting structures
If there is no possibility of raising the lag, then a wedge or a piece of wood is driven under it, secured, and the excess is simply trimmed off.
Surface preparation
Wood is an organic material by nature, which means it cannot be considered stable and reliable. When humidity increases, it swells; when there is a lack of it, on the contrary, it dries out and decreases in size.
This raises the question: is it possible to lay tiles on a wooden floor in a private house, with such technical specifications basics.
Experienced craftsmen give a positive answer, provided that before installation a damper layer is installed to absorb the movement of the floorboards. Where it turns to the base of the tile with a hard surface, and elastic to the wooden one, taking on the shocks.
Important point! When constructing such a layer, it is important to remember that the wood must breathe, otherwise it will begin to rot or deteriorate from fungus and mold.
What is important to do when treating the floor:
- Treat thoroughly with antiseptics and impregnations
- Fill the distance between the joists with fine expanded clay
- Prepare new or old floorboards
- Important to consider! When using old floorboards, they should be additionally prepared - completely remove the paintwork.
- Lay floorboards on the structure with a gap of 5 mm between them (for expansion)
- If there are cracks or knots on the floorboards, they need to be puttied and sanded
- Sand the coating completely after roughing
- The gaps between the boards are filled with tape or polyurethane foam
- To organize monolithic insulation, the surface is coated with latex impregnation or heated drying oil.
Lightweight screed device
The third stage of preparatory work is the creation solid foundation under the tiles. It is rational and correct to organize a conventional monolithic screed, only lightened because the base in question cannot withstand a full screed.
In principle, for laying clinker, porcelain stoneware or tiles, three screeds are used:
- Standard monolithic - thickness no more than 3 cm. A reinforcing mesh is laid on the waterproofing layer, secured with self-tapping screws and filled with concrete mortar.
- Liquid glass or KS glue. You can also use polyurethane two-component glue. They are used to create an elastic coating to prevent cracking of tiles from wood movements.

A screed based on liquid glass can be prepared.
To do this you need to prepare: liquid glass, water and washed coarse sand in proportions respectively – 2:1:2.
If the bathhouse in a private house is dry, then the surface of the floors can be leveled with GVL or DSP slabs.
They are laid at an angle of 30 0 C, but so that the joints of the slabs and the joints of the subfloor do not coincide.
The seams can be protected and additionally secured using a special adhesive for drywall.
Key points for installing tiles on wood floors
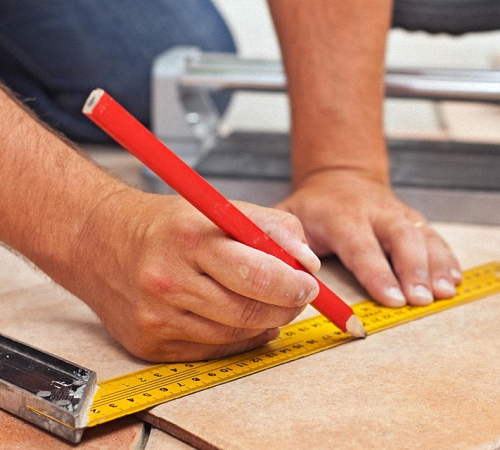
The entire installation process consists of the following stages: marking, preparing glue, laying and grouting tile joints. We won’t dwell on each one individually this time, but we’ll look at the most important ones right now:
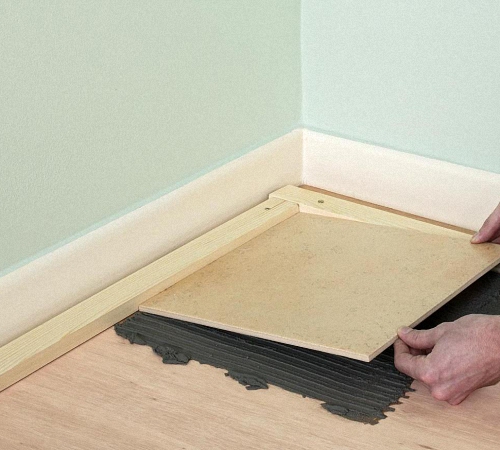
- It would be a good idea to place the tiles on the floor before “setting” them on the glue. This way you can distribute the material as accurately as possible by removing trimmed parts, select a more precise pattern, and so on.
- It is very important to adhere to the line of the window opening when laying. The lines must be strictly parallel to it. To make it easier to keep the seams the same width, you can use crosses in your work.
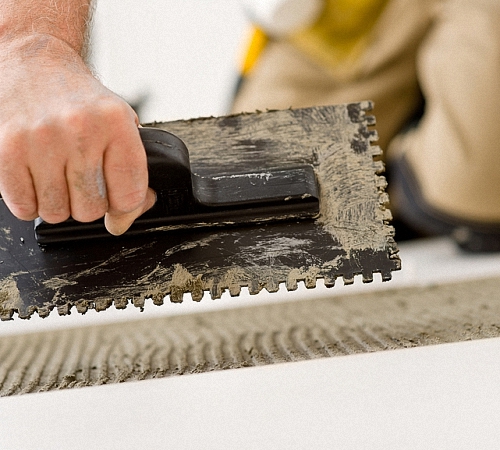
- To increase the adhesion of the tile base and the floor, you can use a special cement-based adhesive.
- For increase strength characteristics couplings, you can use compounds containing plasticizers or add them to the glue yourself at the rate of no more than 15% of the total mass of the glue.
- It is important to remember that the glue must be used completely within three hours.
- The working surface (the area where the glue is applied) should not be too large - optimally one meter square.
- If errors are made during installation, they must be corrected within 10 minutes, otherwise it will be impossible - the glue will begin to stick.
Important point! You need to start laying from the farthest corner, moving towards the doors, focusing on the center lines.
The only and nevertheless important disadvantage of laying tiles on a wooden floor is its fragility, but with proper care it is guaranteed to serve as a reliable and durable base for 7 years.
Despite its fragility, this is the most optimal solution to the immediate problem of organizing flooring. Moreover, there are no particular difficulties or problems in installation. The main thing is to properly prepare the wooden base, and everyone who reads the material will know how to do this.
About laying tiles on wooden bases - in the video:
Ceramic tile - best coverage for the floor in a room where it is often carried out wet cleaning or there is high dampness.
The material is difficult to install and even when laid on a stable monolithic concrete, places high demands on the qualifications of the master.
If the base is made of wood, the process becomes much more complicated. Next, we will tell you how to lay tiles on a wooden floor so that the coating is strong and durable.
Bases for tiles are usually divided into two categories:
- simple;
- complex.
The tree is classified as the second type due to the following features:
- Low load bearing capacity: tiles and - heavy materials and not every wooden structure can withstand such a load.
- Need for aeration: tiles are an airtight coating, and without air access the wood is destroyed.
- Short service life: a wooden base will require repairs much sooner than ceramic tiles. This means that the user will one day be forced to knock down expensive finishing material, despite its good condition.
What distinguishes wood from other materials is its mobility, which implies the ability to:
- shrink;
- bend under loads;
- transmit vibrations;
- shrink and swell with changes in humidity.
The greatest mobility is observed in the first year or two after construction, when the tree shrinks.
Tiling can only be done after this period. The above does not apply to dried lumber with a moisture content of 8-12%.
Thus, laying tiles on a wooden floor is possible under the following conditions:
- the structure is strengthened and the load is minimized so that deformation is eliminated;
- the tree has already shrunk;
- the condition of all floor elements is ideal and repairs will not be required soon;
- for the same purpose, the wood is carefully treated with antiseptics;
- there is a layer between the base and the tile that allows the wood to change sizes, but at the same time maintaining a stable shape;
- there is air access to lumber.
Let's see how all these requirements are implemented in practice.
Preparatory work
Preparation of the base consists of several operations.
Dismantling floor boards and checking the condition of all elements located underneath them - from joists to vapor barriers
All damage is eliminated, and if it is significant, new materials are installed. Require special attention:
- Layed on top of the ground vapor barrier film: if there are holes in it, steam enters the floor structure, which promotes the development of mold colonies and rotting fungi.
- Wooden elements.

Laying plywood on a wooden floor (with glue) to level the base under the tiles
It is important to remove rotten areas, stripping them down to completely healthy tissue, and treat all lumber with one of the antiseptics:
- hot drying oil;
- sodium fluoride solution (50 – 100 g per 10 l of water);
- copper sulfate;
- any factory-made antiseptic for interior work.
Rotten areas are recognized by their soft structure - a knife or awl can easily penetrate them.
It is necessary to bring the drying oil to the desired temperature carefully: if it overheats, its vapors will ignite. If you lack experience, it is better to apply impregnation without heating.
Gain and Leveling
When the lag pitch is more than 50 cm, intermediate ones are laid between them to prevent sagging of the floor boards. New beams are also treated with impregnations.
The upper edges of the joists must lie in the same plane - then the base will be perfectly flat. During construction, they are placed this way, but due to uneven shrinkage, distortions occur, so alignment is necessary. Protruding beams are trimmed with a plane, sagging ones are placed on supports or thin boards are stuffed onto them, then the thickness is adjusted with a plane.
Installation of boards
The dismantled floorboard, if it is in good condition, is returned to its place. Before this, varnish or paint is removed from it using one of the following methods:
- Heat construction hairdryer: fast and inexpensive option. When air is supplied at a temperature of 200C - 250C, the paint and varnish coating lags behind the wood, swelling with bubbles, so that it can easily be cleaned off with a spatula. This effect is due to a significant difference in the thermal conductivity coefficients of paint and wood. You cannot remove paint from metal and concrete substrates using this method.
- Wash treatment: that's what they call it chemicals, intended for removal paint and varnish coatings. Available in the form of a ready-made solution (available in liquid and gel form) and a dry mixture. The paint can be easily removed after treatment, but for large volumes of surfaces, this method is expensive.
- Processing with abrasive tools: in the manual version, the method is labor-intensive, in the mechanized version (use an angle grinder or a drill with special nozzle) - dusty and requires mastery of the tool.

Finished floor - tiles on wood
If damage is detected (cracks, woodworm passages, rotten areas), the boards are rejected.
The boards are laid on the joists with gaps of 3–4 mm, and between the boards and the walls - 1 cm.
The gaps eliminate the occurrence of stresses when wood expands due to changes in temperature or humidity.
Before installing the flooring, you must make sure that there will be a gap between it and the insulation. ventilation gap at least 5–7 mm in size.
The boards are secured to the joists with corrosion-resistant nails or self-tapping screws:
- galvanized;
- oxidized (black);
- phosphated.
The board is attached to the outer joists with two hardware, and to the rest - with one.
Irregularities are puttied, then the boards are sanded with a grinder.
Finally, all gaps are filled polyurethane sealant(spray foam). This elastic composition will transform the flooring from cracked to solid and at the same time allow the boards to expand freely. The gaps are foamed little by little: the sealant significantly increases in volume when curing. The protruding material is cut off flush with the floor.
Waterproofing
In order to impart hydrophobic properties, the flooring is generously treated in several stages with latex impregnation or hot drying oil.- polyethylene;
- glassine or other bituminous material;
- paraffin-impregnated material;
- painting mesh.
The overlap of the painting mesh panels is 5-10 cm, all other panels are 10-15 cm. The overlapping areas are taped.
How to properly lay tiles on a wooden floor
The next step is to form a rigid base for the tiles. One of three types of screeds is used: wet, dry and semi-dry.
“Wet” screed on a wooden floor under tiles
This is an option for rooms with high humidity. It's set up like this:
- a mesh of steel wire with a diameter of 3-5 mm with a mesh of 20x20 mm is laid on the separator substrate;
- install beacons, checking their horizontalness with a building level;
- pour cement-sand mortar in a layer 3 cm thick;
- align it with the beacons using a rule (for this, the distance between the beacons is made slightly less than the length of the rule);
- remove the beacons and fill the remaining openings with solution.
A thickness of 3 cm is optimal. If the value is lower, the screed will crack; if it is higher, it will be too heavy for the wooden flooring.

Wet screed
If a drain (shower) is installed in the floor, the screed is made with a slope towards it, for which special beacons are used.
They are often supplied complete with drains. In the washing departments, instead of the usual cement-sand mortar, a waterproof polymer solution is used. Purchased ones are expensive, so they are often used homemade version
- prepared according to the following recipe:
- polyurethane glue or liquid glass (KS glue can be used): 2 parts;
- coarse sand (must be sifted and washed): 2 parts;
water: 1 part.
A “wet” screed dries completely and gains strength after 28 days.
"Semi-dry" screed This option also applies cement-sand mixture
- , but with a limited amount of water. “Semi-dry” screed has the following advantages:
- the time for complete drying and hardening is only 4 days, the tiles can be laid after 3 days;
- in comparison with the “wet” analogue, it has less weight, therefore the load on the wooden base is reduced;
- can be laid quickly, it is possible to use mechanized installation means;
- there is no risk of moisture penetration into the underlying layers;
- can be used on any base, including crushed stone, sand or wood;

does not shrink (little water evaporates).
Semi-dry screed A “semi-dry” screed is inferior to a “wet” one only in penetrating ability: it fills bottlenecks worse - seams and cavities. The situation is improved by adding plasticizers to the solution. They reinforce a “semi-dry” screed, just like a “wet” one -
wire mesh
- and fiberglass.
- For every 10 m2 of area, components are taken in the following quantities: Portland cement grade 400 and above: 25 kg; fine-grained
- river sand
(clay impurities - no more than 3%): 60 l;
It is useful to add fiber fiber threads to the solution - additional reinforcement reduces the likelihood of cracking to zero.
"Dry" screed
In rooms with normal humidity (corridor, hallway) over waterproofing instead of cement mortar You can lay one of the following materials:- cement bonded particle boards;
- gypsum fiber sheets;
- moisture-resistant plywood;
- moisture-resistant drywall: the material, due to its fragility, is used only for lack of anything better.
The slabs are laid with a rotation of 30-45 0 relative to the boards so that the seams do not coincide. They are screwed along the perimeter with self-tapping screws in increments of 25-30 cm and another in the center. The seams are filled with a compound for sealing cracks between sheets of moisture-resistant plasterboard, for example, Polyrem SShP-421 cement putty, and after it hardens, they are sanded.
After installing the screed, tiles are glued onto it in the usual way.
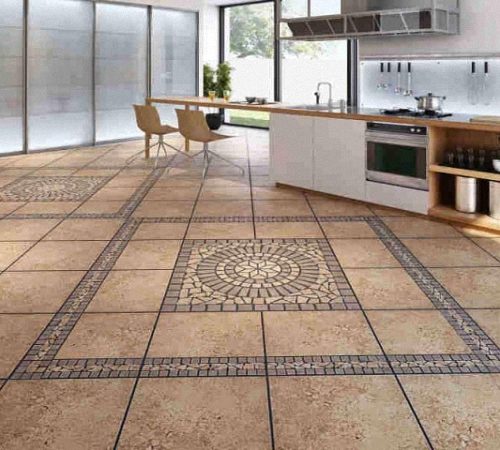
To cover a wooden floor with ceramic tiles, a large amount of work needs to be done. But if everything is done correctly, in accordance with the recommendations outlined above, the floor will not be inferior in quality and durability to concrete.
Ceramic tiles have long been one of the most practical and beloved floor coverings, and their current availability and variety are increasingly pushing the boundaries of the use of this environmentally friendly finishing material.
The ideal base for laying tiles on the floor is concrete or at least a cement screed. But what about people who have wooden floors in their home?
There are two possible scenarios here:
- There is a need to lay tiles on a wooden floor in a house with concrete floors.
- The same issue needs to be resolved by a person living in an old house, where all the floors are wooden (and not only the attic, but also between floors).
As for the second option, the answer is clear - you shouldn’t do it.
Tiles are a rather heavy material, and in old houses with wooden floors Bearing beams should not be overloaded.
In 75% of cases, they are already in disrepair. Therefore, a tiled floor is allowed here only if the house has undergone a major renovation and the floors have been replaced with new ones. Nowadays, load-bearing beams in such houses are often replaced with metal ones.
If the floors are concrete and the floor is wooden, then this possibility is allowed.
But even here you will have to do some research first. Having decided to install a tiled floor over a wooden one, you need to be fully aware of how such an undertaking could end if the base is poorly prepared and the work is performed incorrectly.

- The tiles are laid on glue. This creates a sealed surface that does not allow air to pass through. And good ventilation is critical for wood, which prevents it from getting wet and rotting.
- Wood itself is an unstable material that changes its state and size under the influence of environment. Time isn't doing her any favors either. Therefore, sooner or later, in conditions of high humidity or temperature changes, the wooden base may become mobile, which will cause cracking of the adhesive layer (and, possibly, the tiles) and peeling of the ceramic coating.
Therefore, before deciding to install a tile floor over a wooden one, you will have to examine the condition of the floor and the joists.
Floor condition survey
Start the examination as soon as possible in a simple way– walk along it, gradually covering the entire surface. Your task is to find places where the boards "play".
This could mean the following:
- the boards are poorly secured to the joists;
- the boards have already been damaged and may be rotting;
- the logs sank due to damage to the wood or the linings simply fell out from under them.
Any of these options means that the floor in these places will have to be opened up and the necessary repair work carried out. If the floor seems to be durable - it doesn’t creak and doesn’t “breathe”, then you still need to open it up in some corner. This is necessary in order to make sure that there are no signs of rot or areas damaged by wood-boring insects on the boards and joists.
If you find even the slightest traces of damage, tiles cannot be laid on such a base.
In this situation, it is easier to completely remove the entire wooden floor and install the tiled floor as usual - directly on the concrete, having first leveled it. If the floorboards are cracked, but not rotten or wobbly, then they can be used.
Depending on the condition of the floor, surface preparation for tiles needs to be done in different ways.
There are several options for the development of events:

- quick preparation of the base;
- installation of a wet screed on top of a wooden floor;
- leveling the surface without dampness and dirt.
Quick preparation of a wooden floor can only be used when the wooden floor is in almost perfect condition: it is strong, dry and fairly level.
To complete the preparation, you will need moisture-resistant drywall and polyurethane glue, which has high elasticity, which will subsequently level out possible movements of the wooden base.
The work is performed as follows:
- The floor must be carefully examined to ensure that its level is horizontal. If there are differences, they must be leveled using fiberboard or cardboard of suitable thickness.
- Two layers of gypsum fiber board are mounted on a flat wooden base in such a way that the joints of the sheets in the top and bottom rows do not coincide. In this case, it is necessary to maintain a technological gap of 10 mm between the wall and the floor surface.
- Joints plasterboard sheets need to be filled with sealant.
- Then the surface is primed.
- After the primer has dried, you can lay the tiles in the usual way.
- After all the work has been completed, the gap between the floor and the wall is sealed with a plinth.
This method is not used in rooms with high humidity - bathrooms and kitchens. Its advantage is the high speed of work and the relative low cost of preparing the base.
 The “wet” method is practically no different from regular pouring cement-sand screed. But here it is necessary that the wooden base is strong enough, since the screed has a lot of weight. If the floor is assembled from boards less than 40 mm thick, and the logs are located quite far from each other (more than 400 mm), then this method will not work.
To construct the screed, you can use either a cement-sand mortar laid with a thickness of no more than 30 mm, or self-leveling mixtures based on cement or polymer. Their use makes it possible to obtain a screed with a thickness of no more than 10 mm, which is important for small apartments with low ceilings.
The work is carried out as follows:
- The condition of the floor is carefully assessed.
- If the boards are thick enough and the support joists are located on a small condition, then you can use the existing floor. If the logs are rare, then it is necessary to strengthen the floor structure with additional bars installed between the logs.
- In such a situation, it is necessary that the subfloor boards be located at a distance of 8-10 mm from each other. This will ensure better ventilation. So the floor will have to be opened in any case.
- On the floor with gaps you need to lay chipboard or plywood with a thickness of at least 12 mm. The sheets are fastened with “ligation” of the seams at a distance of 2-3 mm from each other.
- Next, it is necessary to waterproof the surface by laying polyethylene film or others waterproofing materials. The waterproofing should extend onto the walls to a height of 7-10 cm.
- Next, the screed is poured.
- After the screed has gained strength, the tiles can be laid.
 As you can see, this method requires a lot of labor, but the foundation will be strong and reliable.
Dry foundation installation is widely used both by professionals and when carrying out work on their own. For this you will need chipboard or plywood. If the leveling material will be mounted on the surface of the boards, its thickness must be at least 22 mm. If the floor is bad and the material will be attached to the joists, then its thickness should be at least 30 mm.
Installation is carried out as follows:
- Sheets of plywood are cut into 4 squares - this will relieve internal stress in the material.
- If plywood is attached to joists, then the distance between them should be no more than 400 mm. If it is larger, then additional supports should be installed - this will increase the rigidity of the base and the plywood will not sag.
- Plywood is installed in a checkerboard pattern - with sheets shifted in adjacent rows. Wood screws are used for fastening.
- When installing the base, you need to constantly check its horizontalness - this will allow you to lay the tiles without any problems.
If it was not possible to purchase thick enough plywood, you can use a thinner material, but it will have to be laid in 2 layers, gluing them together. The seams of these layers should not match. It is necessary to leave a gap of 2-3 mm wide between the sheets. A technological gap of 10-12 mm wide is also maintained between the wall and the floor structure. Upon completion of the work, it is filled with sealant or polyurethane foam, and then covered with a plinth.
Before tiling the surface, plywood or chipboard must be cleaned of dirt, sanded and all dust removed.
After this, the base is treated with an antiseptic and waterproofing is arranged. To improve the adhesion of the tile to the base, you can attach a sickle or paint mesh to it, and then prime it.
 Since installing a tiled floor on a wooden base is already a rather controversial method, it is not worth saving to achieve a good result.
- Buy only quality materials from trusted suppliers.
- Do not use materials such as liquid nails, liquid glass, or a mixture of polystyrene foam and nitrocellulose varnish to attach tiles (such recommendations can be found). However, a high-quality result is not guaranteed at all.
- Buy good glue, suitable for working with the base you have installed. Not every tile adhesive is suitable for gluing tiles to plywood or chipboard.
- Do not prepare a lot of solution at once - it sets quickly and you may not have time to use it. Follow the technology for completing the work - haste can be costly.
Ceramic tile - best option for finishing the floor. It is preferable to lay tiles on concrete base. However, if the floor in the room is made of wood, it can also be finished with tiles. Let's look at how to lay tiles on a wooden floor below.
Is it possible to lay tiles on a wooden floor: advantages and disadvantages
The only advantage of laying tiles on wood flooring, is that there is no need for additional leveling of the floor before starting installation work. That is, there is no need to install additional screed and level the flooring.
However, this process has many disadvantages. First of all, tiles are unstable to deformation processes on the floor; under their influence, they can crack. A tree, in turn, increases in size at high humidity and shrinks at low temperatures. These linear movements can negatively affect the general condition of the floor after laying the tiles.

In addition, we will highlight several more factors that indicate the inappropriateness of installing tiles on wooden flooring:
- wood has a warm structure, and the tiles are cold; it is unreasonable to lay cold ceramic tiles on a warm wooden floor;
- after laying tiles on wood, oxygen does not reach it and the material begins to rot and destroy;
- The service life of tiles and wood is not the same, wood will last less tiles, thereby reducing its service life;
- in the process of exposure to linear movements on the tile, it begins to crack;
- a wooden floor does not have the static quality that is so necessary during the installation of tiles.
Installing tiles on a wooden base in a room is often necessary if there is high humidity and the need to constantly wash the floor. This is true for such kitchens or bathrooms
The main rule for high-quality laying of tiles on a wooden floor is the creation of a durable and practically motionless flooring. Before starting work, you should evaluate the individual characteristics of the room and choose the most optimal technology gluing tiles. The quality of the resulting coating directly depends on the correct choice of this technology.
How to lay tiles on a wood floor
Wood flooring is a multi-layer sandwich made from lumber. There are several flooring options on which tiles can be laid:
- exclusively joist flooring on which it is dismantled flooring;
- covering the floor with plywood with moisture-resistant characteristics or chipboard sheets, with or without lags;
- wooden floor with virtually no defects;
- wooden flooring that needs repair.
The type and further steps for laying tiles depend on the condition of the floor on which repair work is being carried out. Installation of tiles on a surface made of wood on each floor is carried out according to the same scheme, however, the order of preparatory work for all floor options differs.
As a result, after the preparatory work you should get a smooth and perfectly flat surface on which ceramic tiles can be laid.
If moisture-resistant plywood is laid on the floor on joists, then it is necessary to initially arrange on it waterproofing layer, then you should lay the screed with additional reinforcement. After the screed has dried, the floor is covered with moisture-resistant glue and laid on it. ceramic tile.
The plank flooring installed on the joists is initially provided with double waterproofing. Next, you should install moisture-resistant plywood and a layer of polyurethane glue on the flooring. After this, tiles are laid on the floor.
These options described above are relevant for interfloor floors. If the floor is being installed on the first floor, the procedure changes somewhat.
After the foundation slabs, plank flooring is laid on the floor and two-layer waterproofing is mandatory. After this, a cement screed is installed, covered with tile adhesive and directly with the tile itself.
It is possible to cover the floor with insulation, waterproofing, OSB, an additional board, and then glue and tiles.
How to lay floor tiles on a wood floor
When studying the question of what to put on a wooden floor under the tiles, you should be guided by the individual characteristics of the room in which the renovation work is being carried out.
The simplest and most technologically correct method of preparing a floor for laying tiles is leveling it. With its help, it is possible to form a stable rough coating, for the manufacture of which plywood with moisture-resistant characteristics or similar in composition is used Decoration Materials. In order to level the floor using the dry method, the following materials are used:
- already exist ready-made kits adjustable floor, on which there are screw or plastic supports that allow installation plywood sheet very fast;
- manufacturing a joist system on a strong wooden flooring, followed by installation of plank materials on it;
- installing another plywood layer on top of the existing one;
- fixing the material in the form of OSB using self-tapping screws onto an already leveled flooring.
The dry preparation of the flooring for laying tiles is completed by installing chipboard, plywood or similar materials. These materials have minimal linear movement, therefore reducing the risk of tile deformation during use.

To fix the tiles on such a flooring, a two-component polyurethane-based adhesive is used, which has a certain elasticity.
Before fixing ceramic products, the plywood must be sanded along the seams. To seal the resulting joints, a sealant or glue is used, and a wood primer is used to treat the surface.
The advantages of using this method of preparing a wooden floor include:
- the possibility of increasing insulating properties by laying such thermal insulation materials like polystyrene foam, mineral wool or expanded clay;
- the presence of a minimum load on a wooden surface that does not have the strength of a reinforced concrete base;
- high production speed ideal smooth surface, there are no technological interruptions during the work, for example, for drying of the screed.
However, the disadvantage of dry leveling is the reduction in the height of the ceiling in the room, the presence of a difference between the wall and the floor, for the decoration of which a threshold or step should be installed.
Please note that the floor in a room with ceramic tiles should be several centimeters lower than the floors in adjacent rooms. Since when a room is flooded with water, it will not flow into other rooms. If the floor in a room with dry leveling is higher, we recommend abandoning this method.
How to properly lay tiles on a wooden floor
The second, simpler way to level a wooden floor for gluing tiles is the wet screed method. This method of filling is relevant if the wooden surface does not have the necessary hardness to hold the tiles.
Please note that the screed on a wooden floor is cut off both from the walls of the room and from the underlying layer. That is, it is in some way reminiscent of a floating floor, which is not affected by the thermal expansion of wood. In this case, it will be possible to achieve a perfectly flat flooring that is not affected by linear movements.
Initially, the wooden floor must be repaired and rotten or old boards replaced with new ones. It is also advisable to polish it. After this, the floor is poured using a polymer-based leveler. In this case, the coating is pre-treated using a primer. If it is necessary to level the floor by more than ten millimeters, a polymer-based mesh should be glued to the flooring.
The optimal screed thickness for a floor made of wood is three millimeters. Increase given value not advisable, as it increases weight and pressure on the wooden flooring.

In order to arrange the screed on wooden floor, follow these steps:
1. Remove the flooring down to the timber. If there are questionable and unreliable elements on the floor, replace them. If there is a step of more than 50 cm between the logs, care must be taken to strengthen the system by installing additional timber supports. Use antiseptic impregnations to treat all floor parts.
2. The next stage is assembling the flooring for pouring. For these purposes, you will need new or old boards, the thickness of which is about 4 cm. Please note that a gap of approximately 10 mm is left between the boards. It is necessary to provide ventilation in underground space. When laying boards tightly, ventilation holes settle into the flooring independently.
3. Next, moisture-resistant plywood is installed transversely to the boards, the thickness of which is at least 1.2 cm. It is possible to use other types of pressed boards. The arrangement of elements should resemble brickwork. To fix them, self-tapping screws about 200 mm long are used. Provide a gap of 30 mm between the sheets.
4. Further actions are related to the installation of waterproofing on the floor. For these purposes, waterproofing based on bitumen or paraffin is used. It is possible to use waterproofing materials such as parchment, glassine or high-density polyethylene. In order to form a monolithic insulating coating, lay the material overlapping and secure with tape. The waterproofing extends 10-15 cm onto the walls. They are also fixed to the wall with tape.
5. A damper-type tape, about 1 cm thick and 100 mm wide, is laid on the surface between the floor and the wall.
6. Next, the screed itself is installed, for the manufacture of which a leveling mixture or self-leveling compounds are used. In order to prepare such a solution yourself, you should combine sand and liquid glass in a ratio of 2 to 1. In addition, one part of water is added to this composition.
After the poured layer has hardened, the tiles are laid on a wooden base. Usage this method wooden floors in the bathroom, how to lay tiles is especially important.
You can also prepare a wooden floor for laying tiles by pouring a screed based on a mixture of sand and cement reinforced with fiberglass. In this case, the layer thickness will be about 3 cm. The screed is grouted immediately after it is poured. To level such a screed, beacons are used. Next, the screed should gain strength over the course of three weeks, and after that it is coated with a primer.
Tile adhesive is prepared in batches. Because it is highly flexible and dries quickly. Excess glue is squeezed out by pressing on the tile. In order for the tile to fit tightly to the surface, it is struck rubber mallet. After 24 hours from the moment of laying the tiles, the surface is treated using a fugue.

Recommendations on how to lay tiles on a wooden floor with your own hands
The last method of gluing tiles to wood flooring involves installing the tiles directly onto the floor using polyurethane-based adhesive. Which does not lend itself to the effects of movement caused by the thermal expansion of the tree.
The floor is first inspected for defects that require repair. Next, the base is covered moisture resistant plywood. In order to improve the rigidity of the floor, moisture-resistant plywood slabs are laid in two rows. However, the seams of the bottom row should not coincide with the top.
The base is also constructed as a floating floor, to compensate for the thermal expansion of the wood underneath. Sealant is used to fill the joints between the plates. For surface treatment, we recommend using a universal primer.
Next, the tiles are glued to the base. Please note that two-component glue should be diluted strictly following all recommendations from the manufacturer. The slightest errors in this process, will lead to disruption of the integrity of the coating.
The perimeter of the room is closed using a baseboard laid on silicone. Under no circumstances should moisture seep through it onto the lower areas of the floor.

How to Install Vinyl Tiles on Wood Floors
Initially, you should prepare the surface wooden base for laying tiles on it. To do this, the varnish or paint is removed from the coating, and the floor is sanded. If there are cracks, they should be repaired. Next, the surface is primed. At the same time, all work is carried out at temperatures from 19 to 23 degrees.
When gluing tiles to the floor, you should determine the central part of the room and move from it. The tiles are fixed to the floor surface using acrylic dispersion adhesive. The principle of its preparation is indicated in the instructions.
There are two options for laying tiles on the base - in the form of a pyramid or layer-by-layer laying. Please note that small gaps are left on the surface between the wall and the floor, which are covered with a plinth.
The seams must be treated after two days from the moment the tiles are laid on the wooden base.
How to lay tiles on a wooden floor video:
Ceramic tiles are considered ideal material for walls and floors of rooms exposed to moisture and temperature changes. These are, as a rule, kitchens, bathrooms, baths. True, the process of laying it itself is fraught with certain difficulties due to the need for a suitable foundation and some experience of such work for a home craftsman. As for the second, here they will come to the rescue skillful hands and the desire to achieve what was planned at any cost. But regarding the basis, the issue is controversial. You cannot do without proper knowledge; all work must be carried out in accordance with the requirements technological process, non-compliance with which can lead to the fact that the floor covering will ultimately turn out to be of poor quality and will not be able to perform required functions. In principle, today, carrying out repairs with your own hands is an activity, one might say, even fashionable, so many home craftsmen have at least rudimentary knowledge in this regard regarding the technologies for carrying out certain works. Nevertheless, sometimes there are situations that are perplexing due to the originality of the question. For example: “Can it be laid on tiles?” Agree, this will not come to everyone’s mind, because, as a rule, ceramics are usually laid on a concrete base. And not for wood. However, sometimes there are still situations when it is literally vital to lay tiles on a wooden floor - in a bathhouse, for example, or in the kitchen of a private house. What to do in this case? Is this just a whim of the owner who doesn’t understand anything about finishing work or is this really possible? Let's try to answer this difficult question. So, is it possible to lay tiles on a wooden floor?
About the compatibility of ceramics and wood
In principle, here you can get by with just a few words. These two materials are practically incompatible. And it is possible to “make friends” with each other only by creating special conditions. The tree cannot tolerate instability of the temperature background, constantly changing its size as it changes. It is not difficult to imagine what will happen to the ceramics, under which, so to speak, lumber lives its own special life, being in constant motion. The tile will naturally begin to crack, move away from the base, and chips will appear on it under the influence of loads. In turn, the tree, tightly “packed” under the ceramics, will not be able to receive the much-needed air, which is why it will begin to rot and deform. In general, it turns out to be a kind of vicious circle. Is it possible to break it? How can the owner of a private house, who can no longer watch without tears how his wood flooring becomes less and less attractive every day from constant exposure to moisture or temperature changes, install tiles on wood or in the kitchen? Let's say right away: this can be done. But this should be done only if there are really compelling reasons, because the procedure for preparing a wooden base will take a lot of time, and in addition, it will require very significant expenses, effort and money. Are you ready to part with both the first and the second? Well, good luck. As they say, nothing is impossible. If you really want it, why not try it. True, you will have to thoroughly study the process technology and choose the appropriate option for your case.
When the procedure is not possible
Our home craftsmen are sometimes quite capricious and stubborn. A person needs ceramic tiles on a wooden floor - and that’s it. And the last one was installed quite recently; the house was occupied almost a few days ago. This is the option when, unfortunately, you won’t be able to please yourself. Such an idea will have to be abandoned in any case. Because a new wooden floor covering will still have to acclimatize for at least three years, getting used to unusual conditions, and shrink, the end of which must certainly be waited for. And only then implement your plans.

A few words about the basic foundation
So, what does someone who sets out to lay tiles on a wooden floor have in their assets as a basic foundation? We have already said that the new coating is not subject to such arrangement. So, as a base House master, most likely, will have three types of flooring. These are worn-out and unattractive boards lying on relatively strong joists, a floor made of plywood or fiberboard, which also causes despondency with its appearance, but still amenable to reincarnation, and relatively strong, staying in in good condition plank covering on which tiles are required due to current circumstances. Regardless of which option is available, the home craftsman will be faced with one task: to create a strong and even base suitable for laying ceramics. The difference will be the appearance repair work and their volume. Therefore, before laying tiles on a wooden floor - in a bathroom, bathhouse, hallway, kitchen, it doesn’t matter - you need to carefully study the existing base and choose suitable way preparation. Actually, there are two of them. This is dry leveling and wet leveling. But in any case, you need to remember one thing: laying tiles on a wooden floor without a screed and careful preparation of the base will not work. As a matter of fact, difficulties, especially ones created with one’s own hands, will have to be overcome in any case. And to make it easier for the home craftsman, we will then tell you in detail about all the preparation options.
Dry leveling
Its principle is to create an additional rough layer for cladding on an existing base. This can be done by installing sheets of plywood - always moisture-resistant - directly on the existing “original” base, creating an additional floor covering on joists with insulation between the old and new floors, and using ready-made sets of adjustable floors mounted on top of the existing worn-out base. In addition, today there is another material at the disposal of those who want to lay tiles on a wooden floor - gypsum fiber boards. They will not only successfully replace plywood, but also, thanks to their special composition, will help create a normal microclimate for the base boards.

Pros and cons of the dry method
This tile option is considered the most common. Which is not surprising, since it has a lot of advantages and only one drawback. The first concerns primarily the speed of work. You can level the floor in this way quite quickly, without breaks between stages, which most often slow down the repair process. In addition, if you choose the option with logs, then by laying insulation you can significantly increase the insulating qualities of the surface. Well, the third plus is the creation of a minimal load on an already not particularly special quality characteristics As for the disadvantages, as we have already mentioned, there is only one - this method of leveling “eats up” the height of the room. Therefore, it is sometimes impractical to use it in rooms with low ceilings.
Wet method
Essentially, this is the same screed, the difference is that it is made on wooden surface and with some reservations. The latter include the fact that, firstly, it should be lightweight (no more than three centimeters) due to not quite good condition wooden floor and its inability to bear significant loads, and secondly, they do not do it over the entire surface, but with gaps around the perimeter. This is a kind of floating option. Thanks to this trick ceramic coating will not suffer from movement wooden elements, which in any case cannot be calmed down in any way.

Advantages and disadvantages of screeds
Here, in principle, everything is quite conditional. The undoubted advantage of this method is that it will have virtually no effect on the height of the room, but a huge disadvantage is that the procedure itself is quite lengthy, requiring significant breaks between stages. But sometimes those who are looking for an answer to the question of whether it is possible to lay tiles on a wooden floor have no choice. If a screed is the only acceptable option, then you will have to put up with temporary losses.
Well, now that we’ve sorted out the theory, let’s move on directly to the process itself.
Preparing the old floor
Whatever leveling method the home handyman prefers, the old plank base In any case, it requires preparation. It will not be possible to lay tiles on a wooden floor in a bathroom, or even in a room less exposed to moisture, without carrying out preliminary repair work and cleaning the base surface.
First of all, you need to check the integrity of the floorboards and the joists themselves. If any elements become unusable, they need to be replaced. Then you need to remove all the paint. If you plan to make additional flooring on joists, then the base leveling is not required, but if plywood, gypsum fiber board, chipboard or wet screed, you'll have to arm yourself grinder and carefully cut off all the humps. Then the old one floorboard should be treated with an antiseptic and existing cracks should be filled with putty if possible. And then be sure to drill the ventilation holes. And only then start leveling.

Leveling process without screed
In principle, there is nothing complicated here. If an additional floor covering is created on joists, then first the supports are installed with a step between them of 30 cm, then the insulation is laid, after which everything is covered with moisture-resistant plywood. If you plan to level the prepared board base with just plywood or GVL sheets, then they are attached directly to the base surface with self-tapping screws. All resulting seams and cracks around the perimeter must be sealed. Foam is excellent for these purposes. Upon completion of installation work, the new surface is primed. Experts advise not to save money and purchase “Betonokontakt”.
Note!
Important point! If the master decides to lay tiles on a wooden floor in a bathhouse with his own hands or in a bathroom, that is, in those rooms that are most susceptible to moisture, then before leveling it is necessary to lay a waterproofing layer on the wooden surface. It can be thick polyethylene, bitumen paper, or roofing felt.

Filling the screed
In this case, regardless of the room in which the work is carried out, a layer of waterproofing is required. After this, a reinforcing mesh is applied to it, and sides made of a special tape, which in the language of experts is called damper tape, are installed around the perimeter of the room. Remember we mentioned that the screed should not be monolithic, but floating? This limiter will create the necessary conditions. After this, you can fill in any suitable mixture for the screed. It is best, of course, to take a leveling compound. After drying (this process should take at least two weeks), the surface is primed. At this point, the question “is it possible to lay tiles on a wooden floor” is considered closed. Now you can. Which, in fact, is the time to start after the primer has dried.
Laying tiles
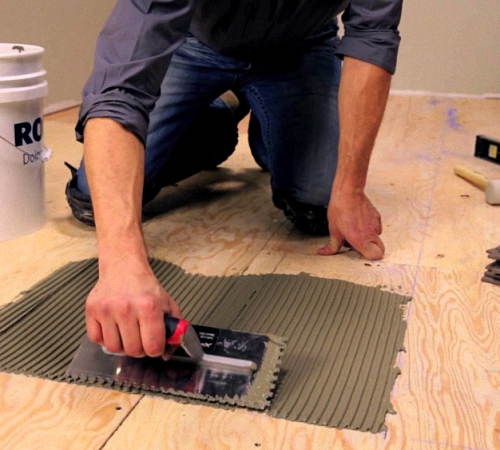
So, on a wooden (photo of the final result below) floor? Yes, just like what everyone is used to. Now, after proper preparation, there will be no problems. The only nuance that you should pay attention to: it is better to buy tile adhesive not ordinary, but more durable, intended for porcelain tiles.

Choose the laying pattern that you like best (traditional, diagonal, brick, etc.) and begin the process. If you select a diagonal, then start from the center. If there is another way, then from the most visible angle, so that the trimming is not noticeable. Adhesive composition applied directly to the base, the rows are laid strictly under level control. Try not to have a very thick layer of glue, as it creates additional stress on an already insufficiently strong base, which is a wooden floor. After installation, the joints are grouted. This can be done a day after the end of the whole process.
Conclusion
What conclusion can be drawn? As we found out, it is possible to lay tiles on a wooden floor. The main thing is to correctly carry out all the necessary preparatory work and create a reliable and even base for the tiles.


