How to make a lampshade from napkins with your own hands. DIY lampshade made from napkins. Oh, I boast! Wire mesh
Do you love vintage things, or maybe you just don’t know how to use the numerous knitted napkins given to you by a knitting lover you know? Here is a very simple way to make the simplest lampshade much more original, and each lampshade will be absolutely unique!
First way
This method is suitable for cases when the lampshade fabric is damaged and needs to be replaced.
For the craft, you will need openwork napkins of any shape and any color, threads, a base for a lampshade (a wire frame removed from a floor lamp, chandelier, table lamp), narrow thick braid, glue.
Work process:
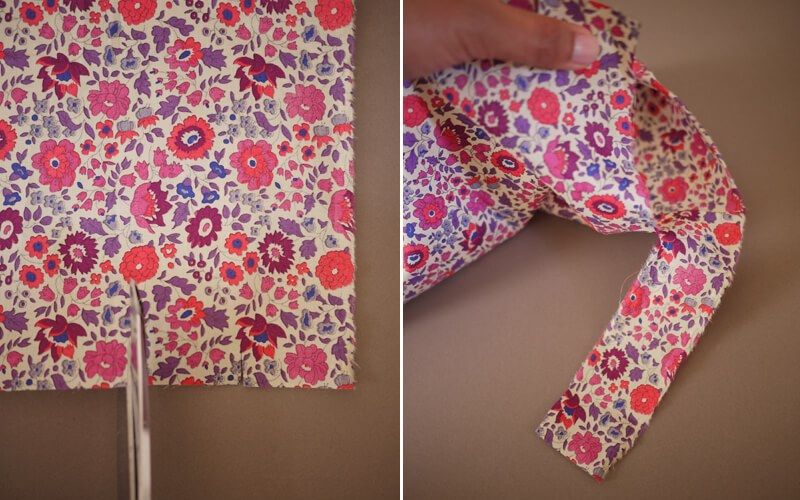
1. Assemble a solid rectangular sheet suitable size, fastening napkins to each other with threads in color.
Helpful tip: if you don't have enough napkins, fill empty seats in your composition with pieces of lace fabric, organza.
2. Attach or sew a narrow braid in color to the upper edge of the wire lampshade and secure the resulting lace fabric to it.
3. Fix the finished lampshade on the lamp.
Second way
In such a situation, simply sew napkins onto the fabric of the lampshade using inconspicuous stitches in any order. Of course, you can also use not only napkins, but also pieces of guipure, strips of finished lace or sewing.
Attention! To prevent fire, use with a lampshade made of napkins LED bulbs minimum power.
In conclusion of our series about what can be made from lace and knitted napkins with our own hands, we invite you to get acquainted with different ways make lamps from lace.
We are one of the options; there is something else that has been “wandering around the RuNet” for a long time, but we think this is the first time you will see such a collection. The most valuable quality of a lace lamp is the delicate shadows it casts on the walls and ceiling.
But, in addition, there is also a practical benefit: small handicrafts or leftovers from creativity (which may have already filled the house) are transformed by the magic of your hands into a beautiful interior accessory.
We have divided all the guides here into 4 main parts:
- how to update a table lamp with lace (for example, for a bedroom);
- how to create a lampshade for pendant lamp(let's say in the kitchen or dining room);
- how to make a ball lamp similar to a Japanese lantern (for any room or for the veranda);
- how to make a light garland from small lace balls (for a holiday or just to create a romantic mood).
To implement most of these methods, you will need one or more knitted napkins, and in some cases, factory lace (lace fabric - guipure). In some situations, a frame from old lamp, but you can also do without it.
All ways to create lamps from lace and knitted napkins are accompanied by detailed instructions However, you will also see a short text description in the pictures. And a few more words before the start:
- about light bulbs for such lamps (with the exception of a light garland) - ordinary incandescent or energy-saving lamps are suitable;
- in order not to worry about fire safety, try to keep the distance from the edge of the light bulb to the lace at least 15 cm (this does not apply to energy-saving lamps and LEDs in garlands, they do not heat up as much as regular ones);
- if you are using knitted napkins that are not too new and have stains on them, keep them in a strong tea solution for several hours, as a result they will resemble vintage lace and the stains will no longer be noticeable;
- for radiant whiteness, they can be dipped in strong bleach, but for no more than 1 hour, so as not to damage the strength of the threads (but we recommend testing this method on a small piece).
We wish you pleasant creativity and charming results!
__________________________
how to make a lace lampshade for a table lamp
method number 1:

You will need: a piece of white guipure + any table lamp with a fabric lampshade. Border lace is preferable (with the presence of an openwork “edge”).
The idea looks good in 2 versions: either in a clear contrast of the color of the lace and the color of the lampshade, or tone on tone. This means that your task is to paint something that is different in color from your design: either the lampshade, or the lace, or both, using spray paint.
After the painted parts have dried, attach the lace to the lampshade with a thin thread or carefully glue it (from the inside top side).

variations on this theme: You can use lace to cover different areas of the lampshade - completely or partially, on the side, along the top or along the edge.
method number 2:

In this case, the integrity of the table lamp shade is not important at all; the frame and base are sufficient. In addition, you will need pieces of lace strips left over from needlework, as well as braid and any other mini-decorations of your choice. If you don't like the color of the base, you can paint it (spray paint).
Lay out the remaining lace on the table and distribute the stripes so that the patterns and degrees of transparency alternate. Starting from the bottom, attach the lace, sewing the bottom part over the edge of the frame and, as you move, to vertical posts frame, sew the next rows to the previous ones.
Make sure that the lace is taut enough, but not deformed. The braid can be sewn both between the lace and on top. You can hang beads, fabric flowers, mother-of-pearl or bone buttons on the finished lampshade.
__________________________
how to make a lace lampshade for a pendant lamp
method number 1:

You will need: a cord and a base for the lamp, as well as several multi-colored knitted napkins in similar colors (one of them should be significantly larger in diameter than the others), wallpaper glue, balloon.
Coat the edges of the napkins with diluted glue or even dip them into the bowl. Inflate the balloon until the right size, attach a large napkin to its upper part and hang the ball on a thread. Attach the rest of the napkins on top, without covering about a third of the height from below.
Leave until completely dry (usually overnight). Pierce the ball and remove the remains. Attach the lamp fixture (cord with base) to the top side of the lampshade.
method number 2:

You will need: a strip of thick knitted lace, a large tin tin(or any other cylinder of sufficient diameter), aluminum wire (it should hold its shape well), fixtures for the lamp (cord and base), wire cutters, thread and needle, wallpaper glue or PVA.
Dip the lace in glue, wrap it around the jar (cylinder), firmly fasten the edges, and leave until completely dry. Cut 2 identical pieces of wire, wrapping it around the blank of the future lamp + a small allowance to fix the joint.
Remove the dried lace from the base and attach a wire frame inside - along the top and bottom, secure with thread. Make a loop out of the wire and attach the reinforcement, having previously disassembled it into 2 parts.
variations on this theme:
the lace does not need to be stiffened with glue, and the lower part of the frame does not need to be created - in this case, the lace will hang more freely, but for such lamps energy-saving (not heating up) lamps are desirable; You can additionally glue a thin braid to the upper edge of the frame.
lace on Japanese lanterns:
And if you have a Japanese lamp that you want to give a fresh look, attach knitted lace in warm shades, such as chocolate, around its perimeter.
__________________________
how to make a lace ball lamp
method number 1:

Everything here is very similar to “method No. 1 for pendant lamps” (see above). But there are two differences:
- the ball is covered almost completely with lace napkins, leaving small holes at the bottom and top, approximately 7-10 cm in diameter, through which the remains of the ball are removed;
- the second difference is that the size of the napkins does not matter, the main thing is that they are round.
Make a wire loop on top and attach the lamp fittings.
Another very interesting idea To make your own lampshade for a light bulb, you will use crocheted napkins. The fashion for them goes away and then comes back, and now with their help you can realize an interesting design idea interior design.
A lampshade made of lace doilies is suitable for use in rooms of various functional purposes - in the bedroom and in the nursery, in the living room or in the corridor. A wonderful openwork chandelier, made by yourself, will become a real decoration of a room in the country. This lighting fixture is so unique and original look, which is sure to delight all guests of your home. And the process of making it will give you unforgettable moments of real creative inspiration.
The process of preparing material.
In the manufacture of this interesting and very beautiful product The same technique is used in which they do. That is, you will need almost the same tools and basic materials, only in this case, instead of threads, knitted lace napkins will be glued to the surface of the inflated balloon.

If you already have a large number of already knitted, ready-made napkins, then this will greatly simplify the process, and making a lampshade from lace napkins will take only one day from the moment you start work until the solemn installation of the product on the light bulb.
If the napkins are not ready yet, you need to start knitting them. Many needlewomen love to crochet, and they produce lace of amazing beauty. But we will not dwell on the description of this process.

Necessary materials and tools.
And again, we will need almost the same materials as for making a lampshade from threads:
- balloon round shape;
- wallpaper glue;
- lace napkins;
- fatty substance for lubricating the ball (cream, Vaseline, vegetable oil).
The tools you will need are:
- scissors;
- container for pouring glue;
- a needle and thread matching the color of the napkins;
- marker or felt-tip pen.

Sequence of work.
1). Wallpaper glue is diluted with water according to the instructions on the package, but it is worth making it as concentrated as possible so that the product holds its shape better. Even if the packaging indicates that the glue instantly acquires the desired consistency, you need to give it the opportunity to stand for a while, at least for half an hour.
2). Balloon inflates to the desired size. A strong thread must be tied at the base. You also need to immediately select an area on the ball that we do not decorate with napkins. It will serve to thread a light bulb. To do this, simply mark a circle on the surface of the ball with a marker required diameter. The ball is lubricated with a greasy substance - vegetable oil, cream or Vaseline, excluding the area marked with a marker.
3). The prepared lace napkins are moistened in glue, wrung out and placed on the surface of the balloon, forming a pattern as desired. The joints of the napkins must be additionally fastened with a needle and thread.
4). When the work is completed and the entire surface of the ball is covered with napkins, it needs to be hung up to dry. The napkins will take longer to dry. than simple threads, so you need to be patient and not touch the product for at least 24 - 36 hours.
5). After the lampshade has completely dried, the balloon inside it needs to be pierced and carefully pulled out by the thread from the hole left for the light bulb. That's it, now I'm left The final stage- hang the lampshade on the light bulb - and an excellent hand-made chandelier is ready.

You can make the lampshade either round or leave it open. just without sealing the entire surface of the ball. This lampshade is suitable for updating a table lamp or floor lamp, but you can also decorate the ceiling with it.

When you want to change the decor in your apartment and add a little originality to it, start with the little things. Try changing the lampshade, and you will be surprised at the transformation of your family nest.
And if you manage to find an original model that differs from analogues, then the changes will impress not only you, but also your guests.

Is it true, unique lampshades they cost a decent amount of money, because you can’t buy one-piece works by famous masters for pennies.

But no one is stopping you from creating your own unique masterpiece from cheap, and sometimes even waste materials, which will look much better than the samples presented in the store.

All you need are simple materials, a little patience and a flight of imagination, and we will tell you how to make a lampshade with your own hands.
Materials
You can create a masterpiece from everything you have at hand: fabric, paper, thread, twine, wire, plastic bottle, beads or beads.

In general, absolutely everything is suitable, even what you usually throw in the trash bag.

Don't believe me? Just look at the photo of the lampshade.

Frame
If you have a frame from an old lampshade, then that's just great.

However, don’t be upset if you don’t find one, because you can create a frame yourself from ordinary wire.

Copper, aluminum, steel - anything that you can independently combine into a single structure will do.

The metal frame of a classic lampshade consists of three rings and six jumpers between them. The small ring is a holder, which is connected by three jumpers to a ring of a larger diameter.

The same, in turn, is connected by jumpers to the last ring. The following photos will help you understand the design.
From fabric
When you have a frame for a lampshade, the easiest way to create your masterpiece is to wrap the base in fabric. For this you will need:
- paper (newspaper);
- scissors;
- textile;
- chalk or pencil;
- threads

Wrap the frame with newspaper in such a way as to form a pattern out of it. Then transfer the resulting shape onto the fabric using chalk, adding 1 cm to the seam on each side.

Make a pattern, cut off the edges and sew the sides, forming a cover for the base of the future lampshade. We bend the upper and lower edges of the “cover” in such a way as to close the frame rings and secure them with a seam.

Note!

Voila, your lampshade for the floor lamp is almost ready. All that remains is to add a few highlights to your taste, making it unique.
From threads
How to make a lampshade when there is no frame? As easy as pie.

Take a balloon without drawings, glue, thread, marker and start creating.

First you need to inflate the balloon and mark on it the upper and lower boundaries of your future masterpiece. Then take the threads and wrap them around the ball, trying not to protrude beyond the marked contours.

Apply glue diluted with water 1:1 to each layer of thread. When the thickness of the wound thread satisfies you, fix the cut edge and hang the ball to dry. After 3-4 hours the threads will dry. Then pierce the ball and carefully detach it from the walls of the finished lampshade.

Leaves and flower petals woven between layers of threads can add additional charm to a thread lampshade.
Note!


A ball decorated with sparkling drops of beads also looks original. In general, watch and be inspired.
From paper
Ordinary sheets of office paper, glossy magazines, a cheap newspaper, an unnecessary book or an ordinary notebook, a paper towel or napkin - these are all future lampshades.

It doesn’t matter whether there is a frame or not, the main thing is that you have scissors, glue and paper. A thousand and one versions of such lampshades can be described with the words “cut and stick”.

The main thing is not to forget a few simple rules:
- It is safest to use a paper lampshade together with economy light bulbs, which heat up significantly less than incandescent lamps;
- the diameter of the lampshade should be large so that the paper does not heat up excessively;
- for a bright room you can make a lampshade from thick paper, but for dark you need a thin one that transmits light well;
- be careful with color. For example, red or yellow paper will add warmth to the room, green and blue will add coldness.

Well, that's all. Charge yourself with new ideas, arm yourself with the means at hand and move forward to easy changes that will bring warmth and comfort to your home.

Note!

DIY lampshade photo


Any interior decor starts with the little things. So, by changing a few details, you can create a completely different interior. Try changing a lamp or lampshade on it, and you will see how the entire interior design changes. Depending on the chosen room, the lampshade can be classic, made of fabric and lace, modern, made of plastic, buttons or paper, abstract, made of feathers or other improvised means.

With some effort, you can get a truly unique item, the likes of which you will not find anywhere else. It is known that designer designer items created by hand are not cheap, since their production takes a lot of time, but the result is something unique and inimitable.

To make a lampshade yourself with your own hands, you will need cheap materials at hand:
- plastic spoons, forks and glasses;
- wooden ice cream sticks;
- fabric scraps;
- ribbons and lace;
- buttons;
- tubes from magazines;
- beads and seed beads;
- cardboard and paper;
- shells and pebbles;
- clothespins;
- plastic straws for drinks;
- threads and twine;
- metal wire for the frame.

Typically, a lampshade consists of two metal rings connected by jumpers (from 3 pieces). The shape of the frame can be trapezoidal, cylindrical or curly.
Wire made of any metal is suitable for the frame: copper, aluminum, steel. Using wire cutters, you need to cut two pieces of wire and make two circles out of them - one larger, the other smaller.

It should be noted that the design for the lampshade pendant chandeliers slightly different from the lampshade design table lamp, but in any case there is always another inner ring through which either the socket or the cord from the chandelier is threaded.

To work with wire, you will need wire cutters and round nose pliers (in order to make a neat loop to hold the wire together.

But, nevertheless, the most correct thing would be to buy already finished frame for a lampshade - fortunately, construction hypermarkets are full of them.
You can make a pattern for a lampshade like this:

So, the frame for the future lamp is ready and the most important thing to choose is the decor of the lamp and the material with which to work. We offer several options for making a lampshade with your own hands.
Lampshade made from scraps of fabric

To make such a lampshade you will need following materials and tools:
- two pieces of fabric of different colors;
- lampshade frame (purchased or made yourself);
- threads with a needle;
- scissors.


And more options for inspiration: fabric lampshades:


Ribbons and lace, buttons and beads, pieces of other fabric and bows are suitable for decoration. Even old pants or other clothes can give life to a designer item.
Most often, such lampshades are sewn according to a template: for this, a pattern is cut out of paper or newspaper, and then transferred to fabric:

Lower and top part products can be decorated by pasting or trimming them with fabric of a different color or with lace or braid.


Paper lampshade - options and ideas
No less interesting can be a lampshade made of paper or cardboard.
Suitable for work:
- pages of glossy magazines;
- old newspapers;
- old unnecessary book;
- notebook (can be covered with writing);
- paper napkins with patterns.
Remember: paper is flammable, so you will have to use either energy-saving or LED light bulbs - they heat up less than incandescent lamps.

To make a simple paper lampshade you will need the following materials:
- base - a lampshade-ball made of paper of any diameter;
- square-shaped note paper;
- scissors and glue.
First, cut out circles from note paper (can be replaced with regular colored paper).

Paste decorative elements from below, row by row, until the entire surface of the lampshade is covered.

Instead of ordinary colored paper, you can use corrugated or velvet paper, or you can replace them with lace fabric - in this case, the lamp will look lighter and airier.
More options for lampshades made of paper or cardboard, photo:


In order to change the look of the room, just a little is enough: change the pillows or blanket on the sofa, throw in a bright rug or make a lamp with your own hands.
Decorating interior items can be interesting and addictive! Vases, napkins, panels, lampshades - it’s these little things that change the face of the interior!
To avoid buying designer lamp, make a lampshade from plates with your own hands. For this you will need:
- the base for the lamp is a cylinder made of paper or cardboard;
- several sets of disposable paper plates;
- glue gun;
- scissors.
Procedure: fold each plate in half and glue it to the base along the fold line:
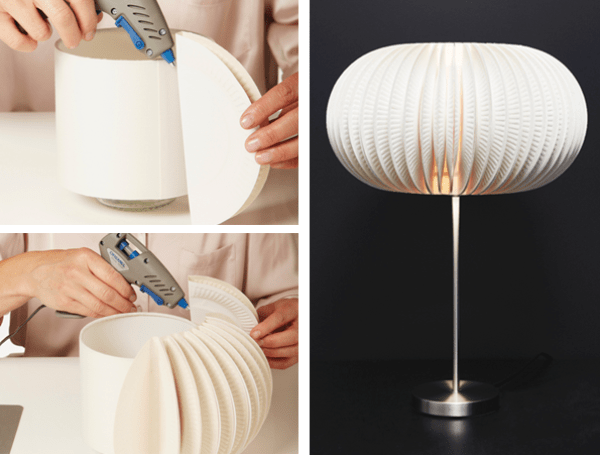
A similar lampshade can be used for a sconce, a pendant lamp, and a floor lamp. If desired, you can use different colored plates or paint white ones in different shades.(42)
Similar things became popular several years ago. Light and weightless balls of thread, depending on the diameter, can become either Christmas tree toy, either a decorative item or a lampshade. Threads can be used in any color, or you can dye them when the craft is ready. You can also decorate the top with ribbons and lace, beads or buttons - this will make the craft look more elegant.
How to make a lampshade from threads? For work you need materials and tools:
- a balloon (or an inflatable ball that can be deflated);
- a skein of thread (the thicker the thread, the more reliable the lampshade will be);
- PVA glue;


Depending on how often you wind the threads, you can get either a completely airy and light lamp, or a denser lampshade.
Attention! Before winding the threads, the ball must be lubricated with Vaseline - this will allow it to be easily separated from the dried lampshade.
Operating procedure:
- First, you need to inflate the ball - whatever the diameter of the ball, the lamp will be the same. Mark the hole at the bottom that will need to be left open.
- Wind the threads around the ball in any order. Between layers, as well as on top, coat the entire ball with PVA glue and let the glue dry for about 4-5 hours.
- Now the ball can be burst and pulled out. All that remains is to thread the lamp socket and hang the lamp.

Using threads and glue, you can make a lamp in a different way: instead of a ball, use plastic bottle, and take denser threads. The bottle must first be covered with tape to make the dried lampshade easier to remove. The shape of the lamp will also be different:


More thread lampshades, photo ideas:


Using simple techniques and a few packs of disposable spoons or forks? you can create a great original lamp that will decorate your interior. Such lampshades can be used in almost any room - in the kitchen, in the hallway, on the balcony, and even in the bedroom.

To make such a lamp you will need the following materials and tools:
- several sets of disposable spoons (table spoons or tea spoons - it all depends on the desired size of the product);
- plastic 5-liter cylinder;
- scissors;
- glue gun or universal assembly glue for plastic products.
Operating procedure:
- Cut off the lower part (bottom) of the cylinder and degrease the surface.
- Carefully break off (or cut off) the ends of plastic spoons.
- By using glue gun glue the spoons to the balloon in rows, starting from the bottom.
- Then make a headband and glue it on top.
- Pass the cord with the socket through the hole on top and screw in the light bulb.


If desired, the spoons can be painted in any color. This way you can make a lampshade for a floor lamp, wall or pendant lamp.
In addition to spoons, you can also use disposable forks or knives for the lampshade - the lamp will be a little different, lighter and more elegant:

Or from plastic cups:

Original do-it-yourself lampshades, photo
With desire and good imagination and with skillful hands you can make a lamp from other available materials - wood, cocktail straws, clothespins, burlap, packaging cardboard, even plastic bottle caps.
We have selected original ideas DIY lampshades, we hope our ideas will help you choose what suits your interior. So, photos of lamps and lampshades made and decorated with your own hands:


