How to decorate a veranda at your dacha in an original way. Design of a veranda and terrace of a country house: interesting ideas (50 photos) How and with what to sheathe the outside of the veranda
Open verandas require a more careful approach to the choice of materials for finishing the ground. The decision from which to install the ceiling on an open-air veranda should take into account that with changing seasonal influences, the effects of moisture, precipitation and other atmospheric influences will be subject to temperature fluctuations. With this in mind, it is necessary to select a design and material that can withstand such rigorous operating conditions.
The main problem will be choosing the most suitable material.
The house has a veranda: expanding the usable space (more than 120 best projects)
It should be waterproof, strong and beautiful. At the same time, it is very important that the ceiling cover on the open veranda is well connected with the decoration external walls house, which is part of this room. The choice of materials available in stores that meet these requirements is not overwhelming:
- Plastic panels
- Both and boards
- Paving with plastic or metal
- drywall
- OSB panels
In the case of the last two materials, you will not only have to trim the ceiling, but also finish the surface.
Plank
If you choose how to cut the ceiling on outdoor porches, it is relatively inexpensive and quick, then the most convenient option will be a plastic panel.
Coverage is simple and takes some time. The cost of such materials is also not too high, which will allow you to get an excellent upper limit with minimal cost.
There are only a few disadvantages to this resolution.
These include relatively low cold strength - the plastic becomes brittle and can be easily damaged. In addition, the assembled surface is far from perfect in an aesthetic sense - the cheapest slabs do not look very nice, but they are very suitable for finishing on a budget.
Both and boards
One of the best options for the relationship between beauty and value.
For a small amount of money you can get a lot beautiful ceiling made from natural wood. You can draw it in the color you want and repeat it if necessary. Installation is not a problem - even an experienced person will be able to handle it, and time for all the work will be at least a must.
In addition, wood is completely compatible with any type of wall decoration. If you decide to cover the ceiling on the terrace, with a smaller renovation budget, you can stay at the base, but if they allow it, you can buy beautiful plates from different breeds tree.
The disadvantages of this option are seasonal deformation of the material and the need for processing wooden parts special compounds that prevent rotting and pest damage.
In addition, panels and substrates may become deformed due to temperature changes. The installation must be taken into account.
toilet
The material, originally intended for finishing vertical surfaces, will perfectly serve as a decorative ceiling in this part of the house. The panels are made of durable plastic or metal and are ready for any difficulty when used outside the living space, so it is recommended to install the ceiling on the veranda.

There are virtually no downsides to this design, except that some grades of plastic parts may fade over time.
The cost of the cover is completely affordable, and installation is very simple, with special fasteners.
Drywall and OSB panel
Both materials can only be used if they are purchased as waterproof. Their standard types have one drawback - poor water resistance.
Therefore, when purchasing, pay attention to the markings of panels and sheets. Installation is not particularly difficult, depending on the size of the parts, it may take some time.

However, additional complications begin - GKL must be installed with a special plaster suitable for external use, and after both types of wallpaper must be painted with weather-resistant paints.
Other things that are the same, when choosing what to cover on an open veranda, it is better to give priority to the OSB panel. Unlike GCR, it does not require any additional output other than coloring.
Finishing the veranda inside and outside

Decorating the veranda: finishing in style
A veranda is usually called an extension adjacent to one of the walls of the house. This building belongs to the category of summer, unheated premises. By design, verandas can be either open, that is, under a roof, but not glazed, or closed.
It is quite natural that the decoration inside the veranda is made depending on this fact. Also, the configuration of the extension and its exterior decoration must harmoniously fit into the exterior of the house.
Design features of verandas
The veranda plays not only a decorative function, but is also necessary from a purely practical point of view.
A well-lit room, without cabinet furniture, decorated with many indoor plants, is ideal for a pleasant stay in the summer.

Covered veranda with many plants
- The veranda can be combined with the main entrance to the house. In some cases, the entrance to the veranda can be from any room, that is, it does not have access to the street.
This is exactly the veranda shown in the photo above. But such an extension must be provided for during the construction of the house.
- If there was no veranda in the project, then it can be added to the house later. But, so as not to have to break through a doorway in the load-bearing wall, this is done on the main facade, in front front door. None engineering communications You won’t have to lead there, so you can build a veranda with your own hands.
- Naturally, the extension should correspond as much as possible to the structure of the house.
The main thing is to properly build the foundation for the veranda. It is better to do this in the summer, otherwise, after thawing, the soil may sag and your veranda will simply move away from the wall of the house.
Think carefully about what it will be built from and how it will be finished on the outside so as not to spoil it. appearance building.
- Usually, a columnar foundation is made under the veranda. This is quite enough to support the weight of the frame and its cladding.
The brick foundation pillars are laid out in pits up to one meter deep, under each corner post. If the veranda is more than one and a half meters long, intermediate pillars are also made.

Columnar foundation diagram
- In the holes dug for the foundation, they first arrange sand pillows, approximately twenty centimeters high.
Fine crushed stone is poured over the sand and poured liquid solution. To ensure that the water from the solution does not go into the sand, before filling it with crushed stone, it is better to lay roofing felt with a bend of 10 cm along the walls of the pit.
- The resulting concrete pad will serve as a support for the brick column. Before laying it out, the concrete must be coated with liquid glass or bitumen. Any other waterproofing composition will also work. The height of the pillars must be calculated so that the floor level of the veranda is 20-25 cm lower than in the house.
- After the masonry is completed, the internal cavity of the columnar foundation is filled with gravel, stone, broken brick - any available material.
The outer surface of the pillars is also coated with a waterproofing compound.
- They will rest on the foundation pillars wooden beams(lags). Beams must be treated with an antiseptic solution before laying. This will not only protect them from moisture saturation and rotting, but will also protect them from damage by insects and rodents.
This is just one of the options for constructing a foundation for a veranda. It may have a different design, depending on the size of the veranda under construction and its walls, if any.
In each specific case, you need instructions, and best of all, a project.
Veranda wall decoration
If the house to which the veranda is attached is made of logs, timber or frame-panel, then the most organic option would be to make the walls of the extension from wood. Although, you can make a frame from a metal profile, and then simply cover it with clapboard. Moreover, if the veranda is planned to be glazed.

Aluminum stained glass windows in the glazing of the veranda
- Then for this purpose you can use aluminum stained glass windows installed directly on the base of the veranda.
Their use solves two problems at once: the construction of walls and their finishing, or rather, the lack thereof. We washed the glass - that's all the finishing was done.
All that remains is to decorate the base and intermediate racks: with facing bricks, or, for example, stone.
- Such a problem as finishing verandas combined with the construction of walls can be solved with the help of glass blocks. This material is both constructive and decorative.
- Besides, construction markets countries offer a truly huge range of blocks: with corrugated glass, colored glass, frosted glass.
There are block options with decorative appliqués in the inner cavity - it’s so beautiful!

Veranda walls made of glass blocks
- Various types of glass blocks can be combined in any way you like, creating panels, making lighting.
Of course, the price of such a veranda will be more expensive than one whose walls are covered with plywood or plastic, but the beauty that you will receive in the end is worth it.
- In the example we gave, the windows of the veranda are small and located high from the floor. But thanks to the light transmission of glass blocks, it is light on the veranda without additional lighting.
By the way, in this case, window openings could also be done on the roof, in the manner of dormer windows.
In the construction of the walls of the veranda, you can combine both options mentioned above: one wall can be made of glass blocks, and the other two – from aluminum stained glass windows. The fourth wall is bearing wall Houses. It will be decorated during the interior decoration of the veranda.
Wood in the decoration of the veranda
If the veranda is open, then the concepts of exterior and interior decoration are mixed. And most often, such verandas are made of wood: structural elements, and decorative.
- Of all the materials that can be used to build and decorate a veranda, it is wood that will create the most favorable environment for relaxation, saturating the air with its unique aroma.

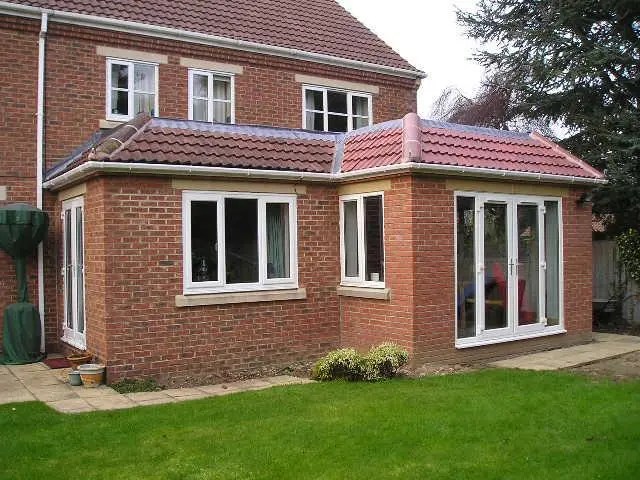
Open veranda trimmed with wood
- The racks supporting the roof of the veranda can be made of rounded logs or timber with a cross-section of 15*15cm.
In the simplest version, as in the example above, the floor of the veranda is made of ordinary edged boards, not even painted. The ceiling is lined with standard clapboard, and the parapet is made of ordinary bars used for installing sheathing.
- But many home owners do not want to save on finishing the veranda, and prefer to decorate this relaxation area, solidly and well, as they say, for centuries. For such cases, wood manufacturers finishing materials, there will always be the right offers.
- One of these options used today in exterior finishing is decking.
Methods of finishing and insulating the ceiling on the veranda: choosing materials
Otherwise it is called a terrace board. This concept can also include garden parquet and deck boards.

Veranda floor lined with garden parquet
- It is made not from solid wood, but from a wood composite. That is, it contains polymer additives.
But in this case, this only improves the characteristics of products that are very durable and are not afraid of moisture. And this is very important both for an open room and for a closed, but not heated one.

Exterior finishing of the veranda made with planken
- Expensive and high-quality wood for exterior decoration is larch or ash plank.
This is the name of the façade planed board obtained from solid wood. Planken differs from ordinary planed boards in its cross-sectional shape, which has beveled and rounded chamfers. Planken does not have connecting grooves, like a lining board, which allows it to be mounted with gaps, and not just end-to-end.

Installation of plank with a gap
- In principle, a wooden veranda can be attached not only to a wooden house, but also to a brick or stone house.
The main thing that color scheme its finishing was harmoniously combined with the decoration of the facade. But wood can not only be painted, but also carved into the design of its surface, and there have always been plenty of craftsmen in Rus'.

Exterior finishing: wooden veranda with carved elements
Here is a wonderful example of using carvings in a veranda design.
There are twisted pillars, a beautiful carved parapet, painted in contrast to other structures, and hanging arched elements with a lace pattern. Take note!
Interior decoration of the glazed veranda
The interior design of a glassed-in veranda can, in principle, be considered as the decoration of a loggia.
But the veranda, as a rule, is more spacious, which means it has more design opportunities. So:
- Although this room is considered a summer room, nothing prevents you from installing heaters on the veranda, as in our next example, and using the veranda all year round, and not just in the summer.
Then absolutely any finishing materials can be used.

Heated covered veranda
- And here's an example for you interior design verandas. In addition to the stained glass windows, the roof of the room is also glass, so the room is simply flooded with light. To avoid direct sunlight, frosted acrylic glass is used in the glazing of the roof windows.
- An excellent addition to the interior of the veranda can be some unusual blinds or original curtains. The design of the ceiling, of course, will depend on what kind of roof is made. In addition to wood, you can use plastic and MDF in its finishing, line it with plasterboard and paint it, cover it with polystyrene tiles, make a suspended ceiling - whatever you want.

Carpet on the floor of a glazed veranda
And the walls can be decorated in different ways, but almost always in light colors.
The floor on such a veranda can be almost anything: from tiles to parquet. In the image above: the floor under the baseboard is covered with carpet, along the entire perimeter of the room. You can’t do on the veranda without upholstered furniture– what’s a vacation without a comfortable sofa!
Do-it-yourself finishing of the veranda inside and outside
Most often, when we talk about a veranda, we mean an open or closed extension to one of the walls of the house, where it is convenient to spend time relaxing or having lunch. But the terrace, being one of the types of extensions to the house, differs from it, although their concepts are somewhat similar.
A terrace is a structure that has supports on pillars and a roof, adjacent to the house on one side. On this side there is an exit to the terrace from the house. The remaining sides are open, the effect of unity with nature that the terrace gives is very strong. Even heavy rain, which can be observed under the roof of the terrace, fully feel its dampness, humidity, hear all sounds, will not wet someone who is on an area open on three sides.
A cup of tea before bed, in a chair in the fresh air, is a luxury not available to many.
As for the veranda, this building can be found both on the first floor and on the second.
Interior decoration of a veranda in a private house photo
Cottages with such a structure on the second floor look quite stylish and impressive. Therefore, much attention is paid to the decoration of the closed veranda on the second floor - this indicates the status of the owner and his taste. This room also has a roof, which can be made in a traditional way, or it can be made of glass, which will allow a large amount of daylight to enter the room during the day.

Finishing open veranda at the dacha (you can see from the photo that it can be stylized to look like anything) requires a special creative spirit.
You can decorate it with evergreen cypress seedlings around the perimeter, then it will turn into a structure in the Greek style. You can decorate the inside of the veranda in the form of a winter garden or a stone palace.

A carefully thought-out interior will give this building a special look, turning an ordinary house into your own corner of creativity and imagination.
Decorating the veranda pillars with wood carvings or decorating them with climbing ivy or vines will add a charming look to your terrace design.
This design is built on one side of the house (open or closed type), and around the house. If it is built lengthwise along the perimeter of the house, the structure looks like a gallery, but if it is a rectangular extension, it looks like a pavilion.
For the summer period, the structure is built without insulation and glazing. Wall decoration on the veranda can be done in different materials. And for winter, the living space moves into one where the windows are equipped with double glazing. The decoration of a closed veranda in a private house (see photo) even allows for the installation of a fireplace (bio-fireplace or false fireplace) to create a cozy atmosphere in which you will be comfortable.

How to decorate a veranda at the dacha, photos, ideas
Verandas come in different types, depending on the design of the house, choose open (terrace) or closed (glazed) types.
Different cladding options will create different impressions when creating a design.
It is also important what the decoration of the veranda will be like, because the main purpose of this extension is the comfort of those who spend their leisure time here.
Guided by your own taste in the finishing process, do not forget about some rules in order to get the desired result.

If the decoration of a veranda in a private house (pictured) assumes that it will be open, you need to ensure that Construction Materials, which you will use for finishing, were resistant to precipitation and dampness, and withstand high humidity.

Do-it-yourself wood finishing on the inside of the veranda requires mandatory preliminary impregnation with an antiseptic; this step will avoid not only premature deformation of the wooden elements, but also protect the walls, floor, and pillars from rodents.
Finishing an open veranda in a private house, photo
If a private house, in which it is planned to build a terrace, is located on the sea coast or on the shore of a reservoir, it would be an interesting decision to decorate the veranda with polycarbonate - transparent walls will protect you from dampness on cool evenings, but will not interfere with the wonderful views opening from there.
Usually summer premises do not require glazing, it is used only in warm time year, this seasonality does not provide for monolithic buildings or stationary cabinet furniture.
Light plastic models of chairs, tables, or transformable furniture are more suitable here. Wicker chairs, tables, rocking chairs, and fresh flowers suspended in pots along the perimeter of the terrace perfectly create a themed interior.
Materials for constructing a veranda
One of the fashionable solutions in construction today is the choice of a frame veranda.
To build such a structure, you will need to lay a foundation and erect a frame for the building. Options for finishing the veranda are a matter of taste and possibilities, but the principle of creating the structure is almost identical.

Will be required concrete pillars concrete (to build a foundation), wooden beam to build the frame, lathing around the perimeter for its lower part and finishing materials for the interior decoration of the walls of the veranda (stone trim in the photo):
- wooden or plastic lining(pvc),
- polystyrene tiles,
- MDF panels,
- composites, stone, perforated sheet metal, etc.
If you purchase brackets, corners, screws, anchors, and tools, you can make a veranda with your own hands.
Wood, metal, profile sheets, metal tiles, glass, etc. are used as roofing upon request.
Finishing the closed veranda inside (pictured wooden roof), you need to take into account the degree of natural light, because the only communication needed here is electricity.

The floor will need waterproofing, and depending on the style chosen, the type of surface, whether floor slabs or stone are used, beautiful high-quality linoleum can be laid.
You should not rely on the fact that a plank floor or laminate will be used while remaining just as spectacular and beautiful - if the option is open, summer, the interior decoration of the veranda in a private house (see photo) for the floor is also susceptible to dampness and humidity. Therefore, it is better to give preference to those materials that do not absorb moisture.

A perforated sheet for finishing the veranda inside will help to divide the room into zones (for example, a dining area and a relaxation area); if you show your imagination, you can perfectly decorate the ceiling with it.
It is important to correctly calculate the lighting in the interior decoration of the veranda.
Wall decoration on the veranda inside
One of the popular ways to make a closed terrace not only beautiful, but also warm is to decorate the veranda with plastic panels (you can see this option in the photo).

In itself, it is a lightweight structure, so the interior decoration of the veranda at the dacha (the photo illustrates one of the options) makes it possible to make windows without using double-layer glass.
It will be much more effective to take care of insulating the floors and walls. Moisture-resistant plasterboard slabs are suitable for finishing the inside of a veranda at the dacha; you must first waterproof the walls of the structure on both sides: inside and outside.
To insulate walls, you can use mineral wool or extruded polystyrene foam. The interior decoration of the veranda (photo) consists of a layer of insulation, which is carefully sandwiched with a vapor barrier film, and MDF and plasterboard sheets are placed on top and reinforced PVC panels or clapboard.

When choosing mineral wool as insulation, remember about its moisture absorption, so that the insulation does not soon crumble into dust, provide waterproofing to the walls!
Wall panels for interior decoration for the veranda can be made of any material, even painted with decorative plaster. Wooden panels will look very impressive and respectable, but you need to remember that they need to be taken care of.
Cheaper and more practical finishing verandas with imitation timber (photo), even on an open structure this type is preferable due to its durability.

Lining is one of the simplest materials, characterized by wear resistance, good qualities For wet areas, low maintenance.
The advantages of finishing the veranda with clapboard include its following qualities:
- The lining is easy to install, allows you to create a smooth, even wall due to its own texture,
- Is an excellent soundproofing material,
- It is durable and easy to replace damaged areas if necessary.
Finishing the veranda with clapboard inside (photo) gives great prospects in terms of choice of colors, neat and easy installation, but the disadvantage of clapboard is fragility, especially in the cold season.

Glazing of the winter veranda
Today it is fashionable to use extraordinary solutions in glazing; one of the ways to make your home aristocratic and sophisticated is the French decoration of the veranda (photo).
It is an installation metal-plastic windows V various forms and large size. If possible, stained glass windows built into the French decoration look good in the interior.

Finishing the veranda and porch inside, the design of which involves the use natural materials, looks beautiful in stone or wood.
Exterior finishing of the veranda
A beautiful appearance for the veranda is the image of the owner of the house.
Stone and wood are classic options; carved wood in decoration looks especially beautiful and impressive. It is cheaper, more practical, and easier to maintain when finishing the veranda with siding (the photo illustrates this option).

The advantages of vinyl siding include high performance, a wide range of colors, ease of installation, and affordable price. Horizontal panels make the structure very aesthetically pleasing.
How to hem the ceiling on the veranda?
Some rooms in the house require special finishing of the floors due to the fact that the operating conditions of the materials here are very different from the standard ones. For example, when choosing what to put on the ceiling on the veranda, you need to take into account that this area is essentially located on the street and the conditions here differ from residential premises.

Basic requirements for materials
In order for the design to please you for as long as possible and not cause trouble during operation, it is necessary to select coatings with the appropriate characteristics.
The basic requirements that the ceiling covering on the veranda must meet are as follows:
- Moisture resistance
- Strength
- In cases of self-assembly - ease of processing and installation
- Match the appearance with the rest of the home's finishes
- Resistance to low temperatures in winter
- Affordable price for budget repairs
Particular attention should be paid to resistance to frost and moisture - even glazed rooms, as a rule, are not heated, and there is a lot of moisture in the street air, for example, during rain.
The remaining parameters are also important, but some assumptions are possible here, taking into account the personal preferences of the home owners.
Popular options
If desired, the finishing can be done in any way in an accessible way. However, the most suitable and popular options for lining the ceiling on the veranda are:
Despite the fact that everyone is accustomed to seeing stretched fabric exclusively in residential premises, it is also perfect for repairing open spaces, provided that textiles are chosen and not PVC film.
The film will not work, as frost causes it to lose its elasticity and crack.

It is also better not to use plasterboard, which is very popular when decorating residential spaces.
Even its moisture-resistant variety will not be able to withstand the vagaries of the weather and will absorb moisture over time.
How and how the interior decoration of a veranda in a private house is carried out
This will affect the appearance of the surface in the most negative way - it will swell with bumps and become covered with unsightly spots, after which the structure will have to be completely dismantled.
Suspended solutions made from panels are very inexpensive and are in demand for renovations on a small budget. In addition, the installation of panels both on a frame and on a simple sheathing is very easy and is within the capabilities of even novice craftsmen.
Of the remaining materials, the most popular option and suitable for almost any design style is ordinary lining.
It is affordable, easy to install and, after treatment with special compounds, will be able to withstand atmospheric conditions.
Rare repair methods
If you want to be known as an original, then when choosing what to cover the ceiling on your veranda, you can pay attention to one of the materials mentioned below.
They have not yet earned such popularity as the previous ones, but they look very original and are suitable for decorating this part of the house according to their characteristics.

In principle, there are a lot of finishing options. It is important to consider whether the room will be open or closed. For open verandas or areas with partial glazing, it is better to select finishes with increased weather resistance and durability.
Completely enclosed areas can be decorated with less weather-resistant materials.
Examples
If you do not see this or that finishing option with your own eyes, it is very difficult to decide on a specific type of design. Therefore, below are several photo examples of what can be used to line the ceiling on the veranda and how the coating will look in the end.


Almost all of the options for finishing the veranda presented in this article can be done independently.
The exception will be suspended ceiling, but, if desired, even such a coating can be installed with your own hands. The choice of a specific type of design should be made taking into account the appearance of the entire house, the available budget and the personal aesthetic preferences of its owners.
It’s great when it’s possible to add a porch or veranda to your house. This allows you to increase it usable area and organize a cozy place to relax closer to nature. However, during the preparation process a number of questions arise. How to decorate a veranda or porch so that it harmonizes with the facade of the house? How to choose architectural solutions, materials and colors? Let's try to figure it out.
How to decorate the veranda outside?
The veranda can be open (summer) or closed (glazed), as well as combined - partially closed. The finish depends on the type chosen.
So, for an open veranda, finishing is not at all necessary - you can limit yourself to just the roof. If you plan to use the extension all year round, it should be closed. This means you can’t do without finishing.
The most common materials for cladding a veranda: wood, brick, stone, glass, plastic double glazed windows, siding and façade panels. The choice depends primarily on the decoration of the facade of the house.
The optimal solution for wooden facade- veranda trimmed with wood.
Such a house will look harmonious. Sometimes wooden porch or a veranda is also added to houses finished with other materials.
However, this cladding is not for lazy homeowners. It needs to be treated regularly to protect it from moisture, mold and pests.
A veranda finished with brick or stone looks solid and fundamental. It fits perfectly with a façade lined with the same material.
Advantages of stone and brick:
- durability,
- strength,
- frost resistance,
- moisture resistance.
However, do not forget that this is quite heavy material. It needs an appropriate foundation. Before deciding to finish with brick or stone, consult with experts about the possibility of laying a suitable foundation.

Glazed verandas are a common and interesting option.
Glass combines with almost all materials. Glass has, perhaps, only two disadvantages:
1. This is a fragile material. If boys like to play football in the yard, it is better to avoid such decoration.
2. A glazed veranda cannot be additionally insulated with thermal insulation materials.

The veranda can be lined with polycarbonate. It looks good as a roof for an open veranda. But it can also be used as the main material for construction.
Such a veranda can be combined with different finishes facade, but is not suitable for every architectural style. For modern houses it is quite acceptable, but for classical, Russian, Scandinavian and some other styles it is not suitable.
The disadvantage of a polycarbonate veranda is that in appearance it resembles a greenhouse.


Advantages and disadvantages of finishing the veranda with siding
Siding has many advantages as a material for finishing verandas and porches:
- moisture resistance;
- frost resistance and resistance to temperature changes;
- possibility of additional insulation of the veranda;
- ease of care;
- simple and quick installation;
- affordable price.
In addition, it fits almost any facade, because in addition to traditional siding, you can use the following to decorate the veranda:
- facade panels imitating natural brick and stone;
- foam siding, repeating the shape and texture of the house’s wooden trim;
- block house, externally almost indistinguishable from the facade made of logs.
There is, perhaps, only one drawback. Vinyl siding will fade in the sun over the years. Depending on the additives that make up the panels, color changes may be more or less noticeable, but they exist. Therefore, the veranda, if it is added after a few years, may stand out a little against the background of the facade. What to do?
Ideally, of course, it is better to immediately build a house with a veranda - then the color of the finish will be uniform. Also, problems do not arise if the facade was lined with white (or very light, pastel) panels. The color of this siding will remain unchanged. The difference will be practically unnoticeable if the house is lined with acrylic panels: even dark ones, they do not change their color over the years.
Although the finishing area is small, be sure to use sheathing. This will extend the life of the panels and the walls underneath them. Thanks to the air gap under the finish, moisture will not accumulate and mold will form.
Not just exterior decoration
There are practically no restrictions in choosing the interior decoration of the veranda and porch. It could be wood, plastic panels, brick walls or any other option you like.
What flooring should I choose for my veranda and porch?
Wood looks beautiful, but its service life is limited, and the coating itself requires regular maintenance. A good alternative is . It is made of wood-polymer composite, thanks to which it combines everything best properties wood and polymer. On the one hand, it is warm, cozy and beautiful, on the other hand, it is frost-resistant, not afraid of moisture and temperature changes, and does not require special treatment or care.
Summary
Before you start building a veranda or porch, consider whether it will be open or closed, what materials you will use, what colors to choose. Calculate how many panels you will need. After this you can start working. And may your veranda and porch be cozy, beautiful and delight you for many years to come.
22508 0 7
Finishing the veranda: choosing a combination of 9 types of materials
Living in your own home offers many benefits: fresh air, silence, the ability to leave the room directly into nature at any time. But all this is not given for nothing; you have to organize comfort for yourself by arranging the house not only inside, but also outside. And even such a completely non-global task as decorating the inside of the veranda with your own hands forces you to spend a lot of money, and first study the materials that can be used for this.
In our current house, the porch is attached to the main entrance. In our future home, we want to make an exit to it from the kitchen-living room. Therefore, we are already thinking through finishing and design options.

Types of verandas
Unlike gazebos and terraces, the veranda has at least one common wall with the house, since it is attached to it or even built between two or three walls and has a common wall with it.
On the one hand, this facilitates its construction, but on the other hand, it imposes restrictions on the freedom of choice of finishing materials. After all, you want the veranda finishing material not to be dissonant with the main structure, so that the house and its extension look, if not as one whole, then as a beautiful ensemble.

By design, a veranda in a private house can be open or closed.
- Open only has a canopy(or placed under the roof of the house) and light fencing around the perimeter. Of course, you can feel comfortable on it only in the warm season and in good weather.
This is an excellent option for a summer holiday, an opportunity to admire nature and breathe fresh air without obstacles. At the dacha, I would agree to such a decision. Or if this veranda was not the only recreation area.

- Since the house is our permanent place of residence, I only need a closed veranda, that is glazed or otherwise protected from slanting rain, cold winds and snowfalls. Plus it is insulated, but this does not apply to finishing.
Because you want to go out to breathe and admire the beauty at any time of the year, without experiencing discomfort. As well as sitting with friends over a glass of tea in an informal setting.

Thus, the issue with the design is resolved for me: either closed, or, if conditions allow, both. But with materials for construction and finishing - no.
Exterior decoration
The house will be wooden. Perhaps the finishing of the facades is still unknown. Therefore, I am considering all possible options.
1 – Tree
An ideal material that can be combined with any other and allows you to realize the most different design from Russian rustic with twisted pillars and carvings to modern with supports made of square beams.
Here are some example combinations:
- Tree + wood;


- Wood, glass, forged elements;

- Wood and brick.

The only one, but significant the disadvantage of wood is its instability to precipitation and other weather and natural phenomena , including the sun's rays and bugs that love to chew on it and live in it. Well, there's a fire danger.
The instructions prescribe that construction wood must be treated with all kinds of fire-retardant and antifungal impregnations and coated with paints and varnishes.
In my humble opinion, such treatment deprives the tree of its essential positive property– environmental friendliness. In addition, it must be repeated periodically so that the structure does not lose its attractive appearance. And this makes me despondent due to natural laziness and the knowledge that there is enough to do in the house even without annual paintwork.

2 – Brick and stone
The foundation and supports that support the roof of the veranda attached to the house can be made of brick, stone or concrete. This design fits well with the main structure of similar material or plastered, lined artificial stone, basement siding.


Such an extension to a wooden building would look somewhat ridiculous and alien.
3 – Plastic
Plastic double-glazed windows, vinyl - all these and similar artificial materials can withstand any weather disasters:
- are not afraid of moisture,
- frost,
- heat,
- practically do not fade from the sun.
And if you are deciding what to decorate the outside of the veranda with, so as not to think anymore about maintaining it in its original form, then preference should be given to them.
- Plastic double-glazed windows themselves are both a supporting structure and glazing. The option presented below is very convenient to use: such surfaces are easy to care for, the veranda closed windows and the doors become almost airtight, and it will last for many years.

- But I don’t like its appearance; I would choose not white plastic, but a wood one. Or a completely transparent design, like this:

- Another popular material is cellular polycarbonate. It can be either transparent or colored, which allows you to visually connect the veranda with the house into a single ensemble. In combination with metal frame, it is used both to create a transparent or translucent canopy for an open veranda, and as the main material for the construction of a closed one.


- Soft windows. Another type of PVC materials. They represent a dense transparent film, edged around the perimeter with durable material with mounting holes. Mounted on a frame, mostly wooden.
Soft windows are convenient because are not afraid of moisture and do not rot, they can be easily dismantled for the summer and returned to their place when bad weather arrives, at will, turning a closed veranda into an open one and vice versa.

- Vinyl siding. In my opinion, such exterior decoration looks good only if it is a continuation of the facades of the house. But I have a personal, inexplicable prejudice towards this material, associated solely with appearance.
Perhaps because there was too much of him around. But with a limited budget, I allow this option.

Looks much more solid basement siding like a stone or brick, besides, it is thicker and stronger than a wall one.
Wall and ceiling finishing
An equally important question is how to decorate the inside of the veranda. Especially for me, since it will be an extension of the living room. The choice is greatly simplified by the fact that the room will be closed and, if possible, insulated, which allows the use of materials that are not too resistant to moisture.

However, in the conditions of a cold veranda, some will still have to be excluded, leaving only those that will not be capricious due to changes in temperature and air humidity.
I'll start with flooring.
4 – Tile
There are many varieties of floor tiles; almost any can be used on the veranda. The main thing is that the surface is not slippery.
- Concrete slabs, including paving stones and paving stones, are an excellent solution for extensions “on the ground”, without a foundation. It is not afraid of precipitation, does not slip, especially if made with the addition of stone chips, and is easy to care for.

- Ceramic tile. Before finishing the floor with it, you need to make sure that the material is frost-resistant. Disadvantages: gets very hot in the heat and cools down in the cold.

- Clinker tiles. Externally it resembles a brick due to its size and rectangular shape.

- Porcelain tiles are high-strength tiles. To decorate the inside of the veranda, it is better to choose tiles with a rough surface rather than a polished one.

All of these coatings are remarkable in their operational and aesthetic characteristics, as well as durable and repairable - you can easily replace a cracked tile with another if you have a certain supply of material.
5 – Wood and composite coverings
Plank flooring is the most affordable, familiar, and easy to install material. All this is great, but I have the same complaints about it as I do about load-bearing wooden structures: the need to protect the wood from insects, fire, moisture, etc.

I prefer decking or decking - composite material from wood waste and polymers. Externally, the coating is indistinguishable from natural, but it is not at all afraid of moisture, resistant to mechanical damage, and does not change its geometric parameters when humidity and air temperature change.

And if you have to choose what you can use to finish the floor on the veranda, terrace or gazebo, then I will give preference to decking.
To prevent the coating from slipping, its surface is often corrugated, as in the previous picture. But there are also smooth models.

By the way, a note to lovers of the classics: in addition to the traditional form in the form of a board, decking is also available in the form of parquet.
6 – Synthetic coatings
These include tiles made of PVC, rubber, rubber. Quite durable, non-slip, with a variety of designs, easy to install.

And self-leveling polyurethane floors are a solution that forms a continuous, seamless surface, consisting of a mixture of polymers with polyester and epoxy resins.

If the entrance to the veranda was only from the house, the floors inside could be finished with laminate or parquet board. But this is not our case, since access to the garden will be required. And this is dirt and moisture carried on shoes.
It remains to consider possible finishes for walls and ceilings.
7 – And again a tree
For the third time I will not express my complaints about the lining, bolthouse, imitation timber and other wooden finishing. Moreover, being inside and not in direct contact with dirt and water, it is much more acceptable on the ceiling and walls than on the floor or outside.

I will only say that I much prefer the option coated with matte or glaze paint, since the color of natural wood, when there is so much of it, evokes associations with a bathhouse or sauna.


Although much depends on the profile of the wall panel and the technology of its fastening. For example, a plank made of ash or larch, mounted on a frame with small gaps, looks very original.

8 – Natural and artificial stone
Internal wall cladding with tiles and artificial stone is a fairly common move in interior design. He is very suitable for any Mediterranean style. You can also create one on the veranda if desired.

And natural stone goes well with outdoor oven or a fireplace built into one of the walls. It will also ensure fire safety.

9 – Wall panels
And again we return from wooden panels to plastic and MDF panels that are similar in appearance, but completely different in characteristics.
- Plastic panels are an ideal material if you are thinking about how to decorate the ceiling and walls of an open veranda. He is only afraid of mechanical damage, especially during severe frosts. All others are negative natural factors he doesn't care.

- MDF panels are afraid of moisture because they contain wood particles, so they are only suitable for cladding the internal walls and ceiling of an extension that is protected from precipitation. And in appearance, unlike PVC panels, they also look more like wood.

Conclusion
I don’t yet know what my future veranda will look like, but some priorities regarding the choice of materials for its finishing have already emerged. Most likely, it will be continuous glazing with some decorative elements because I don't want a tree.
Finishing the inside of the veranda with plastic panels makes it too artificial, and the stone is difficult and expensive.

Of course, we need to think more, watch the video in this article again after we decide on a house. But the pros and cons of all options are already listed. Share your thoughts on this with me in the comments, maybe you know something else?
October 28, 2016If you want to express gratitude, add a clarification or objection, or ask the author something - add a comment or say thank you!
The content of the article:
Finishing a veranda is a set of measures aimed at its improvement. A veranda is an extension adjacent to the wall of a house. It refers to a type of summer unheated premises and can be indoors or open version execution. Depending on the type of extension, the interior walls are finished. In addition, the configuration of the veranda and its external design should fit well into the exterior of the entire building. With simple execution skills construction work, you can finish the walls of the veranda with your own hands.
The choice of material for finishing the walls of the veranda
The materials chosen for finishing the walls of the veranda must meet practical and aesthetic requirements. The peculiarity of their choice is the lack of heating in the closed type extension and the serious impact climatic conditions on the open veranda structure. Therefore, the material used for decoration must not only be visually attractive and match the design, but also withstand exposure to the sun, high humidity and temperature fluctuations.
The veranda walls can be covered with many finishing materials that are used for interior and exterior work:
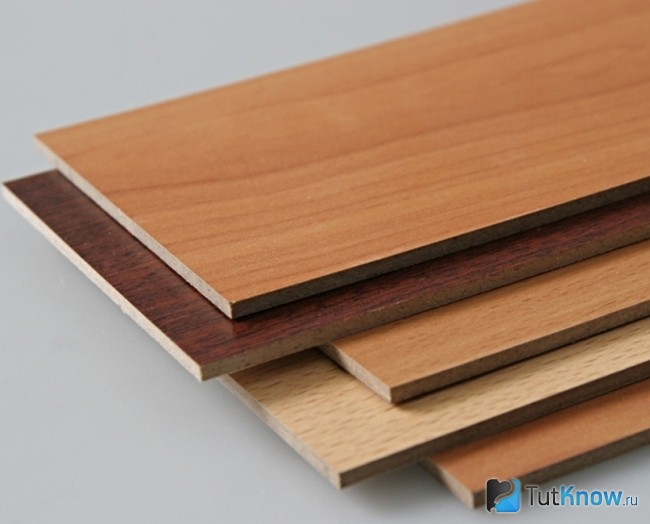
- . It belongs to the classics of the genre, as it is the most popular material for wall cladding due to its environmental friendliness, excellent appearance and pleasant aroma exuded by natural wood.
- Plasterboard sheets (GKL). For verandas, their moisture-resistant version is suitable. Such products differ from ordinary gypsum boards in their green color. The material is environmentally friendly, easy to install and can be easily processed in numerous ways. It can take almost any shape, and this is important when decorating walls. This type of cladding is used in closed verandas.
- . This material imitates natural wood. It is quite durable, but a damp environment is not for it. Therefore, MDF can be used to cover the walls of a closed veranda.
- PVC panels. This is a durable and inexpensive moisture-resistant material. It is presented in a rich assortment of various shades and colors, can have different textures, is very easy to work with and is not particularly demanding to care for. Suitable for cladding walls of any type of extension.
- Siding panels. They are practical to use and affordable. Often imitate wood and come in a variety of colors. The material does not rot, is resistant to temperature changes and fire, easy to care for and durable. Most often used for exterior wall decoration on the veranda.
Preparatory work before finishing the walls on the veranda

If the veranda has glazing, it is better to finish its walls after installing thermal insulation under the windows. In this case, the room can be used almost until frost sets in.
To insulate a closed veranda you can use mineral wool or polystyrene foam. To begin with, waterproofing should be secured to the walls; you can use a moisture-proof polyethylene film as it. It is laid with an overlap of 150-200 mm, the joints of the canvases must be glued with metallized tape.
After this, it is necessary to install lathing on the walls. The material for it can be a wooden beam, pre-treated with an antiseptic. The cross-section of the beam should be selected according to the thickness of the insulation, and the size of the sheathing cell should correspond to the width of the insulation.
Then the insulation, in particular mineral wool, should be packaged in waterproof material and placed in the cells of the sheathing. Wrapping the insulation will protect it from moisture and maintain its functionality for many years.
After this, a foil membrane should be secured to the sheathing on top of the insulation and its joints should be taped. During the insulation process, it plays the role of a heat-reflecting screen. At this point, the thermal insulation of the walls can be completed.
Veranda wall finishing technology
Having chosen what to cover the walls on the veranda with, you can begin finishing them. Below we will look at several of its options.
Decorating veranda walls with PVC panels

This finishing method is inexpensive, but it can make an ordinary room cozy and interesting. The panels are not afraid of high air humidity and sudden changes in its temperature - they are not capable of causing deformation of this material. Installation of the panels is easy and without any tricks.
The disadvantage of the material is its fragility, although currently you can purchase “armored” panels, the cost of which will be twice as much as usual. Therefore, after installing such cladding, you should be more careful when moving chairs towards it or leaning on the wall. To minimize risks, there is such a construction trick: the first plank of the panel sheathing is mounted at the level of the knees, the second - at the pelvis, and the third - at the shoulder.
The frame for plastic panels is made of wooden slats or profiles, which are used when installing gypsum boards. The slats can have a cross-section of 30x10 or 30x20 mm; before use they should be treated with an antiseptic.
The sheathing slats should be fastened in a perpendicular direction relative to the installation of the panels. For example, if the plastic on the wall needs to be placed vertically, then the slats for attaching it should be placed horizontally on the wall, the step between them should not exceed 50 cm.
After making the sheathing in the corner of the room, you need to secure the mounting angle or starting profile with screws or nails. The corner will allow you to join the panels to each other. The starting profile is installed if the adjacent wall will be sheathed with a different material. You need to install a mounting strip for the baseboard on the ceiling.
The first panel is inserted into the guide profile with the tenon facing towards the installation. Then it needs to be fixed to the sheathing using a self-tapping screw with a press washer. Then the tenon of the next PVC panel must be tightly inserted into the groove of the previous one and secured. All other cladding panels are installed in the same way.
Due to the fact that plastic has thermal expansion, a gap of 20-30 mm should be left at the bottom and top of the wall to compensate for it, masking it with a plinth.
Important! Panels with a pattern when covering walls are installed from left to right. Plain panels can be mounted starting from any side.
Decorating veranda walls with MDF panels
This material is quite popular among DIY enthusiasts. MDF panels are stronger than plastic, but are not resistant to moisture. Therefore, they should only be used on closed verandas.
The installation process of MDF panels is similar to the previous one. Only in this case their fastening is done using metal special devices- clamps, which are fixed to the material with small nails or a construction stapler. This must be done through the attachment; it will prevent damage to the edge of the panel.
Decorating the walls of the veranda with clapboard

Lining is a wooden board up to 22 mm thick, which has special grooves with which the installation and joining of cladding elements is carried out. If the material is treated with an antiseptic, its service life can be extended to 20 years.
According to the production method, the cladding board can be solid or spliced. In the latter case, pieces of high-quality wood are connected to each other in a special way. Such products do not have flaws in the form of knots or cracks, but are not suitable for covering the walls of an open veranda.
The reason for this is the formation of cracks in the places where the boards meet at high humidity, which spoil the appearance of the finished cladding. The most expensive lining is almost always spliced. It has an “extra” class, and products of classes A, B and C are made from solid wood.
Before finishing the walls on the veranda with cladding boards, the material must be left to adapt in a closed room for several days, and then the lining must be treated protective composition. Installing boards on veranda walls is similar to installing PVC and MDF panels.
There are several ways to attach it:
- The simplest of them is fastening using galvanized nails. In this case, they are driven in along the center of the planks, and the caps are recessed into the wood using a punch.
- Fixing the sheathing board with self-tapping screws is more labor-intensive, but the fastening points are not visible. A hole with a depth of about 10 mm is drilled in the board on the tenon side. The diameters of the drill and fastener heads must match each other. Then the plank is screwed to the sheathing batten, and the screw is recessed into the hole and closed with a dowel on top. The fastening area is then sanded.
- The board can be attached to the sheathing using mounting brackets. For this, a pneumatic or mechanical construction stapler is used.
- Another way is fastening wood paneling kleimers. In this case, it is first attached to the rear wall of the mounting groove of the first strip. Then it is fastened with nails to the wall and only then the clamp is fixed. The same clamp is installed on the second board, its tenon is inserted into the groove of the previous plank and the clamp is secured to the sheathing batten. With the help of such fasteners, only interior lining walls
Before painting the walls on the veranda, it is recommended to apply the selected varnish to a sample of the material and let it dry. It happens that after drying the shade of the coating changes, and it is quite difficult to remove a layer of varnish that does not correspond to the design. Therefore, it would be better to buy a small container with a painting composition for testing, and if it suits, purchase the rest.
If there is a need to leave the cladding wood in original form, a colorless glaze containing an ultraviolet filter can be applied to it. It will help prevent the walls of the veranda from fading from exposure to the sun.
Exterior wall decoration of the veranda

It can be done using lining or siding. Wood cladding in this regard, it is somewhat capricious. Despite the treatment of its elements with various antiseptics, when exposed to precipitation, sunlight and seasonal temperature changes, the cladding may lose its original appearance if it is not taken care of.
Therefore, every year you will have to carry out various measures to preserve it: impregnation, painting, etc. But if the choice towards using wood has already been made, it is important to remember that horizontal fastening of boards external cladding should be done with the tenon facing up, fixing them in 2 rows on each side of the lock joint.
Exterior finishing of veranda walls with siding is a better option. This type of cladding got its name in the 19th century. Planed and painted boards were attached at an angle to the plane of the wall so that each subsequent horizontal element slightly overhangs the previous one. This position of the boards allowed water to roll down the cladding without delay. Nowadays, siding performs two functions - protective and aesthetic.
Most often used for external wall cladding vinyl siding. Its popularity is due to ease of installation, practicality and affordable price. Externally, the material looks like an ordinary board, which is used for cladding the facade.
However, vinyl will not lose its appearance even after a couple of decades, despite seasonal temperature fluctuations, bitter frosts and heavy rainfalls. In addition, dirt does not stick to this material and maintenance is minimal - just wash off the dust from the cladding with a garden hose. Thanks to a huge number of shades, siding can be matched to any home exterior; it will fit perfectly into the overall ensemble.
Installation of vinyl siding panels is carried out in the following order:
- First, you need to make and install sheathing for cladding the walls of the veranda. This will require unedged board 30 mm thick or wooden beam with cross-sectional dimensions 40x50 mm. It must be fixed in a vertical position in increments of 400-500 mm over the entire surface of the walls. Additional wooden blocks should be installed around the windows, at the corners of the veranda, along the upper and lower edges of the future cladding.
- From below, along the perimeter of the walls in a strictly horizontal position, it is necessary to secure the starting profile to the sheathing using self-tapping screws.
- After this you need to install corner profiles around openings, as well as in all corners of the building. The lower edge of the corner profile should be located 5-6 mm below the level of the starting strip.
- Then you should cut the panels. Vinyl is easy to cut with scissors, a hacksaw or electric jigsaw. Due to the fact that vinyl panels have thermal expansion, each of them must be made 5-7 mm shorter than the wall.
- After this, the prepared panel must be slightly bent in the center, and its edges inserted into the grooves of the profiles located at the corners of the wall. Then the panel should be aligned and its lower edge should be inserted into the starting profile. The upper edge must be secured with self-tapping screws to the sheathing through special holes.
- Pressing the screw heads tightly against the panel material is unacceptable. The oval shape of the fastening holes is specially designed for free movement of material relative to the screw part of the fastener when air temperature changes. There should be a distance of 1.5 mm between the screw head and the sheathing.
- The next panel must also be inserted into the corner profiles, snapped into the groove of the previous element and secured to the wall sheathing.
- Before installation last panel It is necessary to level the finishing profile on the sheathing. Then you need to cut the panel to the required width and snap it into the previous paneling element, simply inserting the free edge of the product into the finishing profile. This completes the covering of the veranda walls with siding.
This article is intended to help you understand the variety of materials for finishing a veranda in a private home. Photos of what to cover and how to paint are also included. The article specifies the features of the use of finishing materials in open and closed verandas. Materials such as lining, decorative plaster, PVC panels, polycarbonate, etc. will appear. So, if you are interested in the question of how to cover a veranda, then you will get the answers from the article.
Terrace design in country house in a modern style (photo)
Finishing a veranda in a private house - photos of finishing materials and their purpose
Having dealt with the issue, you need to move directly to its finishing. When choosing, you should rely, first of all, on the practicality of the finish and its appearance. It is worth thinking through and deciding whether the veranda will be used for walking, as they say, “barefoot,” or whether they will walk on it in shoes.
In any case, the number of different finishing materials allows you to unleash your imagination to the fullest and show your creative power. Before buying a finish, a good option would be to create a mock-up of the future design, which will help you avoid:
- problems with the combination of colors and materials;
- overspending or lack of finishing.
In addition, the design project allows you to think through more details and choose the best combination for finishing the veranda in a private house. All finishing materials can be divided into different target areas of application:
- Floor-standing;
- Wall-mounted;
- Ceiling.
Most of the materials used for finishing are universal - they are suitable for verandas open type, and closed, however, there are various exceptions.
 Decorating a veranda in a private house - interior photo
 Interior wall decoration
For the interior decoration of the veranda, there are many materials that allow you to achieve a pleasant appearance. Of course, you can use ordinary finishing materials, such as wallpaper, however, on the veranda they most likely will not last long and will become indecent.
This chapter discusses the main types of materials for covering walls on the veranda:
- Lining;
- Decorative plaster;
- PVC panels;
- MDF panels.
 room interior
 They all require different levels skills from a master - sheathing with PVC panels is much easier than finishing a wall with plaster, however, they produce effects that correspond to the labor costs. How to sheathe the inside of a veranda? – Let's start with the most popular lining.
Finishing the veranda with clapboard
 Warming the veranda wooden house
 Lining for a veranda is classically a thin, usually up to 5-10mm, board made of wood, wood processing materials or plastic. To connect individual boards together, a tongue and groove system is used, which allows you to quickly and securely connect the boards to each other.
Previously, the use of lining was considered especially chic - walls covered with lining in the times Soviet Union, were a huge luxury, since getting it could be quite problematic. Now it is a publicly available material that can be bought at any hardware store.
The lining for the veranda differs in the profile of its grooves and the angle of processing of the edges, which allows you to create different cosmetic effects:
- standard profile, with beveled edges forming noticeable transitions between boards;
- “calm” profile, with softer transitions due to the small angle of edge stitching;
- Europrofile, forming a pattern after collecting the coating.
 Separately, there are American and European linings, which have their own characteristics of use - “American” allows you to imitate the “overlapping” style of laying, and “European” has additional ridges on the front side that cover the joints.
As a material, it is quite whimsical - when choosing lining from solid wood, you need to take into account the drying that will occur after fixing the lining to the wall. MDF lining will not require such treatment, however, if the humidity in the room is very high, over time it can absorb moisture and become unsuitable for use. wall covering view. 
To finish the veranda with clapboard, you only need a screwdriver and clamps - special metal latches that are screwed to the board and allow you to speed up the work process. The tenons on the boards are longer than the grooves, which protects against the destruction of an even row when the board dries, so you should not try to push the tenon all the way.
Decorative plaster
This type of interior decoration of a veranda in a private house (photo enlarges) is a special mixture that, when dried, creates a finished, in the case of colored and textured plasters, or an unfinished wall covering. 
For now decorative plasters for the veranda there is a huge number:
- Colored, having various colors in its composition;
- Stone, imitating the texture and appearance of natural stone;
- Venetian, creating the effect of natural marble;
- Silk, or also called “liquid wallpaper”, containing synthetic fibers, and other types.
The appearance of a plaster coating is determined not only by the material, but also by the application technique. Using different brush stroke techniques and experimenting with the amount of mass on the spatula, it is possible to achieve different visual effects. Craftsmen can use it to produce entire paintings - sgraffito, which are distinguished by great strength and durability. 
Of all types of plaster, only silk is not suitable for use on open verandas - the material is very sensitive to changes in temperature and moisture, which will lead to its deterioration after the first frost and high dampness after rains.
PVC panels for verandas
Polyvinyl chloride is extremely versatile and comfortable material, which is essentially plastic. Panels made from it can take any shape, and the colors are limited only by the designer’s imagination and coloring capabilities. 
Panels made from it have:
- resistance to high temperatures;
- low weight;
- water resistance.
Another huge advantage is the cost - one sq.m. PVC panels will cost you much less than a meter of lining or MDF panels. 
Both regular panels without special treatment and lining with a system of pins and grooves are available for sale. The process of finishing a PVC veranda is very simple - it is done using fasteners. The panels can also be screwed using ordinary screws. low power, however, this is not very beautiful and you risk easily splitting the sheet with too much force. 
PVC lining is installed similarly to conventional lining, using clamps and screws. Its profiles are very diverse - it all depends on the manufacturer.
The main disadvantage of PVC products is their low frost resistance - at temperatures below -15 degrees the panel may crack.
MDF panels
The word MDF comes from an abbreviation from the English name - Medium Density Fiberboard, which translated into Russian means fiberboard medium density. The material consists of chips of different types of wood pressed under high pressure under temperature. It is an environmentally friendly material. 
MDF panels for covering verandas are made up to 10mm thick and have:
- sound absorption;
- resistance to high and low temperatures;
- ease of work.
The main disadvantage of MDF is its low resistance to moisture, which is seriously reduced if there are open ends or chips without coating. The slab swells and, over time, breaks up into chips. 
MDF panels are manufactured as separate sheets, and in the form of lining and other finishing products. They are easy to work with - you can simply screw them on with screws. The material is varied - the coating has many different textures and colors.
Having discussed the question of how to decorate the walls of the veranda inside, we move on to the ceilings themselves.
What to make the ceiling on the veranda from
Ceiling coverings have a separate feature - the material, if possible, should be light and resistant to moisture that can get on it from the roof. 
To finish the ceiling on the veranda, we will consider the following options:
- lining;
- PVC panels;
- polycarbonate;
- wicker ceilings.
All these materials are easy to install and do not require special temperature conditions in the room, which makes them truly universal.
When making a ceiling on the veranda, you need to take into account the future location of the light sources - they can add additional zest to the room with the correct ceiling covering. 
A prerequisite is the use of skirting boards - no material will give you a perfect ceiling without noticeable joints, and when creating wooden coverings It is necessary to leave additional gaps for the expansion of the wood after drying.
Lining
The lining on the ceiling is no different from the lining on the walls. Using it on two surfaces of the veranda at once - the ceiling and walls - allows you to create a complete, noble design of the room. The direction can create a special effect - it can be placed diagonally, adding a play of geometry to the room, or continuing the lining on the walls. 
The peculiarity of covering the veranda inside with clapboard is only the use of lighter ceiling lining, up to 7 mm thick, and somewhat more complex installation with tracking of indentations from the walls, which are laid for possible expansion of the wood due to rising temperatures. When finishing the ceiling and walls with clapboard, it is necessary to take into account the width of the boards. For a pleasant appearance, it is advisable to continue the joints of the walls on the ceiling, making the same arrangement of the boards. 
PVC panels
How ceiling material, polyvinyl chloride is universal - it can be used both on the veranda and in the house. For ceiling works The panels are very convenient - they are very light in weight. 
The process of finishing a veranda in a private house (photo clickable) is simple and combines finishing and leveling - using guides from metal profiles manages to create a perfectly flat ceiling without extra costs by time. The profiles are mounted at the required length - usually 50-80mm is enough to remove even a noticeable difference, after which the wiring necessary for the lamps is laid under them and the entire structure is sheathed with panels.
The material is quite thin and soft, so if necessary it can be easily cut with ordinary construction knife to the required parts. Each panel is protected with a film that must be removed after installation. 
The variety of materials allows you not to limit the creative space, but for the ceiling it is better to take a closer look at glossy options that will visually enlarge the room.
Polycarbonate
Polycarbonate is a very pleasant-looking material. At the moment it is produced mainly in two forms:
- monolithic plates;
- with cellular division.
 The advantage of this ceiling material is its transparency, which imitates glass, without the latter’s disadvantages: fragility and heavy weight. It can be given any color scheme. A good option is the design of a polycarbonate ceiling together with a transparent roof, which can create a unique-looking veranda, completely filled with sunlight.
Installation of polycarbonate on the veranda is carried out by pressing it along the edges, in the case of small individual plates, or by creating a frame and subsequent covering. 
You need to be especially careful when working with wires - they must be secured to opaque areas, otherwise they will spoil the entire effect of the transparent ceiling.
Wicker ceilings for the veranda
Such a design solution will give a special “rustic” feel, in in a good way this word, the shade of the veranda. The only difficulty is installing the lamps - the weaving is not always strong and making an even hole in it is quite difficult. 
The wicker bamboo ceiling for the veranda is made of thin plywood, 3-4mm, or veneer. It is enough to simply unravel a large sheet into 50-150mm pieces and intertwine them together. The ends are lined with perpendicular strips.
For fastening, it is necessary to add several transverse strips to the ceiling, at a distance of about 1000-1500 mm, to which sections of the tape are nailed with slate nails with wide heads and thin legs. It is better to lift the weaving with the help of ropes that are attached to cross joists. Start with a narrower edge - a good braid will not fall apart from such an impact. 
Difficulty may arise at the fastening stage - plywood and, especially, veneer easily crack from strong influences, so it’s better to take your time and hammer in the nails slowly.
Having examined the main aspects of the interior decoration of a veranda in a private house (clickable photo), let’s move on to the final and no less important stage– floor covering.
Veranda flooring
The floor is very important - tactile sensations come from it when walking. You can consider the following types of flooring for the veranda:
- Tile;
- Terrace board;
- Linoleum;
- Rubber coating;
- Concrete floor.
 When choosing a floor covering, you need to take into account what kind of building it will be - open or closed, whether people will walk in it wearing shoes or barefoot. With a “clean” veranda, you must not forget about the possibility of placing carpets or other decorative coverings.
Let's move on directly to discussing the question of what to make floors on the veranda from, let's start with tiles.
Tiles for the veranda
This may not be the easiest option, but it is the most practical. The tile itself:
- shockproof;
- easy to clean because it is water resistant;
- has many design options.
You can lay different tiles geometric patterns, combining in them the shape of the tile itself and the pattern on it. 
To place tiles on the veranda, preliminary preparation of the floor covering is required - leveling and screeding. Otherwise, the tiles will “play”, creating unevenness and unpleasant sensations for the feet.
To work with tiles, you need tile adhesive, which is applied to the back surface. The individual parts must be leveled with each other, and special crosses are laid between the corners to align the seams in size. The joints are masked using a special grout, which remains in the seams and is easily wiped off the surface. 
The main difficulty may be cutting under non-standard sizes– smooth edges are quite difficult to make without a special tile cutter, which costs quite a lot of money, however, if necessary, you can ask your friends with this tool to cut the tiles, or cut the tiles with a hacksaw or grinder.
Terrace board for veranda
Terrace boards for verandas, also called decking, are specially treated lumber. It has three layers - the bottom, which is a surface with grooves for ventilation, the middle, which has cavities for expanding the wood, and the top, smooth, front layer. 
Advantages of flooring for the veranda:
- Easy installation;
- Durability;
- Heat capacity.
The appearance depends on the coating and the material used, of which there are a huge number of combinations. If use is planned for open areas, then it is better to give preference to one coated with varnish or impregnated against dampness. 
The floor on an open veranda requires the creation of a frame and the passage of joists. The logs are placed perpendicular to the direction every 400-600mm. After this, the board is simply nailed or screwed. You must work with this material very carefully - a blow past the nail can ruin the appearance of the coating. 
Linoleum
When studying the question of how to cover the floor on the veranda of a private house, let’s turn our attention to linoleum. It is made from a combination of polyvinyl chloride and polymers, which gives excellent qualities for flooring. Linoleum:
- waterproof when installed in one piece;
- impact resistant;
- very easy to work with;
- cheap.
 There are a huge number of types of linoleum and choosing it to suit your design is quite simple. There are those that imitate parquet or stone, and quite naturally, and they can only be distinguished upon detailed examination.
 Decorating a veranda in a private house - photo of linoleum on the floor
 For installation, it is enough to have a relatively flat floor surface for a veranda outdoors or indoors. The roll is simply rolled out, leveled and attached at the edges with a plinth. If necessary, it can be cut into separate sections and fastened with a special strip. This is useful when you have narrow passages where it is impossible to fit a solid piece.
For an insulated floor, it is possible to use a polyvinyl chloride lining, which is quite cheap and allows you to eliminate some of the imperfections of the surface under the linoleum, creating a heat-retaining lining.
Rubber coating
The rubber covering for the veranda is, in fact, rubber. The flooring made from it consists of individual tiles or monolithic pieces that have unique properties:
- enormous impact resistance;
- waterproof;
- resistance to temperature changes.
 The floor on the veranda of your dacha made of rubber gives you the opportunity to create a wide variety of designs with enormous strength and wear resistance. To work with it, you need a prepared, flat surface. When installing a coating with separate modular tiles no special tools are needed - with a small floor area, they simply interlock with each other and are reinforced at the edges with a plinth.
For regular tiles a polymer adhesive is needed to hold it in place. Installation is similar to conventional ceramic tiles However, the joints can be made closely without aligning them with crosses.
Rolled resembles regular linoleum with a smaller roll width. The joints between it are welded with a special soldering iron or a hair dryer with a thin nozzle, or sealed with polymer glue. 
Concrete floor
Concrete flooring for a veranda is the simplest and at the same time the heaviest covering option. For it you only need to have a pre-made monolithic foundation, or cover the floors with concrete slabs. 
This coverage:
- shockproof;
- waterproof;
- not sensitive to temperature changes;
- does not require careful care.
Of course, it is not enough to simply lay a concrete slab on the floor - you need to polish it. To do this, you need to stock up on a polishing machine, abrasive diamond belts or wheels and a lot of patience. 
The polishing process begins with the use of the largest grain belt (they are marked by the number of grains on square centimeter– 40, 80, 160, 320 and so on) and walk it over the entire surface. After this, a less abrasive tape is taken and everything is done again until the surface reaches a uniform shine.
Having dealt with the question of how and what to cover the floor on the veranda, let’s move on to painting it.
How to paint the floor on the veranda at the dacha with your own hands
Painting your porch is an excellent option for protecting your flooring. Paint protects the floor from damage and corrosion. Can be painted various materials:
- wood - boards, MDF, decking boards;
- concrete.
 How to paint the floor on the veranda at the dacha, other than acrylic paint
 For painting the wooden floor of an open veranda, the most optimal are acrylic, alkyd, nitro-enamel and oil paints. For good wood, you can also use stain or varnish. Before painting the veranda boards, the floor must be cleaned of remnants of the previous paint, if any, and sanded.
When painting, you need to dip the brush or roller to remove any excess - otherwise, accumulations of paint will form in the recesses, which will ruin the appearance. It is better to polish the varnish after painting, otherwise it will be too slippery to walk on.
Concrete floors are best painted with epoxy, acrylic paint or polyurethane enamel. Epoxy paint is not exactly painted on; it is rather “rolled” across the floor with a special spatula until an even layer is achieved. It does not wear off over time and gives a very bright color. 
How to paint the floor on the veranda at the dacha? Choose acrylic paint and polyurethane enamel. They are applied with a regular brush or roller. Before painting, it is better to clean the surface from dust and prime it, which will ensure better adhesion of the paint.
Rating of finishing materials for the veranda
To make it easier for you to make your choice, we have compiled for you a small table of the most convenient and popular finishing materials.
| Place | Material | Purpose | Rationale |
|---|---|---|---|
| 1 | Lining | Ceiling and walls | Environmentally friendly material, does not require special skills from the master. Allows you to create design solutions that will always look natural. It can be updated - sanded and re-coated with varnish or stain. |
| 2 | PVC panels | Ceiling and walls | Cheap and available material, easy to work with. Has low mass. You can find a large number of textures and colors on sale. However, it rarely looks natural and is not very durable. |
| 3 | Linoleum | Floor | Easy to use and practical at low cost. Large assortment with different colors and textures. It imitates parquet and natural stone very well. The downside is the limited area of use - it only looks good on the floor. |
| 4 | Network | Ceiling | It looks extremely impressive. The variety of plywood allows you to create different design solutions. Requires careful installation and is difficult to operate. It can only be placed on the ceiling due to its fragility. |
| 5 | Terrace board | Floor | Decking is easy to use and allows you to create a natural plank floor. The material is extremely durable due to ventilation and is immediately ready for placement. However, it costs a lot of money and is not very convenient for working around the house. |


