Concrete blind area around the house by hand. Pouring a concrete blind area around a private house. Concrete blind area around the house: how much does it cost to make the structure?
Reliable protection of the foundation from destruction by surface water is facilitated by the presence of a concrete blind area surrounding the building. The undoubted advantage of the design is its ease of manufacture. The only one alternative option creating a barrier will be a multi-tiered “pie”. The integrity of the building directly depends on the quality of the foundation, so it needs full protection. In parallel with the main function, the blind area provides comfortable movement along the building and gives its external appearance completeness. Let's look at how to make a blind area around the house with your own hands in detail.
Blind area parameters
The dimensions of any construction structure and the rules for its arrangement are regulated by regulatory documents, in our case this is SNiP 2.02.01-83. Correct blind area made of concrete meets the following indicators:
The installation of a blind area around the house is carried out in a certain sequence, the option with cladding from paving slabs shown in the diagram below:
Types of structures
The scope of work on decorating the blind area around the house with your own hands varies depending on the type of structure chosen, which can be rigid, semi-rigid and soft. Let's look at the main advantages and pitfalls of each option.
Tough
This group includes monolithic concrete products. Serves as a finishing coating concrete pouring or asphalt.
Comment! If the protective structure is planned to be insulated, a rigid type of system is the only acceptable device option. Organize insulation of semi-rigid and soft blind area inappropriate.
The operation of monolithic products continues throughout the service life of the building. But the construction concrete protection around the house is accompanied by negative aspects:
- The process is labor-intensive and takes considerable time.
- High material costs.
- Asphalt pavement requires tar. It is practical to use this binder only in the case of large-scale asphalt paving work.
- In the absence of additional cladding, it does not have a sufficient decorative effect.
Semi-rigid
The protective underground layer of the semi-rigid system is represented by a multi-layer cushion. Decorative coating can be made from paving or ceramic tiles, paving stones. Sometimes reinforced concrete slabs, cobblestones or porcelain stoneware are used for this purpose.
To fill around the house, much less labor and materials will be required than for a monolithic blind area. The technology of the device is simpler, but is unacceptable for heaving soil, which can cause deformation of the system. Comparative analysis cost, quality and external characteristics makes the semi-rigid blind area a leader compared to other types of protection around the house.
Advice! The matching of the blind area made of paving slabs and other paved paths contributes to the formation of an aesthetic appearance personal plot.
Advantages of a semi-rigid structure around the house:
- If the technology of the device is followed, the service life is from two to three decades.
- There are no climate restrictions, with the exception of permafrost.
- It can be done with little financial investment.
- Easily amenable to preventative repairs.

Soft
To protect the foundation of a soft type around the house, you will need a multi-layer cushion covered with a layer of crushed stone on top. Similar design characterized minimal costs funds and time. But it will bring benefits for a maximum of seven years. It can be done in any region, but they resort to similar decision for installing temporary protection around the house in case of lack of finances.
A concrete blind area, made in compliance with all the rules, is presented in the following video:
Technology for manufacturing concrete blind area
Installing a protective structure made of concrete around a house begins with the purchase of materials. For these purposes you will need:
- Cement. It is optimal to choose the M500 brand.
- River or quarry sand without impurities that can spoil geotextiles.
- Crushed stone fraction from 5 to 10 mm.
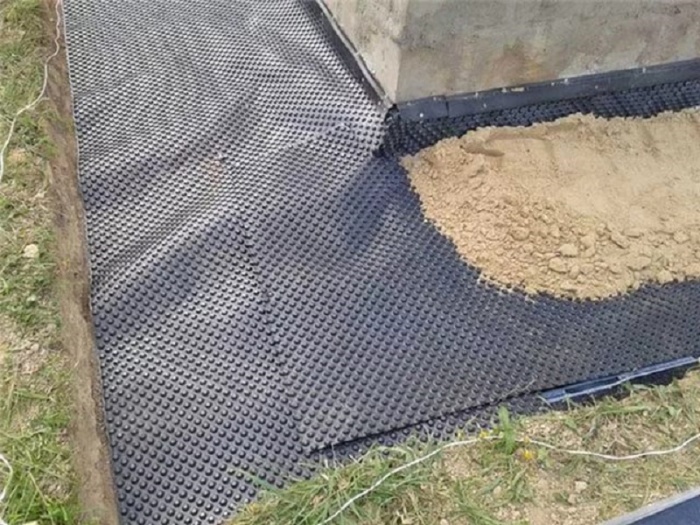
- Natural clay or geotextiles will help you create a hydraulic lock around your house.
Site preparation
Excavation work to create a blind area around the house begins with removing the top layer of soil. The use of herbicides will help eliminate vegetation activity under a concrete structure. To make an accurate designation of the boundaries of the blind area relative to the edge roof slope, use a plumb line. To mark around the house, the rope is pulled onto stakes. In addition to the corners, to avoid sagging, they are installed at intervals of 5-6 m. Installing beacons on the base around the house at intervals of 1.0-1.5 m will help to create the correct angle of inclination of the blind area.

Hydraulic lock
A hydraulic lock can be made using a layer of fatty clay, the thickness of which is 10-15 cm. A waterproofing material - roofing felt, geotextile, PVC film - serves as a complete replacement. The film will maintain its integrity if you protect it with a sand layer 5-10 cm thick, located under and on top of the material.
Attention! The sand under the future blind area must be leveled, moistened and compacted.
The installation of the material should be done correctly without tension, so that it can move around the house along with the soil. When constructing a hydraulic lock with clay, only one sand layer is formed.
Shaping the pillow
Next, according to the technology of the device, it is necessary to make a pillow around the structure of the blind area. Initially, an embankment of crushed stone 5-10 cm thick is formed. The use of material of different fractions ensures better compaction. Gravel or broken bricks can be a substitute for crushed stone. When located close to the blind area groundwater, between sand and crushed stone it is necessary to make additional waterproofing layer from geotextile. The edges of the material should extend onto the formwork.
The optimal thickness of the sand layer is 10-15 cm, taking into account high-quality compaction. You can do the work manually, making it easier labor-intensive process vibrating plate is capable. Periodic wetting with water increases density sand cushion for a blind area around the building.
Important! The formation of a cushion around the house takes place with strict observance of the angle of inclination of the concrete blind area.
A well-arranged blind area around the house with your own hands contains high-quality drainage. The following design can cope with the task of drainage:
- Around the house you need to make a trench about 20 cm wide and 10 cm deep.
- The recess is filled with crushed stone or lined with a drainage pipe.
- The pipe is laid with a slope to ensure complete drainage.
At the same stage, storm water inlets are being installed around the house.

Installation of formwork
It is better to make formwork around the house from boards 30-40 mm thick. The height depends on the size of the concrete blind area. If dismantling of the structure is not planned, the boards are treated with an antiseptic solution, and it is also advisable to waterproof them using roofing felt.
Correctly make the formwork around the building for a concrete blind area using a level. Stakes hammered with outside. Angles on bolts with a diameter of 10 mm will help to fix the formwork structure at the corners. In order for the blind area to have an attractive appearance upon completion of the work, it is necessary to make the internal seams of the formwork boards invisible.
Important! To make a blind area around the building correctly, you will need to create an expansion joint.
The seam is located at the junction of the walls of the structure and the blind area, as well as across the system. The absence of this element will cause cracks to appear in the concrete protective structure. It is necessary to make transverse seams with an interval of 2 m. Create gaps the right size 20 mm thick boards will help. If pouring concrete for the blind area around the building is not planned, the stage of arranging the formwork is excluded.

Installation of insulation
The following algorithm of actions will help to ensure high-quality insulation of the blind area:
- Sheets of foam plastic are tightly laid around the structure, and bricks are used as temporary fixation.
- The space between the plates is filled with polyurethane foam.
- After it dries, the protruding parts are removed with a sharp knife.
- On top of the foam plastic, it is necessary to make a second layer of thermal insulation for the blind area made of concrete in the form of polystyrene foam slabs.

Reinforcement and pouring concrete
To ensure the strength of the concrete blind area around the building, reinforcement is required. The cell size is 25 cm. Apply chain-link mesh not recommended due to excessive flexibility of the material. If there is no insulation layer, the reinforcement frame is placed above the blind area cushion at a height of 2-3 cm. This design contributes to the high-quality distribution of the concrete solution.

The key to pouring concrete is to ensure that the solution is evenly distributed and there are no air bubbles. “Bayoneting”, which is best done with a metal rod, will help eliminate voids. While drying cement composition it is periodically moistened with water to avoid cracks. Also, a blind area cast from concrete can be covered with a film to slow down the evaporation of moisture and uniform hardening of the protective structure around the house.

Conclusion
To protect the concrete blind area, you can make it iron-plated. There is dry and wet method processing. As an option, apply a primer to the surface, liquid glass or enamel.
To make the protective concrete structure around the building decorative, it is preferable to make cladding. As suitable material tiles (clinker or paving), natural stone, pebbles. In such a situation, concrete acts as a binding solution.

Another option on how to make a reliable blind area around a building is presented in the following video:
The blind area is designed to protect the foundation from damage that may result from contact with atmospheric moisture. Additionally, the blind area will protect the structure from the destructive effects of the roots of various plants. Many owners ignore the need to install this element completely in vain. You can make a blind area with your own hands, and thanks to this element, which is easy to construct, the service life of the building will increase significantly.
The blind area performs a number of important functions, including:
- security reliable protection the foundation of the house from the harmful effects of atmospheric moisture and other negative factors;
- diversion of any kind of water from the building into the drainage system. Special drainage gutters are installed in the surface of the blind area, thanks to which the risk of the base and base getting wet is significantly reduced;
- improving the appearance of the building. Thanks to the blind area, the foundation will look more harmonious and complete;
- additional insulation of the foundation. Given that proper arrangement all layers of the structure or the use of special thermal insulation materials, the soil close to the house will freeze much less;
- practicality. Quite often, a blind area is used as a convenient path around a building, along which you can move without causing harm to plants and other elements of the site’s landscape.

Thus, the blind area is a functional and aesthetic element that must be installed around your home. Study the instructions provided and you will be able to make a high-quality and reliable blind area with your own hands.

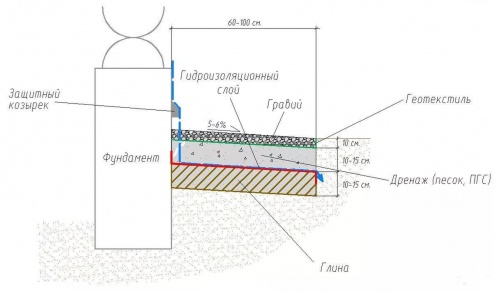
The design under consideration consists of covering (upper) and underlying (lower) layers. The underlying layer ensures a smooth surface. However, the base should not be 100% horizontal, but have some slope.
If concrete is used as the top layer, the bottom layer must be made horizontal. The slope will be created directly at the stage of pouring concrete. Thanks to the slope, quick and high-quality drainage of water from the facade of the building will be ensured.
At the end of the work, a drainage ditch is created along the outer edge of the perimeter of the blind area. The slope is usually maintained at a level of 5 cm per 1 m of blind area width.
The underlying and covering layers can be made of different materials. So, clay, crushed stone and gravel are suitable for arranging the bottom layer.
Practice shows that it is best to use crumpled clay as a base. This material initially has good waterproofing properties. Standard thickness the bottom layer is 25-30 cm. If the base of the blind area is made of clay, it will be enough to arrange a 15-20 cm layer of the substrate.

When using gravel or crushed stone, sand must be poured over the main part of the underlying layer. The thickness of a separate additional layer of sand should be 7-10 cm.
For the covering layer, use a hard and moisture-proof material. The most commonly used materials are concrete, natural stone, asphalt. Paving slabs and bricks are sometimes used.
Preparing for work
Before starting work, you need to decide on the basic parameters of the future blind area. First of all, set the appropriate width. In the majority regulatory documents it is indicated that the blind area must have a width of at least 60 cm. However, this is only the minimum recommended value. There are many additional important factors to consider before you finally select the appropriate width.
First of all, Pay attention to the features of the eaves overhangs of the roof of your house. The outer border of the blind area should be approximately 25-30 cm further than the most protruding edge of the roof eaves.
At the stage of designing a blind area, one cannot help but take into account the architectural and design features of the house. For example, if the site is designed using various kinds unusual design elements, the blind area can also be given original look, intelligently and organically connecting it with other elements of the landscape.

A very important parameter is the type of soil at the construction site. For example, if the house stands on subsiding soil, the width of the blind area should be at least 90-100 cm. Experts recommend that the blind area be more than 1 m wide. In such conditions, the structure in question will be able to simultaneously drain water and serve as a convenient path around the building.
It is important that the blind area is continuous. Any kind of fabric ruptures can lead to a decrease in protective functions blind areas.
After determining the appropriate width, you will need to set the optimal slope of the blind area. In order for the structure to effectively cope with water drainage tasks, the slope must be at least 2-5 degrees in the direction from the house.
For determining exact value slope must also be taken into account climatic features, characteristic of the location of the house, and the type of material used to construct the top layer of the structure. For example, if the covering layer is made of paving slabs, the slope of the blind area can be slightly reduced compared to the same indicator for a structure made of crushed stone.

The slope itself can be created at the stage of laying the bottom layer or during installation face covering. This point depends on what specific materials are used to construct the structure in question.
After determining the optimal system parameters, calculate required quantity materials and collect the required tools. At the stage of creating the underlying layer, you will need crushed stone and sand or clay.
The top layer of the blind area is most often made of concrete. If you decide to make your choice in favor of this material, first prepare a concrete mixer or container for preparing mortar, fittings and wire, several shovels, a level and other small accessories.
Step-by-step instructions for pouring a blind area
The process of constructing a blind area will be discussed using an example concrete structure. If you are a beginner, pay attention to this option, because... in most cases it is easier to set up compared to others existing varieties blind area. Complete each step of the work and you will get a reliable, durable and efficient design.
First stage. Mark out the local area. It is enough to measure the selected distance from the walls of the house, drive pegs from any suitable material and connect these pegs with a rope. Make sure that the marking points are on the same line.
Second phase. Remove the soil over the entire area of the blind area. The depth of the pit is selected individually, taking into account the type of system and the characteristics of the materials used. In most cases, the thickness of an ordinary concrete blind area is about 25 cm, excluding the front finish.

Third stage. Treat the plant roots at the bottom of the trench with special herbicides. Such treatment will not allow roots to grow in the future and disrupt the structure of the blind area.
Fourth stage. Assemble the formwork. You can use as starting materials unedged board And wooden blocks for supports. The thickness of the boards should be at least 2 cm. Install the boards along the outer border of the trench.
Fifth stage. Compact the bottom of the trench and place a 5 cm layer of clay on it. Thoroughly compact the clay, place a 10-centimeter layer of sand on top of it and tamp it down. For better compaction, the sand should be spilled with water. Place a layer of crushed stone on top of the sand.
Sixth stage. Place reinforcement bars on the prepared cushion. Maintain a step of 10-15 cm. As a result, you should get a reinforcing mesh. Tie the joints using steel wire. Thanks to reinforcement, the structure will have higher strength and resistance to various types of loads.

Seventh stage. At the junction of the blind area with the building, make an expansion joint. A 1.5 cm wide seam will be sufficient. Fill the seam space with a sand-gravel mixture or bitumen.
Eighth stage. Pour the concrete. Fill in one horizontal layer. Approximately every 230-250 cm, install transverse wooden slats. Thanks to them, the expansion joints necessary for the normal operation of the blind area will be created. Select the slats so that they top part was flush with the surface of the concrete structure. The slats should be pre-treated with an antiseptic.

Ninth stage. Carefully level the concrete and create the required slope before the mixture hardens.
Tenth stage. Cover the fill with wet burlap. As the fabric dries, it will need to be re-wetted with water. This will prevent the concrete mortar from cracking.

After about 3-4 weeks, the concrete will completely dry and gain the necessary strength. If desired, you can lay porcelain stoneware, paving slabs or other suitable material on the dried blind area.
Thus, in self-construction there is nothing complicated about the blind area. All costs are reduced to purchase costs building materials. Follow the instructions and you can do everything as well as a professional builder.
Happy work!
Video - DIY blind area step by step instructions
Greetings, friends.
Alexander Alexandrov is in touch with you.
Today I will tell you how make the right blind area with your own hands.
When building a private house, you should consider various nuances. This includes preventing flooding of the foundation by rainwater. Constant flow of water under the foundation can lead to very undesirable consequences. The action of atmospheric moisture on foundation concrete leads to cracks and other damage. Plant roots begin to grow into these cracks and have a destructive effect on the foundation.Sometimes, when constructing a building, builders for some reason forget that such a problem exists, and the owner of the house has to solve it himself. Some owners still do not realize the need to protect the foundation of the building, and this significantly reduces service life dwellings.
To prevent water from flowing under the foundation, a blind area is made - a special strengthening of the perimeter of the building. If you have experience in construction work, you can do this element of the house structure yourself, thereby saving on the services of specialists.
So, how to make a blind area yourself?
Why is a blind area necessary?
The blind area is designed to perform the following important functions:
- protecting the foundation of the building from destructive factors such as moisture, plant roots, and so on;
- drainage of rain or melt water from the walls of the house into the drainage system, for which the blind area is equipped - this design reduces the risk of the foundation becoming damp;
- increasing the aesthetics of the appearance of the house, giving it harmony and completeness;
- reduction of heat losses in the cold season.
How the blind area is arranged
The basis of the blind area is the underlying layer, on top of which a covering layer is applied. Often used to create them different materials. To ensure drainage from the walls of the building, the surface of the blind area should have a slight slope.
The capping layer is often made of concrete.
In this case, the surface of the base layer must be horizontal, while the slope of the surface of the covering layer is created when the concrete is poured. The standard slope is five centimeters per meter.
The underlying layer is most often made of clay, crushed stone or gravel. Most practical material is crumpled clay due to the fact that it does not allow water to pass through well. Typically the underlying layer is made from 0.25 to 0.3 meters thick. When using clay, a sufficient thickness for the underlying layer will be from 0.15 to 0.2 meters.
If crushed stone or gravel is used to create the underlying layer, then between it and the covering layer there should be a layer of sand with a thickness of 0.07 to 0.1 meters.
The covering layer is made of durable and waterproof material - natural stone, asphalt, concrete. In some cases, brick or sidewalk tiles are used for this.
Preparing for work
The first step in preparation is to establish the main parameters of the future design. The standard minimum width of the blind area is 0.6 meters. However, when designing it, it is necessary to take into account the following factors, including those related to the features of the architecture and design of the building:
- The position of the edge of the eaves of the roof of the house: the edge of the blind area should protrude beyond this edge by at least 0.25-0.3 meters. This will prevent water from flowing from the roof onto the ground if there is no drainage or problems with it.
- Compatibility of the blind area with overall design buildings and the surrounding landscape.
- Features of the soil around the building. So, if the house is surrounded by subsidence soil, then the minimum recommended width of the blind area is one meter. This size makes it convenient to use the blind area as a path.
- Features of the climate of the area in which the house is located.
- Materials that are supposed to be used for the construction of the blind area. So, if you make a covering layer of paving slabs, then the slope can be made smaller than if you use crushed stone.

After establishing the width of the blind area that is acceptable in a given situation, it is necessary to determine the angle of its inclination. To ensure effective drainage, the value of this angle should lie between two and five degrees.
The slope of the blind area can be created both during the process of laying the underlying layer and during the installation of the outer covering. The choice of one approach or another is determined by the materials used.
Materials and tools

The next step in preparing the construction of the blind area is to calculate the required volume of materials and select the right tools. To lay the bottom layer you need crushed stone, sand or clay.
The most common capping material is concrete. If it is intended to be used in the construction of the blind area, then the following tools and additional materials will be needed:
- concrete mixer or mixing trough cement mortar;
- wire;
- reinforcing bars;
- bayonet shovels for digging soil and shovels for working with mortar;
- ruler or tape measure;
- level.
DIY blind area
- Marking

The first step in building a blind area is marking the area in front of the building. To do this, you need to drive pegs into the ground around the perimeter of the building at the required distance from the wall and connect them with twine.
2. Digging a trench for a blind area
After this operation, you need to dig a trench between the stretched twine and the wall of the house, the depth of which will be determined by the selected material. As a rule, the thickness of a concrete blind area is 0.25 meters. In this case, the thickness of the surface finish is not taken into account.
After the trench for the blind area is ready, it is necessary to prevent unwanted growth of plants in it, the roots of which could have a destructive effect on the structure in the future. To do this, the soil in the trench and near it is treated with special herbicides. If trees grow not far from the future blind area, their roots should be cut off.
You can also lay geotextiles, but this is more expensive.
Digging a trench is not always necessary procedure. If the soil around the house is soft enough, then it will be enough to compact it to the appropriate depth.
3. Installation of formwork

The next step is to assemble the formwork. For this, you can use uncut boards with a thickness of at least 20 millimeters. The boards are installed along the outer border of the pit. Wooden blocks can be used as supports.
4. Creating an underlying layer

After installing the formwork, it is necessary to compact the bottom of the trench and fill it with clay so that the layer thickness is 50 millimeters. The clay must be compacted tightly, and then a sand layer 100 millimeters thick must be poured onto it, which should also be compacted. To ensure good compaction of the sand layer, the sand should be moistened. The final step of this stage of work is laying crushed stone on top of the sand layer.
Compacting the soil at the bottom of the pit is a necessary step in the construction of the blind area. If this is not done, then the blind area may sag in the future under its own weight. In order to completely eliminate water seepage through the blind area, the clay layer can be separated from subsequent layers with a waterproofing material, for example, a film of polyvinyl chloride or polyethylene.
5. Installation of reinforcing mesh

After the preparation of the cushion is completed, reinforcement is laid on the surface of the crushed stone layer to form a reinforcing mesh. In this case, the distance between the rods should be from 100 to 150 millimeters. The intersections of the rods must be tied with steel wire. The presence of a reinforcing mesh ensures the strength of the blind area and its ability to withstand various loads.
Instead of reinforcing bars you can use ready-made reinforcing mesh.
IT IS IMPORTANT TO KNOW
An important nuance when reinforcing is to ensure complete envelopment of the reinforcement with cement mortar. To do this, you can lay the mesh on wooden blocks, which are gradually removed during the concreting process.
6. Creating an expansion joint

Where the blind area comes into contact with the wall of the building, an expansion joint must be created, the width of which should be approximately 15 millimeters. To fill the joint space, sand mixed with gravel or bitumen is used.
To create a heat-insulating layer between the blind area and the wall of the house, you can also use slabs of extruded polystyrene foam or polystyrene foam. It is important to ensure a tight fit of the insulation boards to each other.
7. Pouring concrete

The next stage of work is pouring the concrete solution. To do this, you must first lay wooden slats across the trench so that the distance between them is 2.3-2.5 meters. The purpose of these slats is to create expansion joints, ensuring normal operational characteristics of the structure. The width of the slats should be such that their edges coincide with the surface level of the concrete layer. To prevent the destruction of the slats by bacteria and fungus, the wood must be treated with an antiseptic solution and covered with a layer of bitumen.
Standard concrete mortar prepared from cement (one part), sand (two parts) and small crushed stone (three parts). It is advisable to use river or sea sand. If you use regular sand from a quarry, you must first wash it to remove various impurities.
Sand is washed twice or three times. You can use a concrete mixer for this. When washing, sand is poured into a concrete mixer, filled with water and mixed for several minutes. After this, the concrete mixer is turned off and the water is drained. If this procedure is neglected, then in the future it is possible that the blind area will be washed away by water.
Concrete is poured in one layer at once. Otherwise, between areas filled in different time, cracks may appear in the future. Therefore, even if it is impossible to pour all the concrete within one day for some reason, then the next day the work should be completely completed.
To prevent the formation of cracks and defects in the future, it is important to ensure high quality cement mortar. Therefore, it is best to prepare it in a concrete mixer.
If hot weather occurs during the construction of the formwork, then best time for work - early morning or evening.
8. Leveling the concrete surface

After the concrete layer has been poured and has not yet hardened, its surface must be leveled and the required slope created. A rule is applied to perform this procedure. If this tool is not available, you can use the usual wooden slats with a smooth and even surface. To ensure evenness, smoothness and correct slope of the surface, special beacons should be used as guides.
Upon completion of the creation of the covering layer, the surface of the concrete must be covered with burlap moistened with water. This fabric must be moistened regularly to prevent it from drying out. This will ensure that cracks do not appear in the concrete as it gradually hardens.
9. Finishing and decorative works
The concrete curing process lasts two to three weeks. After this time period has passed and the concrete has acquired the necessary strength, you can remove the formwork and begin finishing and decorating its surface. For this you can use sheets of porcelain stoneware, or anything else.
Do-it-yourself blind area at home - video
Well, that's all, friends.
By following these step-by-step instructions, you can easily make a blind area with your own hands and spend only on building materials.
Even the strongest foundation is eventually exposed to moisture, which gradually reduces the load on the house’s drainage system, as well as on vertical waterproofing. To prevent this from happening, make a concrete blind area with your own hands, step-by-step instruction which will be discussed in the article.
Concrete blind area is a necessary coating to protect the foundation
In addition to its main function (protection from interaction with moisture), this coating also allows you to create a pedestrian zone around the perimeter of the house and give the architectural appearance of the building a complete look.
However, before you fill the blind area, you need to pay attention to its design features and requirements for construction projects of this type.
Design of the blind area
The concrete blind area has quite simple design, for the preparation of which the following materials will be required:
- Bedding (pillow). This is done before pouring the solution. A variety of materials are used as bedding: coarse or medium sand, sand and gravel mixture, crushed stone, fine gravel. On fine sand the foundation blind area is not laid due to the possibility of shrinkage, since in this case there is a risk that the base will crack. It is best to prepare a two-layer cushion: first lay gravel or crushed stone, which will compact the soil, and then sand.
- Reinforcement. Availability reinforcing mesh for a concrete blind area it will give the structure more strength. The cell size of this product is usually 30 x 30 or 50 x 50 cm. The mesh diameter should be about 6-8 mm, but it all depends on the type of soil.
- Formwork. Wooden guides located along the perimeter of the coating are required, as they will prevent the concrete mixture from spreading. The width of the formwork boards is usually 20-25 mm.
- Concrete solution. The blind area is poured using a specific concrete mixture composition.

The brand of mortar must be carefully selected, since the strength and durability of the entire structure will depend on its quality and characteristics. For such a coating, Mixture M 200 is usually used, the strength class of which is no less than B 15 (a higher grade can be purchased). It is also worth paying attention to the frost resistance of the composition, which should not be less than F 50. To ensure better resistance to changes temperature conditions, it is recommended to give preference to formulations with an F index of 100.
To obtain a high-quality coating, it is most profitable to produce concrete mixture on your own.
Making a concrete mixture for the blind area of a house
To organize a concrete blind area around the house it is not necessary to buy ready mixture and order expensive delivery by concrete mixer. Knowing the proportions of the components, you can make M 200 concrete yourself, for this you will need:
- 1 part cement (the optimal one is Portland cement 400);
- 3 parts sand (preferably medium, but fine-grained will do);
- 4 parts of coarse aggregate (gravel or crushed stone);
- ½ part water.

Accordingly, to get 1 cubic meter of concrete you need to mix:
- 280 kg of cement;
- 1100 kg of crushed stone;
- 800 kg of sand;
- 190 liters of water.
Also using PC 400, you can get other brands.

Healthy! First of all, cement and water are mixed, and only after the composition is homogeneous, sand and gravel are added to it.
To ensure that the design of the blind area is strong and the concreting is durable, certain rules and requirements are provided.
Design requirements
To fill the blind area of a house with concrete, you need to familiarize yourself with the regulations and recommendations of SNiP:
- The width of the blind area should be 20 cm greater than the roof overhang (SNiP 2.02.01-83). If the structure has a drainage system, then its indicators are also taken into account. The optimal value is 1 meter. In this case, you can lay a tile path around the house.
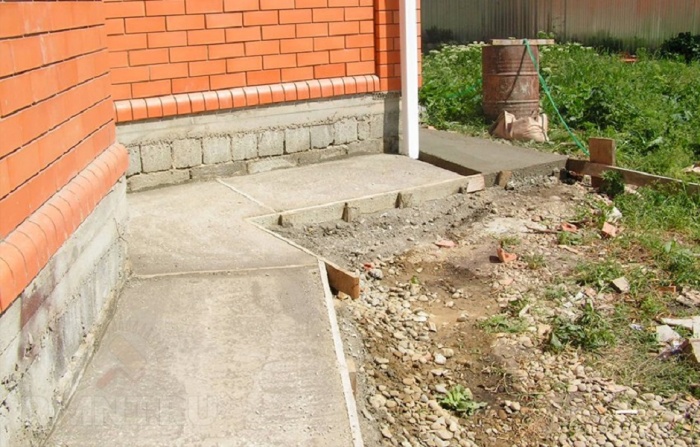
- The length of the blind area around the house, made with your own hands, must correspond to the perimeter of the building. However, if you plan to install a concrete porch, then a “break” is allowed.
- Depth. The depth of the “tape” is half the calculated freezing depth of the ground.
- The thickness of the concrete blind area is also regulated by SNiP and, according to these requirements, should be at least 7-10 cm for the top layer. However, many people make concrete parking spaces for personal cars along with the blind area. In this case, the operational load increases, and the thickness of the concrete blind area can reach up to 15 cm.

- Slope. According to SNiP III-10-75, the slope should be from 1 to 10 cm for each meter of width. Most often it is 2-3 cm per meter - this is approximately 2-3 degrees. The angle of inclination must be directed in the direction opposite to the foundation. It is not recommended to increase the slope, as in this case it will be difficult to walk on such a path. winter time when ice forms on the surface.
- Border. The installation of a blind area for a house does not include the mandatory production of a border, so in this case the decision is made by the owners of country property. However, experts recommend installing such “limiters” if trees and shrubs with an “aggressive” root system (blackberries, raspberries, plane trees, poplars and others) grow near the foundation.
- Base height. For a hard type covering (concrete), the base must be at least 50 cm.
- The recommended height of the blind area above ground level is 5 cm or more.
There are also several schemes according to which a blind area of crushed stone can be erected in the form of a monolithic concrete covering both for the usual type of soil and for the “problematic” one.

Knowing the SNiP requirements and features suburban area, you can make a blind area with your own hands using the step-by-step instructions given below.
We make the blind area ourselves
The technology for constructing a blind area includes several stages that even a beginner in construction work can handle.
Preparation
To begin creating a protective coating around your home, prepare:
- pickaxe;
- twine;
- roulette;
- tamper;
- pegs for marking;
- waterproof film (geotextile);
- concrete mixture;
- boards for formwork;
- hacksaw;
- level;
- nails;
- reinforcement material, welding machine and wire cutters;
- usually a trowel, spatula;
- sealant for processing seams (it is better to purchase a polyurethane compound).
Marking
Arrangement of the blind area around the house begins with preparing the area for construction. At this stage, it is necessary to mark the perimeter of the future “tape”, or rather the trench for it, using pegs. There are several recommendations in this regard:
- The step between the beacons is 1.5 m.
- The depth of the trench will depend on the soil, but the minimum value is 0.15-0.2 meters. If the ground is “heaving”, then the depth increases to 0.3 m.

The easiest way to apply markings is to proceed in the following sequence:
- Drive metal or wood pegs into the ground at the corners of the house.
- Install intermediate beacons along the perimeter of the building.
- Stretch the cord or rope, connecting all the pegs.
Healthy! At this stage, you can use a sealant to separate protective covering from the foundation.
After this, the slope of the system is formed; for this, a trench is dug in which the depth of one of its sides will be greater. To compact the resulting ditch, it is enough to use wood. First, you need to place the log vertically, lift it and sharply lower it down with force. This will compact the bottom of the trench.
Formwork

For formwork you will need boards on which it is better to immediately mark the height of the future cushion. Attach the improvised “box” in the corners metal corners(with bolts from the outside).
Important! If you do not want to remove the formwork after the construction of the concrete blind area is completed, then be sure to treat the wood with an antiseptic compound and wrap the boards with roofing felt.

Making a pillow
In order for a concrete blind area to be made according to all the “canons” of construction, it is imperative to prepare a sand or clay base for it. The thickness of the sand layer can reach up to 20 cm. It is best to lay the pillow in several layers, moistening and thoroughly tamping each subsequent layer. On final stage the surface needs to be leveled.
Waterproofing
The waterproofing device involves laying several layers of roofing material or other geotextiles on the pillow.
- The material needs to be “wrapped” slightly onto the walls to create an expansion joint.
- Roofing felt must be laid overlapping.
- A thin layer of sand is poured on top of the geotextile, and then 10 cm of gravel.
- If you plan to install drainage system, then it is laid close to the resulting “hydraulic seal”.

Reinforcement, pouring and drying
Above the level of 3 cm from the crushed stone layer it is necessary to lay metal mesh in increments of 0.75 m. After this, you need to mix the concrete and pour it in equal portions into the resulting formwork sections. In this case, the poured composition should reach the level of the upper edge of the wooden “box”.

Healthy! After pouring, pierce the surface with an iron rod in several places to allow excess air to escape.
The composition can be distributed using a trowel or a rule. To increase the resistance of concrete, 2 hours after pouring, ironing is performed. To do this, the surface is covered with a layer of dry PC 400 3-7 mm thick.
Healthy! To prevent the composition from cracking, it must be moistened with water 1-2 times a day.

In addition to how to properly fill the blind area, you need to take care that it does not crack during the drying process. To do this, you need to protect the coating from precipitation and sun using plastic film. It is believed that the blind area dries completely in 10-14 days. However, according to the regulations, at least 28 days should be allowed for drying.
Post Views: 7
During construction, there are no trifles. Safe home
Like a clock mechanism, the absence of one screw renders the entire mechanism inoperative.
The same is true with the blind area. Many people put off installing a blind area until later., and some even think that they can do without it.
But in vain. It performs a number of important functions.
Functions of the blind area
- Protective. Protects the foundation from various climatic phenomena: rainwater, freezing/thawing of the soil and protects the building from deformation.
- Practical. The blind area creates a convenient passage along the building.
- Decorative. Modern materials allow you to make the blind area a beautiful decorative element.
- Insulation. By laying a special insulating layer, you can further insulate the house.

Nuances and subtleties of organizing the installation of a blind area
- The width of the blind area should be no less than the roof overhang. But as a rule, professionals recommend adding 20-25 cm to the length of the roof overhang so that water from the roof does not fall on the blind area and does not seep into the soil close to the foundation.
- The blind area must have a slight slope from the foundation. This will ensure the drainage of melt water and rain. The slope must be at least 5 degrees.
- Before the installation process, you need to decide with coating material ( concrete screed or paving slabs), since it depends on future design blind areas.
- Particular attention should be paid to the connection of the blind area with a foundation. A so-called expansion joint must be left at the joining point.

Types of blind areas
The most common option for a blind area around a building is a concrete screed. This option is the simplest, most accessible and cheapest. But it loses its decorative function.
Another way - installation of concrete-reinforced slabs. The size of the slabs is different and is selected individually, but the most popular slabs are 60x60cm in size. This installation simplifies the work.
Another option - arrangement of a blind area made of paving slabs or natural stone. Naturally, it is more expensive, but a properly equipped such blind area will last as long as the building itself and, in addition to its practical function, will decorate the house, giving it finished aesthetic look.

Styling tools
- Concrete mixer.
- Rubber mallet.
- Shovel
- Construction level.
- Rule.
Necessary materials
- Sand.
- Crushed stone.
- Waterproofing.
- Geotextiles.
- Fittings.
- Board 25-40 mm for formwork.
- Cement.
- Stone or paving stones (optional and financially feasible)
- Curb slab (curb).

Algorithm for installing a concrete blind area
Making a blind area around the house with your own hands is quite a labor-intensive task, but possible. Let's consider an approximate installation algorithm.
Step 1.
Measure the required distance from the foundation base(as stated above: length eaves overhang+ 20cm) and drive in the pegs.
Step 2.
We stretch the rope along the pegs, this is the future edge of the blind area.
Step 3.
We excavate the top layer of soil. As a rule, this is 15-25 cm. It may be more, but it is very important to select all fertile soil so that there are no roots. We excavate around the entire perimeter of the building.
Step 4.
Important: the width of the blind area must be equal everywhere. It is also very desirable to make a level base for the trench.
Step 5.
Place in the resulting trench PVC film and fill in the first layer of sand - a sand cushion. Its thickness depends on the soil and the resulting trench depth. On average, this layer has a thickness of 5-10 cm. This pillow will act as a buffer between the soil and the future blind area.
The sequence of laying the sand cushion is as follows:
- distribute sand evenly in the trench;
- Pack the resulting layer tightly. For this procedure, a block may be suitable, to which you attach a handle on both sides. The tamper is ready;
- After thorough compaction, the sand layer must be watered, preferably through a sprayer. It is necessary to water quite abundantly, but so that the sand does not loosen. The water will help expel the air from the sand so that air pockets do not form in it. This procedure can be done twice if necessary. You can check whether you did everything correctly with a simple experiment: when the sand absorbs water and dries out a little, stand on it with both feet. The sand shouldn't fall through, but only leave a clear mark from the soles. If everything is so, then everything was done correctly.
Step 6.
After laying the sand cushion, we set up the border. Development of further actions is possible in two ways. First - installation curb stone, second – installation wooden formwork with further pouring of concrete.
- Option 1. Curb stone. Laying of border elements is done along a stretched thread or wire. We leave a small gap of 1.5-2 cm between the plates for the solution to penetrate into these cracks. The difficulty with this option is that each stone must be precisely set at the same height as all of them. You will have to check the level of almost every curb stone.
- Option 2. Formwork. Using pegs marked in advance, we level the formwork 5-10 cm above the ground. The downside is that you need formwork material. It is also important to level the entire formwork exactly.
Step 7
Next stage: laying gravel. We carry out all the same operations as with sand. They filled it up, leveled it, compacted it. Thickness gravel bed should also be 3-5 cm.

Step 8
Then we install a metal mesh or reinforcing rods at the bottom of the trench. The cells should have a fraction of 5x5 cm. For reinforcement, cells can be made 10x10 cm. There should be a space of 3 cm under the mesh for concrete penetration. To do this, you can place stones under the mesh.
Step 9
Next, you need to set up the beacons. The distance between beacons is determined by the width of the rule. A board or metal profile can serve as a beacon. At this stage of work, do not forget about the slope of the blind area a couple of degrees towards the ground.
Step 10
We do the filling. Used for concrete standard proportions(1:3:1 – cement, gravel, sand). Since this layer of concrete will be exposed to atmospheric influences during operation, It is recommended to add frost-resistant additives to the solution. Next, using a trowel, we level the mortar in the blind area section. It is important to ensure that the concrete penetrates into all voids throughout the area. Once leveled, you can correct the top layer using the rule.
Step 11
After watering one section, carefully remove the unnecessary beacon, and seal the place where it was with mortar.
Step 12
After filling the entire blind area, we remind you that it should be done simultaneously and monolithically, you should water it from time to time (in hot weather - every four hours). Can also be covered plastic film

, which will create a greenhouse effect and prevent moisture from evaporating quickly.
Video
Installation of concrete-reinforced slabs If you have chosen a blind area made from ready-made slabs, then installing them will not be much different from installing a concrete blind area
. All operations up to step 7 of the algorithm are the same. Afterwards, we prepare a concrete solution, place it in trenches and place a slab on it. It is also important to remember the required slope and check their evenness building level

. The gap between the plates should be at least one and a half to two centimeters. After laying and checking the cracks, carefully seal them with mortar.
Blind area made of paving slabs or natural stone Installation of this type of blind area the most expensive and labor-intensive
. But at the same time, such a blind area gives the house an aesthetic appearance. Important.
Even before laying the curbs, you need to calculate the width of the blind area so that the paving stones fit entirely and do not have to be cut. When installing this type of blind area step by step we carry out all points of the algorithm up to step 6 inclusive. With weak or heaving soil , Maybe, it is necessary to reinforce a layer of crushed stone
, pour it with concrete and only after it has completely dried, apply a layer of sand, compact it and install stones or paving slabs. Top layer of sand should be 5-10 cm. it is also moistened generously with water. Laying is done using rubber mallet . The whole process is checked by level. After installing the stone or tile, the entire surface fill with a dry mixture of slightly damp sand and cement


