How to cover a roof with corrugated sheeting without outside help? How to cover a roof with corrugated sheets with your own hands? How to cover a roof with corrugated sheets with 20
The roof is an important element of the building, from correct installation and high-quality coating, which determines the safety and durability of the entire structure. The building materials market offers a huge selection of products for roofing work, among which corrugated sheeting occupies a leading position. The article will tell you how to properly cover a roof with corrugated sheeting with your own hands. It is worth saying that the technology itself is simple if you know the features of this material and follow some installation rules.
Characteristics of corrugated sheets
During production a metal sheet passes through special rolling equipment, which creates a profile of various heights from 8 mm to 75 mm. Due to the wavy, rectangular and trapezoidal profiles, additional rigidity is achieved. Thanks to this, the corrugated sheet easily withstands mechanical damage and high loads.

- The galvanized coating makes this material reliable and durable. It is not afraid of chemically aggressive substances, corrosion, precipitation (weather conditions).
- Corrugated sheeting is one of the few materials that is easy to install and convenient to transport.
- Roofing work using profiled sheets is completed faster than with other materials. This significantly saves not only time, but also money.
- During the production process, the corrugated sheet is coated with a colored polymer; this coating serves as an additional protective layer and gives an attractive appearance. This allows you to choose this roofing material of any color in accordance with general view buildings.

Roof angle
The laying of corrugated sheets depends on the slope of the roof, minimum slope is at least 12°. Upon completion of work, the working seams should be sealed using mastic or sealing tape.

- tilt up to 15° - adjacent sheets are mounted with an overlap of 200 mm;
- tilt up to 30° - the overlap in this case is 150-200 mm;
- tilt more than 30° - permissible overlap is 100-150 mm.
Calculation of roofing material
Before calculating the amount of material required, you should measure the roof. Because, at the stages of project implementation roofing slopes may undergo changes.

- To do this, you need to measure the slopes diagonally and compare these values, the discrepancy should not exceed 20 mm. It is also necessary to check the plane of the slopes; this measurement is performed with a level with a cord, where a deviation of no more than 5 mm is allowed for every 5 m. Otherwise, the sheets will not fit together.
- The ideal option is if the length of the sheet corresponds to the length of the slope; to this parameter you need to add about 40 mm more for the overhang of the cornice. Next, the amount of corrugated sheeting is calculated, where the length of the cornice is measured and divided by the installation (taking into account the overlap) width of the sheet.
- You can also calculate the number of sheets in another way: divide the length of the cornice by the useful (overlap) width of the sheet, and round the resulting value up.
- If the roof has complex configuration, then it should be visually divided into geometric shapes. Each form is calculated and the final results are summed up. It is important to take into account when calculating the material such additional elements like: windows, pipes, ends, ridges.
Roof structure made of corrugated sheets
The roofing structure, in addition to the covering itself, consists of a whole complex structural elements such as: heat, hydro, vapor barrier and ventilation. Each of them plays its role, providing correct work the entire roof. In order for the roof to last a long time and fulfill its direct function, it is necessary to ensure the correct arrangement of all layers of the pie.

Vapor barrier. Its task is to prevent moisture from penetrating into the insulation. Here special films are used, which are laid from the inside of the roof using a construction stapler along a horizontal line. Seams formed during installation are sealed with tape or butyl tape.
Insulation . The next layer consists of insulation, which serves as a compensator for air temperature differences, thus preventing the accumulation of moisture and condensation under the roof during operation of the building. Its thickness is selected depending on the region of residence; it is recommended to use insulation with a thickness of at least 200 mm. Laying tiles or roll material into the space between the rafters.
Waterproofing . The final stage is installation waterproofing membrane(wind protection). It acts as additional insulation and, thanks to its waterproof surface, protects the entire structure from condensation, thereby extending the service life of the roof.
The membrane is rolled out horizontally from the eaves to the ridge (from bottom to top). Positioning it in such a way that the joints of the rolls are on the rafters, it must be secured with an overlap of 150 mm.

The material for hydro- and thermal insulation is calculated in the same way as the number of profiled sheets.
- sheets are lifted onto the roof using logs made of one or two boards of the required length;
- It is not recommended to carry out work in windy weather, as there is a possibility of missing the sheet and damaging it;
- during work, you should move along the profiled sheets in soft shoes, stepping only into the deflections between the waves in the places of the sheathing;
- You can avoid the formation of corrosion on the material if you treat all cuts or other damage to the sheet with repair enamel;
- when working with corrugated sheets, it is necessary to use thick protective gloves, since the edges of the sheets are quite sharp;
- debris generated during installation should be swept away with a brush or washed with soapy water;
- the protective film of the material must be removed immediately after installation;

- It is forbidden to use an angle grinder ( grinding machine) to avoid the development of a corrosion process.
Required Tools
- lever shears or electric shears for cutting sheets;
- a screwdriver for fastening the material or a hammer if fastening will be done using nails;
- construction stapler for fastening films and insulation;
- drill and drill No. 5, if the profiled sheet will be attached to metal structure thickness over 2.5 mm;
- and such auxiliary tools such as: marker, knife, level, tape measure, sealant gun.
Material and additional elements for corrugated roofing
Profiled sheeting. To cover a light roof with a slight slope, you can use profiled sheets C35 or C44 of a sinusoidal or trapezoidal shape.

Their length ranges from 2 to 6 m, but some manufacturers offer production of sheets according to custom sizes from 0.5 to 12 m and above.
It is recommended to install a pitched roof using CH35 grade corrugated sheeting; this model is better suited for these purposes. Profiled sheet of grade N is used for equipment load-bearing structures. The height of its profile can range from 57 to 114 mm.
Self-tapping screws. This fastener With polymer coating matched to the color of the leaf. Thus, it is as invisible as possible in the architectural ensemble. They are chosen depending on the material: wood and metal. Its drill tip allows for fastening to a metal structure whose thickness does not exceed 2 mm. When purchasing self-tapping screws, you need to check the presence of a sealing washer (neoprene rubber).

Seal. You can seal gaps, for example, between the ridge and the roofing, using a special sealant. It prevents debris and moisture from entering the under-roof space, thanks to the repetition of all bends of the profiled sheet.

The ridge is semicircular or rectangular. Performs both a functional (protects the joints between profiled sheets) and a decorative role. The ends of the semicircular ridge are covered with special plugs.

Wind bar. It prevents rain from falling on the walls of the building and gives the roof a finished look.

Depending on the complexity of the roof structure itself, the following additional elements will be needed:
- Upper and lower valley strips. The bottom strip prevents rainwater from entering the roof space. The upper valley serves as the final detail, giving the roof a finished look.
- External and internal corner. With their help, sheets are connected at external and internal corners.
How to cover a roof with corrugated sheeting
- The lathing for laying corrugated sheets can be continuous or stepwise. The lower the roof slope, the smaller the pitch of the sheathing, for example, if the slope is less than 15°, then wooden or metal strips are mounted at a distance of 300-400 mm, with a roof slope of more than 15° - the pitch can be 500-600 mm or more.

- Installation of profile sheets always begins from the bottom up, and moisture (rain or formed from melting snow) will not get into the space between the sheets. Such wavy material is laid against the prevailing wind direction in the area. If the wind blows more often right side This means that the installation of the corrugated sheet should be laid from left to right, and vice versa. The correct sequence to cover the roof with corrugated sheeting is shown in the photo.

- If the length of the slope allows the use of a single sheet, then installation begins from the end of the roof. It must be aligned along the cornice, not forgetting the additional 40 mm (overhang of the cornice); alignment of the corrugated sheet along the edge of the end is not allowed.
- First roofing sheet is installed in place and secured with one self-tapping screw approximately in the center. The second one is laid with an overlap on the previous sheet and fastened in the same way. Having secured the required number of sheets along the entire length of the roof, they are aligned along the horizontal line of the eaves. Next, you need to connect the corrugated sheets together at the ridge at every second deflection of the wave.
Then the final fastening is performed:
- Self-tapping screws are screwed in along a vertical line through the pitch of the sheathing;
- horizontally - in every second deflection of the profile sheet;
- It is advisable to strengthen the sheet at the end of the roof according to the pitch of the sheathing;
- the upper edge of the sheet (at the ridge) and the lower edge (on the eaves) - in each deflection of the wave;
- It is recommended to strengthen the joint between the sheets with hardware, both on the wave and on the deflection of the sheet.

- Excess material is cut off using electric scissors or an electric saw. Similar manipulations are performed from the ends of the building and on the other side of the slope, if we are talking about a gable roof.
- At the next stage, the end strip is installed and secured to the wave crest using the same screws. Its installation begins from below towards the ridge of the roof. When increasing the length of the planks, the overlap should be no less than 50 mm, the fastening step should be up to 1 m.
- Finally, the ridge is fastened. It is recommended to lay a self-adhesive seal between it and the profiled sheet. The ridge strips are built up with an overlap of 100 mm, the fastening pitch is at least 300 mm.

Installation of complex roof structures
Complex designs often have internal corners(valleys), ventilation or chimneys, parapets, and so on are located on the roofs. The resulting joints must be carefully sealed, since through such places moisture can enter the under-roof space.

Endy. At these points, continuous sheathing is required on both sides of the valley. The lower (bottom) strip is attached at the edges with self-tapping screws or nails; when lengthening it, an overlap of 200 mm is required. A bend (flanging) is made from the upper end of the plank at the roof ridge.

The top strip is installed on top of the corrugated sheet, serving rather a decorative role, covering the joint between the edges. It is also advisable to install it using sealing materials that protect the installation joints from possible leaks.
Pipe. The sheathing around the pipe must be continuous, where the junction strip (apron) is attached to chimney using dowels (200 mm pitch), and to the sheathing - with self-tapping screws.
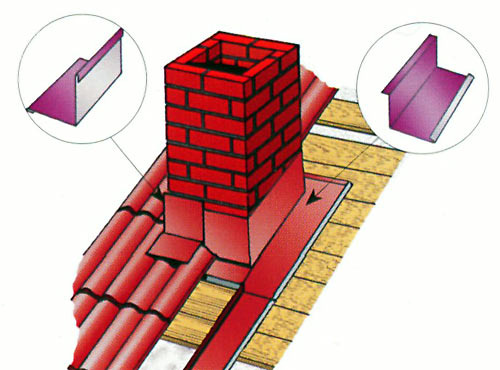
Installation of the lower apron can be done by first cutting a groove into the brick pipe, with mandatory sealing of this joint. A roofing covering with a sealant is mounted on top of it. The top strip is installed without grooves, after the installation of the coating around the pipe is completed. Installation of both longitudinal and transverse junctions of pitched surfaces to the wall is carried out in the same way.
Many manufacturers are ready to make additional elements non-standard forms, therefore, difficulties associated with the installation of roofing materials on complex roofs will not arise.
More clearly how to cover a roof with corrugated sheeting is demonstrated in the video presented.
Cover the roof with corrugated sheeting, cost of work
- installation of corrugated sheeting will cost approximately 200 rubles per m²;
- performing step lathing - 120 rubles per m²;
- installation of ridge, wind and cornice strip, junction strips - 100 rubles per linear meter;
- bypassing the pipe costs 2,000 rubles per element.
The roof made of profiled sheets fits harmoniously into modern architecture. And affordable price and easy installation makes this material popular among consumers. Roofing made from corrugated sheets has high strength and has aesthetic qualities.
Any craftsman with basic construction skills can cover a roof with corrugated sheets with his own hands. basic set tools, even without much experience. Therefore, this type of roofing is most in demand in private housing construction, as well as in the construction of outbuildings and outbuildings. Corrugated sheeting is inexpensive and lasts 25-50 years, making it a long-term leader among roofing materials in its price category. With the help of this available material can be mounted and gable roof, and more complex designs. The technology for laying corrugated sheeting on the roof is quite simple; we will discuss it in detail in this article.
Do-it-yourself corrugated roofing - common constructive solution for a small private house, garage, shed or shed, which is popular among developers due to its excellent performance qualities material. Corrugated sheets are made from galvanized steel using the cold rolling method. During the production process, the surface is given a relief, which gives greater horizontal rigidity, and then cut into sheets of standard shape.
- Effective drainage of water from the slope. Installation of corrugated sheeting improves drainage from the roof surface, thanks to gutters directed along the slope. Covering with corrugated sheeting helps solve the problem of snow and liquid retention on roofs with a small slope.
- Versatility. The instructions recommend installing corrugated sheets if the roof has a slope of 12 to 60 degrees. Almost all roofing structures used fall into this range.
- A light weight. One square meter corrugated sheet weighs 5-7 kg, covering with this material does not increase the load on rafter frame and the foundation of the structure.
- Resistance to mechanical stress. Corrugated sheeting, thanks to the large number of vertical stiffening ribs, has high strength and can withstand deformation snow load up to 1-1.5 m, as well as the weight of a person.
- Resistance to corrosion, fungus, mold and other biological factors of destruction. Installation of corrugated sheeting solves the waterproofing problem, does not collapse under the influence of moisture, and lasts for many years.
- Easy installation. You can cover the roof with corrugated sheets yourself; any worker with basic construction skills and a basic set of tools can handle this task.
- Affordable price. A sheet of corrugated sheets costs 400-600 rubles, so covering the roof with this material will not cost that much.

Note! Before covering the roof with corrugated sheeting, you need to choose a quality, durable material. Corrugated sheets are produced painted and unpainted. The paint or polymer coating that gives color to the material also performs protective function: It prevents moisture penetration and corrosion. However, if the paint layer is damaged and electroplating The corrugated sheet begins to rust quickly. The most reliable is considered to be a profiled sheet made of galvanized steel coated with pural.
Design Features
Novice craftsmen often do not know how to properly cover a roof with corrugated sheeting, so they fall victim to a lack of experience. Poor installation reduces waterproofing qualities roofing structure, reduces the service life of the material, leading to the formation of corrosion or leaks. Corrugated sheeting can be laid on pitched roofs with a slope of 12 degrees. Experienced craftsmen
Important! Before covering the roof with corrugated sheeting, you can purchase the material directly from the manufacturer, cut into sheets along the length of the slope. This allows installation with a minimum number of joints, which increases the service life and waterproofing qualities of the coating, and also saves money by using less material.


Before covering the roof with corrugated sheets with your own hands, you need to study the technology of working with this material. Usually given by manufacturers detailed instructions, describing the sequence in which installation should be performed. Corrugated roofing is multilayer cake, which in addition to the finishing coating includes waterproofing and vapor barrier. Working with corrugated sheets has the following features:
- Before covering the roof with corrugated sheeting, you need to make a lath. If the distance between rafter legs does not exceed 100 cm, you can use 30x100 mm bars. If the step exceeds 100 cm, the cross-section of the sheathing bars must be increased.
- Before laying the corrugated board, you need to make a sheathing. For this material, you can lay a lattice sheathing with a step between the bars of 30 cm. In the places of valleys and ribs, a reinforced solid base is installed.
- Before you start installation roofing covering, it is necessary to coat all wooden elements of the rafter frame with an antiseptic drug, and also treat it with a fire-retarding compound.
Many homeowners do not know how to properly cover a roof with corrugated sheeting, and therefore make annoying mistakes that affect the operation of the structure. A major defect is the lack of vapor barrier and waterproofing in the roofing pie. Corrugated sheeting has high thermal conductivity, which leads to condensation of water vapor on the elements of the rafter frame.
Corrugated sheet laying technology
Most homeowners who want to reduce construction costs install the roofing themselves, but do not have a clear idea of how to properly cover the roof with corrugated sheeting. As a result of an unprofessional approach, the roof may leak, become covered with ice, and the rafter frame begins to rot and collapse. To avoid these negative consequences


, you must strictly follow the technology of laying corrugated sheets. Instructions for constructing a roof from this material are as follows: Important! Profiled steel with polymer deteriorates from thermal influences, so do not use a grinder or welding to cut the material. Installation is carried out strictly in a cold manner, and the sections are treated with a special primer that prevents the formation of corrosion.
Video instruction
A home is a cozy nest where you are always welcome, fed and warmed. To do this, it must be built and then protected from wind and precipitation. We need a reliable and inexpensive roofing, and doing it yourself will be even better because you can be confident in the quality and compliance with the technology. There are many materials for roofing work, but metal profile is the most popular of them. This is a budget-friendly and reliable material that looks beautiful and neat. In addition, it is easy to install and does not require special qualifications. Let's find out how to cover the roof with corrugated sheeting and do this work with your own hands.
In this article
Types of roofing and material calculation
To understand how to cover a roof with corrugated sheets with your own hands, you need to find out what types of roofs there are and design it yourself. We choose the type of roofing according to our needs. This determines the consumption of material, the direction of water flow and melted snow, as well as strength. The design of the roof depends on the direction of the slopes, and it is divided into the following types:
- three-gable roof;
- hipped roof;
- gable roof;
- combined roofs.
When designing a rafter system and before covering it with corrugated sheets, you need to take into account the not very large weight of the entire structure, so you don’t need too powerful beams.
The slope angle of the slopes should be 12 degrees or more. The greater the slope, the less the load on the rafters and sheathing, and the less consumption of timber and corrugated board. If at angles of 12-15 degrees the distance between the sheathing elements is 400 mm, then for a slope above 15 degrees a distance between the bars of 600 mm or more is required.
How to use corrugated sheeting and how to cover a roof? You can lay the sheets with an overlap in one wave, and top sheet put on the bottom with an overlap of 180-200 mm. For ease of work when attaching the sheathing, it is necessary to make a template equal to the distance between the bars. Covering the roof with corrugated sheeting implies that all wooden elements must be treated with fire retardant and bioprotective compounds.
The most important stage of work is taking measurements and calculating the material. It is necessary to measure the slopes diagonally, and these values should not diverge by more than 20 mm. It is also important to measure the plane of the slopes; this measurement is done with a level using a cord; here, for every 5 m, the possible deviation is no more than 5 mm, otherwise the sheets will not fit together. Then the amount of metal profile is calculated, where the length of the cornice is measured and divided by the width of the sheet, taking into account the overlap of one wave.
When calculating the amount of corrugated sheeting from the slope to the ridge, you need to take into account the overlap of sheets of 180-200 mm. Complex roof It will be useful to break them down into geometric shapes and calculate them separately and then sum them up. Separately, it is necessary to take into account windows, pipes, ridges and ends. It is important to take into account the overhang from the slope, which should be at least 50 mm.
Roof structure
In difficult weather conditions in Russia, the problem of how to properly cover a roof with corrugated sheeting must be solved taking into account insulation and vapor barrier. Standard technology involves insulation mineral wool interrafter space and vapor barrier. Then it is necessary to lay a hydrobarrier, which is a membrane film. It is laid directly on the rafters and allows the previous layers to remain dry.
After laying the waterproofing layer, a counter-lattice is installed, which runs along the rafters and over the waterproofing with 25x40 mm bars. Next, the sheathing is filled in increments depending on the angle of inclination of the roof. We splice the sheathing slats only on the rafters. In places where pipes exit, on valleys, on ridges and eaves overhangs we do continuous sheathing or install additional bars.

Next, the profiled sheet is laid in compliance with all the rules that will be described later. Thus, before covering the roof with corrugated sheeting, you need to carry out certain preparatory work, which consists of the following:
- installation of a vapor barrier layer to prevent moisture from entering the insulation layer;
- laying a thermal insulation layer to compensate for temperature differences in both hot and cold weather;
- installation of a waterproofing membrane, which is used as additional insulation, a waterproof surface and protects against condensation, thereby ensuring long term roofing services;
- installation of counter battens and sheathing necessary for roof ventilation and increasing strength properties.
Tools and auxiliary materials
In order to properly cover the roof with corrugated sheeting with your own hands, you need to develop your own approach to this process. A properly chosen tool will be of great help and will improve the quality, as well as increase the speed of installation. Let's figure out what tool is needed and why.
When performing roofing work, you will need a not very complex set of tools, namely:
- measuring set, which includes a tape measure, level and cord;
- a set for cutting and marking, including a knife, pencil or marker;
- punched and electric metal shears;
- construction stapler and sealant gun;
- electric drill;
- cordless screwdriver with bat;
- rubber hammer;
- soft brush.
Metal profiles with a polymer coating are not resistant to high temperatures, therefore, it is not recommended to use welding and a grinder during installation. To ensure a long service life of the roof, the cut areas during cutting must be treated with an anti-corrosion compound. It must be taken into account that working on the roof is a traumatic process. When cutting and assembling the coating, it is very important to follow safety precautions and work only with protective gloves or mittens.

Profiled sheets are attached to the sheathing with self-tapping screws with a rubber gasket, which does not allow moisture to penetrate through the fastening hole. They can be electrolytically galvanized or coated powder paint. It is advisable to select self-tapping screws of the same color as the covering sheets, since this way they are less noticeable. TO auxiliary materials There are also special polyurethane foam seals with an applied adhesive composition. They are made with perforations to ensure better ventilation of the under-roof space.
Installation of corrugated sheets
When lifting sheets to the installation site, it is important to use wooden joists so as not to damage inner surface decking and avoid further corrosion. A huge risk of roof damage arises when covered large areas. At this time, you need to move only in soft shoes and with caution. It is also not worth carrying out work in windy weather, since you can not only damage the sheet, but also harm the health of others. You can use a soft brush to remove debris.

We have reviewed preparatory stage lifting corrugated sheeting, but how to cover the roof? There are several ways that we should summarize and suggest best option. When the slope is in the shape of a trapezoid or triangle, it is recommended to first lay the sheet in the center of the cornice, and then lay the sheets on both sides. We must not forget that the overhang should be at least 50 -70 mm. Otherwise, if the coating consists of several rows, you just need to follow the order of installation.

Careful placement of the first sheet leads to correct styling everyone else, so he needs to pay special attention. First sheet metal profile you need to align it with the end of the roof and the eaves, check the horizontal position with a level and secure it with a self-tapping screw in the upper part of the profile. After this, fasten one end into each sheathing beam and into each wave along the cornice. The following sheets are attached through the wave in a checkerboard pattern. The sheets of the top row are placed on the bottom ones with an overlap of 180-200 mm. We attach a horizontal overlap to each wave, and the same along all edges of the roof. It is advisable to make the front overhang equal to 50-70 mm.

With this method of correctly covering the roof with corrugated sheeting, you get a neat and reliable roof. An important element final installation is the operation of fastening the ridge elements and end strips, as well as snow retainers. When attaching the ridge, you need to maintain a pitch of 300-500 mm and screw the screws into the upper bend of the sheet, with an overlap of the planks of 50-100 mm. Wind elements need to be covered in the same way. We must not forget about self-adhesive seals and sealing of joints between the roof and auxiliary elements.

Option for installing a cornice overhang
Thus, it was described here how to properly cover a roof with corrugated sheeting. Do this work yourself, while receiving not only significant savings, but also high moral satisfaction from a well-made roof. May it serve you for many years.
Corrugated sheeting is considered universal building material. It can be used for a variety of purposes. IN Lately More and more often you can see very elegant and attractive roofs that are covered with sheets of corrugated sheets. As a rule, there are plain surfaces, but there are also those on which geometric patterns in the form of rectangles and stripes. This design gives the roof individuality and a special style. You can often hear from owners of private properties: “I’m covering the roof with corrugated sheets for the first time.” Craftsmen with no experience in roofing works, may encounter certain difficulties. Next, we’ll look at how to properly cover a roof with corrugated sheeting.
Advantages of installation
Many owners of residential private buildings say: “I cover the roof with corrugated sheeting, considering this material to be the best of all existing ones.” Let's figure out what its advantages are. One of the undoubted advantages of corrugated sheeting is the ease of its installation. Often the family budget does not allow hiring a team of craftsmen. In this case, it is necessary to choose the material so that it can be installed independently, involving as little outside help as possible. In this case, corrugated sheeting is optimal. To carry out the work, it is enough to involve two people. However, they may not have much experience and may not have special knowledge. It is enough to follow some simple recommendations. It should be said that the installation itself takes relatively little time - you can cover the roof with corrugated sheeting in a couple of days. The issue of price is also important. The cost of this material, in comparison with others, is much lower.
Main characteristics
Before covering the roof with corrugated sheeting, you should become familiar with some of its operational properties. Many owners prefer this material because it is durable and reliable. Corrugated sheets are made from cold-rolled metal sheets. Its surface is usually treated with a polymer. The corrugated sheet is resistant to wind loads. A factory-applied paint layer prevents corrosion and precipitation from damaging the surface. The material is available in various thicknesses. This allows you to select best option for one or another climatic conditions. So, for example, in regions with a large volume of snow in winter, a load-bearing profiled sheet with a wave height of 20 mm or more is perfect.

Material calculation
Before covering the roof with corrugated sheets, you need to calculate the number of sheets. During the calculation, overlap should be taken into account when joining the material both horizontally and vertically. In addition, the dimensions of the overhang must be taken into account. Vertical overlap is taken into account depending on the profile. The edge of one sheet is superimposed on another by overlapping the wave. U different brands material different pitch. Depending on the angle of the slope, the horizontal overlap is calculated. So, if the angle is up to 15 degrees, then the overlap can be more than 20 cm. If the slope is within fifteen to thirty degrees, then the size of the overlap is within 15-20 cm. If the angle of inclination is more than 30 degrees, the overlap is 10-15 cm. Amount overhangs are determined in accordance with the brand of corrugated sheeting, namely the height of the sheet. At large size there is a high risk of moisture getting under the roof. This, in turn, will lead to decay wooden elements rafter system. Therefore, the higher the leaf, the greater the overhang.
Insulation materials
Speaking about how to properly cover a roof with corrugated sheeting, it is necessary to talk about roof protection. Special films are used as a vapor barrier. Their range today is quite wide. You can also use roofing felt. The material should be stapled to the rafters. After this, the sheathing is done. Laying roofing felt or film starts from the bottom edge. This will overlap the top edge of the row, which will prevent moisture from penetrating the wood.

Lathing
Before laying the roof with corrugated sheets, it is necessary to build a base for the sheets. The lathing is arranged in accordance with the grade of material. If the metal thickness is 0.5 mm, and the type chosen is either C-8, or C-20, or C-10, then it is recommended to make it solid. In other cases, the pitch of the sheathing is set in accordance with the angle of the slope and the size of the profile. As a rule, the distance between elements is 0.5-1 m. All wood in the rafter system must be treated with special antiseptic compounds. They protect elements not only from rotting, but also from fire.
Safety precautions
Before covering the roof with corrugated sheeting, you need to familiarize yourself with some rules for carrying out the work. Installation of the material is relatively simple, but some features should be taken into account. First of all, this is the delivery of material and lifting it onto the roof. Here care must be taken so that, firstly, not to damage the sheets, and secondly, not to cause damage to the facade of the building. The work itself must be carried out wearing protective gloves and appropriate clothing. You can move along the roof by stepping on the ridge. When installing, you should correctly determine the type of rafter system used, as well as the distance between the elements.

We cover the roof with our own hands using corrugated sheets
First of all, it is necessary to determine the optimal installation option. Then the plank flooring is made for the valley planks. After this, the end elements are attached. The installation of the roof begins with the installation of the eaves strip. It should be lower than waterproofing film. Next you should start attaching the sheets. How to properly cover a roof with corrugated sheeting? Laying the material should begin from the end if the roof is ordinary. If the roof is hip, then the starting point of installation is the center of the hip. One sheet requires seven to eight fasteners (screws). At some joints it is better to use special steel rivets. All sheets must be aligned with the end of the slope before final fixation. Depending on the angle, as mentioned above, an overlap is established. However, it must be done at least one wave.
Strengthening material around pipes, ridges, valleys
Speaking about how to properly cover a roof with corrugated sheets, it is necessary to say about laying sheets near various elements roofs. To install a valley at the dormer window (short valley structure), it is necessary to cut the sheet into 2 equal parts at the lower end. First, the lower element is installed, then the bottom strip is installed. The last thing to install is the roofing sheet. To install the ridge strip, special smooth elements are used. It is recommended to install special seals with fine corrugation or those that follow the profile of the roof under the corrugated sheeting. The overlap must have a length of 100 mm. The strip on the sheet side is secured with self-tapping screws. The pitch between fasteners is up to 400 mm. It is advisable to install outlet pipes (pass-through elements) together with a snow blower. The lower components are selected in accordance with the roof profile. The pipes should have a diameter of about 100 mm. Ventilation outlet elements must be insulated.

End strip
The length of this element is two meters. The overlap during installation should be 50-100 mm. Installation must begin from the overhang towards the ridge of the roof, near which the excess is cut off. At the same time, the plank covers a distance of at least one wave of corrugated sheeting. The element is attached to the end board and into the ridge to the sheets. The distance between screws is 1 m.
Seals and fasteners
Since it is necessary to cover the roof with corrugated sheeting, following the technology, special attention should be paid to the screws that are used to fix the material. Fastening elements are made of hardened galvanized steel. They have a special elastomer gasket. The screw caps are the same color as the corrugated sheeting. The elements are painted during the production process with thermally strengthened polyester powder. This guarantees high quality elements, their resistance to corrosion, UV rays, and mechanical damage.

Before covering the roof with corrugated sheeting, you need to make sure that all the necessary fastening components are available. Often, when constructing a roof, special gaskets are also used. Seals are used to improve protection from wind, rain and snow, and prevent moisture from penetrating under the decking. This is ensured by the tight fit of the gaskets to the strips. Among other things, seals improve the sound insulation of the house. Installation today is most often carried out using seals to match the corrugation of the flooring. A special gasket for the 1.1 m ridge and the same reverse gasket are also used. There are also universal seals for two meters, at 45 degrees for 1.05 meters.
Roof care
Above we looked at how to cover a roof with corrugated sheeting. It should be said that caring for the roof is as easy as installing it. Rain is enough to make the surface clean. However, precipitation may not always wash away debris, leaves or branches. In this regard, it is recommended to clean the surface annually. It is also necessary to monitor the condition of the grooves, drainage system. Places where dirt is present are washed with a soft brush and water from a hose, the pressure of which should be up to 50 bar. If there is severe contamination, it is allowed to use products for painted surfaces. In this case, you should apply the substance, let it sit for a few minutes, and then rinse with water.

Use a clean rag and solvent to remove difficult stains. After such cleaning, the roof should be rinsed with a hose. Do not use products that are not intended for such surfaces. Otherwise, the coating may be significantly damaged. Ice and snow should be removed using wooden or plastic shovels. This work must be carried out carefully so as not to scratch the surface.
Finally
Despite the comparative simplicity of installing a roof made of corrugated sheets, this work has its own characteristics. When installing the roof, they must be taken into account. Carrying out work in accordance with technology guarantees the durability and reliability of the structure. Correct calculation of the material is also important.
Profiled sheet (corrugated sheet) is made of steel sheet coated with zinc, aluminum and protective polymers. Widely used in construction in the form of roofing material, for the construction of gates, fences and other structures.
The material acquires corrugation when passing through roll forming machine, while the edges of the sheet can be in the form of a wave or in the shape of a trapezoid. The width of the corrugated sheet is 113-120 cm, length 30-1200 cm, thickness 0.4-1.2 mm.

Advantages of corrugated sheets
Before moving on to installing a profile sheet roof, let’s consider the advantages of the material:
- Not subject to corrosion;
- Long service life;
- Ecologically pure;
- Variety of colors and shapes;
- High resistance to environmental influences and mechanical loads;
- During installation, a minimum number of joints are formed;
- Universal.
Disadvantages include the formation of condensation and low sound insulation.
Corrugated sheet overlap and roof slope angle
If corrugated sheeting is used as a roofing material, the sheets must be installed with an overlap.
- If the slope exceeds 30°, the sheet overlap will be 10-15 cm;
- 15°-30° – 15-20 cm;
- less than 15° – up to 20 cm.
Calculation of roofing material
To correctly calculate the roofing material, you first need to calculate the roof area, taking into account design features. To do this, the surface is divided into geometric shapes, and all the data is subsequently added up.
Each type of roof shape (triangle, trapezoid or square) uses its own formula to calculate the area. Eaves, end overhangs and bends (ridges, ridges and abutments) are measured. Corrugated sheeting has two widths: total width – 118 cm, and working width – 110 cm; this fact also needs to be taken into account when calculating.

To calculate the required number of sheets running horizontally, you need to divide the length of the ramp by dividing the working width. The size of the overlap is also taken into account. The number and length of sheets is equal to the sum of the overhang from the cornice, the overlap and the length of the slope.
2 meters is standard length additional element to determine required quantity material, sum up the length of the slopes, and then, taking into account the 10 cm overlap, divide the resulting figure by 1.9. To fasten the corrugated sheeting, self-tapping screws with rubberized gaskets are used, their number is 8 pieces per 1 m2. At the last stage, we determine the amount of insulation and waterproofing.
Installation of corrugated roofing
Thermal insulation, vapor barrier and waterproofing indicators in a roof structure largely depend on the correct installation of the “pie”. The entire roof structure is called a roofing “pie”. The system may be different, depending on the room: whether it will be residential or not.
Pie device:
- Profiled sheeting;
- Lining or drywall;
- Insulation;
- Vapor-proof material;
- Lathing;
- Rafter leg;
- Ridge seal;
- Skate and rail;
- Rafter strip;
- Waterproofing film.

The first sign of damage to the roofing “pie” will be the formation of ice at sub-zero temperatures.
Tools and material for installing corrugated sheets
- Film or thick polyethylene;
- Stapler;
- Glass wool or mineral wool;
- Silicone;
- For gluing waterproofing seams, connecting tape;
- For waterproofing, membrane in rolls;
- Paralysis film;
- Self-tapping screws;
- Screwdriver;
- Beam;
- Lining.
List required quantity building materials are compiled when calculating the estimate, and will depend on the type of roof structure.
Correctly covering the roof with corrugated sheeting with your own hands
At the first stage of installation work, waterproofing is laid, starting from the lower edge of the sheathing. The film is laid with an overlap of 10 cm to 15 cm. The material should not be stretched too much, and a construction stapler is used to fasten it.
Installation of counter-lattice

It is necessary to leave a gap between the waterproofing and the corrugated sheet to drain moisture. The counter-lattice is installed afterward; the structure consists of planks 5 cm high, they are placed along the sheathing, parallel to the cornice and rafters.
Installation of corrugated sheets
To ensure that the mounting hole is tightly closed, use self-tapping screws with sealing gaskets. Silicone sealant The horizontal overlap of the corrugated sheet is processed.

If the installation takes place in a flat roof, then the sheets are installed with a vertical overlap in two waves. If a sealing gasket is used, the sheets may be installed with an overlap in one wave.
Installation of corrugated sheets on gable roof comes from the bottom row. Place 5 sheets and fix them in the center with a self-tapping screw. And then, in increments of 50 cm, the corrugated sheets are connected to each other with self-tapping screws. If everything is aligned along the overhang, then final fixation is made.
Installation of end strips
The end strip for most sheets is 2 m; installation begins at the bottom with an overlap of 5-10 cm. When correct installation at least one wave of the corrugated sheet will overlap. In increments of up to 1 meter, fastening occurs with self-tapping screws.

The ridge strip with an overlap of 10 cm is attached using smooth elements; they must be included in the kit. It is advisable to install a layer of breathable seal between the corrugated sheets; fastening occurs in increments of 30 cm using roofing screws.
Installation of the junction strip
The abutment strip is laid with an overlap of 20 cm, fastening occurs with self-tapping screws in increments of 40 cm. Using a ridge seal, the connections between the ends of the wall and the roof are sealed, this will help prevent moisture from getting into the cracks.

- The roofing process is considered high-altitude work, and before starting installation you need to take safety measures;
- During installation, it is better to lay corrugated sheets on boards rather than on the ground;
- The corrugated sheeting should go down from the eaves by about 5 cm;
- The waterproofing should sag a little.
- Use a taut string to lay the profile sheets evenly along the cornice.


