DIY wooden movable toy. Plywood toys: tools and auxiliary elements, manufacturing subtleties. Sales of finished products
Even those people whose own grandchildren have grown up remember their toys. Something has been erased from memory, but the entertainment of childhood is invisibly present nearby. That’s why many parents try to do it themselves wooden Toys so that they are original, develop creativity and bring joy.
Wooden toys are the best
It is the tree that parents choose most often to create fun for children. Past generations have left many interesting ideas for craftsmen, and now these ideas are increasingly being brought to life, as industrial toys of dubious origin made of plastic and rubber attract parents less and less. Wooden toys are also on the shelves of children's stores, but they are quite expensive. So why not try making wooden toys for children with your own hands.
This is, of course, a labor-intensive task, but the result will be impressive: a happy child, pride in a talented dad, a new original toy.
To create children's fun, you will need minimal skills - the ability to operate woodworking tools and have a little knowledge of wood species. Imagination and the desire to make a surprise will also help.
Why is it so active in Lately This folk skill is being revived due to the fact that wood is an environmentally friendly material, completely harmless, and objects made from it are durable and attractive.
Necessary materials for work
If parents decide to make more than one toy, then it is better to purchase high-quality tools for making them. Of course, they will cost more, but working with them will be much easier and faster. But the process itself will not be expensive.
Before you start making wooden toys with your own hands, you need to stock up required quantity material, which includes not only wood, but also varnish, paint, and glue. For children's toys, varnish should be selected that does not contain harmful substances and heavy metals.

The toy, first of all, must be safe and not cause harm to the child. Therefore, the wood needs to be processed perfectly. As a material, experts advise using types of trees such as linden, alder, aspen or poplar - they can be processed much easier than, for example, oak or birch. If the varieties are hard, it will take more time and effort to process them. In order to make wooden toys with your own hands, you can use the wood that is available. It is not advisable to hire coniferous trees, as they can produce sharp, dangerous splinters that cause wounds.
Required Tools
Tools for work play important role, so you need to be careful when purchasing them. During the work process you will definitely need:
- drill;
- jigsaw;
- several hacksaws;
- Sander;
- bit;
- chisel;
- devices for taking measurements;
- glue and varnishes for wood;
- burning machine.
Each master, deciding to create wooden toys with his own hands, has his own secrets, skills and methods, so the number of tools and the set itself are usually selected individually. The presence of some kind of device also depends on the complexity of the work. The more complex the manufactured item, the more skills and equipment will be needed. It may even be necessary to have the skills of a turner and milling machine.

Where is the best place to buy raw materials?
Having thought about what kind of toy you need to make, you should prepare the material. If there is a possibility for own plot take wood - this is the most best way out, but many have to purchase raw materials in specialized stores. There is an excellent opportunity to buy illiquid goods - it is always available in a store or warehouse, where you can choose trimmings and remaining substandard wood. Plywood can also be used for work.
Beginning of work
When all the materials and tools are prepared for the work, the idea has been formed, it’s time to start implementing it. To make the work easier, you need a sketch of the future toy. Each detail must be drawn separately, and the scale must be 1:1.

Before assembling the toy, all parts must be thoroughly cleaned and polished. When making children's wooden toys with your own hands, you should immediately decide how all the parts will be connected to each other. The fastening must be reliable and durable. Most often, glue is used for these purposes, secured with wooden dowels.
If nails are used, it is necessary to wooden parts first mark the place where the holes will appear, then drill them very carefully so that wooden surface didn't crack.
If the craft has wheels that rotate, it is most convenient to use nails for upholstery, and to ensure that they are securely fastened, it is better to use metal pins in parallel - preferably with threads. In this case, the wheels will be firmly fixed and will not fall off during the game.
During the work you may encounter some difficulties. Wood will not be easy to process if it has not been dried first, so it is better to wait a little until the wood is completely dry.

Usually parts in homemade toys small sizes, there are also very small ones, and therefore extreme caution is required. The smaller and thinner the part, the more likely it is to crack. But over time, the experience gained will help you cope with this problem.
Final stages
When the toy is completely assembled and ready, you can make it a little more beautiful. If you paint a wooden toy, while maintaining both the texture and natural color of the wood, it is guaranteed to attract the child’s attention. For this purpose, the burning method is used. When buying varnishes and paints, it is better to consult with the seller which ones are safer.
To decorate wooden toys with your own hands, you can borrow several ideas from photos on the Internet that make it possible to decorate your own work in an original way. For decoration, use cutouts from magazines and postcards or draw some details yourself, and then glue them firmly.
If you don’t have any special skills in creating wooden toys, you can start practicing with the simplest crafts. These can be cubes and pyramids with themed designs or letters and numbers, which are used as educational games for young children. Then, having gained experience, you can begin to make more complex crafts - animals, people, cars, ships, airplanes.
Children grow up and want to have more toys complex structures. Therefore, parents will have to improve in order to know how to make wooden toys with their own hands, more functional and unusual.
Good afternoon. Today we start uploading articles on the topic of DIY wood crafts. In this first article I want to show you what simple crafts can be made from wood - for both children and adults. Many ideas will work for labor classes at school- for boys. Some ideas will work for a school competition crafts from natural material. Some wooden crafts can become decorating your dacha or yard. Here you will find a storehouse of inspiration and joy in anticipation of such interesting and simple work. In this article I will prove what to do beautiful crafts made of wood everyone can. Because here you will find simple and feasible tasks. Even a frail woman with a manicure can do half of the crafts in this article. So - let's fall in love with wooden creativity.
Let's start with simple magic.
Tree + sun
Crafts that glow with love.
Here are the simplest and cutest ones country crafts made of wood. For the craft, you need to cut a log (ask when you are sawing the firewood with a grinder to make several thin cuts). Or you can do it without cutting - just take a board of any size.
We drill holes in the wood so thick that a store-bought glass pebble will fit into it. Such sets of multi-colored decorative glass stones are sold - in the gift department, and in the department where there are candles, vases and everything for holiday decor.

You can simply drill such holes with glass into a board and hang it on an apple tree. You can drill such holes in the fence - if the sun shines into it at least once a day at a low angle.
That's very beautiful. Magically. Like in fairyland. Your children will be delighted with this wooden craft.

Simple wooden crafts
from log cuts.
If you have logs being cut into firewood in your yard, you are in luck. You can get priceless craft material for free. Ask the men to cut you flat cuts from both small and large logs. Lovingly stack them away from the woodpile and start dreaming up future wood crafts. For example, let it be wooden owls . It's easy to do and looks beautiful. The saw cuts can be nailed to each other with nails. You can put them on liquid nails (like glue).

The surface of the cuts can be rough and unsanded (as in the photo with the bunnies craft). Or you can sand it with sandpaper and even varnish such an ornamental material. Or paint it the color you want.

From large saw cuts you can make large country wood crafts. And small log houses (made of thinner branches and logs) are suitable for miniature crafts - for example, these birds. You can cut branches of this thickness yourself with a hacksaw - manually, without a chainsaw.

Log cuts can become a canvas for art installations. Such wooden crafts-pictures can be made from any natural material. Go to the river and find smooth, flat stones. They will become the source interesting crafts. The stones can be easily painted with felt-tip pens, office fat markers or just gouache (after work, fix the gouache with hairspray or nail polish).

Here's another way to make beautiful AIR crafts from wooden cuts. Lacy through cutting with an electric jigsaw (photo with craft Maple Leaf) looks simply magical.

Here is a small master class from which you can see how the process of cutting out openwork patterns on a thick cut of wood occurs.
First we outline the stencil with a pencil. Then we use a drill to drill holes in the key nodes of the drawing. And then we use a jigsaw to move from one holey node to another.

You can come up with a device yourself which will help you cut wood products using a conventional drill. Do it yourself electric jigsaw. Holding the comfortable handles with your hands, you simply move the device - following the lines of your drawing. The thinner the drill, the finer details of the design you can cut out with it. Well thought out.

Or you can buy a jigsaw– it costs on average 100 dollars. You can find it and over 50, we don’t work on an industrial scale, so it’s not necessary to buy a very powerful, expensive tool.
Mosaic crafts
From cuts of thick branches.
If you have country yard The boring barn wall is looking right at you. Then you need to make it not boring. Let's decorate the shed using wood crafts. Let's do it mosaic applique from small wood cuts. Such cuts are obtained by cutting thick branches or thin logs with a hacksaw (or chainsaw).
The basis For such a wooden craft, we cut it out of a sheet of plywood. First, we draw the silhouette of the future craft on it. Cutting out the plywood base with a hand jigsaw or a special power tool. And we glue wooden rounds onto it - with liquid nails, with wood glue or with hot glue from a pistol.


And you can even make it at home from saw cuts decorative frame for a mirror made of wooden rounds(master class in the photo below).
- Buy too round mirror. Place it on a sheet of plywood and trace it with a pencil.
- Around the resulting circle, retreat a few centimeters (to the width you want for the frame). And with this indentation draw a second circle.
- Cut a large circle out of plywood. And cover the outer ring with wood cuts. You will get a beautiful wooden craft frame - all you have to do is glue the mirror into the middle using liquid nails.

Puff Crafts
made of wood.
This is perhaps my favorite type of wood crafts. Here the woven shields lie on top of each other creating a LAYER VOLUME of the craft.
Here is a cow craft made from three layers of wooden shield. The first layer is the body, the second is the head, the third is the bangs and nose.

You can paint all layers of your craft the same color (like a craft polar bear made of wood) or different colors(like a craft mouse on the moon– photo below).

Or you can leave a textured wood pattern (as in the crafts in the photo below).
Wood fox It has two-layer construction- the back layer, and the head and tail are placed on it.
Craft duck has 5 layers - a central layer with the head, and two layers on both sides (tummy + wing).

The more layers you will overlap each other, the more voluminous and convex your craft will be. Here is an example with the craft “Lions made of wood” you can see how the animal's muzzle moves forward, thanks to four layers of thick wooden boards.

If you paint your crafts. Complete the facial expressions, add small details - folds, spots, etc. You can get very realistic and expensive wood crafts. Your small hobby can become your business. Such works can be safely put up for sale.

You can come up with your own characters. Draw their layers on a sheet of paper. Increase the craft first in paper template– transfer the contours to wooden shield and saw out. Or find pictures in a children's coloring book– and redraw them in an enlarged size.

Wood craft
For school activities
At the labor lesson.
Such LAYER wood crafts can be cut NOT FROM THICK SHIELDS, but from thin plywood sheet . And then such work can be carried out in labor classes as part of the school curriculum. On the topic “sawing with a jigsaw on plywood.”
Here's an idea - how out of 3 plywood panels make a two-color puppy craft. The first very back layer of WHITE PLYWOOD shows only the tips of the ears, tail and one hind leg. We will cover the second layer with stain (so that it darkens). Eyes, nose and lines can be drawn with a marker, or burned with a special device for burning wood.

Using the same technique of shields with different shades of color, you can make a lot of three-dimensional crafts from wood during labor lessons at school or in a woodworking club.

Wood crafts
in the form of an APPLICATION.
Using a very similar technique, you can make an applique from wood. Here, too, wood is taken as a basis. solid wood board(that is, not a glued board, but a solid board). Because we will be sanding it, and the glued board may delaminate from sanding and the glue seams will be visible.

- On paper all future crafts are drawn. Divided into parts by lines. Each detail is numbered. And it is photographed (so that later the location of each element can be verified from the photo).
- Next, the drawing is cut along the lines into elements. We outline each element on the board with a pencil. We cut out an element from a flat board. All elements are flat on top, rough around the edges of the cut and with sharp sawing edges.
- Now our task smooth all edges of each part, round it. We trim off the sharp edges of the cuts with a chisel. And we grind it on a grinding machine (if you have one) or do it manually with sandpaper of varying degrees of hardness and roughness.
- After sanding all parts painted with tinted stain(sold in construction stores). Depending on how many times you wipe the part with stain, you will get a lighter or darker tone. Very light parts can be wiped simply with vegetable oil. You can check in advance shades of color on scraps of wood left after sawing the craft.

You can also paint wooden craft parts in watercolor or gouache(using not a brush, but a foam sponge). After painting, to prevent the part from getting your hands dirty, you can spray it with hairspray or saturate the craft with another wood coating compound (just check the color first on scraps).

It only seems that the cow (in the photo of the wooden craft above) is behind the moon. In fact, all the parts are in the same plane. On a piece of paper. But thanks to the streamlined edges of the parts, everything looks voluminous, soft and as if pressed into each other. Nothing is actually pressed in - everything just lies next to each other.
Ideas for such flat wood applique crafts can be taken inside children's coloring books. There are just pictures with large details. You can find a children's coloring picture on Google - enlarge it and print it. Or redraw directly from the monitor screen by placing a sheet of paper on the glowing screen.

Methods for grinding parts
for wood crafts
(instructions to help).
To make it easier to sand the smooth edges of parts without rubbing calluses on your hands, I want to give some useful tips.
You can clamp the sandpaper sanding belt in a special vice, also made of wood. Here's how it's done in the left photo below. Or come up with your own version of the device.

Here in the left photo - sandpaper is wrapped around a thick piece of wood with a semicircular edge. And the edges of the sandpaper are wrapped in a groove, and clamped with a bolt twisted through a round cylindrical piece of wood-clamp.

There are also grinding attachments to the drill. And then you can grind the parts using the rotational force of the drill and magical power electricity.
Below we see grinding attachments for drill– plate and drum shape.

Eat grinding devices for a drill, where you can change sandpaper - remove the old worn-out sandpaper and fill in a new one.

By the way, on AliExpress you can buy immediately in bulk sanding drums for a drill for 3-4 dollars per batch of 100 pieces. If you search, you can find it cheaper.

And to prevent the drill from spinning in your hand while working, you can create a special FASTENING STRUCTURE that will record your homemade grinding machine in one place, and all you have to do is bring the parts to the grinding drum.

The design of the mounting pallet can be different - with a wooden clamp (photo above), or with a retainer in the form of a metal bracket (as in the photo below).

With such an assistant, making wood crafts with your own hands is a pleasure. Quick, pleasant and immediately beautiful results. This kind of work can be put on stream - and a whole production of beautiful wooden (smooth and safe) toys for children and wooden gift paintings can be set up.
You can become a successful master. Completely unexpected for myself. Just like that, look at this article and fall in love with the idea.

The imagination of wooden crafts is limitless. Remember the formula for success - everything can be made from wood. The main thing is to start... then continue... and finish.
For example, knocking toys. Beautiful fun for children and for decorating the garden. Such a knocker or woodpecker may knock on your door, announcing guests on the porch. Just like in a fairy tale, pull the string and the door will be opened for you.

You can make decorations for your children's room with your own hands. Essentially, reincarnate and become a designer of interesting interior wood crafts. Any boy will be happy if his children's room sparkles with motifs from the Jungle.

You know... I’ll probably continue the topic of wooden crafts for design children's room in one of the following articles. I'd like to see what ideas are hidden here. And making someone fall in love with this is a good thing.
And perhaps we should create an article with wooden toys for children - self made. I also need to write. And then it will work here link.
In the meantime, let's continue...
WOOD CRAFTS
and WASTE material.
Where do future crafts live? …. Old half-decayed boards. For example, from grandma's fence. Which are usually used for firewood or removed from the yard as excess garbage. Stop. Let's not throw them away. Let's dig through this pile and create something wonderful - with our own hands from wood.
A wooden mop-brush, if sawed in half, turns into the mouth of an evil dog. A little imagination and work. And now service dog, bristled and grinned at you.
A beautifully crafted piece of art. tree and waste material.

Any waste material (pieces of iron, plastic) and old pieces of wood can populate your home with fairy-tale characters. They are alive. They have a soul and their own history.


Wood crafts
Imperishable beauty.
Peeled veneer , from old furniture panels, quietly dampening in your shed - can also become a source for crafts and wood appliqués.
From this thin wood material You can directly cut out the details of the future craft with scissors and stick it with hot glue from a gun (or with wood glue).


You can also use thin birch bark instead of veneer. And also make interesting flat crafts from wood.

Wood crafts
(logs, firewood and bark)
Ordinary firewood from your woodpile can become a source of inspiration for wooden crafts for the dacha.
If you cut a round log diagonally, you get a figurine with its face turned towards you. All that remains is to draw this face, add elements of eyes, ears, and nose to it.

You can use logs and round logs to form the body of an animal. The logs will be the legs and the logs will be the back. The head can be made from a round cut of a small log. Or chop with an ax face to the desired shape from the same log as the body of your four-legged wooden craft.

Show your imagination and don’t stop before a difficult task. A squirrel made of wood or a snail made of logs - there is nothing complicated. We turn on our head and sense of humor - it will tell you the most ridiculous, but effective ways hand over gentle image animal using rough wood and other natural materials.

YOU can work with a chainsaw or an ax - sawing out or beheading the face of your wood craft. You can make these cute pigs with your own hands as a fun wooden craft for your dacha.

And in the bushes you can put a beautiful, proud deer - also a simple and quick craft made from wood and branches.

Wooden crafts
from chips from a log.
It happens that when you chop firewood, large shaped chips break off from the log. This chip often has weird shape– already similar to something (a bird, a panther, a face profile). You need to carefully put such a gift of fate aside, so that you can later return to it and complete the craft started by nature. Trim something with a knife, highlight something with paint, glue something as an additional detail. And you will end up with a do-it-yourself wooden craft - beautiful and original.


These are the ideas I managed to find for wood craftsmen.
Now you too can make beautiful crafts from wood with your own hands. Moreover, this article is only the first in a series on the topic of wooden crafts, which are clear and easy to do at home. You've probably already fallen in love with some ideas and are determined to implement them - I keep my fingers crossed for you - let everything work out in the best possible way. And your wooden craft will appeal to your entire Family Bunch.
If you look back a few decades, you can see that previously toys for children were made mainly of wood. And in most cases they were completely homemade. But this in no way diminished their beauty, and most importantly, their safety for children. Even now in modern world Many parents prefer to buy toys made from wood for their children. And many more do wooden Toys with your own hands, drawings of which can easily be found on the Internet.
Varieties of wooden toys
 Wooden toys are usually lightweight and very durable. For small children this is a real find. They always throw something on the floor, and ordinary plastic toys easily break when handled this way. In addition, babies always put something in their mouth to get acquainted with the world around them, and, of course, toys made of wood in this case will be safer for their body than toxic plastic. By playing with toys from a young age, children develop fine motor skills, and this is very important for speech development child.
You can make a variety of wooden toys:
- Educational sorters.
- Puzzles.
- Pyramids.
- Designers.
- Various auto and motorcycle equipment and other types of transport.
- Movable toys.
- Mosaics.
- Sets of cubes with patterns.
The main thing is that their production does not require a lot of materials and additional costs. Typically, all that may be required is:
- Wood blocks.
- Dye.
- Tools for working with wood.
And of course, a little desire and patience for this exciting process.
Educational sorter
Probably not every child will immediately understand how to play such a game. interesting game , but after he understands the whole process, he will definitely like her. The following materials will be required for manufacturing:
- Wooden blocks 2-3 cm high.
- Ruler.
- Compass.
- Pencil.
- Skin.
- PVA construction glue.
- Wood paint that is harmless to children (for very small children we recommend not to paint the bars, leave a natural shade, because they may put them in their mouth).
- Sandpaper.
- Cylindrical wooden pins.
- Jigsaw.
Step-by-step manufacturing instructions:
- Before starting work make a drawing or use ours. Decide on the size of the toy and cut out all the necessary parts.
- On a solid block we drill holes for the pins. Please note that they do not have to be end-to-end. You will need to pour glue inside and install pins for gluing.
- You need to make five columns of pins. First, we place one pin from the edge, then we make room for the solid part and drill two holes according to the marked pattern. We repeat the algorithm until we drill all the holes for the pins. There should be 15 of them. Each column should have its own a certain amount of holes for pins ranging from 1 to 5.
- Glue the pins into the base and leave to dry thoroughly.
- While the base is set aside, let's start cutting the parts for the sorter. You need to make 4 parts of each geometric shape from the bars. The diagram shows that they took a circle, a rectangle, a triangle, a square, and a pentagon. There should be exactly 4 pieces of each figure.
- Using a ruler and compass, we mark holes in the parts and drill them so that the figures fit freely onto the pins in the base.
- We process all parts with sandpaper to avoid possible the appearance of splinters on a toy. And after that we paint them smooth surfaces in different colors, each figure from the column should have its own color. In total you will have to paint in four primary colors.
After complete drying toys you can start playing with it, the baby will try to get different figures into the holes, and then he will understand that each figure must have a certain number of holes and coincide with the sticks on the board.
Rope horse
 The horse used to be the most common wooden toy. Craftsmen made them with their own hands according to drawings to delight children. The horse as a toy was most often made in the form of a rocking chair for younger children. Made for older children plywood horse They were already riding on it, skipping around the room with sabers in their hands. Such a horse allowed boys to play outdoor games.
To make a plywood horse you will need:
- Sheet of plywood.
- Hacksaw or jigsaw.
- Paints.
- Rope.
 Before starting work, measure the child's height; the horse should not touch the floor, so make it from the top of your head to about the knee or just below. If the toy is too long, playing with it will be inconvenient and traumatic.
Manufacturing instructions:
- On a sheet of plywood we draw the silhouette of a horse in profile. You need to draw the head to the end of the neck, and then it will just be a long stick.
- It will be convenient for a child to ride on such a stick and, importantly, hold it with one hand, since it will not be wide. We cut out the horse according to the drawn stencil.
- The horse needs to be painted so that it is beautiful and colorful; for this we will take a special wood paint. Leave until completely dry. It is recommended to paint only, and not to paint the base on which the child will sit.
- After the horse blank has dried, we attach a rope to its muzzle - it will serve as a bridle.
That's all. The jumping horse for children is ready, you can sit on it, pick up a bladed weapon and ride into battle with your enemies.
Constructor from cubes
 For development logical thinking and training the visual organs, you can make multi-colored cubes, using which children will collect the pictures given by their parents. This craft is very easy to do, but this does not reduce it at all. useful qualities.
Materials:
- The bars are 3-4 cm wide. It all depends on what size you want to make this toy.
- Wood paint.
- Jigsaw.
- Ruler.
- Pencil.
- Sandpaper.
- Paper and pencils for sketching a diagram.
Step-by-step production:
- The width of the beam will determine the size of the resulting cubes. Carefully mark equal parts using a ruler and pencil.
- Cut them with a hacksaw or jigsaw, you should get the number of parts you need, according to your diagrams.
- Gently sand each side of the cubes using sandpaper.
- We paint each cube in desired color, you can decorate each side differently, it all depends on what games you will play with your child.
- Leave them until completely dry and start writing assignments on a piece of paper for the baby. Using them, he will make various shapes from these cubes.
Clown on uneven bars
 Toys can be not only for the development of logical thinking, but also simple dynamic ones. With the help of mechanical force on them, they begin to walk, roll over and move on their own. It is worth noting that they are also entirely made of wood, and use of metal they do not provide for this, and this is very important.
Materials:
- Wooden block.
- Small diameter pins - 6 pcs.
- Plywood.
- Wood paint.
- Sandpaper.
- PVA construction glue.
- Ruler.
- Pencil.
This upside-down toy, like a clown on the uneven bars, will appeal to children of any age; they will be interested in the principle of its operation. And everything will be based on balance and very precise measurements.
Step-by-step instruction:
- According to the proposed scheme, cut all necessary details for making crafts.
- Carefully sand all cut areas to avoid getting splinters on children's hands.
- The clown part must be painted immediately, before gluing it with other parts. To do this, color its cap yellow and blue, and the suit is red and green.
- Drill a hole as shown in the diagram, insert a pin into it and carefully secure it with glue inside. Please note that accuracy in measurements is very important here; there should be no distortions, otherwise the toy will turn over to the end of the bars.
- We assemble the beams by drilling holes in the base and top of the beams and gluing pins there for support.
After the entire structure has dried properly, you can start playing. Gently swing the clown by the cap and he will begin to turn over from one end to the other.
Wood crafts for the Christmas tree
 Probably not many people remember that they used to make wooden toys for the Christmas tree with their own hands all the time. Precisely because wood as a material for their manufacture was always available, but they themselves Christmas decorations during the shortage in the country they were very expensive, and people could not always afford them. Very simply and easily make such toys even for little girls and boys. To do this, you just need to saw blanks with it and drill holes in them for threading.
 Take a thick branch from a tree, but not a dry one, but a good one. Saw it into small circles approximately 1-1.5 cm wide and make holes with a small drill. Give them to the children to color. Here they can show all their imagination and draw whatever they want.
A the most savvy They can make a beautiful snowman out of such round pieces. To do this, you just need to select three circles, different in diameter, and use PVA glue to connect them together. You can put them on top of each other - this way the toy will turn out to be voluminous. Attach a bucket cut from the remains of some plywood on top. Glue small lumps on the sides - arms and legs. And at the end color it in White color, draw a nose, buttons and a mouth with eyes.
Puff polar bear
Such homemade toys are made up of several components, superimposed on each other. Below is a master class on making a layered polar bear toy craft.
Materials for production:
- Plywood.
- Pencil.
- The paint is white and black.
- Jigsaw or hacksaw.
- PVA glue.
- Paper.
- Scissors.
- Sandpaper.
Step-by-step instruction:
- On a piece of paper, draw a silhouette of a bear with its hind limbs standing on all legs.
- Below, draw another similar silhouette, but in the other direction with the front paws drawn.
- Nearby, draw the head of a bear looking to the side.
- Cut out the stencils with scissors.
- Attach them to the plywood and use a pencil to transfer the image.
- Carefully cut out all parts of the bear.
- The cut areas must be sanded with sandpaper.
- Paint the plywood white on all sides and wait for it to dry completely.
- After this, we glue all the parts, placing one on top of the other. The head will be located on top, the body with the front legs will be in the middle, and the back will be the third part.
- Using black paint, carefully use a thin brush to draw the eye and nose of the animal, and also separate the toes on all paws.
That's all, beautiful toy the bear is ready for playing with children. You can make many more animals and study them animal world wild animals. This style of teaching will look visual and more interesting for toddlers and older children.
Attention, TODAY only!
All photos from the article
Making toys with your own hands is an entertaining and fun process, especially if you make these toys for children or as decorations, for example, for a New Year tree. Can be used various materials, especially when constructing moving models, but plywood is considered the easiest to work with.
It has the necessary strength and is not heavy. This material makes a lot of useful and fun homemade products for children from a very early age. Today we are making toys!

The beginning of the beginning - design

Whatever you have in mind, first you need to draw drawings of plywood toys with your own hands.
There are several types of toys that can be cut out with a jigsaw, each of them requires drawings or diagrams:
- drawings of flat toys made of plywood, which are cut out to decorate children's corners, rooms or playgrounds;
- blueprints toy furniture from plywood, as well as any other items based on a box;

Our help! The principle of making boxes applies not only to the manufacture of doll cabinets or cabinets; fairytale castles, static and dynamic models of cars, ships, airplanes and other models of equipment are assembled in the same way.
- blueprints dynamic toys from plywood. This is another large section of fun crafts that you can make with your own hands. The result is homemade moving mechanical toys. Unlike previous analogues, the design of a movable toy requires mathematical precision when calculating the sizes of moving parts. A discrepancy between the idea and the dimensions can lead to a banal stop of mechanisms, even elementary ones.

Let's start simple
Our instructions are written in such a way that after reading it to the end, you will understand the most important thing - the principle of working with plywood and the principle of assembling structures from it. It doesn't matter what you do - complex medieval castle, a sailboat model or a moving 3D puzzle constructor - the principles will be the same for simple and complex homemade products.
Let's start with flat models:
It's very difficult to find quality wooden toys these days. Plastic has conquered the entire market. Of course, plastic toys have low price, but the quality leaves much to be desired. Wood is an exclusively natural product, which is more environmentally friendly and durable than plastic. True, toys made of wood are much more expensive and not everyone can afford to buy them for their child. But there is always a way out, because it is possible to make wooden toys with your own hands, which we will talk about in this article.
Making wooden toys with your own hands is not so easy, here ordinary tools, which everyone has in the house, cannot be avoided, but if you wish, you can do everything. Let's take a closer look at this.
Tools:
- drill;
- jigsaw;
- Grinder;
- chisels;
- chisel;
- burning apparatus;
- hacksaws.
It is also worth paying attention to the material itself.
Materials:
- Tree. Experts recommend using varieties such as linden, aspen, and alder; they are easy to process. It’s also worth choosing well-dried wood so that you don’t have problems later. unnecessary problems with processing.
- You will also need varnish, paint and glue. It is worth choosing those types that do not contain heavy metals and harmful substances.
Features of creating toys from wood.
- As in any other craft, we will need drawings of your future toy; the parts must be drawn separately and in real scale.
- When all the parts are cut out, they must be carefully sanded and cleaned.
- Also make sure that when assembling the toy, all parts are securely fastened.
- For parts that need to be in motion when playing, such as wheels, it is best to use fasteners such as furniture nails or metal pins.
Detailed manufacturing process the best way will be shown in the video at the end of the article, but now we propose to consider several interesting schemes.
Drawings for work
- Rocking horse.
Everyone probably remembers this swing. And of course they remember the special delight from using them. And if you want to please your children, then it is made according to the following drawing.


- Weapons for boys.

The process of making weapons is simpler than making them in a swing.
- Mother of God toy.

This is another popular type of toy that every adult remembers.
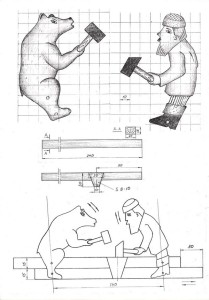

You can make other characters using the same principle.


The provided drawings are quite complex to execute, especially for inexperienced craftsmen, but you shouldn’t be upset, you can start with something simpler, for example, as shown in the following photos.
- Bowling.
Homemade bowling is very easy to make, you just need to buy wooden beads various shapes and glue and paint.


