How to make a wooden plinth with your own hands. Homemade plinth for the floor. Video - Installing a floor plinth with your own hands
- Balcony Balcony and loggia repairs The homeowner's dreams of a warm, well-appointed balcony or loggia are possible. You just have to want it, having it required amount bills, and dreams will turn into reality. Combining a glazed, insulated balcony with a room and kitchen, turning the loggia into winter greenhouse or in a separate living space - all this can be done, and with your own hands. In this section of the site you will find step-by-step instructions on insulation and glazing, as well as installation and installation finishing balcony and loggia. They will help you carry out the work yourself or have it professionally assessed. renovation work, carried out by qualified builders.
- Bathroom Bathroom Renovation Taking hot bath you probably want to relax. Beautiful ceiling, luxurious walls and floors greatly contribute to this process. Few owners square meters» will refuse to use high-quality plumbing fixtures, earthenware plumbing products, household appliances and equipment. The publications collected in this section of the site will help you choose the ones that are right for you. Appliances, plumbing and finishing materials. Even in a Khrushchev-era building, this room, the area of which does not exceed 2 square meters, with proper planning, can look great and meet functional requirements.
- Doors Entrance and interior doors - selection, installation, installation My home is my fortress. This is how the English lawyer Eduard Kok once described the feeling of security in his home. But not a single outpost will be reliably protected without strong and sometimes even armored gates. A modern apartment, like a medieval citadel, needs protection in the form front door. We think that if you protect the entrance to the apartment with modern door block, a feeling of security will settle in you forever. But that's not all. Members big family Those who have their own personal space in the house instinctively want to isolate themselves, at least for a while, even from their relatives. And here there is no way to do without interior door. This section of the site contains publications devoted to the selection and installation of entrance and interior doors.
- Kitchen Kitchen renovation The kitchen is undoubtedly the most popular room in a modern apartment. We cook in it, and often eat food, unless, of course, there is a dining room in the house. While preparing culinary masterpieces, the housewife spends almost all of her time in it. free time. It is important that the necessary kitchenware, household items and equipment were at hand, and the furniture was located so as not to hamper the movement of the cook. In this section of our website we will talk about finishing materials compatible with food products and their application. Our step-by-step instructions will allow you to renovate your kitchen yourself or teach you how to supervise the work of a hired team of repairmen.
- Repair materials Selection of building materials and their description Materials for repairs is a capacious concept that implies thousands of names, hundreds of groups and dozens of categories of building materials. They help make wishes and dreams of comfortable, functional and convenient housing that meets all requirements come true. At the same time, the appearance and quality condition of the elements of your home directly depends on the building materials you choose. In order not to regret wasted money when low-quality finishing falls off or loses decorative properties, purchase only materials for repairs tested by professionals. Do right choice The publications collected in this section of the site will help you.
- Window Windows and balcony frames An important element of a modern apartment is the window. And the question of what it is made from plays an important role in ensuring comfortable stay in this apartment. Indeed, in addition to protecting the room from atmospheric phenomena, the window protects from street noise, especially when the room faces a busy highway. This section contains materials about the manufacture, appearance and features of windows and balcony frames for your apartment or private house.
- Floor Repair and finishing of the floor An integral part of the interior of a living space is the floor. Problem-free living of household members is associated with the condition of the base of the floor and floor covering. Even the health of the apartment's inhabitants directly depends on whether the floor is warm or cold. This is especially true for young children who spend most of their time playing on the floor. Modern building materials require absolute evenness of the base on which installation is planned. This section of the site combines publications in which we describe and show the process of preparation, installation and installation of screed, “warm floors” and finishing.
- Ceiling Ceiling repair and finishing It is known that ceilings in modern apartments are not particularly smooth. Our website team, drawing on vast experience, will suggest many ways to repair, level and finish them. finishing building materials. Tension - PVC and fabric, hanging - plasterboard, coffered, Armstrong and grillto, covered with wallpaper and painted. Each type of ceiling can become a real masterpiece. Step-by-step instructions, photographs and videos about the installation or installation of each type of ceiling are collected in this section of the site. Using these materials, you can easily do everything yourself or professionally supervise the craftsmen hired to carry out the work.
- Walls Construction, leveling and finishing of walls Having a roof over your head is, of course, great, but it wouldn’t hurt to rest it on strong walls that have been built to last. In the apartments of block and brick high-rise buildings, they are naturally strong, but curved, like a Janissary's saber. Therefore, before finishing, they need to be leveled, and at the same time soundproofed in order to isolate themselves from noisy and reckless neighbors. And walls bordering the atmospheric environment also require insulation. In this section of the site we have collected descriptions of building materials and step-by-step instructions on installation, installation and fastening of finishing, as well as sound, noise and even waterproofing of walls.
- Toilet and sewerage Repairing a toilet The age of the Internet and urbanization, super speed and stress leaves virtually no room for privacy and the opportunity to calmly reflect on the complexity of life. Household chores also do not conduce to special philosophical activity of the brain. However, throughout the day, even a super-busy person finds time for solitude and calm reflection. This time is dictated by nature itself and the place for it, no matter how funny it may be, is the toilet. This section of our website contains publications about the arrangement of a toilet, sewerage system, the choice of plumbing fixtures and its installation.
- Home construction This section contains materials on the construction of houses, cottages, bathhouses and other buildings. Construction of a house from scratch to finishing of floors, walls, ceilings.
- Foundation This section contains articles describing various types foundation for a house. For the construction of buildings, strip, free-standing columnar, pile and slab or combined foundations are used. They are prefabricated (solid monolithic or glass type), monolithic and prefabricated monolithic. The choice of foundation depends on the seismicity of the area, underlying soils and architectural solutions.
Home » Floor
DIY wooden plinth installation
Decorating the corner of the junction of the wall slab and the floor covering is traditionally done with a plinth. In addition to performing decorative functions, the plinth performs several purely everyday tasks. Such, for example, as:
- preventing the accumulation of dirt and small debris;
- short-term retention of water from getting under flooring;
- laying behind its surface electrical wiring and other wires.
Modern industry offers the consumer many options for the appearance of skirting boards, as well as many materials from which it is made.
It has already been described in one of the publications. Now we would like to present to your attention step by step instructions about installing another type of decor.
Installation of wooden plinth
All digital values are indicated in millimeters.
We think that the choice of material has already been made; it suits the decoration of the room perfectly, or at least harmonizes with it. So let's start fastening.
Step 1, preparation for installation
When working on flooring, such as laminate, it is necessary to leave a gap of 10–15 between the wall slab and the board. If this condition has been met and the gap is no more than 12, the option of installing flat baseboards will suit you.
A gap of 15 creates some difficulties, as manufacturers make products with a thickness of 14. Accordingly, if the situation develops this way, you need to use wooden skirting boards of a different type, for example, triangular.
Wood, unlike artificial materials, has some natural defects. The building material may have knots on the surface or a different texture from each other.
Before you begin installing the wooden plinth, determine the location of each piece of building material. Select approximately according to the texture, and hide the knots in the place where you plan to install the furniture.
Having completed the layout, start making holes in the solid wood. This must be done if the most reliable type of fastening is chosen - a self-tapping screw. Make holes in increments of 850–1200, at a height of 12–15 from the floor. Following the hole, it is necessary to make a countersink (a recess in the material for recessing the screw heads into them). The diameter and depth of the recess should be 1–1.5 larger than the screw head.
Step 2, cutting joints and corners
Joining a wooden plinth is very not an easy task. Unlike its plastic counterpart, the wooden plinth is connected without the use of adapters.

To make corner joints, use a miter box ( special device for cutting corners) or miter saw with a protractor. The bar must be pressed against the wall of the miter box and cut at an angle of 45°.
Experience shows that the length of one rod is not enough to cover the length of the room, so on straight sections of the wall, installation floor plinth It is also produced with the connection of two or more elements.
Installing wooden skirting boards with your own hands requires a filigree connection of finishing elements. It is better to do the joining not at a right angle, and also use a 45° cut. Moreover, on one whip it will be right, and on the next it will be left.

Pressing the two plinths against the walls, check the connection and, if the joining is carried out without a gap, begin installing the plinth to the wall.
Step 3, installing the baseboard
During preparation, you drilled a solid piece of wood in order to fasten the wooden plinth to the wall with self-tapping screws through these holes. If the wooden baseboard is fixed with other fasteners, this is not necessary.
In special departments of construction supermarkets you can find more inconspicuous fasteners:

- finishing nails;
- staples for a pneumatic construction gun (and the gun itself, to the heap);
- thin screws with a small head;
- various adhesive compositions.
However, as mentioned above, the self-tapping screw is the most reliable appearance fasteners, so consider the installation method where it is used.
How to fasten a wooden plinth using self-tapping screws?
If the wall is plasterboard, it is necessary to press the baseboard tightly against the wall and the floor covering. Apply light pressure to the screws inserted into the holes. Marks will remain in the wall material. According to this marking, drill the surface, insert plastic dowels for gypsum boards and fix the strip in them.
If the slab is reinforced concrete, make holes with a hammer drill and use wood plugs into which to attach the wooden plinth.
By the way, we almost forgot. In the construction departments of supermarkets you can find wooden skirting boards with a removable decorative strip that covers the fastening elements with its surface.
That's all, actually. Installation of wooden skirting boards is completed. All you have to do is cover the fastening points with a special wood putty, matched by color, and open the wood with varnish.
All photos from the article
Wood finish It is deservedly considered a classic, not subject to any newfangled trends. On modern market there are a lot of good floor borders available now, but natural wood, just like a hundred years ago, is valued higher. In this article we will talk about the advantages and disadvantages of this material, and also tell you how to correctly select and install a wooden plinth with your own hands.
What you need to know about wooden skirting boards
Advice: when choosing such products, you should remember that today high-quality wood cannot be cheap.
These curbs belong to the upper or, at most, middle price category.
Even if you decide to make wooden skirting boards with your own hands, they will cost more than budget plastic.
Types of products
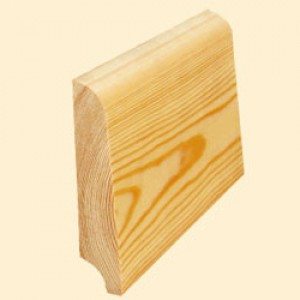
On this moment The market offers two types of products made from natural wood: a border cut from solid wood and a veneered version.

- Solid wood plinth is a classic. The cost of such planks depends, first of all, on the type of wood, as well as on the complexity of the profile, grade and level of processing. Such borders can be located both among elite goods and in the middle price niche;
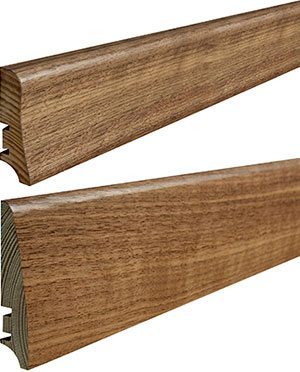
- The basis of the veneered border is a natural array of inexpensive conifers, usually pine or spruce. In some models, glued laminated timber is used as a basis. After forming the facial profile, place the bar industrially veneer is glued over . As a result, at the output we have a product absolutely identical to the elite one. natural massif, but the price of this plinth is an order of magnitude lower than the original.

Important: in part, wooden products include planks made from pressed MDF and covered with natural veneer.
Most often they are used for arrangement.
Product form
Gone are the days when the entire range of such products was limited to a few models with a triangular cut. And these skirting boards differed only in the presence or absence of a chamfer. The modern woodworking market is constantly improving technology and equipment.

Nowadays, wooden planks in terms of the complexity of the ornament are practically not inferior to polyurethane products or plaster stucco. The patterns that programmable CNC machines can produce can only be compared with hand carved on wood.

Each manufacturer is now trying to stand out with its unique models. Of course, there is a standard classic line of products, in which the size of the base of the bar ranges from 10 to 25 mm. As for the height, there are no restrictions; it starts from 40 mm and in some models can reach up to 300 mm.

Important: when choosing a size, they are often based on the height of the ceiling.
For a city apartment with standard ceiling in the area of 2.7 m, the height of the bar should not exceed 70 mm.
For ceilings up to 3 m, planks of 70 - 90 mm are suitable; for higher ceilings, a plinth of at least 50 mm is taken; there is no upper limit here.
What kind of wood is the plinth made of?
It has always been believed that the baseboard should be selected based on the material from which the floor is made.
But modern design trends allow you to successfully arrange different breeds and bypass old dogmas.
- Among coniferous species, pine is undoubtedly considered the most popular. It is a pleasure to work with this material. The soft massif is well cut and processed. Texture and color allow the use of a variety of tinting compositions, achieving original design solution. Spruce is less often used in production, since this solid wood is considered less elastic;
- A separate niche is occupied by larch borders. The price of such an array is quite high, but larch is not afraid of moisture, and most importantly, it is not susceptible to rotting. These skirting boards are great for areas such as the kitchen or shower room;
- Oak is traditionally considered an elite wood. It has unique strength and durability. But it is valued not only for this; the aesthetic qualities of oak are deservedly considered one of the highest. Skirting boards made of stained, bleached or artificially aged oak will emphasize the solidity of the interior;

- Beech also belongs to the elite varieties; its characteristics are practically not inferior to oak. But in its pure form it has an original pink tint and smooth texture;

- Walnut borders have a noble Brown color. These strips have good elasticity and are often used for the production of bent profiles. The high iodine content gives the nut health properties and makes it resistant to rotting;
- Ash has a beautiful light olive color. Like walnut, it bends well, its texture is vaguely reminiscent of oak, but with more clearly defined fibers;
- Alder is quite pliable when processed, but the planks practically do not bend. In addition, this array is afraid of any moisture; even light, temporary dampness can lead to rotting and damage to the border;
- People choose exotic wenge and mahogany because of their original color and texture. The array itself is quite durable and lightweight, but not everyone can afford such a plinth;

- Aspen and linden are quite resistant to moisture, flexible and easy to process. They are relatively inexpensive, so these rocks are often used to decorate bathhouses and other similar premises;
- Cherry is also quite popular. It is certainly not as strong as oak, but it is more elastic and resistant to rotting. When choosing such a plinth, you should take into account the fact that cherry changes color over time.

Tip: When you buy an unvarnished, clean border, do not forget that after varnishing it will seriously change its shade.
To find out what awaits you at the finish line, you need to wipe the bar with a wet sponge.
But this only works for clear varnishes.
Installation subtleties
Although wooden planks are much tougher compared to their plastic counterparts, the instructions for self-installation Even elite plinths, as a rule, do not cause difficulties for people who are well familiar with a hacksaw screwdriver and a drill. Moreover, some craftsmen make borders with their own hands.
Is it possible to make a border yourself?
Many people ask the question of how to make a plinth from wood with their own hands. But here it should be remembered that making borders yourself is not always economically profitable.
First, you need to choose the right board. The forest humidity level should not exceed 16%.
Raw wood cannot be sanded well, plus it is difficult to mill. Knots, rot, chips and other defects are also undesirable. Ideally, you need a clean, dry, planed board.
Wood is rightfully a classic material for finishing a room. First of all, it is valued for its environmental friendliness and high mechanical strength. Wooden skirting boards perfectly complement the parquet floor, harmonizing with it. There are a large number of purchased wooden skirting boards. Self-production skirting boards will not only save money, but also open up options for choice optimal shape and baseboard colors. About how to do it yourself wooden baseboard We'll find out further.
Wooden floor plinth: advantages, features and characteristics
White wooden plinth is installed preferably in dry rooms, such as a bedroom, living room, and children's room. They are installed on wooden or parquet floors. Among the advantages of such skirting boards are noted:
environmental safety;
naturalness;
attractive appearance;
high strength.
There are two main options for wooden skirting boards:
massive;
veneered.
The first option is more expensive. For its production, valuable types of wood are used in the form of oak, beech, cherry, and alder. Cheaper models are made from pine or spruce wood. This plinth is suitable for expensive flooring. He's different long term operation, resistance to mechanical damage, labor-intensive installation, high cost.
Veneered version of the plinth is more cheap option. Pine or spruce wood is used to make it. Valuable wood species are placed on top of the base. In appearance, the plinth is identical to the massive one, however, the performance characteristics are at a lower level.
Another option for wooden plinths is flexible plinths. The basis for the construction of the plinth is ash, oak, beech and other hard woods. Special technology wood processing allows you to obtain elastic properties. To store such a plinth, special packaging is required; the interaction of the plinth with air leads to its solidification in a certain shape.
The pricing policy for wooden skirting boards is determined by the type of wood used in the process of their manufacture. The cheapest options are pine skirting boards, and the most expensive are oak. The best option is larch; the wood has excellent performance characteristics, almost the same as oak, however, the cost of such a plinth is not much higher than that of pine.
After installing wooden skirting boards, they must be coated with varnish, which provides additional protection for the coating from moisture, temperature changes and other factors.
In addition, there are a huge number of types of skirting boards in relation to their shape. The most popular skirting boards have a triangular cut. With the help of modern woodworking equipment, it is possible to create models of skirting boards with a variety of cutouts and patterns.
Standard plinths have a base height of 1-2.5 cm. The height of the plinths themselves is not limited and ranges from 4 to 30 cm. When choosing the size of the plinth, you need to take into account the height of the ceiling in the room. High skirting boards are suitable for rooms with high ceilings.
The classic solution is to make a plinth from the same type of wood from which the floor is constructed. However, with the help of modern devices it is possible to successfully combine several types of wood.
Coniferous trees are used to make cheap skirting boards. Most often, pine is used as a material. Soft wood is easy to process and cut. Due to the presence of a light texture, the plinth easily accepts any coloring composition. Spruce skirting boards are rare, as this material is difficult to process.
Skirting boards for which larch is used are the most popular, thanks to successful combination pricing policy and quality characteristics. This material resists moisture well, does not rot and is used even in the kitchen and bathroom.
Wooden oak skirting boards - luxury options. They have unique strength and the highest durability. Using plinths made of bleached or artificially aged oak allows you to give the room sophistication and solidity.
Beech has the same performance characteristics as oak, but differs in color. Beech plinth has a pinkish texture, which does not suit every interior.
If you want to get a nice brown color, we recommend making your own plinth from walnut. This type of wood has special elasticity and is suitable for making flexible plinths. It is this type of plinth that will allow you to decorate walls that are unusual in shape. The nut contains iodine, which has a beneficial effect on the atmosphere in the room, making it healthier.
The light color of olive can be obtained from ash. This type of wood, like walnut, has high plasticity, the texture of the wood is clear and has veins.
The original coloring of mahogany makes it popular in the manufacture of skirting boards. In addition, the array is durable and lightweight. Although the cost of such wood is quite high compared to all of the above options.
Linden is best suited for making bath skirting boards, as it is characterized by good plasticity and resistance to moisture. Cherries are also very popular. However, its only advantage is the gradual change of color during use.
Please note that when choosing a baseboard without varnish coating, after treating it with a varnish composition, it will change color. This fact should be taken into account. If you are going to open the plinth with colorless varnish, then in order to find out what color the plinth will acquire, wet it with water.
__________________________________________________
In the Soviet Union, skirting boards were only made of wood; they were installed quite simply - with a hammer and nails. Panel houses had a plinth made of cement mortar. Nowadays, plastic skirting boards have also appeared.
And yet the most ancient and reliable option The floor edging is a wooden plinth. Wood-rich Rus' has long used this material in construction. Today, wooden plinths, so to speak, a classic of Slavic house-building, are in great demand, since, with all positive properties plastic, wood - living, breathing natural material, looks very good and is easy to use.
WHAT WOOD ARE THE SKIRTING BOARDS MADE FROM?
When choosing according to GOST, we will most likely purchase a pine product. After all, pine is an excellent material for construction; it has excellent characteristics. But this is not the only material of its kind from which skirting boards can be made.
Let's start with the fact that the plinth should be perceived visually as a straight line, which, as it were, emphasizes the floor. For this line to be truly smooth, the material from which the product is made must also be smooth. That is, the wood that was used on the baseboards should not have been subject to deformation under the influence of high humidity. In other words, it is extremely undesirable for it to “twist”.
Moisture-resistant species are conifers, such as pine, spruce, yew, fir, and larch. They are not subject to deformation if they grow in places high humidity, and also do not crack when dry. Therefore, they are very convenient for installation and easy to process.
Hardwoods, such as walnut, linden, cherry, are very soft, subject to deformation, and therefore are not suitable for construction. Hard deciduous trees - hornbeam, oak, maple - can crack when dried, and they are difficult to process and install due to their increased hardness.
According to the material, all skirting boards are classified as follows:
- plastic (thin-walled or foam);
- veneered (outside thin veneer made of valuable breed wood, and the base is coniferous wood;
- wooden (solid wood of one type of wood is used);
- laminated MDF (base - MDF, outside film with a pattern of stone or wood);
- others (ceramics, metal, polyurethane, etc.)
Mounting methods:
- using clips;
- self-tapping screws or finishing nails;
- adhesive;
- hidden fastening in the cable channel.
By decorative layer:
- wood pattern (natural or imitation);
- monotonous color;
- identical to the floor covering (wood, imitation carpet, etc.)
By degree of flexibility:
- hard (metal, wood, ceramics, plastic, polyurethane);
- medium (thin-walled plastic, plastic cable channel);
- flexible skirting board(special types).
INSTALLATION OF WOODEN SKIRTING BOARD
Installation of such a plinth is impossible without basic construction skills. After all, wood is not plastic, and working with it is not easy. And yet, if you wish, installing wooden skirting boards with your own hands may well be within your reach, the main thing is to do everything according to the instructions.
First, let's determine what tools and materials are needed to install a wooden baseboard, and you need quite a lot of them:
- miter box;
- construction corner;
- wood hacksaw;
- roulette;
- wood hacksaw with a thin blade;
- screwdriver;
- self-tapping screws;
- pencil;
- electric drill;
- wooden baseboards;
- dowels (if we attach them to drywall, then “butterflies”;
- countersink;
- long nail.
INSTALLING A WOODEN SKIRTING BOARD ON A BRICK WALL
First, very important rule: Install skirting boards only at the beginning of the second day after purchase. This time will be needed for the new skirting boards to “get used” to the new room: dry out, adapt to the new temperature conditions, “get to know” the humidity level of a given room. If the new plinth is made from damp wood, if it has not dried well enough, after installation it may “lead” and the whole work will be ruined.
But the day has finally passed, the baseboard has adapted, and you can install it. Where to start? As a rule, with internal corner premises. First of all, we take measurements. Let's measure the wall from corner to corner, its length. Next, transfer the dimensions to the wooden plinth and mark the place where you need to cut. We install the construction corner in the desired position and draw a straight line, separating the unnecessary part of the plank. High-quality joining of skirting boards occurs when their ends are cut at an angle of 45 degrees. To measure and cut very evenly, use a miter box. This simple tool helps to cut the objects we need very evenly. You can also cut the baseboard using a circular saw.
We measured it, now we cut it with a hacksaw. Next is docking. If everything was measured correctly and cut at the right angle, everything should fit well. But sometimes it happens that after measuring and cutting there is still a noticeable gap in the corner, since the corner of the room itself failed - it turned out to be uneven and of poor quality. Yes, the corners of a room are not always 90 degrees; sometimes they are 87 or 93. This happens when the diagonal was broken during the construction of a building - laying a foundation or erecting walls. Don’t throw away the baseboard and don’t be upset: after all, a small gap can be filled with putty. Well, a larger gap can also be removed if you grind down the edges of the plinth to minimum sizes cracks. This adjustment of joints can be done with a simple grinder.
Appearance skirting boards directly depends on how correctly they are fixed, as well as the tools that you have available for installation. For example, a tool called a countersink helps to make a recess for the head of a screw, which allows you to hide it completely.
By the way, initially uneven corners premises are laid out slightly differently than those that do not deviate from universal standards. In this case, a plinth stick is placed between the wall and the floor at the corner; closer to the joint, we draw a marking line on the floor along the plinth. We perform this operation for each corner separately on both sides. Then we cut off a piece required length and make markings at the end of the rail.
The top point can be the top corner of the stick, which is resting against the opposing wall. The lowest point is marking line on the floor, perpendicular to the baseboard that we are marking. We connect these points with a line and cut the plank at an angle of 90 degrees to the floor. A neat cut usually leaves no gaps. In relation to the length of the wall, the length of the plinth that we cut should be maximum. Only in this case will they fit together tightly and beautifully.
If two skirting boards are installed along the entire length of the room, they are also connected at an angle of 45 degrees, so that the smooth joint in the middle is not noticeable. If one plinth is enough for the entire length, then we adjust the other end at the corner to the same size. Let's take a closer look at this.
The length of a plinth alone is not always enough to stretch it from wall to wall. Sometimes two or three segments are used, and a strong and beautiful connection is also needed between them. Corners cut at 90 degrees will not work here. You need to cut them at an angle of 45 degrees; such a joint, if done carefully and treated with sandpaper, will not be visible at all.
By the way, the quality of both corner and intermediate joining depends largely on the quality of the product itself. The plinth should be the same throughout its entire thickness, there should be no knots or jagged edges at the joints.
Attaching a wooden plinth to the wall
Using a drill, we mark the wall where the mounting dowels will be placed. The procedure is very simple. As a rule, a wooden plinth is attached after about 50 cm - this is if the wall is smooth, and if not very smooth, then it can be attached more often.
Then, using the markings made, we drill holes into which the plastic dowel will be placed - these are the ones that are used if the wall is made of brick. If the wall is made of plasterboard, the baseboard is fastened with self-tapping screws or butterfly dowels.
The mounting process is also quite simple. We take into account only a few points. One of them is that the plank can be fixed only after careful adjustment of the joints. It is very important to observe the correct depth of the holes for the dowels; it should be no more than 1 cm deeper than the length of the dowel itself. For accurate drilling, wrap the drill with electrical tape to the indicated depth of the hole. On the baseboard you also need to drill recesses for the heads of dowel screws and self-tapping screws so that they are not visible on the baseboards later. For such recesses, take a drill whose diameter is slightly larger than the fastening head. Or, for such holes, a tool such as a countersink is used.
Then we fix a well-fitted plinth around the perimeter of the room. All is ready! Proceed to puttying, varnishing or painting the wooden baseboard, having first cleaned the surface of dirt and dust. To prevent the varnish from getting on the floor and wallpaper, you should cover them with something.
We have described a method for attaching a wooden plinth to a brick wall.
How to install a wooden plinth on plasterboard walls.
- First, with a pencil, measure out the places on the wall where the screws will be located, which will be used to install the plinth. However, this procedure is not so necessary; it is quite possible to do without it.
- We transfer the markings applied to the wall onto a wooden plank.
- We drill holes in the plank, for this we definitely use wooden board, which we place under the plank as a support and so as not to spoil the floor covering. The diameter of the hole cannot exceed the thickness of the nails we will use, so measure the diameter of the drill very carefully.
- Next, take a countersink and make small indentations in the holes made. As already written above, such recesses will serve to ensure that the head of the screw is completely immersed in the baseboard.
- Having replaced the drill with a suitable bit, carefully secure the baseboard with self-tapping screws.
We attach the wooden plinth to concrete wall.
- We drill a hole in the baseboard using the technology indicated above.
- Place the baseboard against the wall and insert a long nail into the holes you just made. We hit it several times: you need one strong or several weak blows with a hammer on the nail. The result of this procedure is obvious: a mark remains on the concrete wall. Everything is correct, because the purpose of this action is not to break through the wall, but only to make a nail mark on it.
- Focusing on this inconspicuous chip on the wall, we drill a hole required diameter using an electric drill.
- We hammer a dowel into the hole made.
- We install the wooden plinth and screw it in one by one required quantity self-tapping screws
Fastening the floor plinth at the internal corners.
- We create a layout of the plank by sawing off a couple of centimeters from a wooden baseboard.
- We lean the model with its edge against the plinth and trace the outline of its end with a pencil.
- Using a wood hacksaw with a thin blade, we carefully cut the material, repeating all the contour features.
- Check the accuracy of the cut before installing the plinth by constructing an internal corner from the planks.
How to fix a wooden floor skirting board at the outer corners
- We install the plinth in the intended location and reflect outside corner walls on planks.
- We install the wooden plinth in the miter box and make the cut at an angle of 45 degrees.
- Checking the accuracy of the cut.
- We finally install the baseboards, securing them with self-tapping screws.
ATTACHING A WOODEN SKIRTING BOARD TO THE FLOOR
You can attach the plinth to the wall, or to the floor. How it's done? Quite simply - with nails. Sometimes it is even easier to nail it to the floor than to the wall, since it is easier to attach wood to wood. You just need to try to avoid gaps between the plinth and the wall (in this case, the gaps between the plinth and the floor are completely eliminated), which can arise from the unevenness of our typical walls and floors.
In this case, the nails are driven into the floor boards through the baseboard strip at approximately an angle of 70-80 degrees to the floor. Well, if it’s impossible to hammer a nail into the floor, if its coating is too hard or too fragile, then, of course, we use the methods described above: we nail a wooden plinth to the wall.
INSTALLING SKIRTING BOARDS ON FINISHING NAILS
You can attach the wooden baseboard with finishing nails. This installation is similar to installation with self-tapping screws, only finishing nails are used instead of the latter, and pieces of wood are used instead of dowels.
This type of fastening has both its advantages over other types and limitations. The advantage, of course, is the almost invisible attachment point. But nails are smooth, and some types of wood can become
crack. If the plinth is installed in a stressed state as a result uneven walls or floor, then there is a high probability that either nails or wooden dowels may not withstand such a load.
There are also restrictions on installation with nails - for example, it is completely excluded if the walls are made of plasterboard or the walls are very loose. In both cases, on such a surface wooden dowel won't hold.
Wood screws, which are often used today instead of nails, are in many cases more effective than nails. After all, the self-tapping screw is easily hidden in the baseboard, after which the hole is sealed with “liquid wood” type putty.
A LITTLE ABOUT DECORATING CRACKS
Gaps, often formed at the joints of two planks, as well as between the floor and the baseboard, or between the wall and the baseboard, can be decorated using colored putty and sealant to match the wood. How to do it?
Cover the surface that borders the gap (floor or wall) with paper tape, then apply the decorating compound, pressing it into the gap with a spatula. Remove the tape immediately - leaving it on for a few days will make it much harder to remove.
Among the many skirting boards that vary in design, color, shape, texture, there is a model with a decorative insert in the middle, which serves not only for beauty, but also to hide the fasteners. After installation, a wooden insert is glued to the top of the recess.
The disadvantage of wooden floor plinths is that uneven surface it does not press tightly; a careful, careful adjustment is needed here: measuring, cutting and filing. After all, even if the floor is level, the wall is not always level. Often for this reason it is necessary to refuse wooden products and put plastic. Well, although the plastic fits almost perfectly, it is alien; it does not have the inanimate, life-giving energy that wood has.
AESTHETIC SIDE OF INSTALLATION OF WOODEN SKIRTING BOARDS
Not all wooden plinths and their cutting are subject to certain standards. For example, a wide wooden plinth will give your home more comfort due to the fact that it visually brings the floor closer. A white baseboard will highlight the cleanliness of the room. And it is not at all necessary that the color of the wooden baseboard matches the floor or walls. The play of color always gives a special charm to a room, which in a certain way affects a person, his attitude, energy, and psyche.
I would like to note that conifers wood, which is used to make skirting boards, will have a beneficial effect on our body. In our age of high percentages of allergic, cardiovascular and other diseases that often arise due to pollution environment, it's impossible to really breathe fresh air, because chemistry is present everywhere. All these factors speak in favor of only natural, environmentally friendly products and materials, one of which is wooden plinth.
Many people around the world have encountered such happiness as repairs))). This word frightens some people to the point of horror, while others, on the contrary, really enjoy doing this work, learning and creating. Apartment renovation, or country house, takes up a huge amount of precious time physical labor, and of course not a small amount of money from your family budget. Some people, in order not to deal with this long, tedious and tedious task, hire a team of builders, and they complete the work assigned to them in a short time. But accordingly, hiring this brigade is again a waste of your Money.
Not every person has the opportunity to hire a team of repairmen to help. So you have to ordinary people do all the hard work, and not light work themselves, without anyone's help. But this circumstance is only for the benefit of a person, his development, and hardening at work. By carrying out repairs on their own, a person learns a lot for himself, develops creatively, and as a creator.
Do-it-yourself repairs will be more valued than those done by a team of hired workers, because you will involuntarily respect your work.
The author conceived a renovation in his country house, decided not to hire a team, and to cope with this problem on my own, in order to save money for the sake of preserving family funds. Because in addition to expenses for repairmen, money is needed, and Construction Materials.
Building materials, on which the author also decided to save money and make some materials himself, using power tools available on our owner’s farm country house. He decides that he will make the skirting boards himself and will not buy this material in the store. If you look into it in detail, it’s not that difficult, and it’s difficult if you have the appropriate tool. He takes the boards he has, 25 mm thick and 2000 mm long, sawing them lengthwise, cutting them into 50 mm wide slats. Then it is passed through with a cutter and a cable machine.
And so now let's look in detail at what the author needed to make a homemade plinth, and how he did it.
Materials: board 2000 mm long and 25 mm thick, paint.
Tools: electric planer, milling cutter, cable machine, Circular Saw, brush.
First, I assembled the tool so that everything was at hand, and I didn’t have to look for anything later.

Gives a drawing of the future plinth.

Next he takes a circular saw.

Use a ruler to set the width for sawing the workpiece, and also set the angle of the saw to 10 degrees to create a bevel.

And he loosens the boards onto slats.

Next, the resulting workpieces are processed with an electric planer.


The edges of the workpieces are passed through with a milling cutter.

And accordingly, he performs the work with a cable machine in order to remove all roughness and unevenness.

And so he came up with such a wonderful plinth.


Next, I painted my product, and this is what happened.


