How to remove old tiles. Removing tiles - we remove the tiles with our own hands, saving the family budget. Determining the adhesion solution
In what cases may it be necessary to remove old tile from the wall and how to do it? Answers to the questions will be given in the article. Ceramic tile– a popular facing material that has wide application.
Ceramics has the following advantages:
- Beautiful appearance, a large assortment the product allows you to create a unique and inimitable interior;
- durability of the coating provided correct installation and operation;
- not exposed to moisture or sun rays, resistant to mechanical influences, for example, light impacts.
But there are times when the ceramic coating needs to be partially or completely replaced.

- Cracks or chips have appeared on a separate fragment of the cladding, and the enamel is damaged.
- A little renovation was needed, you decided to refresh the interior and do cosmetic treatments for the walls or floor.
- The cladding work was done poorly and everything will need to be redone. One option is that the tile is tapped and a dull sound is heard, which means there are voids inside. This will affect the durability of the coating, so it is better to replace it immediately.
- Over time, the facing coating has become obsolete, so a complete replacement is required.
- The base, for example a plastered wall, has become weak and unreliable, so that it can crumble along with the masonry.
- Depending on the reasons and goals to be achieved, different methods and ways to remove tiles.
We carry out partial dismantling
How to remove tiles from a wall if you only need to replace one or two tiles? If you only need to remove one or a few tiles from a wall or floor, you will need more patience and care.
How to carefully remove tiles without damaging them, tips and solution to the problem - video
The main requirement for performing such work will be the integrity of the remaining cladding. When dismantling one damaged tile, one should not forget about the integrity of the neighboring ones.
The following tools will be required:
- scraper;
- putty knife;
- bit;
- hammer drill or drill;
- 6 mm drill;
- hammer.
First you need to remove the grout that binds adjacent tiles together. Wet the seam with water, then wait until the grout swells a little and softens. Remove the grout carefully using a scraper or spatula.

If the grout cannot be removed, you can use a grinder with a diamond wheel. You need to be careful not to spoil your “neighbors.” Operate the tool at low speed.
After this, drill several holes to loosen its fixation on the surface. This can be done using a drill and a 6 mm drill bit. Take a hammer and break the tile, then pick up the fragments with a thin chisel or spatula and knock it down. Be careful not to chip or touch the cladding.
The layer of tile adhesive should be removed so that it does not interfere with the installation of new tiles in this place.
The surface must be cleaned; after removal, check whether the replacement will fit here. Are there any burrs or remnants of the grout mixture that will prevent the new tile from installing?
You need to start dismantling provided that there is already a replacement material that will not differ in color, shade and size from what is already there. Otherwise, the appearance of the updated coating will be clearly different from the old one, and this, in turn, will spoil the appearance.
Replacing tiles - real video advice from a working master
It is always wise to take 10% more tiles than necessary. It is taken in reserve with the expectation of trimming, fighting and replacement if necessary, as in our case. We considered the option of partial dismantling with the condition that the tiles do not need to be kept intact. Next we will reveal how to remove the tiles without damaging them.
Everything is safe and sound
How to carefully remove tiles from a wall: this question interests those who intend to reuse them in the future. Somewhere in the country, in utility rooms, you will also need recyclable materials, so saving is never superfluous.
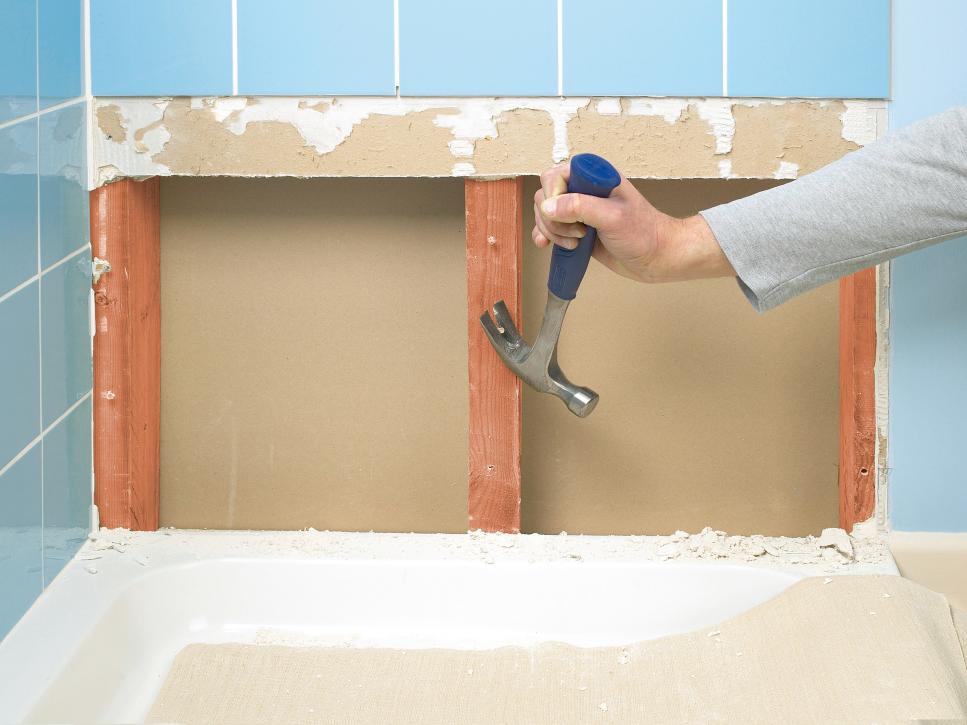
Let's consider a difficult case, if the tiles in the bathroom have come off as a solid wall, what should we do?
In some cases, this option is simply impossible: if the tiles were laid on cement mortar, it can then only be shot down in parts. If the installation was carried out poorly, for example, there are voids, then it will be easier to remove the tile intact. It is easier to dismantle when laid with special tile adhesives.
- Clean the grout from the seams; this can be done by first wetting the seam with water. It will become more pliable and easier to remove.
- Carefully pry off with a spatula.
You should always knock tiles off the wall from top to bottom.
- Avoid sudden and strong movements. Using a hammer, carefully tap the tile.
- The most difficult stage of the work: the tile has already been lifted, it has moved away from the surface by two-thirds. Work carefully so as not to break the ceramic at the last moment or break off the far corners.
Cracked tiles cannot be reinstalled. No amount of grout will help.
We carry out complete dismantling
In many cases, complete dismantling of the facing covering and preparation of a new base is required.
Rules for removing tiles from the wall and something about safety measures
If your renovation dates back to the Soviet period, then most likely the geometry of the walls leaves much to be desired, and the tiles are laid according to ancient and original methods. Here you cannot do without understanding how to remove tiles from the wall.
Complete dismantling of the coating will be required. In this case, the most important thing is to follow safety precautions and take care of your own health. Dismantling is carried out manually using a hammer and chisel, but this is a labor-intensive and time-consuming option. Use a professional construction hammer.

Wear gloves, safety glasses, and earmuffs to protect your ears from excessive noise. Respiratory system Protect with a gauze bandage or respirators. Complete dismantling is a noisy and dusty job.
Removing tiles includes the following points:
- The edge is pryed off with a hammer drill with a chisel attachment. After that, under acute angle ceramics and plaster are knocked off.
- You need to remove all the tiles and knock down the plaster down to the brick, if possible. Otherwise, you can go through primers deep penetration, and then begin installation of a new facing coating.
- Periodically, the hammer drill must be allowed to rest to avoid overheating of the device. And a little smoke break wouldn’t hurt for the employee.
Using a hammer drill is a smart decision that will help save time and effort. You can manually knock down a small area or hard to reach places. If we are talking about dismantling old ceramics in the bathroom, then you should take care of the safety of the rest of the interior.
Cover sinks and bathtubs with plastic wrap to protect from dust. If you leave the bathroom, be careful that large pieces of tile and plaster break off and fall without damaging the finish.
At complete dismantling ceramic tiles, it is important to choose the right temp. If you rush, you can injure yourself and damage water pipes and other important elements.
How to remove tiles from the floor?
We will separately consider how to remove old tiles from the floor. Technological process dismantling will not be very different from removing tiles from a wall. The reasons may be various flooring defects, such as chips, cracks and gouges.

Impacts, accidental fall heavy objects can split the tiles, and in high-traffic areas scratches appear and the attractive appearance is lost.
First, inspect flooring and determine exactly how many tiles will need to be removed. Tap gently with a hammer to see if there are any voids. If the sound is dull, it means there are voids.
This will make the removal process easier; this is where the hammer blows should be directed. The cracked tile is pryed off with a spatula or chisel and removed. The work can be done manually.
Bottom line
Our article was devoted to the question of how to remove old tiles from the wall and floor. The process is simple, but labor-intensive. It requires slow work, especially if you need to remove one or two tiles.
But every man and not only can do this himself. Calling a specialist for such trifles will cost a penny, which you can save.
During renovation, it is necessary to remove old tiles to level the walls and lay new ones. This must be done carefully so as not to damage the walls. However, removing tiles is not so easy, and even specialists do not like to do this service, demanding a fairly high payment for it.
A lot depends on what composition the tile was glued to. If it was a cement-sand mixture, then removing the tile intact will not be possible at all. When installing with tile adhesive, 50% of the tile can be saved. WITH brick surface You can remove the tiles almost without loss, but from a plasterboard wall the destruction will be large-scale, and you will have to redo the partition as well.
Tools that will come in handy: a hammer drill with special nozzle. Chisel, chisel, spatula, chisel, screwdriver, drill, sponge with water and possibly a grinder.
Before removing the tiles, wet all the seams between them with warm soapy water and remove them with a chisel or spatula. old grout. We wet the seams again and leave for the water to soak the glue or solution.
What methods exist:


Remember to protect your body and respiratory system and wear a mask when working with a hammer or drill, pieces of ceramic will fly everywhere.
Don't let it hit construction waste inside the plumbing. The work is very noisy and dirty; if you don’t dare to do it yourself, it’s better to turn to professionals.
At first glance, it may seem that dismantling tiles is much easier than laying them. But in practice, the task turns out to be much more time-consuming and complex, especially if it is necessary to remove the coating not completely, but to chop off only a few elements of the tile. We will tell you in this article how to properly remove tiles from walls and floors, and what tools to use to do the job.
When is dismantling necessary?
Complete dismantling ceramic cladding may be required when the coating has deteriorated over time. The surface may become moldy, accumulate dirt and grease, especially if it is. The coating may simply become boring, and then dismantling is considered as an effective renovation of the interior.

Partial tile removal may also be required when several units are removed. For example, you need to gain access to communications hidden under tiles, install a new washing machine or dishwasher, perform plumbing repairs.
If the tile was poorly laid or simply damaged during repair work, it can be easier to completely dismantle it than to perform zonal correction of the coating.
Preparatory stage
During the work you will need not only tools, but also means personal protection. The process will be long and unsafe - you can get hurt and injure your eyes from tile fragments. It is better to wear a protective suit, thick gloves, construction glasses and a respirator - it will be safer.

If you have to work with a hammer drill, cover the doorway with a wet cloth, and plumbing fixtures and interior items are securely covered with film or tarpaulin.
Which tool should I use?
For installation you will need the following tools:
- hammers - with a rubber attachment, heavy and lightweight;
- chisel;
- impact screwdriver with a handle adapted for hammering;
- a hammer drill with attachments in the form of a lance, a drill, a bit and a chisel;
- construction knife with a thin replaceable blade;
- spatulas of different sizes - durable, but thin for lifting tiles;
- chisel;
- sandpaper or any other abrasive;
- with a special disk for cleaning the space between tiles;
- hooks made of hardened wire 3-4 mm thick.

You will first need to soak the seams, so you cannot do without a bucket of water, a sponge or rag, as well as detergents.
Removing tiles with metal hooks
It is most convenient to work in hard-to-reach areas with metal staples. They are made independently from thick wire or old screwdrivers. The workpiece is shaped like the letter P, leaving room for a strong grip.
Pre-prepare the surface: moisten it generously tile joints with a wet sponge and wait until it softens slightly. Then one hook is inserted under the lower edge of the ceramic tile, and the other under the upper edge. You just have to forcefully pull the bracket towards yourself, trying to carefully separate the tile from the base.
This method is good when the tiled elements need to be kept intact. But the results will be excellent only if the tiles were laid on, and not cement.
Assessment of the quality of old coating
The scale and timing of the repair will depend primarily on the quality of the mortar on which the ceramics are held. This is especially important if the builder is faced with the task of not just removing the coating, but leaving the tile intact.
It is most difficult to dismantle the cladding using mortar, since it provides stronger adhesion, especially if the masonry was done well and “to last forever.” Therefore, if you want to prevent damage to the ceramics, the work ahead will be labor-intensive and lengthy. The solution will have to be soaked for a long time to soften the cement, make it looser and more pliable for dismantling.

If the base turns out to be too strong, all that remains is to remove the tiles with a hammer drill, and then you will have to forget about the integrity of the tiles.
It is best to soak cement tiles with water-salt solutions or special acid-based liquid products available at construction sites.
It's easier to work with. Sometimes it is even possible to do without soaking in order to keep individual elements intact. The tile is pryed with a chisel and, tapping with a hammer, removed from the base.
Do not forget about the communications that may be hidden under the ceramics - during dismantling they can be easily damaged. Especially if the work is to be done with the facing coating of the “warm floor” system. You need to make sure that work area no hidden wiring or piping.

Dismantling methods
There are several techniques for dismantling tiles that you can use. The choice of method will depend on the strength of the coating and the preservation needs of the tile.
Pre-treatment of seams and surface preparation
Preparatory work is especially important when the tiles need to be kept intact. The better the preparation of the seams, the higher the chances of success.
How to prepare seams:
- Prepare a warm soap solution from any household chemicals.
- Dipping a sponge into the solution, thoroughly wet all the seams, without missing a single millimeter.
- With a sharp spatula, construction knife or use a chisel to remove all the old grout between the tiles, trying to get as deep into the joint as possible.
- Clean the resulting uneven edges with a drill with a brush attachment. If such a device is not available, wipe the areas with a damp, soapy rag.
Partial and complete dismantling
Removing individual cladding elements requires special scrupulousness and accuracy from the master. Especially if the tiles were laid a long time ago, because it can be very difficult to find an analogue in color and design of old ceramic collections. It is important not only to leave intact necessary elements, but also not to damage the glaze and the edges of adjacent zones.

The seams are soaked according to the algorithm described above. If the surface allows, you can even carefully pour water into the cracks between the tiles or spray them thoroughly with a spray bottle. This will help soften the grout. They work with a spatula and a chisel, carefully prying the tile on each side and trying to tear it off the base.
The angle between the chisel and the tile surface should be about 40°.
At full installation you can work more boldly. A hammer drill with an attachment in the form of a chisel, bat or lance, set to impact mode, will come to the rescue. Dismantling is carried out from left to right and from top to bottom.
How to remove tiles from the floor?
Floor tiles are thicker than wall tiles, making them more difficult to remove. The seams are deeper, it will take longer to soften them, waiting until they are completely wet. After thoroughly cleaning the seams between the tiles, pour water and wait until the material softens as much as possible.

The further course of work will depend on the type of base and the desire to leave the tile intact. To begin with, tap the entire area of the cladding with a spatula, identifying weak spots where the tile does not hold well by the dull sound. From the weak point at the edge of the tile, they begin to use a chisel, tapping it with a hammer, each time increasing the force of the blow. Sooner or later the tile will give in.
How to remove tiles from drywall?
Ceramic tiles are removed from the plasterboard base only manually– without a puncher. After wetting and cleaning the seams, a chisel or chisel is driven under the ceramic, trying to tear it away from the plaster. Due to the high adhesion of drywall, the tiles can be removed along with it.
If the wall remains in satisfactory condition, it can be preserved by cleaning off the remaining mortar, priming and puttying. In difficult cases, drywall will require replacement.
- You can clean the seam using a grinder. Use a disk to cut the grout 2 mm deeper than the tile level, and remove the residue with a spatula.
- When working with hooks, the force must be applied strictly perpendicular to the surface of the tile, and not at an oblique angle.
- Taping the edges will help protect adjacent elements from damage. masking tape.
- When dismantling tiles on a wall, remove the top row first with a spatula. If areas with voids are found, removal begins with them.
- Tapping on the voids begins from the uppermost element on the right (for right-handers) or on the left (for left-handers).

A scraper or coarse sandpaper will help to clean the surface and the tile itself from residual glue and mortar. With the desire and due perseverance, the work will be argued, the main thing is not to rush and think through all the stages of dismantling in advance.
Ceramic tiles are so strong and durable that they can be used several times: tired of it in the house - zealous owners put it in the garage or at the dacha. The problem is preserving the fragile facing material intact and intact during dismantling. If you try, you can carefully remove the tiles from the walls and floors without damaging them, but still no one can guarantee that everything will go like clockwork. However, even split material can be given a second life if you show your imagination.
Features of dismantling tiles with different bases
Poor-quality installation with many cavities gives hope for large quantity whole tilesDuring operation, some of the elements will crack in any case, and whole tiles may not remain at all. Sometimes it’s easier to quickly knock down the cladding with a hammer drill and collect the fragments without wasting time and effort on careful dismantling.
- The ability to preserve tiles during removal depends on many factors, which can be assessed by visual inspection or tapping the wall and floor:
- If the tile was laid just a few days ago, it will undoubtedly be easier to remove than tiling that was ten years old. How better quality work master, the more difficult it is to dismantle the material, and the greater the percentage of losses. Presence of voids and cheap adhesive composition
- make solving the problem easier.
- The base material affects the accuracy of dismantling.
- The glue is absorbed more strongly into the porous back surface of the finish and is fixed more firmly.
Waterproof grout is stronger than regular grout and additionally holds the finish together into a single piece. If the cladding remains from the previous owners, then you can assess its condition by tapping it with light blows. or other tool. A dull sound will be in areas with a dense, continuous fit, and a ringing sound will be in the presence of voids.
Removing the finish from drywall is doubly difficult, because you need to preserve not only the tiles, but also the base. The adhesive composition adheres perfectly to the gypsum board and eats into it very firmly. If you only need to remove a few tiles, then the damaged section of drywall can be cut out and a new one inserted in its place.
Plaster absorbs glue, primer and moisture into the porous structure, so in the bathroom the tiles can simply move away from the base due to constant crumbling of the material and exposure to dampness.
Brick wall and concrete floor have less adhesion, so the percentage of tiles that can be reused will be higher. In case of careless recent installation, up to 80% of the material can be saved. If the finishing was carried out by experienced repairmen who used cement-sand mixture, the tile will crack almost entirely.
Safety rules for dismantling
 When dismantling tiles, you need to wear clothes made of thick, coarse fabric with long sleeves.
 When a fragile tile hits the floor, it shatters into many large, heavy pieces and small fragments, which can fall on an arm or leg, scratch the skin, or get on the face or eyes.
You need to take care of personal protective equipment in advance. These include:
- special clothing;
- closed shoes;
- thick gloves;
- safety glasses for construction work;
- headdress.
When knocking down tiles, a cloud of dust rises, which can lead to particles entering the respiratory system, so a respirator should be used for protection. You need to start work from the top of the wall, continuing down, then there will be less risk of several heavy pieces collapsing. It is better to close the door tightly to prevent dust from entering adjoining rooms
, and open the window to provide ventilation and make breathing easier. The equipment must be taken out, and work with caution near communications and wiring.
How to remove tiles from the wall and floor If, as a result of inspection and tapping, it turns out that the tile is firmly seated, and it will not be possible to remove it without damage, you should use the fastest and most popular dismantling method, which allows you to free up the walls and floor for fresh cladding, but splits the entire tile into pieces.
This method is very noisy, and repairs must be carried out during the daytime, warning neighbors.
 Fast way
 A hammer drill with pick and spade attachments removes tiles faster
- To work you will need the following tools and materials:
- chisel and hammer;
- old burlap, thick plastic film, cardboard or plywood.
Sequencing:
- If you need to clean a wall, it is better to cover the floor with thick plastic film, cloth or cardboard to avoid scratches and dents. You also need to close the door, open the window, and cover the plumbing items with old blankets.
- Using a hammer drill, knock down the tiles, starting from the top row from the window or doorways and moving to the side to reduce the risk of damage. On the floor, you should start from the threshold or the junction with the wall.
- If individual elements cannot be removed with a hammer drill, you can place a chisel with a sharp edge at the junction of the tile with the base and hit the handle with a hammer.
- Carefully collect large fragments and vacuum to completely remove small ones.
Instead of a hammer drill, you can only use a chisel and a hammer. It's more labor-intensive method, but less noisy and aggressive.
How to remove tiles without damaging them
 When removing adhesive with a knife, the risk of damaging the tiles is minimal.
 Principles and algorithm of working with different materials The bases on the floor and walls are similar. If, for example, the drywall in front finishing was plastered and puttied, it is easier to remove the tile without damage, because the layer of plaster is weaker than the tile adhesive, the rough base will remain smooth. Otherwise, when dismantling the tiles, the front cardboard layer will be torn off and many elements will burst.
Affects fastening strength and temperature rise. Near radiators and heated towel rails, the connection to the base will be more reliable. Cement, as an adhesive, eats into the base more strongly; as a result of the work, both the tiles and the gypsum board sheets will be damaged. Special ready-made mixtures will allow you to remove the cladding carefully.
To work you will need:
- a chisel or spatula that will not break when struck with a hammer;
- hammer and hacksaw;
- Bulgarian;
- water, sponge or spray bottle;
- masking tape.
Dismantling process:
- Wet the grout onto tile joints with water from a spray bottle or using a sponge to soften it a little. Let it stand.
- Using a knife or sharpened nail, clean the joints from grout and glue and wet them again.
- Pry the tiles with a spatula and, tapping it with a hammer, separate the tiles from the wall or floor.
- Soak the tiles in water for several hours, then use an angle grinder with a grinding wheel or a metal brush.
- Clean the plasterboard base from glue residues using a grinder with a grinding wheel attachment.
 If you do not plan to leave the drywall, the tiles can be removed along with it
 - Determine the area to be cut, for example four tiles located between the guides metal frame under gypsum board. To prevent mechanical damage, the edges of adjacent elements are sealed with masking tape.
- Wet the seams and go over them with a construction knife or spatula. You can buy a special tool to remove grout.
- Carefully insert a hacksaw into the seam between the tiles and cut out the piece along with the drywall. The teeth of the cutting blade should be smaller than the width of the joint.
- Carefully pull the finishing area out, and then separate the facing elements from the base by soaking them in water for several hours or sawing them off with a grinder.
The slabs on the floor must be removed as follows:
- Soak the tiles with a water-salt solution and leave for several hours. You can also use a ready-made acid cement remover. Tile adhesive will become more pliable and flexible.
- Place a spatula or chisel under the edge of the covering and slowly separate the covering element from the floor. In this case, the first tile may split, which will not affect the integrity of the rest of the material.
- Place a hammer drill with an attachment in the form of a wide spatula under the edge of the tile and, using pressure at an angle of 45º, make shallow notches in the middle and along the edges.
- Remove a single element and repeat the procedure for the entire tile.
Craftsmen often use homemade metal hooks, which can be made from two flat screwdrivers. The tool must be inserted under the tile into pre-soaked cement or glue and the element must be separated using pulling movements.
Features of dismantling 1–2 tiles
 To remove 1-2 tiles, it is better to use a spatula or chisel with a hammer, rather than a hammer drill.
 In a situation where one or two tiles are split, cracked and require replacement, or there is a problem in the communications behind the wall, and the owners forgot to make a door or hatch to access the pipes, you can dismantle part of the finish without damaging the adjacent elements.
For gentle removal you will need:
- a container with warm water and a sponge;
- durable spatula or hooks made of hardened wire;
- grinder for sawing seams;
- masking tape, construction knife.
Stages of work:
- Seal the edges of adjacent tiles in several layers with masking tape to avoid damage.
- Soak the tile joints with soapy water and allow the material to absorb moisture.
- Use a construction knife to clean the seams, and in the case of cement grout, saw through them, holding the grinder at an angle of 45º to the tile.
- Wet the adhesive under the cladding with a sponge, wait a while and, using hooks or a spatula, carefully remove the tile, holding it with your hand. To prevent falling, it is necessary to knock down the tiles little by little from all sides.
If the tile is already cracked or split, you can replace it by choosing in the store a similar shade and texture or, on the contrary, a contrasting bright tile with a pattern, using it as an element of wall or floor decor. In order not to risk the beautiful cladding in the future, it is better to build a small hidden door for free access to communications in the event of their failure. It can be finished with the same tiles as the main wall.
How to use old tiles
 Decorating the bottom of the pool with old ceramic tiles
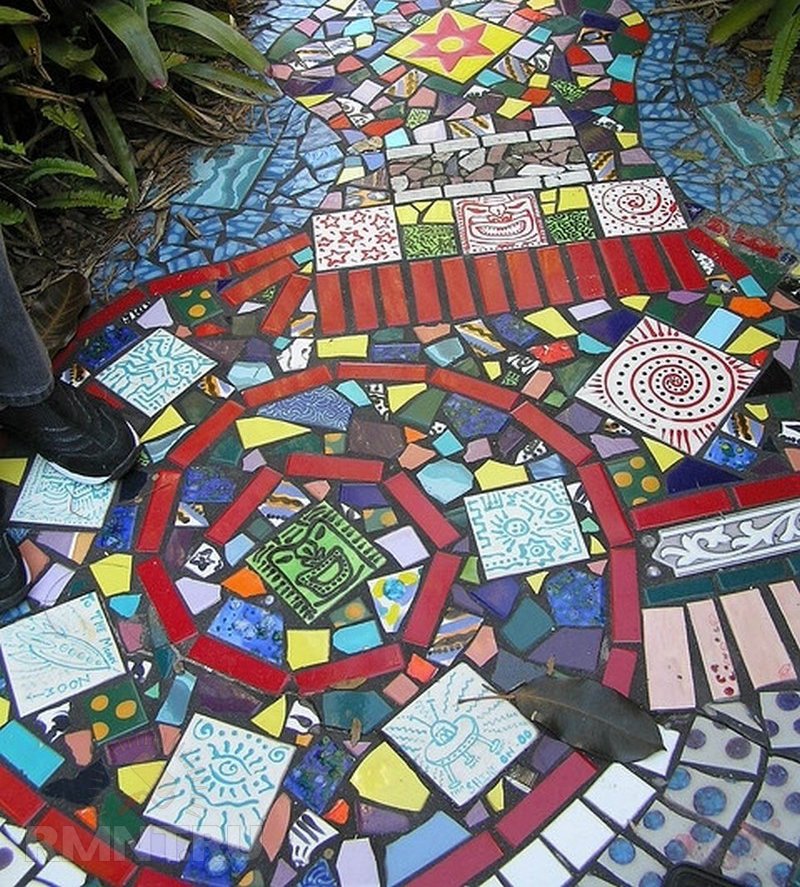
 There is no need to throw away whole or broken ceramic tiles. You can create extraordinary beauty from it with your own hands, with a little imagination. Any non-professional master can do this. Materials and tools are inexpensive, and the basis for creativity is already available.
Variegated and multi-colored tiles make a beautiful mosaic. It can be laid out from fragments of arbitrary shape and size or sawn into identical squares or elements of any geometry.
 From fragments of tiles you can lay out beautiful mosaic on the wall
 Floor tiles can be used to create a mosaic floor, combining neutral shades and elements with bright flowers and patterns.
 From floor tiles you can make a mosaic floor in a boho style
 From boring frames for pictures and photographs, coasters for hot and flower pots in combination with tiles you can create fabulously bright design objects.
 Floor tiles will look great on garden path, protecting from dirt in wet weather
 Video: How to remove tiles without breaking them and put them back
Even if during dismantling it was not possible to keep the ceramic tiles safe and sound, you should not be upset, because there are many interesting ideas for registration modern interior. Designers enjoy using mosaics, creating masterpieces of amazing beauty and originality that can stand out in an interior. bright accent in a neutral palette of other elements, and complement the harmonious ensemble, joining general style and palette.
Tile is a strong and durable coating, but it will also require replacement at some point. However, in order to put new material, you will have to put in a lot of work to remove the old one. This work is dusty and quite labor-intensive, but still breaking is not building, and it can be done much faster than installation ceramic coating. How to remove tiles from the floor?
Any renovation work in a house means not only updating the interior, but also destroying the old design of the room. Removing coverings from the ceiling or wallpaper from the walls is a difficult task, but necessary to apply new materials and update the room. Ceramic floor tiles are removed much less often than other covering options, but someday their turn comes.

The work of removing tiles from the floor is quite labor-intensive; they should be carried out by a person who is ready to physical labor and does not suffer from allergies, since during dismantling there is usually a lot of dust in the air. The removed coating itself is heavy, which means that taking it to a landfill will also require a lot of effort.

However, in some situations, the tiles should remain intact after dismantling. Usually the need to preserve it arises if the material has not yet lost its appearance and can be used elsewhere (for example, in the country).
On a note! If you plan to install heated floors in the bathroom, the tiles will also have to be dismantled and then replaced or replaced with new ones.

The timing and complexity of the work will help determine the composition on which the material is based. It can be:
- old cement-sand composition , which was widely used for laying tiles during the USSR. Now it is not used, but we must pay tribute - the tiles on it hold very tightly. There is a chance to remove the material from such a composition intact, but it is minimal, so you will have to prepare for the worst. Soften this one glue mixture from a removed tile, only using water-salt solutions– they will have to soak the dried composition for a long time. If they do not help, then an acidic product sold in specialized stores will come to the rescue.

- glue for ceramics. A reliable and modern composition has been used for repair work on tiles for about 25 years. It is more flexible and the chances of keeping the floor elements intact during dismantling are significantly increased.

Prices for Tarkett floor tiles
Tarquette floor tiles
Methods for dismantling tiles
There are different methods for removing ceramics from the floor, some of them are gentle and some are quite rough, which radically damage the coating. The choice of coating removal option will generally depend on what kind of adhesive the material is “sitting” on. There are three main ways to remove old tiles:
- using a hammer drill;
- chisel and hammer;
- using special hooks.
Any of the methods requires strict adherence to technology and does not provide any guarantee that it will be possible to immediately make the base level and leave the tiles intact. Also, each method requires a certain tool, which you will either have to buy or rent.

Table. Basic methods for dismantling tiles.
| Way | Short description |
|---|---|
| Manual method of removing ceramics. To implement it, you need a chisel equipped with a fairly wide blade. Sometimes it can be replaced with a spatula or a wide flat-head screwdriver. A scraper may be required to remove grout, and a hammer is needed to apply mechanical force to the tool. The grout between the tiles is moistened with water and then removed using a scraper. If it is old, it will require several stages of moisturizing. Cement grout This method cannot be removed - only a grinder can handle it, with whose help the seams are sawed to a depth exceeding the thickness of the tile. If the cut depth is shallower, the tiles will most likely split during removal. Typically, material is removed from the edge of the floor - a chisel is inserted between the covering element and the wall, then it is carefully struck with a hammer. This is how the tile is separated from the base. The method is suitable for gentle removal of tiles while maintaining their integrity and the possibility of further use. |
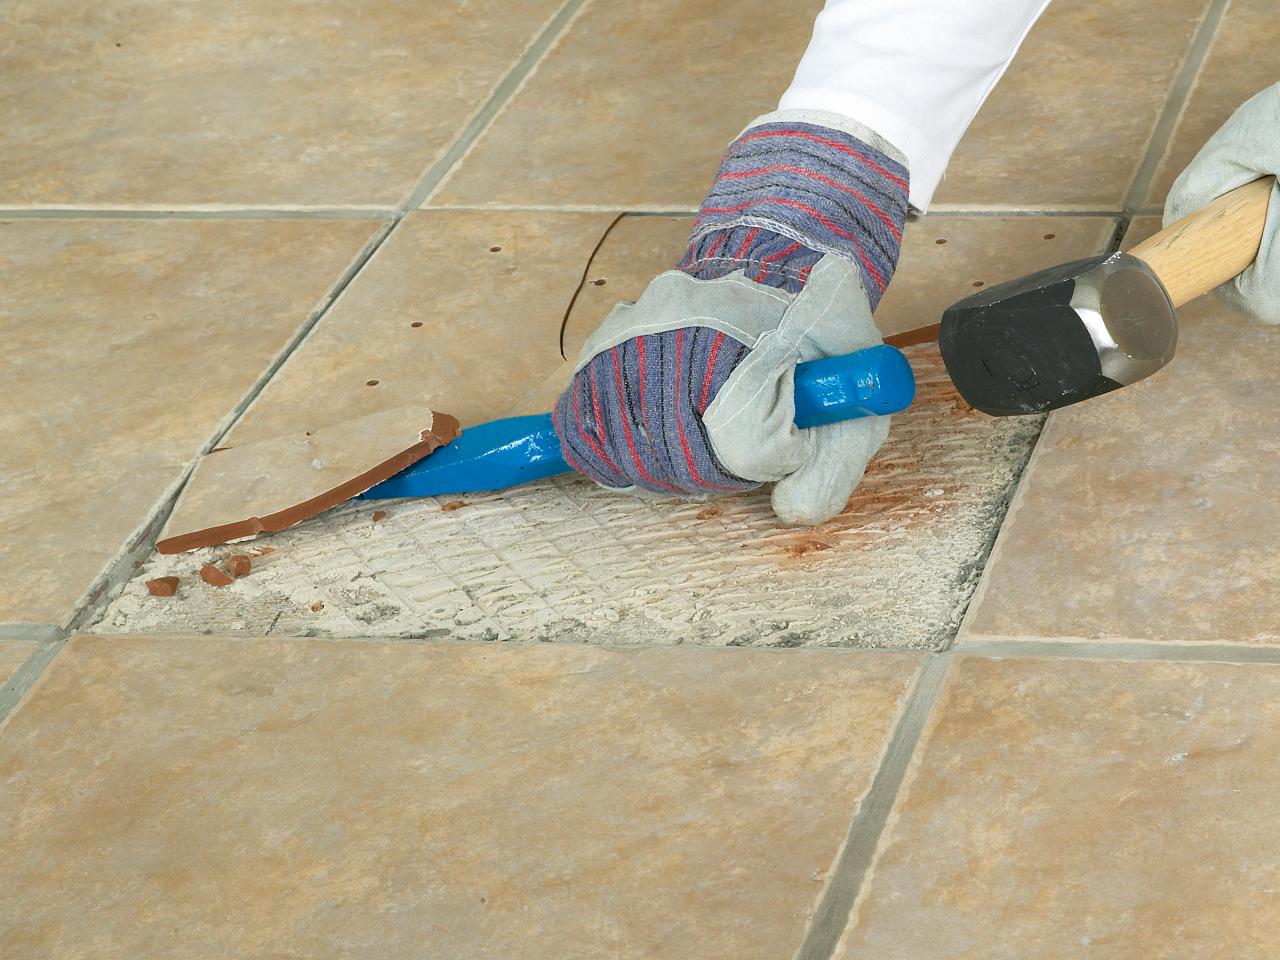
| This powerful tool can also be used to remove ceramics from the floor surface, only you need to purchase a wide breaker blade for it. This is a destructive method, after which the tiles definitely cannot be used for cladding again. The method is fast, but quite noisy and dusty, so it is important to warn neighbors that such work will be carried out. The blade is inserted into the hammer drill; it must be used in the same way as a chisel in the previous method. It is important to work with a hammer drill very carefully to avoid injury. But it can easily remove tiles, even if they are set on cement. |
| This method also makes it possible to try to remove the tile while maintaining its integrity. But you will have to make the removal tool yourself. Two hooks are made from metal, for example, from old screwdrivers. Next, the seams between the floor elements expand, and the space between them is well moistened. The hooks are carefully placed under the floor element on both sides and the tiles are removed using pulling movements. The method is also suitable for removing one tile from the entire coating if it needs to be replaced with a new one. True, the tiles should not hold firmly. But the remaining glue from the floor can be removed using the impact force of a hammer drill. |


Advice! The edges of the tiles can be covered with masking tape in several layers to protect them from damage. This is necessary if you want to keep the coating elements intact.
Precautions when removing old tiles
However dismantling tiles is not such a simple method as it may seem at first glance. And you need to work with caution. To begin with, it is recommended to determine how and where the plumbing and sewer pipes. It happens that communications run not only in the walls, but also under the floor, and how deep they are located there is a big question. They are easy to damage during operation, especially when using a hammer drill.
It is also important to know whether the floor electrical wiring– it can also be easily hit by a tool and cause serious injury. It is important to know about the presence of a heated floor system under the tiles. In all cases, you will have to be extremely careful not to damage any wires or pipes. And very often the presence of such features affects the choice of dismantling method and tools used for work.

Important! When dismantling tiles, quite a lot of dust is released, which means it is important to stock up on a respirator and old clothes. Otherwise, you can inhale this dust and then suffer from problems with the respiratory system.

Pieces of tiles flying off can ruin what is in the bathroom. To avoid damage to furniture, mirrors and other interior objects, it is recommended to either remove them from the room or cover them with something. An old blanket is perfect for this.
A few tips will help you do everything correctly and as quickly as possible.


You should not hope for a miracle and think that with a gentle dismantling option you will be able to keep all the material intact. Usually only 80% of the tiles can be saved from destruction.
What do you need to prepare to remove tiles?
To complete the work of dismantling the tiles quickly, without being distracted by searching for tools and materials, you need to prepare everything at once. To remove old tiles you will need:
- spray bottle with water– it is convenient for them to wet the grout between the tiles;
- tool, depending on the selected dismantling method – chisel, hammer, hammer drill, blade for it, etc.;
- putty knife– useful for widening seams between elements, as well as for cleaning tiles from old adhesive;
- grinder with a small disc– sometimes needed for sawing seams between floor elements;
- screwdriver or drill can replace the grinder, but in this case the tile is unlikely to remain intact;
- protective clothing and personal protective equipment.

Gentle removal of tiles in full
Let's see how tiles are removed in a gentle manner in one of the dismantling options.
Step 1. First of all, everyone gets ready necessary tools. This should be a hammer drill, a mini construction drill, a disc for stone and ceramics.

Step 2. The seams between the tiles are cut. All of them are carefully embroidered using a stone disc placed on a mini-drill.


Advice! If it is possible to invite someone to help, this person can be assigned the following task - to hold the hose from a working vacuum cleaner in the place where sawing or drilling is being done. This way, all the dust will immediately go inside the cleaning device.

Step 4. First, a notch is made in the middle of the side of the tile, then exactly the same ones are made on the left or right, almost at the edges of the product.

Step 5. During operation, the hammer blade is inserted under the bottom of the tile and it is easily removed.

In this way, all tiles are removed from the floor surface and there is a chance to keep almost the entire coating intact. This method is also suitable for dismantling individual floor elements if they need to be replaced.
Removing ceramic floor tiles
Step 1. First, dismantling is done carefully using a hammer and chisel.

Step 2. Using a hammer, a small piece is broken off from the edge of the outer tile.


Step 4. The tile begins to crumble and move away from the base. This will have to be done in places where the tiles fit very tightly to the plumbing elements that need to be preserved.

Step 5. The remaining tiles are removed using a hammer drill with a spatula attachment. There is no need to spare material here, because you can work quite quickly.

Step 6. The tile pieces are thrown away. They are assembled with hands wearing gloves to avoid damage and cuts - the pieces can be very sharp.

Video - Removing tiles
Video – Tile repair
How to remove glue or cement from the surface of ceramics
In order to removed cover could be reused, it must be thoroughly cleaned of dried residues of the adhesive solution, since usually during dismantling it comes off along with the cladding. It’s easy to remove regular ceramic adhesive – you just have to do a little fiddling with a thin spatula. The dried mixture is pre-soaked with water. The remaining composition can be easily sanded off with a regular brush used to process metal.

And it will be quite difficult to remove the cement composition. The tiles are pre-soaked in water for several hours, then treated with a spatula. But this method does not always help. If so, it is recommended to pour regular salt and wet the dried solution again. Next, another attempt is made to scrape the glue from the tile with a spatula. In particularly difficult cases, it is recommended to buy a special solution for removing cement mixture, it is sold in stores.

Removing tiles is a noisy, troublesome and time-consuming job, especially if the coating will be used a second time. And you must be prepared for this before getting down to business. But if you follow the dismantling technology, then usually no problems arise and you can remove the tiles yourself.


