Make a 2-level stretch ceiling. How to make a two-level stretch ceiling: advantages and disadvantages, necessary equipment and installation. How to secure the frame - the initial stage of installation
Tension coverings are becoming increasingly popular not only because of their beauty, but because they are very practical to maintain and do not require too much attention. If you can surprise with your appearance suspended ceiling, located in the same plane, what then can we say about the effect produced by a 2-level tension structure. Yes, she is the one who is now in the center of our attention. Let’s set ourselves the task of determining how to make a two-level stretch ceiling and find out what is needed for this. Having determined in detail how a two-level coating is made, it will become clear how likely it is to solve this problem without involving outside help.
Advantages and disadvantages of suspended ceilings
It would be wise to first simply find out if this method of decorating your living space is right for you. To do this, take into account the following:

- This option is acceptable if you want to hide the shortcomings of the base ceiling, and are not inclined to devote too much time to solving this issue. Communications will be securely hidden, and the plane will become perfectly flat;
- you can stop at installing the tension fabric even in the case when it is planned additional insulation. The thickness of the insulation layer is not particularly important;
- if you are tired of frequent maintenance or repairs ceiling surface, then a tension covering is exactly what you need, because even if the house shrinks and cracks form on the surface, it will not be noticeable. The elastic fabric can compensate for fairly significant movements of the entire house structure;
- when the room is not maintained at a constant temperature and is heated irregularly, PVC film may suffer from this. As a result of prolonged cold exposure, the quality of the coating deteriorates, and it gradually begins to change its properties, even to the point of destruction. Thus, if you understand that you will permanently live where you plan to install the curtain wall, then it would be reasonable to abandon this idea altogether;
- young children can make parents think about the advisability of installing a covering due to the high probability of it being pierced by something sharp or torn as a result of other children's pranks;
- at first glance the cost of elastic ceiling covering looks quite acceptable, but if you add installation costs and the costs of the equipment necessary for installation, it is possible that you will change your mind and decide to decorate your ceiling differently.
How to properly make two-level ceilings?
Installation work cannot be done at random, since the technology requires a clear understanding of the main technical tasks. Along the way, for example, you will definitely have to:
- accurately take all measurements;
- cut the coating;
- carry out a number of manipulations using complex gas or electrical equipment, which depends on what type of heat gun you will use.
And that's just the most complex operations in the same way as two-level ones are made stretch ceiling, but in fact there are many more of them.
Tools
If you get down to business yourself, you can’t do without them. Let's list what we need:

- A step ladder or a comfortable table.
- Perforator with a drill with a diameter of 6 mm.
- Various levels: bubble, laser, hydraulic, etc.
- Screwdriver.
- Chockline (dyeable marking cord).
- Dressing spatula and spatulas.
- Heat gun.
This is the main thing that will be useful. But one thing is especially significant - this heat gun, the absence of which cannot be circumvented in any way. If you can’t purchase this expensive tool, it is better to rent it with the owner, since independent training experiments are not worth it and will cost much more than the services of the owner of a heat gun.
Preparation and marking

Having cleared the ceiling of everything unnecessary, you can prepare to mark the plane and install the first tier. Also, to prevent the appearance of mold, it may be useful to pre-treat the surface with an antifungal compound.
The markings must be made taking into account where the electrical wiring runs. It is advisable not to be lazy and carefully make a small vertical groove, finding out the level of laying the wires. Next, using a level, preferably a laser, we place marks in each corner at the desired height, and then use a chokeline to connect them with solid lines. The resulting contour serves as a level for installing load-bearing moldings of the first ceiling level.
Markings are applied in a similar way for the second level of the tension covering, which will be located under the first.
On a note: Even before you start making a two-level stretch ceiling, it is recommended to consult with specialists, or better yet, slowly observe how they cope with this task step by step.
Installation
All installation process can be divided into a number of stages:

- Drawing up a sketch based on previously taken measurements of the room. Here you need to measure the perimeter of the room, the length of the diagonals and determine the area. In the case of constructing a structure on two levels, the sketch must reflect the layout of all lighting fixtures.
- Installing a two-level stretch ceiling involves installing plastic or metal installation profiles on the walls directly above the marking line, which perform a load-bearing function, tightly holding the canvas suspended. The profile fastening step is 10-15 cm. Near the profile joining point, it is better to reduce the step to 2-5 cm.
- The canvas is straightened and fixed on corner hangers. Next, the room and the curtain itself are heated with a heat gun. The heating temperature of the canvas can reach about 70℃.
- The hot elastic fabric is carefully tucked into the baguette profile using a spatula. Let us highlight that even before you start making a 2-level stretch ceiling, you need to remember that you first need to install the level located closer to the base, and then move on.
- After the stretched fabric has cooled, you can make holes in the right places for the planned lighting. Then the canvas itself is attached to the lamps using plastic projector rings specially designed for this purpose. They prevent the coating from overheating. It is recommended to install luminaires in which the body height can be adjusted in the canopy.
Of course, reflect everything installation nuances How to make a two-level stretched fabric in one article is not possible. Special video materials can be a good help in this sense; familiarization with them will also bring a lot of practical benefits.
Video on the topic
Installation of tension fabric is one of the most simple ways ceiling finishing. This design looks impressive, complementing any interior. The material used is polyvinyl chloride or treated fabric. Wide choose colors and textures allows you to bring to life any design ideas. Typically, the installation of a stretch ceiling is carried out by a team of installers, but if desired and with a minimum amount of equipment, the work can be done independently.
It is not surprising that stretch ceilings are gaining more and more popularity, because they are so practical. Installation of the canvas takes about four hours, and the result is a smooth and even surface. In addition, installation of the ceiling does not require much labor, such as putty. After all, the ceilings and walls are apartment buildings have errors in height, which can be easily corrected using a tension structure.
It is worth noting high stability to the water. For apartments located down the riser, the problem of flooding is very pressing. So as not to do it every time redecorating, it is more practical to install a PVC stretch ceiling that can withstand a large volume of water. To eliminate this problem, it is necessary to free the structure from water and carefully stretch the fabric using a heat gun or hair dryer.
In addition to its advantages, the tension structure has its disadvantages, namely:
- cost, especially of two-level structures. But the money spent is more than recouped by its useful life;
- fragility of the material, since vinyl sheets are easy to cut or scratch;
- PVC is unstable to temperature changes, therefore vinyl ceilings not suitable for installation in unheated room or country dacha. In this case, it is recommended to choose textiles.
Preparatory stage
PVC material is ideal for installing a two-level stretch ceiling. It is plastic, so it easily takes the desired shape, which allows you to realize any design idea. When developing a sketch of a two-level ceiling, it is recommended to take into account functional features future design and aesthetic side of the structure.
Thanks to two-level design you can easily hide electrical wiring, imperfections in the ceiling, and also effectively arrange the lighting in the room. To achieve this result, materials of different textures are used, which further expands the space and divides the room into zones.
When choosing a ceiling sketch, it is recommended to take into account the interior design of the room in order to future design did not draw attention to itself, but complemented the overall picture. For rooms with a laconic design, calm tones and an even texture, without pretentious curls, are appropriate. Separately, it is worth mentioning photo printing, since this design is suitable for spacious rooms with high ceilings. In addition, you should carefully choose an image that will not irritate over time.
In addition, installation of a two-level stretch ceiling requires equipment. Minimum list of what you will need to install the structure:
- a heat gun or hair dryer is necessary to warm up the PVC film;
- hammer drill for securing profiles;
- level for marking;
- screwdriver;
- ladder;
- spatulas and spatulas for working with tension fabric;
- PVC film;
- plastic or aluminum baguette;
- decorative insert for closing the gap between the canvas and the wall.
Technical requirements for installing a two-level ceiling

Installation of a two-level ceiling is done after all repair work. This is due to the fragility of the canvas and the possibility of damage. Before installing the aluminum frame, it is necessary to clean old ceiling from anything that can crumble and damage the tension fabric. The profile is attached to any surface: wood, drywall, brick, plaster or tile.
You can even install a stretch ceiling in a living room. To do this, you need to move all the furniture to the center of the room in order to free up space near the walls. It is worth noting that the distance between the ceiling and the cabinet should be at least 70 cm. Also, before installing the tension fabric, you need to take care of developing an electrical wiring and communications diagram, since heating the material can lead to its melting. Therefore, it is worth taking care in advance about the correct placement of spotlights, air conditioners, ventilation, alarm systems or fire extinguishing systems.
Installation of the structure profile

Before installing an aluminum frame under a plasterboard structure, it is necessary to correctly mark the marks. This is done using a level and a tapping cord. Along this line, marked along the entire perimeter of the room, you need to attach a U-shaped profile. Its shape can be straight or curved. If everything is simple with the first option, then to install a curved profile, you need to cut it at intervals of 4 cm in order to bend it and secure it to the ceiling.
Next, you need to make omissions from the profile fragments and attach them to established profile on the ceiling. They should be located flush with the wall profile, creating the lower frame of a two-level structure. A box is assembled from sections of metal profile using self-tapping screws, which must be attached to the wall profile. In this case, it is mandatory to comply with horizontal and vertical lines, which can be checked with a laser or water level. In this way, a frame is built around the entire perimeter of the room.
Next, a baguette under the tension fabric is attached to the structure. Installing plasterboard frame, all parts should be firmly secured, since the vinyl film, after stretching and cooling, will heavily load the structure. After this, electrical wiring is laid, and the metal frame is covered with plasterboard. To do this, sheets of suitable size are attached to the ceiling using self-tapping screws. The final stage is putty and installation of a perforated corner to strengthen the corners of the plasterboard structure. You need to putty all the holes from the screws, achieving a smooth surface. After this, the hardened putty is sanded and primed, then covered with wallpaper or painted. It is also necessary to mark where the lamps will be placed and drill suitable holes.
Installation of stretch ceiling

To install the tension fabric, special clamps are installed at the corners of the plasterboard frame, which are needed to stretch the PVC film. The most popular is the harpoon fastening method. This method allows you to later dismantle the canvas in the event of flooding by neighbors above, free it from water and put the suspended ceiling in place.
To install a stretch ceiling, you need to have a pre-cut canvas according to the exact dimensions. The room temperature should be about 40 degrees, and the material itself must be heated to 60 degrees with a heat gun or air heater. Only in this case will the PVC film become elastic and amenable to installation. When securing the material to the baguette, you should do all the work carefully, trying to fix the canvas as tightly as possible. This will help extend the life of the ceiling.
If there are any streaks left on the material, they can be easily smoothed out with a hairdryer. After the canvas has cooled, the ceiling will become smooth and beautiful. The gap formed between the canvas and the plasterboard frame is covered with masking tape. Next, you need to cut out places for the lamps and cover them with a thermal insulation ring to prevent damage to the material.
Thus, anyone can install a two-level stretch ceiling. With a little imagination and maximum effort, you can get the perfect ceiling that emphasizes the interior of the room. In addition, such a design will hide all imperfections and irregularities, and will also protect against flooding by neighbors.
Installation of suspended ceilings is one of the most aesthetic and convenient types of finishing. Such ceilings look especially beautiful in large rooms With high walls. Either vinyl films or a special fabric material are used as a ceiling panel, and the surface can have a different structure - matte, glossy, etc. Let's look at how to make a two-level stretch ceiling without turning to professionals for help.
Stretch ceilings are becoming increasingly popular. They are beautiful, convenient, and practical, since they allow you to covertly lay electrical wiring and other necessary communications.
In addition, tension panels are distinguished by a wide variety of colors and textures, so using them you can bring to life a variety of design ideas.
It must be said that in most cases, the installation of tension panels is carried out by professionals. However, if you wish, you can do it on your own. Let's look at how to make a two-level stretch ceiling, what materials and tools are required for this (see)
Characteristics of suspended ceilings
Before you find out how two-level stretch ceilings are made, it’s worth getting acquainted with their characteristics in more detail, learning their advantages and disadvantages.
The advantages of this type of finishing
Here are the main advantages of suspended ceilings:
- Obtaining a flat surface with little labor costs. Very often the ceiling in apartments is uneven, with large differences in height. To get rid of this shortcoming in the usual way, that is, using a plaster mortar, it will take a lot of time and effort. When using stretch ceiling technology, labor costs to obtain a flat surface will be insignificant.
- Visual appeal. It is unlikely that anyone will dispute that this type The finishing looks very nice. Moreover, the range of ceiling panels is very wide and you can choose a variety of options.
- Water splash protection. Unfortunately, accidents often occur in apartment buildings, as a result of which apartments located lower down the riser are flooded. But if you install suspended ceilings, then you don’t have to worry about the safety of your repairs. The panels simply won't allow water to pass through. To eliminate the accident, you will need to release the water and eliminate the sagging of the panel using a heat gun.
Disadvantages of this type of finishing
Of course, suspended ceilings also have their drawbacks.
Here are the main disadvantages:
- Relative fragility of the canvas. If the coating is touched in any way sharp object, then damage may occur on its surface - a puncture or scratch.
- PVC panels are not recommended to be installed in country houses seasonal residence, which are not heated in winter. Because under the influence low temperatures the film will be destroyed.
Advice! Fabric panels for suspended ceilings can withstand low temperatures, so it is worth choosing this option for finishing unheated buildings.
- Another disadvantage is the high price. Stretch ceilings are not cheap, however, this is compensated by their long service life.
- You will have to pay a significant amount not only for materials, but also for the work of installers. If you want to save money on this point, you should find out how to make such a ceiling with your own hands. For home handyman with some experience construction work, the process of installing tension panels is quite accessible (see)
Advice! When preparing to carry out repairs, do not limit yourself to just reading the instructions. It will be useful to see the installation of two-level stretch ceilings in a video that will help you find answers to all your questions.
Installation

It must be said that in order to make a two-level stretch ceiling with your own hands, you need to have some experience.
Difficult aspects of the process include:
- Taking measurements. It is very important to take measurements correctly, otherwise you will not be able to get a flat surface.
- Cutting the blade. It is very important to avoid mistakes when doing this work.
- Work with gas equipment . When performing this operation, you must strictly follow the safety rules.
Equipment needed for installation

So, installing two-level ceilings requires the following equipment and tools::
- Hammer. This tool is necessary to secure the guide profiles to the walls.
- Screwdriver.
- Heat gun complete with gas cylinder . The equipment is used to heat the fabric so that it can be stretched.
- Level. This tool useful for marking.
Advice! Particularly convenient to use laser level, but if you don’t have it, you can get by with the usual hydraulic one.
- Stepladder or sawhorses. They are necessary to make working at height more convenient.
- Special blades and spatulas necessary for stretching and securing the fabric.
Installation process

Before starting work, you should carefully familiarize yourself with how to install two-level suspended ceilings - video instructions can be found on construction websites.
The process takes place in several stages:
- Taking measurements and drawing up a sketch. It is necessary to measure the perimeter of the room, its diagonal, and calculate the total area. If the structure is two-level and it is planned to install lamps, all this must be shown in the sketch. This data is transmitted to the workshop where the panels are made.
- Before making two-level stretch ceilings , you need to install a molding profile on the walls that will hold the panel.
- Next, using corner hangers, the canvas is stretched. For tension, a heat gun is fired, which heats the canvas to 70 degrees.
- The heated canvas is secured in the profile using special spatulas.
- Holes for lighting are cut in the stretched canvas, and the canvas is attached to the lamps with special latches.
conclusions
You can find it on the Internet detailed instructions how two-level stretch ceilings are made - video from detailed description processes can be found on portals dedicated to repairs (see).
Despite the complexity, installation of two-level suspended ceilings can be done with your own hands, following the instructions and after studying master classes. Correct works installation will allow you to implement bold and bright design ideas within the allocated budget.
Two-level systems differ depending on the design, type of material used, and decor. Designs can be illuminated around the perimeter, with central lighting and spot, combined and LED - and all this must be taken into account when developing a sketch and planning the purchase of components and equipment.
The shape of the products can also be very different:
- spiral;
- arched;
- round;
- wavy;
- domed, etc.
It is important that colors, shades, shapes and decorative elements are in harmony with each other and correspond to the overall concept of the interior.
- In a room decorated in laconic colors, it is worth installing the simplest design in the same colors with a minimum of decorative elements.
- You can order PVC sheets with photo printing for suspended ceilings in spacious rooms with high ceilings and an abundance of windows.
- A canvas with a “starry sky” effect is used to create the lower level of the structure.
- PVC film for both tiers is the right and simple solution. It is acceptable to experiment with colors.
- To achieve an interesting combination, combine a matte plank with a glossy one, and also combine PVC material with fabric base.
- The lower level in most cases plays the role of the main one and has the largest area.
- Illumination between levels will allow you to implement fashionable design solutions without compromising the functionality of the product.
If you plan to install a structure with the participation of craftsmen, you can bring something new to the interior design by using three-dimensional shapes, such as funnels, cones or waves.

Installation options - what are they?
There are several ways to install two-level ceilings. The first option involves fixing the frame on a rough base with a certain configuration and then stretching the film, fabric, or both materials in combination.
The second option simplifies the installation task: a special baguette is attached to the base of the ceiling, which is later used to fix the tension fabric.
Simplified installation allows you to save centimeters, and correctly selected colors and textures of products can visually expand the room and hide defects in the base and communications.
Technical requirements for the ceiling during installation
You can begin installing the structure only after you are ready necessary tools and components, such as a profile for two-level ceilings, for example, made of aluminum or plastic for fixing the film. Installation of products on final stage repair work, observing the following nuances:
- the profile is mounted on the coating, ensuring its integrity with preliminary cleaning and priming;
- fulfill installation work allowed in a room without removing pieces of furniture from it with a distance from the top of the cabinet to the ceiling near the wall of at least 70 cm;
- Before installation, you should study the wiring and communications diagram;
- It is possible to complete the installation of a two-level ceiling if you have special equipment.
An important point is the temperature of the electrical equipment built into the ceiling. Ventilation, lamps, climate systems should not overheat the surface of the structure.

Preparation of tools - basic list
Even the most simple design for a two-level stretch ceiling will require the use of a standard set of tools. This is about:
- hammer drill and screwdriver;
- heat gun (can be rented);
- level;
- stepladder;
- spatulas and spatulas;
- roulette;
- fasteners;
- hammer;
- nylon thread;
- mele;
- eraser and pencil;
- graph paper;
- wooden blocks;
- sheets of drywall.
The profiles are fixed using a puncher (a photo of the separator profile will help you choose the right products), the gun is used to heat the PVC film before stretching. The most difficult stages of DIY installation are taking measurements, as well as working with a gas cylinder and preparing the ceiling sheet.

Preparatory work - where to start
The quality, practicality and durability of the tension structure will depend on the correctness of the measurement procedure at the initial stage. To do this, measure the height of the corners in the room, after which 5 cm are retreated from the lowest of them, driving a bead nail into this area. The next step is to measure a uniform distance along the remaining corners using the same principle.
A nylon thread is pulled through all corners. This is important to do in order to level the room around the perimeter. Only after this can you proceed to calculating the working perimeter.
Once the perimeter data has been calculated, you can proceed to developing a sketch. Regular will do squared notebook paper or graph paper. According to the sketch, the tension fabric is ordered from a specialized company, having decided on the color, texture, and material. Interesting option- combining several coating options, for example, matte and glossy to create a visual distinction.
The main work should begin only after the ceilings have been delivered to the premises. Retreating 5-6 cm from the level of the thread, pull the same one in a parallel plane. The outline of the second level is marked with chalk on the ceiling surface. This will be the marking for the future two-level ceiling.
Screw along the contour wooden blocks, according to the sketch. In case of height differences or rounded shapes of the structure, use a plasterboard sheet with high level flexibility.

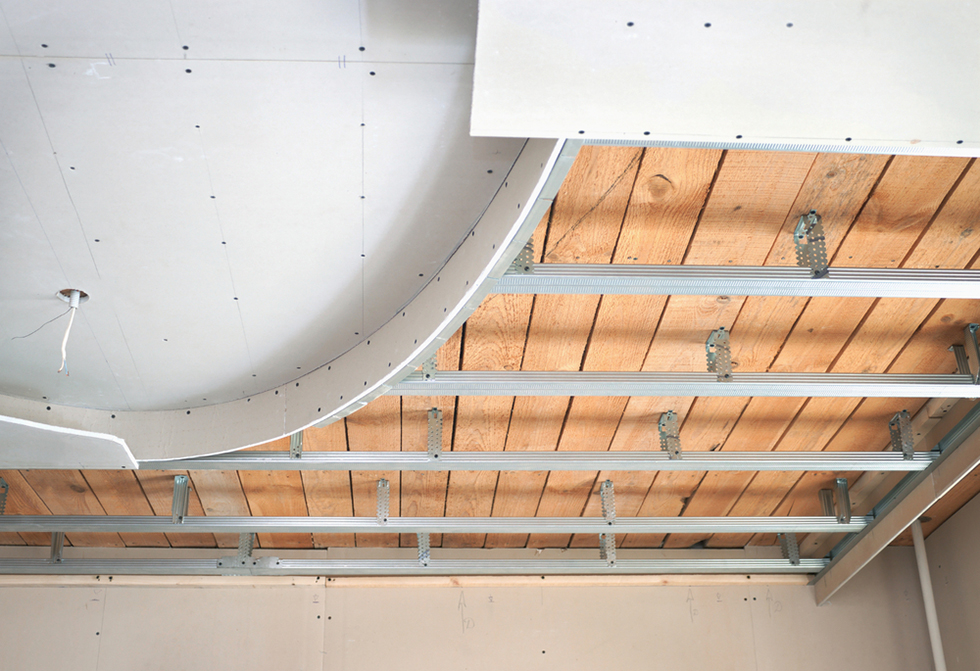
How to secure the frame - the initial stage of installation
Installation of the frame for a two-level ceiling is carried out using special metal profiles by analogy with creating a frame for plasterboard structures. A water or laser level will help you maintain dimensional accuracy.
A U-shaped profile is attached along the line prepared during the measurement process, using a screwdriver for convenience. Exactly the same profile is fixed on the ceiling surface, again, according to the markings. Considering that the shape of the box is not always correct, use metal scissors if necessary, securing the profile along a curve after making small cuts on it.
The drops made from its segments continue to be attached to the fixed profile. It is important to ensure that their lower edge is at the same level with the wall profile. Only in this case do they form the lower level of the structure.
Using an aluminum profile (two sections) and a U-shaped one, assemble a box, twisting a structure similar to a pipe rectangular section. Fasten it to fixed omissions. All work is performed for speed and convenience with a screwdriver.
The installed box is mounted on the wall using a supporting profile, ensuring that the verticals and horizontals correspond without fail. In this way, the entire frame is assembled along the perimeter designated earlier.

The next stage is wiring and finishing
Using aluminum profile for suspended ceilings with lighting, you should remember that it will not save the situation if the lighting equipment overheats the canvas. That is why it is so important to calculate the power of lamps and sconces intended for installation in a structure at the design stage.
Electrical wiring and communications are masked inside the frame before the sheathing is carried out plasterboard sheets. Once this work is completed, you can proceed to preparing the material for finishing. Drywall sheets, pre-measured and cut, are attached to the frame with self-tapping screws, after which the corners are reinforced perforated corners followed by puttying.
Putty is used not only for corners, but also for leveling the places where screws are fastened. After drying, the finished box is polished with a special grater, the mounting locations for the lamps are marked, and holes are prepared for them with a “crown” attachment. The resulting base is primed, painted, or covered with wallpaper. After all the work has been completed, the bottom layer can be considered ready.

Tension fabric - mounting options
Since we are talking about a structure that has 2 levels, the process does not end with the construction of the base. The next step will be the installation of the tension fabric. At this stage, you will need a puncher, as well as a heat gun with a gas cylinder to heat the film.
There are several ways to attach the canvas to the surface of the profiles:
- wedge;
- glazing bead;
- harpoon
The most commonly used is the last, harpoon mounting option. This method involves welding special hooks - harpoons - to the edges of the film covering for easy fastening in a tense form. The convenience of such a ceiling is that it can be dismantled if necessary without unnecessary problems, followed by the same quick and easy installation in place.
To use the harpoon method, you need to pay special attention to the correct cutting of the material. It is necessary that the canvas is 7% less area ceiling for finishing.
If the choice fell on the wedge fastening method, then the canvas is cut out with a margin. The excess is cut off after installation. The glazing bead method is almost similar to the wedge method, except that the film is attached to the surface of the profile with a special tape to guarantee tension.

How to fix the canvas correctly?
You can attach the tension fabric to a previously prepared plasterboard base or frame after heating it with a special heat gun or, in the absence of one, with a hairdryer. Only raising the temperature to 60 degrees will make the fabric more elastic and pliable.
It is worth paying attention to temperature regime in the room where installation is carried out. It is correct that the temperature is within 40 degrees Celsius.
The canvas begins to be fastened from the corners in opposite sides, continuing to fix in other corners by analogy. For convenience, spatulas are used to cut off excess film when choosing wedge or glazing bead fastening technology.
To make the canvas even and smooth after installation, it is reheated with a hairdryer. As soon as the temperature of the film drops along with the normalization of the temperature in the room, the surface of the film should become ideal.
To mask technological gaps, masking flexible tape is used. Lamps and fixtures are installed in the prepared holes, avoiding their contact with the canvas.

In conclusion, it can be noted that the installation of a two-level stretch ceiling - not an easy operation, which requires strict adherence to the algorithm of actions, the presence of certain tools, the presence of an assistant and, most importantly, patience and time.
The absence of even one component from the list above will, at best, lead to a violation of the composition and functionality of the ceiling, at worst, to its complete deformation, if not immediately, then over time. That is why it is so important to really assess your own capabilities, carefully prepare for the installation process not only practically, but also theoretically, thoroughly studying the process from the inside, reading video tutorials, and advice from real people on repair forums.
If, even after an educational program on the topic, there are still unresolved questions, doubts and uncertainty, you should abandon the idea of making such a ceiling and entrust the process to specialists. You can contribute to the installation at the design stage of the structure by offering own ideas, fantasizing about the decor, the shape of the structure, the placement of light, shades and general style direction.
Two-level stretch ceilings are modern look decorative finishing, which is very popular when creating design projects. Thanks to the chic assortment of textures and colors, these designs fit well into any style and allow you to create unusual interior in the rooms, filling them with an atmosphere of home comfort and warmth. For self-installation it is enough to choose the right ceilings Construction Materials, tools and acquire minimal installation knowledge.

Peculiarities
The two-level suspended ceiling consists of polyvinyl chloride film, which is fixed to frame profiles, after which the canvas makes the surface ideal. Such designs are in great demand for decoration, as they are characterized not only by their aesthetic appearance, but also allow them to visually increase the space. Depending on the desired effect and the height of the room, you can choose a canvas with a glossy or matte surface.

Before you start installing a two-level stretch ceiling, it is important to consider the following features:
- Location. In the event that the canvases are planned to be hung in a room with high humidity, then you will need to purchase moisture-resistant drywall. For rooms where there is no accumulation of condensation and normal temperature conditions are always present, ordinary sheets of drywall are suitable.
- Design form. First, it is recommended to create a projection of the future view, and only after it corresponds to all sizes, you can begin to make two-tier compositions, which often consist of arched contours.
- Frame type. To install it, choose the following: wooden beams, and metal profiles. Moreover, the latter allow you to create any shape, are easy to bend and are characterized by high wear resistance.


It is also worth noting that two-tier ceilings have many advantages, among which are:
- installation speed;
- ensuring a perfectly flat surface;
- Beautiful appearance;
- protection of premises from flooding.
As for the disadvantages, these include the fragility of the canvas and the high price.
Therefore, during operation, punctures and scratches must be avoided; installation cannot be carried out in rooms that are not heated in winter, since under the influence of low temperatures the product will lose its original structure and collapse.

Types of structures
Two-level compositions are a special type of structure, which is made of two stages and has a different configuration. Compositions can be made from any fabric, and combinations of several textures and colors look unusual in the interior. Before making such a ceiling, you will first need to build a frame with a base coating. Depending on the model, designs can be used various materials: most often plywood, wooden beams, profiles and metal tires are used for this.
Two-tier ceilings come in the following types:
- Regular. They are a surface consisting of tension material, laid out in two tiers.
- Combined. The structures are made from plasterboard boxes and sheets.
- With backlight. They can be installed as tension fabrics alone or supplemented with plasterboard inserts.


For the installation of each type of ceiling, a diagram is first drawn up, according to which precise measurements are taken, and all the necessary components are calculated.
Therefore, it is important to correctly measure the surface area and draw a drawing indicating the material of the frame and panels.
Conventional designs, as a rule, made from profile, plywood or wooden frame. Combined compositions need a solid foundation, so they choose a reliable frame that can support plasterboard boxes. Steel profiles are perfect for this.
As for two-level illuminated ceilings, their base is made of metal corners and tires. In this case, the installation must be calculated in such a way that there is free space in the frame for laying hidden lighting and cords. For this installation, special instructions are used to avoid errors.


Installation subtleties
Installing two-tier ceilings is not particularly difficult, but it should be carried out by adhering to certain rules. All work and assembly require sequence of execution. Therefore, for novice craftsmen who want to hang a structure with their own hands, it is first recommended to make sketches of the ceiling, and only then proceed with installation. Typically installation consists of the following steps:
- Frame assembly. To do this, choose the shape of the structure, make rough sketches and attach the elements to the main ceiling. In order for the two tiers to overlap correctly, they are connected one by one and everything is measured accurately. The frame must be durable in use, so an aluminum profile is often chosen for it. The fastening technology is simple: the guides are fixed, and then profiles are attached to them using self-tapping screws.

- Fastening the upper tier. Contours are drawn along the perimeter of the room, along which you can see the intended installation location of the ceiling. The plane should be horizontal, and to simplify the marking process, it is recommended to use a laser level. At the same time, the adjusting hangers allow you to install the profiles strictly according to the level; they need to be mounted at a distance of 0.5 m from each other. For profiles, a distance of 30 cm is maintained. Then sheets of plasterboard are laid: they are fixed to the frame using self-tapping screws.


- Fastening the second tier. When installing it, it is important to consider the location of the first level. If the design consists of straight parts, then performing the work will not be difficult, but to design curved figures you will need to “adjust” the profile to the shape. To do this, they are simultaneously cut in several places and bent along the lines. The fastening of the profiles begins from the wall, and the guides must be placed in the center, so the frame will be stronger. Upon completion of the work, all that remains is to cover the structure with plasterboard and stretch the fabric.


In addition, it is important to pay attention to the distances between tiers, as problems with the cladding can often arise.
In order for the installation to be carried out without errors, it is recommended to first cut strips from solid sheets of plasterboard according to the sketches, after which they are moistened with water and the desired shape is made. Thus, the material becomes flexible and simplifies installation work. When drywall dries, it gains strength and can be attached to the surface with screws. At the end of the work, it is worth sealing the joints between the sheets and installing a lighting system; You also need to apply a primer to the base of the structure and lay the finishing coat on it.

Two-tier stretch ceilings are considered an ideal decoration for any interior, so the issue of their installation must be taken with full responsibility, especially for the installation of structures that are carried out independently. So that the ceiling acquires an aesthetic appearance and complements it in an original way overall design premises, it is necessary to choose correctly not only the material, but also the shape and color of the future composition, which directly depend on the design style.
That's why experienced craftsmen When installing such ceilings it is recommended:
- Use combinations of different shades. This will allow you to advantageously emphasize the shape of the structure.
- Combine matte and glossy fabrics.
- Supplement the tiers with plasterboard fragments.
- Use original patterns, drawings, ornaments and photo printing.
- Choose unusual shapes in the form of waves, straight lines, circles, cones and ovals.
- Separate the tiers of the ceiling with various inserts and colored lamps.


Installation of structures is carried out in one of two ways: harpoon or wedge. The harpoon installation is recommended for beginners and is characterized by its simplicity. All that is required is to correctly measure the ceiling edging and connect all the parts as tightly as possible. If you plan to make large differences in levels, then it is best to choose the wedge method. In this case, the canvas is heated and clamped strictly according to the markings under the baguette.


To ensure that the canvas is easily even, you should use during installation construction hairdryer– it will help smooth out the material, and the ceiling will become perfectly smooth.

Beautiful examples in the interior
Two-level stretch ceilings look good in any design; they are often chosen for decorating large and small rooms. At the same time for small rooms need to choose White color– it will visually expand the space and make the room cozy. To small bedroom revived and filled with an atmosphere of romance, you need to choose a light color scheme for it. It is best to make two tiers of the ceiling in one white color and install hidden lighting. The lines of the structure should smoothly transition into the walls, which it is advisable to also decorate with pastel colors.


Ceilings with a glossy surface look special in small bedrooms, but if bright light will interfere with rest, then you can install matte canvases. It is not advisable to install compositions in such rooms complex shapes, since details of incorrect textures will “steal” the area of space. For spacious bedrooms, you can choose a beige color scheme, as it looks original on a glossy surface. It is best to highlight the center of the ceiling with a dark shade, the continuation of which will be furniture and other decorative items.


Two-level ceilings open up enormous possibilities in the interior design of children's rooms. Thanks to beautiful colors and drywall, you can turn various creative ideas into reality. Unusual design You can make such a ceiling yourself. In addition, designs in a children's room can harmoniously combine all types of lighting: from chandeliers to spotlights. Thanks to two illuminated tiers, it becomes possible to fill the room with light as much as possible and beautifully perform zoning, dividing the room into a place for sleeping, playing and relaxing.

For little fidgets, compositions are chosen depending on personal preferences. For boys, inserts with photo canvases depicting their favorite cartoon characters are well suited. From sheets of drywall you can make various shapes in the form of birds, butterflies, flowers and airplanes.


