Do-it-yourself comfortable mini-steam room in a private home or country house: step-by-step technology for arrangement. Your own bathhouse with your own hands: how to make a steam room correctly How to install it in a steam room
It seems that the steam room is being set up without any hassle. And it’s hard to argue with this, because when decorating such a room, they don’t think about architectural delights. However, creating a steam room must follow strict rules. Only a flawlessly constructed steam room can become a place for complete relaxation.
General structure of the steam room
The main furniture of the steam room is a shelf, a high platform on which to steam. If the bathhouse is designed for visiting big company, then there should be several shelves in the steam room.
The platform in the bathhouse is constructed from wooden slats, and small gaps are left between them, which will not allow moisture to linger on the surface of the shelf.
The easiest option for installing a shelf is attaching a wooden structure to the floor
Typically, a high platform is attached to walls, behind which horizontal support bars are laid. This fixation option is better than the standard floor grip, since it does not limit the area of the steam room and greatly simplifies cleaning the floor that is not occupied by the legs of the shelf. Another advantage of a platform attached to the walls is the ability to place buckets and other bath accessories on the floor under the wooden structure.
In addition to the platform, there is a stove in the steam room.
In most cases, a brick oven is installed in the steam room, which heats up relatively quickly and does not cool down for a long time.
There are many options for a stove for heating a steam room: it can be either brick or metal. And in Lately Bathhouse owners even install electric stoves in the steam room. The choice of device for producing hot steam depends on the preferences and financial capabilities of the steam room owner.
Photo gallery: steam room options
 You can use an electric oven to heat the air in the steam room, but it is expensive.
  The stove is sometimes placed in a corner near the door, but this is not the best solution.
  The steam room can look original if you make shelves from different boards
  Corner shelves take up little space, but may be inconvenient
  Fans of a simple Russian bath do without lining and build shelves from thick boards
Preparing for the construction of a steam room
When planning the construction of a steam room, you need to decide what size it will be. There should be 0.7 m² per person in the steam room.
Experts advise making a steam room for 3 or 4 people in the bathhouse. This is due to the recommendations of doctors not to steam alone. It is much more difficult to bear the heat without company.
There is no need to make the steam room either cramped or very spacious. In the first case, it will be uncomfortable, and in the second, it will be quite cool, because it is difficult to heat a large room. It is preferable to create a steam room of size 2x2.4 meters. But deviating from standard solutions is not prohibited.
Photo gallery: drawings and dimensions of the steam room in relation to the dimensions of other rooms in the bathhouse
 IN big sauna it is possible to make a large shelf
  The dimensions of the steam room must correspond to the dimensions of the washing room
  To save space in the bathhouse, it is worth making a steam room less than two meters wide and building it corner shelves
  Even in small sauna it is possible to make a steam room 3x2 meters
Determining the size of the steam room
To some extent, the width of the steam room depends on the way a person is placed on the shelf. If it is planned that the person relaxing in the bathhouse will sit on a platform, then the room is made compact.
When it is decided to steam while lying down, more space is provided to create a steam room. In this situation, the optimal width is equal to the height of the tall man in the family, plus another 20 cm.
The dimensions of the shelf and bath are chosen taking into account the position in which it is convenient to steam
The height of the steam room can be from 2.2 to 2.4 meters. It is determined based on the height of the tallest visitor to the bathhouse. When entering the steam room, this person should not touch the ceiling with his head.
Subtleties of material selection
A bathhouse with a steam room is installed in a log house made of logs or beams made of linden or aspen. These materials retain heat, smell pleasant and do not retain exhaust air in the room. Followers alternative options Bathhouses are often made of brick or laminated veneer lumber.
Insulation material
The walls and ceiling of the steam room both from the outside and from the inside insulated using regular or foil-coated mineral wool.
Mineral wool is a high-quality raw material and inexpensive. Only foam glass, a material that is extremely resistant to influence, can better perform its task of preserving heat in the bathhouse. high temperature.
Mineral wool, rolled into a roll, is considered the best material for insulating a steam room
Expanded polystyrene is absolutely not suitable for insulating a bathhouse. Constantly heating up due to hot steam, it will begin to release toxins.
Waterproofing material
Glassine or foil is used as a waterproofing sheet. And the casing for attaching all the materials that protect the steam room from heat loss and fungal damage is made from wood that does not contain resin. We are talking about linden, alder, aspen and cedar. Materials made from these trees do not deteriorate for a long time, as they are not afraid of dampness and temperature changes.
Foil is ideal for protecting steam room walls from moisture
Decoration Materials
It is customary to decorate the steam room only with natural wood. Materials treated with chemicals are not suitable for covering surfaces in a steam room, as high temperatures cause them to release toxic substances into the air. This phenomenon does not happen with traditional lining, the planks of which are connected to each other according to the “tongue and groove” principle.
To decorate the steam room, it is advisable to purchase lining 15 mm thick. It is important to check the purchased material for splinters. There should be no defects in high-quality construction materials.
Lining has become the most popular material for finishing bath rooms
It is wiser to cover the floor of the steam room with boards or cover it tiles. If the choice is made in favor of a wooden covering, then you should purchase material only from larch. There is no need to put insulation under the board floor, since practically no heat escapes from the steam room through the bottom.
A practical steam room owner will decide to cover the floor with tiles, which, unlike wood, can be easily washed and disinfected. It’s good if he also realizes that the tiles need to be glued to the lower zone of the walls, because drops of water often fall on this place.
Ceramic tiles do not deteriorate from exposure to moisture and are therefore often used to decorate steam rooms.
Door selection
Windows in the steam room should be completely abandoned, but the door should be such that it does not let precious heat out of the room. The temperature in the steam room will not drop if you build a 30 cm high threshold at the entrance to the steam room and make the door ceiling low.
By creating a threshold, less warm air will escape from the steam room
To make it convenient to enter the steam room, it is better to install the doors near the stove. They should open inward, to the side where the person entering cannot get burned due to accidental contact with the stove.
The door to the steam room should open without problems. This means there are no constipations or locks that could break due to dampness and extreme heat.
Wood and glass are considered good materials for making steam room doors.. Boards, compared to glass, have more significant advantages, because they can be insulated. But a glass door can visually increase the area of the steam room.
You may like the glass door because it seems to attract a person to relax in the steam room
Required materials and tools
Creating a steam room will require the use of materials such as:
- vapor barrier membrane;
- bars measuring 6x2.7 cm and 5x2.5 cm;
- corners;
- mineral wool;
- polypropylene twine;
- aluminium foil;
- planed boards 2–3 cm thick;
- antifungal impregnation;
- lining;
- liquid concrete;
- ceramic tile;
- heat-resistant mastic and grout.
The formula will help determine how much material is needed for the floor and ceiling of the steam room: N = Sp/Sm, where N is the volume of construction raw materials, Sp is the surface area, in m², and Sm is the area of one piece of material, in m² (for example, the area one tile or board).
Calculation of the amount of material for finishing the walls of the steam room is carried out after determining the area that needs to be covered with clapboard, according to the formula S = (2AN + 2BH) – ah, where A is the length of the room; H - room height; B is the width of the room; a - door width; h - door height.
Having found out the area of the walls, calculate the area of one wood panel: the length of one lining element is multiplied by its width, and then the groove area is subtracted from the resulting value. The last computational action to determine required quantity lining is the division of the finishing area by the area of one panel.
Installation of building materials in the steam room must be carried out using the following tools:
- building level;
- perforator;
- screwdriver;
- brush with short bristles;
- regular and rubber hammers;
- saw;
- stapler;
- mixer;
- construction gun;
- shoulder blade;
- clamps and screws;
- plastic crosses;
- nails, the length of which is 3 times the thickness of the boards.
Step-by-step creation of a steam room
Creating a steam room indoors is a step-by-step process consisting of waterproofing, insulation and finishing work.
Insulation against steam and water
To prepare the steam room for finishing, perform the following steps:

Laying insulation
Immediately before finishing the steam room, do the following:
- Mineral wool is placed into the manufactured frame. To insure it from deformation, polypropylene twine is used for fastening. The vapor barrier material is again fixed on top of the insulation.
Suitable sized pieces of mineral wool are placed in the sheathing
- Thermal insulation material is attached to the ceiling, which is usually protected from dampness with sheets aluminum foil. Then the planed boards are nailed down. Between them leave gaps of 1 cm, necessary for ventilation of the room.
Planed boards are attached to the ceiling with long nails
- Cut the lining to the required length. After this, it is treated with antifungal impregnation. The work is postponed for several days, giving the material the opportunity to dry thoroughly.
- The lining is horizontally attached to the walls of the steam room, starting from the area near the stove. The wooden planks are connected so that each previous one overlaps the next by 1 cm. This will insure the material from the formation of cracks, which may be the result of deformation or shrinkage of the lining. The planks are held in place using discreet clamps that don't heat up like nails. But the bottom boards are attached with self-tapping screws, which in the future will make it possible to replace rotten planks without resorting to complete dismantling material. The lining is not installed all the way to the floor. At the bottom of the wall, be sure to leave space for attaching one row of ceramic tiles.
Installing the lining resembles assembling a construction set: each board is inserted into the groove of the plank attached above
Floor finishing
To finish the floor in the steam room, do the following work:

Video: how and with what to decorate a steam room in a bathhouse
The wall behind the stove can be protected from fire with a brick screen
To avoid heat loss through the exit, the door installed in the steam room is trimmed with boards on both sides. Inner surface entrance structure cover with foil and mineral wool.
In the steam room, it is recommended to make two-tier or three-tier shelves in the form of a ladder. The first stage should be located at a large distance from the floor, since cool air circulates at the bottom of the steam room. The second shelf is made 50 cm higher than the first.
The second or third step of the platform, if it is the last, should be 1 meter away from the ceiling. Otherwise, it will be inconvenient to use a broom on the shelf.
Ventilation ducts are created on the wall of the steam room next to which the stove is located. The hole for the air supply is made in a place slightly above the floor level, and the exhaust duct is located opposite the supply duct - on the wall near the ceiling. The diameter of this hole should be 2 times the size of the inlet channel. Both ventilation passages are equipped with valves.
The inlet opening is created at the bottom of the steam room
The steam room should be illuminated with lamps placed in stainless metal housings. All wires are insulated and hidden in special boxes. The switch is mounted outside the steam room.
It makes more sense to mount lighting fixtures under the steps of the shelf. As a result, the light will not “hit” your eyes, and the lighting will be soft.
The finishing and arrangement of the steam room should be undertaken with a full understanding of the matter, because this construction task takes a lot of time and effort. To make the room warm and reliable, it is better to refuse savings. As a result, the steam room will be safe, high-quality and beautiful.
Perhaps someone is waiting for step-by-step instruction on how to build a steam room with your own hands will include points from the very beginning of designing and laying the bathhouse.
Preliminary steps
Before following the steps of our instructions, it would be better if you followed the links that lead to detailed articles - about, types of building materials for and. Because otherwise, either the volume of this article would grow uncontrollably, or we would have to talk about everything too superficially.
Here we will look at the main steps in detail and touch a little on some additional aspects independently work on creating your ideal steam room. For more detailed information, follow the links in the text.
If you don’t want to resort to the help of outsiders, find out what options there are for arranging the floor, walls and ceiling in the steam room, make your choice and get to work.
Step 1: Bathhouse with steam room and sink: floor
 Why is it said here not only about the steam room, but also about the sink? Because with a certain floor arrangement, you don’t have to make a separate drain for each of these rooms. But first things first.
In a steam room, especially a Russian one, there is often enough water on the floor that it becomes necessary to drain it. This is done standardly in two ways plum and two locations withdrawal.
Gender may be smooth(without tilting), but there will be gaps between its boards - it is through them that the used water will escape. In this case the floor is called .
Gender may be inclined and without gaps between the boards. In this case, the water is supposed to roll down to the very bottom, where a drain hole awaits it, leading into the underground. In this case it is called « ».
What is in the underground differs in design: it can be a drainage pad for absorbing and distributing water, which is easily drained directly under the bathhouse. This could be a concrete slope, repeating the idea of water flowing to the drain hole, from where it is diverted through a pipe outside the bathhouse - into a septic tank or drainage field. These two options are used when installing a pouring floor.
For dry there is no need for a concrete screed - the water goes into the ladder, and from there through a pipe - also into a septic tank or drainage field.
For the first option you need to make sure that the bathhouse is located on sandy soils or those with similar drainage properties, then place a cushion of sand and gravel under it within the boundaries of the steam room and sink.
To do this, the entire layer of soil is removed from the subfloor, then 10-15 cm of sand is poured, and a layer of gravel is placed on top of it.

Concrete screed device for the second case much more labor-intensive and financially expensive.
First thing you dig trench under the sewer pipe. Next, a concrete ladder– tank for drain water. A hole is made in it for the sewer pipe, which should go at an angle of several degrees.
The next step is to do the same work to create sand cushion, but without gravel, while the sand is spilled with water and compacted.
IMPORTANT! Compacting ensures that the concrete will not crack later due to deformation of the cushion.
You can put a layer on top of the waterproofing thermal insulation. For example, it could be 50 mm polystyrene. A reinforcing mesh with a wire diameter of 5 mm must be laid on the foam boards.
These were two subfloors for pouring floors. The pouring floor itself consists of boards that are attached to the foundation frame. In this case, the gap should be not only between adjacent boards, but also between the boards and the wall. Here and there it may be equal 10 mm.


Dry floor can be wooden or ceramic, from tiles. The tile is placed directly on a concrete screed, arranged identically to the one described above.

Wooden dry floor it is made from tongue-and-groove boards, but the entire structure may not have contact with the base of the subfloor, because it is attached to the joists, and the joists are attached to the foundation frame.
If there is a need for insulation, then boards are hemmed from below to the joists, on which a layer of waterproofing and insulation is then laid, after which everything is again covered with waterproofing and sewn up on top with a rough and finishing floor.
ON A NOTE! The slope of the finished floor is done by trimming the top of the joists. And do not forget that there is always a gap of 1 cm between the floor boards and the wall.

Now that you have described the installation of the floor of a steam room in a bathhouse with your own hands, you can move on to the walls and ceiling.
Additional materials on floors:
Steps 2 and 3: How to make walls and ceiling
Arranging a steam room in a bathhouse with your own hands will not be complete without finishing the walls and ceiling. In this case, the owner needs to decide for himself whether his steam room will need insulation, and in particular, for this purpose.
Many people do it as standard - with mineral wool And foil. Moreover, this insulation scheme is used not only in bathhouses made of bricks or blocks, or frames, but also in log houses, in bathhouses made of timber. However, in practice, it all depends on how cold your winters are, how well you sealed everything possible - walls, basement, roof, whether it works correctly and much more.
It happens that it is enough to approach rationally sealing, and there are no longer any problems with the steam room cooling quickly. If they remain, or you are one hundred percent sure that in your climate you cannot do without insulation, then proceed according to the scheme described below.
It is assumed that you already have the walls of the steam room. On my own The thermal insulation “pie” is the same for any wall. You don't even need a diagram if you understand its principle.
In humid and hot rooms the appearance of condensate, especially when the weather is frosty outside. This condensate must evaporate. At the same time, it is highly desirable that it does not get inside the insulation if it is used as mineral wool. Because it will take a long time for water to evaporate from it, and its presence greatly reduces thermal insulation properties mineral wool.
Start arranging the walls of the steam room with your own hands by stuffing the walls battens. However, you should think in advance in which direction you will ultimately attach the lining, because the counter-lattice is made in a direction perpendicular to the length of the lining.

The diagram shows wall insulation; a foam block wall is shown as an example. Read more about the scheme.
A counter-lattice coincides in direction with the sheathing. So, first you place the sheathing beams soaked in antiseptic and attach them to the walls, floor and ceiling so that they can hold the mineral wool mats.
Lathing step it is done along the width of the insulation minus 1-2 cm in order to compress the insulation and it supports itself due to expansion.

Insulation is inserted between the bars to insulate the wall
Mounted on top of the sheathing film either regular or wind protection, or a water protection membrane that releases vapors from the insulation to the outside.
Inserts into the space between the sheathing beams insulation. After which it closes either foil, or any other vapor protection. The vapor barrier is sealed using a metal tape, For example.
On top vapor protection stuffing himself counter-lattice, creating an air space 2.5-3 cm thick, sufficient for the lining to dry out.

The insulation is covered with a vapor barrier and counter-battens are nailed
And it is already attached to the counter-lattice lining. You can read about how this is done.
In general, you can use screws, dowels, and staples for fastening.
The ceiling in the steam room will be either grazing, or hemmed. The structure of both is discussed in this article.
In principle, it is only suitable for insulation hemmed ceiling, and it is immediately insulated from the attic side. In this case, a variety of materials are used, but it is desirable that they are non-flammable and do not emit anything harmful when heated significantly (we remember that the ceiling is the most heated part of the steam room, because hot air tends upward).

Step 4: Arrangement: ventilation
 It is worth taking care of ventilation already at the construction stage. Leave vents in the foundation - these can be asbestos-cement pipes with sand, which you will then free and install stubs or deflectors.
Ventilation in a steam room is essential and should not be forgotten. But she different for Russian baths and saunas! This must be taken into account ().
IN Russian bath you can't do it at all ventilation pipes, if you use burst ventilation, open windows and doors wide between procedures and after them. But for this there should be a steam room, preferably opposite the door.
However, not only people need oxygen, but also stoves, so usually ash pit the furnace is supplied supply ventilation pipe supplying fresh, oxygenated cold air. It is this that will oxidize the fuel and affect the combustion temperature. The more oxygen, the more completely the fuel burns, the higher the temperature.
And if there is inflow, then why not do it sharpening? Even in a Russian bathhouse, it makes sense to make drain holes under the shelves, because this is a zone of stagnant air, and moisture can stagnate there too. About the hood below.
You can limit yourself to a simple hole in the wall, but this harmful to walls in the long run– the constant release of moisture destroys them. It's better to make a pipe.
ADVICE! All ventilation in a Russian bath must be adjustable, that is, have dampers that allow it to be completely closed during procedures.
IN sauna ventilation is the basis of everything. It is arranged in such a way that the air changed 5 times in an hour. It is on this basis that the inlet and outlet pipes are selected according to their diameter - in order to pass the volume of the steam room in a specified time.
Basics functional room any bathhouse is a steam room. Its proper arrangement determines the quality and safety of the health procedures performed, as well as the popularity and demand for the bathhouse.
To reduce the cost of building a steam room, many bathhouse owners perform all the work themselves, without involving third-party specialists.
In this case, the structure of the steam room will be simple and concise - wooden shelves for relaxation and a heater for heating the room.
A steam room in a bathhouse built on its own requires the development of an affordable and high-quality project.
Design Issues
The key element of the steam room is the heater (firebox). When building a steam room, it is recommended to take into account the dimensions of the stove, as well as the number of visitors to visit the steam room at the same time.
What should a steam room in a bathhouse be like, designed for a specific number of visitors? So that vacationers do not experience discomfort and at the same time there is no unused space in the room, which should be heated more, the steam room must have certain dimensions.
Room dimensions
To reduce high humidity, as well as prevent, the steam room in the bathhouse must have a reliable system exhaust ventilation. carried out at the construction stage of the bathhouse.
The ventilation system is provided for the timely removal of excess moisture and supply clean air from outside. Experts recommend equipping a modern supply and exhaust system ventilation with built-in air ducts.
In this case, the supply channel should be located near the firebox in the lower part of the room. The hood is installed on the opposite wall at the top, almost under the ceiling. The diameter of the exhaust duct should be twice the diameter of the supply duct. Air flow is regulated by built-in valves.
To develop a project for a future bathhouse, you can contact an architectural bureau or private designers.
A ready-made steam room with your own hands and step-by-step instructions for its construction are aimed at novice craftsmen.
Preparation of tools and materials
The construction of a steam room of any type requires preparation special hole for supply and exhaust ventilation. The ventilation duct is equipped with flexible aluminum corrugation.
To build a steam room in a bathhouse with your own hands, you should prepare the necessary tools and materials:
- Bars measuring 5x5 cm;
- Insulation (mineral wool, ecological wool, basalt);
- Waterproofing material;
- Vapor barrier material;
- Sealant, silicone;
- Aluminum tape;
- Level, construction stapler with staples;
- Hammer, nails with wide heads.
Internal insulation
All work is carried out in stages in accordance with the finished project and begins with insulation of the building. High-quality insulation prevents heat loss and reduces fuel consumption for heating the room. First, the ceiling is insulated, then the walls and floor base.
- The surfaces to be treated are cleaned of dust, dirt and debris, and a sheathing of 5x5 cm bars is installed. The correct installation is checked by the building level.
- Waterproofing material is laid on top of the constructed wooden frame.
- The selected insulation is installed on the finished waterproofing. For ceiling surface It is recommended to use a double layer of insulation, for walls - a single one.
- Next, a single layer of vapor barrier is installed. As a vapor barrier regular one will do, which is attached to wooden sheathing using metal staples and a stapler. All joints are carefully taped with aluminum-based tape.
- On the walls, on the installed sheathing with insulation and vapor barrier, another sheathing is attached for installation of a decorative covering - wooden lining. Porcelain stoneware or ceramic tiles can be used as floor cladding.
- At the final stage, all cracks, joints and gaps are sealed with sealant or silicone.
Installation of oven and shelves
The next stage of arranging a steam room is installing a firebox. The stove in the steam room is mounted or built in the near corner from front door. Subject to technique fire safety optimal distance between the firebox and the walls should be at least 33 cm.
Bake
Modern steam rooms use various types of stoves - metal, brick, soapstone and electric. Each type has its own advantages and disadvantages.
- Metal stoves heat up and cool down quickly, and also require a protective casing.
- Brick heaters take longer to heat up, but cool down more slowly, as a result of which they accumulate heat more efficiently and produce clean steam.
- Soapstone (soapstone) - a modern type of heater, distinctive characteristic which is high wear resistance and cost-effectiveness of the material. They warm the room slowly and evenly, releasing soft and comfortable heat.
- Electric stoves do not require a chimney and are easy and accessible to control from a distance.
If metal and electric heaters can be purchased at any specialized store, then brick and stone fireboxes will have to be made with your own hands.
shelves
To steam in a sauna with comfort and convenience, you need to do it correctly. It is recommended to use high-quality dry lumber that does not release resins and is resistant to heat.
To make boards, you can choose wooden slats made from aspen or oak. The slats are securely connected to each other with a small gap for the air duct and water outlet. The number and size of shelves are determined by the dimensions of the steam room, as well as the number of visitors for which it is designed.
The optimal size of the shelves is 65x180 cm. In order to save space, it is recommended to mount the shelves against the wall on horizontal bars fixed to the sheathing. In addition, under the shelves you can install accompanying ones - ladles, buckets, watering cans, etc.
Most projects do not provide for paired rooms natural light, so you simply can’t do without additional light sources. will create a favorable atmosphere and ensure comfortable bathing procedures.
A classic DIY steam room provides for a sufficient number of light sources to create twilight, conducive to relaxation.
The location of bath lamps should not interfere with the procedures, and the light should not tire the eyes. The best option is to place one large surface-mounted lamp above the door, and small built-in lamps above the shelves.
Today you can purchase lamps and lamps for the steam room, made with decorative lampshades made of wood or glass. They can be overhead or built-in.
The main thing is to adhere to fire safety rules when installing lamps - insulate conductive wires and light bulbs. To do this, the light bulbs are placed in special metal housings of a hermetically sealed design, and the wires are placed in plastic boxes that are resistant to overheating. The switch is mounted outside the steam room.
That's all the subtleties of how to make a steam room in modern bath with your own hands - to do this, it is enough to purchase a heater, insulate and decorate the room, install bath furniture and the steam room is ready for use.
And if during its arrangement all the rules and recommendations were followed, then the heat and steam produced will have a powerful beneficial effect on the human body.
Hello, dear site visitors! We continue the series of articles from our readers. In this article, the author shares his personal experience in building a log bathhouse with his own hands. The construction is not finished yet, so we wish him success! If you have recommendations or questions for the author, you are welcome to comment.
Part 1. Foundation
To build the bathhouse, I chose a relatively flat area with a slope of 20 cm on a six-meter section. First of all, after preliminary marking, I cut off the fertile layer over the entire area of the future foundation. This is required to eliminate the processes of decay of plant residues and other organic matter in the basement.

The area is dominated by sandy soil, That's why the best option will be 50 cm high from the base and 40 cm wide. The foundation contour is marked with ropes that are attached to the improvised corners of the internal and external perimeter. To mark the perimeter, I took scraps of boards about 70 cm long and drove them into the ground, and screwed horizontal shelves on top with self-tapping screws with protruding screws for attaching the rope. It is better to choose a rope that is not prone to stretching; it will be easier to work with.
In addition to the lengths of the sides of the future foundation, the diagonals between the corners must be verified, which must be equal to each other with a tolerance of plus/minus 3-4 cm. You can read more about the methods of marking the foundation in this article. We continue to film fertile layer and dig a trench to create a sand cushion.

As a result, we get a fully prepared “pit”, where the bottom of the trenches is almost horizontal (we check it with a building level). The depth of the trenches is 20 cm, from the soil level in the highest place of the site 40 cm, in the lowest - 30 cm.
The dimensions of the foundation are determined by the center of the intersection of the logs. This will be the center line. If the diameter of the logs is about 20-22 cm, then we retreat 15-20 cm in both directions from the center line. This will be required to obtain “shelves” for attaching floor joists and rain tides. In addition, the mistake is practically eliminated when logs, due to miscalculations in the foundation, fall outward or inward, “hanging” in the air.

The bathhouse is connected to the strip foundation to eliminate multidirectional shifts of the bathhouse and stove. The size of the stove platform was chosen as 120*120 cm, as the average size for installing metal stoves under brick lining.

We begin laying sand in the trenches. At the same time, we moisten the sand and compact it. We pour water until puddles appear, after the moisture is absorbed, we begin to tamp. The process is repeated 3-4 times until your shoes leave no marks on the compacted surface of the sand.

A day later, after finishing the work, we once again go through the entire base under the foundation with a tamper. Of course, you can use a simpler option and connect a tamping machine to the work; this will speed up the process slightly. I have the simplest option: a 100 mm beam, a 20x20 mm sole and a handle. The appearance of the finished base and manual tamper is shown below.

We pour a sand cushion on top of the prepared site under the foundation to level the horizon and raise the site above the level of the site to prevent water from getting under the foundation.
If you hire a concrete truck, take care to additionally strengthen the formwork with diagonal stops outside and inside the proposed foundation. The pressure that is created when supplying the mixture is not enough to carry robust construction. The same applies to pouring the mixture from a concrete mixer. Only in this case you need to strengthen the place where you will drain or simply move the concrete mixer around the perimeter.

It is better to pour the entire volume of concrete at one time so as not to get the effect of a layered pie. We cover the top of the foundation with a film that keeps our foundation moist to avoid cracks in the concrete. We periodically water the foundation with water, not allowing it to dry out.

After 7-10 days, we remove the formwork, unscrewing the screws, which will also be used in subsequent stages. The finished foundation looks like this. Layout: 2x6 meters – veranda; 4x4 meters – rest room; 2x2 meters – washing room; 2x2 meters - steam room. Location ventilation holes approximately 20 cm from the soil level; if necessary, you can buy plugs to close the holes in winter.

The approximate quantity and price of materials used in the construction of the foundation are indicated in the table below.
Part 2. Installation of log house and roof
To bandage a 6x4 meter log house and a chopped veranda you will need 25 bags of moss. When purchasing, make sure that the bag of compacted moss weighs approximately 20 kg. Moss must be elastic, that is, have optimal humidity.

We use “cuckoo flax,” which we collect in late autumn, when all living creatures go to “winter” in the soil and there is no risk of catching a snake with a bunch of moss. A small amount of sphagnum moss is allowed, which is shorter and crumbles when dry. If you completely use only sphagnum, then after a while it will simply fall out of the grooves.

The length of the moss strands should be at least 30 cm, so that when caulking, you can curl the ends and ensure sealing of the grooves. When drying, we sort the material, selecting twigs, foreign plants and cones. By the way, if a cone falls into a groove, then at a certain humidity it opens with such force, which is enough to lift the log and create a “cold bridge”. This is what log installers did in the old days, and even now this situation is not uncommon if the owner “offends” with money.


We install rolling logs. I have a small gap between the foundation and the log house, so I used half a log on one side and a 100 mm beam on the other.

We break through the place where the log comes into contact with the roofing felt with moss.


Mistakes were discovered that were caused by the reluctance of the hewers to do their work efficiently. The grooves were cut using a chainsaw, which made the gaps in the logs very large. Look, the edges of the grooves fit tightly to the body of the log, but in fact there is emptiness inside. Because of this, the amount of moss that will be used for caulking increases greatly. And this is if you do the caulking yourself, and the “shabashniks” only do the external treatment, no one will pierce the insides.

| Material | Volume/quantity | Price |
|---|---|---|
| Edged fence board “inch” for sheathing, 300 mm | 1 m 3 | 4500 rubles |
| Wood screws 50 mm | 2 kg | 300 rubles |
| Moss | 25 bags | 6250 rubles |
| Log house | 1 piece | 72,000 rubles |
| Board 50*150 six-meter | 14 pieces | 3600 rubles |
| Metal tiles, thickness 0.5 mm, length 4.2 meters (additionally ridge and wind protection) | 12 sheets | 31,000 rubles |
| Steam-Wind insulation | 1 roll | 800 rubles |
| Tongue board 20 mm | 1 m 3 | 8500 rubles |
| "Belinka" base | 2.5 liters | 400 rubles |
| "Belinka" glaze composition | 2.5 liters | 600 rubles |
| Total: | 127950 rubles | |
Part 3. Caulking of a log house
The simplest, but tedious job of caulking a log house. We use a mallet, iron and wooden caulking. The iron one has a blade thickness of 3 mm and a width of 50 mm, the wooden one is made from hard wood (I have dry birch) and is a consumable material.

Initial view of the groove.

We tuck the moss into the groove with a construction trowel. Previously I used a spatula, but it quickly failed and was not so elastic. Feel free to hammer the groove completely. There is an opinion among ordinary people that there is no need to make the seams tight and uniform, they say, the temperature in the bathhouse is enough to compensate for the losses. But judge for yourself, drafts in the steam room and washing room will not add comfort and the consumption of firewood will be 2-3 times higher.

We hammer the resulting roller with wooden caulk.

If necessary, if the groove is not tight enough, we make another roller of moss and punch it until we feel the hardness of the wood when struck with iron caulk.

Final view of the caulked groove.

To prevent birds from dragging moss and for aesthetics, we close the groove with a 100 mm wide jute tape, which will subsequently be treated with impregnation and a glazing compound to match the color of the log. Special “craftsmen” place logs only on jute or flax, but this is unacceptable for a bathhouse. If we have constant humidity in our house, then steam generation is encouraged in the bathhouse. Flax and jute absorb moisture, but do not dry out for a long time, the grooves rot and mold.

We receive logs prepared for grinding.

We caulk the corners especially carefully to prevent cold air from entering the bathhouse. Work, if you don’t hire specialists, will be in vain. When attracting “shabashniks” - from 70 to 150 rubles per linear meter.
Part 4. Sanding logs
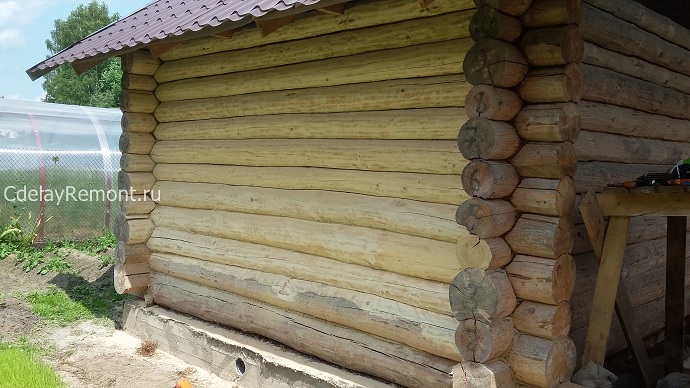
So, the caulking is completed, the moss is tucked in and compacted in the grooves, we begin to prepare the log house for painting. Currently, the logs look very unpresentable - plane marks, chips and pulled out chips. In addition, the logs are heavily “tanned” in the sun and under the influence of slanting rains, and some of the knots require removal and sealing with mastic.

The ends of logs that were damaged during storage and transportation also require processing. Here the wood is the loosest, and therefore there is a high probability of rotting and further destruction of the log.

Tools for grinding logs:
- Bulgarian;
- flap sanding wheel;
- soft mop brush;
- putty knife.
The grinder used was the cheapest - 1200 rubles, made in China. It is worth noting that it passed all the tests with honor and remained operational even after passing 70 square meters of walls (we add to this the semicircular profile of the log). The only inconvenience is cleaning the stator, rotor and the inside of the grinder from wood dust. Of course, you can put a stocking on the instrument, but the incoming air is not enough for cooling. By the way, the work is very dusty and immediately stock up on glasses, closed on all sides, and respiratory protection - a respirator is enough. Working with an angle grinder requires utmost attention. High speeds and a removed protection cover can play a cruel joke on you. All you have to do is lose your vigilance and approach the grinding wheel too quickly, and you are guaranteed to get injured. I walked over the same place on my hand twice - the glove was in shreds and the skin was torn to the flesh.
The grinding wheel was used with 80 grit. After testing and selection, I settled on this value - 60 grit leaves too noticeable marks, and 100 grit clogs very quickly. The approximate consumption of petal circles is 1 piece per 3 square meters. You can continue to use the circle, but the pace of work will slow down and you will simply get tired.
Attention, bonus! I accidentally discovered that if a circle clogged with dust and resin is walked over the concrete of the foundation, the sandpaper is cleaned and the circle is ready for work again.
If you don't have the skill and work with caution, you can sand 6-10 squares of wall in a day. The prices of the “shabashniks” fluctuate between 400-500 rubles per square and plus they do not stand on ceremony with spending circles. Pay attention to the resin pockets. If you expose such an area, then treat it with a solvent, otherwise this resin will then appear even through a layer of paint.
I started working from the smallest wall, the logs are transformed before my eyes. I encountered a problem that when processing grooves, the edge of the grinding wheel leaves cuts on the bottom log. But with further processing, the cuts are ground off well and no marks remain.
There is especially a lot of fuss with the corners, the high speed of the grinder and the tightness slow down the process. Where the circle is not enough, you will have to switch to a slower processing method - a chisel.

When grinding wheel Almost “sat down”, we pass the ends of the logs. It is irrational to use a new circle for the ends - you will have to throw it over a dozen logs.

We seal the ends with wood mastic. At first I used the color “pine”, but then I realized that it was more economical to use White color, since it will be painted under it.

After sanding, the interesting structure of the wood appears, with intricate patterns running throughout the log. Knots and unevenness of the log add log sauna a certain fundamentality, and I was even glad when I came across particularly gnarled specimens.


To get an idea of what the wall would look like after painting, I stopped and prepped the logs. Based on all the combined criteria (quality and price), I chose the composition under the Belinka brand. I pre-treated it with Base, which had a drying time of 24 hours, and passed over the polished surface with the first layer of glaze compound No. 24 (rosewood). Agree, enchanting beauty! If you want to get a surface that is smooth to the touch, then after the first layer of the composition and it has dried, go over the log manually with sandpaper. This is true on the railings and on the front part of the bathhouse, where guests love to run their hands along the wall and evaluate the work of the master.

The drying time for the first layer is 12 hours; to be sure, I left it for a day and covered it with a second layer. A dark, noble matte shine appeared. Another trick is that after using the glazing composition, a little pigment remains at the bottom of the jar. We dilute it with a solvent until it looks very pale and go over the second layer of the dried coating. You can do the procedure at any time after coating. As a result, we get a surface that resembles a log additionally impregnated with wax. Very pretty.

Along the way, the ends were treated with glazing compound No. 11 (white), which favorably highlights the work already done.

I was completely satisfied with the result, so we continue the grinding we started. Since you will do all the work yourself, the quality will be at the highest level. If hired workers can ignore flaws, then the master himself will torment himself for even the smallest mistake. For example, knowing that somewhere at the bottom of the log I missed a cut, like a criminal returning to the scene of a crime, I examined my “jamb” again and again. Until he fixed it.
The log house is becoming more and more beautiful. Don’t forget to clean the logs from dust with a brush after work.

The following photo shows logs treated with Base and the ends sealed with white mastic.

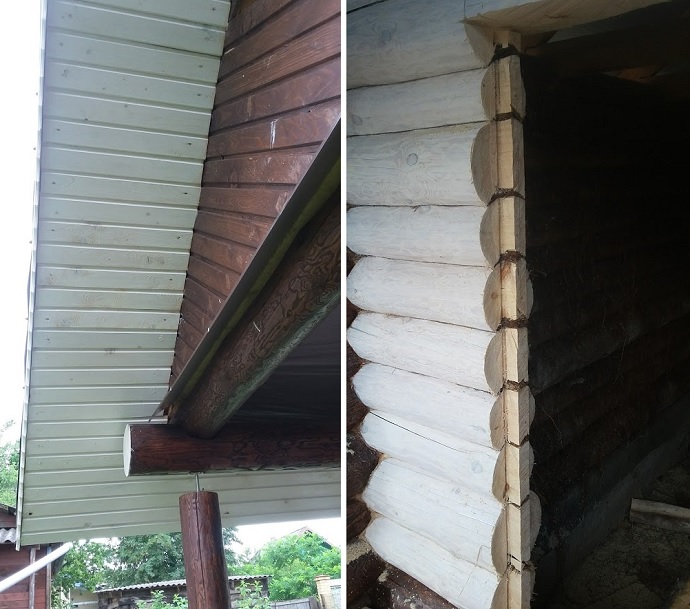
Having appreciated the color and texture of the painted logs, I realized that inside the veranda it would look somewhat dark, and I conducted an experiment by painting the log with composition No. 11 (white).


White paint preserves the texture of sanded logs, and I decided to completely paint the veranda. Through the first layer, a slight yellowness of the pine appears, and there is no shine. Very similar to just bleached wood. But the second layer works wonders. Shine and a certain completeness appear. By the way, buy “Belinka Lazur”, since the white “Belinka Top Lazur” is intended for window frames and costs much more.


Now the bathhouse, with the exception of one wall, is covered in one layer and looks like a house with a negative Khokhloma painting. Pleased with the top cross beam- This is a knotty fir tree that gives the structure the appearance of matching the natural style.


We continue the construction of the bathhouse and move on to the stage of laying floors on the veranda. There is a roof over the room, but the absence of a pediment (for the airiness of the structure) does not prevent drops of slanting rain from entering. In winter, it is possible that snow will blow in and then melt during the thaw. Therefore, we will pay special attention to preserving the boards and joists, as well as giving the floor surface water-repellent properties along with a good appearance.
Part 5. Veranda floor
The logs will be 50*150 boards placed on edge. According to the universal formula, the thickness of the board is multiplied by a factor of 20, and we get the step between the logs in my case 1000 mm. But I decided to strengthen the structure somewhat and placed the logs in 600 mm increments. It turned out like this.

For the veranda (conditionally 2 meters by 6 meters) I purchased 16 six-meter boards, taking into account the joists and a reserve of one board. It cost me 4300 rubles and 500 rubles delivery. Blue stains and mold appeared on some boards, which can be easily removed by sanding and bleaching. Worst of all, several boards are infested with wood-boring beetles. Its larvae made several through holes, which I then sealed with mastic. Upon inspection, I didn’t find any more living creatures, and that’s where I calmed down - after drying, the wood doesn’t attract them much, and treatment with an antiseptic and biocide will discourage the beetle from any desire to approach my veranda. I laid a vapor-permeable film on the ground inside the foundation so that no plant had a chance to germinate inside the veranda. The boards were marked and sawed according to their location.

Afterwards, I removed the boards, numbering them by location, and began processing the joists. I used a powerful antiseptic made in Yaroslavl. I am a little familiar with the preparation of antiseptics and the composition of the purchased products inspired confidence in me. Wood preservation is declared for 45 years, subject to impregnation technology. It is required to use 500 grams of solution per square meter, i.e. Apply the first layer, and after 1-2 hours the second. The antiseptic is yellow, so the coating is clearly visible. When dry it becomes dark brown.

Next came the turn of processing the boards. First, I ran a flap emery wheel attached to a grinder along the surface located below and on the sides of the boards to remove the lint. This way we ensure better absorption of the antiseptic. Then we grind the front surface with a 100-grit wheel. I also used my long-suffering grinder of the lowest price category. If you are afraid of making ruts and holes, then try sanding part of the board with a hammered wheel to gain a little experience. Don't forget to chamfer the edges of the board.

Attention, bonus! To ensure that the floor surface is ideal to the touch and pleasant to the feet, walk over the sanded board with a mild soap solution. Apply with a brush or roller. When dry, the raised residual pile will become hard and can be easily knocked off with sandpaper even in manual mode work.
We lay the boards on the logs with a gap of 4 mm. As a “standard” we take an ordinary nail, which we place vertically between the boards.

Since my boards have natural humidity, maybe a little drier, there is a possibility of them warping during the drying process. That is why I decided to use screw nails rather than self-tapping screws for fastening. A self-tapping screw is a weaker fastener for lateral loads and can simply burst. To prevent rust from spreading to the boards, cover the head of the nail with wood mastic.

Do you see the nail? And he is here!

In the process of laying the boards, I begin to process them. I had the choice of using oil as a coating for open terraces Alpina or Belinka glaze composition. I liked the second option better. Firstly, both oil and Belinka Base penetrate deeply into the wood and protect it from moisture. Secondly, the tinting of the oil and Belinka No. 24 are almost similar. Thirdly, oil and glaze composition, which do not have high abrasion resistance, should be renewed every two years. And fourthly, Belinka is cheaper. A large flow of visitors is not planned on the veranda and the maximum load is walking in slippers or barefoot.

After the first layer of Base has dried (24 hours), apply the second layer and give it another day to dry. And the culminating moment comes - coating with Belinka No. 24 glazing compound. If you want more effect and shine of the floor, then purchase Top Azure.


–––––– Six months have passed ––––––
It’s been a long time since my last story, and the construction of the bathhouse has gradually moved forward. Little by little, because you have to do everything yourself. I don't trust covens. I contacted them twice (assembling the frame and installing the roof) and was very dissatisfied with the result.
I looked at the bathhouse from the side and decided that another pediment was needed to protect the veranda space from rain. I placed the clapboard in different directions, leaving something like a window. There will be a stained glass window - polycarbonate with a pattern applied with special stained glass paints.


The fit of the boards to the gable turned out to be quite tight, so I will do without an additional plinth and leave it as is.

The pediment was painted the same color as the bathhouse, and a side board with pretend carvings was installed. The cost of the work was: lining - 2500 rubles; self-tapping screws – 200 rubles; paint - 200 rubles; wind carved board - 800 rubles. I think it’s quite inexpensive for such a result.

Last year I didn’t have time to paint the roof lining, I just covered it with base, and the temperatures started to drop below zero. Just the other day, having chosen a period without rain, I walked with two layers of white Belinka. I liked the result, but I’m thinking of securing it with a third layer.
And so, a new bathhouse construction season has opened. In the fall, I managed to capture several fine days with positive temperatures, which allowed me to finally make a window and a door. The technology for preparing openings is standard. We mark and cut out to form a spike on the log. For the window opening I used 100*200 timber, and for the door frame I used 100*250 timber. At the sawmill they met me halfway and made two six-meter blanks to special order. They charged ridiculous amounts of money - about 2,500 rubles including delivery.
On site, the timber was sawn into the required lengths. The window opening turned out to be clean 50*50 centimeters, the door was clean 70*160. So let’s really implement the ancient commandment - bow to the bathhouse when you enter. Top level the threshold will be 15 centimeters from the floor to keep warm in winter. I cut a groove on the beam to the size of the tenon on the log, plus a centimeter in width in each direction. I attached a 20 centimeter wide roll of insulation to the tenon, I think it was linen, I don’t remember what I bought. The vertical beam was stretched, and horizontal sections were used as spacers. The gap from the top post to the log is about 3 cm, filled with moss. There is also moss under the threshold and window sill, which, after installing all the components, was compacted to the state of almost a log.

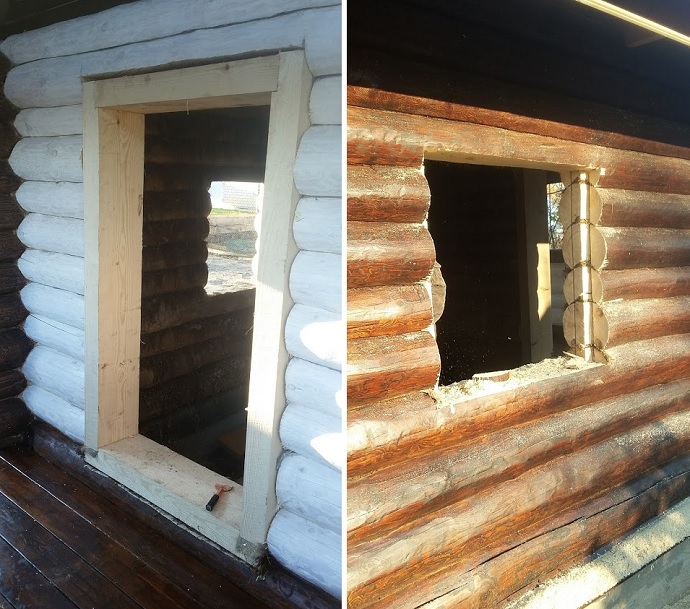
A quarter is selected on the window for ease of installation of plastic. Spacers are installed in the door, since deformation is possible during the natural drying of the timber.

What's planned. The window is plastic with imitation of division into smaller windows. The photo shows my hooliganism, so to speak - instead of a window I inserted polystyrene foam and used insulating tape to mark the future product.

The door is metal with insulation along the leaf and jambs. In the company where doors are made, the director is a good friend of mine, we discussed all the details and, I hope, it will work out good product. By door leaf will wooden overlay 1.5 centimeters thick. Using the overlay, I will age the wood, make an imitation of forged hinges and wooden crossbars. But that’s in the future, but now I’m busy landscaping the veranda.
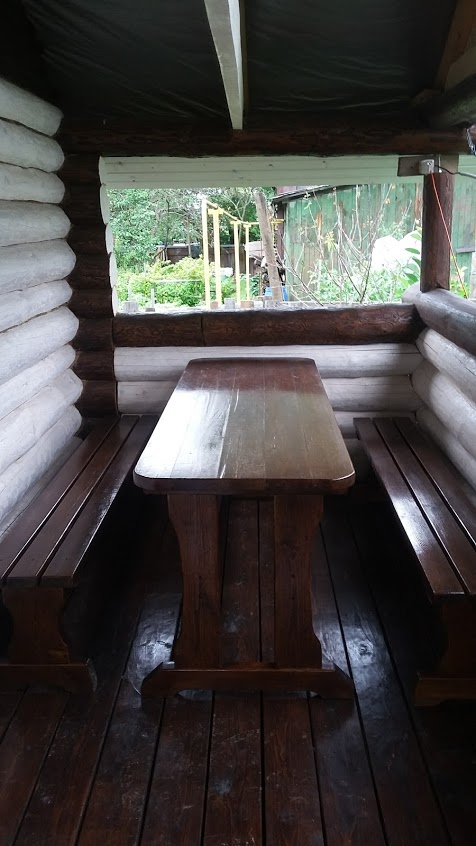
We have one craftsman who makes tables and benches of fairly good quality and very inexpensively. This headset cost me only 7.5 thousand rubles. Following tradition, I covered it with Belinka base, Rosewood glazing compound and deck varnish from the same company.
Somewhere on the hundredth or two hundredth jump from the level of the veranda, I realized that I needed a porch. The plan was to make some kind of forged product with wooden steps, but for now I decided to limit myself to a temporary shed. Although the temporary hut turned out to be quite nice and will still serve me until I get tired of it. On the sides I used logs that remained from cutting out the openings, and on the steps I used a 50*150 board. He placed stones from a nearby quarry on the base.

And now about the urgent matter. First, I apply caulk inside the log house. The logs have already settled in place. What was possible - dried up, what was needed - led, what wanted - settled in its permanent place. Accordingly, cracks have appeared inside that require careful sealing.

External inspection confirmed the good quality of the caulk. Nothing fell out, the birds didn’t act up, and the moss lay as planned. When I cut out the openings, the moss compacted into one dense and hard strip, it was even difficult to disassemble, but such strips are good for filling cracks. I made another caulk from birch. The spatula turned out to be wider and larger; a two-kilogram sledgehammer fits perfectly with it. Moss flies into the cracks with a whistle, and where the log lies too tightly I use birch wedges. The process is long, but mandatory if you don’t want to steam in felt boots in winter. Secondly, I inspected the foundation. There are slight chips on the outside, but these are sagging during pouring and do not affect the quality. However, if I have free time, I will plaster and cover facade paint. I haven't chosen the manufacturer or color yet. Last year I installed ebb tides, which performed well even with a serious snow load. And thirdly, I will count the snow guards. When last year a crust formed on the roof after an icy rain and 50-60 centimeters of snow fell on it, there was a good surprise in the form of a huge dense snowdrift near the bathhouse after the first thaw.

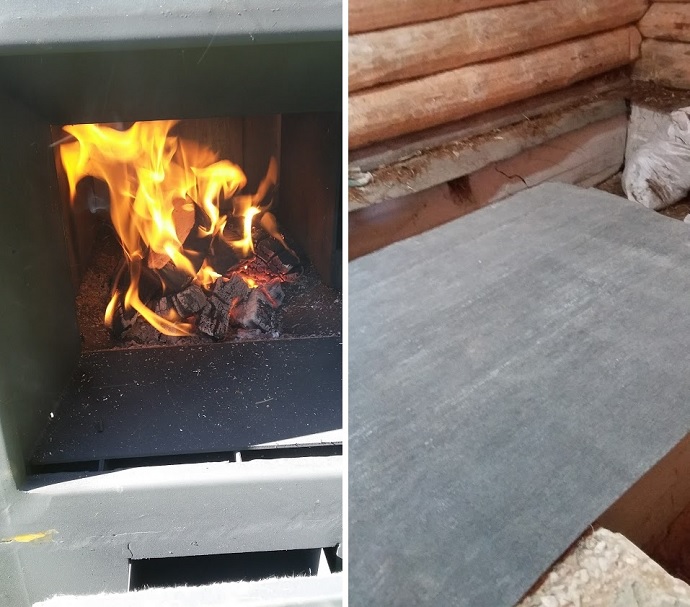
Well, I’ll tell you what I do to keep my bathhouse warm and dry. A month ago I bought a metal stove from the Izistim company for 58,000 rubles. I took a long time to choose, tediously, read all the reviews and realized - this is what I need. Its parameters can be found on the company’s official website, where a detailed description is given. While the stove is standing on the street in front of the bathhouse, I still need to figure out how to carefully drag 130 kg of metal, especially since I don’t have floors yet and there are 600 bricks stacked on the ground. It turned out that these stoves are made literally right next door to me, so I had the honor of communicating directly with the manufacturers, who really helped with advice and recommendations. The pipe is planned to stand next to the stainless sleeve. The structure will be about 5 meters. I ordered a stainless steel pipe with a wall thickness of 1 mm there, from the Izistim company. Literally a week later I received my order. Laser welding, high quality and reasonable price. In terms of money, the pleasure amounted to 11,500 full rubles for a set of pipes of 5 meters. CRAFT company.

IN full set includes a tee, a plug for cleaning the pipe from soot and removing condensate and a type of adapter with a platform that will allow you to firmly fix the chimney in brick pipe. The structure on the right in the photo is a horizontal section of pipe from the stove to the chimney. Heat-resistant stainless steel, 4 mm thick, was made at EasySteam for 4,300 rubles.

Naturally, I didn’t go shopping and bought convection doors without leaving the checkout. Convenient locks, normal appearance and additional sheets of metal for securing products in brick.

I purchased Kostroma clay brick grade 150, which is enough for lining a stove. The geometry of the brick is normal; if necessary, the edges can be rounded to give the products a more interesting shape. If you want more beautiful brick, then buy Vitebsk mark 200. Each brick cost me 25 rubles apiece.
I didn’t bother with clay, which still needs to be mined somewhere and a solution prepared, since I don’t have any special skills. I purchased the ready-made mixture " Stove house Makarovs" produced in Kostroma, Gzhel colors. They also have a white clay mixture for the aesthetes. It was not possible to find the stove makers - everyone was busy. The cost for craftsmen starts from 40 rubles per brick on the lining and 60 rubles per brick on the pipe. You can calculate the cost of the work yourself. I will do it myself, although the work will take longer.
Part 6. Oven
“And the battle begins again” - we continue the construction of the bathhouse and the improvement of the internal space. The heart of the sauna is the stove. My wishes for the climate of the future steam room and other rooms are extremely simple and unpretentious. Firstly, your feet and ears should be warm even in winter, and not steam with a hard plus in the head area and at the same time wearing felt boots so that your feet don’t freeze. Secondly, there must be inertia sauna stove to be able to stop flooding and steam without running around for firewood while maintaining the desired temperature at all times. It is advisable to keep the heat in the bathhouse for two or three days to dry the premises. And thirdly, hot water should not boil in the steam room, but is located in the washing compartment in the remote tank.
As I already wrote, the Sochi stove from the Izistim company with a mounted heat exchanger for heating water was chosen.

The heat exchanger is equipped with inlet and outlet pipes with a diameter of one inch. The design is intended to be covered with brick, which will simultaneously serve as a screen from hard infrared radiation emanating from the metal and the heat accumulator. Before installation, you need to heat the stove outside in a gentle mode to burn the factory paint and eliminate the burning smell when used directly in the bathhouse. A heat-resistant cord is laid on the door and ash pan, which is necessary for sealing. This has not happened before, but company managers listen to consumer recommendations through communication on the forum and make the necessary changes.

A cast iron grate is installed inside the combustion chamber. Additional sheets of metal are welded on the sides and end of the chamber to reduce the impact of the flame on the furnace walls to avoid deformation.
For relative draft, I installed a meter-long pipe and conducted the first tests of a metal sauna stove. The draft even with such a piece of pipe is quite good, only there is a slight emission of smoke from the door when it is opened and, accordingly, a small amount of soot on the glass.
The foundation for the stove is connected to the foundation of the bathhouse, and reinforcement was carried out during pouring. To begin laying, I leveled the surface with cement mortar so as not to damage the waterproofing. I laid two layers of roofing felt on the pedestal, on which I will begin laying bricks.
To rise above the floor level, and from the foundation it will be about 18-19 centimeters, we lay out the base under the stove three bricks high. There is a little trick. To save mortar and bricks, we lay out a “well”, and inside we simply place the worst brick and fill the remaining space with sand.

The sand will need to be slightly moistened and compacted so that it does not settle, but this is not necessary; the filling will not go anywhere.
Bricks produced in Kostroma, costing 24 rubles per piece. The geometry is normal, there are chips in the corners and edges, so you have to choose the front side of the stove. It doesn't prick well, it's better to cut it with a grinder. For the solution, the stove mixture "Makarov's Stove House" is used. The solution sets quickly, holds the brick well, and is easy to use. Bags of 25 kg, cost about 400 rubles per piece. One bag is designed for laying 60 bricks. The solution must be stirred powerful drill With a nozzle, it’s unlikely to be possible to make a homogeneous mass with your hands. The mixture is well dried and you have to add quite a lot of water.
I “sealed” the top row of bricks along the base of the stove with mortar; I wanted to install the structure on metal nickels - the legs of the stove, it seemed to me, would push through the brick. But it turned out that in this case the neck with the door rises and a gap appears. Therefore, I later cleaned off the solution and discarded the lining.

I immediately tried on convection doors that would draw air from the relaxation room into the steam room for exchange. But, as it turned out later, they cannot be installed in this place; the decorative screen around the firebox would interfere.

The most difficult thing was to drag the stove into the bathhouse and not demolish anything along the way. The 130 kg structure was awe-inspiring, and I had to order two stronger loaders. If the first time a loader from the “legs and cap” category helped me drag the stove to the bathhouse, then the craftsmen really arrived. They moved me away and in 10 minutes they installed the “piece of iron” at the place of operation.
I installed a T-bend on the stove to determine the main pipe. The picture shows a view from the rear, where the “lambs” are located for removing the roof and subsequently cleaning the pipe from soot, although the manufacturers assured me that there was no soot.

The main pipe will run to the left of the furnace and will also sit on a foundation connected to a common strip. We continue laying and forming a pipe.
The pipe will be functional only after the T-shaped section enters, so we make its sides one and a half bricks long, and also fill the internal space with sand.
Inside the steam room in the furnace screen we install two more convection doors, but of a large size. This is necessary to quickly warm up the room. We do not cover the top of the stove with bricks, leaving space for stones. When the convection doors are open, air is taken from the floor, passes near the stove body and exits through the stones already heated. The air flow can be adjusted using the damper. The doors are hung from the side that is convenient for you.

I bought the doors from the Izistim company; they modernized the design by adding a stainless steel frame the width of the brick. Now it has become convenient to install the doors, without additional fastening with wire. Small gaps are left around the perimeter (except for the bottom) of the doors, which compensate for the thermal expansion of the metal.
The main pipe, so that it passes between the rafters and does not take up much space, is located in line with the “face” of the stove screen. The T-adapter goes a little to the side. Izistim made it for me in abundance. But, as it turned out, the size was the most suitable, as they say, neither decrease nor add. A 4 mm stainless steel product cost 4,500 rubles.

It's time to hang the heat exchanger. I bought galvanized angles, bends and couplings per inch, attached them to the overall structure, wrapping the threads with flax treated with heat-resistant sealant (red in the photo).
The brickwork reached the top of the firebox. We install a support angle of 50*50 mm with an overlap of 8-10 cm on the brick. There is a thermal gap of about 2 cm around the firebox.

The front side is almost finished, the convection doors are set higher than planned, but for air exchange this is even more convenient; the air coming from the relaxation room into the steam room will not overheat. Contact with the heated oven is minimal.
We slowly cover the heat exchanger with masonry and make pipe outlets to connect to the remote tank. The holes are not very neat and then I will cover them with disks from of stainless steel or other decor that is not afraid of moisture. This is a wall in the washing room; it is planned to lay brick up to the ceiling.

The facade of the stove is finished, the next row will be a “mantelpiece” so that the hot air from the firebox, when it is opened, does not go directly to the ceiling, but has some obstacle. Yes, and you can put interior decoration items on the shelf.
The wall in the washing room is finished, the pipe connections are made. All that remains is to buy stainless pipes and make connections to the hanging tank.

It's time to fire the pipe. Tying the masonry from the steam room side. The T-adapter is connected to the sleeve through a tee. A cover is installed at the bottom of the tee to drain condensate and clean the pipe from soot.
From the side of the steam room, the stove looks like this: the T-shaped adapter is covered with a brick screen on top. A 40*40 corner was taken as supports.

I will cover the free cavity above the stove and the adapter with stones for decoration and evaporation of various incense; no other function is provided for these stones. And perhaps I’ll cover the pipe with a sheet of stainless steel iron to avoid harsh thermal radiation from the highly heated metal.
We continue to build the pipe. In the place where the ceiling passes, we form a fluff in order to maintain fire safety distances from the “smoke” to wooden structures. As expected, the front and side walls of the stove reached almost to the future ceiling.

According to calculations, the main pipe should pass in the middle between ceiling beams. And so it happened. The pipe has “grown” to the roof and it’s time to make an opening.
And the “face” of the stove looks like this. Convection doors are located in one row with pipe cleaning. It’s still stained with clay, but you can already understand what I want.

Next we prepare the roof for the passage of the pipe. From the inside, the roof was drilled into the corners of the future passage with a margin of one centimeter. I used a grinder to cut out metal tiles on the roof. I got a passage almost strictly in the center of the ridge, which is convenient for later closing the hole from rain. And the snow will not put pressure on the brickwork.

First of all, we insert a stainless pipe sleeve into the opening, then we begin laying.

You should not be content with just the level; you will have to run down so that the pipe is visually level. “Otter”, the rain protection is made of almost half a brick. And so the pipe, not yet cleared of clay, takes its proper shape.
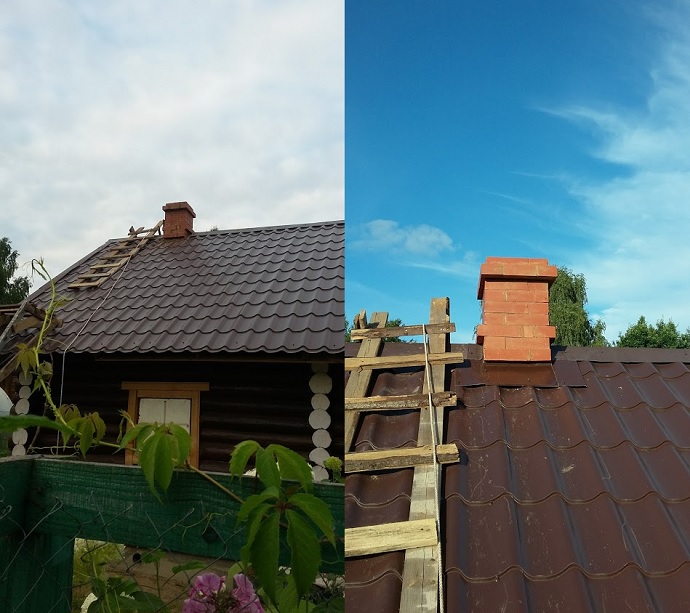
The pipe was cleaned of clay and coated with varnish for exterior work on stone and brick in three layers. Each layer hardens in about four parts at a temperature of +200°C. This produces the effect of a wet stone and seals the pores. The temperature at the top of the stove will be approximately the same as the outside air, if only a little warmer, so the varnish is frost-resistant and can withstand sudden temperature changes. The result was the effect of wet stone and sealing of pores on the brick and seams, which will protect the material from washing out.
The pipes were covered around with material that was left over from making the castings. The approach to the brick is about 1 centimeter under the “otter”. The very first rains showed the effectiveness of the design.
Firstly, clean the oven from clay. Do not use water. This way you will only rub the mortar inside the brick and will not be able to get rid of the stains. If you don’t want to spoil the outer part of the brick, then be patient, use rags and brushes. You can use fine sandpaper.
Secondly, coat the oven with heat-resistant varnish, it is enough to use the composition up to 1500 ° C, you will not heat the screen any more, even if you want.
And thirdly, place an umbrella on the pipe to prevent precipitation from getting inside.
A little trick: to prepare the solution, take rainwater, thereby avoiding salt stains on the bricks when the clay dries.
And, I will be happy to answer all your questions, since the report from the scene is far from complete and you may be interested in some nuances. We’ll help, take photos, show you.
To be continued! (No ratings yet)
The steam room is the central part of the bathhouse, since the quality of bathing procedures, the formation of steam, and the safety of visitors depend on it. That is why, during the construction of a bathhouse, much attention is paid to the steam room project and the owners often do not hire builders, but do everything with their own hands.
Steam room in a bathhouse - general arrangement
The design of the steam room should be quite simple, but at the same time convenient and comfortable for the people who will be steaming in it. The main thing is that it contains required amount shelves and racks.
The stove is the main element of the steam room, since it is it that is designed to provide the necessary temperature and microclimate in the room. Today, any type of stove can be installed in a steam room: brick, stone, metal or electric.
The shelves in the steam room are traditionally made of wooden planks, leaving small gaps for the free flow of water. The wood from which the shelves are installed must not be coniferous. Typically, shelves are attached to the walls of the room so that as much free space as possible remains and can be easily removed after visiting the steam room. Under them there are various bath accessories: buckets, ladles, brooms, etc. The distance from the floor to the shelves should be as high as possible, since the coldest air is located at the bottom. From the ceiling to the top shelf there should be a little more than 1 meter. They can also be folding or retractable.
The steam room must have optimal dimensions so that it can warm up to the required temperature. Experts recommend designing a room area of 2x2.5 meters (height 2.1 meters). This is a convenient and economical steam room device.
The walls of the room must be insulated special material who can long time retain heat and do not release harmful substances into the air. The floor in the steam room is usually made of wooden planks or tiles, which can be easily and quickly washed.
The door to the steam room should be as small as possible, since it is additional source heat loss The best option for installing doors is considered to be near the stove. It should open and close very easily, and also not have any constipation, as it can jam due to high humidity in the room. There are no windows in the steam room, but if they need to be installed, they must be very small and dull. It is recommended to place them as close to the ceiling as possible, where the air is least heated.
A ventilation system is required to remove excess moisture from the room and ensure the entry fresh air. Traditionally, a supply and exhaust system is used for this. The openings for air intake are located near the stove, and the hood is located opposite.
Since there are no windows in the room, then without lighting fixtures it won't work out. Luminaires must be made specifically for wet areas where there is a temperature difference. It should be noted that there is no artificial lighting in the Finnish sauna, as it is created by smoldering coals in the stove.
Preparatory work: determining the optimal size of the room
The design of the steam room must be developed before the construction of the bathhouse begins, since its dimensions may depend on a large number of factors.
When designing, the following indicators are taken into account:
- The maximum number of visitors who will be in the steam room at the same time. According to standards, at least 0.7 2 square meters are required for each person.
- It is necessary to focus on the height of the tallest person in the family. This figure requires about 20 cm. Also, when calculating, it is necessary to take into account the thickness of the insulation, which will “take away” several centimeters. A steam room that is too high will cause additional heat consumption and insufficient heating of the room. Optimal height 2.2–2.4 meters.
- Options for placing people on shelves. If there are benches for sitting in the steam room, it will be possible to make the room more compact. A lying position will require more space. In this case, the dimensions of the steam room should be 20 cm larger than human height.
- Type, power and dimensions of the furnace. It must be installed at a distance of at least 32 cm from all wooden elements structures. If the walls are covered with special fireproof material - at least 26 cm.
Types of steam room stoves
- The metal furnace has a high degree of power, small sizes and is capable of warming up the entire volume of the room as quickly as possible. But since its surface is heated to a high temperature, people in the steam room can accidentally get burned. Therefore, it is best to make a protective fence for it.
- A brick oven takes a long time to heat up, is large in size and retains heat for a long time. It is almost impossible to get burned on such a stove, so it can be placed in close proximity to the shelves.
- An electric stove can only heat a small steam room. Therefore, it is chosen for small rooms.
Material selection
A bathhouse, including a steam room, can be built from brick, natural stone, gas or foam blocks, but good wood is considered the best “bath” material. Usually, planed and rounded logs or beams are used for the steam room. Glued laminated timber, which has maximum degree resistance to moisture. But it is the most expensive of all materials.
The most accessible and convenient to lay, as well as resistant to various kinds deformation is a profiled beam.
It is best to build a steam room from larch, aspen, birch, linden, since these species do not emit resins. But if you still decide to choose pine, then it is best to build only walls from it, and make the interior decoration from non-coniferous wood.
Calculation of the amount of material and necessary tools
To build a bathhouse (steam room) we will need:
- Beam 15x15 for the construction of walls. For the two or three lower crowns we take larch, and for the upper ones we use pine beams.
- Beam 15x10 for the construction of partitions.
- Concrete solution.
- Sand, crushed stone, clay.
- Reinforcement for foundation construction.
- Second-class boards for formwork.
- Waterproofing materials (roofing felt).
- Flat stones.
- Fire brick.
- Insulation (jute or tow).
- The lining is aspen, linden or alder (recommended 12 mm thick for wall cladding and 50 mm for the ceiling).
- Tile.
- Foil or special foil material for heat and vapor barrier.
- Minvata.
- Slate, roofing felt and galvanization.
- Antiseptics.
- Lights, cables, fan, switches and junction boxes.
Tools
- Shovels or small excavator.
- Electric or gasoline saw.
- Concrete vibrator.
- Axes.
- Electric drill.
- Hammers.
- Electric screwdriver.
- Mallet and caulk.
- Construction stapler.
- Rule and level.
DIY steam room - step-by-step instructions for construction and finishing
Once the project is completely drawn up, you can begin laying the foundation and erecting walls.
- Laying the foundation. To do this we need to dig a pit rectangular shape. The depth should reach ½ freezing of the soil. The height above the ground is about 15–20 cm. If there is no base, then raise it by 60 cm. The width of the foundation should be about 10 cm greater than the width of the beam. We install the reinforcement on top onto which we will attach the first crown.
- We make formwork and fill the foundation with concrete and remove bubbles with a vibrator.
- We dig under the sink drain hole 1.8x1.8x1.5 m and fill its walls with concrete.
- We let the foundation stand for about 5–7 days. In the upper part we make holes for ventilation, which are located on opposite walls.
- We make a blind area around the entire foundation (1.2–1.5 meters). To do this, we take clay and mix it with crushed stone. Pour a layer of 5–10 cm.
- Top along the perimeter concrete foundation We lay the roofing material in several layers. It should extend beyond the base by 5 cm.
- To build walls, we can take factory wall kits. Or we can cut the timber ourselves into pieces of the required length. Then cut the necessary grooves and tenons. In the initial row we mark in accordance with the installation of the reinforcement and drill holes Ø25mm.
- We place the first crown on the pins, connect the beams, and seal the connection points.
- We lay the second row, drill holes that will go to ½ the height of the first row. We remove the second row and drive dowels into the holes of the first one one and a half times the height of the beam. Then we fill the next row on them. We connect the crowns with dowels. We insulate the grooves with jute. We leave room for doorways. Thus, we build a bathhouse with a steam room up to a certain height.
- We cut the floor beams into the upper crown, and the lower ends of the rafters into them. We connect the upper ends in a ridge. We take a step between the rafters of about 1–1.2 m, and nail the ridge board and sheathing to them. We lay hydro and vapor barrier on top, and then slate or other roofing material. We provide embedded pipes in advance.
Floor installation instructions
The floor is installed immediately. In the steam room its level should be higher than in other rooms. Let's look at several ways to lay the floor.
- To install a wooden floor, we place logs made of wooden beams on the prepared foundation.
- We nail boards onto them in increments of 5–10 mm. The distance between the floor and the ground should remain at least 50 cm.
- We made holes in the foundation in advance for ventilation.
- Concrete flooring is much stronger and more durable, but it costs much more. In the steam room and washing room we dig a pit (10–15 cm deep) for drainage. We fix the walls with concrete mortar. We put a metal sheathing on top. From the pit, waste water will flow into the sewer drain pipe.
- After the drainage device we make a screed. First, we mark on the walls the points to which the floor level will be raised. We mark down the distance from them for pouring the screed.
- Carefully level the soil, removing a little of the top part.
- Pour sand and crushed stone (30–40 cm), pour water and compact well. We provide a slope towards the drain.
- Pour the first layer of concrete mortar 5 cm.
- After the screed has dried, we roll out roofing material or glass insulation on it.
- We lay 50mm thick thermal insulation material on the waterproofing.
- We lay rigid metal mesh reinforcement.
- Fill the second layer of concrete mortar 10 cm.
- We level the concrete, not forgetting the drainage slope.
- We lay the tiles.
Instructions for vapor barrier and ceiling installation
- We attach water vapor barrier material to the floor beams. To do this, you can use foil, a special foil-coated penoizol or a water vapor barrier membrane. We mount the material with a stapler and 8–12 mm staples. We lay the sheets with an overlap of 20 cm, and reinforce the joints with tape. We wrap them on the walls with a protrusion of 15 cm.
- We screw wooden slats (50x25 mm) to the floor beams in increments of no more than 70 cm. Maintain the level. Before fastening, treat with an antiseptic solution.
- We fasten the lining to the slats with nails or clamps perpendicular to the sheathing.
- We cut grooves in the beams and install fasteners for the chimney in them.
- We cut out an opening on the ceiling for the smoke exhaust pipe.
- We put insulation between the beams in the attic compartment (it is better to take 150–200 mm).
- Lay out on top windproof membrane and secure it with staples.
- We are laying boards on the attic floor.
Instructions for wall insulation
- First, we cut an opening in the wall for installing the stove.
- Since the walls were built from profiled timber, we simply nailed foil onto them and attached a wooden sheathing on top.
- We install lining for it.
Oven installation instructions
- We install the selected stove on a level base. If it is a metal or electric oven, then it is necessary to make a concrete base. A special foundation is made for laying a brick wall.
- We line the stove with bricks, going along the adjacent walls and inside the adjacent partition. We seal the cracks with basalt material. We use refractory bricks to line the stove.
- We attach a metal sheet in the opening on the ceiling to create a chimney outlet. We make an opening in the sheet in advance for the pipe.
- We install a galvanized or stainless steel pipe and a gate on top of the stove. We fasten the tank and release a reinforced chimney with two walls through the ceiling. We make insulation with non-combustible materials.
- We nail an iron sheet on the roof with a hole made for the pipe.
Installation of an electric stove-heater
Installation of a brick kiln

Door installation instructions
At the very end we install the door. It must be closed very tightly so that the heat from the steam room does not escape outside.
- We assemble a pigtail from timber (100x150 mm). We fit the doorway exactly under it.
- On the end parts of the timber in the opening, we cut out a tenon slightly smaller than the dimensions of the groove on the jamb. At the same time, do not forget that we will lay a sealant (tow or jute) between the box and the timber.
- We install the threshold in the opening, and then the remaining parts of the box.
- We fasten the top element of the box so that it is a few centimeters below the door opening. This is necessary so that the beam has free movement during shrinkage. We caulk all the cracks between it and the wall.
- We hang the door and nail the trim with small nails.
- You can also install the door using the second method. To do this, we cut grooves in the opening. We place the bars in them so that their ends do not touch 5–10 cm of the top of the opening. And then we mount the door frame to them.
Instructions for arranging shelves
The number of shelves depends on its size. The standard solution provides three-level shelves, each of which has a height of 35 cm. But you can also make two shelves.
- First we choose the shape of the shelves and assemble their frames. We recommend making it from larch. The shelves can be made rectangular or corner.
- We lay prepared wooden panels on top of the frames.
- We place the boards loosely in increments of about 1 cm. The boards can be made of aspen or linden.
Instructions for ventilation device
There are several ways to install ventilation in a steam room. The choice depends on the size of the room, as well as the convenience for the bathhouse owners. The opening should be at a distance of 25 cm from the floor. Air is removed naturally through the hole on the opposite side.
- We make ventilation ducts in the wall near the stove. The lower one is for air intake, and the upper channel is for ventilation. We install a fan in it.
- Oxygen enters through a small hole behind the stove, which is made 20 cm from the floor. Excretion is carried out through the genital slits. A channel is created next to the building that will draw exhaust air from under the floorboards.
- We drill a 10x10 cm hole in the floor for the flow of cold air. We install the ventilation duct in the wall opposite the stove. We make an exhaust opening under the ceiling. The channel with the valve will be led out to the street through a wall hole.
- If the room has a firebox with a vent, then you need to make a 10x10 cm opening in the floor and cover it with a grate. Air will pass through it and come out of the chimney.
- For ventilation ducts we take pipes made of stainless steel or galvanized.
- Having chosen a ventilation system, we make openings in the walls or floor of the required diameters (but not less than 10 cm).
- We insert ventilation ducts into the openings. We fill the gaps between the wall and the pipe with non-flammable material.
- We install a protective grille outside.
Electrical installation instructions
At the last stage of the steam room installation, we install the electrical wiring.
- We take all switches, sockets and boxes outside the steam room.
- We lay the cables in engineering corrugation on top of the lining.
- In the steam room we protect all wires with skirting boards.
- We protect the lamps with wooden grilles.
Video: how to make a steam room in a bathhouse correctly
Construction and installation of a steam room in a bathhouse is not light work, since it requires certain skills to work with various types materials and tools. But if you do everything efficiently and approach the issue responsibly, then you can make an excellent bathhouse with a steam room on your site, which will serve you and your family for many years and will delight you with its healing steam.


