Do-it-yourself paving of paths in your dacha. Original DIY garden paths - practical tips and unique photo ideas. Flooded garden paths and their advantages
Walking barefoot on asphalt is less pleasant than walking on seashells, polished cobblestones or sun-warmed logs. Road surface, without which a metropolis is unthinkable, is inappropriate in a country estate. Almost every day, the owners walk around its territory without shoes, and the kids generally crawl on all fours.
When gardening, it is important to pay attention not only to high-quality care of fruit plants, but also to remember the general arrangement and appearance of the garden. Do-it-yourself garden paths not only create ease of movement around the property, but are also a special part of general design. In this article we will talk about arranging paths with our own hands.
Garden paths - how to combine beauty and convenience
Country house, private house, a cottage requires not only arrangement of the interior and exterior, but also embellishment of the area around it. Often owners want to combine practicality and aesthetics in one project. You can realize your idea by laying garden paths.
What you need to know and consider during construction
Any design begins with a concept, a thorough study of the area and a plan. The first step is to determine the directions, length, width of future paths, imagine their shape, decoration. Next we need to analyze bearing capacity soil to choose the right type building material and only then plan.

You need to draw up a drawing on paper, there will be an opportunity to correct, redo, supplement. There are several important factors to pay attention to:
- Components must be resistant to aggressiveness environment- high humidity, fungi, corrosion.
- It is good to tolerate temperature fluctuations of different seasons.
- Provide possible increase loads (car, loaded wheelbarrow).
- The optimal angle of inclination of the canvas to avoid the accumulation of water from precipitation.
Advice from landscape designer- on compact areas It is better to lay not straight garden paths, but with wavy bends and turns. This visually expands the space and deepens niches for plants.
Each owner decides what to build a path from independently, based on financial capabilities, needs and fantasies. Every coating needs a base. The ideal option would be a compacted earthen embankment or crushed stone cushion.

The most popular materials for DIY garden paths:
- Natural stone. It looks noble, aesthetically pleasing even with unsmoothed corners.
- Artificial substitute. The grace of nature, faceted by man.
- Clinker bricks will add bright colors to the garden.
- Gravel or large polished pebbles will provide originality.
- Wood is an affordable, simple, but short-lived look. Looks impressive separately and in a composition.
- Decking is garden plastic parquet. New material, resistant to ultraviolet radiation, water, mold, rot.
The decorative effect of the structure largely depends on the methods of laying the blanks. The canvas can be solid, smooth, or consist of separately located elements of different geometric shapes. By laying out a path of large “leaves”, “butterflies”, “flowers”, it is easy to enjoy the comfort and pleasant walk.

Types of garden paths
Everyone who has a dacha, albeit small, but their own personal plot, will think more than once about ways to decorate and transform it. There is not always enough finance to realize ideas and fantasies. Many will ask: “What should we do then?” The answer is quite simple: if you want to improve your garden paths, but you don’t have the money for a landscape designer or expensive components, then you should pay attention to available and more affordable materials.
Useful for arranging garden paths with your own hands various types stones, boards, wood cuts, river pebbles and even lids from plastic bottles. Now a little about each of the options.
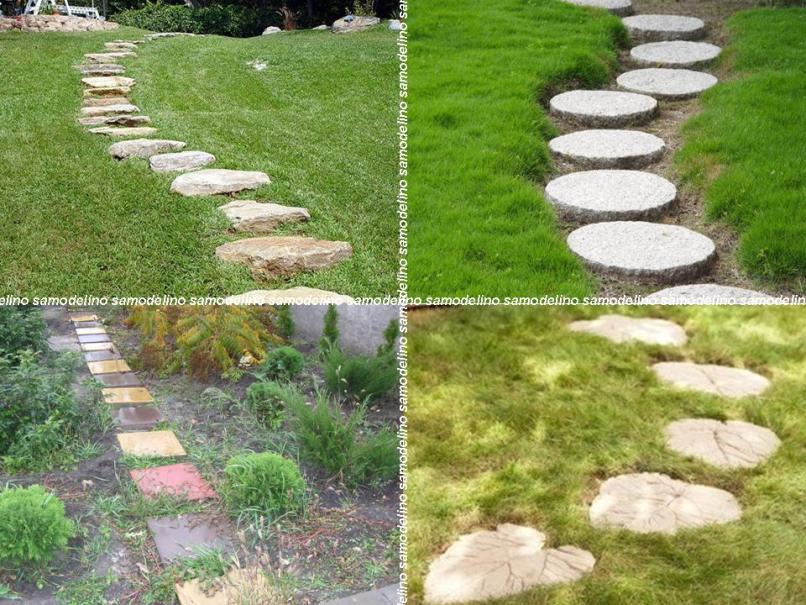
Paths made of natural stone
They fit into any site design. They look natural, and if properly installed they can last for ages.
Such paths look very impressive. If there are stones left after the nearest construction, you can use them. Or those left over after installation will do alpine slide. They have uneven shapes, which makes them ideal for a picturesque path.
 Path made of natural stone
 First you need to calculate the number of pebbles. One of the methods is rough placement of stones. This way you can estimate whether the amount of material you have is enough.

Sprinkle the area for the path with sand and compact it well. It turned out to be a kind of “pillow” for the pebbles. They need to be processed, adjusted to shape, and made more uniform. For good joining and grinding, you can use a grinder or other not very powerful types of tools. Having prepared the stones, they are placed in a mosaic composition.
Since all the stones are different in size, they are adjusted to each other using a rubber hammer. At least one side of the stone must be flat for the path to turn out as it should.

When the mosaic is ready, you need to start sealing the seams between the stones. Otherwise, they will begin to overgrow. Although some may prefer another option, the most natural one: a cement-sand mortar is used for grouting joints.

Concrete paths
They are very similar to stone ones. First make a bed, the depth of which is approximately 10 cm. Then pour sand on the bottom and compact it. Fill the top with a mixture of concrete and sand, install the formwork around the edges. Before the solution hardens, pour pebbles into it. Lay out your intended pattern from it. A drainage system must be installed next to such a path.
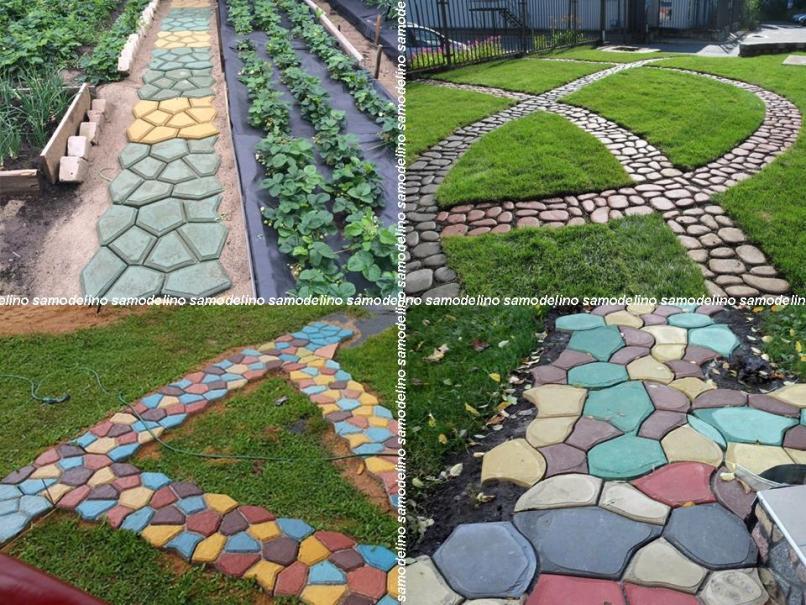
Sometimes a concrete path is made using already ready-made form. It's easy to buy at hardware store. And then just pour the concrete mixture into the mold in the place you need, level it with a trowel, remove the excess and remove the mold. This is a very easy and quick method, and besides, you can lay out this form in at least several rows.
 How to make concrete paths with your own hands using ready-made forms
Wooden paths will last a long time, but at the beginning they require maintenance. They can be laid out from sawn boards or timber, using what remains from the construction of the house.
 Wooden paths
 Prepare boards and blocks; the latter can be replaced with steel corners or pipes. Treat them with protective impregnations or bitumen mastic. After soaking, nail the boards to the blocks. Mount the path on top using hemp of various sizes. Paint them one or more colors.
But in domestic climatic conditions the most modern impregnations will not protect the boards from deformation, rotting and corrosion, therefore, imitation wood - tiles with a corresponding pattern - is often used as a material for paths.
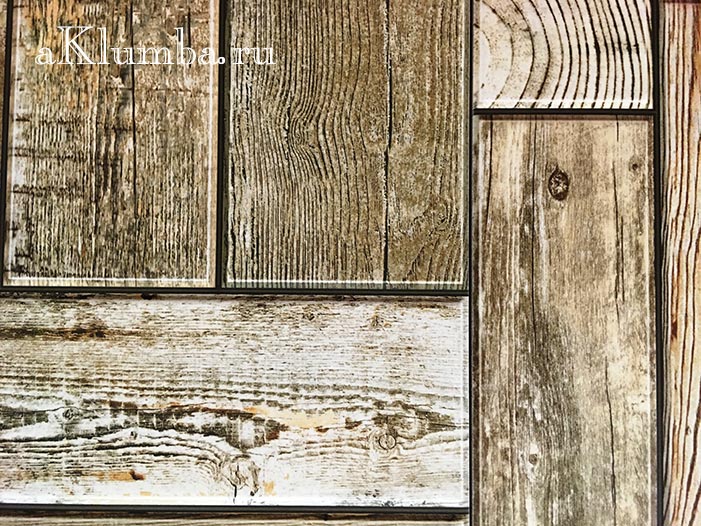
It will be possible to select such perfect samples that no one will detect the difference at a distance. It is felt only after tactile contact. The tiles reliably depict the natural texture of pine, beech, oak and other species in cross-section - as a result, the ersatz is indistinguishable from the original.
DIY gravel garden paths
Gravel is a simple material that has good flowability, allows moisture to pass through, and is relatively cheap. It can be used to make paths of any width and length, and perhaps even give them different shapes. This path looks neat and fits harmoniously into any landscape. Making it yourself will not be difficult.
 DIY gravel garden paths
 The order of execution of the gravel path
- First you will need to mark the path around the area. Marking is carried out with pre-prepared wooden pegs. You can stretch a string between the pegs if you find it difficult to determine the direction by eye.
- Next, according to the markings, prepare the bed. To do this, dig a trench in the ground. The depth of the trench can be about 14 – 17 cm.
- Prepare the gravel. It is advisable, if possible, to view it and remove unwanted impurities (broken glass, sharp large stones, etc.). Handling gravel should be done with thick gloves.
- Backfill gravel to the depth of the trench. You can level it with a rake or your hands (also use gloves).
- Next, the laid gravel is compacted.
- At the end, along the edge of the path you can lay curb stone. This will give an even more impressive and finished look. The stone is secured with a cement foundation. It can be laid either flush with the canvas or slightly above it.
This algorithm is also suitable for constructing a sand garden path. Accordingly, gravel is replaced with sand, and then all work is carried out according to the same scheme.
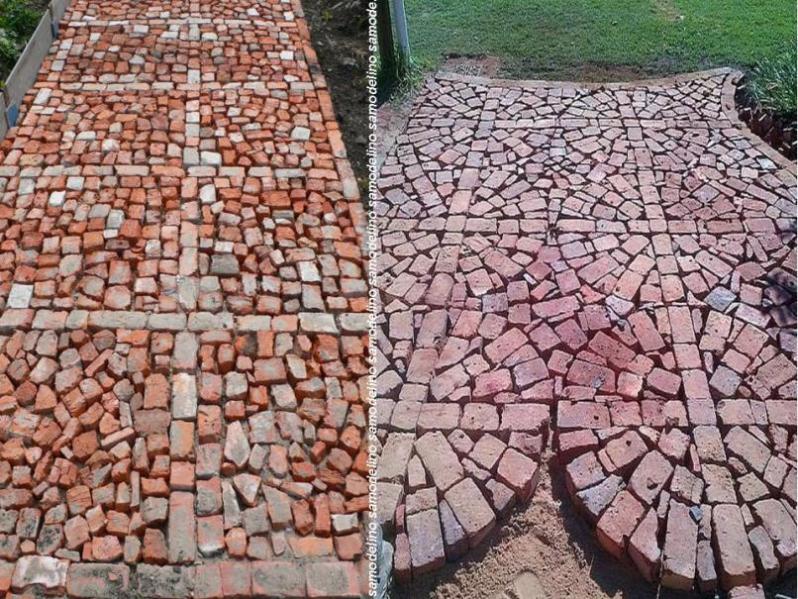
DIY brick garden paths
This is a very fragile type of material. Before laying it is necessary to check for strength. First, mark the path using string and pegs.
Remove the soil (25 cm), place drainage underneath. In this case, it will be simple, but the main thing is that water does not penetrate. It is necessary to pour crushed stone on top of the drainage system. The boards are laid sideways along the edges. Then the brick is laid. You can come up with a wide variety of brick designs.
 Clinker brick path
 A garden path lined with brick chips looks great. It is also permissible to sprinkle it on a concrete path. Beautiful mosaics are made from broken bricks. If the bricks different colors, from them are laid out beautiful patterns. You can leave space between them to fill it with small stones, pebbles or soil, so that later there will be a green island there.
 Homemade path made of brick and stone
 Sandstone path
They are made dry or used cement pouring. This method is similar to laying a stone path, but the first one is more natural and original.

Dig a trench, removing part of the soil. Pour sand in there and compact it. The middle part should be higher than the edges. You need to walk a bit on the slope. This is a dehumidification system. Next comes the processing of the stones.
Sandstone can come in a variety of sizes and shapes. Try on each stone before cutting.
Level the stones, making the gaps as small as possible. The processed stones are laid out as you like. For a classic path you need a bucket of sand and the same amount of mixture with cement. Under each pebble you must first put the first one, then the second one. Moreover, the cement should protrude slightly. You need to press the stone tightly. The completed path must be washed so as not to spoil the aesthetics with cement residues. The seams are filled with soil or sand.
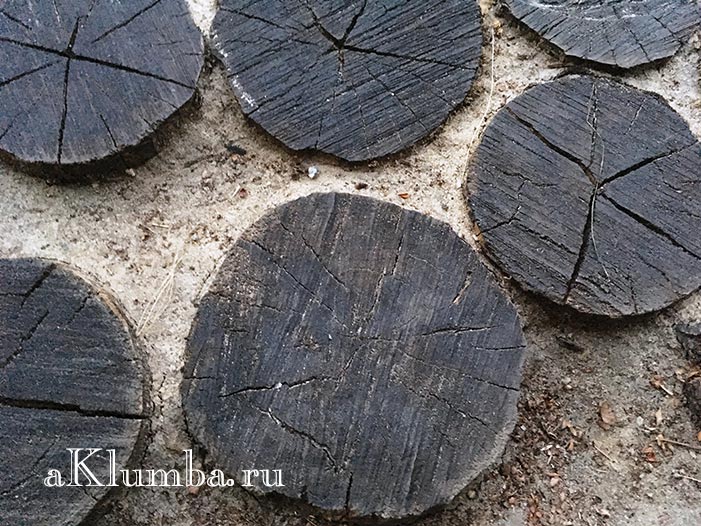
Path made from wood cuts
Such a path will look very beautiful and attractive.
 Path made from wood cuts
 The cuts must be taken of different sizes, laying them so that there is no free space between them. Before laying, round timber must be treated with an antiseptic composition.
 Saw cuts for garden paths
Another option is to use round timber as borders and add a layer of gravel between them.
While staying at the dacha, you want to move away from city life, because all around, if not a forest, then a garden, some lucky ones even have a lake or river. In a word, no matter what the surrounding landscape is, it encourages you to get closer to nature.
An interesting idea is a path stylized as a forest one. It represents fragments of ordinary tree stumps. Round plates different sizes laid along the edge of the pond and concreted.

The side of the artificial pond is made from them. It is pleasant to sit on such stumps to sunbathe; touching your feet with them also gives rise to positive sensations.
Plastic garden paths
Such country paths are sold as ready-made modules. Their installation does not require surface preparation or treatment. They are very simply and quickly attached, very economical, characterized by durability and long service. They can be laid out on any site, in the form of any composition. They are environmentally friendly and aesthetically pleasing.
River pebble paths
Working with these pebbles will be difficult, time-consuming and will not end quickly. They are placed in advance limited space into wet sand and compacted to the required depth. The process takes several days.
 River pebble paths
 It happens that the design of country houses is based on imitation of the styles of past times - the ancient era, British classicism, etc. Then you should choose slabs ornamented in accordance with the general concept of the site and the residential building. They may have impressions of Mediterranean pebbles, ancient bricks, etc.

Paths made from plastic bottle caps
The most original and interesting way- lay out a path or part of it plastic lids from bottles. Due to the fact that the lids have a variety of colors, you can create patterns and mosaics, even creating entire paintings.
The only disadvantage of this improvised material is its collection, because you will need a lot of lids.
Reinforced garden path concrete tiles
Stages of work:

 DIY ready-made garden path made of reinforced concrete tiles
  From lined ceramic tiles mosaic type
  Paving stones, stone path
  The slabs are laid on a layer of sand, and lawn grass is sown in between. Haircut is carried out as usual electric lawn mower. The photo was taken 3 years after installation.
 These are just the basic materials from which you can make country paths with your own hands. Human imagination is limitless, so to the next summer season They'll probably come up with something else. Paths for dachas are made with your own hands from any, sometimes unexpected, material. For example, from glass bottles. You can create combinations from different types material in one composition.


Remember that such paths carry not just convenience and benefit, but also beauty, pleasure for the eyes, and harmony. Imagine, invent, create.

Independently choosing materials for garden paths and the driveway to your dacha can sometimes be difficult. Then you just need to set aside time for a scrupulous study of catalogs or the means to consult with specialists. The result will justify all these costs.
Video master classes


The level of comfort of country life is higher if the space around the country house is properly organized. Paths play a big role in country life. They should be comfortable, durable and beautiful. using improvised or purchased materials.


You need to start landscaping your summer cottage with a drawing. The plan must indicate:
- all outbuildings (garage, parking, toilet, shed, bathhouse, well);
- recreation areas (terrace, gazebo, barbecue area, swimming pool);
- garden.
First, draw paths between the house and outbuildings. They will be in charge. The secondary category includes garden paths, paths to recreation areas, flower gardens, and greenhouses. After the movement paths are plotted on the diagram, you can select materials and paving methods. Photos of paths made from scrap materials will help you make a choice.
By using illustrative examples It’s easier to imagine the shape of the future path and understand the manufacturing technology. Saving on materials is difficult, but possible. Some of the secondary communication routes can be made from scrap materials:
- bricks left after building a house;
- brick pallets;
- used boards;
- felled old trees.
If you have the energy and time, then you can save a decent amount on the services of a company and design all the paths in the garden yourself.
We make budget embankment paths on our own

The easiest way to make artificial paths with your own hands. Inexpensive natural materials can be used as coating:
- pebble;
- crushed stone;
- gravel.
The advantage of bulk coating is its simple manufacturing technology, low cost estimate consumables. With a simple, beautiful gravel path you can make appearance garden plot more attractive. Increases the decorativeness of the border from natural stone or brick.
Stages of work

To ensure that they last for many years, earthen garden paths must be made according to the rules. First take measurements and markings. Use pegs, twine, tape measure. For convenience, mark the places where smooth bends are planned with pieces of an old garden hose.
At the next stage of work, shovels will be required: bayonet and shovel. They need to be removed top layer soil (25-30 cm) - make a shallow trench. Cover its bottom with geofabric. It will prevent weeds from germinating. Place a curb stone along the edges of the trench and pour 10-15 cm of sand at the bottom.
sand cushion tamp down, water with a hose. At the final stage, pour crushed stone, gravel or pebbles in a layer of 10-15 cm. Level the surface with a rake and the coating is ready for use. Caring for it is not burdensome:
- weed removal;
- backfill in areas of subsidence;
- periodic leveling of the surface with a rake.
Use in landscape design


Soft gravel and pebble surfaces work well in flower beds. It is recommended to use boulders, bricks, and low willow fences as a border. Combines well with fine coating fractions clinker brick red and gray natural stone.
In a garden decorated in natural style, soft paths with a surface of fine crushed stone without curbs look natural. They look natural, smoothly bending around trees, shrubs and flower beds.
Comment!
It is not recommended to make paths that are too narrow and winding. They don't look neat and create a feeling of disorder.
Pool, artificial pond on summer cottage not uncommon. You can decorate the area near the pond with pebbles or crushed stone. This brings the visual picture closer to natural nature. Walking barefoot on pebbles is good for health; the small particles massage the soles of your feet.
Disadvantages and advantages

Advantages of bulk garden paths obvious. You can easily make them with your own hands, playing with the shape, width, size of the fractions and color of the bulk layer. They are functional and decorative, ideally protecting shoes from dirt. Rainwater it does not stagnate on them, it quickly goes into the lower layers of the soil.
Disadvantages of soft bulk coatings:
- the inevitable appearance of weeds, the need to combat them;
- in autumn it is difficult to remove fallen leaves;
- In winter, an ice crust may appear on the surface; you cannot chip it off; some of the gravel will be removed along with the ice.
We use available materials for garden paths
The use of available materials allows you to reduce the cost of coatings. Their low cost does not negate the exclusivity and durability of hand-made garden paths.
Budget paths made of wood, bark and grass

Organic mulch(pine bark) is used to create soft garden coverings. It comes in different sizes and colors. The bark creates a dense cover that makes it difficult for weeds to break through. A bulk canvas made of tree bark looks decorative in a garden, flower bed, next to a pond or swimming pool.
If you have boards or pallets at your dacha, you can make a wooden path with your own hands. It is comfortable and pleasant to walk on, it is pleasant for visual and tactile perception. Wood is always a favorite among summer residents. It is valued for its low cost, environmental friendliness, and unique texture. There are impregnations on sale that protect natural material from fungus. A garden path made of treated wood lasts for decades.
The boards can be laid on a sand bed. But they will last longer if used as a base. wooden joists. Multi-tiered wooden structures used in summer cottages located in lowlands and on slopes. With their help, they easily play out the unevenness of the site.
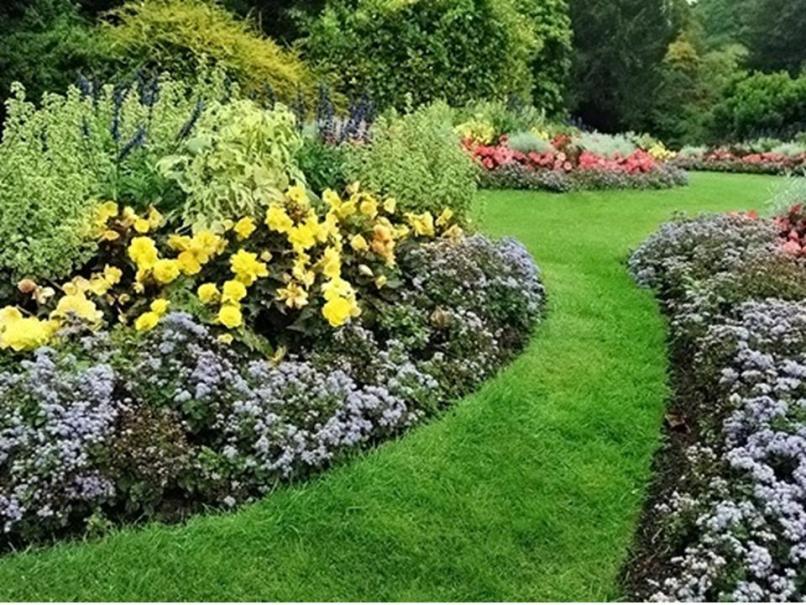
Winding paths in a flower garden can be sown lawn grass. They will resemble a green stream. The grass will have to be cut regularly. Only thick and short will it resemble a carpet. It's nice to walk along such a path. IN middle lane It is recommended to plant:
- meadow bluegrass;
- bentgrass;
- ryegrass
Path made of stumps

Need dry wood logs. Round timber and timber will do rectangular section. It's better if there are cuts different diameters, they make it easier to fill the track area. The masonry is more dense. The logs are first sanded and then sawn.
Comment!
The most durable types of wood are alder, aspen, and oak.
The thickness of the saw cuts is 15-20 cm. They are treated with hot drying oil to prevent rotting. They must be completely dry before installation. Important stage– track markings. Determine its trajectory and width. Mark with pieces of old hose or pegs and twine.
Take out the soil. The depth of the trench is equal to the height of the cut plus 10-15 cm. Its bottom is covered with geotextile, a layer of crushed stone of 7-8 cm and a layer of sand of 10-15 cm are poured on top of it. Each is leveled and compacted. Lay out the cuts. They press them into the sand. The gaps are filled with fine screenings, sand or soil mixed with lawn grass seeds.
Advantages of saw-saw coverings:
- cheap;
- do it simply and not for long;
- easy to repair;
- add natural flavor to garden design.
Such paths can be made in the garden between high beds or in rows of boxes. For borders, you can use the same logs, but make the height of the cuts 2 times larger. Garden paths with such borders look very organic.
Inexpensive and reliable paths from asphalt waste

The cost of asphalt crumbs is 1100 rubles/m³. It can be used to make a cheap but very durable path. The material is loved by summer residents due to its low price. The crumb coating is moisture resistant and durable.
In the marked area, a layer of soil (20-30 cm) is removed and a slight slope is formed for water drainage. The trench is covered with geotextiles. Laying curbs. Fall asleep crumbs. They are compacted with a roller.
Many summer residents prefer to save on asphalt chips. They use broken asphalt and buy it cheap from road workers. Fill the prepared trench with it. The surface is leveled with asphalt chips.
Practical garden paths made from tires

In rainy weather, you don’t want to stir up mud in your garden. Option from the economy category - paths between vegetable beds from tires. Car tires resistant to high and low temperatures. When it rains, their coating is safe for movement, it does not slip and protects shoes from dirt.
From one tire from passenger car You can make a 2 meter strip. For a 2 m path with a width of 0.6 m you need 3 tires. Using this formula you can calculate the required amount of material. Tires must be laid according to the following algorithm:
- Make U-shaped brackets from galvanized wire with a cross-section of 3 mm;
- cut off the sidewalls of the tires, cut each one with a grinder into pieces 30-40 cm long;
- step back 2.5 cm from the edge and drill holes with a diameter of 4 mm, they are needed to connect the pieces of tires into a single sheet;
- insert staples and bend;
- lay the canvas on the prepared, leveled surface.
Bottle paths

Plastic bottles are used to make various devices. Summer residents make durable coverings out of them. Food-grade plastic overwinters well and is not afraid of summer heat. It is tedious to pave a large path with bottles, and decorating small areas will take a little time.
Most It will take time to prepare the trench. It is dug to its full length. The soil is taken out to the height of the bottle + 3-5 cm. The bottom is covered with sand, the layer thickness is 5-10 cm. Each bottle is filled with crushed stone or sand and screwed.
Note!
You can make a beautiful border from glass bottles. Dig a groove, fill it with cement mortar, and place bottles filled with sand.
Place the bottles in the trench upside down close to each other. Using a hammer and a flat board, level them in height. The gaps between the bottles are filled with a dry mixture of sand (6 parts) and cement (1 part). Water the entire surface using a watering can.
Types of garden paths made of natural stone

Natural stone goes well with bulk materials. To create inexpensive, original coating use natural stone and crushed stone. The technology for making bulk paths is standard.
At the owners' place country houses unformatted flat flagstone (sandstone, limestone, slate, dolomite) is popular. Paved and walking garden paths are made from it. Flagstone can be yellow, gray, brown.
Laying is carried out on mortar, dry mixture or sand. The method depends on the type of paving and how the path is used. A flagstone walking path looks great on the lawn. Stones for it are selected with a thickness of 1 to 7 cm. They are laid with a gap of 4-5 cm.
Concrete garden paths

The process of making concrete paths is not complicated. But it takes time and physical strength. You can buy ready-made concrete or mix it yourself from water, cement and sand. At the preparation stage, the path is marked: soil 25 cm thick is removed, the bottom of the trench is leveled.
A cushion 15 cm thick is formed from sand and crushed stone. It is leveled and compacted. Provide a slight slope to one side or an elevation in the center. Reinforcing mesh is laid, formwork made of boards is placed along the edges of the trench, and concrete is poured.
Comment!
IN finished form the concrete covering should rise 2-3 cm above ground level.
It is mixed from 1 part M-500 cement, 3 parts sand and water at the rate of 2.5 liters per kilogram of cement. Crushed stone is added for strength. All concrete work carried out in dry weather at air temperatures above 0 ° C, the surface of the concrete is leveled as a rule. Closed for 7 days plastic film.
If desired, decorate the concrete surface:
- paint acrylic paint;
- use the ironing method;
- a pattern resembling paving stones is applied to the uncured concrete;
- press in pebbles and shells.
Paving slabs for covering paths

The main paths of movement in the country should be non-slip, frost-resistant, and have decorative look. Their strength and durability are prerequisites. Paving slabs are an affordable and popular material. It is used where needed hard surface.
Advantages of paving slabs:
- durability;
- decorativeness;
- withstands high loads;
- comfortable for movement;
- easy to keep clean.
Make paths from . You will need sand, crushed stone and tools:
- tamping;
- shovels;
- level;
- pegs and string;
- mallet (rubber);
- Bulgarian;
- brush (broom).
Note!
The ideal thickness of flagstone for garden coverings is 4 cm.
They make markings, remove the soil, and level the bottom. A cushion is formed from coarse river sand and crushed stone, and curbs are installed along the edges. The pillow is compacted and spilled with water. Start laying the tiles. Be sure to leave gaps (seams) of 3-6 mm. At the end of the work they are filled with sand.
Alternative materials for garden paths
Coverings made of concrete are decorated with various rubbish, which is abundant in the countryside. They use screws, bottle caps, pot lids, broken dishes, old tiles from the bathroom, unnecessary coins, buttons.
They are putting up formwork. Mix the cement mortar and pour it onto the prepared area. All the “good” that was found at the dacha is laid out on top. Carefully press each part into the solution. When it dries, the formwork is removed.
Using plastic stoppers

Multi-colored caps from plastic and glass bottles are used to create beautiful patterns on concrete surfaces. The lids are pre-sorted by size and color. If desired, the motifs of the patterns are made in advance. To make them you need an awl and fishing line.
The awl is heated and holes are made in the side walls of the lids. Using fishing line, multi-colored parts are connected according to the chosen pattern. The garden area is prepared and poured with concrete. The motifs are laid after the concrete surface has set a little, but has not hardened.
How to use broken tiles

Practical summer residents do not throw away old tiles; they use them in arranging their summer cottages. Broken tiles serves as an excellent decoration for garden paths. Small colorful rugs are made from it different corners garden Mark the boundaries, remove 8-10 cm of soil, level and compact the surface.
Install the formwork. A layer of fine crushed stone is poured, poured with concrete, and leveled with a trowel. When the concrete surface begins to set, the shards are laid, creating a unique pattern. Finish the work by sealing the seams. Use putty or liquid solution. You can quickly and inexpensively make an exclusive garden path from waste tiles.
It is difficult to decide which path to make at the dacha - from wood, concrete or natural stone. Each material has its own advantages. The type of paving must be chosen, taking into account the type of soil, the size of the path, and its practical application.
The need for arranging paths at the dacha is unnecessary to prove: without them in bad weather you can’t walk or drive. Of course, I want them to be both reliable and beautiful. It is clear that the paths in the country serve us for a limited time, and a small number of people use them.
In such a situation, there is no point in spending significant amounts of money on garden paths.
Techniques for arranging inexpensive paths
The total length of paths in a country house can reach hundreds of meters. Simple calculations show that a lot of materials are required for their arrangement. Let's look at a few techniques that will help you decide what tracks can be made from cheaply:
- use as few materials as possible;
- use the most budget-friendly components;
- use available means;
- make track elements with your own hands;
- use local materials;
- use cost-effective options and technologies.
We make budget paths on our own

If we talk about standard options, then the most inexpensive garden paths are made from local bulk materials: crushed stone, pebbles, sand and gravel. If you arrange a path in the garden from bulk material correctly, it will turn out not only cheap, but also beautiful.

Cement-based paths will cost slightly more than bulk ones. Economical option can be obtained by arranging a covering only 60cm wide. To reduce costs, instead of crushed stone for preparing concrete, you can use broken brick and local rubble stone.
The method of execution is very interesting. In this case, it is possible to produce inexpensive and at the same time beautiful coatings. Note that constructing a path of this kind requires a lot of time.

Of course, elegant and durable paths in the garden can be made using natural stone. In this case, in order to perform paving inexpensively, thin layers of material should be used.

A great option is to use bulk material in combination with natural stone, concrete, brick and wood. In this way you can make a cheap and original coating. Of course, you will have to work hard with your own hands to implement a non-standard solution. In this case, you can use the technology of making bulk paths.
Another way to reduce the cost of the coating is not to make it continuous, be it concrete, stone or tile. The option is quite acceptable for those places where people do not go very often - a lawn, a flower garden, paths between the beds.
We use available materials for paths in the garden
A radical way to reduce the cost of pedestrian pavement is to use available material at hand. At the same time, it is quite easy to ensure the exclusivity of the path, and if you try, the durability and quality of the pedestrian surface in the garden will not suffer either. You just need to carefully look at what material is available and get acquainted with possible solutions.
Budget paths made of wood, bark and grass

If you have an old, dried tree at your disposal, you can make a wonderful path out of it. Unusable pallets can be disassembled and a covering made of planks can be constructed.
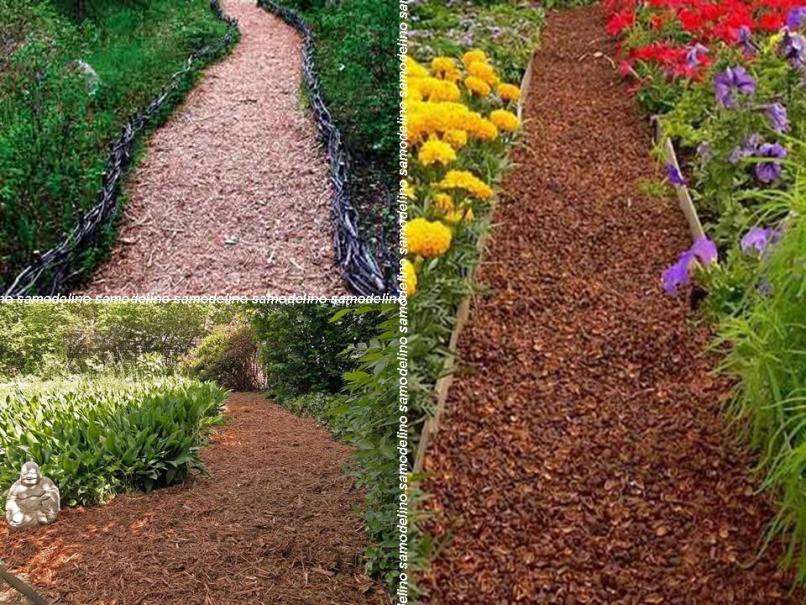
A budget path made of bark laid on flat and compacted ground will last for more than one season. The coating will be more stable if you first prepare a trench 10 cm deep for it and fill it with sand. A miniature fence made of branches will look organic next to the path.
A living grass path looks attractive and is quite inexpensive. It's nice to walk on the lawn barefoot, but if you do it too often, it will quickly lose its charming appearance. It is better to plant the green path with rygas or bluegrass. You can purchase packaged seeds for sports lawn. The grass should be cut, watered, and fertilized.
Inexpensive and reliable paths made from tires and asphalt waste

When repairing asphalt roads, the old surface is often cut off. The resulting crumbs are inexpensive and will last a long time in the yard. The material is poured in an even layer on flat and compacted ground. Then it is heated until softened blowtorch and tamp. The crumbs are held together and a reliable coating is obtained. Of course, it is better to arrange a border near the path.

The most inexpensive tracks for the garden can be made from car tires. The resistance of car tires to moisture, sun and frost is beyond doubt. The coating does not become slippery when it rains.
A car tire produces a strip 2 meters long. This means that for a covering about 60cm wide and 2m long, you will need three old tires. Let's stock up required quantity tires and proceed according to the following plan:
- We level and compact the soil surface under the future path.
- We cut off the sidewalls of the tires with a jigsaw.
- We cut the tire tread crosswise every 30-40cm. It is better to use a grinder, since the wire cord of a tire is difficult to saw with a jigsaw.
- We prepare U-shaped staples measuring 50x25mm from wire. Best option– galvanized wire with a diameter of 3 mm, coated with PVC, which can be cut from a suitable mesh.
- We place adjacent fragments of the coating on the board and drill holes in the tread with a diameter of 4 mm for staples. They are placed 25mm from the edges of the rubber opposite each other.
- We insert the staples into the holes and bend them from the back.
- Assembling the track required length and put it in place. Elements of the canvas can be painted in different colors.
An economical option for paths made from bottles, plastic caps and broken tiles

Plastic and glass bottles are free materials for arranging paths. This type of coating has the following features:
- drink containers are not afraid of frost, sun, moisture and serve for a long time;
- ridges on the bottom of the bottles provide foot massage;
- the track has original look;
- When it rains, the surface becomes slippery.
A path of plastic and glass bottles can be built according to the following scheme:
- At the site of the coating, they dig a trench slightly deeper than the height of the bottles.
- The bottom of the groove is leveled and covered with a 5-10cm layer of sand.
- Plastic bottles are filled with sand or crushed stone.
- The container is placed upside down at the bottom of the trench. A board is laid on top, which is tapped with a hammer to level the sheet of bottles.
- A mixture of cement and dry sand is prepared in a ratio of 1:6. The composition is poured into the gaps between the bottles until completely filled.
- The path is moistened using a garden watering can.
As follows from the photo, glass bottles can also be used to create a border for a path. To install such a fence, a ditch is dug under it, sand is poured in and compacted. The bottles are placed on a cement mortar prepared in a ratio of 1:3.
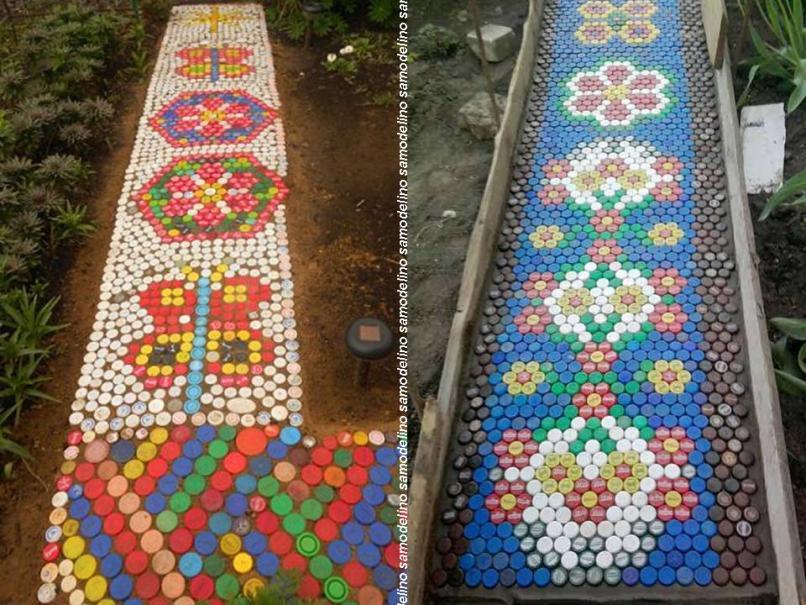
The colorful fabric of the path can be arranged using caps from plastic bottles. Paths made from traffic jams do not fade and are not afraid of the influence of the atmosphere. However, when it rains, the covers can become slippery.
The plugs are placed in the hardening solution of the cement path. Then the coating is leveled by tapping the board laid on the coating. To simplify installation, fragments of the cork mosaic can be pre-fastened with fishing line through the holes in the sides of the lids.

It’s easy to decorate homemade cement-based country paths using mosaics made from broken tiles. Such material is sufficient after completion construction work. Broken tiles can also be purchased very cheaply at the appropriate store.
It is more convenient to use tiles of approximately the same thickness.
In the simplest case, to obtain a mosaic, pieces of broken tiles are pressed into the hardening solution and leveled by tapping on a board laid on top. To create a beautiful and large canvas, mosaic tiles are laid with your own hands according to the following scheme:

We looked at examples and methods of arranging inexpensive, convenient and beautiful paths on the site. In most cases it is necessary to provide them
The level of comfort of country life is higher if the space around the country house is properly organized. Paths play a big role in country life. They should be comfortable, durable and beautiful. You can make them yourself using improvised or purchased materials.
Options for inexpensive garden paths

You need to start landscaping your summer cottage with a drawing. The plan must indicate:
- all outbuildings (garage, parking, toilet, shed, bathhouse, well);
- recreation areas (terrace, gazebo, barbecue area, swimming pool);
- garden.
First, draw paths between the house and outbuildings. They will be in charge. The secondary category includes garden paths, paths to recreation areas, flower gardens, and greenhouses. After the movement paths are plotted on the diagram, you can select materials and paving methods.
With the help of visual examples, it is easier to imagine the shape of the future path and understand the manufacturing technology. Saving on materials is difficult, but possible. Some of the secondary communication routes can be made from scrap materials:
- bricks left after building a house;
- brick pallets;
- used boards;
- felled old trees.
If you have the energy and time, then you can save a decent amount on the services of a company and design all the paths in the garden yourself.
We make budget embankment paths on our own

The easiest way to make artificial paths with your own hands. Inexpensive natural materials can be used as coating:
- pebble;
- crushed stone;
- gravel.
The advantage of bulk coating is its simple manufacturing technology and low cost of consumables. A simple, beautiful gravel path can make your garden look more attractive. A border made of natural stone or brick increases the decorative effect.
Stages of work

To ensure that they last for many years, earthen garden paths must be made according to the rules. First take measurements and markings. Use pegs, twine, tape measure. For convenience, mark the places where smooth bends are planned with pieces of an old garden hose.
At the next stage of work, shovels will be required: bayonet and shovel. They need to remove the top layer of soil (25-30 cm) - make a shallow trench. Cover its bottom with geofabric. It will prevent weeds from germinating. Place a curb stone along the edges of the trench and pour 10-15 cm of sand at the bottom.
Compact the sand cushion and pour water from a hose. At the final stage, pour crushed stone, gravel or pebbles in a layer of 10-15 cm. Level the surface with a rake and the coating is ready for use. Caring for it is not burdensome:
- weed removal;
- backfill in areas of subsidence;
- periodic leveling of the surface with a rake.
Use in landscape design


Soft gravel and pebble surfaces work well in flower beds. It is recommended to use boulders, bricks, and low willow fences as a border. Red clinker bricks and gray natural stone go well with the fine fraction of the coating.
In a garden designed in a natural style, soft paths with a surface of fine crushed stone without borders look natural. They look natural, smoothly bending around trees, shrubs and flower beds.
Comment!
It is not recommended to make paths that are too narrow and winding. They don't look neat and create a feeling of disorder.
A swimming pool or artificial pond on a summer cottage is not uncommon. You can decorate the area near the pond with pebbles or crushed stone. This brings the visual picture closer to natural nature. Walking barefoot on pebbles is good for health; the small particles massage the soles of your feet.

The advantages of artificial garden paths are obvious. You can easily make them with your own hands, playing with the shape, width, size of the fractions and color of the bulk layer. They are functional and decorative, ideally protecting shoes from dirt. Rainwater does not stagnate on them; it quickly goes into the lower layers of the soil.
Disadvantages of soft bulk coatings:
- the inevitable appearance of weeds, the need to combat them;
- in autumn it is difficult to remove fallen leaves;
- In winter, an ice crust may appear on the surface; you cannot chip it off; some of the gravel will be removed along with the ice.
We use available materials for garden paths
The use of available materials allows you to reduce the cost of coatings. Their low cost does not negate the exclusivity and durability of hand-made garden paths.
Budget paths made of wood, bark and grass

Organic mulch (pine bark) is used to create soft garden coverings. It comes in different sizes and colors. The bark creates a dense cover that makes it difficult for weeds to break through. A bulk canvas made of tree bark looks decorative in a garden, flower bed, next to a pond or swimming pool.
If you have boards or pallets at your dacha, you can make a wooden path with your own hands. It is comfortable and pleasant to walk on, it is pleasant for visual and tactile perception. Wood is always a favorite among summer residents. It is valued for its low cost, environmental friendliness, and unique texture. There are impregnations on sale that protect natural materials from fungus. A garden path made of treated wood lasts for decades.
The boards can be laid on a sand bed. But they will last longer if you use wooden logs as a base. Multi-tiered wooden structures are used in summer cottages located in lowlands and on slopes. With their help, they easily play out the unevenness of the site.
In a flower garden, winding paths can be sowed with lawn grass. They will resemble a green stream. The grass will have to be cut regularly. Only thick and short will it resemble a carpet. It's nice to walk along such a path. In the middle zone it is recommended to plant:
- meadow bluegrass;
- bentgrass;
- ryegrass
Path made of stumps

Need dry wood logs. Round timber and rectangular timber are suitable. It is better if the cuts are of different diameters; it is easier to fill the area of the path with them. The masonry is more dense. The logs are first sanded and then sawn.
Comment!
The most durable types of wood are alder, aspen, and oak.
The thickness of the saw cuts is 15-20 cm. They are treated with hot drying oil to prevent rotting. They must be completely dry before installation. An important step is marking the path. Determine its trajectory and width. Mark with pieces of old hose or pegs and twine.
Take out the soil. The depth of the trench is equal to the height of the cut plus 10-15 cm. Its bottom is covered with geotextile, a layer of crushed stone of 7-8 cm and a layer of sand of 10-15 cm are poured on top of it. Each is leveled and compacted. Lay out the cuts. They press them into the sand. The gaps are filled with fine screenings, sand or soil mixed with lawn grass seeds.
Advantages of saw-saw coverings:
- cheap;
- do it simply and not for long;
- easy to repair;
- add natural flavor to garden design.
Such paths can be made in the garden between high beds or ridge boxes. For borders, you can use the same logs, but make the height of the cuts 2 times larger. Garden paths with such borders look very organic.
Inexpensive and reliable paths from asphalt waste

The cost of asphalt crumbs is 1100 rubles/m³. It can be used to make a cheap but very durable path. The material is loved by summer residents due to its low price. The crumb coating is moisture resistant and durable.
In the marked area, a layer of soil (20-30 cm) is removed and a slight slope is formed for water drainage. The trench is covered with geotextiles. Laying curbs. Fall asleep crumbs. They are compacted with a roller.
Many summer residents prefer to save on asphalt chips. They use broken asphalt and buy it cheap from road workers. Fill the prepared trench with it. The surface is leveled with asphalt chips.
Practical garden paths made from tires

In rainy weather, you don’t want to stir up mud in your garden. An option from the economy category - paths between vegetable beds made of tires. Car tires are resistant to high and low temperatures. When it rains, their coating is safe for movement, it does not slip and protects shoes from dirt.
You can make a 2-meter strip from one passenger car tire. For a 2 m path with a width of 0.6 m you need 3 tires. Using this formula you can calculate the required amount of material. Tires must be laid according to the following algorithm:
- Make U-shaped brackets from galvanized wire with a cross-section of 3 mm;
- cut off the sidewalls of the tires, cut each one with a grinder into pieces 30-40 cm long;
- step back 2.5 cm from the edge and drill holes with a diameter of 4 mm, they are needed to connect the pieces of tires into a single sheet;
- insert staples and bend;
- lay the canvas on the prepared, leveled surface.
Bottle paths

Plastic bottles are used to make various devices. Summer residents make durable coverings out of them. Food-grade plastic overwinters well and is not afraid of summer heat. It is tedious to pave a large path with bottles, and decorating small areas will take a little time.
Most of the time will be spent preparing the trench. It is dug to its full length. The soil is taken out to the height of the bottle + 3-5 cm. The bottom is covered with sand, the layer thickness is 5-10 cm. Each bottle is filled with crushed stone or sand and screwed.
Note!
You can make a beautiful border from glass bottles. Dig a groove, fill it with cement mortar, and place bottles filled with sand.
Place the bottles in the trench upside down close to each other. Using a hammer and a flat board, level them in height. The gaps between the bottles are filled with a dry mixture of sand (6 parts) and cement (1 part). Water the entire surface using a watering can.
Types of garden paths made of natural stone

Natural stone goes well with bulk materials. To create an inexpensive, original coating, natural stone and crushed stone are used. The technology for making bulk paths is standard.
Unformatted flat flagstone (sandstone, limestone, slate, dolomite) is popular among owners of country houses. Paved and walking garden paths are made from it. Flagstone can be yellow, gray, brown.
Laying is carried out on mortar, dry mixture or sand. The method depends on the type of paving and how the path is used. A flagstone walking path looks great on the lawn. Stones for it are selected with a thickness of 1 to 7 cm. They are laid with a gap of 4-5 cm.

Concrete garden paths

The process of making concrete paths is not complicated. But it requires time and physical strength. You can buy ready-made concrete or mix it yourself from water, cement and sand. At the preparation stage, the path is marked: soil 25 cm thick is removed, the bottom of the trench is leveled.
A cushion 15 cm thick is formed from sand and crushed stone. It is leveled and compacted. Provide a slight slope to one side or an elevation in the center. Reinforcing mesh is laid, formwork made of boards is placed along the edges of the trench, and concrete is poured.
Comment!
When finished, the concrete coating should rise 2-3 cm above ground level.
It is mixed from 1 part M-500 cement, 3 parts sand and water at the rate of 2.5 liters per kilogram of cement. Crushed stone is added for strength. All concrete work is carried out in dry weather at air temperatures above 0 ° C, the concrete surface is leveled as a rule. Cover with plastic wrap for 7 days.
If desired, decorate the concrete surface:
- painted with acrylic paint;
- use the ironing method;
- a pattern resembling paving stones is applied to the uncured concrete;
- press in pebbles and shells.
Paving slabs for covering paths

The main paths of movement in the country should be non-slip, frost-resistant, and have a decorative appearance. Their strength and durability are a must. Paving slabs are an affordable and popular material. It is used where a hard coating is needed.
Advantages of paving slabs:
- durability;
- decorativeness;
- withstands high loads;
- comfortable for movement;
- easy to keep clean.
You can make paths from paving slabs on your own. You will need sand, crushed stone and tools:
- tamping;
- shovels;
- level;
- pegs and string;
- mallet (rubber);
- Bulgarian;
- brush (broom).
Note!
The ideal thickness of flagstone for garden coverings is 4 cm.
They make markings, remove the soil, and level the bottom. A cushion is formed from coarse river sand and crushed stone, and curbs are installed along the edges. The pillow is compacted and spilled with water. Start laying the tiles. Be sure to leave gaps (seams) of 3-6 mm. At the end of the work they are filled with sand.
Alternative materials for garden paths
Coverings made of concrete are decorated with various rubbish, which is abundant in the countryside. They use screws, bottle caps, pot lids, broken dishes, old tiles from the bathroom, unwanted coins, and buttons.
They are putting up formwork. Mix the cement mortar and pour it onto the prepared area. All the “good” that was found at the dacha is laid out on top. Carefully press each part into the solution. When it dries, the formwork is removed.
Using plastic stoppers

Multi-colored caps from plastic and glass bottles are used to create beautiful patterns on concrete surfaces. The lids are pre-sorted by size and color. If desired, the motifs of the patterns are made in advance. To make them you need an awl and fishing line.
The awl is heated and holes are made in the side walls of the lids. Using fishing line, multi-colored parts are connected according to the chosen pattern. The garden area is prepared and poured with concrete. The motifs are laid after the concrete surface has set a little, but has not hardened.
How to use broken tiles

Practical summer residents do not throw away old tiles; they use them in arranging their summer cottages. Broken tiles serve as an excellent decoration for garden paths. Small colorful rugs are made from it in different parts of the garden. Mark the boundaries, remove 8-10 cm of soil, level and compact the surface.
Install the formwork. A layer of fine crushed stone is poured, poured with concrete, and leveled with a trowel. When the concrete surface begins to set, the shards are laid, creating a unique pattern. Finish the work by sealing the seams. Use putty or liquid solution. You can quickly and inexpensively make an exclusive garden path from waste tiles.
It is difficult to decide which path to make at the dacha - from wood, concrete or natural stone. Each material has its own advantages. The type of paving must be chosen, taking into account the type of soil, the size of the path, and its practical application.
May 1, 2019 Olga
Arrangement of garden paths is necessary for cleanliness, comfort and convenience on the site. Paths are needed not only for functionality, but also for decoration in landscape design and green areas.
To create paths it is not necessary to hire specialists; the work can be carried out using own strength, while reducing financial costs.
Country path project
Before they begin work on designing garden paths, they begin to plan the site.
- When creating a plan, the most passable places are taken into account and marked.
- Next, the width of future paths is determined and markings are applied to the area.
Country paths should be easy to use. The thickness and shape can be made in any variant, it depends on individual preferences.
The main point in the arrangement will be the choice of material.. It directly depends on the composition of the soil, climate, and personal wishes.
Advice! When planning a site, the area of the main and auxiliary paths is first determined. Are taken into account important criteria: entrance to the site, outbuildings, watering area, rest area, passage between flower beds.
Material selection
After planning the site, the question arises: is it cheap?
Let's consider the main types of materials that are most often used when arranging country paths.
Tree
Traditional material, harmonizes well with the lawn and flower beds. Wooden walkways are environmentally friendly and safe. You can easily install them yourself.

Wood is exposed to aggressive environments, so to extend its service life the material is pre-treated chemicals, protecting against moisture penetration and the formation of dampness.
Wooden paths are used only in dry areas.
Natural material is not cheap, so to save money, remnants of saw cuts or bars are used in arranging paths.
Winding paths look good from ordinary stumps. The prepared sections are laid directly on the ground, leaving a small distance between them.

Wooden plank paths look impressive on a green lawn. The edges of the path are trimmed with wooden blocks, or left without decoration at all. Wooden boards if desired, combine with small pebbles.

Such budget paths look no less attractive.
This video explains in detail how to make a garden path from old logs:
Concrete
Concrete paths are easy to make yourself, which will significantly reduce construction costs. Your own work will not be in vain, because such paths will last a long time. Concrete paths are made of any shape and size.
The advantages are:
- low cost;
- ease of installation;
- durability;
- resistance to precipitation;
- inability to germinate grass.
An interesting option for execution are special shapes that give an original look. concrete pavement. Budget option You will purchase one plastic mold, with which you can arrange a small area of the path.

Arranging long paths with one shape will turn into a labor-intensive process.
Advice! The lack of clear lines will help you get away from boring design. When creating paths, you can use curved lines and rounded bases. This process will be more difficult, but the result will be much more beautiful and interesting. .
Watch a useful video on how to make a concrete path using a plastic mold:
Bulk materials
Using bulk materials, you can create attractive and functional paths in your summer cottage. The advantages of this type of material include:
- low cost;
- no need to prepare the foundation for the construction of trails;
- possibility of making it yourself;
- wide range;
- the opportunity to implement creative ideas.
The following materials are used as bulk material for arranging paths in the garden: pebbles, crushed stone, gravel, slate.


Natural stones differ in structure, fraction size, and color.


Bulk material combines well with natural stone and a tree.
Look at the video, the technology for constructing a garden path from decorative granite screenings with granite paving stones edging:
Paving slabs
Another type of material for arrangement country paths. Today, paving slabs are especially popular when arranging summer cottages. The high demand for the material is due to its high strength, durability, and aesthetics.

Save on manufacturing sidewalk paths V own garden It will help to carry out independent work.

Each tile has its own size, pattern and color. The material is selected according to the general design of the site. For a beginner, it’s better to avoid complex geometric designs, but lay them out evenly paving slabs It's quite possible to do it on your own.
Video on the topic, technology for laying paving slabs:
Natural stone
Stone paths are considered the most durable and durable. They are perfect for areas where increased strength of paths is needed.

Natural stone is laid on sandy base, either to the ground in the form of smooth paths or chaotically disintegrating areas. Natural material combines perfectly with other types of road surface finishes.
You can not only make garden paths from natural stone, but also create landscape designs.

The only disadvantage of this material is the formation of ice on the surface of the stone path in winter period time. The technology for laying natural stone with your own hands is simple and does not require special skills.
Advice! The use of homogeneous materials in the arrangement of the facade of the house and garden paths will add laconicism and harmony to the exterior.
Look interesting video, the process of creating a garden path from ordinary stone:
Making paths with your own hands from scrap materials
Many summer residents are wondering: how to lay out paths without experiencing serious financial losses? For this suitable use scrap materials.
Rubber tire resistant to external natural phenomena, so it is perfect for arranging paths in the garden.

The material can be easily purchased at a tire shop for free.
Car tires are prepared for further installation in place of the future track: the edges are cut off and the straight part is straightened. There is no need to prepare the base; the tire is laid directly on the ground.
This video shows how to make garden paths from old car tires:
You can find a lot in nature useful material, which can become a covering for garden paths. For example, coniferous forest rich in tree bark.
This natural material looks great in the landscape design of the site, and installing it yourself will not be difficult.

Tree bark is durable and perfectly permeable to moisture. The technology for laying bark is simple - just prepare a trench, pour a layer of sand and fill the space with bark to a height of at least 10 cm.

Advice! When arranging paths, it will not be superfluous to design borders. They will help hide flaws and add completeness to the road design.
Conclusion
In order to do it yourself at the dacha, you do not need knowledge in the field of construction or architecture. The main thing is to follow the advice, choose the right material, and fulfill all the conditions for preparing for work.
The paths in the country between the beds are arranged according to the same principle as indicated above in the article.
Budget options for designing country paths can look very interesting and laconic. With a little effort and imagination, you can create a beautiful garden alley on your site without experiencing large financial losses.