How to make a canopy over a porch (canopy) from metal with your own hands - we study in order. How to make a canopy over the porch (61 photos): creating a beautiful entrance to the house How to build a canopy over the porch with your own hands
In order not to get wet in the rain and not languish in the sun while you open the front doors, you need some kind of protection. Usually they make a canopy over the porch or just over the door. In some cases, the canopy may also cover steps and even a path or part of it. How to do similar design, from what materials we’ll talk further.
Species and types
If we talk about the structure as a whole, the canopy or canopy over the porch consists of a frame and roofing material(facing). There may also be support posts that support the outer edge of the canopy. They are an optional element. They are needed when there is no confidence that the structure without additional supports will be able to retain precipitation.
Precipitation generally means snow. In regions with big amount snow, you can either make the slope of the canopy steep so that the snow melts quickly, or install additional supports. You can do both, as is usually done - the margin of reliability/strength reassures and instills confidence.
Frame and stand materials
The frame and supports of the canopy over the front door are made from:

Most popular in Lately material for making the frame of the canopy over the porch - profiled pipe. At equal sizes and wall thickness with round pipe(if we compare the diagonal and diameter), the profile has greater rigidity. Moreover, it comes in a variety of sections - a square and a rectangle with different sides, it can be bent into arcs, it is easier to weld and attach to walls, it goes well with elements of traditional or cold forging, durability is the same as other steel products. In general, it is the profiled pipe that is in favor today.
What is the lining of the canopy over the porch made of?
If we talk about materials for cladding the canopy over the porch, there is a very wide choice. Very often the canopy over the entrance to the house is made of the same material as the roof. And this is correct, since in this case the result is a harmonious design of the house. With this solution, any roofing material is used:
The second option is to use the material that is used in the fence. In this case, both the design style and decorative elements should be recognizable. This will create a single ensemble with the site. Here the materials can be like this:
- slate (usually flat, but not a fact);
- corrugated sheeting;
- polycarbonate;
- wooden plank.
And the third option for designing a canopy over the porch is to install a canopy that is “neutral” in style and material. This may include:
Glass is used less often. It is necessary to use reinforced types such as triplex, and not only are they expensive, they also weigh heavily, so additional suspensions or powerful support columns are definitely required. And if you consider that sheet polycarbonate or plastic is not much different in appearance from glass, it becomes clear why glass is unpopular.
Shapes of canopies
There are more than a dozen forms of canopies over the front door. The easiest to make - lean-to canopy. Requires a minimum of effort and materials, and can look very good. The downside is that when the snow melts, a snowdrift will end up in front of your door and will urgently need to be removed. Other models with slopes tilted forward suffer from the same “disease”. This great options for regions with little snow in winters, but with hot sun - not quite for our latitudes. Although, if you are not afraid of the need urgent cleaning snow, you can do any of the options.

It’s a little more difficult to make a gable canopy (which is the house) and simple arch. They are good because the melted snow ends up on the sides of the entrance and, even if there is a large amount of it, there is no need to urgently remove it. So for regions with a lot of snow, these are the best models.
How to connect the canopy over the porch and the wall of the house
One of the most difficult moments is to join the covering of the canopy over the porch so that water does not flow down the wall. Usually, standard methods of joining the roof are used - using a bumper strip. This method is suitable for any roofing material, as well as sheet metal and wood. You just need to choose the right color. There are two approaches: to match the wall or to match the roofing covering visor The options are equal, so it’s up to you to decide/choose.

A groove (5-7 mm deep) is made under the bumper strip in the wall. The edge of the plank is inserted into the recess, secured, and the seam is sealed with moisture-resistant sealant for external use. The other edge of the strip rests on the roofing material. When water runs down the wall, it flows onto the plank, from it, bypassing the joint, onto the roofing material and further into or directly onto the ground - depending on how it’s done.
If you use metal tiles, sellers have a special wall profile. It can also be used with other materials - it is important to choose the color. The standard unit includes rubber seals, which are placed a couple of centimeters from the outer edge. In this case, during strong winds, water and debris do not fall under the bar.

If the canopy over the front door and porch is made of polycarbonate, glass or sheet plastic, the method described above is unacceptable - it looks too rough. In this case there are two options:

Others good options No. You can only combine both proposed ones for reliability.
How to fix if the wall is multi-layered
Recently, more and more buildings have multi-layered external walls - ventilated facades, insulation... The load-bearing part of the wall turns out to be covered with a couple of layers of materials, the load-bearing capacity of which is only enough to hold its own weight. You won't be able to attach anything to them. The entire load must fall on the load-bearing wall.

Even if the outer layer is a finishing brick, it costs nothing to attach to it. Masonry is usually carried out in half a brick. So it only looks durable on the outside. Even the smallest and lightest canopy cannot support the weight, and the supporting columns do not help either.
Therefore, with any multi-layer wall, holes are made in all finishing/insulating layers, and the structural elements are attached to the load-bearing wall.
Single-pitch canopy: design features
An inclined or straight single-pitched canopy is the simplest thing that can be. We rarely see straight ones - they are not very functional, but there are quite a lot of single-slope inclined ones.
The inclined single-pitch canopy is based on a right-angled triangle. A right angle is adjacent to the wall, and the length of the sides depends on the desired slope.

In the very simple case, you can weld three identical triangles from a profiled pipe (as in the figure above), make holes in them for fasteners (at least three). These three elements can be combined into a single whole using sheathing for roofing material - as in the figure. Or you can weld cross members from the same pipe (but of a smaller cross-section) or a strip or corner. This option - with a metal jumper - is more suitable for a canopy over a porch made of polycarbonate or plastic. It is also good for metal sheets - it will be convenient to weld it or screw in self-tapping screws.

There is also an option with a variable tilt angle. This is a rectangular frame with sheathing lintels to which lightweight roofing material is attached. This frame is attached above the entrance using a wall beam fixed to the wall (we described how to make the connection above).

Depending on the required angle of inclination, struts are made. They can be made of metal or wood. Fixed to the frame.
If desired, this option can be made with an adjustable tilt angle. Make the fastening of the frame and struts to the wall movable (on hinges, for example), make several holes in the frame. By rearranging the struts in different holes, you can get different angle tilt This feature is not very relevant for doors - except for glass ones - to block out too bright sun, but for windows it can be useful.
Gable canopy frame
There are at least two ways to assemble a canopy with two slopes: from two or more (depending on the length of the canopy) triangular rafters or from two rectangular frames with sheathing, secured with crossbars. The second option is shown in the figure below, and the first will be a little further.

A canopy with a house is one of the popular options
Method one
Two quadrangles are assembled from timber or thick boards, which are connected by a ridge board. The angle of inclination of the slopes is set by cuts on the ridge, fixed by crossbars - a spacer bar. Since the roofing material is laid from the ridge down, the sheathing strips are laid in the opposite direction. A continuous flooring is required under soft tiles. It could be moisture resistant plywood or .

Also, brackets are assembled on the ground - stops that will transfer the load from the visor to large area walls. It is better to assemble the structure on the ground (without fastening the roofing material). In order to lift and secure the canopy, assistants or the services of a manipulator will be required.
Method two
The second option is the assembly of individual rafter structures. Maybe this option will seem easier to you - all gable roofs are assembled according to this principle.

Here, too, a frame is assembled from timber and brackets are needed. But the frame lies in horizontal plane, leaning on the brackets. Two or three triangles are assembled from rafters, which rest on a ridge beam, and it rests on a post, the other end of which is fixed to the frame. It turns out a mini-model of a conventional rafter system.
To improve the appearance, bevels are placed near the counter. In the photo above they are curved, but this is far from necessary. You can simply make it from timber, sawing it at the desired angle. It is also better to assemble the system on the ground - it will not be possible to connect it smoothly at a height.
Made of metal
If the canopy frame is made of a metal pipe, everything is much simpler. The pipe has a large load-bearing capacity, so the supporting and auxiliary elements much less.
Two identical triangles are cooked - according to the size of the future canopy. They are connected by jumpers, the length of which is determined by the “depth” of the visor. To prevent the cladding from bending, additional crossbars are welded.

The finished canopy structure is complemented by brackets - stops. In the picture above, the canopy over the porch has only a stop without slopes. For regions with little snow in winter, this is enough, but to hold a significant mass of snow, you will need a mow or stand. Or maybe both (as in the diagram below).

Decorative elements are an optional part. There may be an ordinary triangle here.
Arched canopy over the porch: manufacturing features
A canopy over the front door in the form of an arch cannot be called difficult to manufacture. It is more convenient to make this shape from a steel pipe, moreover from a profile, rectangular section. Using (you can do it manually, but it’s more difficult) you make several arches of the same size. They are connected by jumpers, the length of which is determined by the desired size of the roofing part.

Arched design is the simplest option
The first and last arches are connected by horizontal jumpers, brackets or, as in the figure above, ordinary stops are welded to the last one.
You can often see double arches with decorative and not very decorative filling. They are typical for large structures. Still, the windage and snow load turn out to be large and it is better to play it safe by making a safety margin than to do everything all over again.
Photo ideas


The canopy over the porch is not only over the front door, but also over the terrace too

Wooden canopy over the entrance in the form of a house - options with support pillars under the tiles

An integral element of each entrance is the visor. Without it the front door to a private house looks unfinished. In addition, it has an important practical purpose, which is to protective function. The article will discuss the types of designs, as well as the option for making a canopy over the porch yourself.
Requirements for visors
The visor must be not only practical, but also safe, so there are a number of requirements that the design of the visor must meet:
- tightness;
- strength;
- attractiveness;
- sufficient width and length;
- compliance with the general mood of the building.

One of the main functions of the visor is protective. In this case, we are talking about both the residents and guests who will enter the house, and about the front door itself. A good canopy is sealed, that is, rain or melt water does not leak through the cracks in its covering. This extends the life of the material from which the door is made. In addition, the canopy casts a shadow on the porch, which prevents the paint coating applied to the trim and the door from quickly fading.

The design of the visor must be strong enough. This means that without any particular difficulties it must withstand both its own weight and the wind load, which in some cases can be several times greater than the weight of the canopy structure. In addition, in winter, with heavy snowfalls, some of the precipitation will be retained on the canopy. Its strength should be sufficient for the weight of the snow cover.

The visor is not a module that is made just to be. It should be attractive and set the overall mood. At the same time, the design of the canopy should not contradict the exterior of the building. This is expressed both in the lines of the frame and in the colors. The width of the visor should be such that the projection on each side of the door is at least 50 cm. Only in this case can we speak of a sufficient protective function.
Types of designs

The classification of canopies is most often made according to the method of design of the roofing decking, and the names correspond to the name of a roof of a similar design. It follows that they can be:
- single-pitched;
- gable;
- multi-slope;
- arched;
- domed;
- concave.
The first option requires the least amount of material for manufacturing and is light in weight. You can assemble such a structure with your own hands without much effort. It consists of one plane, which is fixed to the wall at the required slope. This design has certain restrictions on the slope, so if the length is long, snow may accumulate on the canopy. The visor with two slopes resembles a triangle. To make such a structure, you will need twice as much material as for a lean-to structure. In this case, the angle of each slope can be increased. This will make it possible to speed up the removal of precipitation from above.

Multi-pitched canopies look great if they are installed on the porch of a house that has a hip or other roof complex shape. It is quite difficult to make such a visor, so you will need to draw up a high-quality and thoughtful drawing, as well as the help of a specialist. Arched canopies are a semicircular structure. It is worth choosing if the house design has rounded shapes with which the canopy will be combined. Otherwise, it is better not to take risks with experiments. This also applies to dome visors. They are to a certain extent similar to arched ones, but have an additional bend in the front part of the structure.
Note! Concave structures are a type of single-pitch canopy. Their disadvantage is poor sediment drainage, although in appearance they can be quite attractive.
Roof decking

The choice of roof decking is an important step when designing the structure of the canopy over the entrance. All materials that are suitable for these purposes can be divided into two large groups:
- polymer;
- metal.
From the first group, they most often choose cellular polycarbonate. It's really good material, which has the following advantages:
- light weight;
- ease of installation;
- light transmittance;
- pleasant appearance;
- ease of giving a rounded shape;
- variety of color solutions;
- resistance to chemical influences.

Polycarbonate is capable of partially transmitting light, which can be useful for a visor. Before purchasing polycarbonate, you need to make sure that it has protective film, which minimizes exposure to ultraviolet rays. If there is no such film, then the material will quickly dry out and crack. Among the disadvantages of polycarbonate, its fragility may be critical. If hail is not uncommon in the area where you plan to install the canopy, then it is better to choose a different type of flooring, since the first precipitation will cause the polycarbonate to be completely damaged.

The most common metal roofing materials are corrugated sheet metal and metal shingles. They have similar properties, but metal tiles look more attractive. Among the positive qualities of these materials it is worth highlighting:
- mechanical strength;
- light weight;
- long service life;
- possibility of self-installation;
- possibility of giving a round shape;
- affordable price;
- wide choice of colors.

By mechanical strength metal decking is superior to polycarbonate. They can also be bent to a certain radius to obtain the desired shape of the visor. Metal tiles and corrugated sheets are more resistant to wind loads. Heavy hail can leave dents but will not penetrate sheet metal. One of the disadvantages of the material is its noise. Even a little rain will drum well on the visor.
Self-production
Any work begins with planning. It will help you correctly calculate your strengths and means and take into account possible difficulties in achieving your goal. This is also true when making a visor, so the first step will be its design.

Design

To make the design process easier for yourself, it is better to take a photo of the entrance first. The photo makes it easier to choose the required size and shape future design. This can be done either manually or in a graphic editor. When drawing up a drawing, you need to consider several points:
- width of the structure;
- extension length of the structure;
- number of supports;
- slope angle.

It was already said above that the canopy should be 50 cm wider than the entrance on each side, but this rule is not valid if there is a large porch. In this case, you need to make sure that the canopy covers the sides of the porch. The length of the stem can be adjusted depending on your wishes. If the visor is too long, then additional supports are simply installed. The number of supports will depend on the complexity of the structure and its weight. Usually a wall mount and two supports are sufficient. The angle of inclination is selected in the same way as for the roof that is on the house.

Preparatory work
The preparatory process consists of purchasing necessary materials and missing tools. Materials you will need:
- selected roofing decking;
- metal profile pipe with dimensions 50×30 and 40×20 mm;
- fastening consumables;
- cement;
- sand.
You can't do without a tool:
- Bulgarians;
- screwdriver;
- hammer drill;
- roulettes;
- marker;
- welding machine.
Do not forget about personal protective equipment, such as glasses, gloves and clothing made from natural fibers.
Installation

First of all from profile pipe 40×20 mm it is necessary to prepare the frame of the future structure. Depending on the selected dimensions, blanks are cut. Two of them must correspond to the height of the porch, the other two must correspond to its length. The size of two more blanks is selected in the process. These components should form a right triangle. First of all, parts whose dimensions are known are welded together in pairs. They should be located at right angles.

This can be achieved with a special clamp or vice. The entire seam should not be welded in one pass, as the angle will be broken. It is better to make small tacks, level the workpiece, and then completely boil it. When everything is ready, you can measure the length of the hypotenuse. Two more elements are cut out with a grinder, and they are welded into place. Now you need to combine the triangles into general design visor To do this, they are connected by strips at the corners. To increase the rigidity of the canopy frame in the resulting rectangle, which will be adjacent to the wall, it is necessary to weld several transverse strips.

The next step is to install metal elements under the sheathing on which the porch roofing will be attached. Once the porch frame is ready, it can be installed on the wall. This will make it easier to secure it. Several holes are drilled in the legs of the triangle that will be adjacent to the wall. They must match in diameter the diameter of the anchor with which the fastening will be made. The porch frame is leaned against the installation site and the location of the holes is transferred to the wall. Holes are drilled in the wall using a hammer drill.

Now you can strip the porch frame. All rust must be removed from it. The easiest way to do this is grinder or a grinder with an appropriate attachment. After this, the porch frame is painted. When it dries, you can install the roofing material. If it is corrugated sheeting or metal tiles, then they should be secured roofing screws With rubber seals. Polycarbonate can also be secured with them, but you shouldn't overdo it with polycarbonate. If you tighten the screws too much, they will simply crush the flooring. Next, the visor rises and locks in place.

After installation, it is necessary to seal the junction of the canopy to the wall. This can be done using various mastics or a piece of roofing material. If the visor extends too far, racks are mounted. They must first be welded to the frame. Two holes 50 cm deep are dug under them. The part of the canopy posts that will be in the ground is covered bitumen mastic which will protect them from rusting. The racks are lowered into place and the space around them is filled with concrete. Another version of the visor for self-assembly is in the video.
Summary
As you can see, make simplest option installation of a single-pitch canopy will not pose any problems even for an inexperienced craftsman. The main requirement is to have the ability to work with various power tools.
In the construction field, there are a large number of different projects that are aimed at creating canopies for the house with your own hands. Let's look at some of the possible options for constructing this type of extension over the porch and tell you all the nuances of the work process.
Many people talk about how to attach a canopy to a house with their own hands. experienced craftsmen and newcomers to this business, because, due to the diversity building materials on modern market, these structures can have a wide variety of configurations.
Polycarbonate has gained a high level of popularity among consumers, which protects well from sudden rains and also firmly resists snow cover in winter period. Depending on the base used, the following types of visors are distinguished.
Types and shapes of do-it-yourself canopies for your home
- stone;
- forged;
- metal;
- wooden;
- combined.
Roofing materials such as slate, corrugated board, etc. can be used as a combination. In addition to such functions as shading and protection from precipitation, a good canopy should fit as harmoniously as possible into the overall landscape design surrounding area.
Therefore, the production of multi-level structures is often practiced, and hanging structures are used as a budget option. One of the most common classifications of canopies is the division by purpose. Read more about this in the table.
| For the veranda | This type of protective elements, as a rule, are placed either at the back of the house, facing the garden, or are erected from the facade of the building. If the area of the territory allows such a canopy to be made larger, then the veranda itself can be used as a recreation area. |
| For the terrace | DIY canopy over the house for the terrace can be made in several versions. In a simple way erection of a hanging element is considered a structure single-pitch design, for example, from polycarbonate. Even an inexperienced craftsman will be able to do this; moreover, you can purchase already finished design, which just needs to be collected. Gable buildings are considered a more complex option; they most often have a roof similar to a house. Based on the layout of the terrace itself, and most often they are corner or across the entire building, the canopy can only cover part of the room. |
| For cars | Polycarbonate carports are popular among car owners. They are attached to the house in order to hide cars from sun rays or protect from rain in a passive state. Many factories offer quite simple, but durable structures for a reasonable price. When choosing this type of product, it is equally important to pay attention to the stylistic parameters of the extension. |
| Awnings | Awnings are a kind of house awnings, which are divided into retractable, with posts and basket. The first type operates due to a built-in electric drive and, in the absence of the owners, if not needed, is stored assembled in a special case. The second have an auxiliary support point, due to which they are distinguished by endurance and are able to withstand heavy loads. The third type is a frame, covered with fabric. The shape of basket canopies can be semicircular or rectangular, complemented by stiffening ribs. |
Thus, a do-it-yourself canopy for a house is a structure that is rich in its diversity, but before choosing one or another form of construction, it is worth taking into account its purpose, as well as clearly understanding the purpose of the building, and calculating its functionality in advance.
How to make a canopy for your house with your own hands from polycarbonate
A polymer such as polycarbonate is perfect even for beginners in the construction field; moreover, it has good performance properties and has a fairly affordable price. It is easy to cut and process with tools, and the variety of types of material allows you to adapt structures made from it to any countryside and private territory. For those who are going to make a visor at home for the first time, experts recommend taking as a basis single slope option structure, and then decide on the type of base material itself. To choose a canopy for your house with your own hands, photo projects recommend using a variety of construction portals, where you can get an online consultation on any issue of interest.

Polycarbonate is divided into cellular (cellular), monolithic and profiled. The first is considered the most common in the field of private and commercial construction, and is characterized by its low weight and low cost.
Due to its plasticity, the polymer is suitable for the manufacture of structures of various shapes and is available for the work of even one craftsman. As for monolithic polycarbonate, it is distinguished by its strength, and is similar in appearance to glass, both transparent and colored, but is considered more resistant to stress. Profiled polymer is used as a roofing material on roofs, and its characteristics are no worse than its monolithic form.
You can make a canopy for your house with your own hands according to the drawings that are presented on the Internet, but it is important to pay attention not only to the type of polycarbonate, but to its required thickness, take into account the bending radius, as well as technical indicators.
If a person has special skills, then the work project can be individualized by specifying the location and quantity support posts and so on. Also a properly designed drawing on initial stage construction allows you to correctly calculate the materials that need to be purchased so that there is no extra costs or you didn’t have to re-purchase.
List of necessary materials and tools for creating a polycarbonate canopy with your own hands
In order for a cheap do-it-yourself canopy to have good strength, professionals recommend constructing it using a metal frame, and purchasing polycarbonate with a strength of more than 6 mm. So, the list of necessary materials and tools for creating a canopy with your own hands is as follows:
- polycarbonate;
- shovel for preparing holes for concreting racks;
- welding machine and electrodes;
- grinder and wheels for it;
- thermal washers for fastening the polymer;
- tape measure and building level;
- sand, cement, gravel;
- profiled pipe with a cross section of 80*80.
In order to obtain a solid foundation when constructing a canopy, racks are used, they are also mortgages or supports, they are filled with cement mortar, so it is additionally necessary to prepare a container for its preparation, as well as purchase paint and a brush for painting metal structural elements, thus protecting them from damage by corrosion .
Stages of work on building a canopy with your own hands
To build a canopy in the courtyard of a private house with your own hands and see the result of your labor in a few working days, the owner needs to complete the following stages of the construction process:
2. Install the racks.
3. Assemble the frame structure.
4. Secure the polycarbonate sheet.
Stage 1.
According to a previously prepared or selected drawing, the master needs to mark the work area using rope and pegs. Some workers mark the foundation areas by pouring chalk, others additionally hammer in the reinforcement, regularly checking the marks diagonally with a level to avoid distortion of the structure.
The area must be cleared of possible debris in advance in order to prepare a sand cushion on it. For this they remove upper layer soil and fill with gravel, compacting the stones tightly.
Stage 2.
In places of future supports, holes are dug of appropriate depth (1 - 1.2 m). Typically this process uses either a shovel or hand drill. It is with the installation of the basics that the installation of the future polycarbonate canopy begins. Before inserting the support into the hole and concreting it, it must be made in the ground gravel bed, and then fill the stand with solution.
The layer of stones should be about 20 cm. To prepare the mixture for pouring, use a percentage ratio of 4:1 (sand: cement).
In order for the voids between the stones to be densely filled, the prepared solution should be liquid in consistency, not thick. Fill it to the level of the ground cover. To continue installation process you need to wait until the concrete dries.
Stage 3.
Next, a polycarbonate canopy for the house is created with your own hands by assembling the frame. To do this, to installed supports longitudinal crossbars are attached, they are usually called mauerlats. If the owner’s budget allows, he can purchase such structures ready-made. The purchased elements are fastened with special bolts, and the structure assembled at home requires a welding machine with which the parts are connected. All joints are degreased, after which the metal surface is painted.
Stage 4.
At this stage, the master works with the polymer, cuts it into the required pieces, lays it on the surface, fastens it, installs end strips etc. Sheets up to 8 mm thick can be cut using conventional construction knife, and more durable material is processed with an electric saw. The fastening elements are located on the profile sheet in increments of about 40 cm. Special metal strips are used as polycarbonate connectors.
Thus, a canopy attached to a house with your own hands will be completed ideally only if the owner does the work step by step using not only theoretical materials, but also by watching a video practical recommendations according to the installation process.

Recommendations for making a wooden canopy for your home with your own hands
A do-it-yourself wooden canopy for the house provides protection for the adjacent area of the building and also protects from exposure to sunlight. But be that as it may, this hanging element must be stable, durable and reliable, so it is often made from such a material as wood with a combination of corrugated roofing, soft tiles, etc.
It is worth considering that the canopy must be made on a slope so that precipitation does not linger on it.
Single-pitch wall walls are considered popular among consumers. wooden awnings, as a rule, they are fixed to the facade of the building. But there are cases when the structure is mounted on vertical supports placed on the sides of the house.
To create a wooden canopy, you will need both a wall-mounted supporting beam and bars for the racks. Boards for rafters and roofing base. Installation of wooden supports is carried out according to similar instructions described in the version with polycarbonate. Rafter system and the sheathing is assembled using the “groove-to-groove” method.
Assembled wooden frame intended for fastening roofing material. In this case it is corrugated board.
When buying it at a hardware store, you need to clarify the thickness and brand; the choice of color rests solely with taste qualities owner. When laying it on boards, you should be careful about fastening and fix the corrugated sheet as tightly as possible with self-tapping screws.
The roof sheathing must withstand the fastening line and have a good aesthetic appearance.
Pay attention to the screws; their length must correspond to the selected brand of roofing and the cross-section of the timber used to make the sheathing.
It is worth noting that the frame also requires such a plan additional processing, for this purpose, use a variety of varnishes, etc. means to prevent wood rotting.
When choosing a canopy for the house with your own hands, projects that offer a lot, the master must take into account his abilities, and in case of uncertainty own strength, hire a professional team. published
If you have any questions on this topic, ask them to the experts and readers of our project.
P.S. And remember, just by changing your consumption, we are changing the world together! © econet
It is currently quite difficult to find houses without canopies over the front door; this is not just a decorative element, but also a very important functional architectural structure that protects residents from negative influence atmospheric precipitation. Consumers are offered several options for making a visor, each of them has its own advantages and features. To make it easier to make a final decision, developers should familiarize themselves with the available options.
We will focus only on metal structures; the difference between them is in the coating material. The frame in all cases is metal, made from previously prepared elements, and can be welded or forged.

Most homemade visors have welded frames; forged ones are made according to individual orders and are installed only on prestigious buildings.
Types of metal visors
This is a very conditional classification of products, but it allows you to choose the best for each specific situation.
Table. Types of coatings for visors
| Type of coverage | Brief description and performance characteristics |
|---|---|
| The most well-known coating at present, affordable for most developers. Polycarbonate has good strength and resistance to harsh ultraviolet rays, and is easy to bend and cut. Installation of the coating on the metal frames of the canopies does not amount to big problems even for inexperienced builders. Sheets have different color solutions, thickness and shape of the honeycomb. Disadvantage: in all performance characteristics it is significantly inferior to other types of coatings. After a hailstorm, polycarbonate must be changed; after a few years, due to the harmful effects of UV rays, it loses its plasticity, microcracks appear on the surface, and over time they acquire critical dimensions. At the slightest violation of the tightness, mosses grow in the honeycombs, which has an extremely negative effect on appearance visor It is impossible to remove vegetation from honeycombs. | |
| Impact-resistant glass is used for the roof, which can withstand significant physical loads, including impacts. The service life of glass is almost unlimited, the material perfectly transmits sunlight and protects from precipitation. The price is in the elite category. Glass has several technological disadvantages: it does not bend, is heavy, and requires precision and care during installation. | |
| Sheets are used for covering metal profile, metal tiles or ordinary galvanized sheet steel. The cheapest option for covering visors, in all respects technical parameters and operational characteristics fully meet the needs of consumers. Metal coatings have reliable protection from corrosion processes, the surfaces are additionally coated with polymer decorative and protective paints. U metal sheets light weight; when making the frame, the weight of the coating is not taken into account. | |
| There are options for covering canopies with bitumen shingles. They look very original, have an attractive appearance, and are in the middle category in terms of cost. Disadvantage - due to stone chips on the front surface bitumen shingles Dust settles quickly, and mosses grow on it. It is very difficult to remove them from there; you have to use strong chemicals. | |
| Rarely used, in terms of cost it belongs to the expensive category. Performance characteristics are not much different from glass. An important advantage is that the material is very technologically advanced. Monolithic plastic bends in any direction and can be cut and drilled without problems. Can be completely transparent or colored. |
Prices for various types of ready-made visors
Canopy over the porch
Step-by-step instructions for making a metal visor
For example, we will consider one of the most budget options: welded frame made of profiled pipes square section 20×20 mm, covered with cellular polycarbonate. All work is done independently using basic bending devices. Welding is performed with a household welding machine, the diameter of the electrodes is 2 mm.

Important. During the manufacture of the frame, it is necessary to comply with safety regulations. It is strictly forbidden to carry out welding work outdoors during rain.
Frame assembly
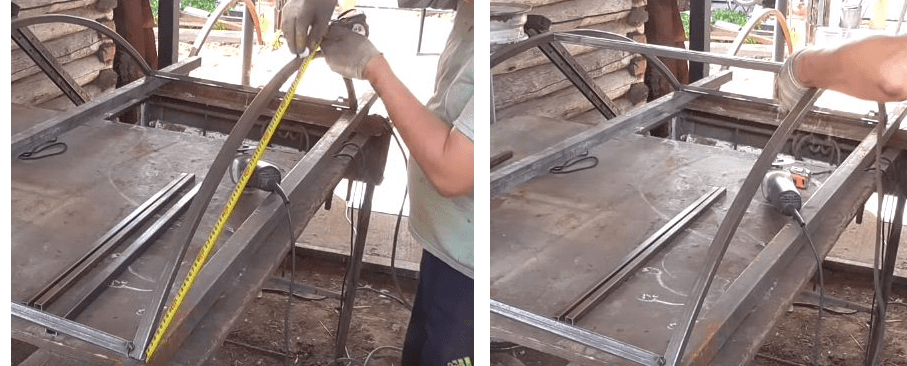
Step 1. Draw a sketch with the dimensions of the upcoming frame. Measurements must be taken carefully; errors are very difficult to correct later. Buy metal, clean it of rust and technical oils. Cut the pipes to size into blanks according to the existing sketch. For the described visor you will need approximately 4 m square pipe and 6 m of wire rod.


Step 2. Bend large arcs. This is the base of the frame, you need to start making it from there. You can bend it using the simplest device - a pipe segment with a diameter of approximately 500 mm, welded to a metal table. How to make arcs?

Important. Constantly monitor the distance between the ends of the pipe; this is a very important parameter; the width of the canopy depends on it.
The more you have practical experience performing plumbing work, the faster the arcs will be prepared. After one is done, start bending the second. Now the first arc will be a template; all dimensions should be checked against it. There is no need to achieve perfect shape; it is almost impossible to do this.

If there is such a desire, then the arcs will have to be bent to special machines, but experienced craftsmen do not insist on perfect accuracy. In the future, the visor will have special decorative elements that will hide all small errors. The main thing you need to keep an eye on is the dimensions of the width and height of the visor, and these parameters depend on the bending radius of the arches.

Practice shows that for an arc 25 cm high and 140 cm wide, you need to take a straight section of pipe 160 cm long. You can start from these dimensions when preparing the sketch. The frame is small in size, two arcs around the perimeter are enough, the load-bearing capacity is enough to withstand wind and snow loads.

Step 3. Prepare a table for welding work. Its surface must be strictly horizontal, the weight of the welding machine must be supplied. If it is not possible to level the surface to the required standards, then you will have to place sections under each canopy pipe. They must be metal and free of rust, otherwise difficulties arise when welding individual elements into a single structure.

Step 4. Prepare tubes for longitudinally attaching the arches to each other. The length of the tubes must correspond to the planned length of the visor. There should be at least five tubes: two at the bottom, one at the very top and two on the sides.
Step 5. Start welding the frame. This is done in several stages.
- Place the arc on a flat pipe, hold it with the elbow of your left hand. In the same hand, take the tube for the longitudinal fastening of the frame and weld it to the arc. Do not weld too much; you will still have to adjust the position of the elements.

- Tack the second arc to the second end of the segment. Check that all three elements lie strictly in the same horizontal plane. Now the structure has three points of support and holds a stable vertical position. Work becomes much easier. Of course, if you have an assistant, then involve him, and the two of you can do it together. welding work much easier and faster.

- Grab a piece of pipe on the other side of the arches and check the position again. Remember that at this stage only tacks are being made; full welds are not yet applied. Pay attention that the planes of the longitudinal tubes are located in the same position to the planes of the arcs; the cellular polycarbonate will then be fixed to them.

- Find the axis of symmetry of the arcs. To do this, measure equal distances from the ends and place marks. Weld the top short section in the center of the arcs.
- Accurately mark the locations of the side pipes and tack them. They should be located symmetrically.

Check all frame dimensions and geometry. If everything is normal, then weld it firmly. Avoid burns, carefully adjust the current strength, hold the arc correctly and guide the electrode.

The frame is ready, you can start making decorative elements.
Making decorative elements
Prices for popular models of welding machines
Welders
The process itself is not very difficult, but it requires a lot of physical effort. If possible, various figured elements can be purchased ready-made in specialized stores.
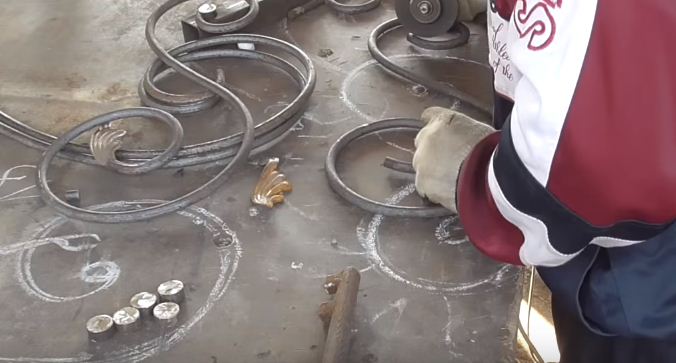
Step 1. Place the visor frame on its edge and draw the arc configuration with chalk. Based on this drawing, the arrangement of decorative elements and correction of their sizes will be done in the future.

Step 2. Draw half of the decor picture. Keep in mind that the simpler it is, the easier it is to make. At this stage you can show your artistic abilities. But always match your desires with your possibilities.

Step 3. Place the blanks for the wall legs of the canopy on the table. Draw a decorative element for them. Keep in mind that there are two wall legs; accordingly, the number of elements doubles.

Step 4. Using an ordinary rope, remove the dimensions of the decor. To do this, apply it along the drawn contour, and then measure the total length. Cut the pieces of wire rod to the dimensions obtained.

Step 5. Start making curls. You will need ordinary devices: bending horns stationary on the table and manual. It will take quite a lot of time to make curls, constantly check them according to the drawing. Discrepancies of a few millimeters are not considered a barracks; you should not waste time eliminating them.

After the curls are ready, you can weld metal washers to them large diameter, they will decorate the ends of the wire rod.
Practical advice. You can use any metal elements for decoration. Choose them to your taste and place them symmetrically on your curls.
Step 6. Weld the decorative elements to the visor.

Step 7 Weld the legs. Make sure that the angles at all nodes are exactly 90°. The end of the tubes for the legs should be filed at an angle of 45° with a grinder, this will increase the strength of the connection. While the visor is in a comfortable position, immediately install the decor in place. Then the operation should be repeated with reverse side visor

This completes the most difficult work on making a metal canopy. Weld special ears to attach the structure to.
Practical advice. Be sure to install one ear in the middle of the visor arc; with its help it is much easier to fix the structure to the wall.

Once the paint has dried, drill holes for fastening the cellular polycarbonate and install the visor in its place. If you have a little experience and a lot of desire, then such a design can be completely manufactured within one working day.
Prices for cellular polycarbonate
Cellular polycarbonate

Video - Do-it-yourself canopy over the porch made of metal
A metal canopy can be installed in a day, even without professional skills. The main thing is a responsible approach to work and strict adherence to installation conditions. You can read how to do other work, for example, install a drainage system yourself.
A theater begins with a coat rack, an apartment begins with a hallway, and the first impression of a house is created by a canopy over the porch. The classic design element not only protects the entrance to the home. He helps create it original design. Important detail You can easily create an interior on your own, armed with simple knowledge about technological processes. What should the canopy be like over the porch?
Advice! If you make the canopy structure at the same time as covering the house, all work will be easier and cheaper. After all, the frame base can be made from residual materials.
But metal tiles also have disadvantages. It does not have sound insulation (if you like the sound of rain, this will only benefit you). In the summer heat, such material will become very hot, although this is not significant for the visor located above the heads.
Corrugated sheet
A very popular material that has the same advantages as metal tiles. It is easier to work with it, since the corrugated sheets have a large area. The popularity of the material is explained by its affordability and ease of installation. A canopy over a porch made of corrugated sheets is practical and will serve you for a long time without additional painting.
Keep in mind that corrugated sheeting is a mechanically weak material and even a small impact will remain noticeable on its surface. But you can always choose a thicker one for your favorite porch sheet metal, with a pre-applied polymer protective layer.
Choosing a design
Our front door canopies should combine style and functionality. When choosing a design, consider the roofing material, the size of the canopy and the direction of the drain.
Advice! To simplify the development of a visor design, prepare a list of points in advance that you will focus on when final choice canopy
The design of the canopy over the porch depends on the installation method: supporting ( massive structures that require additional reinforcement from wooden beams or metal pipes) or suspended (more lightweight design With small in size and fixation on the outer wall). In the general style, it is necessary to take into account the very shape of the canopy:
- Flat. The simplest type of visor, open on all sides. This design will only protect from rain falling in even streams, which is very rare. A no-frills canopy can be made from any material and frame.
- Gable. An easy-to-make canopy that will not only protect you from windy downpours and snowstorms, but will also save you from the wind. This structure can be made using various materials.
- Three-slope. A canopy with three slopes is best made on a metal frame, choosing corrugated sheeting or metal tiles for covering. The three-slope roof is very reliable and can protect you from heavy rain and snow blizzards.
Metal. Metal frames can be made by forging. Artistic forging gives metal products amazing lightness and airiness. Of course, the weight of the canopy will be large. But exclusive forged canopies and awnings over the porch have a presentable appearance and are completely worth the effort invested. Installation of such a structure requires particularly strong walls.
Polycarbonate. A favorite material of designers, thanks to its flexibility you can create original canopies. Semicircular, with a smooth transition into a transparent wall, with additional protection from dust and wind. Using your imagination, you can create a canopy design in the shape of an umbrella, arch or tent, giving the porch a mysterious, fairy-tale look.
The canopy structure itself can be open, or additionally equipped with side, blank walls. A large canopy will be appropriate if you have a large, massive porch, but a more elegant, weightless design will suit a small porch.
Let's get started
How to make a canopy over a porch? There are no particular difficulties here. First do detailed drawing canopy with all measurements and an estimate with calculation of the required amount of material. When designing, consider a number of technical nuances:
- The length of the canopy must be at least one meter larger than the width of the door.
- The width of the canopy will be equal to 1.5 times the width of the doors (the entire door leaf).
- The distance from the outer edge of the structure to the facade of the house should be such as to allow it to swing freely entrance doors by 90°, leaving a margin of 30 cm.
- The angles of the slopes (to ensure snow load) set from 20°.
Let's consider detailed instructions for the manufacture of a simple, single-pitch suspended canopy:
- Add 30 cm to the width of the porch on both sides. We will get the size of the canopy. Let's measure the distance that the visor should cover. We will determine its height, taking into account the structure of the house, taking into account the slope of the slope. Based on the completed sketch, we determine its length.
- We make rafters, struts, slopes, and wall beams from metal or wood. The length of the rafters should be equal to the length of the slope. We connect the parts using welding for metal or self-tapping screws for wood.

If a single-pitch canopy will be attached to a complex, multi-layer wall, the canopy should be secured to the outer, load-bearing layer using stainless steel shoes. Additionally, seal the joints of the struts and beams through the outer facing layer of the wall. This will prevent the insulation from getting wet.


