How to make an arch between rooms with your own hands. How to form an interior arch with your own hands? Carrying out the necessary measurements
In the life of any person, repairs occur from time to time. It may be associated with the purchase of a new house or apartment, with the desire to update the interior of a familiar home. One way to organize space is to create arched structures. Arches in a house can perform two completely different functions: unifying space when an arch is placed instead of doors; room division large area to highlight several zones with different functions.
Of these two options, the arch in doorway, giving more interesting view apartment layout. When replacing a door with an arch, it is necessary to consider the pros and cons of such a solution. An undoubted advantage for a small apartment is the expansion of space. When combining kitchen and small room you can design a dining room where it will be convenient and pleasant to dine with family or friends.
If several arches are placed in a long and narrow corridor, then the feeling disappears. narrow passages like in a train carriage.

If an informed decision has been made to install the arch, then we proceed to choosing the shape of the decorative structure:
- Rectangular;
- Semicircular, having an equilateral rounding;
- Semi-arch having only one rounded corner;
- Trapezoidal, the design of which consists of curved lines;
- Fantasy.
The downside of an arch instead of a door is that you can’t close the door to highlight your piece in the apartment. If an arch is placed instead of a kitchen door, the smell of cooking food will spread everywhere.
How to make an arch in a doorway
Once the shape has been determined, it is recommended to make a template from cardboard, fiberboard or other available materials. Creating a template helps you visualize the final result and more accurately calculate quantities necessary materials. When designing, we take into account that installing an arch in an existing doorway will reduce its height by approximately 10-15 cm. If the dimensions of the opening are not sufficient for implementation design ideas or the apartment owners are enough tall people, then you will have to increase the height of the doorway. Changing the height or width requires large costs, including labor, financial and time to coordinate the redevelopment in the relevant organizations. Determining the shape and creating a template are the first stages of making an arch.

They are followed:
- Dismantling the old door frame (if this has not been done previously);
- Preparing the wall surface for arch installation;
- Creating a frame;
- Installation arched design;
- Finishing and decoration.
All this work can be entrusted to professionals, but if you have the desire, you can do everything yourself.
Instructions: how to make an arch with your own hands
The cheapest and most common material for constructing an arch, as for many other works, is drywall. Dismantling the old one door frame. For more modern designs it's simple. You just need to unscrew the screws and carefully remove the trim. Old houses present various surprises to their owners. In ancient times, nails were used to secure the trim to the bars.
Carelessness during such work can lead to the destruction of ceilings or their damage.
After dismantling, we carefully evaluate the intermediate result of the work. The former doorway and the wall next to it should be clean, smooth, and without serious damage. Therefore, when cracks and chips are detected, we putty, this will help subsequently finish them correctly and efficiently. If you plan to level the walls with plasterboard, then this can be combined with the construction of an arch.
When the doorway is prepared, a U-shaped frame made of a metal profile is installed in it. It consists of one horizontal segment equal to the width of the doorway and two vertical segments, the length of which corresponds to our future design. The frame should be on both sides of the opening, that is, we actually make two of them. Two rows of 10 cm holes are marked and drilled in the profile. Then holes are marked and drilled using a hammer drill at the ends of the wall. The guides are attached to the walls.

It's time to use the pre-cut template. Sheets of drywall are marked along it, two parts for each arch are cut out using a jigsaw and attached with self-tapping screws to installed profiles. It is also necessary to mount a profile along the edges of the attached template parts. As we look at how to make a semicircular arch, important stage is to give the drywall profile the appropriate shape. To do this, we cut the edges of the letter P of our profile to the full height. The profile becomes obedient and takes on the geometric shape we need. After this, it takes its place along the edges of the cuts.
The next stage requires accuracy and attentiveness. We need to correctly install the arched fragment of our arch. The profile has already been installed, so we measure the length of the arc and the width of our part, cut out a rectangle. The difficulty is that the rectangle doesn't really want to become an arc. If ordinary drywall is used, then the main method of “pacifying” it is to wet it and at the same time give it the desired shape. But this option may seem difficult to ordinary home craftsmen who are afraid of making mistakes. In this case modern technologies suggest that we use arched plasterboard, which takes a semicircular shape much more easily than regular one. We fasten our part in the usual way, moving from the center of the arch to the edges, and we are almost at the finish line.
We process the edges of the arch, cutting off the excess. After this, we treat the joints and edges of the drywall with perforated paper tape or sickle tape, putty, and sandpaper. The choice of putty for finishing depends on the future decor of our arch.
Remained Finishing work, which we will return to a little later. If you plan to install lamps in the semicircular part of the arch, then you need to do this before you start puttingty. If you are afraid to take on an unfamiliar material, then you can install an arched structure made of plywood. In this case, two methods are possible: the first is similar to working with drywall, the second is described below.
Do-it-yourself door arch: making from plywood
To build such a structure, first measure the size of the arc of the future arch. A rectangle is cut out of a sheet of thin plywood, the width of which is equal to the width of the doorway and the length is equal to the size of the arc. Plywood is a malleable material, so the cut rectangle is evenly moistened, allowed to lie for a short time and bent to be installed in the opening.
It is important to place the cut out part evenly and neatly; this will require some skill.
Be sure to secure the part with self-tapping screws in the center, then along the edges. We fill the space between the resulting semicircular arch and the walls polyurethane foam and wait for it to dry. If there is a lot of free space, then part of it can be filled with foam parts, and the remaining free space with foam. We cut off the excess foam and putty on the facade of our arch using sickle.
Less common designs are arches made of wood and brick. Despite the beauty and durability of such arches, their installation requires more expensive materials and participation professional craftsmen. The most interesting stage left in creating an arch in a doorway with your own hands is finishing. Various decorative materials can be used here.
Most common:
- Wallpapering;
- Decorative plaster;
- Coloring;
- Gluing finished foam finishing elements;
- Usage decorative stone and other types of finishing.
How to make a door arch with your own hands (video)
Thus, it is quite possible to make an arch in a doorway yourself, using ordinary tool for repairs and available materials. The result of such work will be pride in one’s work and originality. decorative element in apartment design.
Do you dream of creating on your residential squares original interior and add some zest to this space? Pay attention to the design of interior openings, which can become the central object that sets the tone for the entire design. Arches of different shapes and decor are becoming very popular.
An arch in an apartment creates beauty, comfort, and emphasizes the refined taste of the owner.
If your apartment has openings of at least 1000 mm and you do not want to hide the room behind interior doors, then we will tell you how to make an arch in your apartment. At first glance, it seems that this activity is not for an amateur. But having studied the features arched openings, the possibilities of modern finishing materials And detailed instructions After installing the arch, you decide to do it yourself.
 The correct shape of the arch will emphasize the advantages of the apartment.
This, of course, is a rhetorical question. Many people who are interested in art are familiar with the arch, have been in beautiful buildings with high ceilings and large passages, and have looked at interiors country houses on the picture. In many places it is an object of admiration and a connecting element of the interior. The shape and size of the arch depend on the opening in which it is created:
- semicircular;
- ellipsoid;
- rectangular with slight curves at the edges;
- rounded on one side of the passage.
The list can be endless, because each passage and room is individual. But there are certain standards for arches that have a certain shape and name:
- classic;
- modern;
- ellipse;
- romance;
- portal;
- trapezoid;
- transom;
- arch with top elements.
We invite you to look at photos of the listed elements:
 Choose the shape of the arch that is appropriate for your apartment. Consider the features of the room, especially the height.
 For yourself, you can choose a ready-made option for making an arch in an apartment with your own hands or use your imagination, take into account the features of the opening and create your own template.
 You can come up with your own arched design by looking at ready-made options.
 Just remember one nuance - in apartments with low ceilings, you can choose more elongated shapes so that the arch does not create the impression that your ceilings are lower than they actually are. Otherwise, the arch helps to expand the space and eliminate overlapping of rooms door leaf. But you can’t make an arch in an apartment if the design doesn’t match it. Before making a decision, we advise you to review different photos how to make an arch in an apartment and what shape to prefer.
Arched structures are appropriate not only in interior passages, but also in the design of walls where a beautiful baguette or vase will be located.
Often there are fireplaces, the upper part of which is made in the shape of an arch. Perhaps in your apartment you can add such elements as interior arch didn't look lonely.
Having talked about what an arch is, let’s move on to the practical part of our conversation, namely how to make an interior arch in an apartment, what material can be used for this.
How to make an arch in an apartment: choose the material, prepare the opening
To properly make an arch in an apartment with your own hands, study the interior opening. It must be smooth, without holes, distortions, and reliable. If in doubt, carry out work to clean and level the surface with plaster or primer. Decide what the wall is made of - brick, blocks, wood. This is important because the arched structure can be secured with different fasteners, depending on the material of the walls.
Materials for arched structures in an apartment
You can make an arch with your own hands from various finishing materials that are affordable to you:
- drywall (gypsum plasterboard);
- plywood;
- Fiberboard;
- board;
- brick;
- stone;
- plastic (for example, wall panels);
- stucco;
- ready-made arched structures.
Perhaps, after studying the information, you will have your own ideas on what to use to make an interior arch in the house with your own hands.
The easiest to work with and the most affordable is drywall.
 Drywall is better than other materials for making an arch with your own hands. The material is easy to cut and bend into in capable hands.
 In skillful hands, you can use it to create any design object, including an interior arch. It can be bent to the desired shape, and this is important for the arch, because the lower part of the portal will be curved. The sheet area allows you to cut a semicircle big size. It's also very convenient. GCR is cut with a jigsaw or a stationery knife, leaving no dirt in the room. The remaining materials are also available for independent use in creating an arch, but will require more skill, time, and tools. For example, a brick must be laid out beautifully, having previously taken care of a reinforced metal frame. The weight of the structure is large and can threaten to collapse if laid incorrectly.
Wood tends to dry out and bend, which also affects the quality of the final result. You will need the skills of a carpenter to make an arch with your own hands from solid wood.
 Finished solid arches look perfect, but require careful preparation of the doorway.
 It will be more affordable to buy a ready-made arched opening made of solid wood, if funds allow. But even here there are some nuances - the interior opening may not correspond to the factory set. Then you will have to adjust the opening to the finished product.
What is needed to create an arch in an apartment
The key to the success of any work depends on preliminary preparation All you need is measurements of the object. We will need:
- dimensions of the doorway;
- template for the future arch;
- gypsum board sheets;
- wood/metal fasteners (depending on the walls);
- roulette;
- level;
- drill;
- jigsaw or stationery knife;
- metal scissors;
- screwdriver;
- roller with spikes;
- primer;
- putty;
- decorative finishing for an arched structure.
Having decided on the shape of the arch, it is necessary to make the correct measurements of the arched structure in the apartment. The main parameters are the width and depth of the interior opening. If the ceiling height in the apartment is sufficient, there is no need to think too much about the height of the arched curve. Here the size will be dictated by the shape of the arch and the width of the passage.
 Even the most simple arch requires correct measurement of the interior opening.
 Once you have the dimensions, transfer them to a sheet of drywall. It is necessary to make a template on cardboard so as not to spoil the base material.
- Draw the shape of the front part of the arch. To do this, you can use a hand-made compass. Take a simple pencil and a tight rope that does not stretch. The length of the rope must correspond to the radius that corresponds to the size of the arch. Tie a string to a pencil. Place the stylus in the center of the sheet and draw a line in a semicircle or other chosen shape. The facade template is ready.
- One more detail is needed - the lower part of the arch, covering the wall along its depth. The important thing here is the width of the part. It corresponds to the distance from the wall of one room to the wall of an adjacent room. Take the length with reserve, because only a specialist can accurately calculate the size of the arc. And then we’ll cut off the excess.
- We transfer the template onto sheets of drywall - two arch facades, one bottom strip.
Assembling a metal frame for a beautiful arch in an apartment
The metal profile must be prepared before installation in the interior opening. Metal scissors will help you create the desired bend. It is necessary to make small cuts along the entire length of the profile. Consider the step depending on the shape of the arch. You can attach the profile to the front part of the arch and bend it along the contour of the part, making cuts at the bend points. There should be two such elements, on both sides of the interior passage.
We fix the radius profile to the wall with metal or wood screws. You can first screw a dowel into the wall for better adhesion of the profile.
 Mount a metal frame from a profile to secure the plasterboard arch elements into the opening.
 Now we need to strengthen the structure. To do this, you will need a straight profile, which we install according to the depth of the arch. How to make a frame for beautiful arch in the apartment you can see in the photo:
Assembling an interior arch in an apartment
There is very little left until the logical conclusion of the process - attach the parts to metal frame and decorate the surface of the walls.
- Let's take one front part of the arch and attach it to the wall and metal profile. It is more convenient and faster to screw screws into the arch frame using a screwdriver. It's good if you have an assistant. It is very difficult to hold the parts straight and tighten the fasteners alone. There should be no distortions. The beauty of the future arch in the apartment depends on this.
- We proceed similarly with the second part of the arch, securing it with reverse side opening.
- Now let's install the lower bar of the arched structure. This is a little more difficult because the drywall needs to be arched. To do this, wet the plasterboard with a damp cloth along its entire length and leave it near the wall for a while. The sheet will begin to bend forward, then you can take the part and carefully begin mounting it on the wall. A spiked roller is also used to smoothly bend the sheet. Pass it over the entire area of the plasterboard, the plaster will begin to take the desired shape. Secure the part into the opening with self-tapping screws and cut off any excess, if any.
- The vertical walls of the interior opening can also be decorated with plasterboard, unless other finishing is provided.
- Check the result before finishing. The screw caps should be slightly recessed into the gypsum board so as not to interfere with further finishing.

The surface is ready for decorative finishing to match the rest of the walls or something else.
When you get an apartment, you undoubtedly want to make it cozier, more comfortable and larger. Nowadays, one of the ways to make your home appear larger is to create arches instead of doors.
Various photos of arches show how varied they are and how much they change appearance housing. How to make an arch with your own hands will be briefly described below.
Types of arches
An arch is an opening in a wall that does not have a ceiling in the form of a door. Their types differ only top part, or more precisely, by how the corners are constructed (straight, rounded or curly).

IN modern world There are 7 types of arches:
- classic;
- "modern";
- "romance";
- ellipse;
- trapezoid;
- "portal";
- semi-arch.

The first four types have rounded corners and differ only in the shape of the rounding.
So classic arch- this is a semicircle with a radius of half the width of the opening; “modern” has a small corner radius; “romantic” and ellipse are similar to each other and represent ordinary rounded corners.

The trapezoid and the portal are another matter. These two types use sharp corners. In a trapezoid, the top accordingly represents this figure, and the “portal” is an ordinary opening without a door.

However, even an unremarkable “portal” can be made to sparkle with new colors, giving the supports the appearance of columns in antique style(Greek or Roman).

Although the trapezoid is quite unusual solution, but will not suit any style, so it is used much less often than other arch options.

The last type is a semi-arch, as the name implies, it consists of 1 rounded and 1 right angle. This type of arch began to be used recently, but it has already gained popularity.

It is up to you to decide which arch to install in your apartment, but we will dwell in more detail on arches made of plasterboard, as the most convenient material for construction.
Step-by-step instructions for creating an arch
Choose future form arches. It is important that she approaches general style premises that will connect.

We clean the opening from the plaster and level it. It’s simple here - the cleaner the surface of the work, the more reliable the fastening.

We fasten the arch frame. We construct the frame itself from a profile (possibly from wooden blocks).

We attach a cut out plasterboard arch (one side) to the frame. To get the arch the desired type, in the middle of the plasterboard base we make a hole for a nail. We tie a string to it and get homemade compass. Now, by changing the length of the rope, you can change the radius of rounding of the corners and their appearance.

We apply drywall on the other side and mark an arch on it, like a stencil, then cut it out and attach it to the frame.

Under no circumstances should this be done on the floor, since the opening is usually asymmetrical, which has the most detrimental effect on the accuracy of the one-to-one markings.
Note!


We measure the resulting arc and use the profile to make a tape for fastening. After this, we attach the resulting tape to the arch arch using self-tapping screws.

We install jumpers. Their size is calculated simply: the depth of the arch is minus 1.5 centimeters, the material of manufacture is a metal profile, less often wood. We attach a sheet of drywall to the end of the opening with self-tapping screws.

We carry out finishing work (smoothing with putty, filling in possible holes, painting or gluing wallpaper).

Other ways to make an arch
You can also make an arch in the opening in two other ways. The difference between these methods of creating an arch is in the fastening of drywall.
In the second option, it is attached to the jumpers not with a whole sheet, but with specially cut pieces (set) using a special solution (water, putty plus PVA glue) and this must be done without delay, since the solution hardens very quickly.

Note!

The third option involves wooden lintels mounted on glue. Drywall in the opening to the lintels is also glued.

How to bend drywall?
In addition, the question may arise: how to bend drywall? Thin cardboard (6 mm) is best suited for this.
And there are at least 2 ways to bend it:
Method 1 - roll a roller on cardboard to break the plaster in it, soak it in water and gradually screw it to the tape with self-tapping screws.

Method 2 – make cuts on the drywall every 4-5 centimeters. When you attach it to the end of the opening, the material will burst at the places where the cuts are made and will adhere better to the wall surface.

We wish you good luck in completing your work!

Photo of the arch with your own hands

Note!


The door protects the room from strangers, but is also an excellent decorative element. However, in modern homes More and more often an arch appears instead of a door. Probably, the debate about which is better: an arch that decorates the doorway and creates the effect of additional space, or the door we are all familiar with, which allows us to privacy, will never end. Therefore, it will not be superfluous to find out how to make an arch instead of a door.
Door arches in the interior
Not all rooms have room to open doors. Often the door hits something, doesn't open completely, and is difficult to use. This is very relevant for narrow corridors, and indeed all small apartments. In this case, the simplest solution is to install an arch instead of doors, which makes the room more spacious.
Door arches act as a boundary between two neighboring rooms, but also visually expand the space. They are good because they allow you to remodel the apartment: connect the corridor to the bathroom, and make the entrance to the kitchen from the room, designing it in the form of an arch. Another important advantage of arches lies in the fact that they provide the opportunity to radically change the shape of the passage, making it pointed or rounded at the top, or giving it an original asymmetrical shape.

Often, to create a unified home style, arches are installed in all rooms instead of doors. But similar solution is not the only true one. Sometimes it will be possible to successfully plan the space if the arch in the opening between one rooms is combined with beautiful door between others.
Arched openings are created in two ways: by chiselling the walls, according to a preliminary drawing; and sealing the top of the doorway in such a way that it takes the shape of a door arch. In the first case, volumetric platbands are used, which perform a decorative function. In the second case we use chipboard sheets or drywall, which are sewn onto the prepared frame.
Master class on making an arch
It is preferable to make an arch using the second method. The most the best material for making an arch, instead of a door, plasterboard is used, because it has low price and allows you to create a variety of shapes. Of course, a door arch made of wood looks more impressive, but some problems may arise when working with wood. Let's look at how to create an arched opening using drywall.
1. Materials and tools
To make a door arch from plasterboard, you will need the following materials:
- 2 sheets of moisture-resistant plasterboard, which are 12 millimeters thick,
- one sheet of plasterboard 6.5 millimeters thick (arched),
- 4 metal guide profiles measuring 27x28 millimeters;
- one rack profile measuring 60x27 millimeters;
- 2 reinforced corners;
- a sheet of cardboard to create a mock-up of the arch;
- putty;
- wallpaper;
- dye;
- plastic dowels for attaching profiles to walls;
- metal screws 25 mm.

Using the tools for making an arch instead of an interior door, prepare construction knife or electric jigsaw, hammer drill, screwdriver or screwdriver, grinder or scissors, spatula and sandpaper, building level and a tape measure, nylon cord and pencil.
2. Determining the dimensions of the arch
So, you need to start work by taking measurements of your doorway. The door arch consists of 3 elements, two of them are identical. They are sheets of drywall that have a semicircle cut out. The width of the sheets is equal to the width of the opening, and the height varies depending on the shape of the arch.
These two elements are attached on different sides of the opening parallel to each other. The third element of the arch is a rectangular strip, the width of which coincides with the distance between two identical elements, and the length with the perimeter of the part of the circle that is formed by the arched cutout.
The height of the arch will depend on the height of the door opening under the arch. Remember that in the case of a low opening, up to 2 meters high, the arch will “absorb” the space. In this case, you should just slightly round the upper corners in the opening. If the height of the arch is 2.5 meters and above, then you can make a full-fledged arch from plasterboard.
3. Choosing an arch design
In order to harmoniously plan the combination of all elements in the room, you should familiarize yourself with the possible design of the door arch. Today, all options for door arch shapes can be grouped as follows:
- classic arches, which look like an arc with one radius;
- door arches in the Art Nouveau style, having an increased radius, that is, the arc in this case takes the shape of an ellipse;
- arches in romantic style that are distinguished by a complex combination of straight and rounded parts;
- arches in gothic style, characteristic feature of which - the top point is made in the form acute angle formed by two planes.

When choosing the shape of a door arch, consider which one will look best in the interior of the apartment. Take into account the style of the corridor and the size of the interior door opening in the form of an arch.
The classic arch can be segmental or round. With a round arch, the cutout should look like half of the circle formed by the cutout, the diameter of which is equal to the width of the doorway. With an oval or segmental arch, the cutout will have a larger diameter than the size of the doorway. A segmental or triumphal arch instead of a door is characterized by a less pronounced bend and is most often used to design wide openings.
4. Manufacturing of front parts
To create the side elements, you will use sheets of drywall that are 12 millimeters thick. There are two ways to make an even semicircle:
1. Using improvised means. In this case, you need to use what is available in every home: a simple pencil and a tight rope:
- Tie a rope to the pencil;
- Mark the middle of the circle - its radius, remembering the number that you calculated when measuring the width of the doorway. If the opening width is 1 meter, then the radius of the circle is 50 centimeters.
- Measure approximately 65 centimeters from the edge of the sheet where the top of the arched opening will be located and draw a line. These numbers are taken from the following calculation: 50 (radius) + 15 (length from the top point of the doorway to the top of the future arch) = 65. It is not recommended to do less than 10 centimeters.
- Cut the drywall to the width of the interior door opening under the arch, which in our example is 100 cm.
- Mark the middle of the line drawn earlier, that is, 50 centimeters from any edge, to find a point for drawing a semicircle.
- Take a pencil with a rope, measure the length of the rope half a meter and draw a semicircle from the last mark. As a result, you will get an even semicircle.
- Using a utility knife or jigsaw, cut out a semicircle along the markings - a rectangle with a cut out semicircle, 100 centimeters wide and 65 centimeters high. The height at the narrowest point should be 15 centimeters.

2. Before making an arch, get something flexible and long: for example, a soft plinth or PVC panel. It is this element that will help you quickly outline the plasterboard sheet semicircle:
- Cut out a rectangle 100x65 centimeters.
- Measure 50 centimeters from each edge and draw two lines.
- Place a dot where the lines meet.
- Take auxiliary tool and bend it along the width of the opening on both sides to form a semicircle.
- The most convex part will be flush with the marked point, and the edges will meet the edges of the rectangle at the bottom.
- Outline the resulting arc and cut it out.

5. Creating a frame for the arch
Step-by-step instructions for making a frame for an arch instead of a door to the kitchen or living room looks like this:
- To make an arch frame in the shape of the letter “P” you will need a metal profile - 27*28 guides, since they are strong enough and suitable for making an arched arc.
- Measure 2 guides along the width of the door opening, in our example this figure is 1000 millimeters. They need to be fastened parallel to each other on each side of the opening.
- Attach them using dowel screws (brick or concrete surface) or wood screws (wooden wall).
- To make your arch flush with the rest of the wall, attach the frame slightly deeper into the doorway by 11-12 millimeters. After fixing the drywall and putty, the surface will be leveled.
- Now you should fasten two parts of the frame on each side. For our example, their length is 600-650 millimeters. The only thing that needs to be done is to cut off the lower part of the profile at an angle, because at the bottom the arch narrows and part of the profile will be visible if you don’t do this.
- Now you can attach the prepared front elements of the arch to the main part of the frame using metal screws.

6. Manufacturing of the end part
At this stage, it is necessary to make the end part of the door arch from drywall. To do this, proceed in the following sequence:
- First make a frame onto which you will attach the curved strip. It needs to be made from a 27×28 profile.
- Prepare metal scissors for work with spring mechanism, which independently folds the handles back after cutting.
- To give the profile an arched appearance, it must be cut.
- The profile itself is shaped like the letter “P”. Turn it on its side clockwise so it will be positioned inside the secured right side of the arch. Opposite will be placed the same profile in mirror image.
- Make cuts in the middle and upper parts of the profile in increments of 40-50 millimeters. The steeper the bend, the more often you make the cuts.
- After making such a “snake” of the required length, fasten it along the very edge of your semicircle.
- It is imperative to strengthen the resulting interior or front door with an arch. Make cross members for this from rack profile 60
- Insert the cross members into your serpentine frame. They are usually secured with self-tapping screws with a press washer.
Now you need to cut a piece of drywall, the width of which is equal to the thickness of the opening walls. For creating interior partition The sheet should not be too wide, since the size of the walls is small. To create an arch in load-bearing wall the sheet must be wide enough. Make the length of the strip a little longer; you can always cut off the excess. Next, you should bend the plasterboard strip.

There are two methods for bending drywall:
- The first dry method is used if you need to obtain a bend with a small radius of curvature (less than 30 centimeters). Its essence is quite simple: a strip of drywall is cut with a mounting knife so that it cuts through upper layer cardboard and went a few millimeters deep into the gypsum layer. In this case, the bottom layer of paper will remain intact. Then the drywall is broken along the slots and secured with self-tapping screws to the frame profile.
- The second method is based on the property of drywall, when moistened, to acquire some plasticity, and after drying, to retain its given shape. It is with the “wet” method that doors can be made in the form of an arch if its radius is more than 30 - 40 centimeters. For this:
- Wet one side of the drywall strip with water.
- To give the strip of drywall the desired curvature, go over it with a spiked roller, without pressing too hard. Punctures are needed so that the water penetrates the entire thickness of the workpiece more quickly. You can achieve the desired degree of hydration in about an hour and a half.
- You don’t need to prick the workpiece all the way through, but at most half the thickness. You can tinker and make punctures with an ordinary awl.
- The punctures should be placed approximately one centimeter apart. Make punctures only on one side, on the side into which the arch will bend.
- After moistening, the workpiece must be bent to wooden template, but it’s better to make a template from drywall. You can later use this material to create small additional parts during the remodeling process. sliding door into the arch.
- After the sheet begins to bend, carefully attach it to the frame.
- Treat the mounted arch with a sanding mesh or sandpaper, eliminating irregularities and burrs.

7. Finishing the arch
Now comes the turn of finishing the arch:
- To give an arched design correct form and hide the “jambs”, you need to cover up assembly seams putty intended for seams and glued with fiberglass mesh.
- Protect corners with special perforated corners, plastic or metal. Attach the corners to the putty, while smearing them with a spatula.
- After the joints have dried, they go over the arch again with sandpaper.
- After this, the surface is primed with a deep impregnation primer, which dries in 30-40 minutes.
- Then the arch is puttied clean using a finishing compound.
- After the last layer has dried, it must be sanded with a fine sanding mesh.
- The arch can also be painted or covered with wallpaper, as shown in the photo interior doors and arches.

8. Decorating the arch with lamps
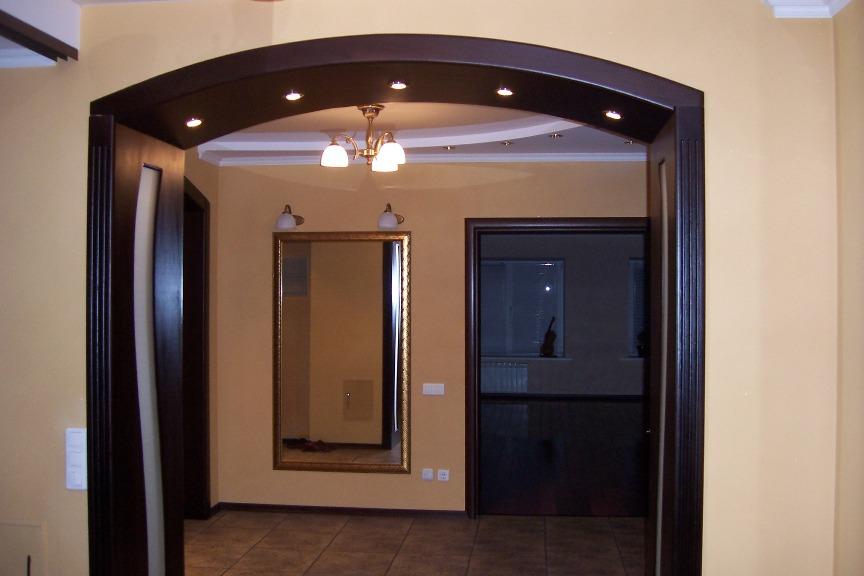
Built-in lamps are an excellent element of the door arch design. There is some space inside the plasterboard arch, and it is this that allows lamps to be built in in those places where necessary. A pair of small lamps that have a directional beam of light can only illuminate the opening itself, almost without illuminating the room itself, which is especially convenient at night.
LEDs, which are filled with plastic into a thin flexible cord, create the effect of a luminous dotted line of the most different colors. Small lamps that produce a beam of light similar to laser beam, are smaller than the nail of the little finger. However, it should be remembered that such “devices” often require a transformer, but it is inexpensive and takes up little space.

Installing similar decor for arches and doors will not be a big problem:
- Most of them have a spring lock, and the light source simply needs to be inserted into the cut-out hole, after which the springs will expand, holding the device well.
- The junction between the lamp body and the drywall will be covered with a decorative overlay. Such overlays have a variety of shapes - from an ordinary ring to fancy futuristic figures.
- If you plan to insert lighting elements into the arch, then the holes for them must be cut at the stage of marking the parts.
- The hole for the lamp in the most in simple form you can carefully cut with a strong, narrow knife. Accidental cuts and chips will be covered with a decorative overlay.
- More serious flaws can be eliminated with a small amount of Fugenfüller.
- To make the composition set faster, add ordinary building gypsum to the putty, about a quarter of the volume of the mixture.
- If you need to cut a lot of holes, you can also buy cutters for gypsum boards. They are attached to a regular drill and cut holes of small and large diameters in soft material- GKL, OSB, plywood, plastic, laminate.

Thus, there are many ways to make an arch from a door, and each owner is free to give preference to the option that suits him best, but when working with drywall general recommendations mandatory for everyone. Of course, you can also buy a ready-made arch made of MDF, but you will have to adjust the door opening itself to fit it. Therefore, it is more practical to make an arch from plasterboard yourself.


