How to attach a Mauerlat to an existing brick wall. DIY roof. Mauerlat - the base of the roof. Mounting the Mauerlat
When planning the construction of individual private buildings, each owner country house thinking about choice future design structures and roofing. As you know, the roofing structure creates a load on the walls, which includes the total mass of the entire rafter system, the weight of the roofing building materials used for the ceiling and lateral (variable) loads from precipitation. Regardless design features brick, wood or concrete walls, roofing devices, to evenly distribute loads, it is necessary to install a power plate, which essentially acts as a transition link in which the weight of the roof and lateral loads mutually compensate each other.
Mauerlat (matitsa) is the most important element roofing system, the basis for the rafters, providing a connection between the load-bearing walls and the entire rafter system of the roof structure, evenly distributing the load level on top part walls
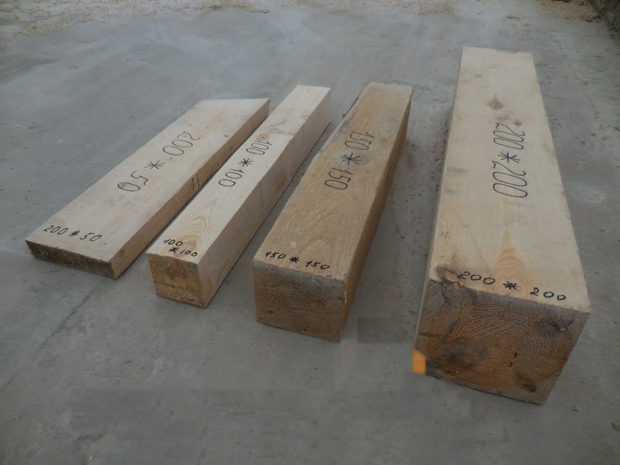
Mauerlat represents wooden beam or a solid log, cleared of bark, which is firmly connected to the supporting brick wall. To manufacture this element of the roofing system, hard coniferous wood is used in the form of finished timber measuring 150x100 mm, 150x150 mm, 80x180 mm, strong logs with a diameter of 185 mm, of which one side is cut off for a better fit to the wall. The moisture content of the wood used to make the matrix should not exceed 20%.
The construction of the house's rafter system is based on the use of durable wooden beams. The beam must have a cross-section of 50*200 mm, required length. When designing the rafter system of a roof structure, you can not take into account the structure of the eaves overhang. It can be equipped after the installation of the entire rafter system is completed. The construction of the roof overhang of the rafter system is based on the use of an additional board (“filly”).

Installing the Mauerlat is initial stage arrangement of the rafter system of the roof structure. Without a reliable connection between the Mauerlat and the brick wall, it is impossible to build a stable, durable structure for the roof structure of a pitched roof. In the process of arranging brickwork, for a greater level of stability of the entire system, a small protrusion is made on the inside of the walls, which will prevent accidental dumping in the event of uneven loads on roofing system Houses.
Methods for fixing the Mauerlat to a brick wall
In construction practice, various methods are used to attach the Mauerlat to the wall of buildings. Before performing work, it is necessary to prepare equipment, purchase required quantity building materials:
- wooden beam the right size with a section 150*150;
- construction hydraulic level;
- waterproofing material (roofing felt);
- hammer, electric drill, adjustable wrench, fastening hardware.
The Mauerlat can be fastened:
- Thick steel wire.
- Construction studs.
- Wooden plugs.
- Anchor hardware and armored belt.
Method of fixing the matrix to brick wall depends on:
- technical, quality and operational parameters of building materials;
- building area;
- structural features of the structure, installation of the roofing system.
It is worth noting that any types of sliding fasteners are not used for this element of the roof structure. The base under the roof must be installed strictly horizontal plane. To avoid weakening of the rafter system, thrust slots are made only from the side rafter legs.
When performing calculations, take into account the methods of installation and fastening of the rafter legs to the support beam, namely:
- The sliding method, in which the rafters rest against the beam, have a certain degree of freedom. The strength of the structure is ensured by the installation of additional crossbars, which can be secured to the beam by fixing the boards of the rafter system.
- Thrust installation. In this case, the thrust element for the rafters is the teeth cut into them or additional wooden blocks.
Depending on the method of fastening, you will also need several wooden blocks and steel construction brackets measuring 250 mm. If the installation and connection of the matrix is carried out with overhead studs, you will need L-shaped pins with threads with a diameter of 12-14 mm, threaded nuts, metal washers, concrete mixture M 250.
Tying the mat with steel wire

This method of fastening can be considered the simplest and fastest. Steel wire with a diameter of 05-0.6 mm is twisted several times around its axis and laid in five rows of brickwork relative to the level of the installed Mauerlat. The ends of the wire are placed in increments of 60-75 cm. After the cement-concrete mixture has completely dried and hardened, the wire is threaded through the beam and twisted, thus fixing and pressing this element of the roofing structure to the brick wall. It is necessary to correctly calculate the length of the wire so that it is not only enough to tie the beam, but also has long free ends left.
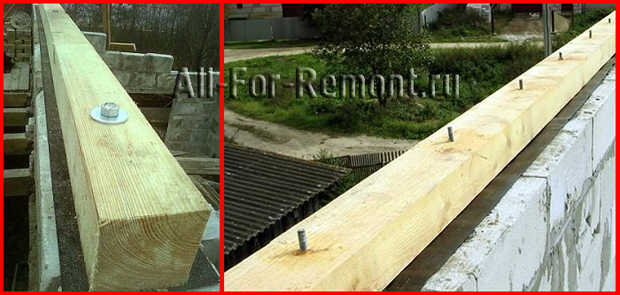
Fixing the Mauerlat with construction pins
When constructing low-rise construction projects, if there are no significant loads on the roof structure of the house, the installation and fixation of the Mauerlat is carried out using mortise construction studs, embedding them to a depth of 40-45 cm, no higher than the third row from the top of the brick wall. To compact and increase the strength of the entire structure, a concrete pad is laid. Filling with concrete solution is carried out very carefully, trying not to contaminate the threads of the studs. It is recommended to wrap construction tape around the threads of the studs to prevent contamination. The support beam is laid on studs. Using a hammer or any heavy object score. In places where there are marks left after studs, using an electric drill with a drill required diameter, make holes. Before installing the beams, they are laid waterproofing layer. The support beam is fixed to the wall using nuts and washers with a diameter of 37 mm.
Application of armored belt and anchor fasteners

This method of installing a Mauerlat is the most reliable, durable, ideal for homes and buildings with increased loads, but very labor-intensive, complex and expensive due to the high cost of anchors. Initially, the formwork is installed, after which well-tied metal reinforcement is installed inside along the entire perimeter of the surface. A cement-concrete mixture is poured on top, pouring in a circle at a time, which allows you to create an even, monolithic structure. During the installation of the armored belt, anchor fasteners are fixed to it, which are installed along one line. The position of the bolts relative to the surface must be strictly perpendicular. The number of anchors must correspond to the number of rafters. The attachment points of anchor fasteners and rafter legs should not coincide.
Washers or pieces of reinforcement are screwed onto the anchors on top and welded onto the bolts. After two or three days the nuts threaded connections tighten, ensuring their maximum fixation, and for reliability it is recommended to fasten a lock nut on top. After hardening concrete mortar anchor hardware is embedded in an armored belt, securely fixing them to the structure frame. Holes are made in the beams, taking into account the location of the bolts, and the Mauerlat is placed on the anchor fasteners.
Fixing maurlat with wooden plugs
The size of the wooden plugs should correspond to the size of one brick. The plugs are initially treated with an antiseptic solution, laying them one row below the installation level of the support beam. The Mauerlat is fixed with steel construction brackets. The number of fasteners should be equal to the number rafter legs. You can use plugs made from bitumen-tarred wood to secure the support beam.
Technological features of installation

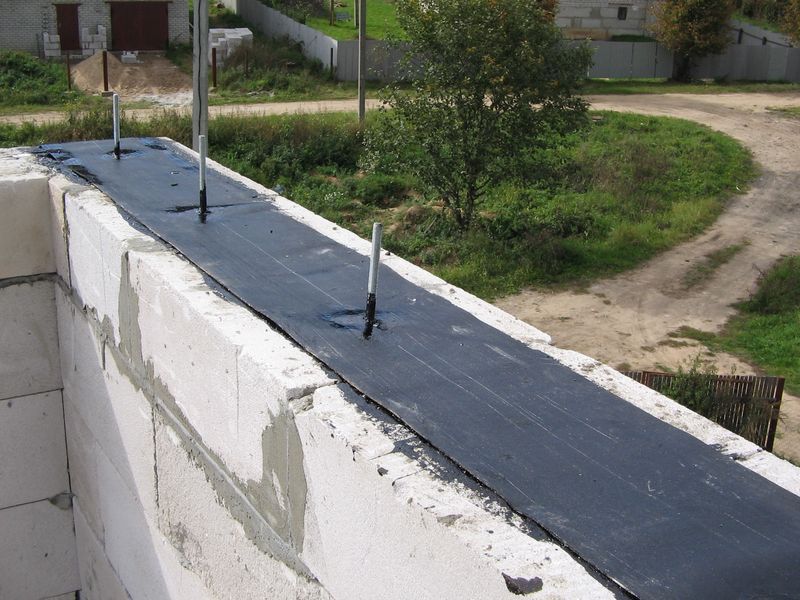
All work is performed in a certain sequence. Regardless of the chosen method, before installing the support beams, perform preparatory work. The surface is ideally cleaned from construction waste, level, install the waterproofing layer, which should be placed between the brickwork of the house and the Mauerlat itself. As waterproofing material They use sheets of roofing felt, isolon, and polyethylene construction film.
Using anchor fasteners and construction studs, adhere to the following sequence:
- mark future holes using a hydraulic level or even boards. When marking the location of future threaded fasteners, mark the locations of the rafter legs on the mauerlat. The best option is the location of the fasteners in the middle of the gap between the rafter legs;
- attaching the board, drill holes relative to the markings;
- place the Mauerlat on the fastening elements;
- carry out installation and fastening of the support beam, tightening the bolts and washers.
In the case of using steel wire, the actions are performed in the following sequence:
- At a distance of 2.5-3 cm, drill holes in the support bars.
- The ends of the wire are threaded into the holes, which are pre-fixed in brickwork walls.
- Twist the ends.
You can install the Mauerlat of a private house yourself, having experience and skills in carrying out construction and repair work. For house walls made of light brick masonry, use a continuous mauerlat that runs along the entire perimeter of the wall. For small-sized houses and country houses, it is preferable to install and fasten the matrix using wooden plugs or steel wire. For multi-storey private buildings, construction anchor fasteners and armored belts are used. Considering technical requirements, you need to attach the support beam to the brick wall every one and a half to two meters.
Without a stable connection between the Mauerlat and the wall, carry out reliable design pitched roof It's simply impossible.

Matitsa, which is what people used to call this important element, is located on top of the walls and is a support for the rafters. It must withstand and evenly distribute the load of the roof, snow, and wind pressure. In addition, unlike the rafter system, this element does not allow movable fasteners.
The material used for the Mauerlat is finished timber or it is made from two boards of the appropriate size, connected to each other with nails. The humidity of the wood should not be higher than 22%; preference is given to pine. Fastening can be done in several ways, the choice of which depends not least on the material from which the building was built, as well as on its area and some design features. The main thing is to place the foundation for the roof on a flat surface and strictly horizontally. Its weakening is unacceptable, so thrust slots can only be made from the side of the rafters.

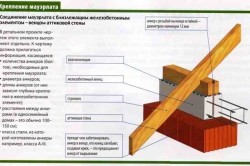
Mauerlat installation diagram: 1 - Screed, 2 - Mauerlat, 3 - Waterproofing, 4 - Rafter, 5 - Wire, 6 - Fasteners.
When erecting brickwork, for greater stability of the system, a small protrusion is created on the wall on its inner side. When laying the base for the rafters, the protrusion will prevent it from being accidentally thrown off, even if uneven loads occur on the roof of the building. This condition applies mainly to roof construction without struts. It also plays a role in cases where the matrix is not secured with metal pins.
Before starting work, you should stock up necessary materials and tools. First of all this:
- timber with a cross section of at least 150x150 mm;
- material for waterproofing (roofing felt);
- level for horizontal installation;
- adjustable wrench;
- drill;
- hammer;
- nails, bolts.
In addition, depending on the chosen fastening method, additional materials are needed.
- If you decide on tying the timber with wire, you will need thick steel wire rod with a diameter of 4-6 mm.
- To work using wooden plugs you will need:
- wooden blocks the size of bricks;
- metal construction staples 250 mm long;
When connecting using construction pins:
- long L-shaped metal pins with threads with a diameter of 12-14 mm, the length of the threaded section is 50 mm, the length of the short part is 120-140 mm;
- nuts for pin threads (usually M12 thread);
- metal washers;
- concrete grade 250 (if concrete pads are created).
Choosing the shape of the structure and method of fastening
For frame, panel houses, as well as those made of lightweight brickwork or lightweight types of concrete, preference is given to a continuous structure along the entire perimeter of the building. In more massive masonry, the Mauerlat is installed flush with internal part walls. From the outside it is protected by a masonry ledge. It is allowed to use pieces of timber or logs as a material if their length is at least half a meter. The pieces should be placed under each of the rafter legs.
In a building with a small roof area, the structure is a rigid frame. The beams are joined together using a direct lock and secured with bolts or nails. Then, using staples, the frame is attached to plugs made of wood treated with an antiseptic and built into the masonry. There must be waterproofing between the brick and the mauerlat frame. Two layers of roofing material are quite enough for her.

However, if the roof area reaches at least 200-250 square meters, it is better to use another method. It consists of creating concrete pads on the wall where the structure is installed. They are vertically embedded into concrete that has not yet had time to harden. metal rods with thread. The distance between them should be no more than 2 m, and the length of the rod should exceed the thickness of the Mauerlat by 30-40 mm. Next product with advance drilled holes you need to put it on the rods and tighten it with washers and nuts.
To make rods, pieces of reinforcement are often used, to which bolts are welded with the threads facing up. The bolt heads are then cut off. But sometimes the sections of reinforcement protruding over the beam are simply bent. Metal plates are usually welded to the bottom of the rods to prevent them from being torn out of the concrete. This provides special stability in strong winds. If the roof area is less than 200 sq.m., concrete pouring you don't have to do it. It is enough to embed the reinforcement in the top 3 or 4 rows of masonry. The pitch of the reinforcement bars should not coincide with the pitch of the rafters.
How to fasten using construction pins?
In creating supports for rafters, this type of installation, according to experts, is considered the most reliable. If metal studs are embedded directly into the brickwork, their immersion depth should be 450 mm. They are located vertically on the wall, and must protrude above the surface of the Mauerlat by at least 30 mm.
You can also attach it in another way: on support pads. This is its difference from a similar operation for concrete buildings, where a monolithic one is created. When creating support pads on a brick wall, the length of the concrete pad should not exceed 400 mm and the height – 220 mm. Before pouring concrete, it is advisable to wrap the threads of the studs with tape so that it does not become dirty and does not make it difficult to screw on the nuts later.
Before installing the Mauerlat, you need to drill holes in it with a special feather drill. To make precise markings, it is placed on the tip of the pins, and then hit from above with a massive hammer. Marks will remain on the surface of the timber in the right places. Make sure that the studs are also located along its edges. The foundation for the future roof is laid along the center line, or it is shifted slightly inward or outward (depending on the design of the building). The main thing is that it does not pass closer than 5 cm from the outer part of the wall.

It is necessary to lay a layer of waterproofing on the wall, pinning it onto the studs. After this, the main installation can be carried out. When adjusting the structure, you should pay attention to the fact that under no circumstances should the Mauerlat be trimmed. It is only allowed to trim the rafters, making sure that they rest well on the beam and do not just touch it.
To make the task a little easier, you can use a template for the support part of the system.
Fixation methods for a small roof There is an opinion that in small houses you can do without a foundation by installing rafters directly to the floor beams. However, we should not forget that with such a design, significant tension arises at the support points. Using a Mauerlat helps to distribute it evenly over the entire surface. In addition, the roof has a fairly high windage, and its correct device
The method of fixing the structure using thick steel wire is quite simple. Sometimes they resort to using rafters, which are connected with twisted wire to metal reinforcement driven into the masonry. They are the ones who press the base against the wall. However, such a device is used only in cases where it cannot be made any other way.
Classic wire fastening is carried out as follows. The middle of the pieces of wire is located in the masonry 4-5 rows before its end in increments of 60-70 cm. Sufficiently long - 25-30 cm - the ends rise up. If you do not plan to plaster the outside of the house, then the outer section of the wire is hidden in the solution. After waiting for the solution to harden and become strong, the ends of the wire are twisted over the beam, pulling it tightly to the wall.
IN country houses and other small buildings it is convenient to use brick-sized wooden plugs. They must first be subjected to special treatment with an antiseptic and wrapped in roofing felt. In addition, it is practiced to make plugs from bitumen-tarred timber. They are laid in increments of 500-700 mm below the rafter support or directly below it. The elements should be connected not with nails, but with metal staples.
- Element Features
- Mounting the Mauerlat
- Preparatory work
- Reinforcing belt
- Necessary tool
Fastening the Mauerlat during the construction of the roof of a building is an important element of the entire construction. The correctness of this operation significantly affects the reliability and durability of the house. Despite its apparent simplicity, installing a Mauerlat is a very responsible undertaking and must be done with the utmost care and precision.
Item Features
Mauerlat is a part of the roof structure in the form of a wooden beam along the entire perimeter of the wall for fastening the rafter structure. When making roofs from metal parts Mauerlat is made from metal profile (most often an I-beam). It is installed on top external walls
building and acts as a connecting element between the wall and the roof.
- The main tasks performed by the Mauerlat:
- providing support for the roof on the wall, preventing the destruction of the upper part of the wall;
- reliable fastening of the rafter system to the wall;
uniform distribution of the load from the roof on all load-bearing walls of the building.
- strength (both the beam itself and its attachment to the wall);
- continuity around the entire perimeter;
- water resistance and resistance to atmospheric factors.
The most common design: a wooden beam measuring 10x10, 15x15, 10x15, 8x18 cm. Sometimes a log without bark is used, in the lower part of which a flat surface. The wood must be well treated with an antiseptic composition. The connection in the corners and beams to each other during elongation is made by creating a “half-beam” type lock with reinforcement with nails. In general, the entire rectangle of the Mauerlat should be a single rigid structure.
From below, the Mauerlat is laid on top of waterproofing (usually roofing felt), and on the outside of the wall it is advisable to install thermal insulation. The beams are located closer to the inner wall surface while maintaining a distance to the outer surface of about 5-8 cm.
Return to contents
Mounting the Mauerlat
Correctly installing the Mauerlat means, first of all, securely securing its structure in the upper part load-bearing walls. There are several mounting methods, the choice of which depends on the wall material. The most commonly used methods are: fastening with wire, staples, pins and anchors, as well as with the manufacture of a reinforcing belt. In general, installation of a Mauerlat includes the following main steps: surface preparation; making a frame from timber; fastening to the wall and securing the rafter system.
Return to contents
Preparatory work
Installation of the Mauerlat begins with careful preparation of the wall surface. To begin with, it is cleaned of dirt, unnecessary objects and leveled. There should be no bulges on the surface (hardened mortar, nails, etc.). Horizontalness is checked using a building level. If necessary, apply a leveling layer cement mortar. A layer of roofing felt waterproofing must be applied on top of the wall, polyethylene film or other waterproof materials.
One of the most simple ways fastening the structure to the wall - using steel wire. This method can be used for any wall material. For tying, steel wire with a diameter of 4-6 mm, twisted into a bundle, is used.
The strapping technology is simple. When building a brick wall, at a distance of 4-5 rows to the end of its masonry, prepared wire is laid with the ends leading up on both sides of the wall. The wire laying step is 65-75 cm. The length is selected so that after installing the timber on top of the brick, the ends of the wire protrude by 30-35 cm. After the solution has hardened and the Mauerlat has been laid, the free ends are twisted together on top of the timber with maximum compaction. With other wall materials, holes are drilled in the wall at the required distance into which the wire is passed.

Fastening the timber to the wall can be done using steel brackets. To do this, when laying bricks, wooden blocks are laid 2-3 rows before the end of the wall. The pitch of laying the elements is 70-80 cm. The size of the bars corresponds to the size of the brick. After installing the Mauerlat, it is secured by driving a staple between its beam and the wooden backing.
For light enough roofing structures wide application finds a way to connect using pins. In this case, they are embedded in the wall masonry to a depth of about 40-45 cm. L-shaped steel studs with threads in the upper part are used for connection. You can make studs by vertically welding a threaded steel rod to a metal plate measuring about 5x5 cm. Above the mauerlat beam, the stud should extend to a height of at least 25-30 mm.
The Mauerlat is installed in the following order:
- When laying the wall, studs are walled up in increments of 65-80 cm strictly vertically, with the thread facing upwards.
- Holes are drilled in the Mauerlat bars, strictly corresponding to the location and diameter of the studs. For marking accuracy, a simple method is most often used - a beam is placed on top of the studs and blows are made on it in order to obtain marks from the studs.
- After installing the structure on the studs, the beams are attracted to the wall surface with nuts. To strengthen the system, a reinforcing concrete pad is sometimes used. It is applied to the wall surface after installing the studs. The thickness of such a pillow is selected within 15-20 cm, and the width is no more than 40 cm.
To do this, holes are drilled in the timber and the wall. The depth of the hole in the wall masonry must be at least the thickness of 2 bricks (at least 15 cm).
The installation step of the anchors is 65-80 cm. The anchor bolts are screwed into the prepared holes and tightly attract the beams. Most often, the anchor connection is used simultaneously with a reinforcing belt, which ensures maximum strength.
An integral part of the construction technology pitched roofs is a Mauerlat device. Today we will look at why a Mauerlat is needed, what it is and how to install it correctly.
What is a Mauerlat
Mauerlat is a long beam fixed along the upper edge of the wall. The main tasks for which this element is needed:
- redistribution of the point load transmitted from the rafters and floor beams along the entire length of the wall;
- tying the roof to the walls of the building.
On multi-pitched roofs it may look like a closed perimeter, for gable roof a beam laid along each slope is sufficient. This difference is due to the fact that rafter frame gable roof rests on only two walls.
This roofing element is made from the same material as the rafters, so the most common type is a wooden Mauerlat (and it must be treated with an antiseptic). For roof with metal frame a channel is used, I-beam and other types of rental.
Types and size of Mauerlat
The cross-section of the Mauerlat depends on the expected loads - most often it is timber with dimensions of 100x150, 150x150 and 150x200 mm. Rectangular shape timber gives it stability, but a log will do if you cut it flat on one side.
Instead of timber for the Mauerlat, you can take several boards 150 mm wide and 50 mm thick and connect them together. This method is convenient because it is easier to build up boards if you need to extend them, and it is easier to carry and lift to a height. Usually they take two or three boards, but sometimes builders make do with one.
This option is applicable only for light and small roofs. In case of significant wind and snow loads For a roof, such a thickness of Mauerlat will be clearly insufficient.
IN wooden houses The top row of logs or beams serves as the Mauerlat, so the cross-section corresponds to the parameters of the material from which the walls of the building are constructed.
Attaching the Mauerlat to aerated concrete
The main methods of attaching the Mauerlat to aerated concrete are the use of embedded pins and anchor bolts. In addition, you can attach the Mauerlat to aerated concrete using perforated anchor plates, self-tapping screws for concrete and binding wire.
Important! Before attaching the Mauerlat, it is necessary to install an armored belt on top of the wall - its absence can lead to the destruction of the walls of the building.
Armored belt device
Armopoyas is a monolithic reinforced concrete belt, poured to increase the strength of the upper part of the wall when absorbing horizontal thrust loads from the roof, which are especially pronounced in winter time of the year. Thus, the main thing for which an armored belt (also called a seismic belt) is needed is to protect block masonry from cracks.
Installation of the armored belt begins with the installation of formwork. There are three options:

Then a frame made of steel or fiberglass reinforcement with a diameter of 8–12 mm. From masonry mesh a cell is cut out or a frame is made from a rod, and reinforcement is attached to it with knitting wire at the corners.
After installing the formwork and frame, the armored belt is poured, and if necessary, studs are installed (if the Mauerlat is planned to be fastened in this way). Recommended composition of concrete mortar when doing the work yourself:
- cement - 1 bucket;
- sand - 3 buckets;
- crushed stone - 4 buckets;
- water – 8–10 liters;
- liquid soap – 30 grams.
The first method is to install studs
To secure the Mauerlat to aerated concrete, you will need studs with a diameter of M10 or more, preferably M12–M16. The length of the studs is chosen so that after installation of the armored belt there is still required stock for installing the Mauerlat and screwing on the nut. You should be careful in your calculations, since after filling the armored belt it will no longer be possible to correct the mistake made. Usually a meter-long hairpin is taken and cut in half.
The cut part of the stud is immersed in the solution, and the flat end is left for the nut - then when screwing it on, you won’t have to clean off the burrs.
The studs are installed at equal distances in increments of approximately 0.6–1 m in the spaces between the rafter legs, aligned along the same line, as well as vertically, so that the beam sits easily after drilling holes in it.
The embedded pin can be installed both before laying the mortar and at the concreting stage: ![]()

To prevent the pin from being pulled out of the armored belt, it is stopped. The most common methods:
- a plate (heel) at the end, which is also a support, the approximate size of the heel is 100x100 mm;
- bending the end of the pin at an angle of 90 degrees;
- screwed nut with washer;
- welded piece of reinforcement.
The following video demonstrates the technique of laying studs (for both a brick wall and aerated concrete):
After the armored belt has hardened, the mauerlat is placed on the studs and tapped on top with a mallet - due to which marks will remain on it along which holes can be drilled (necessarily strictly perpendicular to the plane of the beam). Then the Mauerlat is placed on the studs, the washers and nuts are put on and tightened, the remaining excess part of the stud is cut off, leaving a small tip above the nut.
The upper part of the studs while pouring the concrete (and until the Mauerlat is secured) must be wrapped with stretch film or tape to protect it from the solution, so as not to have problems later with seating the beam and tightening the nuts.

The second method is to attach the Mauerlat to an anchor
When anchoring, it is necessary to correctly install the Mauerlat on the reinforced belt, mark and drill holes in the beam with further penetration into the concrete.

The anchor is driven into the hole and tightened. To increase the anchor support area, a washer is used. 
Fastening the Mauerlat to aerated concrete with anchors is used less often than with studs.
While the reliability of fastening using each of the above methods can be debated, the cost of the studs will be much cheaper. The method of fastening with anchors will be good solution from the situation if, when arranging the armored belt, the studs were not laid or they were installed incorrectly, and also if it was decided to make a mauerlat from several boards.
Very detailed this method highlighted in the video below:
Attaching the Mauerlat to a brick wall
Fastening the Mauerlat to a brick wall can be done using the same methods as described above for aerated concrete, or using:
- wires;
- staples to wooden plugs.
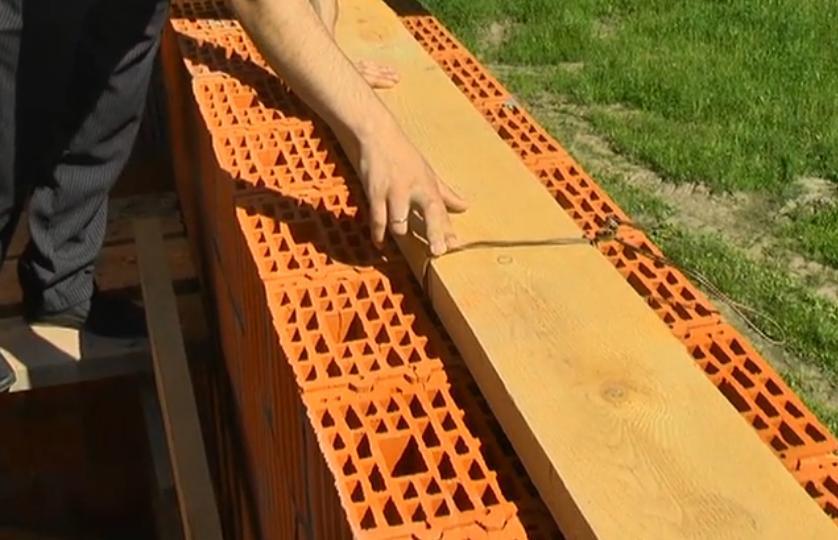
Using wire
When installing masonry, a steel wire is laid under one of the bricks at a distance of several rows from the upper edge of the wall (usually 3-4 rows), the ends of which are brought out and in. The wire is taken thick enough, and the length should be such that it is enough to tie the Mauerlat. It is recommended to make the number of such wire inserts equal to the number of rafter legs.

For fastening, the ends of the wire are twisted on top of the Mauerlat, pulling it to the wall. To make a strong connection, the wire must be tightened using a pry bar or crowbar. Otherwise, it may turn out like the would-be builders in the video below:
Using staples
A wooden plug is made from a block, which is laid in the brickwork several rows below from its upper edge, with the end facing outward. To fix the structure, one end of the bracket is driven into a wooden plug, and the other into the Mauerlat.

The thickness of the block must be greater than the length of the short end of the bracket (otherwise it will rest against the masonry), and the length of the bracket must correspond to the distance between the mauerlat and the embedded block.
How to increase the Mauerlat
Ideally, the Mauerlat beam should consist of solid timber, but since the size of the house does not always allow this, in some cases the Mauerlat can be increased.
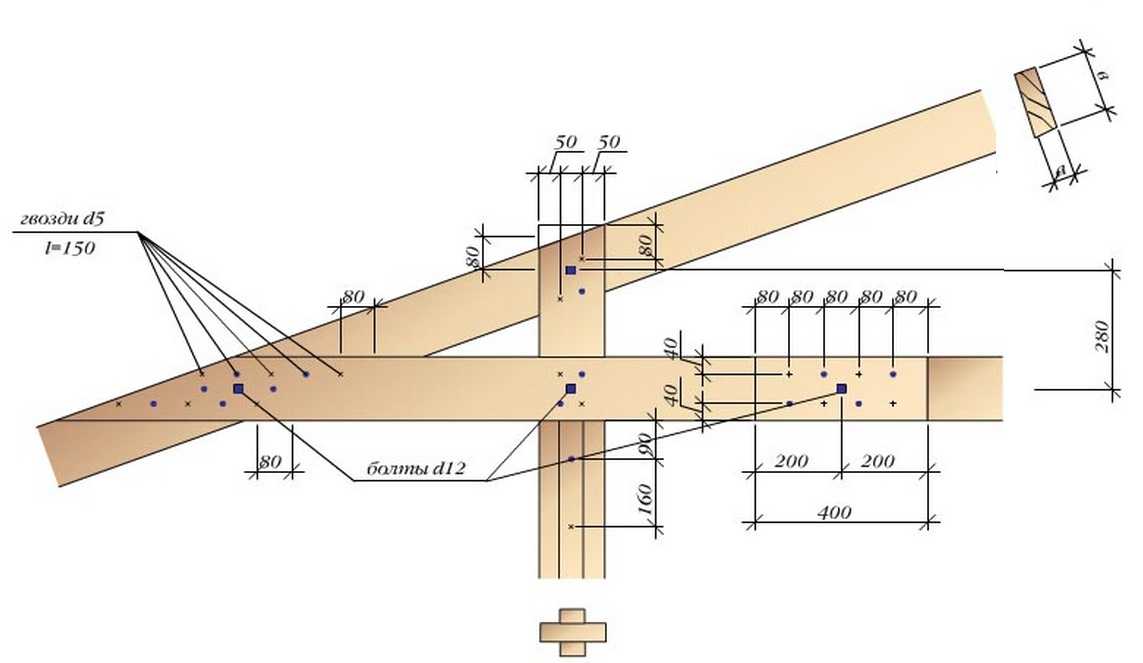
To do this, the ends of the extendable parts of the Mauerlat are sawed down to half the thickness of the timber and must be treated with an antiseptic. It is advisable to make the joint so that it falls on one of the embedded studs (which will significantly increase the strength of the connection), or it is fastened with anchors, fastening plates, or nails.

The beam is spliced from parts of timber approximately equal length, and not from a long piece and trimming, i.e. the connection should be made approximately in the center, and not at the edge of the wall.
A similar connection is used to join the cross beams at the corners of the building. A dowel is driven into the hole drilled in the joint, and the ends of the beams are tightened with staples driven diagonally, giving the entire perimeter additional rigidity. Another option is to use a hairpin.

The need for underlay and waterproofing
With direct contact between the wall and the Mauerlat, condensation forms due to the different thermal conductivities of the materials, so cut-off waterproofing must be installed (otherwise the wood will begin to rot).
In practice, waterproofing of Mauerlat is most often made from roofing felt or any other rolled bitumen-guided material in two layers. Ruberoid can be rolled out on the surface of the wall or attached to the Mauerlat using staples and a stapler; a strip of the required width is marked and sawed off from the roll with an ordinary hacksaw.
It is recommended to lay a linen or jute inter-crown sealant on top of the waterproofing for a tight fit and additional thermal insulation.
Another possible variant– installation of the Mauerlat on a substrate made of foamed polyethylene, which has both insulating and waterproofing properties.
That seems to be all I wanted to talk about in this article. As always, I invite readers to discuss nuances in the comments.
To prevent the roof of your house from being blown away by a strong wind one day, it is very important to correctly install its frame. In particular, we will talk about how rafters are attached to a brick wall.
Do you need any devices for this, what is the procedure for performing technological operations, and what kind of fasteners should be used? Not only the instructions, but also the video in this article will help you deal with these issues.
Mauerlat - roof support element
Before talking about how to install rafters on a brick wall, you should pay attention to the installation of the mauerlat beam, since it is the main load-bearing element of the rafter system. Accordingly, the installation of the roof begins with it.
So:
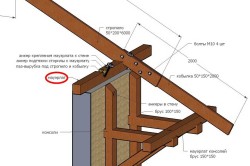
- It is necessary to think about fixing the Mauerlat to the brickwork at the stage of wall construction. Completing the wall is done with two different ways. Most often, this is simply a horizontal and even cut of the masonry, on inner side which the strapping beam is laid.
- In the second case, the masonry is finished with a ledge, which from the outside forms a cornice along the perimeter of the walls. External part ledge higher than the inner one, due to which a niche is formed in the wall into which the mauerlat will be laid. This option is very good from all points of view, since in this case the structure is better isolated from external influences.
In addition, the protrusion of the masonry is an additional barrier to the influence of expansion forces. Therefore, this option is most preferable when building a house. But not everyone can complete such a completion, especially if the owner, without the skills of a mason, builds the house with his own hands.
Fastening the harness: methods
In the first case, to secure the mauerlat into the masonry, long threaded rods. But before you put a beam with holes drilled for anchors on them, horizontal surface walls are coated bitumen mastic and lay a strip of any rolled waterproofing material on it.
So:
- After installing the Mauerlat, put washers and nuts on the studs and tighten them with force. When the wall ends with a ledge, it is impossible to attach the strapping to studs. But there are other options.
- For example: three rows before the end of the masonry, rolled steel wire with a diameter of 6 mm is placed in it, with outlets on the sides, the length of which should be enough to thread it through the holes in the beam and twist it. In this case, the distance between the fasteners must correspond to the pitch of the rafters.
In another option, the Mauerlat can be attached to wooden inserts in the masonry, which are cut to the size of the brick and carefully waterproofed. During the process of laying the edge of the wall, the working bricks in the places where the rafters are installed are replaced with wooden plugs. The rafter legs are attached to them with metal brackets.
Rafter support options
There are two, fundamentally different from a constructive point of view, ways of supporting rafters. Their choice depends on many nuances: the flooring option, which can be slab or beam; roof configurations; different angles slope of the slopes; the presence of an attic in the house.
And note that it makes no difference what material the walls are built from, so this information can also be taken into account by those who are building a house from foam or gas blocks.
Note! In the first version, the rafters rest directly on the Mauerlat, and in the second - on cross beam installed on top of the Mauerlat strapping. In order not to make mistakes, you need to know in which cases you should give preference to one or another option.
Scheme selection criteria
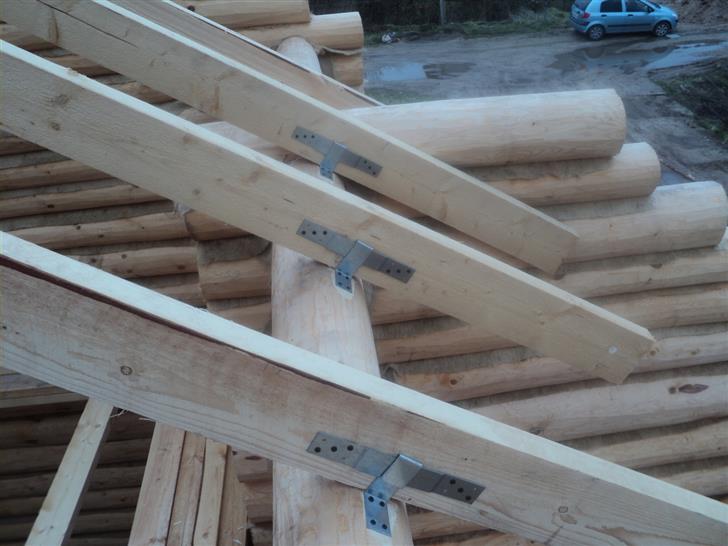
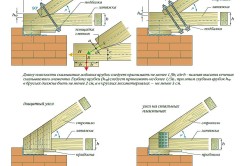
When using scheme number one, which is presented below, eaves overhangs are formed either by the rafters themselves, or by installing special bars called fillies at their ends. To support the rafter legs on the frame, grooves are cut out in the Mauerlat, as shown in this example.
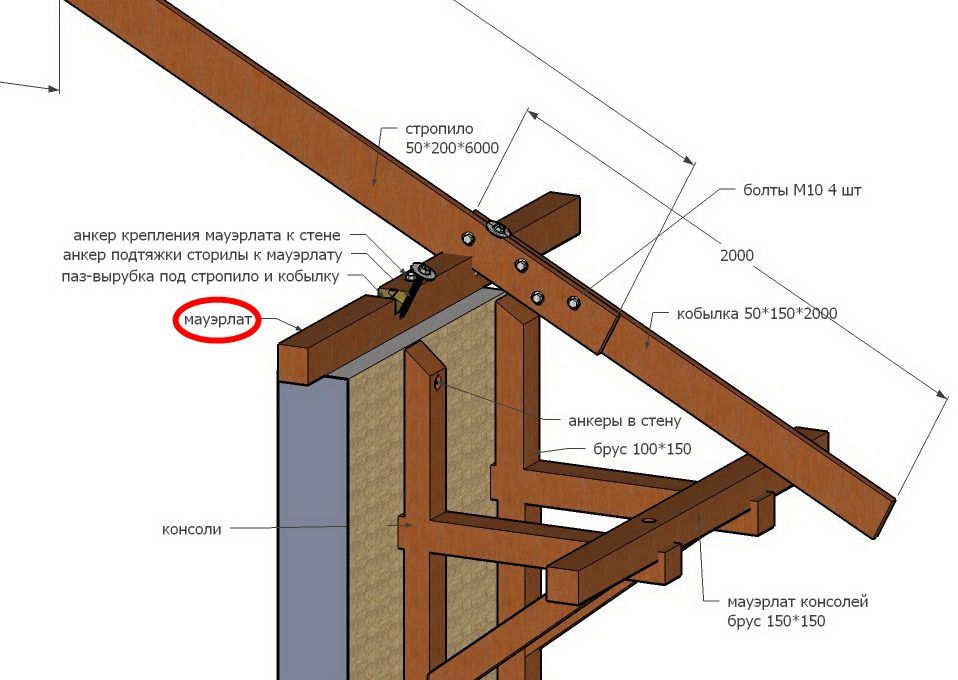
- But if the overhang of the rafter remains long, that is, it is mounted without a filly, at the point of its support on the horizontal beam, a special corner recess is made. In the second scheme, which, by the way, is ideal for houses with beam floors, roof overhangs are formed due to the beams extending beyond vertical plane walls.
- Then the rafters are attached to the ends of the beams, forming triangles with them. In this case, the load from the weight of the rafters falls not on the wall, but on the console, and for better load distribution, vertical supports are installed inside the corner of this triangle, coaxially with the wall, which is clearly visible in the next photo.
- It should be noted that the option of supporting the rafters on the beams is much simpler to implement, since no complex recesses are required. The only thing is that grooves are made at the ends of the rafters for half-tree connections, but the elements can be connected simply by overlapping each other.
- If the roof structure is simple, for example: gable, without an attic, then the second option is more than appropriate: installation of the rafters is quite simple, while the beams simultaneously serve as the basis for insulation and lining of the floor. But there are many situations when to mount rafter system Only the first option is needed.
- For example, when the floor is blocked reinforced concrete slabs. Since the ceiling already exists, the use of beams will only lead to an increase in the price of the structure due to excessive consumption of lumber. Therefore, the first method, in this case, is more economical.
- When a house is covered with slabs, the mauerlat is mounted on them, and not on the horizontal edge of the masonry. During the installation process, the rafters are fixed to the frame with metal plates with perforations for fasteners. By the way: both nails and screws that are used as fasteners when installing rafters must be galvanized!

- It is better to apply the first scheme in the case when the house structure has an attic, located only halfway in the roof. In such houses, the walls are built one and a half, or two and a half floors high. This “half” will form the walls of the attic. It is, of course, possible to install beams in this situation - only then will they cut the room in half, and do anything in it except non-residential attic, will not work.
- On hip roofs, having different slopes of slopes, as well as protruding architectural elements in the form of a mezzanine, it is necessary to use only the second scheme. In this case, it will not be possible to form overhangs correctly using the ends of the rafters or fillets. The reason is that due to the difference in the slope of the roof slopes, the edges of the overhangs will turn out to be different levels, and connecting them into a single line is simply impossible.
If both the main slopes and the hips are inclined equally, you can use both the first and second schemes without any problems. The walls of buildings with roofs with such complex configuration, most often end with cornice ledges, which were mentioned at the beginning of the article.


