A table for a gazebo made of wood. How to make a gazebo table with your own hands: interesting ideas and recommendations. Rectangular portable table made of boards
With friends and family, just sit over a cup of coffee or Mark any celebration.
And in order for there to be enough space for all those invited, a large one should be placed in the gazebo. table, which by the way you can do on one's own.
For manufacturing you don't need any special table materials and tools, and everything you need most likely there will be on your site.
What types of tables are there?
To begin, decide on shape table, focusing on the size and shape of the gazebo itself.
Tables rectangular the shapes are considered classics, but they do not look good in round gazebos. Advantage similar shape is that they can be installed as in center room, in a corner or against a wall.
Also for rectangular table can be made benches.
Round table more compact, and if necessary, you can seat him more number of guests than originally expected. However, the shape of the tabletop itself uncomfortable and does not imply the presence benches(only chairs that are placed around the table).
Legs tables can be either stationary or portable. And their quantity depends on the reference you choose models table:
- one leg (central);
- two parallel legs (in the shape of an inverted T, often connected by a crossbar);
- three legs (for round and small tables);
- four legs (classic version).
Note! If you don't go to the dacha often, optimal choice For the gazebo there will be folding furniture that can be displayed if necessary and removed during your absence.
What are tables made of?
The following are most often used to make tables: materials:
- Tree
The most beautiful and organically fits into the atmosphere suburban home material. Wooden tables are durable and durable, however the surface will need to be protect from exposure external environment(coat with varnish). - Chipboard
This is perhaps the most cheap, but at the same time short-lived material. But if you plan to use the table for occasional gatherings under a canopy or in closed gazebo, chipboard will cope with its function quite well.
The exception is laminated Chipboard: it is more expensive and stronger, not afraid of water and exposure to the external environment. - Plastic
Plastic tables are quite popular. They don’t get dirty, they don’t demand special care, are not afraid of moisture. In addition, plastic is very light, which means the table will be extremely easy to move.
Minus plastic tables – fragility and fear of straight lines sun rays, as well as their small size (the material cannot withstand loads, and therefore the countertop area is often minimal). - Metal
Metal tables are the most durable, but at the same time uncomfortable. Heavy construction difficult to move, the table itself heats up under the sun and cools in cold weather.
There are also other materials that are used in the manufacture of tables, but the options listed above are found more often the rest.
Materials and tools
If you decide do table in the gazebo with your own hands, then you will be needed following:
- hammer;
- saw;
- axe;
- nails(bolts);
- sandpaper;
- impregnation
- varnish
Helpful advice: if you don't plan to cover wooden table varnish, leave a small gap between the boards of the tabletop. This way the water will flow between the boards and not remain on the table, causing it to rot.
Wooden table
 On one's own make the table is the simplest of tree.
To begin, decide on size future table and make a drawing. According to prepared drawing cut out the details.
The manufacture of the table should begin with countertops. It is collected from boards or bars suitable length. Lateral ends should be leveled so that the boards tight adjoined each other and no gaps formed in the tabletop.
The boards are fastened together with self-tapping screws or dowels. Finished countertop surface level out and polished.
If you want to do classical table option, then make from two longitudinal and two transverse boards box, to which the tabletop and legs will be attached. It is important that angles the boxes were not warped.
Legs are attached to the box with self-tapping screws or bolts. To give the design more rigidity Additional boards can be attached to the sides.
The last stage of assembly is attaching to frame countertops.
Wooden table assembly diagram 
Interesting solution For dachas – in which the table and benches represent single design. Table-bench option – transformer: an ordinary-looking bench with a backrest turns into a cozy dining nook in one movement.
Log table
 Making such a table is quite difficult, since before manufacturing parts, it is necessary to process logs
If they're enough smooth and long, they can be used directly as legs. And here table top you will have to cut it out separately.
General assembly principle log table is the same as for a wooden table.
Assembling a table from solid logs (logs)
Step 1. Plan the logs and give them the desired shape view.
Step 2. Give the corners more streamlined shape (to avoid injury later).
Step 3. For structural stability, “plant” the logs on fittings(based on the table architecture you have chosen), having previously drilled holes in the solid wood. Distance between the holes should be at least 30 centimeters.
Step 4. File down the part of the reinforcement sticking out of the logs exactly along edge drilled hole, then pull it out and shorten she's still on 5 mm.
Step 5. During final fill in the assembly drilled holes glue, to ensure reliable fixation of the reinforcement.

Helpful advice: Use logs that are approximately the same size. This will make it much easier for you to fit the parts together.
Product finishing
 After the table is ready, surface must be treated with sandpaper, processed antiseptic and cover with 2-3 layers of varnish.
you also can improve it using various decorative techniques such as:
- painting on wood;
- burning;
- artificial aging;
- cladding tiles;
- mosaic.
Like from one log and without single nail make a table and a bench for the cottage, see video:
The table in the gazebo is one of its most used parts. It must be smooth, durable and beautiful, otherwise you will not experience any pleasure from eating and ordinary “get-togethers”.
On the Internet I found more than ten ways to make a wooden table, using boards, bars and even old half-rotten scraps. However, it is the method proposed below that I consider the most interesting for making it yourself.

The proposed instructions use the most common improvised construction material - board. It is quite possible that you have it on your site or you have access to a place where you can get it.
No complicated fasteners are used constructive solutions, you will only need ordinary galvanized self-tapping screws.
The finished product will have the following dimensions:
- Length - 200 cm.
- Width - 75 cm (5 boards of 15 cm each, not indicated on the drawing).
- Height to tabletop - 70 cm.
- The protrusion behind the leg is 30 cm.
Depending on the size of your gazebo, you can proportionally reduce or increase the size of this table. In general, it is suitable for both small and medium-sized gazebos. In larger structures it will be necessary to use heavier and longer material.

Construction material and tools
To make a wooden garden table you will need:

- Dry board 150mm by 50mm (about 20 meters).
- Galvanized wood screws.
- Grinder with a grinding wheel or plane.
- Screwdriver/drill;.
- Jigsaw/saw.
The main task is to find 20 meters of board, and the rest is not a problem at all. Self-tapping screws cost pennies, and in a pinch you can take the tool for the job for the weekend. If you have these resources, then you can start working.
Step by step construction process
At the end there will be attached a video from the channel " Through ZhPU", which described this method(the name they chose is amazing, you can’t say anything 🙂).
Below you will find instructions, after going through the steps of which, at the exit you will receive a ready-made table for the gazebo. The quality of the photos is not the best, but they are enough to understand the process.
Preparing the boards
First of all, the boards need to be marked and cut. Based on the dimensions of the drawing, you will need to make 18 separate parts, which will later be folded into the finished table.

After you have prepared the boards, they need to be dried in the sun. This is done in order to then sand them properly. If they are wet, the grinder circle will become clogged and you will not be able to process them properly.
There are no such problems with an electric planer, but still make sure that the wood is dry in advance.
Making a countertop
The table top consists of 5 parallel boards, fastened together with four 50 mm by 50 mm slats (to which the legs will be attached in the future). The space between the edge of the table and the slats is 30 cm. The tabletop looks like reverse side as follows (photo below).

If your boards are smooth and straight, then there will be no gaps or unevenness on the front side of the table. In the future, the tabletop will be additionally sanded and processed, so for now you can ignore it.
Making and attaching legs to the tabletop
Having prepared the boards in advance, you need to assemble the legs. The lower part of the legs on which the entire table structure will stand looks like this:

The finished version of the legs looks like this.

The table, like the legs, turns out to be quite massive, but it will withstand both a pot of potatoes and dancing guests. After attaching the legs, it will be necessary to additionally sand the bottom part so that the structure stands stable.
Strengthening the legs with an additional board
For greater stability, an additional board is installed between the legs, which is also attached with self-tapping screws. Its dimensions are about 165-170 cm, the edges of the board should protrude slightly beyond the legs (in the drawing they are flush with them).

Final finishing and sanding
After assembling the entire structure, it is necessary to process the corners and surface of the tabletop. Having achieved a smooth and even surface, you can bring the finished product inside the gazebo (I hope the table will pass through front door, otherwise you will have to disassemble) and enjoy your work.
Video
The proposed option for manufacturing the table was discussed in a video on the Youtube channel “ Through ZhPU" Despite the provocative name, the quality and thoroughness of the finished product did not raise any questions, and besides, the video is quite short and intuitive.
Examples of tables in the gazebo
In addition to the proposed option, there are many more ways to make a table yourself. Below is a selection of ideas that you can implement in your gazebo. In addition to the standard rectangular shape, it can be made round, hexagonal, large and so on.
Don't forget about other material - metal constructions also take place.
Made of wood
I would still like to give priority to classic wooden tables and provide more photographs possible designs. There will be more non-standard solutions, but for now let's look at simple examples.
In addition to the table, you will also need to make or buy wooden bench. This issue is discussed in more detail in the article -.


Round
A square or rectangular table in a round gazebo will look unnatural. Therefore, for this type of room it is better to choose round shape, fortunately, you can also make it yourself, although it is noticeably more difficult.
Big
Make a table large sizes quite difficult, since it is necessary to work with massive and heavy material, and also to achieve compliance in technical terms on a larger scope of work.
This creates some difficulties for those who like to build on their own, however, with a strong desire and availability of material, this option is also feasible.

Mosaic
A table with mosaic pieces on the tabletop looks interesting and unusual. There are many manufacturing options similar type up to the use of live leaves. Introducing this style in your dacha is not a problem at all.

With metal structure
An original solution would be to install a metal table in the gazebo. This material is less susceptible to influence environment, including spilled drinks and fallen pieces of food, and also looks more impressive.

5 DIY tutorials for creating a wooden table
Let's imagine a gazebo without a table. Of course, such options also exist, but how functional are they? Without a table, it is impossible to properly cook dinner, spend an evening with friends, read a book or do drawing with a child. This is an essential item that you simply cannot do without. We know how to make it yourself.
How pleasant it is to spend a summer evening in the company of friends at a table made with your own hands!
A little about the types of gazebo tables
The shape of the table can be:
- Round
- Rectangular or square
- Polygonal.
Metal products are quite expensive, and in addition, they can heat up in the sun and become completely unusable in the hottest part of the day. Plastic options, of course, will cost much less, and you can buy them at any hardware store, but their durability leaves much to be desired.

You can make not only a table, but also benches yourself
A completely different matter is a high-quality wooden table for a gazebo.. made with your own hands. Wood – natural, environmentally friendly pure material, which is affordable and easy to process. In addition, the product you make will be original and unique, and therefore especially valuable.

Purchased tables are not very cheap
What to consider?
- When drawing up a project, pay great attention to sizing calculations. Too much small table cannot be called functional, and a large one will simply interfere with movement.
- Choose the shape of the tabletop depending on the shape of the gazebo itself. So, round and polygonal tables look good in hexagonal designs.

Wood looks beautiful, processed with ostentatious negligence

A good option is a table made of timber and logs

One more example beautiful table from timber
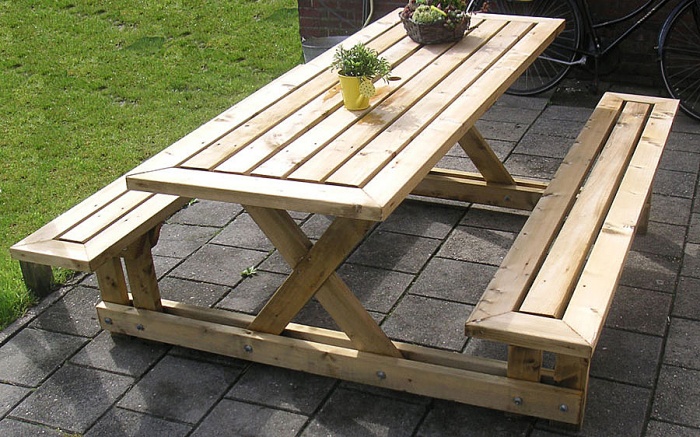
Rectangular portable table made of boards
- Prepare drawings of the future product. You can find them on the Internet or make them yourself.
- Buy wood. You can buy it at a construction supermarket or carpentry workshop.
- Mark the material using a construction tape and a pencil.
- Cut the wood into boards of the size you require and process them using a planer.


Once the table is ready, don't forget to varnish it!
Rectangular table on a foundation
- If you need to install the table on a foundation, make the tabletop and legs separately, but do not rush to connect them.
- First you need to dig holes in the ground equal to the number of legs.
- Now install the legs in them, check the verticality and concrete them.
- Let the solution dry, and only then attach the countertop.
- Don't forget to cover the table with several layers of varnish.

Classic rectangular table
Round stationary table
- Small round table on one leg - great option for small gazebos.

Sketch round table for gazebo
Especially for you: drawing of a round table

Ready round table
DIY hexagonal table
- Making a hexagonal table is a little more difficult than a regular round or square one.

This is the table we will get in the end

You can first assemble the central boards, and then start laying out the rows

Beautiful hexagonal table for the garden
Hemp table
- It is environmentally friendly and original product for lovers of everything unusual.
- You will need a tree stump big size. Surely you can find it at your dacha or ask your neighbors. Or go to the nearest forest, select a fallen tree and cut it down.
- If the wood is fresh, you need to wait until it dries.
- Remove the bark using a chisel, chisel or pry bar.


Checking whether the table is level


We use grinder to create the perfect surface

Sanding the sides and cleaning out the cracks


We paint the table in the color we need. All is ready!
We have selected for you: photo examples of beautiful gazebos

Cozy summer pergola

Gazebo in oriental style carved wood

It is better to place the gazebo in the most blooming part of the garden

Exclusive original gazebo

Openwork metal design

Oriental fairy tale in your garden

Reliable winter house

Flowers always look spectacular!
Conclusion
Do wooden table doing it yourself is quite simple, and this is an opportunity to save a lot of money family budget. In addition, you can make benches yourself, sew curtains, make beautiful chandelier And decorative elements. But what you definitely shouldn’t save on is the construction of a gazebo.
It is better to entrust such a serious issue to professionals who guarantee construction of high-quality and reliable design V optimal timing. Contact us to make all your dreams of an ideal summer vacation spot for adults and children come true. You will be pleasantly surprised affordable prices, which compare favorably with competitors' offers. We can realize your ideas, regardless of their complexity and originality. Order your gazebo construction now to have a perfect summer.
http://besedkimoskva.ru
What city dweller doesn’t dream of getting away from all the everyday hustle and bustle into nature? There are probably few of them. This type of holiday is especially good on warm summer evenings. fresh air. And for this it is not at all necessary to travel outside the city; such a vacation can be spent on your own own plot, in the gazebo.
Often a gazebo serves not just as a gathering place for a group of friends and relatives, but also summer kitchen. In this case, a wooden table for a gazebo is simply necessary. Therefore, the article will consider the question of its self-production.
What do you need for work
Tables for gazebos made of wood can have different shapes and methods of execution. However, the work of making them, like any other, requires some tools and material.
The right tool
To work you will need the following basic tools:
- Roulette;
- A simple pencil or marker;
- Wood saw or chainsaw;
- Variable speed drill or screwdriver;
- Simple level;
- Some protective equipment, such as gloves, plastic glasses and others.
Of course, other tools may be needed during the work process.
Required material
The following materials will be required:
- Boards different sizes;
- Nails, wood screws, bolts;
- Wood glue.
If you plan to make a purely wooden table into a gazebo, then the boards can have the following average dimensions;
- 90*10*2.5 cm – 2 boards;
- 170*10*2.5 cm – only 4 pieces;
- 100*10*2.5 cm – 17 pieces in total;
- 160*10*2.5 cm – only 2 boards;
- 75*10*5 – 4 such boards.

Advice!
The choice of material, or rather its size, should be made based on the size of the table itself; the size of the table was proportional to its size and could accommodate a sufficient number of people.
Direct assembly
So, setting up a table with your own hands can be described in several stages:
- Frame assembly;
- Strengthening the frame;
- Fastening tabletop boards;
- Attaching the legs.
Before direct assembly, all elements should be impregnated with special compounds that will help preserve the wood from insects and the process of rotting. In addition, not only compounds called antiseptics can be used, but also those called fire retardants. They are designed to protect wood from open fire.
All wooden tables for gazebos and more begin to be assembled from a frame.

The frame will consist of 4 longitudinal boards and two end boards. Those that have a size of 170 * 10 * 2.5 are used as longitudinal boards. They are placed on the edge at an equal distance. In total, the distance between the two outer boards should be 90 cm.
To secure these boards together, others are attached to them at the ends, which have dimensions of 90 * 10 * 2.5 cm. Thus, by fastening all the elements with screws or nails, the frame will be completely assembled.
Now you need to strengthen the frame a little so that the table for the wooden gazebo is durable and has a beautiful appearance. For this purpose, other elements with dimensions of 160 * 10 * 2.5 are attached to the outer boards of the frame. They are nailed to the side, in the center.

After attaching them, there will be exactly 5 cm left on each side of the outer boards, that is, just enough for the legs.
Next you need to cover it with boards to create a tabletop. It is not difficult to calculate that if the boards are 170 cm long, then to cover them with other boards 10 cm wide, exactly 17 pieces will be required. However, to make the tabletop wider and hide the legs a little, take 18 of these elements.

All tabletop elements can also be secured with self-tapping screws or nails.
It must be said that self-tapping screws for wood thickness of 2.5 cm must have a length of at least 40 mm, and nails at least 50 mm.
For the countertop, elements with dimensions of 95 * 10 * 2.5 are used. This means that all boards are attached with a 50 mm extension beyond the outer frame bar.
After making the tabletop, the instructions suggest installing the legs. They are attached to the formed recesses in the frame.
Advice!
To make the legs removable, they should be secured with bolts, for which holes of the appropriate sizes are drilled in the frame and the legs themselves.

The table represents one of the most fundamental elements in any relaxation area. This is especially true for country gazebos. You can gather a large group at the table, have fun and eat delicious food. You can easily assemble it yourself. Many homemade wooden tables for gazebos are not much different from purchased models. Often they even surpass store-bought analogues in terms of design ideas.
To save on construction, it is worth knowing a few basic rules for its construction. It is also necessary to imagine the features of such a design and possible mistakes installation You should also consider the variety of types of gazebo tables.
Design differences
A tabletop for a wooden gazebo can have many original shapes. What the building will be like depends on the owner of the site. To decide on the type of future wooden gazebo table, you should look at several interesting photos.

There are several main types of countertops. The most common are rectangular options. This product is very simple design, which can be found in most traditional gazebos. This table is usually made of wood. Advantages of a rectangular design:
- It is easy to fit into any interior and is perfectly complemented by various decorative elements.
- Large capacity. Usually rectangular products are made for 8 people to relax at the same time, however, it can be made more.
- Benches are located on both sides of the table. They are equal in length to it.

A round table is also one of the popular options. It is placed in the center of the gazebo. Benches are usually arranged in a circle. Often chairs are prepared for guests. This design is quite convenient in that you can increase the number of seats.
You can place benches around the perimeter of the gazebo. If there are a small number of places, a simple folding table. With a hexagonal gazebo, it is better to place benches around the entire perimeter.

The table can also be made of metal. However, if you do not have the necessary skills and experience, you should entrust the work to professionals. You can also do combined option- the frame is made from metal elements, and make the part on which they will sit wooden.
If you buy finished design there is no desire, it is better to opt for a wooden product. Such a gazebo table will be affordable and easy to implement, and its appearance will be very attractive.

In the process of choosing a design, take a closer look at numerous photos finished products. This will help you choose the most suitable option for yourself.
Tools and materials
As for the choice of materials, it is best to pay attention to new, thick boards. There should be no traces of rot or fungus on them. You should also check their strength. A structure made of soft wood will quickly lose its original appearance. This is due to the fact that regular mechanical impact will affect the condition of the surface.
The boards must be thick, because bars of greater thickness will be nailed to them from below. The table supports are made of massive bars. All elements are attached to nails or self-tapping screws. The thickness of each part is determined at the drawing stage.
Once all the tools and materials are prepared, you can begin building the gazebo table. Before starting work, it is important to familiarize yourself with the main stages of construction.
Construction stages
How to make a table in a gazebo? First you need to draw a diagram. The drawing indicates the dimensions, as well as the materials that will be used. In addition, each fastening must be reflected in the diagram. Before this, you need to find out the dimensions of the gazebo. This will allow you to build a table taking into account required quantity people for whom the building will be designed. Correctly chosen dimensions will allow you to leave enough space to place benches. They can also be moved without problems.

Execution of the drawing
In addition, the drawing should reflect the shape of the table, as well as the benches. It is better to make the bench at least 0.4 m wide. The edge of the product should be at a distance of 10 cm from it. The optimal height is 80 cm.
When planning a round product, it should be taken into account that such designs are suitable for large gazebos. Products with round geometry take up quite a lot of space. From the exact drawing you can understand how much area will be allocated for the table. Based on these parameters, it is worth choosing the type and size of the product.
Legs
After creating the drawing, you can start working. An elementary option is to build a plank tabletop. However, first you should think about its supports. There are several options. One of the most common is one-legged designs. Also, a table often has 3 or 4 supports. It is often installed on 8 faces.
Products with 4 legs are highly stable. They are easy to install and therefore are used in most cases. Before creating supports, guide bars should be secured to the back of the beams. This will increase the stability of the table.
The bars for the legs must be aligned in length as much as possible. In this case, the table will not wobble. Also, the legs must be thick enough to cope with heavy loads. Fastenings are carried out with self-tapping screws or nails.

When performing work, it is worth looking at the drawing so that all elements have the dimensions indicated in the drawing. If the gazebo floor is not planned, the legs must first be securely concreted in the ground. Only after this the countertop is installed.
At level floor covering no need to fix the legs. The table can also be portable. In this case, the ease of use increases many times over.

Tabletop
It would be logical to make the table round if the gazebo has such geometry. If the tabletop is square, the space round gazebo will be used irrationally. It is better to build a small structure.
Advice! The easiest way is to make a round table supported by one beam. It should be placed strictly in the center.

Sometimes when making a round table, the support is first made, then the tabletop. Then the parts are connected, and that’s it extra sides table tops are trimmed. The beam for support should not be chosen too thin, since it will not be able to withstand the weight of the table and the load that the structure will experience during operation.
Other features of constructing a gazebo table:
- If the holiday house has not yet had a floor, or is not planned at all. You can use a single support for both the benches and the table.
- When building a gazebo open type legs for tables and benches are usually welded directly to the frame.
- When creating a structure, you first need to prepare the frame. Metal pipes are used for it.
- When creating a tabletop with 4 legs, you should pre-weld the corners on which the tabletop will be attached.

Once the work is completed, you can begin finishing. It is designed to decorate the structure and make the gazebo more attractive.
Finishing
An excellent solution for decorating a table is carving. It is usually done along the edges of the tabletop. It can also be covered with thick glass. This will preserve the aesthetic appearance of the wood. When creating tables for a gazebo, the stages of constructing structures different types largely coincide.

As you can see, building a table for a gazebo with your own hands is quite simple. This will require several hours of free time, as well as exact drawing and correctly selected materials. You should also become familiar with several features of the construction of the table top and the legs under it.
A special place in the process of constructing a table is occupied by it decorative finishing. Depending on the tastes of the owner of the site, it can be equipped various elements. To cover wooden elements It's better to choose varnish. It will preserve the wood texture.


