DIY Robinson rocket stove. Do-it-yourself rocket stove drawings and manufacturing process: do it according to instructions, video Official production of rocket stoves is allowed
What kind of miracle is this: a rocket stove? Rocket stove, rocket stove and even jet stove, whatever it is called, but has nothing to do with rockets and jet engines does not have. It received this name, obviously, because of the characteristic “rocket” sound that occurs when the mode fails and there is excessive air flow through the vent into the firebox. In any case, the developers called it exactly that: rocket stove, which can be translated as a rocket stove.
Rocket stove principle
The design was first developed in America and was originally intended for use in field conditions. The main idea is to obtain a furnace with high efficiency with maximum simplicity of the device. For this, two simple and essentially well-known techniques were used. The first is a more complete decomposition of gases with their afterburning due to relatively long retention in a heated state. The second is the maximum extraction of heat from burnt gases.
- Lighting up the stove begins with preheating it. To do this, it is best to use any flammable materials: wood chips, shavings or paper. It is recommended to burn the heating pad in an ash pit.
- At the same time, the main stack of firewood is set on fire. The vent is completely open.
- As ignition occurs, the draft increases and a lot of air begins to flow into the firebox. A characteristic roar appears.
- Here you should close the blower damper until a smooth, quiet sound appears. If the rocket roar appears again, the adjustment should be repeated.
The firebox has good thermal insulation, therefore it heats up quickly and firewood pyrolysis begins - the decomposition of solid firewood into gas under the influence of high temperature. Some of the pyrolysis gases decompose into wood gases and burn. However, some part does not decompose enough to burn. In conventional stoves, these semi-decomposed pyrolysis products fly out into the chimney in the form of smoke and partially settle in the form of soot. Thus, any smoke is unburnt wood, which not only increases heating costs, but also clogs the chimney.
From this we can conclude that the main task of a furnace used for heating is to burn fuel as completely as possible, solving two, albeit secondary, but no less important, tasks. Firstly, take as much heat as possible from the burnt wood gas and, secondly, having accumulated it, distribute it in the heated room for as long as possible.
The main advantage of the rocket stove is that it perfectly solves all these problems.
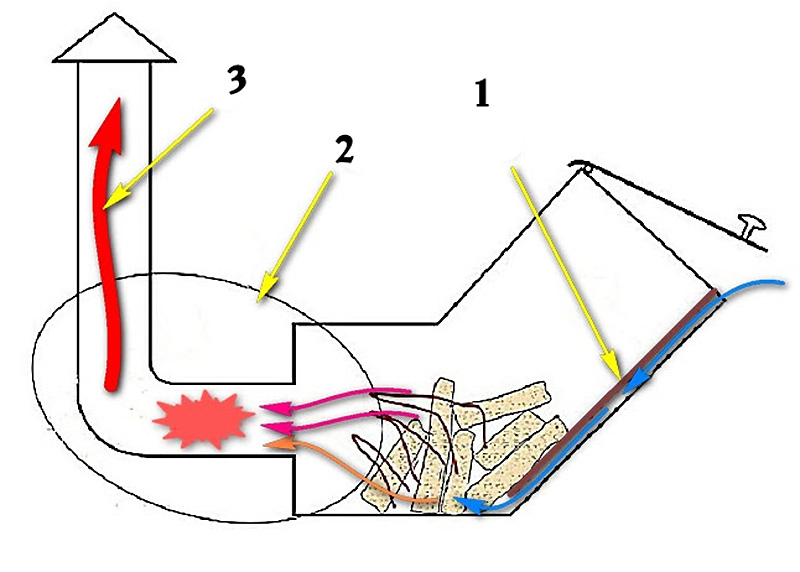
After igniting the main stack of firewood, the firebox warms up almost simultaneously with the horizontal and vertical channels - the so-called Burn Tunnel. For this purpose, the combustion tunnel, or as it is also called, the flame tube, just like the firebox, is insulated with a material that not only thermal insulation properties, but also with low heat capacity. The temperature in the flame tube rises to 900°C and under normal conditions in the upper part can reach 1000°C.
Under such conditions, gases enter the upper part of the bell and heat its upper part to 400°C. Further, falling down and cooling to 250°C, the gases heat the cap and its coating, which acts as a heat accumulator. In this case, the coating is made of adobe: a mixture of clay and straw - an inexpensive and accessible material.
After pre-cooling in the upper zone of the hood, the gas enters the secondary ash pan. Here the afterburning of wood gases ends and the precipitation of pyrolysis residues, which for some reason were not sufficiently decomposed for combustion, ends. Next, the gas moves relatively slowly in the horizontal smoke channel, where it gives off its last remnants of heat, heating the coating of the stove bench, which is also made of adobe.
Main advantages and disadvantages of rocket stoves
Advantages:
- High performance, saving up to 90% wood compared to a conventional metal stove, as stated by their owners. Such savings are achieved due to the afterburning of pyrolysis gases and soot.
- Non-critical to fuel. Any will do wood firewood, wood chips, bark, lumber waste. Their humidity doesn't matter either.
- Simplicity and versatility of design. Anyone can assemble such a stove using clay, brick, stone or tile.
- There is no need to add firewood too often. As the wood burns, it moves downwards and enters the combustion chamber.
- Comfortable bed. Different stoves have beds, but for example, in the Russian stove it is located high.
Flaws:
- the need for combustion control and constant manual adjustment air supply.
- the presence of a hot part that can cause burns. Although on the other hand it can be used for cooking. The temperature of the bell is about 400°C.
DIY rocket stove. Drawings
The rocket stove has a thermally insulated shaped combustion chamber, which causes the fire to move first horizontally and then into the chamber at a 90 degree angle, causing severe turbulence. Once in the upper part of the bell chamber, hot gases heated to a temperature of 1000°C give off most of heat and fall down, where they fall into the auxiliary ash pan, and there, at a temperature of about 250°C, their final pyrolysis occurs along with the afterburning of pyrolysis (wood) gases. Then, in a horizontal channel, the combustion products give up the remaining heat and enter the chimney.

Despite the simplicity and accessibility of the design, for the normal operation of the furnace in the planned mode, when installing it, it is necessary to comply with the dimensions and take into account all recommendations.
Engineers and researchers have worked out the best size ratio to ensure that all processes run optimally. Here are their recommendations:
- The height of the cap H should be from 1.5 to 2D.
- The clay coating of the cap must have the following characteristics: height = 2/3H, thickness = 1/3D.
- The cross-sectional area of the horizontal and vertical parts of the flame tube is 5-6% of the cross-sectional area of the hood (S).
- The gap between the top edge of the flame tube and the hood cover is at least 7 cm.
- The lengths of the horizontal and vertical sections of the flame tube must be equal. Their cross-sectional areas are also the same.
- The blower must have a cross-sectional area of 50% of the area of the flame tube.
- The volume of the ash pan is recommended to be at least 5% of the volume of the hood.
- The thickness of the insulating cushion made of adobe, which is made under the external chimney, is chosen in the range from 50 to 70 mm.
- The thickness of the bed is recommended 0.25D at D = 600 mm and 0.5D at D = 300 mm.
- The height of the external chimney is at least 4 meters, the cross-sectional area is 9 -12% of the area of the hood.
- The length of the smoke channel in the stove bench is also calculated from the diameter of the hood. With a diameter of 60 cm (standard 200 liter barrel) - the length of the bed can be up to 6 meters. If the cap has a diameter of 30 cm (the diameter of the gas cylinder), then the length of the couch is no more than 4 meters.
- It is recommended to make the fire channel from a rectangular pipe, with an aspect ratio of 1:2, laying it flat. This will ensure more stable operation of the entire oven.

Imagine the situation: to heat a room at home or cook food, you need to quickly build a simple wood-burning stove. Fuel quality and consumption are secondary. A suitable option is a homemade rocket stove made from scrap materials. We invite you to familiarize yourself with the design of the heater and the assembly process at home.
Design and principle of operation
The rocket stove shown in the diagram consists of the following main elements:
- a bunker for storing firewood of a vertical or inclined design;
- horizontal combustion chamber;
- pipe with lining - afterburner (the second common name is riser);
- a metal cap that plays the role of an air heat exchanger;
- blower;
- chimney channel.
In operation, the stove uses 2 principles: the occurrence of natural draft inside the vertical section and the combustion of wood (pyrolysis) gases. The first is realized due to the heating of the firebox and waste combustion products tending to rise through the afterburner channel. The released pyrolysis gases burn out in it.
Reference. The name rocket or jet stove is associated precisely with the principle of operation - a powerful natural draft arises in the vertical channel, causing intense combustion in the firebox and the release of heat.
The stove operation algorithm is as follows:
- Firewood loaded into the bunker is ignited from below. The air supply is provided through the blower hatch.
- During the combustion process, flue gases heat up the insulated walls of the afterburner and rush under a thin metal hood, where they give off most of the heat to the room air.
- With a sufficient amount of secondary air, pyrolysis gases have time to burn inside the riser, releasing additional heat.
- Combustion products are discharged directly into the chimney or first sent into the smoke circulation of the stove bench.

Options for portable stoves "Robinson"
In a simplified camping version, the stove is made without a hood and insulation. Accordingly, secondary gases do not burn completely, since they have time to fly out into the chimney. A small-sized portable heater, called “Robinson”, is designed for quick cooking using fuel of any quality and degree of humidity.
Requirements for element sizes
The main heat exchange element of the rocket stove is a metal cap; the intensity of heating a room in the house depends on its size. In stationary structures made of brick, a 200-liter barrel with a diameter of 60 cm is usually used. Portable versions are made from standard gas cylinders Ø300 mm.

Diagram of a rocket heater with a stove bench
Accordingly, the remaining dimensions depend on the dimensions of the barrel - diameter and cross-sectional area:
- the height of the cap is provided to be 1.5-2 times the diameter;
- the cross-sectional area of the afterburner is 5-6.5% of the diameter of the barrel;
- the length of the riser is made such that there is a minimum gap of 7 cm between the upper cut of the pipe and the cover;
- the internal size of the firebox is equal to the cross-section of the afterburner, the ash duct is half as large;
- chimney diameter is 1.5-2 times larger than the afterburner cross-section, height is at least 4 m.
To make it easier for you to calculate the diameters of pipes and linings, we present a drawing for various options rocket stoves - from a cylinder, barrel and old buckets (the riser is made of a round or profile pipe).

We make a stove - a rocket
The easiest way is to make it easy camp stove shown in the drawing, having found the following materials in the household:
- round steel pipe with a diameter of 133-150 mm and a length of 0.5 m;
- pipe profile section 14 x 20 cm, length 0.4 m;
- sheet of metal 2-3 mm thick for grates;
- rod Ø8-10 mm for legs;
- scraps of iron for the stand.

A vertical round pipe is welded to the profile at an angle of 45°, then eyes for the legs are attached to the body (they should be easily removed). A grate is placed inside the inclined firebox, and a lid is attached to the outside. To make it easier to clean the ash below, it is advisable to install a second door.
Advice. Be sure to weld a stand to the upper edge of the fire channel - gases must penetrate between the bottom of the dish and the body, otherwise “rocket” thrust will not occur.

Drawing of an improved version of the portable stove
The design of the furnace can be improved by organizing the supply of secondary air inside the flame tube. Modernization will increase the efficiency and duration of firewood burning. Drill holes on both sides on both sides, covering them with rocket “nozzles” according to the presented drawing. How this stove functions is demonstrated in the video:
From a gas cylinder
The following materials will be used to make a do-it-yourself rocket stove:
- round pipes with transverse dimensions of 70 and 150 mm; with a wall thickness of 4 mm;
- square corrugated pipe 150-200 mm in diameter;
- chimney pipe Ø10-15 cm;
- low-carbon steel (grade St20) sheet;
- dense basalt wool (80-120 kg/m3) or bulk fire-resistant materials, for example, vermiculite or perlite gravel.

To begin, cut the rolled metal into blanks in accordance with the drawing. Then you need to saw off the lid of the propane tank, after unscrewing the valve and filling the tank to the top with water. The tool is an ordinary grinder with a metal circle.

Further assembly technology is as follows:

The master will tell you in detail about the manufacture of a rocket stove from a cylinder in the video:
Made of brick
The simplest rocket stove for cooking can be built from bricks without using mortar, as shown in the diagram with the order. Such a structure can be easily disassembled and moved if necessary.

The rocket stove with a stove bench must be placed on a foundation made of concrete or rubble stone. Material – ceramic or refractory brick, sand-clay or fireclay mortar, respectively. The finished base is covered with roofing felt for waterproofing, then a continuous first row of bricks is laid. The further work order looks like this:

Important. The construction is carried out in compliance with the rules of stove masonry, described.
The length of the smoke channels inside the stove is limited by the draft in the rocket stove and the external chimney. It is better to keep the total length of the flue pipes within 4 m. To prevent the heater from smoking back into the room, raise the top of the chimney to a height of 5 m, counting from the grate. How to build brick stove– a rocket without a barrel, look at the video:
In conclusion - the pros and cons of the stove
Such structures are indeed made quickly, and the contractor does not necessarily have to be highly qualified. The first and main advantage of rocket-type furnaces is their simplicity and undemanding use of materials. In addition, they accept a variety of fuels well - raw firewood, branches, brushwood, and so on.
Now about the negative points:

For the above reasons, a rocket heater is extremely inconvenient for a garage, where it is necessary to heat the room quite quickly. But the hiking option is indispensable in nature at any time of the year.

Design engineer with more than 8 years of experience in construction.
Graduated from Eastern Ukrainian National University them. Vladimir Dal with a degree in Electronics Industry Equipment in 2011.
Related posts:

Nowadays, many stoves have been created that use wood as fuel. A special place among them is occupied by the so-called rocket (rocket) units, which have specific features that are indispensable in certain operating conditions. Let's talk about them.
The rocket is a real miracle unit!
The rocket stove is a heating and cooking system that operates on wood, is famous for its high technical performance and has a simple design. The operating principle of such a unit long burning is based on the fact that the gases formed during fuel combustion enter a special hood in which they burn completely. Due to this, the temperature of the stove increases significantly, and the pressure decreases. Moreover, soot does not form in the reactive heating system.
The combustion cycles of heated gases are repeated constantly (while the stove is heating). This causes the system to enter maximum thrust mode. Its specific value is determined by the characteristics of the homemade unit. If heating device will be assembled truly correctly, the temperature in its cap can reach 1200 °C. In this case, all the fuel used is burned without any residue. It is also important that the heated cap can be used as a hob. You can dry fruits, heat water, and cook food on it.
Initially, the stove we were interested in was designed for use in difficult (for example, camping) conditions. Because of this, special requirements were put forward for its design. The result is a unique unit that:
- makes it possible to cook food in areas where there is no gas or electricity;
- heats the room efficiently;
- retains heat for 6–8 hours (minimum) after the wood burns out;
- has a high efficiency;
- quite safe to use.
In addition, the rocket has a design that allows you to add a new portion of firewood to the firebox without stopping the combustion process. The operation of a unit with such capabilities, of course, appeals to any person. This determines the high popularity of the described heating systems both among lovers of outdoor activities and among ordinary summer residents who need unpretentious and efficient stoves.
Important point. If you plan to create the simplest jet unit with your own hands, it can only be heated with dry wood. Damp wood can cause reverse thrust. However, it is not recommended to fire more complex rockets with wet wood, since they will not be able to provide the high temperature required for burning heated gases.
The described heating devices must not be thrown away without supervision. Light the stove, wait until the fuel burns out completely. Another drawback of rocket equipment is the impossibility of heating private baths (in particular, their steam rooms) with its help. This is due to the fact that the jet unit produces very little infrared heat, which is what is required for bathing procedures. Missiles probably have no other disadvantages.
Types of jet heating systems – what do you need?
The simplest rockets are made from almost any tin container. A portable stove can be made from a bucket, a can in which paint was stored, and so on. Such systems are ideal for an outdoor picnic; they are often used on construction sites. Simple stoves are not suitable for heating rooms. They are used exclusively for cooking and heating water. A rocket made from a bucket can be heated with a small splinter, dry cones and leaves, and bunches of branches. In such a stove, combustion products do not have time to form wood combustible gas. They immediately go down the chimney.
More complex heating structures are created from an old gas cylinder or from metal barrel and brick. These stoves are necessarily equipped with a riser to increase draft and a horizontal smoke exhaust duct. There are also rockets made entirely of brick. They can be equipped with several chimneys at once and are used for heating large rooms and heating floors. And if you want, you can actually build even a full-fledged stove-bed.

We will tell you how to make all of the indicated types of reactive heating devices yourself. Let’s start our master class with the simplest thing - making a basic garden and camping stove from two tin containers (buckets, cans). In addition to them, we will need steel clamps with a cross section of 10 cm, metal corners, an angle grinder, a stainless steel chimney pipe, scissors for metal, crushed stone. The scheme of work will be as follows:
- 1. Take two buckets. From a container of smaller volume (diameter) we make a lid for our rocket. Cut a hole in the bucket. It is necessary for organizing a chimney.
- 2. In the larger bucket, cut another hole at the bottom. We will connect the firebox to it. We perform all operations with metal scissors, bending the resulting petals (pieces of tin) inward.
- 3. We construct a direct flow from pipes and corners. We insert it into the bucket, and then, using a clamp, connect it with the curved petals.
- 4. Fill the space between the forward flow and the housing of the heating device with crushed stone. This building material will play the role of a heat accumulator and at the same time a heat insulator.
- 5. We put the second bucket on the stove.
- 6. We bend a small burner from wire on which you can place dishes with water and food.
It is advisable to paint the portable rocket with any paint with high level heat resistance. After drying, we can use a basic cooking stove. Pay attention! The rocket is ignited through a pipe extending from the forward flow.
A stove made of a barrel and bricks – both cooks and heats!
The construction of a stationary rocket launcher requires significantly more money and time. We prepare the following materials and tools: a metal chimney pipe, red (necessarily heat-resistant) brick, a shovel, an old barbecue, a metal brush, a trowel, cement and sand (it is better to immediately buy a ready-to-use mixture of these materials), reinforcing bars, a little perlite, adobe and expanded clay, heat-resistant paint, 200 liter barrel. Let's start building a stove made of bricks and a metal barrel:
- 1. We dig a hole 0.3–0.5 m deep in the floor. We will hide a horizontal chimney in it, without which the rocket launcher will not work.
- 2. We burn a 200-liter barrel and clean it thoroughly. We install a flange in the container that will connect it to the chimney. After this, apply several layers of heat-resistant paint to the container. We use the barrel prepared in this way as a hood for the heating unit.
- 3. We arrange the foundation. We make a simple formwork from boards, dig 2-3 bricks into the ground at the furnace installation site. We place reinforcing bars on top. Then we lay bricks in the lower part of the combustion chamber (along the entire perimeter). Fill the structure with cement-sand mortar.
After the filling has dried, we begin laying. It is performed using . We bring the first tier of masonry up. We only need to leave a hole for the firebox. On the second line we form a channel (lower) of the heating structure. It should be covered on the third tier, and in such a way that we have two holes left. One of them is intended for the vertical channel, the second - directly for the combustion chamber.
Next, we install a tee in the barrel to clean the chimney. It is not necessary to install it, but it is advisable if you plan to use the stove a lot for a long time. After this we install a vertical channel. We lay out the rising section of the structure (we take its diameter to be about 18 cm) using the “boot” technology. Then we put an old water heater on the rising part of the furnace. We fill all the voids that remain after this operation with perlite.
Now we cover the base of the casing of the rocket unit with clay and surround the base of our structure with sandbags. We fill all remaining free areas with expanded clay. We connect the chimney pipe to the structure, turn the barrel-casing over and pull it onto the ascending part of the stove. The final work is lining the chimney with sand in bags and filling them with expanded clay. Then we give the structure the required shape using clay (fireclay), mount it in the neck homemade rocket barbecue grill and cover it with a lid.
The last step is to seal the existing seams on the stove. In principle, we can already do a test run of our design. But experts advise additionally connecting a separate air duct from the street to the stove. This is important. Heating rocket for normal functioning requires a lot of air. It won't be enough indoors. A street air duct is guaranteed to solve this problem.
Rocket heating from a cylinder - let's work with a welding machine
To build a rocket, we choose a heat-resistant and non-explosive cylinder. An all-metal 50-liter tank in which propane is stored is optimal for these purposes. This cylinder has standard dimensions: height – 85 cm and cross-section – 30 cm.
These parameters are ideal for making your own oven. The modest size and light weight of the cylinder do not make it difficult to work with. At the same time, it is allowed to burn any wood fuel in the finished rocket. You can also take 27 or 12 liter propane cylinders. They make compact portable stoves. But the power indicators of such devices are small. It is not practical to use them for heating rooms or country houses.

To build a furnace, in addition to the cylinder, you will need:
- steel pipes with a cross section of 15, 7 and 10 cm (the first two will be used to organize a vertical internal channel, the third - to the chimney);
- profile pipe product 15x15 cm (we will make a loading compartment and firebox from it);
- 3mm thick sheet of metal;
- dense (100 or more kg/cubic m) basalt fiber (it will serve as a heat-insulating material).
There are various drawings on the Internet for creating a stove from a cylinder. We propose to be guided by this scheme.

The algorithm for manufacturing a rocket launcher is simple. First, we bleed all the gas from the container. Then we turn out the valve, fill the tank with water (to the top) and cut off its upper part along the seam. We cut out the windows on both sides of the gas cylinder, which are required for connecting the chimney and installing the fuel chamber.
After this, we insert the profile tubular product into the container and connect it to the channel (vertical). We remove the latter through the bottom of the tank. Next we do everything necessary actions, focusing on the presented drawing, as well as on the video that we offer home craftsmen for review.
At the end of the work, we weld the cut part of the container in its place and analyze all the resulting seams for permeability. Uncontrolled entry of air into the constructed structure must not be allowed. If the seams are reliable, we connect a chimney to the homemade system. We weld the legs to the bottom of the rocket cylinder. Install the stove on steel sheet with parameters 1.5x1 m. The unit is ready for use!
Stove-bed - for lovers of special comfort
The heating unit with a place to sleep and rest is equipped with a special heat exchanger. Its channels are interconnected. They make them from non-combustible materials. The heat exchanger is installed under the plane of the bed. The design of such a furnace is very thoughtful and relatively complex. The bed itself is a surface made of brick or stone and clay. When the stove burns, the heated gas moves through the heat exchange channels, gives off heat upward, and then is removed through the smoke exhaust duct outside the house. The height of the chimney is made within 3–3.5 m. The stove is mounted at the edge of the stove bench (on one side). In most cases, it is equipped with a surface for cooking food. A detailed drawing of this system is presented below.
.jpg)
Elements of the furnace in the diagram:
- blower - 1a;
- fuel bunker – 1b;
- channel for secondary air - 1c;
- flame tube – 1g;
- riser (primary chimney) – 1d.
The fuel chamber is equipped with a blind cover, and the blower is equipped with a special regulator for adjusting the amount of air supplied. The flame tube has a length of 15–20 cm. The secondary air channel is necessary for complete combustion of gases. The riser cross-section is 7–10 cm. A chimney with a diameter of 10 cm is recommended for cases when we want to obtain the greatest rocket power. A riser with a cross-section of 7 cm provides an optimal indicator of the efficiency of the stove. The fire pipe and the primary chimney require high-quality thermal insulation.
We will make the rocket body from a gas cylinder, although a metal barrel can also be used. Under the housing cover (2a), the primary chimney supplies heated air, and the heated gases leaving the riser heat the cooking device (2b). Other body elements:
- lower part (2d);
- heat exchange channels (2d);
- shell – metal chimney insulation (2c);
- exit to the cleaning chamber (2e).

The smoke exhaust line must be absolutely sealed throughout. At a height of 1/3 from the upper end of the drum (housing), the gases are already at a low temperature. They have time to cool down. From approximately the specified height, the rocket-bed is lined (all the way to the floor). This process refers to the thermal insulation of the furnace with special compounds. The second cleaning chamber in diagram (3a) is needed to remove carbon deposits from the hog (4) - the heat exchanger. It must be equipped with a sealed door (3b). Now that we have figured out the design of the bed, we can begin to build it.
Building a rocket with a place to sleep - the first steps are the most important!
Before starting work, mix all the necessary ingredients:
- Kiln clay (designation 5b in the diagram), which is combined with crushed stone. This composition plays the role of the main heat insulator.
- Saman (5a). It is a composition of straw and any clay at hand, diluted with water to a relatively thick consistency.
- Seeded sand (5g).
- Heat-resistant lining (5c). It is made from equal parts of fireclay sand and clay.
- Medium fat clay (5d). It is used for rocket laying.
We are making a bed for our bed. Essentially, we need to knock down high-strength shields under the stove bench and directly under the stove. The frame of the buildings is made from 10x10 cm wooden blocks. The frame cells are made with dimensions of 60x120 cm (for a bed) and 60x90 cm (for a heating installation). Then we sheathe the resulting skeleton with 4 cm. And the façade of the couch can be finished later with sheets of plasterboard.
Before installation, it is advisable to treat wood products with Biocide, and then apply two layers of water emulsion to them.
We lay 4 mm thick basalt cardboard on the floor where we will place the heating rocket. In shape and geometric parameters, it must be similar to the characteristics of the bed. We install an iron roofing sheet on top of the basalt lining. Before the firebox, it will extend about 25 cm from under the unit. We install the previously made bed in the place prepared for it. We punch a hole on the wall at a height of 13 cm above the level of the couch (at one of its ends). It is needed for the installation of a chimney.

The next stage is installation of formwork around the perimeter of the bed and pouring installed structure adobe. Carefully level the surface of the mixture using the rule. We wait 14–20 days until the adobe hardens. During this time, you can make the body of the heating structure from a gas cylinder according to the previously described scheme. We weld the combustion components of the rocket (blower, flame duct, chamber) into a single structure with a gas container and coat it with a heat-resistant lining. Important! Apply the composition in a continuous layer only at the bottom. We do not treat the top and sides of the structure with the solution.
Next, we install another formwork under the area where the rocket will stand. It will allow us to make heat-resistant thermal protection for the stove. Height formwork structure- about 10 cm. Fill it with a mixture of crushed stone and oven clay. Then we do one by one:
- 1. Shell. We bend it from a sheet of steel or use a ready-made pipe with a cross-section of 15–20 cm.
- 2. Furnace structure.
- 3. Cleaning chamber. This element is made from 1.5 mm galvanized steel. We cut an opening on the side with a cross-section of 16–18 cm. The chimney pipe will subsequently fit into it.
Completion of work - the warm bed will turn out great!
We put a drum from a gas cylinder on the primary chimney. We place oven clay on the bottom of the installed housing, using a spatula to form an inclined surface (about 7°), which is directed towards the cleaning compartment window. Then we put a metal round timber on the chimney. It should be pressed into the clay composition. Then we pull the shell onto the riser and coat it with medium-fat clay. The next steps are:
- 1. We line the chimney from the inside. We use sand. It should be covered in separate layers. We wet and tamp each of them. The total number of layers is 7. Place 5 cm of medium-fat clay on top of the sand.
- 2. Place a cleaning box, coating its bottom and side surfaces with clay. We install the opening of the transition channel into the hole of the drum and press it as hard as possible. We fill all remaining gaps with clay. It is necessary to achieve complete tightness of this stove unit.
- 3. We install another formwork along the (external) contour of the bed. It should rise about 9 cm above the edge of the hole for the hog. Fill the formwork with adobe mixture.
- 4. We stretch the corrugated pipe along the entire length of the rocket-bed. We connect one end of the corrugated product to the cleaning compartment.
- 5. We lay the fixed corrugated pipe in a spiral and insert its second end into the chimney outlet opening, securing the joint with a clay compound.
- 6. We treat the entire length of the bur with adobe solution and compact this coating.
- 7. We fix the housing covers and cleaning chambers with bolts, under which we install rubber gaskets.
- 8. Coat the drum with adobe (don’t touch only the top part) with a layer of about 10 cm.
After about 17 days, the adobe will dry out. We will be able to remove the formwork and apply a special enamel to the drum that can withstand heating up to 750 °C. Then experts advise treating the adobe surface with acrylic-based varnish (preferably in two layers). This coating will protect the structure from moisture and make the stove very attractive in appearance.
The heated bed is done. We test our structure before starting its full operation. The check is carried out simply. We put some paper in the firebox, set it on fire, and monitor the behavior of the rocket. If everything is fine - there are no frightening sounds, we add firewood. After a while the unit will begin to hum. At this moment, close the oven vent. We are waiting. When the humming gives way to a gentle whisper (the soft sound of a working stove), open the vent. Next, we use the heating installation for its intended purpose.
Here you will learn:
Not every person knows such a simple heating device as a rocket stove. Meanwhile, it has few equals in simplicity and effectiveness. It cannot be said that she has best characteristics, but it also has few disadvantages. There are many varieties of these furnaces, differing in design and purpose. We'll look at them in more detail as part of our review.
Design and principle of operation
Rocket stoves have practically nothing to do with the design of rocket engines or jet turbines. On the contrary, they are extremely simple in design, in contrast to the above devices. The similarity is noticeable only in the quietly noisy flame and high combustion temperature - all this is observed after the stove reaches operating mode.
Let's consider the design of rocket furnaces - they consist of the following elements:
- Firebox – a vertical or horizontal section in which firewood is burned;
- Combustion chamber (also known as a flame tube, riser) – here the process of fuel combustion occurs, releasing a large amount of heat;
- Blower - necessary for the correct operation of the stove and the start of the combustion process of pyrolysis gases;
- Thermal insulation – envelops the vertical part, forming a drum together with the body;
- Bed – used for its intended purpose;
- Chimney - removes combustion products into the atmosphere, creating draft;
- Dish rack – ensures unhindered heat escape.
Depending on the type of rocket stove, certain elements may be missing.

Rocket stoves with vertical fireboxes (fuel bunkers) and blowers are the most efficient and convenient - large volumes of fuel are placed here, which ensures long-term combustion.
The most important part of the rocket furnace is the vertical drum. It is here that the most high temperature, as flames burst out here. In order for it to start working, it must be thoroughly warmed up. Without this, the combustion process will be weak. To warm up, paper, cardboard, small wood chips or thin branches are placed in the firebox. As soon as the system warms up, the flame in the drum will begin to burn out with a humming sound, which is a sign that it has reached operating mode.
A rocket (jet) stove without a ash burns wood directly. It is simpler, but less effective. The model with a blower supplies secondary air to the base of the riser, which causes intense combustion of flammable pyrolysis gases. This increases the efficiency of the unit.
The fireboxes in rocket stoves are located horizontally or vertically (at any angle). Horizontal fireboxes are not very convenient, since the firewood in them has to be moved to the combustion zone manually, independently. Vertical combustion chambers are more convenient - we load fuel into them and go about our business. As the logs burn, they will fall down, independently moving towards the combustion zone.
Types of rocket stoves
In this section we will look at the most common types of rocket stoves used in field and stationary conditions.

Simple metal stoves
The simplest wood-burning jet stove is made from an L-shaped piece of large-diameter metal pipe. The horizontal part is short, it represents the firebox. The combustion chamber is located in the vertical part of the pipe, where wood actively burns. A small metal plate is often welded into the horizontal section, forming a blower. After warming up, the rocket furnace enters operating mode, and a flame bursts out of its vertical section (flame tube).
Such rocket stoves are used for cooking food on camping or street conditions– due to their small area, they are distinguished by low heat release, and the overwhelming majority of thermal energy escapes through the flame tube. Kettles, frying pans and pots are placed on this pipe so that the raging flame ensures their heating. To maintain traction, there are stands in the upper part of the pipe, on which the dishes are placed - combustion products can freely come out.
To make a metal rocket furnace made from an L-shaped piece of pipe more efficient, it is equipped with a metal casing made from an old barrel. A blower can be seen at the bottom of the barrel, and a fire tube peeks out from the top. If necessary, the internal volume is filled with insulation, for example, ash - it does not burn and retains heat well.

Simple brick ovens
A small-sized brick rocket stove is another simplest option for building a rocket stove with your own hands. Its assembly does not require cement mortar; it is enough to stack the bricks on top of each other to get a convenient brick outdoor unit for cooking. In the section on self-assembly rocket stoves, we will offer you to familiarize yourself with the simplest procedure for self-assembly.
A rocket stove, made with your own hands from brick, can be used to heat households. In this case, a simple arrangement is not enough - you will have to build a stationary version using a special cement mortar. There are many orders for this, you just have to choose suitable option. By the way, some versions of such furnaces include a water circuit.
Advantage of brick rocket kilns:
- Simple design;
- Long-term heat retention;
- The ability to create a comfortable warm bed.
Some models are made combined, using both steel and bricks.

Sophisticated rocket stoves
A jet stove for heating households or for a bath is characterized by increased complexity. The main link here is still the riser (fire tube), enclosed in a metal casing. Its upper part can be used for cooking, forming a kind of cooking surface. The firebox is made large to accommodate an increased amount solid fuel. The starting materials are metal, bricks and clay.
There are projects for wood-burning rocket stoves that include additional modules. Schemes for their construction include small boilers for preparing hot water, hobs, water jackets and even small ovens. Such stoves will help heat households and create comfortable living conditions for people.
A rocket boiler with a water jacket, created on the basis of a wood-burning stove, will help warm up a multi-room building. It is equipped with a water circuit for heating the coolant. Additional convenience is created by samples with beds - these beds are created on the basis of thermal channels between the flame and chimney pipes.
Types of stoves for different operating conditions
A rocket stove with a water circuit, brick or metal, can replace a boiler. The heat exchanger here is arranged in the upper part of the flame tube in the form of a surrounding water jacket. There are jumpers inside the jacket for more efficient heat transfer to the coolant. The design is extremely simple; it can heat households up to several tens of square meters.
A rocket stove for the garage can be made from an old pot-bellied gas cylinder or barrel. To do this, two holes are made in the selected container - one in the top lid and the other on the side surface. An L-shaped pipe is inserted inside. Having a little experience working with a welding machine, all work will take you a maximum of half an hour.

You can also make a rocket-type furnace described above from sections of square and metal pipe according to the drawing given.
Also suitable for heating a garage is the heating rocket stove “Ognivo – Khozyain”. This is a store-bought model made from aluminum corrugated pipe and ordinary sheet iron. It works in approximately the same way and allows you to warm a garage of up to 30 square meters. m.

There are no drawings of it in the public domain yet, so you can try to assemble the “Ognivo” stove with your own hands based on its photograph. You can also buy it on the manufacturer's website.
We have already said that to heat large households you will need a long-burning rocket stove with a water circuit. A small one-room household can be heated with a simpler stove and a stove bench - this way you will save space on furniture. It consists of the following nodes:
- Top-loading firebox - logs are placed in it;
- The afterburning chamber is a horizontal section in front of the riser (flame tube), where pyrolysis combustion occurs;
- A riser with a hob is a vertical section with a metal body that transfers heat into the room;
- Horizontal channels - they heat the stove bench, after which the combustion products are sent into the chimney.
A rocket stove for heating a one-room house is coated with clay to create a flat and comfortable bed - here you can lay a mattress or a small blanket.
For camping use, the simplest rocket-type stoves made of metal pipes are used. They are compact, easy to light and extinguish, cool quickly and allow you to quickly prepare lunch in the open air. The main thing is not to overdo it with the amount of fuel loaded, so as not to burn the food with a high-temperature flame.
How to increase the efficiency of the stove
Long-burning jet stoves can be made even more efficient with a little modification. If the riser (fire tube) is covered with a metal casing, weld it to outer surface vertically arranged pipes of small diameter - they form a convector that effectively warms the air in the rooms. This modification method is suitable for metal units used for heating technical premises (for example, garages).
Any metal rocket stove can be made more efficient by lining it with brick or natural stone. The masonry will retain heat and slowly release it into the room. At the same time, it will allow you to get rid of unbearable heat if the heating is too intense.
Let's start with the simplest brick sample, intended for cooking. Such a stove can be quickly assembled in your yard without clay mortar, and disassembled after use. It is also possible to assemble a stationary version - for those who like to cook over an open fire. The picture below shows a drawing of the stove, or rather, its order. There are only five rows here.
The first row is the base, which includes six bricks. The second row forms the firebox, and the next three rows form the chimney riser. In the first and second rows, halves of bricks are used so that the stove is rectangular, without protruding elements.

Immediately after assembly, you can start kindling - cook any dishes over the fire in cast iron cauldrons and frying pans, heat kettles and pots with water.
Large rocket stove with bench
The main advantage of the rocket modification over the Russian stove is its compactness. Even if equipped with a bed, it will please small in size. By making it out of brick, you will have at your disposal an effective source of heat with a comfortable bed - household members will fight for the right to occupy this warm place.

The first row forms the base of our rocket stove. It consists of 62 bricks laid according to the pattern shown in the figure. The second row forms channels for heating the bed - they run along its entire length. Cast iron doors are also installed here, secured with metal wire - it is held between the rows. The number of bricks used is 44 pcs. The same amount will be required for the third row, which completely follows the contour of the second. The fourth row completely covers the channels that heat the bed. But here a vertical smoke channel and a firebox are already beginning to form - the row includes 59 bricks.

Another 60 is needed for the fifth row. The bench has already been formed, all that remains is to finish off the chimney channel and build the hob. The sixth row, which includes 17 bricks, is responsible for this. Another 18 are needed for the seventh row, 14 for the eighth.

The ninth and tenth row will require 14 bricks, the eleventh - 13.

Row No. 12 is our key row - the chimney pipe will begin from here. Also from here begins a hole through which the air rising to the hob will fall down to the stove bench - 11 bricks are required (this is the top of the riser). In row No. 13 this process is completed, 10 bricks are spent on it. Now we lay an asbestos pad, which is covered with a piece of thick sheet steel - this will be the hob.

Rows No. 14 and No. 15 require 5 bricks each; they cover the chimney channel and form a low wall between the hob and the stove bench.
In a similar way, you can assemble a long-burning rocket boiler by finding a suitable arrangement. Some schemes involve the use of metal components.
DIY long-burning rocket stove: drawings, diagrams
What is a solid rocket stove and how does it work? In this review, we study the types of rocket (jet) stoves and try to assemble them with our own hands.
Do-it-yourself long-burning rocket stove
This device, despite our brave space achievements, is still unknown to few people in our country. And for sure, only a few are interested in how to make a rocket stove with their own hands, because they do not understand the principle of its operation.

Photo 1 Rocket stove in the interior
Operating principle
Oddly enough, the name “rocket stove” itself has nothing to do with space or rockets themselves. The only analogy that can remotely remind us of this is a jet of flame rising upward in mobile installations.
The design feature of the furnace is the presence of a hood into which flue gases enter and where the final combustion of the sludge occurs. Under the hood, the temperature rises to 1000 0 C within the first 2 hours, as a result of which everything burns without sediment, and the exhaust is formed only in the form of steam and carbon. In this case, gases circulate freely through the channels without forced draft, which is usually created by a chimney pipe.
This design allows the stove to be used not only for heating the room, but also for heating food or water (on the hood). If the chimney is run through a certain area of the room, right up to the lounger, it will also heat up.

Photo 2 Rocket stove in the interior
Among the main advantages of rocket stoves are the following:
- high efficiency - 85%;
- very fast heating of the room - 50 sq.m. in 45-60 minutes;
- absence of soot and, as a result, soot deposits - at temperatures above 1000 degrees, everything burns without a trace;
- the ability to use any solid fuel;
- minimum consumption - at the same temperature and burning duration, a rocket stove consumes 4-5 times less fuel than a conventional stove.
The most simple rocket works according to the direct combustion formula - these are mobile structures that can be easily assembled on the go, literally from scrap materials, and can also be easily dismantled.
The simplest design from a barrel or gas cylinder
Photo 3 Traveling rocket stove
For fuel, a steel plate is welded to the bottom, at the bottom of which a hole is cut for air intake.
You can use any straight cylindrical container for manufacturing - the drawing of a rocket furnace shows how the direct combustion process occurs.
Photo 4 Schematic of a traveling rocket
Brick rocket stove in 20 minutes
If you have 20-30 bricks on hand, you can make a simple rocket stove with your own hands in just a few minutes. Moreover, no adhesives are needed for masonry.
Lay out a brick, as shown in the photo, for a vertical combustion chamber. In this case, the dishes are placed on the hood in such a way as not to interfere with the movement of released gases
Do-it-yourself rocket-type brick oven:
Photo 5 Rocket stove made of 20 bricks
To similar design worked well, needed a warm pipe. This term among stove makers means a preliminary run of wood chips and paper so that the pipe warms up. There will be stagnation of gas in a cold pipe, which will make heating difficult. And if the pipe is warm, then when the wood is ignited, a powerful draft appears in the channel.
For reference. The above simplest designs made from a gas cylinder or pipe have a significant drawback - vertical loading firewood Each time you have to move the wood into the chamber when it burns out and only then add it. Stationary coal-fired or long-burning rocket stoves already have a vertical stack, which simplifies operation many times over.
Long-burning rocket stove
Photo 6 Design of a stationary rocket furnace
DIY rocket jet stove diagram
In order to make such a unit with your own hands, you need to decide on the dimensions and structural elements.
How the rocket works:
As can be seen from the drawing, the diameter of the cap (D), which covers the top of the pipe, is taken as a basis, and its cross section(S).
Based on these indicators, the dimensions of the rocket furnace are calculated:
- the height of the drum is 2 of its diameter;
- the height of the clay coating is 2/3 of the height;
- coating thickness - 1/3 of the diameter;
- cross-sectional area of the pipe - 7% of its cross-section;
- blower area - 1/2 of the pipe section;
- the flame tube horizontally and vertically must be the same;
- ash pan volume - 4-6% of the drum height;
- The cross-sectional area of the external chimney is the double cross-section of the pipe.
- the thickness of the insulating layer (adobe cushion) under the external chimney is 60 mm;
- the thickness of the coating of the stove bench is 1/4 of the diameter of the drum;
- height external pipe- 4000 mm;
- The length of the flue directly depends on the diameter of the drum. If they took it to make it metal container with a diameter of 50-60 cm and a volume of 200 liters, then the length of the flue pipe will be at least 6 meters. If the diameter is half as large, then the bed should be made up to 4 meters.
If you are making a stationary rocket stove with your own hands, be sure to pay attention to the lining of the top of the pipe. This is necessary to isolate the roaster from the walls of the oven to prevent the walls from overheating. Fireclay bricks can be used for lining.
Photos of examples of original performance


It is noteworthy that not only the walls need protection, but also the lining itself. In order to protect it from flammable gases, you can create a metal sheathing and fill it with river sand. For this purpose, you can use any available metal object - a barrel, a bucket, galvanized steel.
Sand is poured into the bucket layer by layer, with each layer being generously watered for proper compaction. When you have filled the protection to the top with sand, leave it to dry for 7-10 days.
The lining of the brazier is done much faster - fireclay bricks are laid on the clay mortar, and the space between the latter and the wall will also have to be filled with sand in layers - with water and time for drying.
Pipe lining diagram


All further work on the installation of a jet-type rocket furnace continues only after not only the lining, but also the clay protection, which is applied over the top cut, has dried.
Before making a stationary structure, practice on a traveling sample. After the first experience it will become clear even if you have not read the books on rocket stoves.

Disadvantages of the heating device
- This device is often used to heat food or water - indeed, a huge amount of heat, a hot cap, why not use this idea? However, connecting a water circuit in order to heat the entire house and not a room is impossible. The design is so simple that any intervention, including a coil, will disrupt the progress of work.
- Surprisingly, such a lightweight mobile heating device is completely unsuitable for either a bathhouse or a garage. Even with its high efficiency, a camping unit will not heat the air in the steam room to the required minimum. And in a garage or warehouse it is not recommended to use devices with direct open fire.
Assembly diagram of a portable rocket stove
In this article we will give an example of a camp installation, which does not require any masonry or finishing materials.
- 2 buckets;
- stainless steel pipe;
- river sand or crushed stone for lining.
Step 1. Cut a hole in the side of one of the buckets along the diameter of the pipe at a height of 5 cm from the bottom. The height should be enough to pour crushed stone or sand into the bucket.
Step 2. Divide the pipe into 2 parts - a short loading section and a pancake elbow-chimney.
Step 2. Insert the pipe into the hole in the bucket.
Step 4. By analogy with step 1, cut a hole in the bucket, but directly in the bottom. The diameter of the hole corresponds to the diameter of the pipe. Insert the pipe.
Step 5. Pour sand or gravel into a bucket, which will act as a heat accumulator for the fire tube.
Step 6. Making legs or stand. For this regular one will do reinforcement that is bent under pressure and the base is cut out.
Rocket stove from a gas cylinder
This is a complicated, improved version, for the manufacture of which you will need an already used gas cylinder and a 4 mm rectangular pipe.
The scheme remains exactly the same with the only exception that flammable gases are discharged from the side through the hole, and not from above, as happens with field samples.
If there is a need to cook or heat food upper part the cylinder with the tap is cut off, and a flat plate is welded on top.
Do-it-yourself long-burning rocket stove made of brick or gas cylinder: drawings, photos and video instructions
We will tell you how to make a rocket stove with your own hands, and what you need for this. This device, despite our brave space achievements, is still very little known in our country, although its effectiveness is beyond doubt.
How to make a rocket stove with your own hands

Rocket stove: diagram and photo of production.
The design of the rocket stove is made in such a way that, using direct combustion, it creates a strong flame from a small amount of fuel. The combustion process occurs in a vertical pipe where the effect of direct combustion of the flame is ultimately created.
Rocket stove diagram.
The figure shows a diagram of a rocket-type furnace.

The stove consists of a vertical pipe and a side firebox placed at an angle of 45 degrees; a firebox located at this angle greatly facilitates the stacking of firewood.
DIY rocket stove.
To make a rocket-type furnace, you will need two sections of profile pipe:
For the firebox, a pipe with a cross-section of 160 x 160 mm is 300 mm long.
For the chimney, a pipe with a cross-section of 120 x 120 mm is 500 mm long.
You will also need metal sheets 5 mm thick and the following dimensions:
Several metal rods for making grate bars.
The manufacturing process of a rocket stove is as follows. The firebox and chimney of the stove are cut out from profile pipes using a grinder.

The chimney and firebox are welded together at an angle of 45 degrees.

At the bottom of the firebox, you need to weld the grates and a plate separating the firebox and the ash pan. Without grates, coals will quickly clog the firebox and reduce draft.

A damper must be provided in the firebox; by adjusting the damper, you can control the intensity of the flame burning in the furnace.

The final stage: paint the rocket stove with heat-resistant paint.

Advantages and disadvantages of a rocket stove.
A rocket-type furnace has its advantages:
- Minimum fuel consumption, the stove can operate on almost any fuel, optimal use of wood - firewood, branches, small chips.
- Strong flame and fast heating, a pot with 3 liters of water boils in 15 - 20 minutes.
- Simplicity of design, compact size.
Disadvantages of a rocket type furnace:
- The weight of the stove is more than 10 kg, so it’s difficult to call this stove a camp stove, unless you transport it in a car.
- It is not practical to use a jet stove for heating rooms; you often need to add firewood to the stove and most of the heat goes into the chimney. The stove is primarily intended for quick cooking, heating water and other needs.
- When burning, the stove makes a characteristic “reactive” sound.
Where is a rocket-type stove useful? The stove can be used in places where it is not possible to light an open fire or there is not enough fuel for a fire. By the way, the stove will be useful if you need to quickly cook food, for example, in the country or in nature.

Another DIY rocket stove option.
DIY rocket stove: drawings, photos, videos
Homemade rocket stove: drawings and photos of production. A rocket stove is used to cook food quickly with a minimum amount of fuel.
DIY rocket stove Robinson

Robinson camping stove
Rocket stoves are attractive due to their simplicity of design and cost-effectiveness. But, behind the apparent simplicity, there is an exact calculation. It is very undesirable to deviate in size: everything will stop working altogether or fuel combustion will be extremely inefficient.
General principles
The portable portable stove "Robinson" was made on the basis of a heating rocket stove. The same principle is applied: firewood burns in the bunker-fuel compartment, the fire, due to the air flow, enters the combustion zone - a horizontal section of the pipe and partially rises up the smoke tube. First, while the stove is not heated up, all the energy is spent on heating the chimney. Then, when it warms up, the gases from high temperatures ignite again, and secondary combustion of the gases occurs. Modern gas-generating pyrolysis boilers are designed according to the same principle.

How does a rocket stove work?
In the Robinson oven, everything is a little simpler: we don’t need to heat the room. Its main task is to heat water and cook food. But the principles remain the same: the fire must heat the chimney, and its length must be enough to burn off the gases. Therefore, for normal performance, adhere to the following proportions:
- The length of the chimney must be at least 2 times the length of the horizontal (sloping) section.
- The height of the fuel compartment is approximately equal to the length of the horizontal section. Therefore, in the Robinson stove, the firebox is made at an angle of 45°, although the fuel compartment can be located at an angle of 90°, but it is not very convenient to place fuel this way.
- The cross-section of the chimney should not be smaller than the size of the firebox.
Construction of the Robinson furnace: drawings and dimensions

This is what a Robinson camp stove looks like
In the original, “Robinson” is welded from a 150*100 mm profile pipe. Homemade similar stoves are made from pipes of similar diameter. Sometimes the fuel compartment is made from a piece of profile pipe, and the chimney is made from a round one. It is important that the cross-section of the chimney is no smaller than that of the firebox, otherwise backdraft may occur.
Below we will lay out drawings of the Robinson rocket stove indicating the most common sizes: profile pipe 150*150 mm, firebox 30 cm long, chimney not less than 60 cm. In general, with this size of firebox it can be up to 90 cm, but keeping in mind that this is still a camping option, we indicate the minimum possible length.

Drawing of a Robinson rocket stove for making your own drawings
The legs are made of threaded rod and are installed on site and tightened with nuts. This option is the most compact, but unscrewing/screwing legs to smoked iron is not the best thing. Alternative support options: steel sheet welded to the bottom or stationary legs. They do not need to be screwed, but they take up more space in the trunk.
In the case of original stove Robinson, it does not provide a combustion air supply channel and there is no lid for regulating combustion. In homemade ones there is an improvement: a plate ending in a grate is welded at the bottom of the fuel compartment. The fuel is placed on this plate. The gap at the bottom allows oxygen to be supplied directly to the combustion zone. To regulate the combustion intensity, a flap cover is welded to the fuel compartment. It is slightly wider in size than the fuel compartment (in the drawing it is 156.4 mm with a firebox width of 140 mm). It should not block it completely - otherwise the fire will go out. They make it smaller in size than the firebox or build in a slide valve.

Drawing of a firebox for a Robinson stove with an ash pan and a ash pan
Craftsmen make small camping rocket stoves from various pieces of metal. In the photo below you see what happened - a finished Robinson stove, made by hand by a craftsman from Penza. Three small sections of 160*160 mm profile pipe were used, from which the combustion chamber was welded. Its total length was 40 cm. A single piece of pipe 120*120 mm, 60 cm long, was used for the chimney. In the firebox the ash pan is welded from sheet metal 8 mm and steel bar 12 mm. Instead of legs, a metal plate is welded: thickness 8 mm, dimensions 180*350 mm.

This is a finished Robinson stove and what the master welded it from with his own hands (To enlarge the size of the picture, click on it with the left mouse button)
According to the author: a heated stove burns well, does not smoke and is not capricious. Just before loading with “serious” fuel: branches and wood chips, it needs to be heated with paper, hay, dry grass or very thin branches. When the pipe warms up, you can lay in thicker firewood.
Difficulties with lighting a cold stove are generally typical for rocket fireboxes. In this case, we also have a narrowed chimney, which makes kindling more problematic.
The second version of a homemade rocket-type camping stove is made from two profile pipes: 160*160 mm 30 cm long for the firebox and 120*120 mm 60 cm long for the chimney (it’s better to take a section no smaller - the draft will be better). 5 mm steel is used for the ash pan, door and stand. The ash pan is cut to half the length of the firebox, and reinforcement rods of 12 mm diameter are welded to the plate. The lid does not reach the ash pan plate by about 2 cm; instead of a handle, a large diameter nut is used. Base plate dimensions 20*30 cm.

Materials and process for making a Robinson stove with your own hands (To enlarge the size of the picture, click on it with the left mouse button)
To make it convenient to place the dishes and to give the smoke a place to escape, CV joint balls are welded at the corners of the pipe. This option turned out to be more convenient than the one proposed in the original (three rings welded together) - on such a stove you can place dishes with a round bottom - a cauldron, for example. Hunters and fishermen most often have these dishes, not pots with flat bottom. The kettle also works great: it boils three liters of water in 20 minutes. There is enough heat to fry meat and for other cooking tasks.

Robinson portable stove: tests in the garage and on a three-day hunt (To enlarge the size of the picture, click on it with the left mouse button)
DIY Robinson stove: the principle of a rocket stove and its manufacture
Do you need a small, portable stove that you can use to cook your meals? Pay attention to the Robinson rocket stove. It is made with your own hands from two pieces of profile pipe.
Simple heating device, which is not much inferior in popularity to the potbelly stove, is the rocket stove. It runs on wood, and the design is so simple that production is possible on your own. The stove can also be made economical - many people think that looking like a potbelly stove means the combustion chamber is gluttonous, but no. There are schemes that operate on smoldering wood (pyrolysis), which means they are economical with the same efficiency.
Why rocket and why jet
Such a stove is often called a “rocket”, but not because the wood in it burns at a high speed, but because of the shape of the structure - the traditional version of the rocket stove is made from two sections of iron pipes welded to each other. The unit resembles a rocket children's drawing. Using a simplified form allows you to make it in less than a day. The adjective “reactive” is also used for the stove, but also not because of the rate of fuel combustion, but because of the combustion characteristics - at a certain stage of supplying air to the firebox, it begins to hum strongly, as if the turbocharging of the injectors in the engine is turned on.
A humming stove is an inefficient and wasteful combustion mode. During normal operation, it makes a quiet rustling sound.

Any owner of a country house or country house has in the workshop at least minimum set carpentry, plumbing and automotive repair tools. These are the ones that will help in the manufacture of a miracle rocket, plus drawings and a minimum supply of materials: pipes or metal boxes, a sheet of iron and - when building a stationary version - brick and mortar on clay. Now it becomes clear that the jet stove is made portable or stationary, for example, for heating a house or bathhouse. 
If a stationary jet stove will heat the house, then it is placed along external wall. Properly designed and equipped, it can heat a house with an area of up to 50m2. The stove is also installed in an open area - on a personal plot, and is used as a summer option for cooking.
How does a rocket stove work?
The device is the simplest - two principles of fuel combustion, borrowed from other stoves:
- Natural circulation of hot gases and smoke through the stove channels is a standard solution, as in a potbelly stove.
- Afterburning of unburned gases (pyrolysis) with limited access of oxygen to the combustion chamber.
The circuit of the simplest reactive stove, which is intended only for cooking, uses precisely the natural combustion of wood - in open cell it is impossible to create conditions for maintaining the pyrolysis reaction and afterburning of unburned gases.
Let's consider a simple design of a direct combustion rocket stove, which is traditionally installed in an open area in the yard. You can quickly heat water on it or prepare lunch for your family on vacation. From the figure below it becomes clear that such a sample will require two sections of a cylindrical or rectangular iron pipe, which are connected to each other by welding at an angle of 90 0.

A horizontal section of a metal box acts as a combustion chamber; firewood is placed there. You can also organize fuel loading vertically - add a vertical iron cylinder on top of the horizontal pipe to load firewood. Thus, you will get a structure of three pipes or boxes, the lowest of which (horizontal) will work as a firebox. In a stationary scheme, the simplest stove design often uses red brick, which is placed on a clay mortar.
The efficiency of the design cannot be called satisfactory, so the craftsmen figured out how to increase its efficiency. The additional element is another pipe of larger diameter (as you can see, all materials are available and cheap), into which the main pipe of the riser stove (primary chimney) is installed. This increases the overall heating and the duration of heat retention. 
On the diagram:
- Outer casing.
- A pipe that serves as a firebox.
- A channel for air outlet into the combustion chamber.
- Insulated area between the body and the riser. The same ash can serve as insulation.
How to heat
The Robinson jet stove is heated according to the principle of starting a fire - paper, hay, straw or other flammable material is laid first, then small chips or large shavings. The last logs to be placed are the size of the firebox. Hot combustion products rise through the vertical pipe (2) and exit outside. You can place a pan or tank of water on the open end of the pipe (2).
In order for the fuel to burn continuously and actively, it is necessary to provide a gap between the outlet pipe (2) and the pan of water using a special lattice metal stand.
The diagram below shows a simple device with a door on the opening for loading fuel. Air draft is formed due to the presence of a special channel formed by the lower surface of the firebox and an iron plate welded 8-10 mm from the combustion chamber. This design will force air to be pumped in even if the door is completely closed. It is clear from the diagram that the design is also designed to operate in pyrolysis mode, while a constant flow of a “secondary” air stream will burn the exhaust gases. But in order for afterburning to take place 100%, it is necessary to equip the thermal insulation of the secondary chamber in which the gas burns out in order to ensure the required temperature indicators for pyrolysis.
On the diagram:
- Forced channel for blowing air when the combustion door is closed.
- Active combustion area.
- Burnt gases.
The improved scheme provides not only the possibility of heating the surrounding space, but also cooking food, for which the upper hob. Total: to the simplest version of the “rocket” you can add an outer casing, which will additionally heat the room, a combustion door, air supply to maintain the pyrolysis mode, and a stove for cooking food. This scheme can already be implemented in the house itself, and not in the yard, since the chimney pipe is led outside. This minor upgrade significantly increases the efficiency of the model. Thus, a do-it-yourself rocket stove, the drawings of which are presented below, has the following capabilities:
- Due to the inclusion of an outer casing made of a larger diameter pipe and its insulation, which creates a thermal insulation layer for the riser, as well as the ability to hermetically close the upper pipe hot air takes much longer to cool down.
- A separate channel for blowing has been added to the lower section of the stove, which makes it possible to organize pyrolysis combustion.
- In this design, it is recommended to place the chimney not vertically at the top, but at the bottom at the back of the body, which will allow for additional circulation of hot flows through the internal channels of the stove, ensuring rapid heating of the hob and the entire insulated body.

In the firebox (1), the fuel does not burn completely (2), since the air supply is not complete - this is mode “A”, which can be controlled using the damper (3). Gases that are hot, but not burned out from pyrolysis, are supplied to the end section of the fire channel (5), in which they are burned. Afterburning is ensured by high-quality thermal insulation and a constant flow of “secondary” air in mode “B” through channel (4).
The hot stream then enters the internal riser (7), rises up to the cooking plate (10) and heats it. Next, hot air enters the volume (6) between the outer and inner pipes, insulated with a layer of ash (4, 9), heats the furnace body, which releases heat into the room. Finally, the cooled air falls down to enter the chimney (11) and exit out.
A consistently high temperature in the riser (7) ensures maximum heat transfer and creates conditions for complete combustion of gases by placing the riser in a larger pipe - the shell (8). The free space is filled with ash or other heat-resistant substance (9) for lining - this can also be a solution of ordinary clay and sand in proportions 1:3. 
The palm of popularity belongs to the industrial model “Robinson” - it is a simple but reliable design. Having such a mobile stove, you can quickly cook food or heat water at the dacha or on a hike. Structurally, it is an inverted L-shaped pipe, as shown in the diagrams below. 
Firewood is placed in the horizontal section of the fuel receiver, and ignition is carried out from the side where the vertical pipe enters. In an L-shaped pipe, due to the difference in pressure of hot and cold air, draft arises, and the intensity of combustion will only increase as the furnace body heats up. The air supply is regulated by a slide damper. 
The furnace operates on the principle of using the energy of a natural flow of hot gases. It turns out to be a closed cycle: as the temperature rises, the fuel begins to burn more actively and the chamber and cooking surface heat up faster. As a result, Robinson is able to heat 10 liters of water in 10 minutes if you place the tank on an already warm surface. The diagram shows that the hob surface in Robinson has a thick thermal insulation layer, which allows large diameter logs to be placed in the firebox.
Stationary oven
Stationary models have a hood to keep the heat in the room longer. In such a stove, fuel combustion occurs according to a different scenario. The beginning of the wood combustion process is the same - the air supply is limited. This causes the release of pyrolysis gases, which are burned in the lower section of a vertical pipe or box, where secondary air is supplied separately. 
The hot gas, once at the top, begins to cool and falls into the free inter-chamber volume, and then into the chimney. It happens like this:
- Gravity forces force the colder, and therefore heavier, burnt gases to rush downward, where they enter the chimney.
- This is facilitated by the constantly maintained pressure from the added firewood and the consistently high temperature of the gases.
- Natural draft in the chimney pipe.
All this creates effective conditions for burning wood and it becomes possible to attach a smoke channel with arbitrary geometry to the “rocket”. Basically, long and complex chimneys are needed in order to better heat the room. 
The main disadvantage of all solid fuel stoves is the inability to retain most of the heat in the house. But positive qualities allow you to level out negative points– high gas exit speed allows you to organize complex vertical or horizontal chimneys with several channels. The implementation of this principle in practice is the Russian stove. In a jet stove with a horizontal multi-channel chimney, you can also equip a warm bench, as shown in the diagram below. 
A rocket stove is a home heating option that can only be cheaper for nothing. A person familiar with the basics of construction can build a combined brick stove in a design suitable for any home interior. The main task of improving the appearance will be decorating the iron cap and firebox lid - everything else will not be in plain sight. 
Combined brick-metal barrel stove
It is stationary, because the structure cannot be moved. From fireclay bricks the fuel chamber and chimney are laid out, and valves and doors are made of metal. Brick gives off heat very slowly, so the room will be warmed for a long time. 
High efficiency– not the strong point of such models, but good heat transfer can be achieved by adjusting the air supply to the chamber, without trying to reach a combustion mode in which the stove begins to “roar” and “hum.” 
In order to somehow minimize heat losses during operation of this simplest design, many craftsmen build a water circuit into the stove and connect a hot water tank. The construction of a bench with a multi-channel horizontal chimney also helps to preserve heat in the room. Negative qualities of “rocket” models that cannot be minimized or eliminated:
- Constant monitoring and adjustment of traction is required - no automatic devices are provided.
- Every 2-3 hours you need to load a new portion of firewood.
- The iron cap heats up to dangerous temperatures.
The simplest and cheapest option is the Robinson model, which is shown in the drawing below. To make it, you need cuttings of pipes or a rectangular profile box, metal corners for the legs, welding machine. Its dimensions are selected based on the dimensions of the workpieces. The main thing is to adhere to the principle of action, not the size. 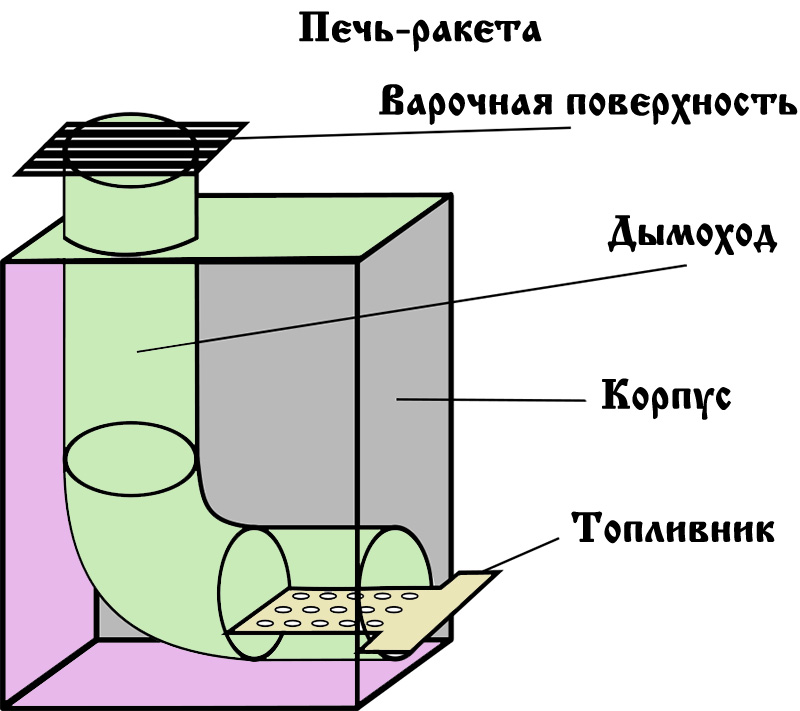
For homemade construction, they often take 200 liter gas cylinders or barrels - thick walls and suitable size could not be more consistent with what was intended. Both are used to make the outer casing, and the internal elements are made from pipes of smaller diameter or are laid out with bricks - halves, quarters or whole.
There is no general formula for calculating heat transfer for all models of a rocket stove, so the option of using ready-made calculations based on the principle of similarity of circuits is quite suitable. The main thing is that the size of the future “rocket” at least approximately corresponds to the volume of the heated room. For example, a gas cylinder will do for a garage, for country house- two hundred liter barrel. Approximate selection internal elements shown in the diagram below. 
Iron cylinder stove
- Cylinder – gas, oxygen, carbon dioxide.
- Pipe ≥ 150 mm for fuel and loading chambers.
- Pipes 70 and 150 mm - for internal vertical chimney.
- Pipes 150 mm - for the outlet chimney.
- Insulation of any type, always non-flammable.
- Sheet metal blanks H = 3 mm.
The upper part of the cylinder is cut off by welding. For safety reasons, it is better to open the shut-off valve on it and fill it with water before cutting. On the sides you need to cut openings for the fuel chamber and chimney. The pipe under the firebox is connected to the vertical pipe of the chimney channel from the bottom of the cylinder. 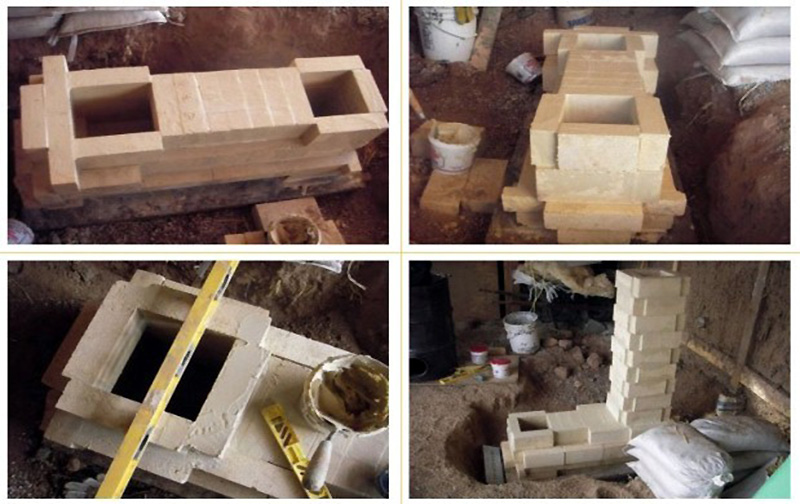
After installing the internal elements, the cut top is welded back. The seams are checked visually and the main chimney is connected. If there is a water circuit, it is connected too. After this, the rocket stove can be tested.
Sufficient draft is ensured by the height of the chimney pipe - it must be raised above the firebox by at least 4 meters.
How to lay a firebox out of brick
This model requires the use of only fireclay (clay) bricks - ceramic or silicate bricks will immediately crack. The masonry is carried out using clay mortar, the proportions of the composition are indicated above. A pit is dug under the base of the stove, the soil at the bottom is compacted and filled with concrete mortar. The size of the foundation is 1200x400x100 mm.
After the base has hardened, it is protected with a sheet of basalt cardboard, then they begin to lay out the firebox, vertical chimney and loading chamber. A door is attached to the front of the firebox for removing ash. After the clay solution has dried, the trench is filled up and a pipe is inserted into the vertical chimney required diameter. The cavities between the brick and the pipe should be filled with insulation - basalt wool, ash or other non-flammable material, for example, asbestos. 
Now a cap Ø 600 mm is placed on the masonry - a cut-out lid from a metal barrel will do. Before installation, a hole is cut in it into which the chimney pipe is inserted. When putting on this cap, the barrel should be turned over, and the pipe will be where it is needed. Then the chimney is brought out - either directly to the street, or through the arrangement of a sunbed with horizontal chimney channels. The lounger can be laid out with ordinary sand-lime brick, since the temperature of the gases will already be low.


