How to repair a hole in the roof caused by a pipe. Do-it-yourself pipe sealing on a slate roof. Pipe leaking on the roof
-
Despite all the efforts of the roofers to lay the roofing covering as closely as possible to the chimney and various protrusions, there are still leaks at the junction points. Water from the roof can thus enter the under-roof space through the cracks formed. Therefore, they all need to be properly sealed.
One of the most discussed issues among stove builders is how to seal a pipe on the roof. At a time when stove heating was present almost everywhere, when installing the chimney on the roof, a special thickening was made, which protected the roof from leaks. Nowadays, brick pipes everywhere have given way to metal, often serially welded chimneys. It is also worth noting that modern stove makers, when choosing a brick for a pipe on the roof, do not thicken it.
In order not to encounter the most unpleasant situation when a pipe is leaking, you need to figure out how to seal a pipe on the roof.
Principles of closing gaps
The cracks are closed using various available materials. Schematically they can be divided into two groups:
- Elements used to close the gaps between the chimney and the roof. These are different aprons, collars, both factory and self-made. The materials used are corrosion-resistant galvanized steel, rubber or silicone. Additional elements may differ in appearance and yours technical specifications. Functionally, their installation provides initial rough closure of the joints.
- All kinds of sealants used to fill the remaining cracks. Eg, cement mixtures or mastic. Today, to solve these problems, more modern materials, which are simple and very convenient when performing insulation work, for example, self-adhesive tapes.
How to seal the gap between the pipe and the roof

As soon as the pipe is made, roofers are faced with the question of how to seal and waterproof the joints , how to seal a chimney. For this they use various materials. Let's note a few of the most common ones.
- Silicone sealant for chimney on the roof. This is a frost-resistant, waterproof material. It is easy to use and affordable. Besides silicone sealant has a high level of heat resistance, up to 150˚ C, therefore it is widely used in the construction of baths and steam rooms.
- Bitumen mastic. The surface to be treated is pre-cleaned and dried. The mastic is applied in a layer 3 or 4 mm high. If the gap is too wide, you can fill it first polyurethane foam, and only then apply bitumen mastic.

- Ecobit. This insulating material provides enough good waterproofing. It is a reinforced self-adhesive aluminum tape with a sealing layer of special modified bitumen. It is laid along the perimeter of the chimney.

- Enkryl. This is a one-component acrylic mastic made in Germany, which is used to treat problematic joints. The waterproofing process takes place in 4 stages.
1. degrease the surface around the perimeter of the pipe;
2. Using a brush, apply the first layer of Enkryl liquid mastic;
3. the pipe is wrapped with Polyflexvlies Rolle (this is a viscose-based reinforcing fabric), which will provide additional elasticity to the waterproofing;
4. After 15–20 minutes, when the mastic has already been absorbed into the fabric, apply the second layer.
According to the manufacturer, it will hardly be possible to see that the roof near the pipe is leaking for 9–10 years.
How to seal a roof pipe from different materials
Technologies for sealing cracks depend on factors such as the type of roofing material, the size of the gap, and the shape of the smoke channel. Let's take a step-by-step look at the process of sealing a roof pipe from rain for popular coatings.

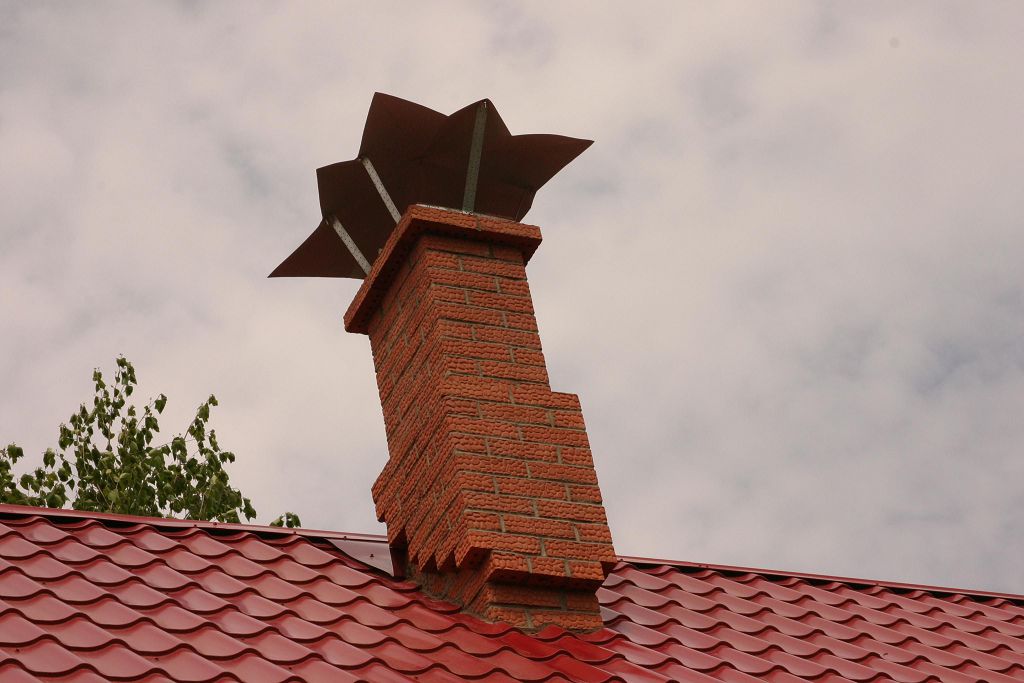
Tile roof
- The gaps formed between the roof covering and the outer wall of the chimney must be covered with corners from of stainless steel. If the chimney has an oval or round shape, metal corners can be replaced with rubber seals with an adhesive backing.
- A special decorative collar is prepared from galvanized sheet steel. It is put on through the head of the chimney and secured with self-tapping screws. Thus, a space for filling is formed between them.
- A viscous cement-sand waterproof solution is poured into the formed gap and left for a day. This time should usually be enough for the mixture to harden.
When filling gaps, it is necessary to ensure that the solution completely fills all possible cracks.
- To drain water from the roof, an inclined surface is formed. This is done as follows: a hole is cut out in a stainless steel sheet. Its diameter should correspond to the size of the collar. Having placed the cut sheet on the head, it is attached to the screws.

Slate roofing
Sealing with mortar is the most accessible technology sealing a slate roof. However, in the case of chimneys round shape using this method is associated with certain difficulties. This problem can be successfully solved using the following algorithm.
- A sheet of polyethylene is placed on thick cardboard and a ring is formed. It is inserted into the gap between the roofing and the chimney.
- A temporary restrictive edge is formed on the slate from some plastic material, say, plasticine.
- An asbestos-cement solution is poured into the resulting gap.
- After mortar hardens, the side and cardboard cylinder are removed.
- In their place remains an asbestos ring, which serves as waterproofing.

Roofing made of bituminous tiles
On soft roof Usually they do the cutting. The gaps are sealed using a special apron, which is framed with a flexible self-adhesive tape based on rubber, for example, “Vakaflex”. The tape is carefully glued to the existing adhesive layer around the perimeter of the chimney, running it from the roof surface to the walls of the chimney. Then the cutting is pressed with a case. The gaps remaining between the flexible roofing material and the chimney are sealed bitumen mastic.
If the gaps are large enough, they are first filled with tow or rope. Before this, the material is impregnated with compounds that give it waterproof qualities. For example, use oil paint, bitumen and more. Gaps can also be filled with cement mortar.
Waterproofing a chimney on a corrugated roof

The connection of the corrugated sheet to the chimney with rectangular cross-section . The most common way to seal a chimney in this case is to install an apron. This shaped element is made of galvanized steel sheet. Install it on the roof, painted in the color of the roof.
- Main part installation work connected to metal junction strips, which must be located in the lower lobe of the chimney.
- Since the pipe is routed through corrugated sheeting, the vapor and waterproofing layers are cut as a result. They are carefully glued to the outer walls of the chimney using tape.
- A shallow groove (about 1.5 cm) is made along its perimeter using a special machine.
- Part of the abutment strip, bending the upper edge, inserts a groove and additionally fixes it with silicone sealant with high level heat resistance.
How can you eliminate gaps?
Seal gaps between chimney and slate roof
Getting rid of cracks on a tiled roof
Material for waterproofing bitumen roofs
The process of eliminating cracks in a corrugated roof
Installation chimney, as a rule, is not a difficult process, however, in some places, for example in transitions through floors, some difficulties may arise.
How and with what to seal the gap between the pipe and the roof?
An important point is to ensure proper waterproofing. We will talk about this and other nuances related to how to seal a chimney pipe in this article.
Even if the pipe is placed as tightly as possible on the roof, minor gaps will still remain. When it rains through them in attic space Moisture will constantly enter, which will eventually lead to damage to the roofing structures. This is why roof pipe sealing is so important.
How can you eliminate gaps?
The easiest way to solve the problem of how to seal the gap between the pipe and the roof is to install an apron on top. You can do it yourself, in which case you will need to provide strips for connection to the pipe in advance. There is an easier way - to buy a ready-made stainless steel roof passage. Often, round passages are made for the chimney, and they are made of stainless steel. The passage is placed on the pipe, and the joint is fixed with a steel clamp.
If you need to seal minor gaps formed between the pipe and the roof, then for these purposes you can use silicone sealant (read: “Which sealants for chimneys are best to use - types, characteristics”). You can find a huge variety of them on sale, but we need a heat-resistant type.
The process of how to seal the roof around round pipe, will differ slightly depending on the type of roofing, that is, in addition to the basic recommendations, there are also algorithms that will differ somewhat.
Seal gaps between chimney and slate roof
Sometimes the question arises of how to seal the gap between the pipe and the slate.
The technology provides the following sequence:
- First, cut a round hole in the steel sheet which will be required to finish the ridge.
- Next, a ring of sheet asbestos cement is placed on the pipe.
- For absolute sealing, so that in the future there will be no problems with the leaking pipe on the roof, the joint between the pipe and the roof is sealed with an asbestos cement solution (proportion 1:2).
- In addition, the same solution is used to fill the gap between the chimney pipe and the slate sheet. To do this, you can temporarily make a limiter out of cardboard.
Getting rid of cracks on a tiled roof
On a tile roof, it is best to seal the cracks with a solution of sand and cement, which the best way will protect inner part buildings from moisture and precipitation.
To achieve the best moisture insulation, you will need:
- Install a galvanized collar on the roof, thus creating a place for pouring the solution.
- Pour a solution of cement and sand, making sure that it clearly fills the entire space between the roof and the chimney.
- In addition, you will need to make a surface and place it at an angle so that excess liquid flows down it.
Material for waterproofing bitumen roofs
Among the options for covering a pipe on the roof if it rises above a bitumen roof, the most optimal is the use of Wakaflex self-adhesive tape.
You can perform isolation in this way:
- First, cutting is done from the Wakaflex tape.
- At the next stage, this cutting needs to be pressed with a pipe case.
- At the end, all remaining gaps between the parts being connected are sealed with bitumen mastic.
The process of eliminating cracks in a corrugated roof
As a rule, when installing a chimney through a corrugated roof, a ready-made Master Flash pipe cutting is used. Its advantage is also that it is very convenient to use such a kit; it can be used for roofing made of almost any material. Read also: “Methods of installing a chimney on the roof of a house - advantages and disadvantages of different options.”
In essence, Master Flash is an apron cap made of silicone or rubber, placed on an aluminum base.
As for operating temperatures, for the silicone version of products it is significantly wider - in the range from -50 to 130 ℃.
The process of sealing cracks on profile roof includes the following manipulations:
- A gap is cut in the cap, the diameter of which is slightly smaller than the cross-section of the chimney.
- The Master Flush is put on the chimney.
- A gasket is placed at the base of the chimney.
- The joints between the material are sealed with silicone sealant.
- The base of the chimney is fixed to the profile roof using screws.
Often the described manipulations do not provide sufficient tightness on the profile roof, so that during rainfall water leaks into the cracks. In such cases, the best option is to use self-adhesive tape, aluminum reinforced. Apply similar material very convenient because it does not need to be preheated before use.
Thus, the fact how well the corrugated roof will be sealed at the exit point of the chimney depends largely on the choice of material and the quality of the work performed. However, we are confident that by following our instructions exactly and working responsibly, you will be able to protect your home from any surprises associated with roof leaks.
Home Construction Roof is leaking, roof repair, tricks and repair tips
The roof is leaking, we are horrified, rushing for a basin.
We substitute him under the drops and watch with sadness what happened. The holiday was ruined, bad weather insidiously made its way into our house.
Pipe leaking on the roof
But maybe it's time to look at the problem from the other side? After all, rain, in a sense, is an indicator signaling problems with the roof, which is the time to patch it up before the winter cold hits. This is what helps diagnose leaks.
Often, before appearing on the surface, water travels a long and winding path, sometimes overcoming complex design roofs.
For those who have a “simpler” roof - slate or metal with a traditional gable profile, detect a crack or hole easier than owners of multi-tile roofs, but in any case you will need attention and patience.
The most vulnerable places junctions of the roof with chimneys, bases of television antennas, as well as joints with projections of walls and windows.
The reason may also be a suddenly cracked shingle or hole in slate caused by a fastening nail that has rusted or lifted.
When examine the roof from the attic, pay attention any stains on the rafters and sheathing are evidence that eloquently indicate the location of the leak.
Remember visually or mark those places on the roof where, when the weather improves and repairs can begin, you can put your foot on without risking falling through.
After all, your own safety is no less important than the integrity of the roof.
For those suffering from height anxiety or dizziness, it is better to entrust the work to professionals.
Throw it over the roof ridge, secure it to reliable beams and tie it with a sailor's knot.
If the damage is minor(crack, slight displacement or hole), sealing them is not difficult. Whatever your roof is - slate, metal, roofing felt or tile.
Use for this purpose, waterproof glue, resin, which are sold in specialized stores, or drying oil putty, purchased or prepared independently.
Due to the high consumption of material, larger damages are usually repaired bitumen(price 41.50 rub./kg) or cement mastic (33 rub./kg).
After drying, the last two materials are primed and reinforced with paint on top.
For waterproofing and sealing roof joints bitumen mastic is the most popular product.
Alternative options- ready-made roof coverings containing bitumen, or more expensive, but also more reliable strips of stainless metals - stainless steel, aluminum, etc.
Self-adhesive strips with aluminum foil, back side which has adhesive (gluing) properties (roller 12.5 m long, 8 cm wide - RUB 2,557.50).
You can temporarily seal the joints with simple putty.
At the beginning thoroughly clean the damaged area of dirt, rust or lichen (it can be destroyed by pouring boiling water over it). Only when the area that needs sealing is dry, apply the selected material.
More extensive damage can be repaired using patches made from various self-adhesive materials sold in stores, and homemade ones made from metal, roofing felt, tarpaulin or any dense waterproof fabric.
During repairs metal surfaces patches of the same metal are applied and mastics containing bitumen are used.
To prevent corrosion, new insulation or nails used to attach patches must be of the same metal as the old ones.
Seal the edges carefully: for safety and aesthetics, cover the top of the patch with a waterproof coating. They are the most different colors- white, terracotta, green, gray, etc.
A “home-grown” patch made of waterproof fabric is placed on drying oil putty or paint, and after drying the latter is painted.
In any case, the patches should cover the area of the repaired area on all sides by 6-10 cm.
When you replace failed tiles, or slate sheets, or rusted metal strips, try to adhere to two important principles.
First— the replacement material must be an exact copy of the previous one in size and quality.
Second- adjacent coating elements should be affected as little as possible.
When there are deep holes in “layered” roofing felt roofs, the damaged layers are usually cut crosswise and the corners are turned away, after which they are cleaned, dried, primed, puttied (bitumen mastic with the addition of sand, sawdust, etc.) and sealed back.
The work is completed with one or more patches of roofing felt, each of which should be approximately 10 cm larger than the previous one. They are resinous and sprinkled with sand or gravel or marble chips for strength.
Saving on materials, you run the risk of discovering that a “cheap” roofing felt roof doesn’t cost you that little. After all, a continuous sheathing is needed under it, and every year it needs to be treated with mastic.
And by investing in tiles, you will be free from hassle for many years to come. And over time, she can become “dear” to you, not only in a financial sense.
During emergency work, not only dexterity is required, but also good memory. After all what you do temporarily, then it is advisable to redo it “forever”
Do not neglect technical innovations - stainless steel roofing nails, nail remover. The first will save you from problems in the future, the second will make your work much easier.
11968 0 0
Self finishing chimney on the roof in 3 options
Many people believe that finishing a chimney on the roof is needed only for beauty, this is partly true, but the aesthetic component is not in the first place here. The lining is needed, first of all, to protect the chimney, both from the inside and the outside. Next, we will look at the 3 most popular methods of arranging a chimney, plus you will learn why this is necessary and how to sheathe the pipe with your own hands.
Why finish the pipe?
There are at least 3 reasons why it is necessary to finish chimneys on the roof:
- High temperatures, on the one hand, and cold air on the other hand, they lead to the fact that inner surface condensation settles in the pipes. But it is not plain water, condensation is an aggressive acid cocktail that gradually corrodes the pipe. External insulation shifts the dew point inside the insulation and eliminates the appearance of condensation;

- 222222If solid wood was used to construct the chimney clinker brick or a stainless steel pipe, then these materials are not afraid of weather troubles. While ordinary brick without external protection will begin to crumble in a couple of years, steel will rust, and concrete will crack;
- In addition to the strength of the chimney, there is also such important point, as protection from rain on the roof itself. If the sealing of the sector connecting the pipe with the roof was performed poorly, then within a year the insulation will become unusable, and the wooden rafter system will start to deteriorate.

Standards and possible finishing options
The chimney system, as well as the entire stove system, is an important fire hazardous facility; accordingly, all aspects of its arrangement are strictly regulated.
Rules and regulations
All important points regarding the arrangement of heating, ventilation and air conditioning systems are described in detail in SNiP 41-01-2003. The work is quite voluminous, so I will recount only those standards that apply to chimneys:

- The ignition temperature of thermal insulation and finishing materials the pipes should be 20 ºС higher than the maximum outside temperature of the chimney, but ideally it is advisable to line the chimney with non-combustible materials;
- Sheathing the pipe with metal is allowed, but the metal must have an anti-corrosion coating;
- The brick pipe must have walls with a thickness of 120 mm;
- Concrete chimneys are rarely installed in private houses, but if you decide to install such a pipe, the concrete must be reinforced, heat-resistant and have a wall thickness of 60 mm or more;
- Minimum gap between the chimney and the wood roofing sheathing ranges from 130 mm;
- For ceramic chimneys, not protected by thermal insulation, the gap between the pipe and wooden structures roofing is from 250 mm;
How to finish a chimney pipe
| Illustrations | Recommendations |
 |
Clinker tiles. The above-mentioned clinker brick is a good thing, but expensive. Therefore, many lay out a pipe from ordinary brick, and the top is lined with clinker tiles. The material can withstand any vagaries of weather, plus such tiles can be used to cover not only chimneys, but also the stoves themselves inside the house. |
 |
Plaster.
The option is not as durable as clinker tiles, but if you attach a reinforcing mesh made of fiberglass or galvanized metal to the surface of the pipe, the plaster will adhere well. But keep in mind that not everyone is capable of high-quality plastering of the surface with their own hands while standing on the slope of the roof. |
 |
Siding.
Both metal and cement siding are equally suitable for lining chimneys. Moreover, this material is mounted on the sheathing, which means it is possible to lay insulation under it. |
 |
Corrugated sheet.
Finishing chimneys with corrugated sheeting is now one of the most common. This option harmonizes especially well with metal tiles. But if you choose a color, then steel chimneys on roofs made of slate, ondulin or ceramic tiles will also fit into the overall design. |
 |
Bituminous shingles.
In this case, we can only talk about installing a decorative cocoon made of fire-resistant plywood around the pipe, onto which the bitumen shingles are placed. |
Three options for independently arranging a chimney outside
There are 3 options where a person without special training can do everything with his own hands. The first option concerns brick pipes, which do not need lining, but you need to seal the joint with the roof. After this comes frame option and an option with ready-made factory solutions.
Option number 1: we arrange a brick pipe
Waterproofing the pipe on the roof should be carried out before laying the roofing material. If the roof is already in place, you will have to partially dismantle it. The entire perimeter of 50–70 cm around is removed, plus you need to remove the lower part of the roof from the pipe to the edge of the slope.

The materials we need are wall metallic profile. You can bend it from galvanized steel with your own hands or buy it ready-made. The profile consists of 4 parts, which are superimposed on each other during installation.
It is definitely better to buy an external apron for the pipe, and it is advisable to buy it together with the roofing material, it is easier to choose the color.
The so-called tie is a sheet of roofing iron with sides curved on the sides. It is laid from the bottom of the pipe to the edge of the slope and placed under the lower section of the wall profile.
In order to seal tightly brick pipe with a wall profile, we need to cut a groove on the pipe with a grinder about 20–30 mm deep. The curved edge of the profile is inserted into this groove.

Next, we insert the curved edge of the profile into the groove and fill the groove with sealant. Then we fix all 4 parts of the profile and the tie, fastened from below with self-tapping screws and press washers. On top of this entire structure is laid roofing material.

The upper apron is attached to the pipe with self-tapping screws along the entire perimeter. It must extend onto the pipe by at least 100 mm. The lower part of the apron is often made of soft bituminous materials. It is pressed around the corrugated roof and glued to this roof with mastic or special glue.

The scheme works something like this: the main amount of moisture is removed from the pipe by the upper apron, but if this barrier does not cope with its task and moisture gets under the roof, then it will be collected by the wall profile and the water will flow down the tie from the roof.

Option No. 2: frame installation
This method is well suited for insulating and lining the chimney with corrugated sheets, siding and other similar materials. To begin with, the base is sheathed with a metal profile; later we will attach corrugated sheeting to it. It is better to make the frame from a wall profile under plasterboard; it is wider than the ceiling.

It is not difficult to work with a metal profile, but if you are not confident in your abilities, you can build a frame from wooden blocks. Is it true wooden frame it will need to be well saturated with fire retardants, antiseptics and a water-repellent composition. Between the frame slats, slabs of dense mineral wool are laid to insulate the pipe.

Corrugated sheet or any other sheet material It is screwed to the frame slats with self-tapping screws and press washers. The whole structure is crowned with an umbrella for protection from the rain.

Option No. 3: ready-made solutions
There are no problems at all with round pipes now. Special flexible aprons are produced for them. Based on experience, such an apron can be installed in a couple of hours maximum. Photo instructions for installing such an apron are given below.

- Select the pipe diameter you need and cut a hole in the soft polymer cone;
- Pull the cone onto the pipe, the connection should be tight;
- Crimp the lower ring of soft metal to the shape of the roof;
- Thickly lubricate the perimeter under the ring with sealant;
- Screw the ring to the roofing material using self-tapping screws and press washers.
Conclusion
It is quite problematic to talk in detail about all the methods of finishing chimneys in one publication, so I tried to select for you the 3 most accessible ones. home handyman option. If after reading the article and watching the video in this article you still have questions, write in the comments, I will try to help.
Installing a chimney is usually not a difficult process, however, in some places, such as floor crossings, some difficulties may arise. An important point is to ensure proper waterproofing. We will talk about this and other nuances related to how to seal a chimney pipe in this article.
Even if the pipe is placed as tightly as possible on the roof, minor gaps will still remain. When it rains, moisture will constantly enter the attic through them, which over time will lead to damage to the roofing structures. This is why roof pipe sealing is so important.
How can you eliminate gaps?
The easiest way to solve the problem of how to seal the gap between the pipe and the roof is to install an apron on top. You can do it yourself, in which case you will need to provide strips for connection to the pipe in advance. There is an easier way - to buy a ready-made stainless steel roof passage. Often round passages are made for the chimney, and they are made of stainless steel; a galvanized chimney pipe is also used, most often. The passage is placed on the pipe, and the joint is fixed with a steel clamp.

If you need to cover up minor gaps formed between the pipe and the roof, then you can use silicone sealant for these purposes (read: ""). You can find a huge variety of them on sale, but we need a heat-resistant type.
The process of how to seal a roof around a round pipe will differ slightly depending on the type of roofing, that is, in addition to the basic recommendations, there are also algorithms that will vary somewhat.
Seal gaps between chimney and slate roof
Sometimes the question arises of how to seal the gap between the pipe and the slate.
The technology provides the following sequence:
- First, a round hole is cut in the steel sheet that will be needed to finish the ridge.
- Next, a ring of sheet asbestos cement is placed on the pipe.
- For absolute sealing, so that in the future there will be no problems with the leaking pipe on the roof, the joint between the pipe and the roof is sealed with an asbestos cement solution (proportion 1:2).
- In addition, the same solution is used to fill the gap between the chimney pipe and the slate sheet. To do this, you can temporarily make a limiter out of cardboard.
Getting rid of cracks on a tiled roof
On a tile roof, it is best to seal the cracks with a solution of sand and cement, which will best protect the inside of the building from moisture and precipitation.
To achieve the best moisture insulation, you will need:
- Install a galvanized collar on the roof, thus creating a place for pouring the solution.
- Pour a solution of cement and sand, making sure that it clearly fills the entire space between the roof and the chimney.
- In addition, you will need to make a surface and place it at an angle so that excess liquid flows down it.
Material for waterproofing bitumen roofs
Among the options for covering a pipe on the roof if it rises above a bitumen roof, the most optimal is the use of Wakaflex self-adhesive tape.
You can perform isolation in this way:
- First, cutting is done from the Wakaflex tape.
- At the next stage, this cutting needs to be pressed with a pipe case.
- At the end, all remaining gaps between the parts being connected are sealed with bitumen mastic.
The process of eliminating cracks in a corrugated roof
In essence, Master Flash is an apron cap made of silicone or rubber, placed on an aluminum base.
As for operating temperatures, for the silicone version of products it is significantly wider - in the range from -50 to 130 ℃.

The process of sealing cracks on a profile roof includes the following manipulations:
- A gap is cut in the cap, the diameter of which is slightly smaller than the cross-section of the chimney.
- The Master Flush is put on the chimney.
- A gasket is placed at the base of the chimney.
- The joints between the material are sealed with silicone sealant.
- The base of the chimney is fixed to the profile roof using screws.
Often the described manipulations do not provide sufficient tightness on the profile roof, so that during rainfall water leaks into the cracks. In such cases, the best option is to use self-adhesive tape reinforced with aluminum. It is very convenient to use such material, since it does not require pre-heating before use.
Thus, the fact how well the corrugated roof will be sealed at the exit point of the chimney depends largely on the choice of material and the quality of the work performed. However, we are confident that by following our instructions exactly and working responsibly, you will be able to protect your home from any surprises associated with roof leaks.
At correct installation corrugated sheeting on the roof of a house can be guaranteed to avoid leaks during rains and spring melting of snow. By this criterion one can judge the reliability of the roof. It should be remembered that any roof structure consists of many elements. The list includes valleys, front strips and ridge. However, based on practice, the most risky element in terms of leaks is the chimney.
Several decades ago, stove makers dealt with this problem by thickening brick chimney. However, such work requires certain knowledge and skills, and modern designs are increasingly being built from metal. Typically chimneys are made with round. It will help you figure out how to seal a pipe on a roof made of corrugated sheets simple instructions.
Causes of leaks
The roof, covered with a profiled sheet, must be equipped with several openings through which the chimney pipe and ventilation channels will be routed. As a result, the integrity of the waterproofing may be disrupted, which will increase the risk of leaks. It is quite difficult to solve this problem if the chimney had to be routed through an already constructed roof.
To ensure high-quality sealing of the areas where the pipe meets the corrugated sheet, you need to put in quite a lot of effort.

If the work is done poorly, many problems arise:
- Water begins to flow. This happens if the sealing of the joint between the chimney and the corrugated sheet is poorly equipped.
- The rafter system began to rot. After water gets inside the roofing pie, the wood from which most of the roof elements are made gets wet. As a result, the structure is deformed.
- The roofing material itself begins to rust. Corrugated sheeting is not very well protected from corrosion from below.
- Aging of thermal insulation. When insulation gets wet, its effectiveness is significantly reduced.
To increase the reliability of the roof, you need to choose the correct location for the chimney outlet and ventilation ducts. This will make sealing the pipes much easier.

Installation features
What needs to be done to ensure that there are no leaks at the points where the pipe joins the corrugated sheet? To do this, you need to properly seal the joints. Experienced installers note that when solving a problem, it is important to take into account the location of the chimney. The closer the chimney pipe is located to the ridge, the less water gets to its junction with the chimney. In this case, the risk of leaks is reduced.
In addition, the pipe installed as high as possible along the slope has smallest area, located in the cold air zone. This allows you to minimize the formation of condensation, which contributes to the growth of soot inside the chimney. In addition, if condensation constantly forms in the pipe, the walls of the pipe are exposed to acid, which corrodes the metal.

Should be considered separately different designs chimney pipes to figure out how to design their joint with the corrugated roofing.
Rectangular products
Today, more and more manufacturers are making sure that the joints of the roof and chimney pipes are reliably protected from water. For this purpose, special additional elements are being developed. They are installed near valleys, ridges, and pipes. Such elements are called aprons.

The main purpose of the apron is to collect water flowing down the chimney and roof slopes. With the help of such devices, moisture is diverted to the eaves into the drainage system. However, during the installation process it is important to consider one important point. Need to take care of proper waterproofing. As you know, it is mandatory to lay under corrugated sheeting waterproofing film. It doesn't matter whether the roof is insulated or not. Together with the junction of the pipe to roofing a cut is made for the installed chimney. The edges of the cut are left wide from 50 to 100 mm. In the future, they will be fixed directly to the chimney structure.
However, these are not all the points that need to be taken into account. At the joints it is necessary to create a reinforced layer of waterproofing. Therefore, quite often a special tape is installed under the apron. It must be placed under the apron strips located on top. The tape partially extends onto the corrugated sheet. The scheme of work when creating a waterproofing layer should be as follows:
- first the tape is applied to the lower edge of the chimney pipe;
- after this, the joints must be sealed on the sides of the pipe structure;
- At the final stage, the upper edge of the chimney is glued.

Situations often arise when it is necessary to run a stove pipe through an already created corrugated roof. This job can be done quite simply. However, one subtlety must be taken into account. It is necessary that the hole for the chimney in the roofing material be 1.5-2 cm smaller than the pipe itself. In this case, the chimney will not be able to fit through. But to do this, the edges of the corrugated sheeting are simply cut and bent.
After installing the chimney, they will fit tightly to it. This allows you to create additional protection for the joint from leaks. In this case, it is imperative to install the lower strip of the apron under the corrugated sheeting, and a waterproofing tape on top.

Pipe connection at the ridge
The easiest way to seal the joint between a pipe and a corrugated roof is if it is routed through a ridge. This increases the reliability of the connection. IN similar designs the formation of snow pockets is impossible. The risk of leaks arises precisely when they are present. Similar options have one significant drawback- to pass the pipe through the top of the roof, the ridge element must be divided. This means that two additional posts need to be installed under the edges of the plots. You can seal the junction using an apron. However, it must have a certain configuration. This element is made from smooth metal sheets.
Attention! Often the space between the corrugated sheet and the apron is filled with silicone-based sealant. Modern manufacturers offer consumers to take advantage of self-adhesive tapes which are made from butyl rubber.

The upper junction area must be sealed using the standard method - using the upper elements of the apron, sealed on top with sealant. Silicone composition is not afraid high temperatures.
Joint of pipe and corrugated sheet on the slope
Not in all cases, the layout of the building allows the chimney to be brought out through the roof ridge. Therefore, another path is chosen - to make a hole on the slope. In this case, the work on sealing the junction becomes significantly more complicated.
The main goal is to correctly install the top element of the apron. Therefore, the main rule is to install this element under corrugated sheets.
Attention! If the upper side of the chimney structure is more than 80 cm wide, a shaped apron with a slope is installed on it. This design resembles a breakwater that diverts water in different directions from the chimney.

Installation of such an apron is associated with certain difficulties. In addition, at the junction of its elements and corrugated sheeting, two valleys are obtained. They need to be sealed in the same way as valley roofs. This requires the installation of additional strips and increased waterproofing.
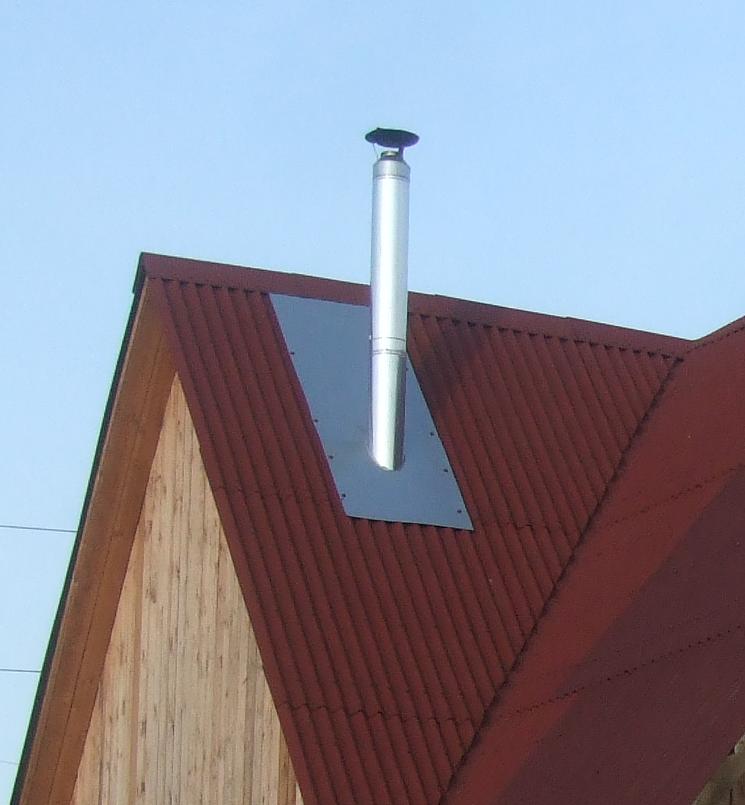
Round pipe
Many chimney structures for stoves are equipped with round channels made of metal sheet. Such products are multi-layered and are additionally insulated. Such a pipe is sealed in many ways. It’s worth looking at the most popular ones:

When there is residential space under the roof of a house attic room, the passage for the pipe must not only be sealed, but also thoroughly insulated. The gap formed between the apron and the pipe must be closed using a special heat-resistant gasket. It is attached to the plane of the product.
As you can see, install a joint between the corrugated roof and chimney you can do it yourself, knowing the installation features various designs. In the process of work, it is important to follow technology. This will ensure sealing of the junction.
How to make a passage in corrugated sheets without disturbing the rafter system
If insulated roofing pie already completed, there will be many problems with running a chimney through it. The main difficulty lies in compliance fire safety. At the same time, it is necessary to maintain the integrity of the vapor and waterproofing.
The chimney structure should be located at some distance from wooden rafters. Therefore, the passage of the pipe through the corrugated roof is created in a special box, which consists of rafters located next to the chimney duct. Two beams are fixed between them. They are placed above and below the chimney structure. From cross beams And rafter legs to the chimney structure is selected in accordance with fire safety standards. This figure ranges from 130 to 250 mm. It depends on the material from which the chimney structure is made.

The inside of the box must be filled with insulation with non-flammable properties. usually used material high density made using basalt fiber. It has low hygroscopicity compared to conventional insulation.
To ensure the tightness of the roof, it is necessary to cut through the corrugated sheeting with an envelope for hydro- and vapor barrier in the place where the pipe passes. Its edges should be secured to the outside of the wooden box.
To cut corrugated sheeting for a pipe in the place where it will be laid, you should create a continuous sheathing. Thanks to this, it will be possible to firmly secure the lower junction strip and the roofing material near the walls of the chimney structure.

conclusions
The choice of method of sealing the joint between the pipe and the corrugated sheet depends on the shape of the chimney and the features roofing structure. You can create a reliable connection using an apron (for rectangular structures) and additional elements (for products with a round section).
Choosing the location of the chimney outlet also has great importance. The lower the pipe is located on the slope, the more water accumulates at the joints. This increases the risk of leaks. The best option location of the chimney opening - at the ridge of the roof or close to it.
By following the technology of sealing the junction of the pipe and corrugated sheeting for certain chimneys, you can reliably protect the roof from leaks. It is especially important to do this if you have an insulated veranda.


