How to make a pond on your property with your own hands: step-by-step instructions. Do-it-yourself pond at the dacha (59 photos): choosing the style of the pond. Selection of location, size and material How to make a decorative pond at the dacha
The pond in the garden is a wonderful place to relax on a hot summer day. Those lucky people whose dachas are located on the banks of a river or lake are incredibly lucky. If there is no natural pond nearby, you will have to build an artificial pond yourself.
We outline an action plan
First, let's try to figure out where to place a man-made pond in the country. It is advisable to reserve a place for it at the design stage of a summer cottage.

Photo: marking the area under decorative pond IR on site
Users often search:
The pond must meet the following criteria:
- be on open place– leaves and branches from trees will clog the water, and roots will damage the artificial bottom of the pond;
- do not be exposed to prolonged exposure to direct sunlight - constantly heated water provokes the rapid development of microorganisms and algae. The pond will quickly become cloudy and begin to emit an unpleasant musty odor.

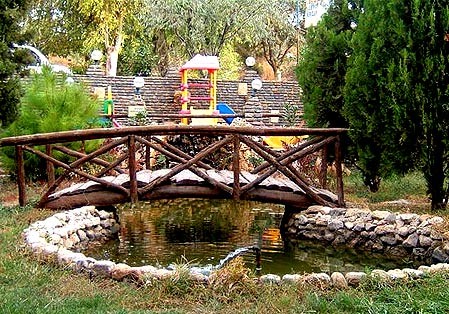
Photo: a small pond on a site with a wooden bridge
It would be useful to provide for the option of expanding the surface of a man-made lake over time. Perhaps you would like to transform the mini-pond into a full-fledged water complex - with a bridge and a small fountain.


Experienced builders recommend making the pond shallow - after all, it is used primarily as a beautiful detail of the surrounding landscape. In addition, immediately think about how you are going to care for the pond. Make a convenient approach to the pond - of course, not through the garden or alpine slides.
You will have to change the water yourself, because it is not purified naturally, like in natural lakes and rivers. Therefore, make sure that the tap at the dacha is located in close proximity to the artificial reservoir.


Choosing the base material
Before you grab a shovel, decide what will serve as the basis for an artificial pond. There are several standard solutions. Let's look at the advantages and disadvantages of popular options.
Reinforced concrete structure
Using this material you can create a long-lasting pond. The bottom and banks, filled with concrete and reinforced with reinforcement, will withstand various additional loads - installation of a fountain, for example, or sculptural compositions on the banks.
The complexity of the process makes it impractical to use this technology for the construction of small reservoirs or decorative ponds in the country. The negative aspects of this solution include the high cost of constructing man-made lakes made of reinforced concrete. You will have to use a lot of building materials and rent special equipment. Dismantling the structure will also cause difficulties, so you must immediately carefully consider the location of the pond.


PVC film
This is a budget solution for creating a simple country pond. The shape and depth of such a structure can be easily changed, and the dimensions can also be expanded or reduced. A pond with a PVC base is often made seasonal - for example, it is filled in for the winter and re-arranged in the spring.
On to the cons such a decision refers to the fragility and fragility of the film coating - this material can be easily damaged, and if the seal is broken, the water from the pond will quickly go into the ground.

Therefore, it is not recommended to swim or play in such home lakes; they are intended to decorate a summer cottage.
Photo: decorative pond with a bridge in the landscape design of a summer cottage
Artificial store ponds This option is golden mean for those who dream of their own pond and at the same time do not want to bother with materials for its creation. Store forms for artificial reservoirs made from durable and durable materials
– polyvinyl chloride or fiberglass. The last option is much more expensive. But the cost of such a product is fully compensated by the high performance characteristics of the material. It’s easy to install such a form yourself, without involving friends or acquaintances in the process.
The disadvantage of this option is that the pit will have to be dug under the mold, and not vice versa.

In this case, the opportunity to use the unevenness of the terrain to create natural coastal contours is lost. In addition, the method will cost much more than using film or improvised materials. The photo below shows a finished form for arranging a pond at the dacha.
Making a pond from scrap materials Another interesting option – use of various containers that have become unusable. Old cast iron baths
, troughs, vagons - all unnecessary containers will be useful for construction. The advantages of this method are that you do not have to buy standard forms or build bulky ones.. The disadvantages include the low decorative quality of old containers - you will have to show imagination and skill to make, for example, a small pond in the Japanese style from a dilapidated trough.
Tire mini pond
For those who have a catastrophic lack of space at their dacha, craftsmen recommend using a simple and convenient tire pond. old car tires they dig in, a film is laid inside, and the banks of the mini-reservoir are decorated according to their own wishes.


The result sometimes surprises even experienced landscape designers - the finished pond at the dacha becomes an exclusive detail personal plot. For example, who will say that this pond in the photo is made from an old car tire?
Pit
Once the material has been selected, it is time to begin earthworks. It is best to do this in the summer, when the groundwater has receded as much as possible. The depth of the hole is calculated based on the material chosen as the basis. If this is a finished form or an old bathtub, dig a pit 20-30 cm deeper than the parameters of the container.
If you plan to build a pond made of PVC film, you will have to dig to a depth of about 80 cm, since the shallow reservoir will completely freeze in winter and quickly dry out in the summer heat. For ponds made of reinforced concrete, they dig a pit over one and a half meters deep - here you can’t do without special equipment.

Technology for constructing a film reservoir
When the pit is ready, all that remains is to clean the bottom and make small terraces about a third of a meter deep and up to 20 cm wide on the sides of the future mini-lake. The bottom of the reservoir is compacted, stones, crushed stone, pebbles, and foreign objects are removed. The cleaned surface of the pit is sprinkled with washed sand and lined with geotextile fabric. Such preparation of the bottom will significantly increase the strength and service life of the coating.
The next stage is laying the film. The size of the canvas is calculated as follows: it is necessary to add the length of the coastline with twice the depth of the reservoir. The material is fixed on the terraces with a margin of about 50 cm. The laid film is laid with bricks or stones - this is done to maintain its shape.


Then they fill the pond with water, check the tightness of the film and begin work on the design of the coastline. Do not cut off the remaining film under the bricks too quickly. It will serve as a hydrosealant during the construction of the blind area.
We are building a pond from an old tank
To create a country mini-lake from an unnecessary bathtub or other container you will need:
- a piece of mesh;
- some crushed stone;
- decorative stones;
- a coil of aluminum or steel wire;
- cement, sand or ready-mixed concrete.
After the foundation pit has been dug and a bathtub has been installed in it (30 centimeters below ground level), they begin to develop the coastline. To do this, remove the top layer of soil at least 40 cm wide along the entire perimeter of the future pond and dig a trench, the depth of which reaches the upper edge of the installed container.

To give a natural look to the man-made lake, tile adhesive is applied to the bottom and walls of the bathtub. After the treatment, the container is allowed to dry thoroughly - this usually takes at least two days.
Then a chain-link mesh is laid around the entire perimeter of the bathtub, which is necessary to reinforce the sides and bottom of the pond. They apply it to her concrete mortar or sand-cement mixture and let it dry. Next comes the turn decorative design banks: planting plants, decorating with stones, paving paths, installing figures and other design techniques.
Thematic material:
Pond from a ready-made mold
The pit prepared for the reservoir is cleared of branches, piles of earth and other debris. The bottom and walls of the pit are compacted. If the soil at the dacha is too loose, they are strengthened. For the finished form, a perfectly flat surface of the pit is important. The plane is leveled using a building level.
The bottom of the future pond is covered with clean, washed sand, which is also compacted. This layer ensures the integrity of the finished form.

After this, the container is placed in a pit and filled with water. The empty spaces between the sides of the mold and the walls of the pit are filled with sand, and this is done gradually. First, pour a layer 25-30 cm thick and water it with water. After the sand is evenly distributed, the steps are repeated until the space between the installed bowl and the walls of the pit is completely filled.
Carrying out this procedure is mandatory, since the shape for an artificial reservoir is quite fragile and easily deformed. Even pressure on all sides will prevent warping.
After 24 hours, check the gap between the sides of the container and the walls of the pit: if there are voids, add sand to them. Then the water is pumped out of the pond, the mold is finally washed and filled with clean water.
The final stage is decorating the finished mini-lake at your discretion. Doesn't exist here strict rules and trends. Just make sure that your dacha pond brings pleasure and joy. After all, that is precisely why it is installed.
Relaxing in the country is a favorite pastime for many people. The only thing that can compete with him is a trip to the shore of a reservoir. By installing an artificial pond in your dacha, you can get perfect place to get rid of fatigue and relaxation. Moreover, building an artificial pond with your own hands will not be difficult; you just need a little perseverance and imagination.
Types of reservoirs
Depending on what functionality you plan to provide to the pond you have built, artificial reservoirs can be divided into several categories.

Pool
This category includes artificial reservoirs of significant size. Such a pond, built at the dacha with your own hands, as in the photo, has not only decorative properties, but also allows you to freshen up, or even swim, without leaving the site.

Pond with fish
A pond for breeding fish is suitable not only for fishing enthusiasts. Your family members, especially children, will enjoy spending time at the lake, watching the bright and beautiful fish.

Mini pond in the country
A small pond that is an element of the landscape composition. Performs exclusively decorative functions and does not involve placing a recreation area around it.

Decorative pond in the garden
A garden pond, built with your own hands, which is the central place of the recreation area. Combination of sufficient size and beautiful design It will not only please the eyes, but will also give pleasant coolness on a hot day.

Style
Having decided on the functionality of the reservoir, it is worth moving on to choosing the style in which the decorative pond at the dacha will be executed. There are two main options.
- Formal (regular) pond. An artificial reservoir of strict geometric shape. Ideal if you want to emphasize the geometric shapes of a building or the site itself. Creates a sense of order and looks appropriate next to geometrically correct flower beds, lawns and other decorative elements on the site.
- Landscape pond at the dacha. It is carried out in any form and fits very easily into the surrounding landscape. This option fits any style and looks as natural as possible. Its construction requires significantly less effort than equipping a geometric reservoir.
 Selecting a location
Great importance when organizing a pond at the dacha with your own hands, as in the photo in the article, it has the terrain. On flat areas you can place a pond in a garden of any style and size. Uneven areas create more difficulties when deciding how to make an artificial pond, but at the same time they can serve as natural cascades and elevations for waterfalls.
It is necessary to build a pond with a fountain at the dacha with your own hands in an open area so that the pond is clearly visible from every corner of the dacha. The depth of groundwater, the qualitative composition of the soil can affect the permissible depth of the reservoir, as well as the complexity of work and use additional materials. When thinking about how to build a pond at your dacha with your own hands, in addition to the terrain, you should take into account a number of others important points.

- Compatibility with the environment. A mini pond at the dacha, visible from all sides, should be combined with buildings and green spaces on the site.
- Illumination of the area. It is preferable to choose the most shaded place on the site for the location of the reservoir. This will prevent increased water evaporation. In addition, with prolonged exposure to direct sunlight, there is a high probability of active development of microorganisms in the water, which will negatively affect the aesthetic component.
- Environment. Do not overuse vegetation near an artificial pond. Long and thick roots big trees Over time, they can lead to damage to the insulating layer, which in turn will require repairs and putting the reservoir in order. Leaves falling into the water from tree branches located too close to the pond can cause siltation and will require regular cleaning. On clear days, nearby trees or buildings will be reflected on the surface of the water. Therefore, you should worry about a beautiful exterior in advance so that your gaze does not fall on a rickety shed or a dry fallen tree.
- Expansion of the reservoir. In the future, you may think about the need to increase the area of the reservoir, additional functional and decorative elements. Therefore, it is worthwhile to provide in advance a place for a possible expansion of the reservoir at the dacha with your own hands.
- Electrification. If you are planning to install lighting next to or directly in a pond, or placing an electric fountain or other movable structures, you should worry about laying all the necessary electrical wiring in advance. It is best to place wires underground, protecting them with durable boxes or corrugation.

Size selection
Having chosen a place on the site that will occupy a pond in the garden, you should decide on the size of the future reservoir. Specialists involved landscape design, do not provide clear recommendations in this regard. However, a decorative pond built with your own hands on a summer cottage should not occupy more than 8-10% of the area of the plot, because a larger structure will look like a bulky and alien object.

The depth of a pond in the garden depends on the purposes for which it is created, as well as on the capabilities of the owner, who equips the pond with his own hands on the site. The photos below will help you make your choice.

Selection of materials
When arranging ponds on your summer cottage with your own hands, you should approach the choice of material with the utmost care. There are many options for what material is best to use to build a small pond in your dacha with your own hands.

The photos in the article and the list below highlight the following main categories.
Concrete pond
A capital structure, which is the most expensive option for arranging a pond in a country house. The advantages of using this material include increased strength and durability of use.

Plastic container
Manufactured industrially the form is made of high-strength plastic, allowing you to solve the question in the shortest possible time: how to make a pond at the dacha with your own hands. Various shapes and dimensions allow you to choose an option suitable for the most demanding owner.

PVC film or polyethylene film
The use of these materials makes it possible to create a garden pond with your own hands of absolutely any shape. The disadvantages of such a material include low resistance to external influences and a short service life

Butyl rubber membrane
A do-it-yourself garden pond made from such a film will please the eye longer than the decorative pond in the photo below made of polyethylene or PVC. When planning how to make a pond on your site with your own hands, it is worth considering that the service life of the membrane reaches 50 years, and the increased resistance of butyl rubber to severe frosts makes it a very advantageous material.

To save money, you can use various available materials. An old bathtub, basin or car tire for a mini pond - these and other “folk” remedies are used to create ponds in the country. Our photo gallery will suggest other original ideas.

Necessary equipment
Depending on the functionality of the reservoir and the material from which it will be made, the following tools may be required during the creation process: a shovel, a cart for transporting excess soil, a level, pegs and a strong cord for marking, as well as a hose for watering. This set of tools will be enough to place mini ponds in your dacha with your own hands, as in the photo above. If the planned pond in the garden is of significant size, it is worth assessing the feasibility of using construction equipment. For a pond intended for fish breeding or designed for a particularly long service life, the installation of additional equipment may be justified:
- An aerator that saturates the water with oxygen necessary for fish.
- Pump for filling or draining water.
- Cleaning filter.
- A device for sterilizing water and removing dead algae.

Details of creating a pond from film
PVC film, due to its performance qualities and relatively low cost, is one of the most popular materials for pond construction. In addition, in order to make a pond with your own hands from PVC film, no special skills or special knowledge are required.
To equip reservoirs, you should not use films with a thickness of less than 0.5 mm, and if you plan to create a particularly deep reservoir, it is better to take a film with the maximum available thickness.
The use of multi-colored film allows you to achieve different optical effects: black will make the bottom of the reservoir mirror-like, and nearby trees and buildings will be clearly reflected in it, brown film is perfect for simulating the soil bottom, and film of light blue or cream tones will make the reservoir as transparent as possible, which will allow you to conveniently observe the movement of fish.
The selected film should be cut so that it covers the bottom and walls of the reservoir, leaving a margin of up to one meter. The cut pieces must be joined with specialized glue or adhesive tape for such work.

Before digging a pit, you need to carefully consider the size, shape of the bottom and walls of the reservoir. If you plan to create a complex multi-stage design, it is better to first draw on a sheet of paper detailed diagram indicating all sizes.
Having marked the selected area, we begin to dig a hole. It is better to remove soil in the direction from the edges of the future reservoir to the center, gradually going deeper to the required limits. The bottom and walls of the finished pit must be carefully examined for the detection of foreign objects, sharp roots, etc. Any debris found must be removed to prevent damage to the film. We lay the prepared film on the compacted bottom of the pits, fixing it with stones and sprinkling the edges with soil.
Next, you need to strengthen the banks of the pond. For this you can use various materials. For flat banks, a geogrid or polymer grid is suitable; you can also use a regular chain-link mesh. For vertical banks, the use of piles or supports will be required.
You can complete the design of the pond by adding various decorative elements, planting plants and installing underwater or outdoor lighting.

Decoration with plants
When decorating a pond in the garden with plants, you should understand that they are divided into those that are planted on the shore along the edges of the pond, and plants that live directly in the water. The root system of shore plants will additionally strengthen the walls of the pond. When planting plants in a pond in the garden, it is important to keep in mind the speed of their growth, otherwise, after a long absence, there is a risk of finding a pond completely covered with a thick carpet of vegetation.

Decor
In order to decorate a pond in the yard with your own hands, except various plants, beautiful stones and other decorative elements good effect gives the use of backlight. The colored glow spreading from under the water will create a wonderful decoration for your pond at night. Additional lighting can also be placed above the water.

You can use various fountains as decor for decorating a pond at your dacha with your own hands, as in the photo in the article. The functioning of the fountains is ensured by the operation of pumps, which can be hidden at the bottom of the pond under the stones. Surface devices are also used. Pumps come in different capacities, which affects the height and intensity of the water jets.

Fish
You can add decorative fish to a pond at your dacha, when choosing which it is important to fully understand the conditions under which they are kept. It is worth buying those types of fish that get along well with each other and do not quarrel.

Pond care
A decorative pond at the dacha requires some care. Planted plants must be protected from the cold or moved to a warm room. During a long absence, the surface of an artificial reservoir at the dacha should be covered with a special mesh to protect it from debris. Fallen in country pond leaves and other debris are caught with a net, and if a large amount of silt forms, it is necessary to clean the reservoir. The water must be periodically updated using a garden hose or a regular bucket (if specialized equipment is not available).
Photo gallery
In our photo gallery you will see more than 33 examples of beautiful ponds in the country.
In the process of creating a pond at your own dacha, many questions arise; general recommendations are not sufficient. Let's consider these questions.
How to make a natural pond?
First, let's define what is meant by this phrase:

How to choose a place and what to provide:
- distance from trees and tall bushes. Leaves and branches should not clog the water;
- good lighting, direct rays of the sun throughout the daylight hours are unacceptable;
- correctly located in a low area so that rainwater does not spill over the area, but flows into the pond;
- choose a flat area with a slight slope.
What to consider so that the reservoir is “alive” and does not rot:

Making a pond
A properly made pond occupies at least 10th of the site. Deep - it warms up poorly and is simply dangerous, shallow - it blooms. On the forums, summer residents are recommended optimal size reservoir 2.5 - 3 m in diameter, 1.5 deep. The hole is dug manually or using machinery. Next, waterproofing is done.
Ecopond - involves natural waterproofing, called clay castle. Only this natural material contributes to the vital activity of living things. ecological system. This is a good way to make a pond without film:

How to make a small pond?
There are a few simple ways arrangement of miniature reservoirs on the site. 

Since the shape is a wave-like configuration, transitions during burial are taken into account. Special steps are made, one wider than the other. After installation, the voids are filled with earth.
The form is installed slightly above ground level, a layer of sand of approximately 20-30 cm is poured under it, but first markings are made on the ground. Then you can start digging a pit. How to do this can be clearly seen in the pictures below.

How to make a big pond?
- At first mark the contours. Suitable for irregular shapes regular rope; for a rectangle, square - hammer in pegs and stretch a string between them.
- An excavator is used to dig a pit. You can calculate its dimensions using the formula for calculating the volume of a truncated cone. This can be easily done on a site like fxyz.ru. You just need to insert the numbers into the required line.
- Further - level the walls of the dug bowl and make them flat. Provide terraces around the perimeter of the reservoir. They prevent the soil from crumbling and serve as convenient steps when laying waterproofing. They will be useful in the future when decorating a pond.
Important! Three zones are provided in the pit bowl: deep, 1.8-2.0 meters (below the freezing level of the ground). She is being prepared so that she can successfully winter. Medium – for plants. Small – in summer such places warm up well, fry and living creatures accumulate here, and microflora multiplies.
If you are digging a pond for swimming, you do not need to deepen the bottom, it is made smooth.
Next you need:
- remove stones and driftwood from the bottom;
- prepare waterproofing material.
The Landscape Constructions company recommends first filling the bottom with sand and laying it on top. geotextiles. 
Among the existing options for waterproof coatings, they usually choose butyl rubber film. The main argument is durability. It lasts up to 20 years.
Lay out the film

How else can you waterproof a pond?

For your information! In specialized stores you can buy a ready-made plastic mold for a reservoir of 1000 liters or more.
How to build a dam?
A pit is not necessary for a pond; it is enough to make a dam using a stream or a drainage area where water flows. Running water constantly fills the reservoir. They block it in the narrowest place. First, a ditch is dug, the bottom is lined with rich clay, and compacted. Then a clay wall is erected and buried into the bottom and edges of the ravine. The dam crest is raised one meter above the future water level, and the rapids are made steep. 
Dams are constructed from natural materials: stone, gravel, logs, and sometimes concrete. The base is assumed to be wide so that the structure can withstand water pressure.
When constructing such structures, remember about floods and consider water drainage in extreme situations.
The embankment is filled with a width of half a meter to 4 meters, a height of at least 0.5 m. The dam is filled only after the dam has settled.
Concrete dam. It is reinforced with rods, angle iron, and steel mesh. For concreting, waterproof cement is used, add liquid glass, PVA glue. 
If there is a ravine
A ravine next to an area along the bottom of which a stream flows and overflows during floods can be turned from a potential enemy into a friend and helper. The ravine is blocked from bank to bank by an embankment. In front of it, rain, spring, or river water, a water surface is formed.
We present such a positive experience step by step:
- Dig a bypass channel, temporarily direct a stream into it so that it does not interfere with work.
- Make shields from boards, cover them with film, and top with roofing felt..
- Make gaps in the ravine, insert shields into them, lay out a dam from stones.
- Bottom of the proposed pond fill with clay, compact, lay a layer of sand on top, level. At the end there is a pond line with film, walls with stone.
- In order to keep the water at a certain level, install overflow pipe. Excess water goes further through the diversion channel into the ravine. To avoid siltation, a septic tank is dug just upstream of the natural stream.
Such a water oasis requires virtually no costs, will avert the threat of flooding, and will decorate a vacation spot. 
How to prevent a pond from freezing in winter?
In autumn, especially tender and valuable plants are removed from the pond, and ornamental fish are moved to the aquarium. Pond at low temperatures freezes, it is impossible to counteract nature, but it is possible to make it easier for fish to winter in a reservoir and ensure an influx of oxygen. 
- Reed, cattail placed vertically. Oxygen penetrates into the water through the hollow stems.
- Polystyrene foam, straw bundles on water will slow down freezing.
- Do vent, pouring boiling water over the ice.
- In severe frosts they cover insulation (straw, burlap, roofing felt). You cannot keep such a flooring for a long time, you need natural light. A wooden or foam box is placed above the hole, an incandescent lamp is hung, the hole does not freeze.
Used here floating aerator, however, its effect is effective only at low subzero temperatures. 
Quarry pond
Such bodies of water are called quarry ponds or gravel pits. Usually these are old neglected quarries in which peat or stone was mined. The water in them stagnates, and the fish are mostly small fish. Used for fish breeding when it is possible to ensure a constant flow of water. Specialized farms on quarry ponds produce up to 2 quintals of fish per hectare. Such reservoirs are of interest to entrepreneurs. 
If there is a well
The easiest way to feed a reservoir is from a well. The owner of such a pond shared this scheme, with the help of which a good idea was realized, on a dacha forum. Water circulates and its consumption is small.
- Water from the pond flows to the filter. In this case, it acts as a skimmer.
- Water cleared of debris flows into the waterfall, saturating the reservoir with oxygen. The pump in the well turns on only when there is a need to raise the water level.
- The relay is activated, turns on the pump in the well, water enters the pond, fills it to the required level. Next comes the turn of the filter. All mechanisms come into play one by one. This scheme automatically maintains the water level necessary for the filter and waterfall to operate.
How to make a flowing pond

Bridge as a decoration for a pond
Straight, curved, hanging over the surface of the water - the bridge can be anything. Wood, concrete, stone, metal and their combinations are suitable for structures. Even the smallest bridge will enliven the area, become a continuation of the path, and add an unusual line to the landscape. 
A simple bridge is easy to make:

Pond filter
Alexander Pisanets talks about how to make a filter for a pond in the video below.
Even if a dacha is a place where work comes first and then rest, we do not forget about the beauty that helps us not to lose heart and enjoy every day spent there. Therefore, today we invite you to feel like landscape designers and build a pond in your dacha with your own hands.
Rules for creating a pond with your own hands and requirements for materials
A pond in the country is not a luxury, but in some ways even a necessity. As the ancient philosophy of Feng Shui says, water near the house brings financial well-being and calms.

In addition, it allows you to save relative humidity on a separate area, pleases the eye and allows you to create an original solution on a designated area. Therefore, more and more often, summer residents create ponds and small ponds with their own hands, as in the photo.


Not everyone has a pond on their territory that can be tidied up, surrounded with stones and made an element of the landscape. More often we create a pond at our dacha with our own hands from scratch, faced with many issues that have to be resolved during construction.
Let's start with the fact that you need to decide on the location of the reservoir. For this the following factors should be taken into account:
- relief of the territory;
- the location of trees and other plants with a powerful root system and foliage;
- illumination of the selected area.
Carefully study the terrain of the area. You may already have well-placed indentations, holes, or ruts that you have made in the past. All of them will simplify the process of digging the pond itself.
In addition, do not forget that plants tend to grow and take up more and more space underground. Over time, the roots can spoil or even destroy the bottom of your pond, and the leaves, seasonally falling into the water, will rot and bleed bad smell. Which will require more attention from you to care for the pond, but not the joy of having it. Therefore, before you start digging, it is worth considering how far away the trees and bushes are located.
Most landscape designers recommend placing a pond near the house. This will make it easier for you to illuminate it without requiring separate lanterns and lamps. In addition, there is always enough free space near the house with natural light, because There are no tall trees or dense vegetation nearby blocking the light.

If you have found a place that meets the above requirements, then you can begin work.
But first, you should stock up on materials and a rough design for your future artificial reservoir.
Exists several ways to create a pond with your own hands in your dacha area:
- from the finished bowl;
- made of PVC film, polyethylene or rubber;
- using available materials.
Besides in addition to materials to make the bottom, you will need:
- shovel,
- measuring instruments,
- finishing and decorative materials,
- water.
After creating a pond, you can add fish there. But then the depth of your artificial reservoir must be at least a meter so that the fish do not freeze in winter.

The procedure for arranging a pond
If you have decided to arrange a landscape, have chosen a location and are thinking about the appearance of your future pond, then first decide the main question - what will it be like? Will you choose a ready-made bowl or cover the dug pit with film? It's up to you to decide. And we will help you create it according to all the rules.
Dig in the finished bowl
A ready-made mold cast at the factory is an excellent and simple solution for those who want to enjoy a charming and calm view of the pond after a busy day at the cottage.


Nowadays, specialized stores offer bowls different sizes, type and content. They may be:
- simple plastic baths;
- containers with several depth levels;
- bowls with complex contours of the shore.
Therefore, everyone will be able to choose the shape that best suits the territory and landscape without wasting extra time.
In addition, there are others advantages of ready-made bowls:
- the plastic form is durable and not susceptible to ultraviolet radiation;
- the bowl is non-toxic and easy to install;
- The average shelf life of this form is tens of years, which makes the pond durable and of high quality.
The main thing is not to damage the bowl when installing it in the future pond. The form cannot be repaired or restored. However, if you are building to last, you can choose a fiberglass bowl; it is famous for its strength and lasts 2-3 times longer.


So, you have chosen a bowl, found a suitable place, cleared it and are ready to create a pond with your own hands in the country. What's next?
First you need to transfer the contours of the bowl to the ground so that it fits exactly into the dug pit. For this you will need:
- bowl;
- pegs;
- shovel;
- rope.
To make the contour as similar as possible to the shape of the bowl, you need to place it on the ground and retreat 10-20 cm from its edge. Following the shape of the bowl, stick the pegs into the ground and stretch the rope along them.
This way you will get the outlines of your future pond, under which you need to dig a pit 20-30 cm more than the height of the bowl.
Don't forget to keep an eye on the top level. It is very important that the surface of your pit is level, otherwise the ground around the pond will always be wet and sticky, spoiling appearance shores.
When you achieve the desired depth and shape, be sure to sprinkle everything with sand and compact it thoroughly. This sand bed will become the foundation for your pond. Afterwards, you can install the mold and fill the free space between the side of the bowl and the ground with sand.
When your future pond becomes stable, you can begin filling and decorating it.
You can line the bank with decorative stones and plant water lilies or other water-loving plants along it. Install small figurines of swans or others created by yourself.


Making a pond from film
If for some reason you do not want or cannot buy a ready-made bowl, then you can always make a pond with your own hands without it.


Enough to stock up:
- Shovel;
- a rope or hose to outline the contour of the future pond;
- thick film.
The rest (water, decorative elements and figures) you will need later, when the main stage is completed - creating a pit for a pond.
As when creating a pond with a finished bowl, first you need to decide on the size of the future reservoir and its contour. Afterwards, mark its borders on the ground using a rope or hose, which can simply be laid along the drawn border, or can be wrapped around driven pegs.
When you are sure that you like the shape and approximate appearance of the future pond, you can start digging. Here the process will always be the same, because we just need a foundation pit.
The pond level should be the same. Therefore, check the evenness of the banks using a building level or timber laid on both sides of the pit.

When you reach the desired depth, fill the bottom with sand, compact it well, and then lay it with geotextile so that the film does not tear over time. For this you can use special material, sold in construction stores, or you can do it on your own. Take, for example, old carpets, rugs, roofing felt or linoleum that fit the area of the dug pit.
Now that the bottom is ready, measure your future pond and calculate the size of the film you need to create it. Usually, for this it is enough to know the area of the pit and its depth. Then add an allowance of 50 cm on each side to strengthen the film along the shore. And you can already go shopping.
The film must be very strong and dense in order to withstand the weight of the water that we will eventually pour into the pond. Therefore, do not skimp on this primary material and choose it wisely - the film thickness should be at least 300 microns so as not to tear under constant pressure.

So, as soon as the film is laid out on the bottom:
- Level it out it so that there are no folds and swellings.
- Line the shore with stones so that when filling it does not gather at the bottom.
- Prepare the plants, if you want the pond to have water lilies or other living decorations.
He will share with us a trick on how to arrange plants and flowers in a film pond. Maxim Maximov in your master class:
The film pond is quite economical and allows us to create it of any shape and depth, which is impossible to do with ready-made form, cast at the factory. That is why many choose this option to create their own pond in the country with their own hands.


But do not forget that the deeper you want to make the pond, the more likely it is that the shore may crumble. That is why we recommend that after the pit is dug, you strengthen its walls. Depending on their height, you can use tiles or slate. And how best to do this, he will tell us Talla Khukhrianskaia in your master class:
When all technical points solved, the pit can be filled with water. To do this, just throw a hose connected to the water supply into it.
In addition to the stone, which has an important function and holds the film on the shore, you can place decorative figurines, flower pots and crafts that you made for your garden with your own hands. Design the pond so that it reflects your creative nature and pleases the eye.
Don’t get carried away with the decor, because the pond needs to be cleaned periodically so that the water in it does not die out and turn a beautiful country pond into a large puddle. And to do this, be sure to leave a place on the shore so that you can approach the pond. Better yet, provide a stream that will drain the water.

We create a pond at the dacha from scrap materials
Unfortunately, it is not always possible to find the right and high-quality building materials, but if the desire to create a pond with your own hands does not go away, do not despair. Simple materials at hand will also come to the rescue, of which any summer resident has enough.
A pond can be made from a variety of things:
- from an old car tire;
- from old bath, remaining after repair;
- from a barrel, basin or bucket.

Bath pond...

...from old tires...

...and from an old barrel
If you truly want to create an unusual and original pond, then the lack of capacity will not stop you.
We use old containers
As we have already said, a pond can be made even from an old bathtub. After all, in essence, it is no worse than the finished form.


The process of creating such a pond will be similar to the previous ones:
- dig a pit for the form;
- fill it with sand and make a cement screed;
- insert bathtub;
- fill with water.
Due to its weight, the bathtub will sag greatly in the pit, which is why it is recommended to tighten its bottom with cement - to strengthen it. So that over time the pond does not go deeper.
Also, use sand and soil to stabilize the bathtub inside the pit. To ensure a tight fit of our improvised bowl to the banks, fill in all the voids.
And do not leave the side of the bathtub open, it will not look aesthetically pleasing and will spoil the appearance of the future artificial pond.

And he will clearly show and tell you how to dig a bathtub and shape it into a pond with your own hands. Vitaly KIY in your video tutorial:
However, if your dacha plot is not large enough to have a full-fledged pond on it, do not be discouraged - you can make a pond with your own hands at the dacha from small containers, as in the photo.


Take an old metal or wooden basin, a small barrel or tub. All of them can become an original decorative pond, which does not even have to be submerged below ground level.
U small pond from an old basin there are many advantages, so don’t deny yourself the joy of creating a modest artificial pond if the area of the site does not allow for more:
- does not require excessive costs - everything necessary for its installation is at hand;
- it will take a little time to arrange it - from a few minutes to a couple of hours, but not a day or more;
- it can be placed anywhere;
- if you installed the pond on the surface and did not dig it in, then you can always move it to another place by simply pouring out the water and filling it again after moving it;
- it does not require special attention to care - it is enough to change the water from time to time and wash it from the inside to keep the bottom clean.
Ponds made from a basin or small barrel can be installed on a reinforced, flat surface, filled with water and decorated with decorative figures or flowers.


But if your basin has long lost its decent appearance and there is no way to return it to its former luster, then simply dig a small pit to suit its size, install it there like an old bathtub and cover it with pebbles along the shore.

As you can see, old containers allow us to fantasize and create incredible ponds with our own hands in a dacha of any size. And this helps us realize our creative potential.
Pond for the dacha made from a tire
However, if renovations in the apartment are not planned, and the old basins have long since become leaky or turned into flower beds, do not despair, you still have a chance to get your own pond.
And for this you will need the most irreplaceable and available material- car tire. Tires in modern country society have long turned into a universal substitute for building materials.

And it’s not surprising - the strength and shape of the tire allows you to make anything out of it, including a pond. And the size of the future reservoir will depend only on the size of the tire you choose.
First you need to prepare your future container - cut it along the top edge so that only the sides remain. For this you will need a jigsaw or sharp knife(if you chose a tire from a passenger car).
Afterwards you can move on to the pond itself.
Installation steps:
- Outline the outline of the tire and dig a pit to the height of the prepared bowl.
- Fill the pit with sand and compact the bottom.
- Insert the tire inside.
- Cover the tire and the bottom of the future pond with thick film.
- Fill the edges of the film with sand, and then decorate with turf, stone or embankment so that the film is well fixed.
- Fill the pond with water and decorate it with pre-designed decor.
Your tire pond is ready. And it is not inferior in beauty to either ready-made bowls or large film ponds located over large spaces.

In addition, it is easier to care for and keep it clean, and it does not require a lot of water or effort to arrange it.

As you can see, if you have long wanted to feel like a landscape designer in order to turn your dacha into a beautiful vacation spot where you can not only work, but also enjoy nature away from the noisy city, you can always create a pond with your own hands without much expense.
If you liked our ideas, read other articles in the series!
In the future, this miracle will delight you and all your guests, who will be completely delighted.
How to choose the best location for a pond
You need to decide on the choice of location that is suitable for the purpose you have noticed. When choosing a site, you need to pay attention to the lighting. The area should be well lit, but not under the scorching sun, and not in constant shade. Because many plants can be negatively affected by such growing conditions and they will lose their natural appearance.
The sun is the main enemy for the plants in your pond. Some plants can cause “blooming” of water, and will cause you great inconvenience with constant cleaning. Since hand-made ponds are not very deep, fish and plants will not be very comfortable in the heat. Also think about your resting place near the pond; in extreme heat, you yourself will not be able to rest there very well.
The best location will be if the sun warms the pond in the morning and evening, since the temperature is acceptable, and in the daytime, the shadow of a house or fence will cover it. You also need to take into account that it should be located away from trees, whose roots can damage the material from which the pond is made.
Materials required for manufacturing
The pond can be made from the following materials:
- Polyvinyl chloride coating;
- Butyl rubber film;
- Ready-made pond tanks (reinforced concrete or plastic)
Although polyethylene is not suitable for making a pond, its service life is only 1-2 years.
PVC coating will serve you for about 15 years, and butyl rubber film for almost 50 years, although its cost will be much more expensive. Also, some gardeners use reinforced concrete bowls, but most still prefer plastic containers. They are a product whose size you can choose for your site. This bowl is durable, but you still need to be careful so that cracks don’t appear on it; they have great frost resistance, so it’s not scary to install them even in our climate.
Preparatory stage
We'll prepare the place and remove everything unnecessary. If we use film, then we outline the shape of the pond arbitrarily; if you have a bowl, then use a shovel to outline the outline. And we begin to drip, this is the most difficult stage of the work. If you have a bowl, then you need to drip 5 cm deeper than its height. When using the film, you yourself think about the depth of your pond.
When the pond is dug, you need to pour sand on the bottom and compact it well, the sand will serve as drainage for the pond. We install the bowl in place, making sure that there are no voids, as they can later lead to cracks in the bowl. After installation, cover the bowl with film and lay the stones in the cut. They can be natural or artificial, it all depends on your imagination.
When purchasing a film, you need to pay attention to its color, since there is a very large range of colors on the market.
Let's move on to the most inspiring stage of the work, which is decorating the pond with a variety of plants. Many gardeners use water lilies; this is the most popular plant for such ponds. They are planted on a special fabric that holds them well root system at the bottom. You can also decorate it with a small fountain, which looks very beautiful, and its murmur will help you and your family relax.

You can also add fish to your mini pond; crucian carp, carps and many other species take root well. If you still let in the inhabitants, but take care of their accommodation, you need to install a filter so that your pond does not become clogged and your fish are comfortable.
How to make a pond with minimal investment
Many gardeners make ponds from old bathtubs or cisterns, which will be much cheaper, since you don’t have to spend money on bowls, which are not cheap. Your bathtub will look no worse than a pond equipped with a bowl, although it will lose in size.
We dig a ditch, 20 cm deeper than the bathtub, and install the bathtub, filling the sides with sand. After this, we lay the film and, using tile glue, lay stones that will give a natural look to your mini pond. The stones should not be laid along the perimeter of the bathtub, but slightly enlarged along the edges in order to visually enlarge the pond.
Pour clay onto the bottom of our pond, mix the solution there, and use it to cover cement mortar between stones, which will give your pond a more natural look. When the clay dries, which will happen in 2 hours, you can pour water in a thin stream and start decorating it.

Tire pond
The tire that will make a very beautiful pond must come from a tractor or dump truck. Using a grinder, we cut off the top part of the tire.
- We dig a hole so that the tire fits freely into it. We lay it on the bottom of the pond fine sand, for drainage of our future pond. You can also protect your future pond from tree roots by protecting it with a road surface.
- We lay waterproofing in the form of a film, which should extend 50 cm beyond the edges of the future pond.

- Once again we smooth the film well, fill it with reins, sprinkle sand along the edges of the pond, and lay decor in the form of stones that will hold the film and protect it from slipping.
- If the lid is used from Belaz, it can be used for swimming, and made in the form of a small pool. Then decorate the area around the pond in the form of small pebbles, which will be pleasant to step on in the future.
- If you use it as a decoration for your site, you can decorate it with a variety of plants and large stones around the edges.

- Also in the center, using a small pump, it is possible to make a fountain.
As you can see, if you really want it, you can make a pond with your own hands on your site, from various materials that suit you.
Do-it-yourself pond at the dacha
A small homemade pond can radically transform the landscape of any yard. It is recommended to plant new plants in and around the pond to make the area more comfortable and unusual.
A family holiday on the shore of the pond will be a pleasant event for everyone. You can build such a pond on your own without outside help.
There are several main types of reservoirs designed for different purposes. Some perform a purely decorative function and serve as a place for planting aquatic plants. In others, fish are often bred, and there are also those where you can swim all summer.
Therefore, before you start building a pond, you should determine its main purpose.
Choosing a site for constructing a reservoir
The ideal construction site is a well-lit area located at some distance from the house or other premises.
Many plants that grow on water love the sun, so an artificial pond should not be in the shade of trees. It is better to choose an open area in the yard or garden.
When choosing a construction site, it should be taken into account that the proximity of bushes and deciduous trees can cause difficult care of the reservoir.
Leaves, branches and other debris can quickly contaminate the water, causing the death of aquatic pond plants. But coniferous trees will perfectly complement the picture.
If the proximity to deciduous trees cannot be avoided, then it is necessary to cover the pond for the autumn-winter period with a net and plastic film.
The size of the pond plays a role vital role, because plants and living organisms in water need a special biobalance.
To maintain the level of biobalance, you just need to maintain the proportions between the area of the reservoir and its depth. If the area is large and the depth is insufficient, the water will quickly bloom. In a deep but small body of water, it will also be inconvenient for plants and fish to develop. The minimum area of the pond should be at least three to four square meters. The groundwater level determines the depth of the reservoir.

Film pond
There is a special film on sale made from polyvinyl chloride, polyethylene and other materials with similar properties.
The service life of the special film is about ten years. Polyethylene for ponds is sold in rolls with a width of 2 to 10 meters. This size allows you to avoid gluing individual elements to achieve the desired width. The film itself comes in different thicknesses. The deeper the artificial reservoir, the thicker the film. Classic polyethylene in rolls is not suitable for such tasks.
The size is calculated using the formula: film length = 2 pond lengths and reserve.
The width is also calculated. Leave approximately 60 cm for reserve.
The most favorable time for arranging an artificial reservoir is spring-summer, when the temperature is above +20. Before direct installation, the film is left in the sun, which will make it more elastic after just a couple of hours.
Naturally, a pond requires a pit.
To plant plants, they will need some kind of shelves along the contour of the pond, 15 cm deep. Before laying the film on the bottom, you should make a preparation of sand 10 cm thick. Next, lay the film, securing it with stones, and fill the pond with water.
The stones laid along the edges of the pond look very beautiful. A special groove is made for them, and the stones themselves are secured with concrete mortar.

Pond from a ready-made plastic mold
Ready-made plastic bathtubs can withstand any temperature well and are quite durable.
The walls of the tank are usually 3 mm, which requires careful transportation of the container. Even a small crack will be very difficult to seal. In addition to being resistant to temperature changes, plastic bathtubs look attractive.
To dig a pit, you should transfer the contours of the container to the ground in accordance with its shape.
How to make a pond at your dacha with your own hands step by step
To do this, place the bowl at the digging site and transfer its outline to the ground surface. The depth of the pit corresponds to the depth of the plastic bath + 40-50 mm on the base. Leveling the reservoir horizontally is done using a building level and a flat board placed on the surface of the bowl.
The pit is filled with sand, which is carefully compacted. Plastic container placed on the surface, deepened, gradually adding soil in the right places.
Having installed the tank, it is checked again for horizontalness and only then filled with water.

Decorating an artificial pond
Of course, a homemade pond is already a decoration for any site.
But next to the pond, you can additionally install a gazebo to relax your soul and body, looking at the surface of the water. In addition, you can organize fountains in an artificial reservoir, operating with the help of special pumps, and arrange multi-colored lighting.
In general, you can turn small pond into a colorful spectacle. It all depends on desire and imagination.
There are special pumps for fountains: above-water and underwater. For a tall fountain you will need an underwater pump, but for a real water attraction you can purchase a surface model.
For a real water show, you will also need lighting. All lights designed for installation in ponds operate on 12 Volts.
Mini spotlights can be installed on the surface of the water or even underwater. Illuminating the pond in this way gives it a truly unusual and stunning look.
Video
 Undoubtedly, everyone who owns a summer house, private plot or private property wants to have a beautiful decorative pond on their land. Now it is considered luxury and something exotic. There is a belief that realizing dreams is actually costly and costly. We will try to show how we create a decorative pond with our own hands at low financial costs.
Let's consider a simple and inexpensive way creating a pond.
Used as a water reservoir polyethylene film. The main advantages of this material are:
- low cost;
- prevalence (in almost every market);
- ease of storage;
- service life - 2-3 years, depending on thickness.
We prepare materials and tools
To make a decorative pond on our website we need:
- contour for the contour of the pond;
- shovels and buckets;
- sand, ruins, demolition stone;
- plastic film (define yourself, depending on the size of the pond;
- A faithful servant and 3 days of free time.
We are thinking about the shape and preparation of the cave for the future decorative pond
After preparing everything you need, get started.
The first thing we do is determine the shape of the future pond. Round, oval, rectangular, curved, etc. It all depends on your imagination. After determining the shape, for example, a curved pond, you need to attach it to the ground and drag the rope around its perimeter to see a frame of the future pond. When we complete this phase, along the perimeter of the rope in a bayonet bayonet (about 20 centimeters), we dig a ditch that transfers the pond section to the ground. In the future, it will be easier to dig without worrying about the boundaries of the pond being affected.
When we finish marking, we continue with the hard work - hammering.
First, pour the entire area of the pond onto 1 bayonet, then onto the second, third. As practice shows, for a decorative garden pond a depth of 3 depths, 50-70 cm, is sufficient.

Level the bottom so that the depth of the pond is the same everywhere.
Even with the top edges of the pond, otherwise it will be unevenly filled.
After completing the work, it is necessary to remove all roots, stones, sharp objects from the walls and from the foundation cave. If this is not done, they may cause holes in the film later.
The bottom of the pond should be filled with sand.
The layer should be 10-15 centimeters. The sand will serve as the crunch pad for the film.
We made a movie
After completing the work described above, continue to use the most careful polyethylene foil deposited in the cave. It is important to correctly calculate the size of the film in order to compress it along the edges of the recess by 30-50 centimeters.

We put it on well and tried to straighten out the big wrinkles.
It is better if three small ridges have one large acronym.

The upper should be denser and more durable.
Filling with water
By laying a kind of film at the bottom of the pond and on its walls (the film must be integral), you can begin to pump water. This may be the only time you can relax while working.
Filling the base pond 2/3 full with water, turn the edges of the liner over the edge and place a rustic stone with gravel along the edge of the pond on it.
Place the rocks on the edge of the pond, still filling it with water.
If you fill the pond, you can consider that the job is complete. The area around it can be planted with flowers, ornamental shrubs, many sculptures, lamps.
How to make a pond in the country with your own hands?
Finally, you can buy a small fountain that will greatly improve the effect.
When it comes to pond maintenance, change the water at least once a month and catch bugs, leaves and other organic waste.
After a detailed look at this method of creating a decorative pond in a garden plot, we can confidently say that this is not a difficult or very expensive business.
If you decide to spend a few days and a little time creating a pond, you will have a wonderful decoration on your site, wet the air in the hot weather and admire the view of your loved ones.
Take a look at the photo of the pond we have at the beginning of the article.
Tyatya.ru is a young cognitive site about home and family. Over time, it will become a repository of knowledge and become a daily assistant in everyday life
Creating a pond on the site
Many people who own large areas where they can not only build a house, but also equip other objects, will consider creating their own pond, which will add charm and appeal to the area, but also create original and comfortable seating.
Such a pond may be small in size, but at the same time it will be the pride of every person. The ideal solution is to decorate it with a variety of interesting materials In addition, you can make a sandy beach or lie on the edges of different stones. For the pond you can even use special water flowers, which will be very beautiful and sophisticated.

The process of creating a pond in a place with your own hands
First, it is necessary to determine where the water body will be, as well as what specific dimensions and characteristics they will have.
To do this, you need to focus on places that are well protected from the wind, and in hot weather the pond should be in the shade.
As an artificial reservoir is created, it is important to supply various communication networks and install equipment. For this to happen, it must be possible, so the location of the pond must be chosen properly.
At the same time, the tank should be located where it will have constant access, so you can have a great rest on the shore if you want.
There should not be too many trees near the pond, because in autumn it will not quickly receive dirty and sticky leaves, which can cause the formation of various dangerous bacteria.

By deciding where to pond, you can begin the practical work.
First they must create a cave, which must have required parameters. This work can be done using special equipment and manually using a shovel. In this case, all walls should have a slight slope to the bottom, and all surfaces should be well covered.
All walls must be distinguished by the presence of exactly the same parameters, so this issue should be considered immediately, and also checked by level.
How to make a pond in the country with your own hands: 4 real channels and 30 ideas
In addition, the walls and bottom are covered waterproofing material, presented in the form of a cylinder, and the roof material is also suitable for this purpose.
The next stage of work is the creation of screeds, for which it is necessary to form a high-quality and homogeneous mixture that has the necessary parameters.
It must contain Portland cement and crushed stone, sand and a certain amount of water. Pour the resulting solution into the cave, which is to be used for vertical and horizontal formwork. The thickness of the layer should be exactly the same at any point of the screed, but it should be at least 100 mm in order to obtain a high-quality and durable layer. We must not forget that they will have pipes in the ground leading to the pond.
For this reason, the screed must have a proper opening through which the water pump and its kit will operate. The tube should lead to a nearby pond or other place where water can be obtained and where it can be emptied.
This system also had to be equipped with special pumping equipment, and the various valves and other elements for its operation were very light.
The pipes must be laid in the ground, for which it is necessary to create ditches around the perimeter, the depth of which must be below the freezing level. It is also advisable that all elements located in the ground be wrapped in high quality and reliable thermal insulation materials, which can last a long time underground.
The exhaust screed must be strengthened, for which high-quality reinforcing bars are used, which must be laid along the screed and above them. In places where all elements are connected, they must be connected with flexible and durable wire. The screed cures for about a month, and during this time it must be covered with burlap and sometimes dampened so that it does not burst.

As soon as concrete screed will be completely ready, you can start the casing so that you can use finishing material or without it.
The ideal solution is to use marble tiles, but if there is no money for this material, plastic tiles will be strong, durable and reliable and have an attractive appearance.
The next stage is that the cave is completely filled with water with a pump and pipelines buried in the ground. We must not forget that once a year it is necessary to completely dry the pond so that the water is restored and unnecessary bacteria do not arise.

The created pond needs interesting design and decoration, which makes it a real highlight of the area.
To do this, you can make a bridge or a small platform and place rocks or sand around the rim. An excellent solution will be creating water lily beds or water lilies.
In addition, you can arrange an interesting and attractive fountain in the center or use other elements for decoration. If you want to create a fountain, you will need to spend a lot of money because it needs a reliable website, as well as the delivery of special equipment.
In the immediate vicinity of the pond, it is advisable to create a relaxation area with sun loungers and benches, so that in the hot summer you can enjoy the pleasant cooling of the artificial pond.
So the site pond is also quite easy to DIY, if you do the job properly the rates will be consistent and competent.


