DIY hut house drawings. Huts for a child's soul
Huts and living gazebos at the dacha can not only modify the exterior, adding some zest to the landscape, but also create a pleasant place to relax based on natural materials. Read now how to make a hut or a living gazebo on your summer cottage with your own hands.
Today we decided to step a little aside from more capital construction and do things that are directly related to nature. We will create a high-quality and very nice hut from branches and living plants, as well as plaited with climbing plants or trees and shrubs. For work that brings pleasure and benefit, you only need desire and some knowledge.
Advantages of huts and living gazebos
Naturally, this is not capital construction, the objects of which are based on serious foundations and frames, so we cannot call this kind of product too stable and reliable. They will not protect against strong winds or heavy rain, but, perhaps, these are the only significant drawbacks.
Now I would like to draw attention to the advantages, of which there are many more.
- It’s worth noting right away that any living gazebo or artificially created hut is an environmentally friendly structure in which there will always be fresh air and the aroma of plants. Here you can easily hide in the shade from the burning sun, and you can also spend time having an interesting conversation, drinking tea, or dinner with your family.
- Such a structure can be created by growing plants or fixing special materials even with your own hands. You won't need experience welding work, installation heavy structures or woodworking. It is enough to want and build, act using elementary technology and create a project that is in harmony with the natural component of your summer cottage.
- You won’t spend a lot of money on building a living gazebo or hut. It is quite possible that all your costs will be only basic materials for light frame(if you provide one), as well as plants that will become the basis for the formation of living walls and a dome roof.
Based on beauty and environmental friendliness, you can find many more advantages, but is it worth proving to yourself? positive aspects future project if you have already decided everything.
How to build a hut at the dacha with your own hands?
To build a hut, you must first determine your priorities. First, decide what needs it will be used for. Most often, the building is used as a children's building, for games and fun for kids. We have already discussed the hut on the playground, like the tree house, earlier, and therefore there is already a source for detailed information.
If the hut is being built for other needs, say, will serve as a gazebo, then we are ready to talk about this now.
The base of the hut is soil and a special ditch for installation frame materials. There is no need for any pouring or foundation here; just use a shovel and dig a trench around the perimeter of the future structure. Next, it is enough to install two supporting elements for the structure using a beam or log. The cross between the supporting elements will become the base of the roof and the upper base of the walls. Now on simple frame you can lay down the branches that will make up the hut, securing their upper part to the base, and the lower part to the ditch that we have prepared.
A simple hut can be built in a day, and then used to store collected vegetables or fruits in a remote area from outbuildings, for children's games, if the hut is in the yard, as well as for relaxing in the country.
You can always make a hut in the country and much faster if you use the frame method and, for example, a camouflage net. Just a few hours and you're done!
How to build a living gazebo in the country?
It seems to us that with living gazebos things are much more interesting, because this is not only a structure for relaxation, but also a wonderful small architectural form that will become an indispensable decoration dacha area when designing the landscape.
What is needed for construction? Let's start with the main thing.
Green living gazebos (video)
Choosing a location for a living gazebo
We keep our focus not only on the place that we like best and suit us, but we deliberately evaluate our own capabilities, future design site and the requirements of the plants that will take direct participation in the organization. It would be more correct to place the gazebo in the backyard, near the main buildings, in order to cover one side of it from the winds. Of course, if the region is temperate climate and you can make a truly reliable frame, then you can not pay any attention to atmospheric phenomena. Consider only the plants and their ability to grow in the place where you are installing the gazebo.
Selection of materials
We recommend working with simple materials and, so to speak, not reinvent the wheel. It's been a long time since similar designs are built from wood or metal - materials of an average price niche that are easy to work with. If you want to bring the gazebo closer to living nature, choose wood, but if metal can be harmoniously blended into the surrounding environment, there is no problem.
Experts advise strong and inexpensive types of these materials - wooden beam and profile pipe.
Installation of a living gazebo frame
You can start with the foundation or concreting the bases, but since we agreed to move away from capital construction, but still want to get a stable structure, we will concrete the main parts. During conversations about fences, fences and even vertical beds and gates for summer cottages, we mentioned how the posts are strengthened. We use the classic method and install a stable base for the gazebo.
The frame can be connected to each other along the perimeter of the structure, and the upper base can be made so that it is more convenient for plants to braid the roof. Since there is no roofing for this element of the exterior, we would only need to create a light sheathing that will support the branches and stems. It may be metal or wooden sheathing, installed on top part frame of a living gazebo, or maybe just a piece of chain-link mesh, which is screwed to the frame with wire.
Decorating a living gazebo
We invite you to think about the internal content yourself. This could be a table and benches, or maybe just a set of ordinary country furniture, say, made of plastic. The main thing is that you feel comfortable.
Painting the frame is also at your own discretion, but it is mandatory, since varnish or paint performs not only an aesthetic function, but also a protective one.
The main part of the decor is the selection, planting and formation of plants for a living gazebo. This is a little difficult at first, but once the plants are planted and their agricultural techniques are studied and accepted by you, everything becomes much easier.
Choose climbing plants, form the bases of a living gazebo from them, carefully and without injuring them, secure the branches to the frame, lay them on the roof, and throw them over the upper base. As the plants mature, be sure to shape the crown, prune as they grow, remove dry and interfering parts, and point the stems in the right direction.
You can install a gazebo in just one day, but growing plants for formation will be a little more difficult and longer in terms of time. Although, if you navigate well ornamental plants for such gazebos, you can get results within a month or a month and a half.
What plants to choose for a living gazebo?
Many plants are suitable for decoration, but again let us remind you that you should choose them not only by name, but also by the requirements for agricultural technology. In addition, be sure to determine the possibility of proper development in your climate, soil composition, temperature conditions, humidity, average annual temperature and so on.
The simplest living gazebo in the country (video)
Build a hut or a cute living gazebo at your dacha with your own hands each of us would like to. But remember that only experience and diligence regulate the final result, and therefore be attentive to details, but never give up the idea original design garden or other area of the dacha area.
Don't know how to build a play hut for your child and his friends? Are you at a loss where to start? Our article examines all the main types of hut designs and provides detailed instructions installation instructions, following which you will easily cope with this task.
Everyone in childhood built forts out of pillows and bedspreads. But these structures stood for a couple of hours at most. Children's play hut - much more robust design, where the child can relax, develop and play both indoors and outdoors.
Basic safety requirements
Parents should make sure that the playhouse is not only interesting and cozy, but also safe. If wood is used for the frame, then the bars must be sanded and coated with paint or varnish so that the child does not accidentally drive in a splinter. All fastenings must also be hidden from children's eyes and hands. The design should not have sharp corners And hard materials(stones, metal).
A sufficient amount of air must flow inside the structure. If the hut is fabric, you need to make windows; if the house is covered with branches or spruce branches, gaps are required. For the same reason, you cannot cover the hut with film.
You definitely need to think about the correct location of the hut. Do not place it in drafts, away from adults or in the sun. There should be no objects or places that are potentially dangerous for children near the structure.
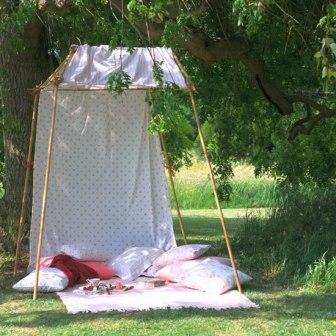
Gable fabric hut
This is the simplest construction of a hut. For very young children, a gable hut can be built by simply throwing it over taut rope a sheet or towel. For slightly older children, a folding hut on a wooden frame is suitable.
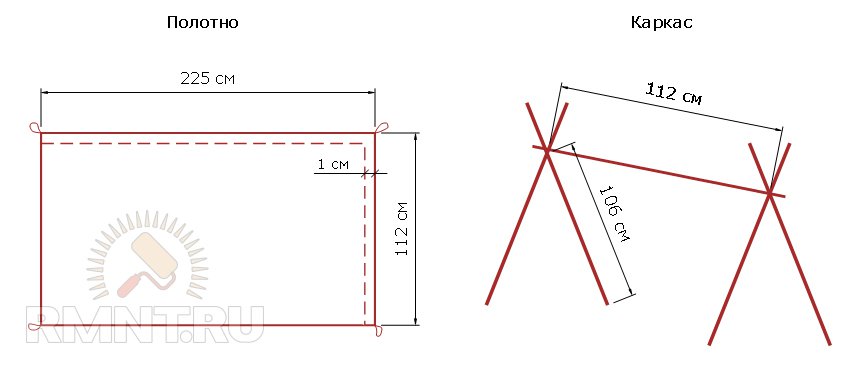
Required materials for the frame:
- four pine bars 25x50 mm, 1.2 m long;
- round wooden rod with a diameter of 20 mm, a length of 1.2 m;
- drill with a feather drill with a diameter of 20 mm;
- pencil;
- roulette.
Materials and tools for the awning:
- fabric 1.2x2.2 m;
- sewing machine;
- linen elastic;
- threads
Operating procedure:
- Measure 15 cm from the top edge of each of the four bars. Mark the location with a pencil.
- Now you need to drill a hole with a diameter of 20 mm with a drill.
- When combining two bars, you need to make sure that the holes match.
- Now you need to push the round rod through both holes. The grip needs to be fairly tight to securely hold.
- Thread the second end of the rod into the holes of the remaining two bars. The frame is ready.
- The fabric for the awning needs to be folded 1 cm around the perimeter using a straight stitch. Required dimensions tent 1.1x2.1 m.
- Cut four pieces of 10-12 cm long from the elastic band.
- Make a loop from each elastic band and sew it in the corners of the awning.
- Now all that remains is to throw the fabric over the crossbar of the frame and secure it to the legs using rubber loops.
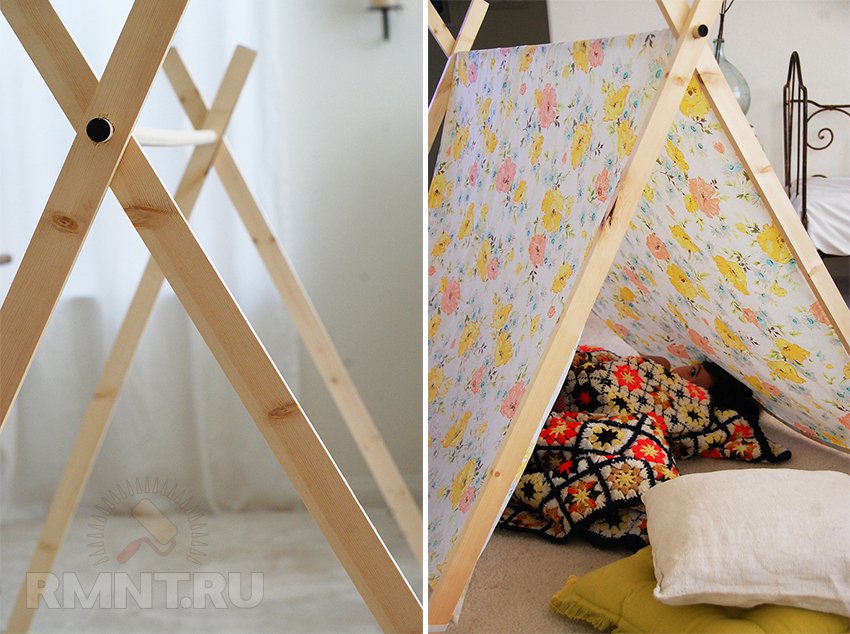
The hut of this design can be adjusted in height and width, it is easy to assemble and disassemble even for one person. It is also convenient because when disassembled it takes up very little space.
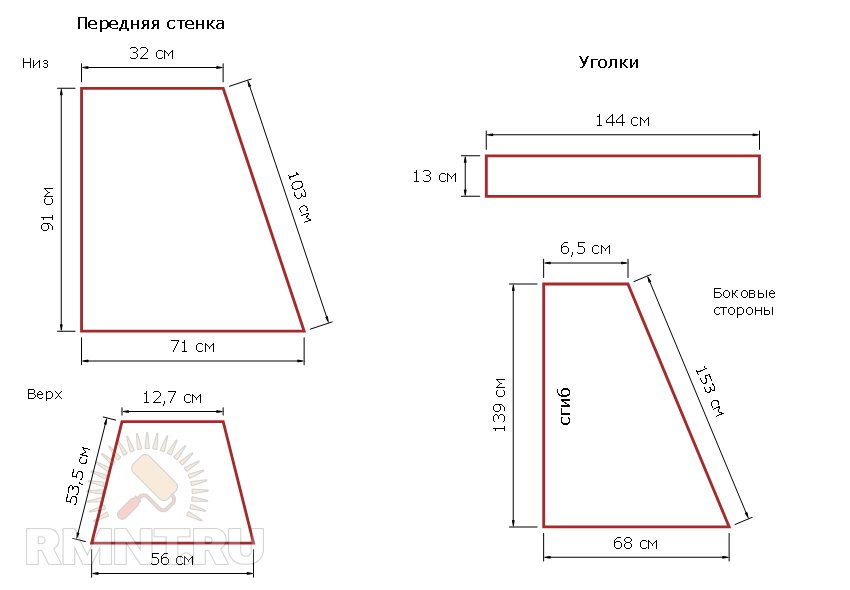
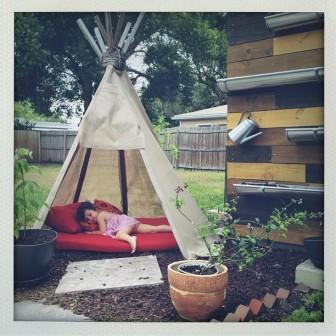
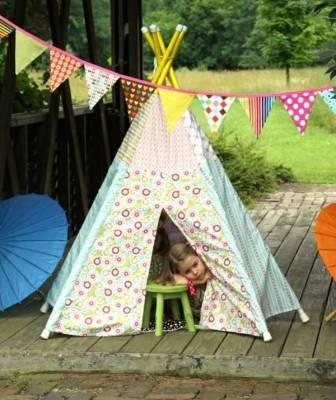
Children's hut "Wigwam"
The frame for the “wigwam” can be long wooden poles, bamboo sticks or PVC pipes. The walls can be fabric - such a hut can be disassembled and stored for a long time. A disposable hut in the forest or at the dacha is covered with spruce branches, but such shelter is short-lived.
To build a fabric “wigwam” you will need:
- 4 PVC pipes with a diameter of 20 mm, a length of 1.7 m;
- 8 pipe caps;
- rope or shoelace;
- 5 m of heavy fabric 1.4 m wide;
- fabric 1x1.2 m for pipes;
- threads
Operating procedure
- According to the plan, you need to cut the fabric. All sizes include 1 cm allowance.
- First you need to hem the edge of the upper part of the front wall with a length of 12.7 cm. We also hem the 91 cm sides of both lower elements.
- Now you can sew all the parts of the front wall together.
- Now you need to hem the upper edges of all three sides. Align them in height, place the bottom so that the final height of the side walls is equal to the height of the finished front wall.
- The fabric for the corner needs to be folded into a kind of loop-cover for the pipe. This cover is placed between the adjacent walls of the “wigwam”, and the whole thing is sewn together. The same needs to be done with the remaining corners. The result is a finished tent.
- You need to step back 10 cm from the top edge of each pipe and drill a small hole.
- A cord is threaded through the holes, which firmly ties all the pipes together. At this stage, an awning is placed on the frame.
- The ends of the pipes are closed with caps, and that’s it - the “wigwam” is ready!
Hut made of branches and living plants
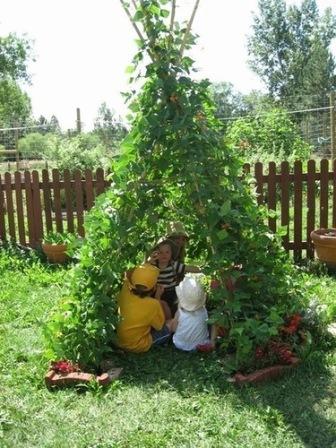
In order to build an original hut from living plants at your dacha, you just need to drive high poles into the ground in a circle - this will be the frame. Plant climbing plants, such as clematis, morning glory or grapes, around the perimeter of the frame. The obvious disadvantage of such a hut is the long time it takes for plants to grow, so such a house will not be interesting for children.
You can quickly build a hut from willow, which will require a lot of long branches (the longer, the higher the house). Simply drive the branches into the ground and intertwine the tops tightly. To make the walls more dense, you can cover the vine with spruce branches or simple straw.
Tent with PVC pipe frame
A tent of this design occupies large area, but can accommodate a whole family. It is very light, easy to install, and when assembled it takes up little space.
Necessary tools and materials for the awning:
- sewing machine;
- dense fabric 2x3.5 m;
- threads;
- roulette;
- pencil;
- scissors;
- pins.
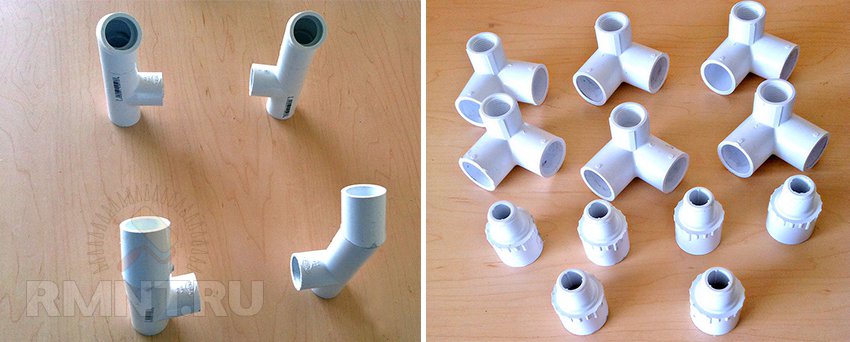
For the frame, PVC pipes with a diameter of 20 mm and plastic connectors are used.
Frame tools:
- A - pipe 146 cm long, 3 pcs.;
- B - pipe 152.5 cm long, 2 pcs.;
- C - pipe 122 cm long, 2 pcs.;
- D - pipe 64 cm long, 4 pcs.;
- E - pipe 80 cm long, 4 pcs.;
- connector for pipes with a diameter of 20 mm, 4 pcs.;
- PVC elbow 45 degrees with a diameter of 20 mm, 4 pcs.;
- T-connector for pipes with a diameter of 20 mm, 4 pcs.;
- triple plastic corner for pipes, 6 pcs.;
- PVC fitting with external thread, 6 pcs.
Making a tent cover:
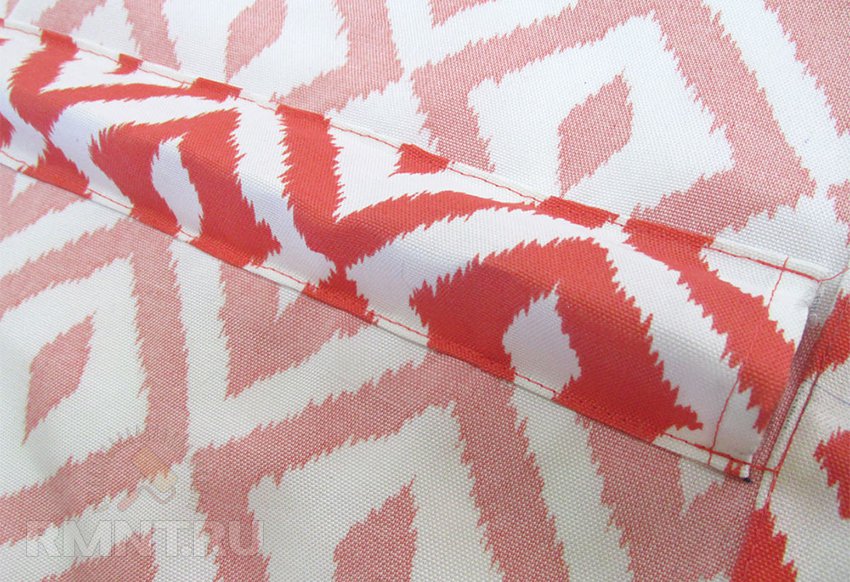
- Cut a piece of fabric 1.6 x 3 m, add 1 cm at the edges. This is the main covering of the tent.
- From the remaining fabric, cut three strips 10 cm wide and 140 cm long. Each short side of the strip needs to be folded 1 cm. These are fastening strips, with their help the awning will be fixed to the frame.
- Bend the long sides of the strips 1 cm and iron them.
- From the wrong side of the main cover, sew one edge of the strip to the short side A. The second edge is sewn at a distance of 4 cm from the first. The same must be done with the fastening strip, which is located with opposite side frame.
- To find the middle of the awning, you need to fold the canvas in half. Step back 2 cm from the fold line in each direction and mark with a pencil. The third strip needs to be sewn here.
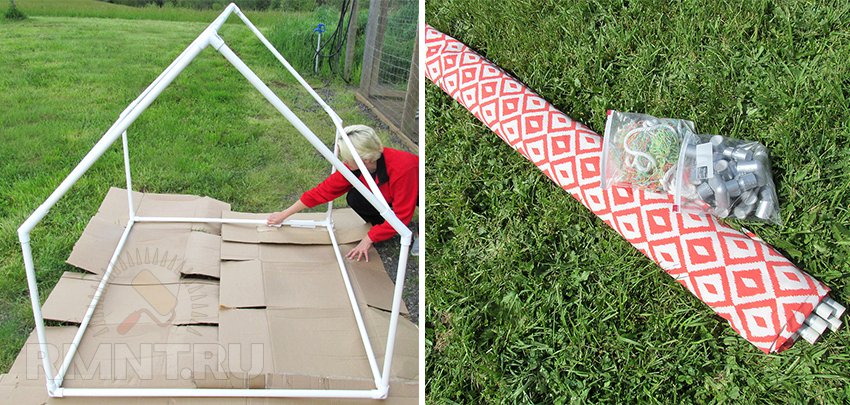
Assembling the tent frame:
- First you need to secure the elbow and T-piece together using a pipe connector.
- Now we will make six 90-degree angles: four for the bottom of the tent and two for the ridge. To do this, you need to attach the fitting to the top of the triple angle.
- Next, assembling the frame is similar to assembling children's construction set. First, the front and rear walls are assembled, then they are connected to each other by crossbars.
- Finishing touch— installation of the tent along with the cover.
An older child can safely be involved in the construction of a hut. Small children are also very easy to keep busy: just give them bright colors, let them leave colorful handprints on the future covering of the house. Your child will be delighted with the hut assembled and decorated with his participation.
Natalia Mamonova, rmnt.ru
DIY huts for children on the street
Children in the country need a place to play and have fun. Great option could be a hut that you make with your own hands. To do this, you don’t need to spend a lot of time and money, just use your imagination. An unusual hut is made from materials that are always on hand. We invite you to familiarize yourself with some design options for a children's hut.

Fabric hut
To make a fabric hut, you need to prepare:
a large and dense piece of fabric measuring 2 by 4 meters;
2 support posts(trees), which should be spaced 2 meters apart;
2.5 meter rope;
a set of hooks for securing the hut to the ground.
Initially, we must pull the rope in a horizontal position between 2 posts and secure it thoroughly. Then we hang a piece of fabric symmetrically on top of the rope. The next stage is fixing the hut to the floor. You need to sew metal eyelets onto the edges of the fabric in advance or make loops that are also sewn along the edge. After this, hooks are threaded through the loops and fixed in the ground.


This option for creating a hut is a little difficult to design, but nothing is impossible.
Prepare in advance:
PVC pipes or branches required length;
climbing vegetation or sow seeds;
strong rope.
It is worth noting that such a hut can only be used after several months. It is recommended to begin construction of the structure after winter period with the beginning of spring. To begin, install pipes or tree branches in a triangle shape. Then fasten them together at the top with rope.
After assembling the hut, you can begin sowing the seeds. It is necessary to plant plants that climb beautifully around the structure. They will begin to grow, and then you must direct them up the racks of the hut. At the height of summer, the children's hut will probably be ready.
This option involves the construction of their structure PVC pipes, which must be covered with durable fabric on top. The construction method is identical to the second plan described above. Racks made of pipes are placed and tied tightly from above with a rope. Then they need to be fixed in the ground. The hut for children is covered with cloth and it is ready for use.
This method is the most original. To work you need to have:
Aluminum hoop or metal pipe, twisted into a ring;
strong rope and fabric.
Building such a hut is not difficult. Cover the hoop with fabric and sew the ends together. The remaining fabric must be sewn all over the hoop and a rope attached to it in the center. Then the structure is fixed on a tree or in another place suitable for children’s games.
In this case, a simple stepladder will serve as a hut. You just need to put a stepladder in convenient place for games and hang a cloth on it. This construction option is characterized by its mobility, since the stepladder can be moved both into the yard and into the house.
This is an unusual construction of tubes made from newspapers, which are covered with fabric. But remember that in inclement weather such a hut must be removed so that it does not get wet and spoil. To build the structure, prepare:
Textile;
newspapers;
large width tape and stapler.
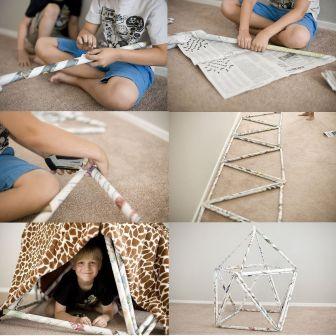
First, roll the newspapers into tubes and secure their edges with a stapler. Then make a triangle-shaped structure and also fix it. Place a cloth on top of the hut.
All children love nooks and crannies. Only in solitude can you give free rein to your imagination and go on an exciting journey through imaginary worlds. This is why children often build homemade houses from pillows, blankets and other improvised means. But if you want your child to feel like a brave traveler or the hero of his favorite fairy tale, give him a hut. Moreover, making a hut for children with your own hands is quite easy, but the child will be able to fill his leisure time with exciting games. Today we will share with our readers ideas for building children's huts, which can be installed both in the children's room and on the street.
Making a hut for children yourself - some interesting ideas
1. Sheet and rope
To make a hut, just stretch a rope between the trees, throw a sheet over it and secure its edges with wooden pegs or other suitable means. To make your child comfortable, place soft blankets, blankets or pillows on the ground. And even though there is nothing supernatural in such a “structure,” a child’s imagination can fill it with an exciting story. A homemade hut for children on the street will give a lot of interesting games and, moreover, will protect babies from solar overheating.
When choosing a place for a hut, give preference to darkened and level areas.
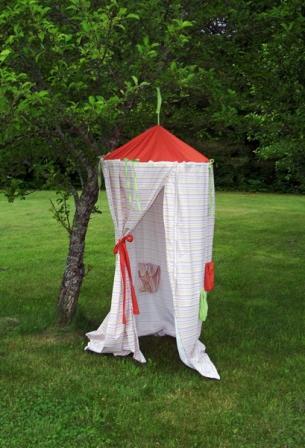
2. A hut made of gymnastic hoop and fabric
Ordinary gymnastic hoop can be an excellent basis for a children's hut. It is enough to sew a long fabric to the hoop and hang it in a horizontal position, for example, from a tree branch at such a height that the edges of the fabric reach the ground. Alternatively, you can simply throw a large piece of thick fabric over the hoop, build a cone-shaped roof and secure the frame at a convenient level. Then, to hang the hut you only need a reliable strap or ribbon.
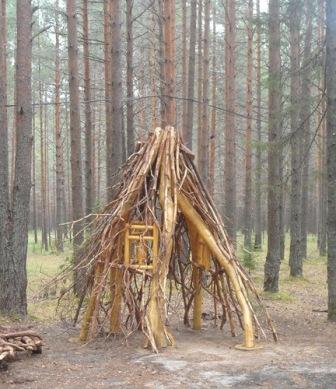
3. Hut made of branches
Probably every child dreams of trip around the world, dangerous adventures and exciting journeys. You can help a child realize his cherished dream without leaving the aisles of his own summer cottage. Since brave travelers prefer to sleep not in a warm bed, but in a hut made of tree branches, made with their own hands, the baby will certainly be delighted with such a gift.
But how to make a children's hut from branches? There are several interesting options:
- Firstly, you can build a hut from flexible and long branches left after pruning trees and shrubs. To begin, collect as many branches as possible and select the largest specimens. At the site of the future hut, draw a circle and dig branches around its circumference, tilting them so that they create a cone-shaped frame. Install only two branches at a fairly wide distance from each other, because they will serve as the entrance to the future hut. Make sure the branches are firmly installed and supplement them with remaining material. It’s okay if the walls of the hut are “transparent” - being in such a house, the baby will still feel like, at least, Robinson Crusoe.
- Secondly, you can make a “living” hut by decorating it with foliage and plants. If you are not in a hurry to build a miracle house, plant climbing plants around the perimeter of the frame, for example, grapes, bindweed, etc., which, as they grow, will beautifully entwine the walls of the hut. If you want to give your child a holiday “here and now,” simply cover the frame of the hut with branches and greenery.
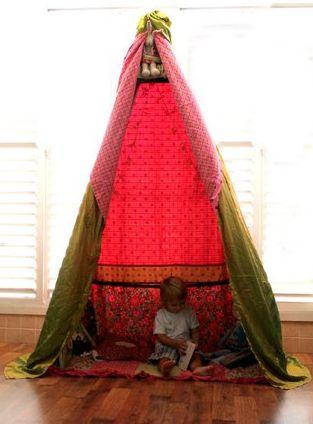
4. Wigwam hut in the nursery and outside
Wigwam hut is traditional house Indians This structure has a cone shape and a strong structure. Previously, the Indians built their homes using thick branches, which were then covered with thick canvas fabric. We can also make a children's hut based on the wigwam principle. To do this, you need to select 5-7 flexible but strong twigs, and then install them in the shape of a polyhedron or semicircle. The tops of the twigs should be connected in such a way that they fit together like flowers in a bouquet, overlapping each other. At the junction, the twigs must be secured with a strong rope or a piece of fabric.
If you are installing your teepee outside, dig the bases of the twigs into the ground a little. If the wigwam will be located indoors, tie transverse rods at the bottom of the structure that will secure the structure.
After this, decorate the wigwam with fabric. Most often, triangles are formed between the nearby twigs of the hut, so you just need to cut out pieces of fabric in this shape and sew them around the frame. However, it is much more beautiful if the wigwam hut is decorated with a specially sewn cover, to create which you will need to carefully measure the height of the frame and the width of each part.
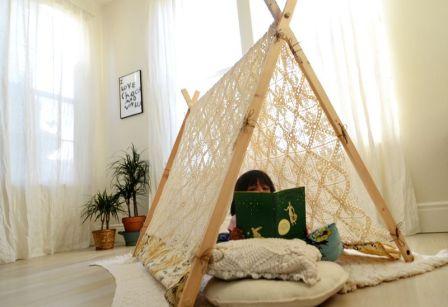
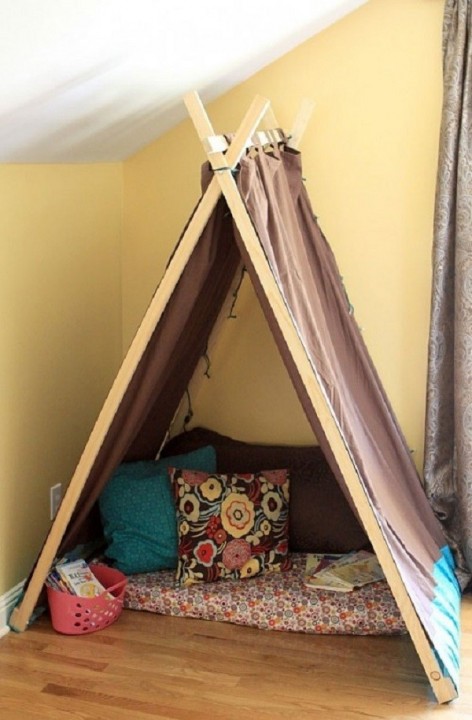
5. Gable hut
Having done simple design from several wooden slats, you can create a beautiful gable hut or hut-tent. The most important thing in this structure is to choose the right fabric. If you are setting up a hut in the yard, it is best to use tent fabric that will not fade from the sun or become deformed due to high humidity. If the structure is located in a child’s room, cotton or any other natural material will do.
All photos from the article
In this article we will talk about how to build a hut from boards yourself, relatively quickly and efficiently. But first, let’s figure out who might need such a design and why.
The need to build a hut is relevant in relation to summer cottages and garden plots. That is, we are talking about those situations when there is a need for temporary housing, which, after a certain period of time, can be dismantled until the next time or not dismantled at all.
Again, you need to understand that a hut made of boards is not a dilapidated structure made of straw and branches, but a durable structure, not inferior in reliability to a light barn. So, what designs of board huts can you build with your own hands?
DIY ideas
Of those designs that can be translated into reality without making excessive efforts, we note the following options:
- structures where a frame is assembled from boards, which will be sheathed with others more available materials;
- structures made entirely of lumber.
Let's consider specific examples assemblies of one and another category of structures.
Construction of a children's wooden wigwam
Who didn’t dream of having their own small house as a child? Possibly owning one's own small house- this is one of the many wishes of your children. Let's try to make a childhood dream come true.
As building materials we will need:
- timber 50 by 50 mm, 2 meters long – 4 pcs.;
- edged board width 100 mm thickness 20 mm;
- self-tapping screws and fastening hardware in the form of plates with through holes;
- paint and varnish materials for finishing processing of lumber.
Tools you will need:
- tape measure and pencil;
- wood hacksaw;
- screwdriver with drill function.
The construction instructions are as follows:
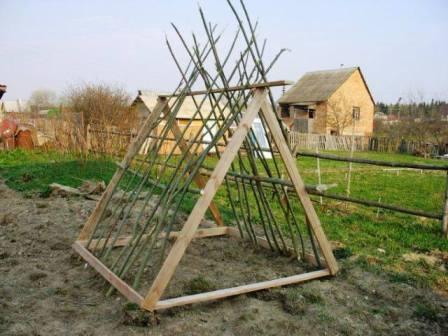
- we prepare 4 beams that will serve as diagonal supports for the assembled structure;
- in the upper part of the beams we make a half-wood groove so that the two boards form a single structure;
- we connect and get two structures with the same angle between the supports;
- we place the assembled supports in the position in which they will subsequently be installed in the finished hut;
- we fasten the boards with self-tapping screws, as shown in the photo;
Tip: As a template for easy installation of the planks, you can use a board placed on its edge.
- after the planks are installed, cut them at the end;
- We align the ends of the planks with sandpaper so that the cut line is smooth and does not leave splinters;
- We cover the finished structure in several layers with a break for each previous layer to absorb and dry.
Ready-made design in warm time year can be installed in the yard. With the onset of the cold season, a hut assembled from lumber can be brought into the house and installed in the children's room.
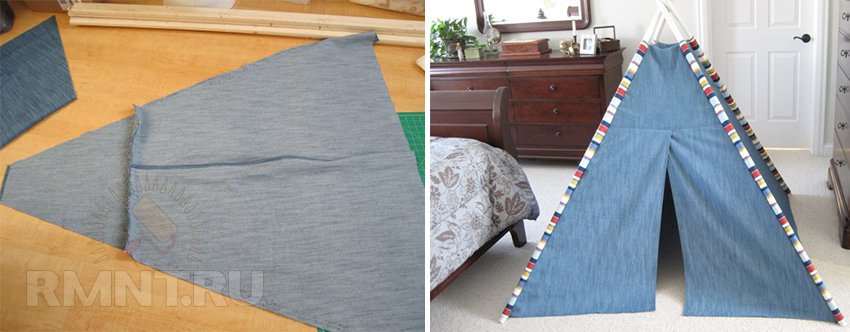
Assembling a children's gable hut
Another type of children's playhouse is a gable plank construction, covered with fabric. To make such a structure, you will need an edged board with a section of 50 by 20 mm. In addition, you will need self-tapping screws to assemble the frame.
The manufacturing instructions are as follows:
- we cut ten beams, each two meters long;
- we assemble 2 U-shaped frames, provided that between all beams gusset is 90 degrees;
- from the crossbar in the manufactured frames along the sidewalls we measure 0.6 meters and make marks;
- According to the marks made, we fasten the beams, which should be placed parallel to the transverse crossbars;
- from the installed beams we again measure 0.6 meters along the sidewalls and make marks;
- According to the marks made, we fasten one more transverse beam, so that everything cross beams the frames were parallel to each other;
- the assembled frames are installed diagonally, applied to each other and fastened with self-tapping screws, as shown in the photo above;
- assembled structure cover with a sheet or denser material;
- We fasten the canvas at the bottom of the structure with a stapler or push pins.
The finished hut, despite its lightness, is quite durable. The structure can be installed on the front lawn country house. If there is a need to dismantle the hut, disassembling it is not difficult. You don’t even have to remove the fabric, just unscrew the screws and fold everything structural elements until next time in the pantry.
Important: To prevent the wood from cracking when assembling and dismantling the canopy, it is advisable to pre-drill small holes with a diameter of 2 mm and screw self-tapping screws into them.
We are building a utility block
Holders country cottages and dachas often face the problem of temporary storage of gardening tools and harvested. Meanwhile, solving this problem is not difficult; it is enough to build a hut from building materials, the price of which is low. Such materials are edged boards and dry reeds.
Reed roofs in lately are becoming increasingly popular in the construction of full-fledged environmentally friendly country houses. Of course, such material will be an excellent and inexpensive solution when arranging the roof of a barn.
As an example, consider the assembly features of the hut shown in the photo. On average, to assemble such a structure it will take not more than a day, of course, provided that required quantity reeds will be prepared in advance.
Important: Harvest reeds for use as roofing material better in winter, when the movement of fluids along the barrel is suspended.
The harvested stems are laid out to dry in one layer in a well-ventilated place.
As the weather warms up in the spring, construction can begin.
Instructions installation work next:
- prepare 4 boards (length 2.5 meters cross section 20 by 2.5 cm) for assembling rafters;
- we assemble the boards in the shape of an inverted letter “V”;
- in the upper and lower parts of the rafters we attach transverse beams, which must be parallel to each other;
Important: Depending on the length of the beams attached to the rafters, the length of the building will be determined.
- from narrow planks we make sheathing along the side, front and back parts of the hut and at the same time do not forget to assemble the opening for installing the door;
- we knit the reed stalks into sheaves and begin to lay them in the direction from bottom to top, so that the sheaves located above lie on the ones below;
- on top along the ridge line you can fasten a strip of tin bent to the shape of the rafters so that rainwater did not penetrate inside;
- the door to the building is made as a type-setting board panel, which is hung on hinges;
- upon completion construction work You can arrange shelving in the hut.
How to extend the life of lumber
So, we have learned what and how can be built using standard edged boards. It remains to familiarize yourself with the popular methods effective protection lumber from negative impact environmental factors.
If you use a hut made of wood under open air, due to long-term exposure to direct sunlight and precipitation, the wood may begin to rot or, on the contrary, dry out with the formation of cracks.
To prevent damage to the lumber, the wood must be properly prepared before building a hut with your own hands. Preparatory work consist of processing wooden parts special impregnations with strengthening disinfecting and fire-fighting effects.
If there are doubts about the advisability of using a particular impregnation, you can use universal products that combine all the previously listed qualities. For example, impregnations are quite functional deep penetration, which contain antiseptics and fire retardants.
Wood processing is carried out on outdoors under a canopy at a temperature of at least +5°C. The impregnation is applied in one layer, after which you need to wait for it to dry completely and you can begin applying the protective paint coating.
Conclusion
Now that we know how to assemble a wooden hut, we can make a similar structure with our own hands. You can find out more by watching the video in this article.
There are still questions that require clarification or there are own ideas assembling a hut from wood? In this case, leave your comments on the article.


