Country furniture made of logs. Do-it-yourself table and bench made of logs: how to furnish the area near the house. Tips to help you when making country furniture
To organize a recreation area in the garden, at the dacha, in the courtyard of a cafe, kindergarten You can make furniture with your own hands. garden furniture made of wood looks the most advantageous. Every table, chair, bench, swing, armchair can become a real work of art in the hands of a person striving for beauty. To make such furniture, you do not need special carpentry knowledge or any expensive tools.
Original paths, lush flower beds will always be a source of pride summer cottage plot.
It is enough just to stock up on materials in the form of logs, boards, stumps. Garden furniture made from logs is not only environmentally friendly, but also always evokes a lot of positive emotions in those who see and use it. In addition, it is very practical and not as expensive as, for example, wrought iron furniture.
What materials to use

Bird feeder diagram.
Summer cottages often require owners to make new decisions in organizing a vacation spot. Such a solution could be to use, for example, cut down trees, vines, beams, logs lying around on the farm to make various furniture for your dacha.
The following tools will help you make furniture from logs with your own hands:
- chainsaw;
- jigsaw;
- chisel;
- bit;
- rasp;
- sandpaper;
- a clean brush for applying the resin solution;
- nails (don’t forget to “bite off” the heads of them);
- construction hairdryer

Sculpture diagram for the garden.
In order to make furniture from logs with your own hands, you will need the following materials:
- logs;
- hemp;
- vine;
- boards;
- means for impregnating wood against rotting (antiseptic);
- wood paints;
- figured tree branches of different thicknesses;
- acetone;
- water.
Return to contents
The simplest options for making furniture from logs

Garden furniture diagram.
If you cut down mature tree on the territory of your summer cottage, do not rush to cut a log for firewood. It will make wonderful garden furniture. You might succeed chic table, chairs with backs or stools, armchair, bench, bench. Making country furniture from logs with your own hands is very simple. The simplest option is to make a bench. The log should be enough large diameter so that when cutting it into two parts you can get a seat and a backrest. You can place the bench on stumps, having first dug them into the ground. Another good and often used option is four logs. You need to use a chainsaw to cut out holes in each one. Place two logs on top of each other, and on top - half of the third, intended for the seat. The notch will give stability to the bench, it will not roll down.
You can fasten the backrest to the seat with boards or logs of smaller diameter.
Using the same scheme, you can make a chair with a back for your dacha. Only then should you take a shorter log. On the sides, for convenience, you can round it.

Swing diagram.
If you are using a log from coniferous tree, then you will need additional processing. Other tree species do not need it. In order to have a bench in your dacha that you won’t be afraid to sit on, the log must be rid of tar. Mix acetone with water in a ratio of 4 to 1, apply it to the wood with a clean brush, and wait until it dries completely. Any unabsorbed solution must be washed off and dried with a hairdryer.
To make a table from a log, you will need a stump from a fairly mature tree. The older the tree, the more interesting and noble the table will look. It’s good if this stump is located in the recreation area of your dacha. A tabletop made of sanded boards is nailed to this stump. It can be made in different shapes and sizes (depending on your taste preferences).
Around this table you can make hemp chairs from the remaining material. They are perfect for the garden. To do this, you need to cut the log into equal parts. But the length of one block should be such that it would be comfortable to sit on this chair later. Place the pads around the table, compacting them well into the ground. Make a hole in the center of the table to insert an umbrella, which will save you from the sweltering heat.
Garden furniture made from logs has become so widespread due to the huge variety of options and the ease of its manufacture. Your dacha, for example, will become fabulous if you make a chair from an old tree that you were going to cut down. To do this, you need to cut a hole in the stump with a chainsaw, remove the bark, sand the surface and cover the product with an antiseptic and varnish.
A bench can be made from a log in the following way: a third of the thickness of the log must be cut off, but the edges should not be touched. They will serve as armrests. You can install such a bench on legs in the form of logs. Great option for the dacha.
Garden furniture is more interesting the more unusually you approach its manufacture. Any dacha keeps the secrets of the past. It’s unlikely that there isn’t an old one on the farm wooden chair with decorative back. Found the right one? Take it apart. Attach the backs and legs of the chair to a small diameter log using nails.
You will get a comfortable and functional chair back. A great design move is to wrap a rope around a log. It will look very original. You can also invite guests to your dacha.
One of the most important places personal plot(of course, after the beds) – a recreation area. Special attention is paid to its arrangement, since relaxation in the lap of nature is an indispensable attribute country life.
Evening “get-togethers” with friends under open air at a table in the garden, morning tea in the gazebo, or lunch on a hot afternoon under the shade of a pergola: memories of such moments make you look forward to the next summer season, forgetting about other, less pleasant aspects of country life - digging up beds or weeding.
Fantasies on the topic: how to make a table from logs with the least amount of time, effort and money
The comfort of vacationers largely depends on the furniture standing in the recreation area - it must be stable, comfortable and of good quality in order to withstand both atmospheric phenomena (wind, hail, rain and even snow) and various human factors.
Acquisition quality furniture having such properties is not a cheap pleasure. In addition, factory-made garden furniture deprives the recreation area of individuality and does not always fit organically into the surrounding landscape, and designer furniture not available to everyone.
The most optimal solution in such cases - making garden furniture from logs with your own hands: there are a great many options for making tables, chairs or benches, and making them is quite easy. In addition, the decision on how to make a table from logs is dictated by the location of the recreation area, the number of family members and the degree of hospitality of the owners. The exclusivity of such a table is guaranteed: no matter what principle it is made on, no one will have exactly the same one, because each product is individual.
The simplest way to make a table from logs is to use a suitable stump from a cut tree (if it is located in the intended recreation area). In this case, the stump is not even uprooted - boards are packed onto the cut, or it is attached round shield from a reel of cable products (its end part is ideal for round table). This shield can be used for another option: any log of suitable height (usually 70 - 90 cm) is equipped with crosses (as shown in Fig. 1), a shield is nailed to the upper end, its surface is painted or covered with oilcloth using a construction stapler.

However, such furniture does not fit into every recreation area: natural style Perfect for a garden or forest edge - there it will be organic and appropriate.
Features of self-made garden furniture
For local area or a gazebo is more suitable for a rustic style, and it needs to be given more attention - making furniture in rustic style takes more time and effort, and also requires the use more tools.
When making garden furniture from logs with your own hands, it is very important not to forget about two things:
- Impregnation of wood with special compounds that protect it from atmospheric influences - otherwise the wood will quickly rot or lose its aesthetic value;
- Grinding all surfaces and cutting off corners - otherwise your vacation will be marred by various injuries such as splinters, abrasions, and bruises.
To make a table from logs you will need the following tools and Consumables:
- An electric chain saw (it is desirable that the chain be hooked), an electric drill with a 10-15mm drill, reinforcement bars of the same diameter, a hacksaw for metal, a file;
- Planer, sandpaper (4-point, 2-point and zero for finishing), universal glue (epoxy is best);
- Axe, chisel, hammer, screwdriver, screws and nails suitable sizes;
- Special impregnation for wood (for exterior use) and varnish, brush or roller;
- Stain, wood paint for exterior use – if the product is to be tinted or painted.
Before starting work, you must complete a drawing indicating all the design details, their dimensions and location.
Several options on how to make a table from rounded logs
If there are already wooden buildings on the site (a house, a bathhouse or a gazebo), there are probably scraps of rounded logs with a diameter of 0.2 m left - this is the most common size of logs for log houses.
Table No. 1. Universal base for tabletop correct form.

For the base you will need logs of length:
- 1 meter – 3 pcs. (Fig. 2, tabletop logs and log 8);
- 0.9 meters – 3 pcs. (Fig. 2, logs 1, 2, 7);
- 0.8 meters – 2 pcs. (Fig. 2, logs 3, 4);
- 0.7 meters – 2 pcs. (Fig. 2, logs 5, 6).
And also timber 5x5 or 6x6 cm - 3 meters (Fig. 2, screed).

Making the base of the table.
To make a table from a rounded log, you need to master some techniques for joining logs. In this case, a “cup” connection. Figure 3 shows the principle of this design.
1 step. Manufacturing of elements. If the log cuttings already have “cup” notches, then it is necessary that they are located exactly in the middle of the segments - this ensures the stability of the structure. If not, you will have to cut them out yourself: first make cuts, then finally shape the bowl with an ax, achieving a semicircular shape (see photo 1).
The dimensions of the bowl should correspond to the dimensions of the log: the length is equal to the diameter, the depth is half of it.

Logs 1 to 7 are stacked as shown in Figure 3, in the order shown in Figure. 1 (top diagram). Moreover, under the ends of log 2, small pieces of log halves are placed - legs, which give stability to the entire structure.
On the logs, places for dowels are additionally marked (additional fastening from reinforcing bars, Fig. 1 - marked with dashes). It is convenient to mark the holes as follows: on the bottom log, in the place of the intended hole, drip a little nail polish with a brush - the varnish will stain the bottom of the log of the next row when applied. The holes must be made strictly in a vertical direction, the depth of the hole is 8-10 cm. Marks are also made on the legs.
It is better to assemble the table structure immediately on site, since the structure is quite heavy to carry:
First, log 1 is laid, a little glue is poured into the holes, and pieces of reinforcing rod are inserted (the length of each of them is from 16 to 20 cm, depending on the depth of the holes). Log 2 is placed on top of the bowl. The procedure with rods is repeated. Next, log 3 is tried on, which is strung on the dowels of the 1st log: if the rods prevent a tight connection of the logs, then they are shortened using a hacksaw, if not, the rods are smeared with glue and the log takes its place. The structure of the entire frame is formed in a similar way.
Manufacturing and installation of countertops.
Meter-long logs are sawn lengthwise, back side 5 of the 6 resulting “half-logs” are cut to a thickness of about 5 cm. The sixth is sawn to a length of 90 cm and placed on the 7th log, cut up (also secured with reinforcement).
If possible, it is better to entrust the sawing to specialists - you need the log to be divided into two absolutely equal halves (see photo).

Before laying the tabletop parts, it is necessary to make a screed from a block. The location is shown in Fig. 2 ( bottom diagram, dotted line), inset diagram is in Fig. 4. The end parts of the logs are sawn, as shown by shading in Fig. 1.
Parts of the tabletop are laid on the crosspiece of the frame, as shown in Fig. 2, fastened and filed in a circle.
If you need a square table, the parts of the tabletop are mounted on a crosspiece, as shown in Fig. 5.
Table - bench made of logs

Illustration 1
Knowing the methods of connecting logs, from the illustrations you can understand how to make a table or bench from logs - in the second case, bowls are made only in the 1st and 2nd logs, all the rest are fastened with reinforcement (tongue and tongue connection).
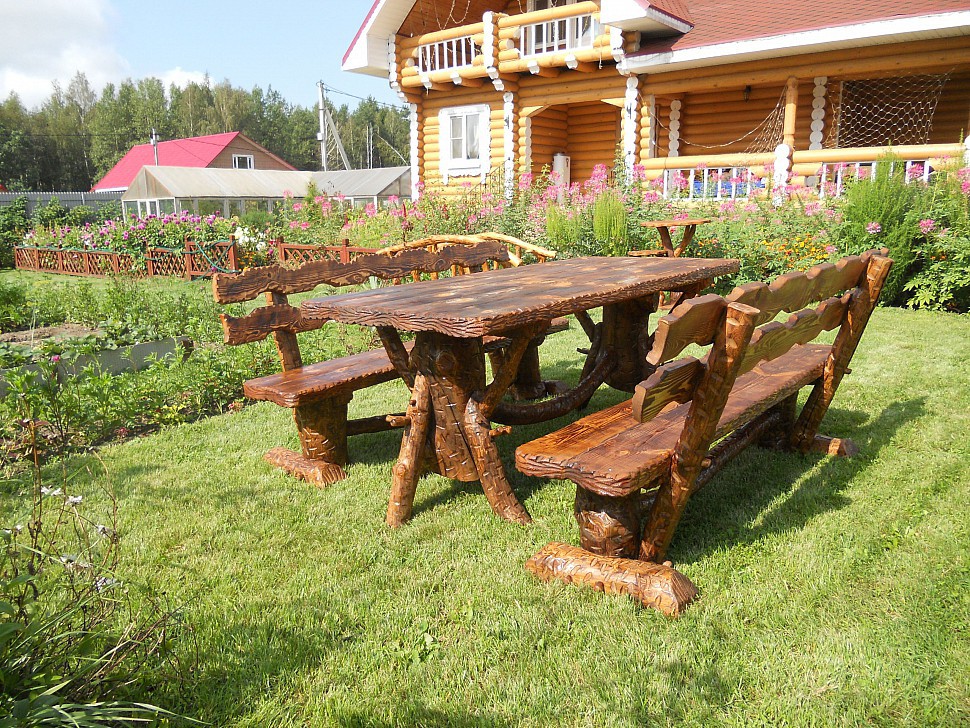
If you decide to make your gazebo more comfortable and sophisticated at the same time, a log table will be an excellent embodiment of your idea. Another place where such garden furniture would look great is a bathhouse. Below we will talk about how to make a table from logs with your own hands.
To better understand what exactly the table material looks like, you need to remember the real Russian wooden house. The same logs as at home are used to make tables and benches for the garden. A table made of such material will be very practical and will also decorate any log house or summer cottage. The use of such furniture in a bathhouse will provide it with even greater convenience, comfort and improve its design.
A log table can be placed both outside, directly in the garden, and inside the house, making the interior more original and sophisticated.
If you decide to install such furniture inside a building, it is best to assemble it there, since due to its considerable weight, it will be quite difficult to bring it in from the street. DIY log table photo and drawing.
Before you start making a table from logs with your own hands, you need to develop a sketch of it. You need to think about what size table you would like and how you see it. It is best to make a three-dimensional drawing, it will especially help you if you have decided to grind logs for your furniture. If you are not able to make a three-dimensional drawing, it is quite possible to get by with a simple one, but you should remember that in this case you will need to draw a view of the table from the front, top and side.

Before you begin assembling the table, you need to properly prepare the material, namely the logs. In order to get rid of small irregularities and sawdust, you should plan the logs using a plane, after which you need to treat them with sandpaper. In order to sand it, you should first use coarse-grained sandpaper, and only then use fine-grained sandpaper.
The logs must be prepared according to the dimensions indicated on your drawing.
Because the longitudinal grooves made in logs using special tools, which are not accessible to everyone at home, it is better to use a plane at the joints of the logs to create a flat surface at least 4 cm wide.
Logs need to be cut at a certain angle, namely 45 degrees, and they will be shorter in size in relation to the log located in the center. Next, use a file to remove the corners. If you leave them, you cannot avoid hitting your knees on them while using furniture.
To ensure the stability of the log, it is necessary to drill holes through it in order to pass the reinforcement through them. The log located at the very bottom does not need to be drilled all the way through; you should make a hole only up to its middle. In order to connect the logs, you can use any reinforcing bars, including those that you still have after some construction work.
The holes should be made strictly at an angle of 90 degrees with an interval of 30 cm, and while placing logs on top of each other, all drilled holes must match.

After you've finished everything preparatory work and pre-processing of the material, you should proceed to the next step, namely assembling the table.
You should check all prepared parts according to the drawing, and then assemble the elements according to your sketch.
To begin with, you should place the first and lowest log in the right place, into which you need to insert the reinforcement and place the logs on top of each other. All assembly work must be carried out strictly according to the drawing, so that there are no deviations that could subsequently affect the quality assembled table.
Once all the logs are in place, the rebar should be sticking out of the log. It is necessary to make a mark on it closer to the hole of the last log. Next, the reinforcement must be removed and cut at a distance of 5 mm below the marked location. After this, the entire workpiece must be disassembled.
As a result of such actions, the reinforcement that is located inside the logs will be glued to them, which will provide additional rigidity and stability of the structure. The top hole should be completely filled with glue so that there is no free space there.
Fastening the table cover
A quick solution for a table top would be chipboard sheet that need to be cut required sizes and place it on glue, fasten it with screws, or nail it. But this method is only suitable if you do not plan to place heavy objects on the table that could damage the sheet, and also if its dimensions are no more than a meter in length and width. When large sizes The chipboard sheet will need to be further strengthened to prevent it from sagging. The support can be made from beams, and they do not require processing. Thanks to this strengthening, not only the lid, but also the logs will have greater rigidity. You determine the number of bars yourself, depending on the size of your table. You can secure the beams to the table frame using self-tapping screws or nails.
However, such a table cover will not provide you with the integrity of the design, since it will stand out against the general background of the logs. Hence, top part from the beams will give a completely different, more aesthetic appearance to the entire product.
The bars must be the same in length, and their thickness must be at least 2 cm. Such material for the top of the table will serve not only as a cover that can withstand any weight, but also as an additional support for the entire structure.
The beams should be attached to the logs in such a way that they do not form cracks, but form a single sheet. Next, you can proceed to processing the table surface.
First you need to clean it with a plane, and then you need to use sandpaper to get a smooth finish on the table top.
Having secured all the beams, it is necessary to clean their edges with a file to remove all sharp corners, give the product best view and provide more practicality.

If you have a tool such as a drill, and you have at your disposal special nozzle for grinding, you should definitely use it. But in case of its absence, you will have to achieve a smooth table using sandpaper.
After you achieve the desired result, all you have to do is coat your product with varnish. First you need to clean the table from debris and dust, and then degrease it. You can use absolutely any varnish intended for a material such as wood. You can use a brush for application or a roller, but it will be most convenient to use a spray can, which will ensure even coverage of the product. After you have covered the table with several layers of varnish, you need to let it dry.
Tree natural material, which fits naturally into . Garden furniture made of logs - inexpensive option for landscaping the site.
 It is necessary to try to preserve the original shape of trees and knots, to emphasize the elegance of the structure of the material
 To make, you need skills in working with power tools, desire and imagination. The material can be found everywhere, it can be an old tree on the site, or in a forest area near the house.
A good addition to a massive log will be unusual shape driftwood, you can look for them on the shores of reservoirs. They will enliven the furniture composition and add a touch of originality.
The advantages of wooden furniture include:
- It can be made from available materials, low cost.
- The aesthetic appeal of wood, the originality of garden sets.
- Durability log furniture, given that correct processing wood.
- Fits naturally into the natural landscape.
Depending on the source material and its size, the results are different variants garden furniture.
DIY garden furniture made from logs
Wood is a unique natural material. After special processing it appears beautiful texture.
Sets of log tables and benches: 15 photos
They use not only logs and driftwood, but also saw cuts. Tabletops and bench seats are made from dies. They are filled with transparent epoxy resin. Such items are exclusive and durable.
There are three rules for processing logs:
- The bark, especially from old trees, is removed using a metal scraper or spatula. Under the layer of bark there are nests of insects and pests. Once the bark is scraped off, the beautiful texture of the material is revealed.
- from penetration of moisture and pests. Impregnations, stains, and varnishes serve as additional protection and help the texture of the material to appear and emphasize the natural pattern.
- Furniture surfaces that come into contact with the body must be sanded to avoid splinters.
Read also
Arrangement of the yard of a private house
You need to be creative when making furniture. Nature itself is a good master.
Log furniture options:
- deliberately rough sets;
- combined: log with snags or saw cuts;
- furniture made from processed, sawn tree trunks.
A separate set is unique, since each tree in nature is unique, different in texture, shape, size.
Making a bench
They are installed in the most picturesque corners of the garden. The simplest option for a bench for a summer cottage is to cut a solid trunk in half with a saw and install it on a base of stumps.
Bench options: 9 photos
Assembly instructions
For a strong connection between the seat and the supports, tongue-and-groove joints are cut into them. Additionally, you can mount a backrest from the second part of the log, securing it to thinner logs.
Looks interesting combined option. The seat is made from a cut trunk, and the back is made from treated driftwood. Installed on stumps with remains of horse taps. The bark is first removed from the wood and sanded. Treat with anti-moisture agents and allow to dry. Then they are opened with stain and moisture-resistant varnish.
The result is an expressive product that will decorate any landscape. Such objects look almost like a natural element.
Ready-made drawings of benches


Every owner of a private house of an urban or country type, a summer cottage or a personal plot, sooner or later is faced with the need to improve his territory. And we are not talking about creating beds and flower beds, planting trees and shrubs, but arranging comfortable, but at the same time practical areas for relaxation, preparation and consumption of food on fresh air. Imagine landscaped area It’s difficult without garden furniture, but not everyone can afford to buy one, and it’s much more pleasant to sit on a bench you made yourself or dine in the fresh air at a table that didn’t cost you a penny to make. In this publication, we have collected many options for garden furniture that you can make with your own hands. Possessing only available materials, a small set of tools and a great desire to make your site landscaped, comfortable and aesthetically pleasing.

In order for garden furniture to appear on your site, capable of becoming not only a reliable piece of exterior furniture, but also a reason for the pride of the owners and the envy of neighbors and guests, not much is needed - waste material, perseverance, a little imagination, work and effort. In this article you will find examples of making garden furniture from wood, construction pallets, and used household items.


Choosing material for making country furniture
In order for hand-made furniture to fit organically into the existing image of a summer cottage or private yard, it is necessary to take a responsible approach not only to the manufacturing process itself, but also to the choice of material. The most versatile and at the same time very malleable material from the point of view of processing is natural wood. The advantage of wood is that it can fit perfectly into any stylistic direction in landscape design. And this can be achieved through a variety of design options - from massive furniture made from logs to light and elegant products woven from wicker or twigs.


The advantage of wood for creating furniture with your own hands is that it has many manifestations. You can create a piece of furniture with minimal processing of the material in the shortest possible time. For example, ordinary hemp can be turned into stools or small stand tables. You just need to make sure that the surface of the new pieces of garden furniture is perfectly hewn and becomes safe for use.

You can create garden furniture from branches and twigs...

Or logs and large timber...


Benches and benches are an integral attribute of country life
Even a very small backyard needs outdoor furniture to sit on to enjoy the fresh air, watch the sunset or watch the sunrise. Well, at the site big family or in the courtyard of hospitable hosts, where companies gather, it is absolutely necessary to take into account the possibility of seating several people.


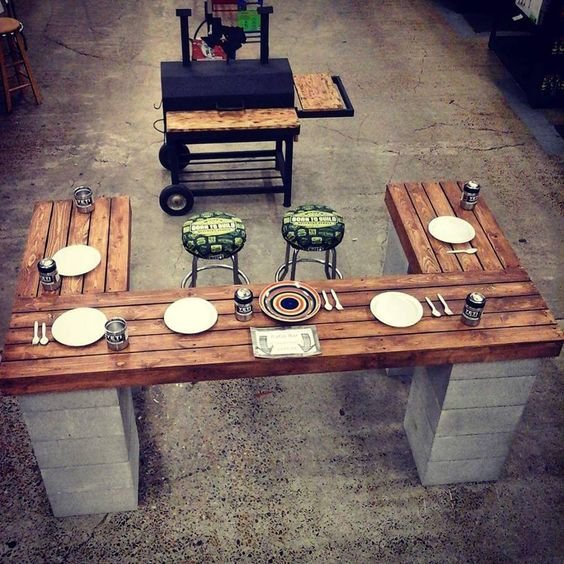
One of the most simple ways creating benches and benches - use wooden beam and cinder block with square holes. A bench or bench can be assembled like a construction set; you don’t even need to use any tools or fastening mortar or construction adhesive. Advantage similar designs not only in ease of installation, but also in portability - you can easily disassemble your piece of garden furniture and move it to another place or put its parts in the shed until the new warm season.


If you put it on a bench made of cinder block and timber soft seats And sofa cushions, then ordinary solid garden bench turns into a comfortable, comfortable sofa.


By combining materials for garden furniture, you can increase strength and improve appearance products. For example, together with wood in one modification or another, you can use metal constructions, for example, parts of beds (backs, legs).

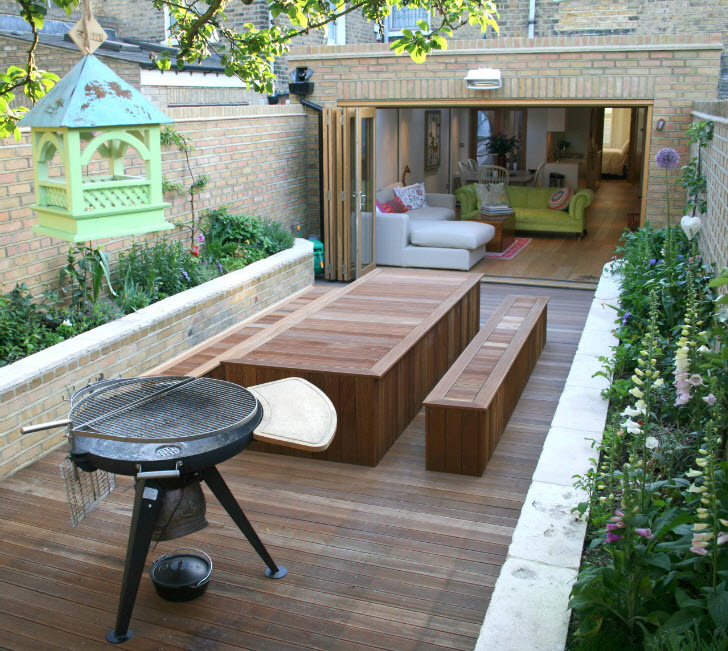
Outdoor dining area
Any dish tastes better in the fresh air. Every owner of even a tiny backyard tries to create an environment in which they can have meals outdoors. outdoors, even if we are talking about short breakfasts. Depending on the needs and size of your family, you can arrange either a small area for short meals or a spacious dining table for entertaining guests outdoors. It is noteworthy that both options can be implemented on your own.


One of the simplest, yet practical ways to organize lunch group in the fresh air - making a table, together with benches. The model shown in the photo will require a minimal amount of material, but will be quite spacious. The only drawback of such a dining group is that if you need to increase the number of people sitting at the table, you can only do this with 2 seats (you will need chairs or stools).

Equip dining area or a segment for short meals (breakfasts and afternoon snacks) can be like a bar counter. This is easy to do using building blocks and wooden beams or boards. The only thing that needs to be selected for such a tabletop is bar stools with the appropriate height.
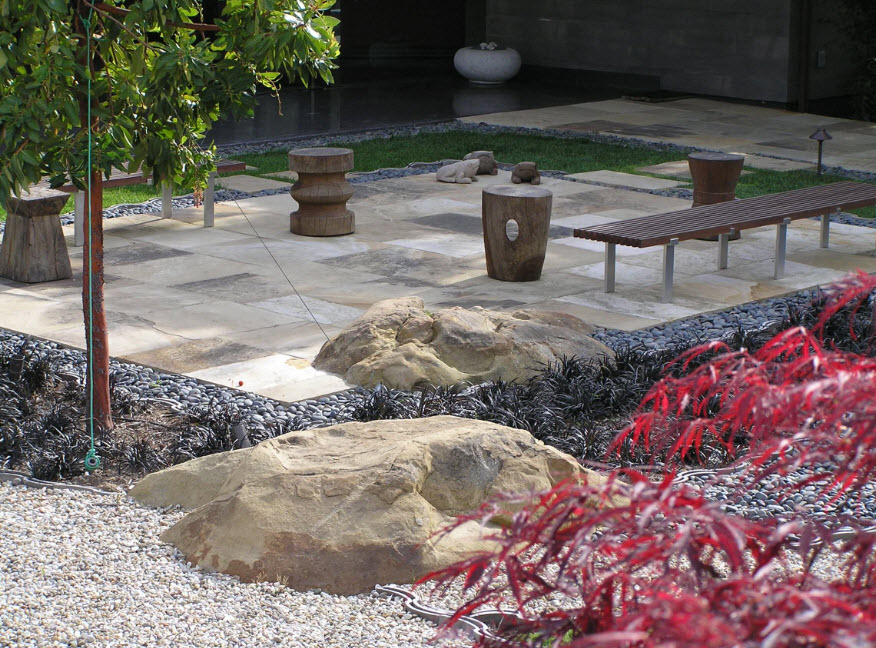
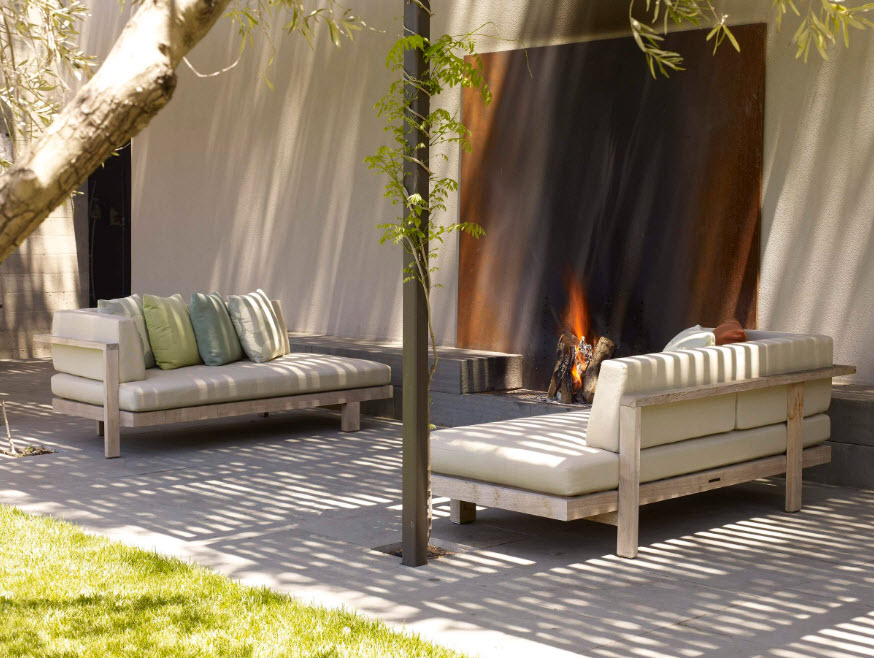
Relaxation area in a summer cottage or garden plot
Everyone associates the outdoors with different things. For some it’s gatherings with friends and neighbors, for others it’s reading on a slightly swaying swing, for others it’s just sun loungers. air baths necessary. For all options for active and not so active recreation, you can make furniture with your own hands, and even from improvised means at minimal cost.


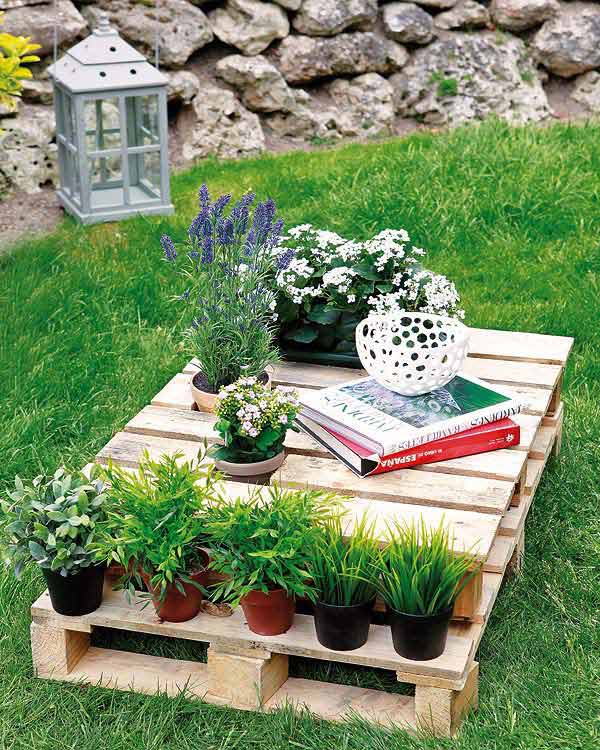
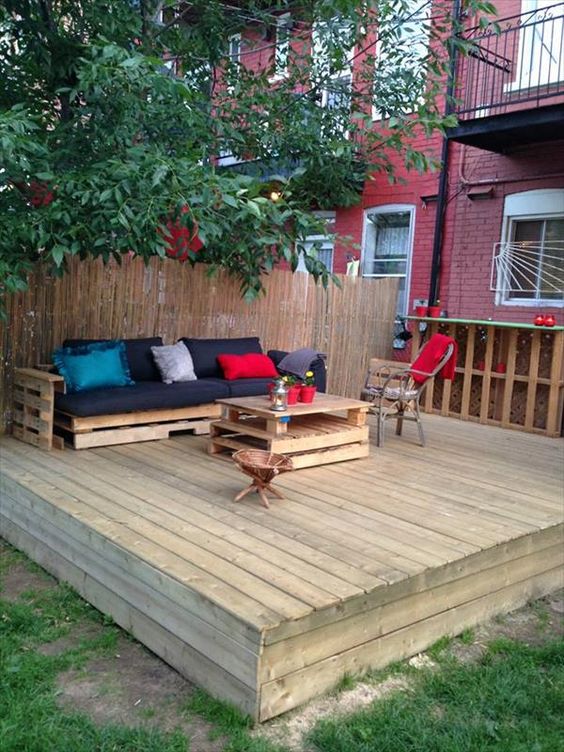
One of the most common ways to create garden furniture for a recreation area is to use construction pallets or pallets. The advantage of such an assembly is its simplicity - wooden blocks have already been formed in terms of future armchairs and sofas. Well, build coffee table even the owner of a dacha or any other land plot who had never held a hammer in his hands before. You can even use construction glue to hold the elements together.


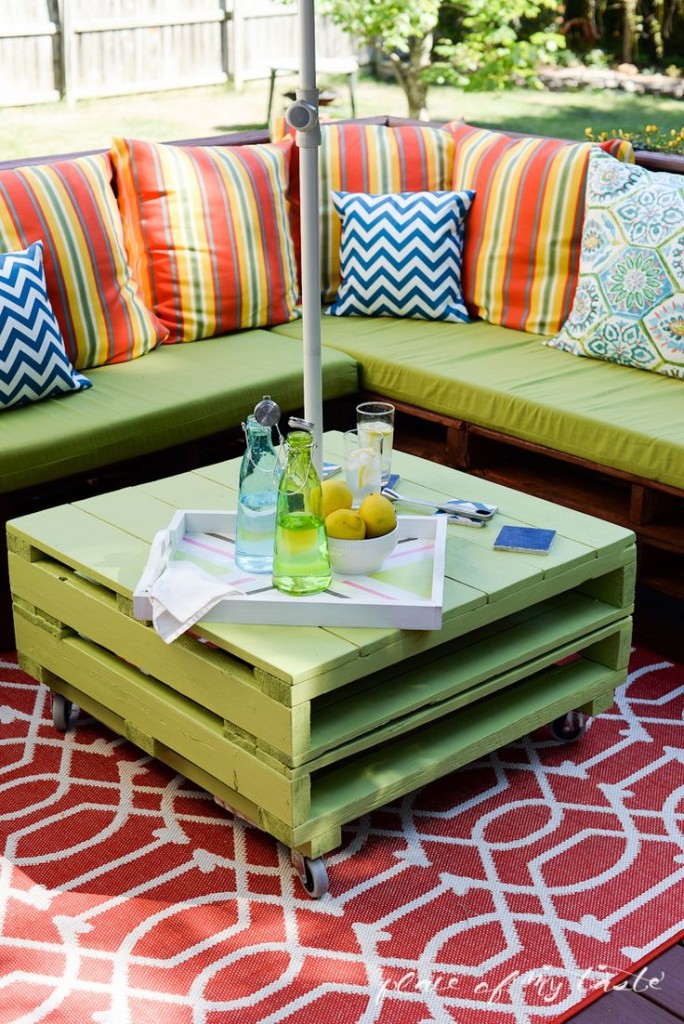
Another advantage of using construction flights for the manufacture of garden furniture is that you can get the material at a very low price or completely free, because we are talking about used products. You just need to take care of thoroughly cleaning the surfaces, leveling and lightly polishing, and impregnating the material with antiseptics against rotting.


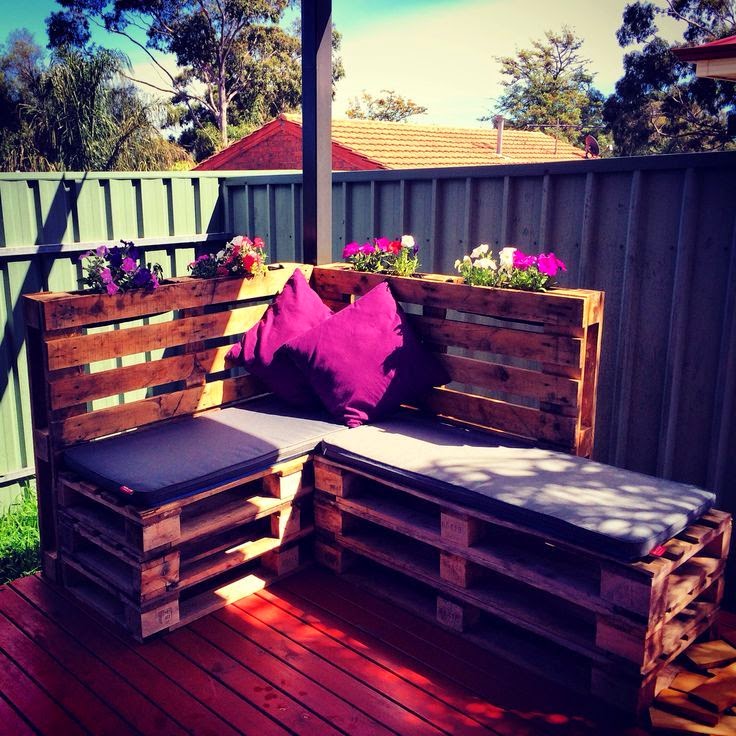
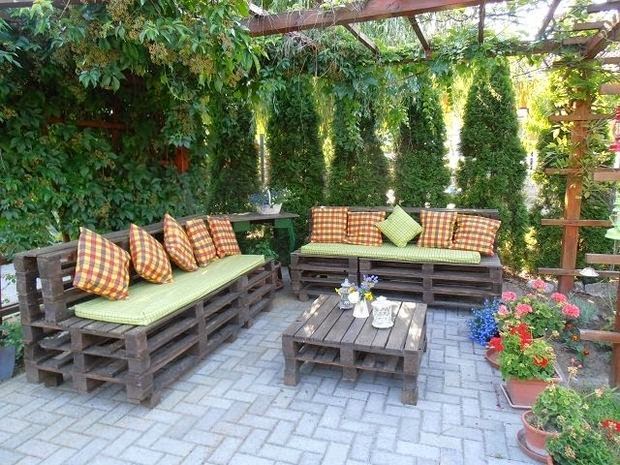
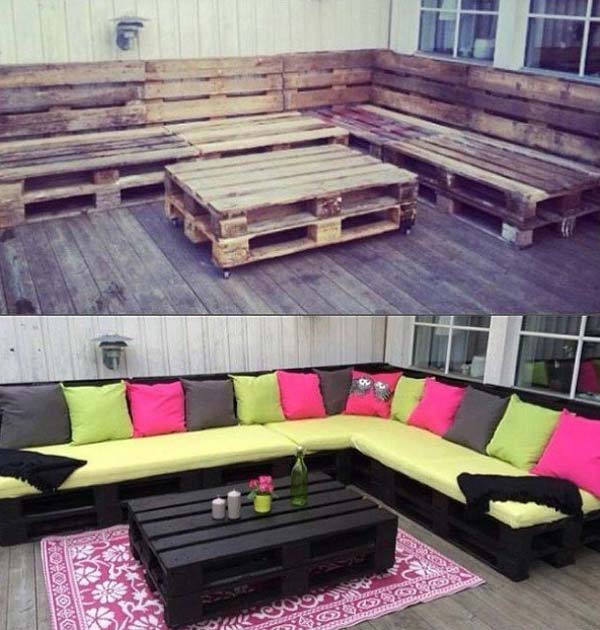
From construction pallets you can create entire compositions for outdoor recreation areas. This can be a spacious corner complex, designed like a sofa, comfortable chairs And coffee table. Enough to put soft pillows and seats into armchairs and sofas to create a living room setting right in your summer cottage or garden plot...

With help wooden pallets you can arrange an area not only for relaxation, but also for sleep. A summer bed or just a layer of construction pallets with a mattress is an excellent opportunity to create a bedroom in the fresh air - just take care of a canopy over the sleeping area to protect from the sun.


It’s easy to build a comfortable swing from old pallets. You can tie them on ropes or chains to the roof of a canopy or gazebo, on a terrace, or simply under a tall, spreading tree with thick branches.


Slightly less popular, but still practical way arrangement of a summer cottage with garden furniture - the use of construction wooden reels. Chairs can be made from them...


