Making a jig for drilling holes. The nuances of making a high-quality furniture jig, we make our own jigs for drilling furniture
In the process of assembling or repairing furniture, it is often necessary to carry out work on precision drilling holes for confirmation, for dowels, dowels and other furniture fasteners. In the case of wood and chipboard, it is difficult to make such holes using an electric drill alone: the entrance part of the hole is broken, and the hole itself may not be at a right angle to the mating surfaces. Thus, you will need a jig to drill the holes.
Purpose and classification of furniture conductors
The purpose of the jig for drilling holes is to accurately guide the drill to the required point and ensure the straightness of the tool throughout the entire depth of the resulting hole.
In metalworking, such devices have been known for a long time, and are often supplied with the machine. Due to the increased number of closed joints in modern furniture products, the need for such conductors for woodworking specialists is very relevant.
- There are the following types of furniture conductors:
- Overlays that do not require fixation before use. They are simple, mobile, but force you to use only one hand when drilling (if the drill or grinder is not installed in a special frame). Making such a conductor with your own hands is easy and simple. They are used mainly when making holes in MDF or chipboards.
- Rotary, which are equipped with folding brackets, and allow you to drill on two adjacent planes in one go.
- Jigs for drilling holes at an angle. A highly specialized version of the jig, which is designed to make holes at various angles. Often combined with the overhead version of the equipment in question.

If the jig is sufficiently rigid, it can also be used for drilling holes in products that do not have a flat plane, for example, in pipes.
Then the conductor is secured using a clamp (this option is not suitable for furniture, due to the risk of surface deformation).
DIY jig for drilling holes
- Fundamentally, such equipment consists of the following parts:
- An angular body element applied to the surfaces of products, which will subsequently be connected to each other with dowels, dowels or confirmations.
- Guide bushings where the drill fits.
Clamping/fixing devices that are located at the end parts of the conductor. For a conductor that is supposed to be made by hand, it is important to design a device for the most common requirements. home handyman mounting options. If you want to universal conductor (for furniture makers), it’s better to splurge on industrial version equipment, which is characterized by increased accuracy of fixation of parts, and has a higher quality performance. Moreover, manufacturers often offer templates, stops, and other kits for the jig. useful little things . Price furniture conductor industrial production ranges from 500 to 1200 rubles, which is determined by its

functionality
– length and number of guide holes. Let's start designing a furniture jig for drilling holes by choosing a corner. There are more possibilities for a product where the corner will be unequal, and with the maximum possible thickness of the shelf. According to the assortment GOST 8510 “Unequal-flanged steel angles,” the minimum permissible dimensions of an angle L63 × 40 × 8: with a shelf thickness of 8 mm, a guide bushing with an outer diameter of up to 6 mm can be placed there. The internal hole for the drill, therefore, can be no more than 3.5...4 mm, but this is quite enough for most options for the resulting holes. As a last resort, they can be drilled out without using the device, especially if the hole is deep enough. The next stage is the design of the guide bushing. It can be selected from any stainless pipe for a drill with a diameter of up to 3.6...3.7 mm, and a 6×1.5 pipe - for a drill up to 2.7 mm (a two-sided gap is taken taking into account the thermal expansion of the material). The length of the sleeve must be no less than twice the height of the hole made in the corner. Each bushing must fit into the hole with an interference fit or transitional fit. The most appropriate is landing using the shaft system, when the already known outside diameter bushings, and a hole is drilled for it in the corner. It is better to use a slight interference fit, for example h9/P10.

It happens that the jig needs to be designed for drilling a deep hole. In such cases, the bushing must be stepped (with a shoulder). Bushings for machine tools in accordance with GOST 12214 have the required accuracy and dimensions, the internal hole in which has a constant diameter over the entire height of the bushing.
The number of holes, and especially the distance between them, is selected according to the specific needs of the user.
When choosing a conductor mounting method, choose one of the following options:
- A spring stop that will press the surface of the jig to the part due to the elastic forces of the material. Any flat spring with the required clamping force will be suitable as such a stop;
- Fixation using self-tapping screws, which are screwed into the material of the part and keep the jig from being displaced by friction forces. This option is convenient in that the resulting outlines can then be used as additional elements centering the future hole. In the case of chipboard, this option should be used with caution;
- External clamps, under which you should place corrugated rubber gaskets. In this case, the weight of the conductor will increase, and the compliance of the rubber may disrupt the perpendicularity of the axis of the conductor bushings. Therefore, using this fastening method, first insert a drill into the sleeve, mark a hole, and only after that use clamps.
Jig for drilling for dowels and confirmations
The sequence and design of the simplest devices for accurately producing holes is discussed using the following two examples:
- Multi-position jig with clamp fastening (see Fig. 1). The initial body part here is a thick-walled aluminum corner. Due to the considerable length of the device, it is provided intermediate mount in the middle. When turning the jig at an angle of 90º, the increased wall thickness of the angle, which is superimposed on the surface of the part, is successfully used. The distance between the guide bushings is selected according to the most common distances for dowels or for confirmation.

Figure 1 — Multi-position jig for drilling holes with clamp fastening
- A two-slider furniture jig, with which you can make holes in two mutually mating parts. The design of the device is clear from the attached drawing (see Fig. 2). It consists of two guide rulers, which are connected by fasteners to a connecting strip. The presence of several holes on it allows you to install the bar on parts of different widths. Replaceable housings with a set of guide bushings with different distances between them move along the rulers. The conductor is fixed using a connecting strip, and with opposite side– a stroke limiter, which is tightened by a wing screw.

Figure 2 – Multi-slider furniture jig: 1 – Guide ruler; 2 – Adjusting screw; 3 – Housing; 4 – Stop bar; 5- Travel limiter.
A jig for drilling holes is a device used in mechanical engineering to simplify the process of processing a part. In essence, it is a template that serves to guide or position the workpiece. Can be used on various equipment, for example, such as a diamond drilling installation.
In mechanical engineering, jigs are fairly precise devices (up to 0.05 mm (depending on the requirements for the part being manufactured)). They come in two main types: overhead (in the form of slabs) and box-shaped, which are three-dimensional structures. There are also jigs for drilling mixed type. These devices are used to reduce labor intensity: from technological process When processing the part, the marking operation is eliminated, in addition, it becomes possible to drill several holes at the same time.
The drilling jig is used only in serial and mass production. This is explained by the fact that for a small batch of parts it is not practical to manufacture a separate device, which, moreover, will have to be installed and configured separately.
A drilling jig is usually used to process several holes lying in the same plane. It is best if the parts are unified by standard size, this will allow the device to be used for a wide range of products.

The drilling jig is also used in light industry and construction. Such devices are only of the overhead type and are made of lighter materials, such as wood or plexiglass. These products are not designed for great accuracy; the positioning error is only ±0.5 mm. But this is more than enough to make holes for fittings in furniture or drill a series of holes in the wall of the house. The equipment used is a regular drill or drilling machine desktop type.

You can make your own conductor for household needs. It will be needed during repairs, when you need to make a lot of the same type of holes and there is no desire to waste time on preliminary marking. To make it, you can use any available materials: mark and drill everything on a sheet of metal or wooden board required holes which will serve as guides. If necessary, an additional plumb line is made so that shavings or concrete chips do not fall on the floor. You can make a dust-free jig when the template is covered with a specially fitted half of a plastic bottle.
The main advantages of these devices are the high accuracy of hole positioning without preliminary marking, high performance labor and reducing perpendicularity deviation (due to guide bushings). However, using a jig for drilling is not always economically justified, especially with small batches of parts in production.
A furniture jig for drilling holes, a drawing of a kind of template that allows you to accurately install assembly elements and greatly simplifies and speeds up the process.
Using this device you can make holes for:
Dowels
futorka
pinch bolt
mounting holes for mounting plate furniture hinge
mounting holes for furniture hinge cup
center for furniture hinge flange
center of the eccentric coupler
The design consists of two parts:
Marking unit
retainer
MARKING UNIT
It is an “L” shaped plate made of thick sheet corrosion-resistant steel, in which through holes with a diameter of 8 and 3 (mm) are drilled horizontally and vertically. To ensure that the processing tool fits better into the holes, chamfers measuring 0.25x45˚ are made on its edges. The plate is hardened and ground.
Drawing
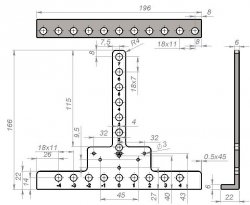
RETAINER

Made from a steel circle, which allows you to install a furniture jig for drilling holes at the required distance from the edge of the chipboard being processed. The movement step is ten millimeters.
Drawing

Let's say we want to install a furniture hinge:
1.
We lay the template on the facade.
2.
3.
We drill a hole with a diameter of three millimeters to the required depth for the fastening screws of the cup.
4.
We drill a hole with a diameter of three millimeters to the required depth for further processing. The prepared hole will be the guiding center for milling a hole for the flange of a furniture hinge with a diameter of thirty-five millimeters.
5.
Place the template on the body.
6.
We drill a hole with a diameter of three millimeters to the required depth for the mounting screws of the strike plate.
Let's say we want to install an eccentric coupler:
1.
Place the template on horizontal surface chipboard parts.
2.
Install the clamp into the hole.
3.
We drill a hole with a diameter of three millimeters to the required depth for further processing. The prepared hole will be the guiding center for milling a hole for the eccentric of a furniture tie with a diameter of fifteen five millimeters.
4.
From the end of the chipboard, along one center line, we drill a through hole with a diameter of eight millimeters to the required depth
In the picture shown

IN different colors shows the center on the furniture jig for various technological operations.
If you make furniture with your own hands, then you know that all products must be butt-joined. In this regard, there is a need to drill many holes. For this, all masters use special tool. It's about about the jig for drilling holes.
What it is?
The jig is a plate on which holes and sleeves are located. Even a beginner can use such equipment. It only takes a few steps:
- the equipment is fixed in the right place;
- a drill is inserted into the sleeve;
- a hole is carefully made.
To fasten two parts you only need one jig.

Advantages
This device is used not only in the manufacture of furniture and construction, but also in mechanical engineering. It can be used to drill holes on any surface. There are several other advantages:
- highest accuracy;
- ease of use.
Variety
All models, regardless of their application, are to one degree or another divided into several main groups. Let's look at them in more detail:
- Invoices. They received this name due to their special use. Equipment is applied to the selected workpiece. Fixed or left without clamping. Ideal for use in materials such as chipboard.
- Rotary. If you need to make a passage on a cylindrical surface, then you should definitely use this type of equipment. This type has several rotation axes: vertical, horizontal, inclined. For the latter, the housing has a guide sleeve.
- Tiltable. If you need to drill simultaneously on several planes, then you should use this type of jigs.
- Sliding. The last group is not in demand, as it is considered the most inconvenient. Before drilling, it is necessary to bring the device into working position. This type cannot be fixed to the surface.
Application
Drilling jigs are used in many fields of activity. Most often in construction. But besides this, there are several other important industries.
Furniture
During assembly, many craftsmen are faced with a problem such as a lack of holes. In this case, you have to make new ones yourself. To do this easily, it is recommended to use a conductor. With its help, all work will be done quickly, efficiently and accurately. Craftsmen who do not have a special machine should also resort to the help of such a device.
Modern assembly is different wide choice furniture fittings and various fasteners. All this requires precise installation without displacement. This is where the conductor will help.

Pipes
Make holes correct form on cylindrical surfaces It's hard enough. Using a drill in this case is useless. It will constantly slide off, which means they will all turn out to be of irregular shape. For this, it is recommended to use a conductor.
Additionally, you can use devices that help make perpendicular holes. It will also help to process rounded elements and edges.

Purchased or homemade: which is better?
When assembling furniture, the use of such a device is mandatory. Some people prefer to buy ready-made option in the store, and many make them themselves.
As for sale, they can be found in almost every hardware store. However, it may turn out that the purchased equipment may not suit your needs.
The cost of products is influenced by the following factors:
- method of use;
- size range;
- manufacturer.
Simple equipment has a low cost, but products with additional functions will cost more.
Having a little idea about the conductor and some tools, you can make it yourself.

Self-production
To work you need to prepare following materials and tools:
- metal sheet or wooden plank;
- welding machine;
- angle grinder;
- drill;
- screwdrivers;
- wire cutters;
- sandpaper;
- pliers;
- reinforcement measuring 10*10 mm.
- Make a blank. It must be cleaned with sandpaper. Mark future holes. There is a standard for this that says the distance between centers should be 32mm.
- We carry out drilling.
- The next step is to make a support from a metal plate. Its thickness should be 1 mm. It needs to be bent and the place for the thread marked.
- Connect the two parts together.

Technical side
It is worth familiarizing yourself with several drilling techniques in detail.
Under confirmation
At self-production Confirmats are often used in furniture. For such drilling use special drills with a size of 4.5 mm. It is easily recognized by its additional head.

Face drill
This is the most difficult technique. The drill should be perpendicular to the end. In this case, the drill must be held firmly and level. It is very convenient to use special equipment.

Drilling in two parts at the same time
This is the most accurate and quick way. For this method, it is necessary to prepare special clamps (clamps). The fixation must be of high quality so that the parts do not wobble.

Drilling for dowels
To do this, use a drill approximately 8 mm in size. To prevent through holes on the part, it is necessary to install a special depth limiter. It is recommended to use the same drill for the end, and the depth should not exceed 20 mm.

Video
From the video you will learn how to properly use a jig for drilling holes in chipboard.
February 6, 2017
When furniture is created, almost all parts have to be joined end-to-end. This is done using dowels in which holes are made. This is where a special part is needed. You can buy it or make a furniture jig with your own hands.
What is a furniture conductor?
A jig is a strip that has several holes and sleeves. It is applied to the required part, insert the drill into the sleeve and make a hole. To secure two parts you will need the help of one conductor, and the parts are fixed as securely as possible.
- precision drilling;
- simple and fast hole creation.
At the same time, conductors are used not only during construction, but also in mechanical engineering. This device also allows you to drill cylindrical workpieces and pipes.
Different types of conductors
Depending on the industry, conductors are divided as follows:
- Invoices. They got their name because of their area of application. This device is applied to the workpiece and fixed, with the help of which holes are made.
- Rotary. They are used to drill cylindrical holes. In this case, the rotary axes can be located horizontally, vertically, or at an angle. The body here is equipped with rotary bushings.
- Tiltable. They are used when holes are created in several planes.
- Sliding. Used to make each individual hole. In this case, this model is not fixed to the surface, which means it is not the most convenient.
DIY furniture conductor
As we already wrote above, this product is needed when assembling furniture. Some people prefer to buy it, while others prefer to make a furniture jig for drilling holes with their own hands. Such products are sold in any construction stores; here it is important to select finished products for a specific purpose. The cost of a furniture jig will depend on its size, purpose and manufacturer.

The simplest option is inexpensive, but professional equipment with various additional functions costs quite a lot. Therefore, today they are increasingly making furniture jigs and templates with their own hands.
They are made using a metal sheet or wooden board. Holes are made in them that will serve as guides. This work is not difficult, anyone can cope with it.
How to create a conductor
So, it’s not difficult to create a furniture jig with your own hands. To get started you will need:
- welding machine;
- Bulgarian;
- drill and some plumbing tools;
- You also need to prepare 10 x 10 mm reinforcement in advance.
First, the workpiece is cleaned with sandpaper and markings are made. The distance from center to center is approximately 32mm. Next, each template hole is drilled. After this, a stop is created - for this you can take a metal plate 1 mm thick. It needs to be bent and a place for carving is prepared. The last step is connecting these parts.

The product must be made as accurately and carefully as possible, otherwise it will be of no use, and in an unfavorable situation it can even damage the furniture. You can learn more about how to make a conductor by watching various video tutorials. The easiest way to make it is using a furniture template, which can also be obtained from specialists.
To ensure that drilling does not cause complications, a conductor is needed. This device will really be needed when assembling furniture. Of course, today you can buy everything, but it is better to make a furniture jig with your own hands, because then such equipment will definitely be suitable for each specific purpose.

20 photos of cats taken in right moment Cats are amazing creatures, and perhaps everyone knows this. They are also incredibly photogenic and always know how to find themselves in right time in rules

9 Famous Women Who Have Fallen in Love with Women Showing interest in people other than the opposite sex is not unusual. You are unlikely to be able to surprise or shock anyone if you admit it.

11 Weird Signs That You're Good in Bed Do you also want to believe that you please your romantic partner in bed? At least you don't want to blush and apologize.

Never do this in church! If you are not sure whether you are behaving correctly in church or not, then you are probably not acting as you should. Here's a list of terrible ones.

15 Cancer Symptoms Women Most Often Ignore Many signs of cancer are similar to symptoms of other diseases or conditions, which is why they are often ignored. Pay attention to your body. If you notice.

Surprise: Husbands Want Their Wives to Do These 17 Things More Often If you want your relationship to be happier, you should do the things on this simple list more often.
We make our own jig for drilling holes
Description and features of the device
The jig is a strip with several holes and sleeves. Such a device is fixed to required part, and then carefully insert a drill into the sleeve and make a hole. To secure two parts you will need one jig, making the fixation reliable.
- drilling accuracy;
- simplicity and speed of creating holes.
It is worth noting that conductors are sometimes used in mechanical engineering, and not just in construction. Moreover, using this device you can make holes in cylindrical workpieces and pipes. The jig also allows you to make perpendicular holes.
Main types of equipment
All conductors used in various industries are are divided into several groups .

Methods and areas of application of the conductor
There are many ways to use this type of equipment. Naturally, the main area is considered building sector .
Furniture industry
When assembling furniture, you may find that some holes are missing. It is for this reason that you will have to drill various parts with your own hands. To ensure that the work does not cause difficulties, it is necessary to use a conductor. This will make furniture assembly accurate and quick. The use of such equipment is really important if you do not have a drilling machine.
Although today there is big choice accessories and fasteners, dowels are still often used in the furniture assembly process. They must be installed very precisely, otherwise the parts will be displaced. To avoid such an unpleasant consequence, you should use a conductor.
Drilling pipes
If it is necessary to prepare holes in pipes and various workpieces cylindrical using a drill will not work best idea, since it often slips off, which means the holes will not have the desired shape. To make the job easier, you should use a universal jig.
It is worth noting that there is special equipment that allows you to perform perpendicular holes. and this is very important when processing rounded elements and edges of workpieces.
Purchased or homemade conductor?
 As mentioned earlier, such a product is indispensable in the process of assembling furniture. Some people make these devices with their own hands, while others prefer to buy them.
Conductors are sold in almost any hardware store, however finished products may not be suitable for specific purposes. It is also important to remember that the cost of the device depends on the purpose, size and manufacturer. The most simple options are inexpensive. what can't be said about professional equipment With big amount additional functions.
Many consumers prefer to make the conductor with their own hands. For this purpose you will need a metal sheet or wooden board. Here, holes are prepared that will act as guides. In general, anyone can handle this type of work.
Making a conductor with your own hands
As already mentioned, you can make a similar product for drilling yourself. To do this, you need to prepare a welding machine, an angle grinder, a drill and several plumbing tools. You will also need fittings dimensions 10x10 mm .
- The workpiece is cleaned with sandpaper and markings are made. According to accepted standards, the distance between centers should be about 32 mm.
- Next, template holes are drilled.
- The next stage is creating a stop. This can be a metal plate 1 mm thick. It is carefully bent and the place for carving is prepared.
- Then both parts are carefully connected.
To ensure that the process of drilling holes does not cause any difficulties, it is worth using a jig. Such equipment is really indispensable in the furniture assembly process. You can buy it, but it’s better to do it yourself, because homemade device will definitely suit your specific needs.
A furniture jig for drilling holes, a drawing of a kind of template that allows you to accurately install assembly elements and greatly simplifies and speeds up the process.
Using this device you can make holes for:
Dowels
futorka
pinch bolt
mounting holes for furniture hinge strike plate
mounting holes for furniture hinge cup
center for furniture hinge flange
center of the eccentric coupler
The design consists of two parts:
Marking unit
retainer

It is an “L” shaped plate made of thick sheet corrosion-resistant steel GOST 7350-77. in which through holes with a diameter of 8 and 3 (mm) are drilled horizontally and vertically. To ensure that the processing tool fits better into the holes, chamfers measuring 0.25x45˚ are made on its edges. The plate is hardened and ground.
Made from steel circle GOST 2590-88. which allows you to install a furniture jig for drilling holes at the required distance from the edge of the chipboard being processed. The movement step is ten millimeters.
How it works? For a better understanding, let’s open the article: “How to assemble cabinet furniture” and take a look.
Let's say we want to install a furniture hinge:
1.
We lay the template on the facade.
2.
3.
We drill a hole with a diameter of three millimeters to the required depth for the fastening screws of the cup.
4.
We drill a hole with a diameter of three millimeters to the required depth for further processing. The prepared hole will be the guiding center for milling a hole for the flange of a furniture hinge with a diameter of thirty-five millimeters.
5.
Place the template on the body.
6.
We drill a hole with a diameter of three millimeters to the required depth for the mounting screws of the strike plate.
Let's say we want to install an eccentric coupler:
1.
We lay the template on the horizontal surface of the chipboard part.
2.
Install the clamp into the hole.
3.
We drill a hole with a diameter of three millimeters to the required depth for further processing. The prepared hole will be the guiding center for milling a hole for the eccentric of a furniture tie with a diameter of fifteen five millimeters.
4.
From the end of the chipboard, along one center line, we drill a through hole with a diameter of eight millimeters to the required depth
In the picture shown
The centers on the furniture jig for various technological operations are shown in different colors.
No need for calipers, ruler, pencil
reduction in labor intensity
ease of use

To better remember the sequence of operations, mill the hole numbers on the furniture jig to a depth of 0.25 (mm).
Jig for drilling holes: how to use and how to make it yourself?
When working with hand drill, sometimes it is difficult to maintain the specified direction of the hole. Conductors are also used if it is necessary to make a series of similar holes according to a template. For example, during carpentry work. In this case, the master does not waste time marking the tree, and is guaranteed to get the same result.
The jig is indispensable when drilling holes in pipes. But the main application is to pass holes at a given angle.
Let's consider various options this useful device:
Jig for perpendicular drilling of holes
A simple furniture jig for drilling holes when assembling metal furniture. Details in the video material
Purpose - to obtain passes in thick workpieces, strictly at an angle of 90°. It is a set of bushings in a single body, or a bracket with replaceable working attachments. 
By installing the device above the drilling point, you can start working without pre-punching. The drill accurately hits the center of the sleeve and does not deviate from the axis.
Important! The only problem is that the tool must be held on the workpiece, especially at the beginning of work. Otherwise, vibration may cause it to shift.
You can make such a drilling jig with your own hands. Thick PCB or solid wood is used. Perfect option— the use of extruder bushings for drawing wire. Worn bushings can be found at the factory. 
The extruder nozzles are made of alloy steel, with the addition of pobedite. The service life is practically inexhaustible.
Conductor for cylindrical blanks or pipes
Making a hole in a sloping surface is almost impossible. It is especially difficult to start the process - the tip of the drill jumps off the specified point. The device will fix the direction and allow you to perform the work with high accuracy. 
By adjusting the length of the fixing bolts, you can drill a hole tangentially to the center. If you don’t have such a tool at hand, you can make it from scrap materials. For example, from a block of hard wood and a strip of plywood. 
To prevent the guides from being broken so quickly by the sharp edges of the drill, they can be reinforced with sleeves made of tubes of different diameters.
Furniture jigs for drilling holes deserve a separate description.
Jig for angled holes
This type of drilling is not very common, however, there are ways to fasten products to each other when this technology cannot be done without. 
In fact, the hole is made tangentially, which is almost impossible to do while holding the drill with your hands.
Important! IN metal parts Such recesses can only be made using a milling cutter.
And for wooden blanks exists ready set.
Any carpenter is familiar with this method of drilling; professionals use this device all the time. Working with the jig is easy: you set the drilling height, the workpiece is pressed tightly against the stop, and you get precise oblique holes. 
A stop-limiter must be put on the drill, otherwise the hole will end up through. Then the screw head will fall through. In addition, it is better to do such fasteners using a special drill with a double diameter. 
It is difficult to make such a device yourself. Although there are simple options that are not particularly accurate. 
There is a separate type of device: for drilling at an angle with an adjustable tilt. This is a specific jig that is not suitable for all workpieces. 
The type of fastener indicated above is only suitable for an array. Pressed slabs cannot be joined this way.
Therefore, such a jig is not suitable for drilling holes in chipboard. To assemble trunnions and other furniture components made of hardboard, dowel fasteners are used.
Dowel hole jig
The device is designed to maintain the alignment of the holes. Otherwise you will not be able to install the spikes. By applying the jig to both parts to be joined, you will ensure a perfect connection. 
If you decide to make such a conductor with your own hands, there is no need to look for drawings. We present two options for perfectly working homemade products:
Invoice template

It's very easy to make. A small piece of plywood and a sheet of hardboard are enough. With this device you can always drill a couple of coaxial holes for dowels. 
Hardboard (or other transparent plastic) must be marked and calibration holes drilled. With their help, it will be easier for you to install the template in the right place. Thin-walled ones must be hammered into the holes. brass tubes. Otherwise, the wood drill will quickly destroy the guides. 
Important! This device is only suitable for workpieces of a fixed width.
Then the spikes will be located in the center of the end. For wood of other sizes, it is necessary to make separate guides, or a universal jig template.
Self-centering jig
If you do not make furniture using standard panels, needed universal tool. You can also make it yourself, and the materials are literally lying under your feet. 
To make such a jig for drilling holes you will need a drawing and basic knowledge geometry. 
Materials used: a piece of plywood 15-18 mm, a thin-walled tube suitable for a drill, several dowels, and a metal strip for the arms of the parallelepiped. 
We make three identical parts: in the middle there is a hole reinforced with a tube, on the bottom side there are symmetrically located dowel legs. It is important that all three components are absolutely identical. 
From metal we cut three identical arms with symmetrically located holes. They determine the linearity of the holes of the conductor. 
We cut out grooves in three blanks and connect them using metal shoulders. The device works no worse than the factory one, at virtually zero cost.
Another way to connect furniture is to use the so-called confirmat. A separate tool is needed for this.
Making a self-centering conductor - video
Conductor for confirmation - types and possibility of production 
Of course, such a device is on sale, and it is quite convenient and versatile. It is used to perforate the first part of the workpiece. The second part of the workpiece must have two rows perpendicular holes 
. A different design has been developed for this purpose. Of course, home craftsmen do not look for easy ways, and do furniture template 
jig for drilling holes with your own hands. Moreover, it does not have to be universal; you can adapt it to a specific type of joint of furniture panels.
Important! Any universal device is designed to save money. Making a mistake in drilling when there are a large number of extra holes is as easy as shelling pears.
Therefore, when making templates yourself, make them narrowly profiled.
Don't be confused by the holes being the same size. Confirmat, as a rule, is issued according to certain standards. Therefore, the drilling diameter is the same. We have discussed how to make a jig for drilling holes for fasteners. During assembly wooden structures 
and installation of doors/windows, hinged joints are used. Their fastenings must also be standardized and synchronous with each other. To avoid mistakes with the markings, a jig is used for the holes for the hinges.
Any devices that can be used to standardize markings or drill holes improve the quality of work by an order of magnitude. In addition, purchasing (manufacturing) conductors allows you to save a lot of time during carpentry work.
Step 25 - furniture jigs
First, let's figure out what a furniture jig is? Every time, assembling some kind of furniture, the master performs many completely identical marking operations (for example, marking 20 minifixes when assembling a cabinet means marking three completely identical holes with the same indentations). So, a jig is a device that allows you to optimize the processes of marking and/or drilling.
There are two main types of conductors: markinge And drilling. If the former serve to simplify marking, then the latter allow you to completely remove this stage from the work, starting immediately with drilling holes. Looking ahead, I will say that it is better to have both types.
Naturally, good conductors cost money, so people get rid of themselves and come up with their own homemade options, which are often no worse than factory ones.
Let's look at a few examples.
Marking furniture conductors:
Homemade conductor from a ruler. Probably the simplest and at the same time quite convenient and multi-purpose marking jig, which I recommend making. It is a ruler with a cross member screwed to it STRICTLY PERPENDICULAR. The ruler has holes drilled at certain distances from the beginning (for example, 32 mm for minifix, 100, 200, 300 mm for shelf holders, etc.)

Alternatively, you can use a ready-made carpenter’s square as a basis for such a jig (that’s what I have). Has its advantages ( great functionality) and disadvantages (less stable on the workpiece).

In addition, there are highly specialized conductors, for example, for marking holes for furniture handles .

For marking furniture hinges -
This is a factory conductor, but who's stopping you from making one like that? 
In general, using several pieces of plastic, metal and even plywood, you can make a simple marking jig to suit your needs.
Professional marking conductor Assistent - serious multi-purpose device. (I haven’t worked with it myself, but it seems to me that you can drill through it - it all depends on the bushings used).

Drilling jigs are more complex devices. The hole in them must not only be clearly opposite the desired location, but also be strictly perpendicular so that the drill does not go to the side during operation (for this, for example, replaceable bushings are used various diameters or the thickness of the conductor must be at least 10 mm).
Dubel-profi conductor from KVB - An excellent household drilling jig (for amateurs), for which a bunch of accessories are available (rulers, clamps, etc.) is inexpensive and simplifies the work. I have two.

Professional drilling jigs. I think that the principle of operation is quite clear from the photo. Replaceable bushings - for drills of different diameters

Another option - Condor conductor.
It has a system for positioning the jig on the workpiece and replaceable bushings. 
Again, to suit your needs, you can make conductors of similar functionality with your own hands.

In short, the topic of conductors is almost endless))). To each his own and for his own. The main points, as I think, I have depicted - then it’s up to your pocket and/or ingenuity.
By the way, you can order a Condor conductor in Chelyabinsk (or by shipment within the Russian Federation) from me at


