DIY jig for drilling holes. How to make a furniture jig with your own hands? Templates for drilling end and face holes
In the process of assembling or repairing furniture, it is often necessary to carry out work on precise drilling of holes for confirmation, for dowels, dowels and other furniture fasteners. In the case of wood and chipboard, it is difficult to make such holes using an electric drill alone: the entrance part of the hole is broken, and the hole itself may not be at a right angle to the mating surfaces. Thus, you will need a jig to drill the holes.
Purpose and classification of furniture conductors
The purpose of the jig for drilling holes is to accurately guide the drill to the required point and ensure the straightness of the tool throughout the entire depth of the resulting hole. In metalworking, such devices have been known for a long time, and are often supplied with the machine. Due to the increased number of closed joints in modern furniture products, the need for such conductors for woodworking specialists is very relevant.
There are the following types of furniture conductors:
- Overheads that do not require fixation before use. They are simple, mobile, but force you to use only one hand when drilling (if the drill or grinder is not installed in a special frame). Making such a conductor with your own hands is easy and simple. They are used mainly when making holes in MDF or chipboards.
- Rotary, which are equipped with folding brackets, and allow you to drill on two adjacent planes in one go.
- Jigs for drilling holes at an angle. A highly specialized version of the jig, which is designed to make holes at different angles. Often combined with the overhead version of the equipment in question.
- Sliding ones, with the help of which you can make several holes (including in several rows) without changing settings. More necessary for professionals who often have to perform such work. Requires skills for proper use.

If the jig is sufficiently rigid, it can also be used for drilling holes in products that do not have a flat plane, for example, in pipes. Then the conductor is secured using a clamp (this option is not suitable for furniture, due to the risk of surface deformation).
DIY jig for drilling holes
Fundamentally, such equipment consists of the following parts:
- An angular body element applied to the surfaces of products, which will subsequently be connected to each other with dowels, dowels or confirmations.
- Guide bushings where the drill fits.
- Clamping/fixing devices that are located at the end parts of the conductor.
For a conductor that is supposed to be made by hand, it is important to design a device for the most common requirements. home handyman mounting options. If required universal conductor(for furniture makers), it’s better to splurge on industrial version equipment, which is characterized by increased accuracy of fixation of parts, and has a higher quality performance. Moreover, manufacturers often offer templates, stops, and other kits for the jig. useful little things. Furniture conductor price industrial production ranges from 500 to 1200 rubles, which is determined by its functionality– length and number of guide holes.

Let's start designing a furniture jig for drilling holes by choosing a corner. There are more possibilities for a product where the corner will be unequal, and with the maximum possible thickness of the shelf. According to the assortment GOST 8510 “Unequal-flanged steel angles,” the minimum permissible dimensions of an angle L63 × 40 × 8: with a shelf thickness of 8 mm, a guide bushing with an outer diameter of up to 6 mm can be placed there. The internal hole for the drill, therefore, can be no more than 3.5...4 mm, but this is quite enough for most options for the resulting holes. As a last resort, they can be drilled out without using the device, especially if the hole is deep enough.
The next stage is the design of the guide bushing. It can be selected from any stainless pipe GOST 9941 (seamless) or GOST 9940 (all-welded). It is recommended to first select the pipe according to the diameter of the internal hole. A 6×1 pipe will allow you to get internal hole for a drill with a diameter of up to 3.6...3.7 mm, and a 6×1.5 pipe - for a drill up to 2.7 mm (a two-sided gap is taken taking into account the thermal expansion of the material). The length of the sleeve must be no less than twice the height of the hole made in the corner. Each bushing must fit into the hole with an interference fit or transitional fit. The most appropriate is landing using the shaft system, when the already known O.D. bushings, and a hole is drilled for it in the corner. It is better to use a slight interference fit, for example h9/P10.

It happens that the jig needs to be designed for drilling a deep hole. In such cases, the bushing must be stepped (with a shoulder). Bushings for machine tools in accordance with GOST 12214 have the necessary accuracy and dimensions, the internal hole in which has a constant diameter over the entire height of the bushing.
The number of holes, and especially the distance between them, is chosen according to the specific needs of the user.
When choosing a conductor mounting method, choose one of the following options:
- A spring stop that will press the surface of the jig to the part due to the elastic forces of the material. Any flat spring with the required clamping force will be suitable as such a stop;
- Fixation using self-tapping screws, which are screwed into the material of the part and keep the jig from being displaced by friction forces. This option is convenient because the resulting outlines can then be used as additional elements centering the future hole. In the case of chipboard, this option should be used with caution;
- External clamps, under which you should place corrugated rubber gaskets. In this case, the weight of the conductor will increase, and the compliance of the rubber may disrupt the perpendicularity of the axis of the conductor bushings. Therefore, using this method of fastening, first insert a drill into the sleeve, mark a hole, and only after that use clamps.
Jig for drilling for dowels and confirmations
The sequence and design of the simplest devices for accurately producing holes is discussed using the following two examples:
- Multi-position jig with clamp fastening (see Fig. 1). The initial body part here is a thick-walled aluminum corner. Due to the considerable length of the device, it is provided intermediate mount in the middle. When turning the jig at an angle of 90º, the increased wall thickness of the angle, which is superimposed on the surface of the part, is successfully used. The distance between the guide bushings is selected according to the most common distances for dowels or for confirmation.

Figure 1 - Multi-position jig for drilling holes with clamp fastening
- A two-slider furniture jig, with which you can make holes in two mutually mating parts. The design of the device is clear from the attached drawing (see Fig. 2). It consists of two guide rulers, which are connected by fasteners to a connecting strip. The presence of several holes on it allows you to install the bar on parts of different widths. Replaceable housings with a set of guide bushings with different distances between them move along the rulers. The conductor is fixed using a connecting strip, and with opposite side– a stroke limiter, which is tightened by a wing screw.

Figure 2 – Multi-slider furniture jig: 1 – Guide ruler; 2 – Adjusting screw; 3 – Housing; 4 – Stop bar; 5- Travel limiter.
When manufacturing cabinet furniture, there is a need to be able to accurately and quickly drill into the end of parts. As a rule, this need is due to the use of euroscrews (confirmats), in which holes with diameters of 4.5-5.0 mm (depending on the density of the plate) are drilled into the end of the parts to a depth of 35-55 mm (depending on the length of the euroscrews).
Of course, there are special drilling and attachment machines for such purposes, but they are not readily available to private furniture makers or small organizations due to their high price, plus the machines are not convenient due to exclusively stationary use. To simplify the work of a furniture maker, conductors were invented - small devices for precision drilling with a conventional hand-held electric drill. Today there are several manufacturers on the market; by paying quite a price, you can buy a ready-made conductor. In this article we'll talk about how you can make a good homemade conductor from available and easily accessible material in a couple of hours.We use ball bearings to guide the drill bushings. The bearings are made of durable steel and will last a long time. In order for the drill to be well oriented in the jig, two bearings are used for each working distance (the bearings are located coaxially one under the other).
To make a conductor (for three working fixed distances) we will need:
- A piece of MDF board 16mm thick.
- A piece of MDF board 10mm thick.
- Six pieces (a pair for each working distance) of any ball bearings with internal diameter 5.0 mm, outer diameter no more than 16 mm. The height of the bearing should be as small as possible and no more than 8mm.
- A dozen 4x25 mm self-tapping screws.
- PVA glue, “Superglue”.
- Furniture footer with internal thread M6 (see photo).
- Screw M6x50. Nut M6. Grover washer 6mm.
Manufacturing of the conductor body.
First, you need to make the case itself. There is no need to particularly explain anything about the body, everything is elementary. Cross section housing - the letter “P” with one end (closed) wall. This wall will be used as a stop and will set the zero point, the starting point for drilling. When drilling, the stop is pressed against the end of the part. Main dimensions:
- The external size of the conductor is arbitrary.
- The upper part, in which the bearings will be seated, is made of 16mm MDF, the remaining parts are made of 10mm MDF.
- The distance between the two sidewalls (where the workpiece will be placed) is equal to16.5 mm, whatcorresponds to the actual thickness of the slab plus a small gap for ease of installation and removal of the jig.
- The distances between the centers of the bearings and the stop: 50, 70, 100 mm are the most common in furniture practice.
To assemble the body, it is necessary to accurately cut all four parts (top, two sides and one end), it is recommended to take measurements with a caliper. Next, holes are marked and drilled for the screws that will fasten all the parts together. The housing is assembled using PVA glue.

The distance between the side walls of the conductor is 16.5 mm (for laminated chipboard with a nominal thickness of 16 mm).
Bearing seating.
After the glue has dried, we proceed to marking and punching the holes for the bearings. We try to perform this operation very accurately! To drill holes for the bearings, we will need a drill mounted in a rack. Execute precision drilling It is very difficult to do by hand, but with some skill it is possible. We mark the centers of the bearings with a pencil and punch them. Using the core, we drill three through holes with a diameter of 2 mm. We clamp a feather drill (punch) into the drill chuck; the diameter of the punch should be equal to the outer diameter of the bearings. We drill two blind (non-through) holes for each bearing on each side of the previously drilled through hole. The depth of drilling with a hammer (the penetration depth of the central tenon is not taken into account) should be approximately 1 mm greater than the height of the bearing. As a result, we should get six mounting holes (three on each side) for the bearings. You can try inserting the bearings into seats, the bearings should fit freely, but without noticeable play. After fitting, you need to lubricate the outside of each bearing with glue and seat it in its place until it stops. If “Superglue” is used (it quickly absorbs and dries), then this operation is performed using a rubber mallet.

Conductor on top. Distances between bearing centers and stop.
Making an adjustable stop.
To be able to drill at any arbitrary distance from the stop (not only 50, 70, 100 mm), it is necessary to supplement the jig with a simple adjustable stop - a long screw. We drill a through hole in the center of the end stop with a diameter 0.5 mm smaller than the outer diameter of the furniture fitting (see photo). Screw in the foot. We screw a long screw into the foot, not forgetting to first screw the nut onto the screw and put on the Grover washer. Now, by changing the screw screw depth, you can set any drilling distance from 0 to 100 mm.

Furniture footwear. To screw the fitting into the conductor body you will need a hex wrench.

The adjusting screw of the jig is screwed into the furniture fitting.

Conductor. Side view.

Conductor. View from the inside.

Drilling a hole in the end of the chipboard using a homemade jig.


Drill overhang. Drilling can be done to this maximum depth.The length of the drill used and the depth of its attachment in the drill chuck must be selected taking into account the thickness of the jig (that is, almost the total height of the two bearings).
If desired, the surface of the jig can be sanded with fine sandpaper, primed and painted (for example, with spray enamel). Practice has shown that the accuracy of drilling with a jig is no worse than +/-0.5mm and largely depends on how much actual thickness was made (slabslaminated chipboard) differs from the calculated thickness. In any case, an error of a maximum of half a millimeter is not critical for end drilling in the manufacture of cabinet furniture.
Quite often it becomes necessary to drill a hole at a certain angle, to a precisely specified depth, or with a standardized distance from the edge. In an equipped workshop this is not difficult to do, but during field work you have to use various devices.
Device and scope of application
There are a lot of options for drilling devices, but they are all united by the presence of three structural elements. The first is the guide bushing, which is made of steel with increased hardness and has a ground inner surface and features precise diameter tolerances. Even with a sleeve length of 10 mm, a deviation from a given direction of no more than 0.5° is ensured, especially if the sleeve is located at some distance from the surface of the workpiece.

Second structural element— a device for fixing the conductor on the workpiece or the surface being processed. As a rule, one or more screw clamps act as such an element, which makes it possible to reliably immobilize the jig relative to the workpiece. If we are talking about a device for drilling walls, the fixing element can be a handle, a vacuum suction cup or perforation for installation on temporary point fasteners. In any case, the need to immobilize the conductor is clearly dictated not only by the requirements for high accuracy, but also by the need to ensure clean processing and prevent damage to surfaces adjacent to the hole, especially slippery ones.

The third structural element is a system for positioning the conductor along markings or base surfaces. The drilling area when using a jig is, as a rule, not visible, so the body of the jig may have additional holes with marks, the centers of which are exactly aligned with the axis of the drill guide. Side stops can also be used for parts that have base planes - this positioning principle is implemented in jigs for drilling ends.
For assembling cabinet furniture
The most famous jig, which is widely used in the manufacture of cabinet furniture additives, is KWB Dubelprofi. That's enough universal device, which has an adjustable stop for drilling exactly into the center of the end and with a certain distance from the edge, which makes the jig an excellent tool for making holes for confirmation using a separate pattern with high accuracy of adjustment. There is also a revolving washer with guides different diameters, thanks to which the product can be quickly reconfigured also for making connections on dowels or body ties. It is especially nice to have a guide for visually aligning the end and counter holes.
For installation of cabinet furniture there is large number simpler conductors. The greatest difficulty is drilling the ends of the parts: it is necessary to maintain not only alignment, but also parallelism to the main planes, otherwise swelling will occur when the fasteners are tightened. To solve this problem, conductors such as LUXTools, Wolcraft, NAREX and SMT656 and many other unnamed, but less efficient linear conductors can be used, in which the guides are located with fixed offsets, which also greatly simplifies the implementation of additive schemes. The “Cheron” series of jigs and templates is considered especially advanced in this regard, with the use of which the assembly of furniture on confirmats is accelerated significantly. The SMT333 and SMT334 jigs are excellent for installing hinges, but this drilling technology requires the installation of 8mm threaded bushings.
For carpentry work
The most diverse list of conductors for preparing carpentry joints. For these purposes, both single products and entire series of devices are successfully used, the use of which significantly expands the range of operations performed.
One of the most common types of jigs allows you to quickly and accurately drill for making countersunk connections on miter screws. Examples include the Wolcraft Undercover Jig, Kreg Jig Mini, and Kreg Jig K Master. These devices vary greatly in design; some may not have standard means of fixation and require the use of quick clamps. Nevertheless, the technical performance of all conductors is at a high level.

In general, products from brands such as Kreg, Wolcraft and CMT are complete systems for making carpentry joints on dowels and minifix/rafix ties, as well as marking and drilling combined holes, including blind ones. In the rulers you can find guides for performing box connections on dovetail grooves and jigs replacing lamella cutters.

General purpose
The scope of application of drilling jigs is not limited to carpentry and furniture assembly. Thus, the already mentioned KWB Dubelprofi and similar devices are ideal for drilling holes on flat surfaces, for example for fastening in walls. Jigs with a V-shaped groove on the sole are practically the only tool that allows you to quickly and accurately drill into round pipe or into a rectangular edge of a part.

The need for drilling is strictly perpendicular holes in concrete and brick walls often occurs when making openings or the need to bypass hidden technological channels or fittings. In the simplest case, for these purposes you can use drill stands Wolcraft Tecmobil or KWB 7778, these devices are also designed for desktop use. In the case of making holes of significant diameter, devices such as Mechanic Distar, designed also for drilling with pobedit bits, are very helpful; in the same series there are convenient dust collector casings.

The most serious and highly specialized conductors are called racks for diamond drilling. In this segment you can find: budget options, such as Titan NS 1000, as well as expensive devices from Bosch and AGP. Distinctive feature such jigs - the presence of a split coupling for attaching the spindle neck of a drill or hammer drill, or a specialized drilling machine. The jigs also have a mechanical feed device, which is a mandatory requirement when using diamond bits.
Independent production of conductors
As a conclusion, it should be noted that most craftsmen do not have to spend money on quite expensive drilling devices. For one-time technical operations, it is not required that the jig be designed to drill hundreds of holes, therefore, in some cases, an ordinary wooden block in which drilling machine a number of holes were made required diameter, as well as drills with an extended shank.
For more technologically advanced solutions, you can use a system of a seamless pipe, perpendicularly mounted on a metal plate, and a bearing located inside it suitable size. This design can be supplemented with stops, screw clamps and centering holes with minimal effort.
Very often, when repairing furniture or assembling it, you need to accurately drill holes for the firmmat, dowel and other fasteners. If you drill chipboard sheet, then it is almost impossible to do this with a simple drill, since the hole breaks and it is not always possible to make a right angle. Therefore, for such work you must have a tool called a conductor.
Classification of conductors
The main function of jigs is to ensure straightness in drilling wooden surfaces throughout the entire depth of the hole. Such devices are used quite often in metal processing and, as a rule, are supplied directly with the machine. Due to the need to create such holes in furniture production in large quantities, such devices are in great demand among craftsmen.
There are the following types of conductors:

If the jig has sufficient rigidity, then it can be used not only on flat planes, but also for curved pipes, etc. In this case, it is secured with a clamp. But under no circumstances should it be used for fastening to wooden surfaces, as you can damage the furniture. You can buy it in the store, or make it yourself.

The jig is in fact a template for making holes, with the help of which such work can be done with maximum accuracy. Due to the simplicity of the structure, they are often used not only in the areas of furniture production. In particular, they are actively used in the field of mechanical engineering for drilling holes in various workpieces, etc. We should not forget about the furniture industry, where such a device is used for various needs when assembling furniture fittings.
Features of self-production
 When designing a conductor for confirmation, it is necessary to correctly calculate what functions it will have to perform in the future. It should be done for the most commonly used fasteners in the house. If such a device is required by furniture makers for permanent job, then it is better to buy a factory sample, which is characterized by great accuracy. In addition, manufacturers often include additional fasteners, stops and templates in the kit.
The price of such a device for professional use ranges from 400 to 1100 rubles. It depends on the immediate capabilities of a particular unit, the number of holes made, their length, etc. Many people are interested in how to make a furniture jig with their own hands. Drawings with dimensions are a must for novice craftsmen, as they allow you to make a high-quality design on the first try. Similar diagrams can be found on the Internet.
Basically, the conductor has the following elements:
- The basis of the product. It is directly applied to the plane of the furniture, on which the holes will be drilled.
- Guide bushings. A drill goes through them.
- Surface clamping parts. As a rule, they are located at the end of the conductor.
To start designing your own conductor, you need to choose the right corner. It is better to make a non-equal-flanged corner, since it will have much more possibilities, and choose the maximum thickness of the shelf.
Next you need to take care of the correct direction of the sleeve. It can be made from stainless pipe. The length of the sleeve should be at least twice as long as the hole in which it will be located on the angle. The bushing should fit tightly in the hole. The simplest and most common option is planting according to the shaft principle. A corresponding hole is drilled in the corner for the already known diameter of the bushing, and then the fit is made. It is recommended to use a low interference fit.
There are cases when the jig needs to be made for drilling deep holes. Then the bushing is made with a collar. The number of possible holes, their length and the distance between them is selected to suit the specific needs of each master.
Several options can be used to attach the device:

Design for confirmations and dowels
Furniture jig for drilling holes for dowels and confirmat - very necessary equipment for furniture makers. Especially if chipboard material is used.

For these purposes, two types of conductor are used:
- Dowel jig with clamp fastening with many functions. The basis of this design is a corner made of thick aluminum. Since the device is quite long, there is an additional fastener in the middle. When turning the angle ninety degrees, the increased thickness of the device helps a lot. The bushings on the structure are located at the distance most often used for confirmations and dowels in furniture production.
- A two-slider jig, which is used to make a hole in two parts fastened together. The design consists of two strips that are connected by fasteners. It has several holes, so you can install devices at different widths.
Scope of use
 Furniture jigs are devices that no furniture maker can do without in the process of work. Such devices allow you to avoid the main problem in furniture production, namely the drill entering at the wrong angle. If you make such a mistake, it is very difficult or even impossible to correct it later. Such a device not only makes it possible to correctly direct the drill during operation, but also allows the tool to constantly maintain the desired trajectory (flat, perpendicular or at an angle).
Such devices are used both in the design and production of furniture, and during assembly, when there is a need to make holes for fastening elements together. Often, for such actions, conductors are used for firmmats or dowels, without which it is impossible to make straight holes. Also, you cannot do without this device if you need to make holes at an angle or in the end of a thin slab (it is especially important to use the device when working with chipboards).
When drilling holes using this design, the process itself is quick and simple. The fastener allows you to do work at any distance from the edge of the slab, as well as regardless of its width.
In the furniture industry, dowels are often used as fasteners. But at the same time, this option has already existed for a long time, and their use requires the presence of a drilling jig when working. The only condition and at the same time a problem is the fact that the parts being connected to each other must have a right angle during operation. Therefore, such elements must be located exactly perpendicular to each other. When making holes for dowels and adding parts, it will be very difficult to do without a jig.
Furniture production is not the only area of application for such devices. They can often be used to make holes in pipes and other round-shaped parts. Special devices allow you to do quality holes even in the smallest tubes.
The principle of their operation and dimensions may be different. Some narrow-profile models are better to buy than to produce yourself. But, on the other hand, the price of such devices is not small, so this is a disadvantage when compared with home-made models.
How to make it yourself
 The most simple designs they are cheap, and professional furniture makers are not puzzled homemade production, but prefer to buy factory models. But there are also craftsmen who want to make such a device with their own hands.
For self-creation The conductor needs to use drawings, of which there are a lot on the Internet. With your own hands you can make simple designs for confirmations and more complex ones for dowels.
For production you need to prepare the following tools:
- drill;
- classic set of tools for a locksmith;
- welding;
- Bulgarian.
The simplest conductor can be made from improvised means, which are generally found in any household, in a workshop in the country or in a garage. To create it, the simplest materials are suitable, such as reinforcement, metal sheets And wooden blocks etc. They can significantly save money in the production of such a device.
The manufacture of such a device should be carried out in several stages:

To ensure that there is little dust during operation, it is necessary to install half plastic bottle. It will also collect dust.
A furniture jig for drilling holes, a drawing of a kind of template that allows you to accurately install assembly elements and greatly simplifies and speeds up the process.
Using this device you can make holes for:
Dowels
futorka
pinch bolt
mounting holes for mounting plate furniture hinge
mounting holes for furniture hinge cup
center for furniture hinge flange
center of the eccentric coupler
The design consists of two parts:
Marking unit
retainer
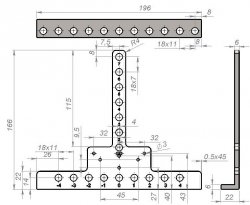
MARKING UNIT
It is an “L” shaped plate made of thick sheet corrosion-resistant steel, in which through holes with a diameter of 8 and 3 (mm) are drilled horizontally and vertically. To ensure that the processing tool fits better into the holes, chamfers measuring 0.25x45˚ are made on its edges. The plate is hardened and ground.
Drawing
RETAINER

Made from a steel circle, which allows you to install a furniture jig for drilling holes at the required distance from the edge of the chipboard being processed. The movement step is ten millimeters.
Drawing

Let's say we want to install a furniture hinge:
1.
We lay the template on the facade.
2.
3.
We drill a hole with a diameter of three millimeters to the required depth for the fastening screws of the cup.
4.
We drill a hole with a diameter of three millimeters to the required depth for further processing. The prepared hole will be the guiding center for milling a hole for the flange of a furniture hinge with a diameter of thirty-five millimeters.
5.
Place the template on the body.
6.
We drill a hole with a diameter of three millimeters to the required depth for the mounting screws of the strike plate.
Let's say we want to install an eccentric coupler:
1.
Place the template on horizontal surface chipboard parts.
2.
Install the clamp into the hole.
3.
We drill a hole with a diameter of three millimeters to the required depth for further processing. The prepared hole will be the guiding center for milling a hole for the eccentric of a furniture tie with a diameter of fifteen five millimeters.
4.
From the end of the chipboard, along one center line, we drill a through hole with a diameter of eight millimeters to the required depth
In the picture shown

IN different colors showing the center on furniture conductor for various technological operations.


