DIY transformable children's chairs. How to make a high chair with your own hands. Mobile high chair
The feeding procedure should be as comfortable as possible for both the child and the person feeding him. It was for this purpose that a table was made, at which you can not only feed the baby, but also play and study with him. The stable design of the chairs is as safe as possible for the little family member, which means mommy doesn’t have to worry about whether her child is okay. You will learn how to assemble a high chair from this article.
The need for a high chair
A huge number of both young and already wise parents will tell you with confidence that such a chair is simply necessary for activities with their baby. It is not surprising, because this design has a huge number of positive properties:
- Small dimensions - this will save space in the room.
- Ease of use and versatility - at this table your baby can eat and play.
- Saving money.
- Physical and psychological safety - the mother does not worry that something might happen to her baby, because as long as he sits on the high chair, he is safe.
- The ability to have contact with your child while doing household chores saves a lot of time.
- The child feels like he belongs when sitting at the table with his parents.
- The baby unconsciously masters initial basics etiquette - this will help him in the future, for example, when he goes to kindergarten.
What should a chair be like?
Before assembling the feeding table, you need to decide what material it will be made of. Nowadays, both plastic and wooden models. Of course, each row has its pros and cons.
Wooden high chair
Children's products that are made from natural breeds wood have always been more highly valued than their counterparts. You can’t argue with this, because even a highchair has a huge number of positive features:
- This product will last you more than one year.
- It is made of environmentally friendly material.
- Has an aesthetic appearance.
- The back of the table can be adjusted.
- The height of the structure can also be changed.
This product also has disadvantages:
- Impressive dimensions both folded and unfolded.
- The package does not always include protective covers.
- There are sharp edges and corners - this is unsafe for a child.
- Caring for the surface is quite difficult.

Plastic chairs
Most often, young parents do not know how to assemble a plastic high chair. This is not surprising, because there are several times more parts and functions in it than in the previous version.
The advantages of a plastic table include:
- You can choose a color to match the interior.
- Has many designs.
- This design can easily turn into a chaise lounge.
- It has rounded edges - this reduces the risk of childhood injuries several times.
- The product case is waterproof.
Important! The only drawback of a plastic table is that it is artificial. Don't be fooled by the low price of the product and its bright design- ask the seller for a quality certificate before making a purchase.
There are three main models:
- Transformer. The height of the tabletop and chair can be adjusted, and the angle of inclination of the structure can also be changed. Such an assistant can become a workplace for the baby when he grows up a little.
- Booster. This model is autonomous and can be attached to the floor or an adult chair.
- Suspension. This design weighs on average 2 kilograms. With the help of a lever and long handles, this design is easily attached to the table.
Let's move on to assembling the table
Many parents, having made a purchase for their child, cannot figure out how to assemble a high chair. This is understandable, because all models, as a rule, are sold disassembled.
Before the assembly procedure you will need the following materials:
- Wooden crossbars.
- Soft seat for baby.
- Small and large countertops.
- Euroscrews and a key for them.
“Agu”
In order to assemble such a mini-installation, you must first remove all the parts from the packaging. As a rule, the chair itself is assembled first - the rest of the work will not be so difficult.
This model of chairs has two armrests, which in turn have triple vertical rods made of wood. The edge located closest to these rods is called the anterior edge.
- Connect the armrests using a wooden crossbar. You need to turn it with two bolts from the front side of the armrests from below.
- Attach a wooden crossbar to the bottom of the seat.
- Place the soft pad in the base so that the seat belt is on both the front and bottom.
- Secure the seat with four bolts, the back and armrests with two.
- Now all that remains is to assemble the feeding table. For this purpose, the tabletop must be placed on top and snapped into place with grooves in its bottom directly on the armrests.
Important! On the left armrest there is a plastic regulator, which determines the distance of the baby’s desk.
- Now you need to make a stand for the table. For this purpose, you need to connect together two identical parts in the set (you will notice them immediately) perpendicular to each other.
Important! The connection points are marked with strokes that you will immediately notice.
- Place the almost finished structure on its legs, screw the very last part with the wall - the structure must remain stable.
- Connect the legs of the structure using the remaining jumpers and secure everything with bolts.
Assembly is complete.
“Baby”
Before assembling the “Baby” high chair, you need, as in the first example, to lay out all the parts in front of you. There will be much more of them here than described above, but the advantage of these details is that they are all already numbered (2-9 - parts of the tabletop; 11 and more - parts of the chair).
The collection process is as follows:
- Arrange all the parts by numbering separately from each other.
- Align and twist parts with holes that have the same serial numbers, starting with number 12.
- Connect the parts numbered 13.
- Fasten the holes of parts 11 and 14 respectively. The end result will be a 4-piece part.
Important! The second part is assembled in the same way - the configuration of the same numbers is connected one by one, then these parts are connected together using a crossbar.
- Now it is possible to assemble a high chair by attaching a soft seat for your child to a wooden base - the crossbar should be between his legs, and the safety strap should hang down. The seat must be secured with six bolts.
- The last stage of the initial assembly of the structure is attaching the table to the armrests using two bolts.
- Next, the stand for the table is assembled. To do this, select 4 elements with cell numbers 3, screw them together with bolts. As a result, you will get a part that resembles the letter H in appearance.
- The second part is twisted in the same way according to the numbering of the same cells.
- Ultimately, all that remains is to assemble the feeding table by connecting the main assembly parts.
Important! Do not tighten the bolts too tightly - this can cause rapid wear of the entire structure.
Purchased furniture for a child’s room, especially made from natural materials, can be quite expensive. In a store or online, you don’t always find exactly the option you like. Children's chair You can create a small table and a wooden table yourself. The work will not be difficult if you prepare all the necessary parts and tools, use your ingenuity and imagination. The reward for the work is a unique product, as comfortable as possible for the baby and practical in home life.
You can create a children's high chair and table from wood yourself.
A DIY chair will cost much less, and one made according to your own sketch will meet the intended parameters and the required degree of comfort for the baby.

The reward for the work is a unique product, as comfortable as possible for the baby and practical in home life.
All natural wood parts can be purchased in specialized departments construction stores. They will select boards and bars of the required sizes for you.

A DIY chair will cost much less.
A child's highchair, created with one's own hands, is high-quality furniture for a child. In the process of work, you take into account the dimensions of the seat and backrest, which are as comfortable as possible for a growing baby, and check the strength of the structure directly at home.

All natural wood parts can be purchased in specialized departments of construction stores.
Created by yourself wooden high chair you can decorate according to your taste, and not be satisfied ready-made solution purchased furniture.

They will select boards and bars of the required sizes for you.
Required materials and tools
To create a chair you will need various materials. Individual parts will be made from them. First of all, this wooden blocks and boards from which the frame, seat and back are assembled. Instead of natural massif For wood, you can use chipboard or plywood, but these materials are short-lived. For fastenings, take sufficient self-tapping screws. You will need medium-hard sandpaper.

A child's highchair, created with one's own hands, is high-quality furniture for a child.
Dimensions of bars (length):
- support legs – up to 20 cm;
- seat frame connecting strips – up to 20 cm;
- backrest lintels – up to 20 cm.

A wooden chair made by yourself can be decorated to your liking.
During the manufacturing process, the thickest bars with a cross-section of 5x5 cm are used for the legs. For the planks, parts are taken with a diameter half the size of the supporting ones.

For the planks, take parts with a diameter half the size of the supporting ones.
The parameters of the seat board (height and width) should also not exceed 20 cm. The back part may be slightly higher, but preferably no more than 30 cm.
- they are less durable;
- The environmental friendliness of such products has not been 100% proven.

The parameters of the seat board (height and width) should also not exceed 20 cm.
To make a chair with your own hands, you need the right tools:
- screwdriver;
- screwdriver;
- jigsaw;
- hacksaw for wood.

The dorsal part may be slightly higher, but preferably no more than 30 cm.
The assembled chair will “require” original decor. In addition to the carved option, you can use paint or other materials to apply a design or appliqué. To accurately apply the image you will need a stencil.

The assembled chair will “require” original decor.
Deciding on design and construction
For a wooden product, you can come up with any option. A highchair is usually made with straight supports and the following forms of the back structure:
- solid square or rectangular;
- wide truncated cone;
- straight through (with jumper bar).

To accurately apply the image you will need a stencil.
Creating a product with your own hands requires careful preparation. You must first make a sketch of the project. Visually draw a diagram of the connections of all parts separately with calculations of sections and lengths. Following the sketches, you will recreate the model in reality with exact parameters. A chair that has all the right dimensions will fit the baby and will not create any inconvenience.

For a wooden product, you can come up with any option.
Certain models are created with the expectation that the child will sit at a common table with other family members. In this case, high legs are chosen for the product, which are not attached exactly vertically in relation to the seat and floor, but more widely. The lower part of such a chair will look like a truncated cone, connected for stability by wooden blocks around the perimeter. Upper part will be approximately 30-35 cm below table level.

A children's highchair is usually made with straight supports and the following forms of the back structure
If you have certain skills, you can assemble a folding product. Such items can be easily removed if necessary into storage areas.

For selected design solution parts are processed in accordance with it.
Manufacturing process: step-by-step instructions
After preparing a drawing with exact parameters, we begin to assemble a simple children's high chair.
- Calculate the length of the legs exactly according to the diagram, saw off the excess with a hacksaw.
- Cut out the jumper bars to size that will secure the frame in the seat area.
- Connect them with supporting structure. Add furniture glue for reinforcement.
- Attach the pre-sized back and seat using self-tapping screws.
- All wood parts must be cleaned with sandpaper to avoid any roughness or burrs.

A chair that has all the right dimensions will fit the baby and will not create any inconvenience.
If the parts are disproportionate, “adjust” them according to the design diagram using a hacksaw. To make the chair you created with your own hands comfortable, ask your baby to sit on it, ask how comfortable he is.
If all sizes were determined correctly, the child will like it new furniture. To ensure the parts are smooth, sand the surface again.

Certain models are created with the expectation that the child will sit at a common table with other family members.
To varnish the product, use only safe compounds - a special coating for children's furniture, environmentally friendly and having the appropriate certificate.

The top part will be approximately 30-35 cm below the table level.
After exterior finishing varnish, let the chair dry thoroughly for a day or two. Then you can start decorative finishing, if such is intended. If it involves carving, then varnishing is done after finishing the artistic treatment and sanding the parts.
Decorating a chair
Use a jigsaw for carving. You can make a decoration in the form of a flower, cutting it out in the center of the back, or any geometric shape. First, mark the area of the future decoration with a pencil so that the carving is even. Parts such as legs and back can be carved. The corners of the seat can be rounded using a jigsaw and sandpaper.

During the manufacturing process, the thickest bars with a cross section of 5x5 cm are used for the legs.
The top can also be made not strictly rectangular, but a truncated cone, rounded, compound. In the latter option, you will need additional bars and cross bars - one or two. They are secured by special holes at the junction with the dorsal frame. It's pretty labor-intensive process, but if you wish, you can choose this option.

For fastenings, take sufficient self-tapping screws.
All steps for processing parts must be performed before the chair is assembled - this way the work process will be faster, more convenient and neater.

If you have certain skills, you can assemble a folding product.
To make a home-made piece of children's furniture look more interesting, you can apply a design to the back and seat. To do this you need to use safe paints. The color scheme should be bright and cheerful. Simple ornaments, floral patterns, and imitation of children's toys, such as cars, look great on wooden furniture.

Instead of natural solid wood, you can use chipboard or plywood, but these materials are not durable.
Due to the fact that the size of the product is small, a large pattern will become a kind of accent that attracts the child’s attention - he will like to sit on such a beautiful chair, play games or have breakfast.

You can use appliqués for decoration – there are plenty of adhesive bright films on sale.
The image will turn out smooth if you use a stencil pre-cut from paper or thick plastic.
You can use appliqués for decoration – there are plenty of adhesive bright films on sale. Whether the image will be monochromatic or multi-colored depends on your imagination.

First of all, these are wooden blocks and boards from which the frame, seat and back are assembled.
It is not recommended to use bulky (protruding) parts, both small and large, in finishing the seat or back of a children's chair. Firstly, it is inconvenient for the child, and secondly, they quickly fall off when frequent use products.

To create a chair you will need various materials.
VIDEO: DIY high chair
When decorating a room for a child, parents tend to purchase furniture made from natural materials. But in addition to the high cost, sometimes you are not satisfied with the limited choice of options. The solution would be a DIY high chair, which can be complemented with a table in the same design. The variety of models, simplicity and accessibility of production will help you create a real masterpiece.
To create a children's chair with your own hands, you will need different materials, which are easy to purchase at the construction department:
- planks and bars for making a seat, frame and back;
- self-tapping screws that will fasten the parts together;
- medium-hard sandpaper.
Tools for the chair you will need:
- screwdriver;
- jigsaw;
- screwdriver;
- hacksaw for wood.
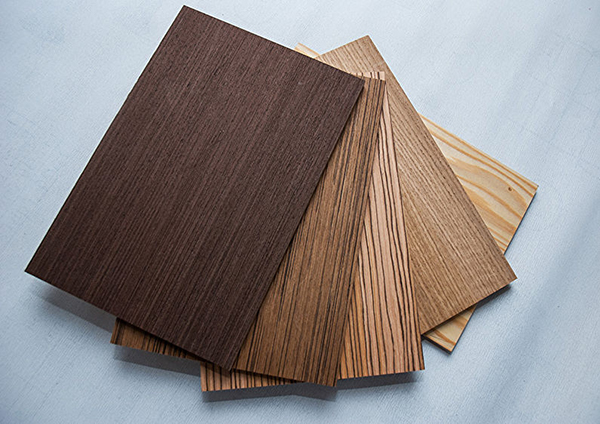
When making at home, it is better to use natural materials. Plastic chairs are significantly inferior to them in terms of performance properties and other important characteristics. Firstly, they do not have high strength. Secondly, their safety for children has not been experimentally proven. Natural wood It is expensive, but such children's furniture is environmentally friendly and absolutely safe for health. Useful properties are retained even after complete processing. The following types are preferred:
- Pine. This - budget option. The antiseptic properties of wood are valued. The finished product is easy to paint. The disadvantages include the fact that in the absence proper care the chair and table may swell and crack.
- Beech. Its qualities are similar to oak. Easily restored if minor damage occurs on the surface.
- Oak. Furniture for children made from this solid wood will last the longest, and it is not susceptible to rotting even with frequent contact with moisture. Remains attractive for a long time appearance- even very active child won't be able to scratch it.
MDF does not emit hazardous resins during operation. The material is quite durable average term service life - 10 years (provided that nothing is dropped on the surface or hit). Therefore, when deciding to make a highchair with your own hands, from MDF is better refuse. Moreover, the cost finished product only slightly lower than solid wood models.
Plywood is an environmentally friendly and safe material. Easily amenable to even very fine processing, it is characterized by low cost in comparison with natural wood against the background long term operation. The disadvantages include a limited range of applications.
Chipboard has a low cost. Disadvantages include increased flexibility and the presence of formaldehyde resins in the composition. It is not recommended to make children's furniture from such raw materials - allergic reactions may occur to it.

Tools


Product dimensions
When starting to make a chair for a child with your own hands, it is important to take into account the following rules:
- When sitting on furniture, your feet should be completely flat on the floor, your legs should be bent at the knees 90 degrees.
- The back of the chair is strictly vertical and fits tightly to the base.
- The outer edge of the seat should not put too much pressure on inner part knee
Children's chairs are classified according to their purpose. The first group includes models for feeding. Such products traditionally come complete with a table. Most often they have sizes:
- chair height – from 840 to 900 mm;
- back width – 450 mm;
- height of the chair to the seat – 500 mm, to the back – 700 mm;
- width along the armrests – 400 mm.
The second group is a smaller copy of adult products. Tables that correspond to the height of the furniture and the height of the child will help you determine the size.
| Child's height, cm | Chair height, cm |
| Less than 85 | 180 |
| 85-100 | 220 |
| 101-115 | 260 |
| 116-130 | 300 |
| 131-145 | 340 |
| 146-160 | 380 |
| 161-175 | 420 |
| above 176 | 460 |
The parameters of the children's table must exactly match the dimensions of the high chair.
The seat should be able to easily withstand the load placed on it. Optimal thickness– 60 mm. It is advisable to make the connecting strips of the seat frame up to 20 cm. The legs in cross-section can have dimensions of 5 x 5 cm - such parameters will ensure sufficient stability. The recommended length of the backrest jumpers is up to 20 cm. All dimensions, drawings, diagrams high chair for do-it-yourself feeding and other models should be compiled as accurately as possible.
A model of the future chair made of thick cardboard will help determine whether the measurements were taken correctly. Another convenience is that it is easy to make any changes to make the final product as convenient as possible.

Selecting a design and creating a drawing
Chairs for children can be of the following models:
- Classic versions - differ from adult sizes. Structurally they have the same elements.
- Folding - characterized by a simple design, actively used in small apartments, at the dachas.
- Growing chairs require the presence of adjustment mechanisms, which allows the products to be used longer.
- Transformers - most often presented in models supplemented with feeding shelves and footrests. At the base there is a table that can later be used for games.
The last two models have the highest leg heights. This especially applies to growing chairs, which can be used from 2 to 14 years. When choosing them, it is important to carefully evaluate the quality of the design.
A wooden chair can have a solid square, rectangular or straight through back (with horizontal and vertical connecting strips) back. Such products support the spine well. You can also find the shape of a wide truncated cone.
To create a sketch and drawing, you will need to take measurements and determine the purpose of the product. You can use pencil and paper, but it is much more convenient to automate the process using specialized programs. They are convenient for creating “explosion diagrams” that will tell you how to assemble the chair.
An explosion diagram is a detailed design sketch of a product, which allows you to disassemble the chair into individual elements, estimate their number and size.
When drawing up a drawing, it is important to indicate the dimensions of each part on it. For convenience, callouts can be made on the side indicating the exact parameters of the structural elements. If you decide to use a ready-made scheme, you can adapt it to your personal needs by changing the numbers. In this case, it is necessary to strictly observe the proportions.

Classic

Growing

Folding
![]()
Transformer

Decoration of the structure
Products made from natural wood require protection from external factors. Varnishing helps solve this problem. Experts recommend choosing the acrylic version of this material. It creates a coating that is not afraid of any childish pranks - spilled water, paint.
If you want to make the product more interesting, you can paint it. You should give preference to bright, but not harsh colors. Muted light green, mint green, pomegranate, coral and others are suitable.
The materials used must not contain lead, other heavy metals, as well as dangerous or harmful compounds. Contact with a surface treated with these paints and varnishes may cause a child’s health to deteriorate.
It is not recommended to decorate the table and chair voluminous decor. First of all, due to the fact that it is one of the most common causes of injury to a child. The best decoration will be hand or screen painting. Appliques and drawings of fairy tale and cartoon characters are suitable for young children. They will look interesting curly legs. If the chair has a back, various figures are cut out on its surface with a jigsaw.

DIY manufacturing steps
There are two main models of chairs - high and regular. Numerous modifications are created on their basis. You can do any of them yourself with a minimum of tools.
Chair and table made of plywood
To make such a model, the following materials will be useful:
- plywood 9 mm;
- wood glue;
- sandpaper, grinding machine;
- milling cutter;
- jigsaw;
- varnish or paint;
- mortise edge
The diagram of a table and chair made from plywood by yourself includes a certain set of parts. Required items:
- support (2 pieces) – 370 x 340 mm;
- rigidity shield – 490 x 270 mm;
- table top – 600 x 400 mm.
You will also need blanks for a children's chair made of plywood:
- support (2 pieces) – 280 x 260 mm;
- seat – 280 x 210 mm;
- back – 490 × 280 mm.
The operating procedure includes the following steps:
- The sheets are cut according to size. An electric jigsaw is used to make roundings at the corners of the table top, back and furniture supports. Due to this, a plywood chair will become safe even for a very small child.
- All cut areas are processed with a grinding machine.
- The milling cutter selects the grooves into which the mortise edge is placed.
- All parts of the table and chair are fastened together.
Detailed drawings and diagrams of the chair will greatly facilitate assembly. The corners may not be cut, but then you will need to purchase special plugs. Finally, the piece of furniture is varnished or painted.

Materials and tools

Make a drawing and transfer it to plywood

Cut out parts with a jigsaw

Remove irregularities with a milling cutter

Blanks

Make holes for the screed

Perform pre-assembly

Varnish

Finally assemble
Transformer for feeding
The structure will be stable if you follow the drawings. To make them accurate, it is better to use special programs that will help you understand how to assemble a children's high chair. Stages of work:
- The beams are cut to size, and all cut areas are sanded with sandpaper.
- From the board using carpentry machine cut out the curves.
- In the places of fixation, holes are drilled whose dimensions coincide with the dimensions of the dowels. The optimal depth is 30-40 mm.
- The sides of the highchair are assembled. The legs are fastened to the bottom crossbar; the roundings are fixed to top crossbar; the resulting elements are glued together.
- To make the seat and backrest, cut 6 rectangles 300 x 250 mm. The corners adjacent on the long side are rounded. The plates are glued together in groups of 3. The finished parts are additionally fastened with a metal strip and screws.
- The sidewalls and transverse planks are connected using dowels, having previously lubricated the joints with glue. In the same way, planks are attached to the structure that will support the table top and back.
You can make a baby high chair with soft seat. It will be much more comfortable for the baby. To do this, foam rubber 2 cm thick is glued onto the seat and backrest blanks, then covered with fabric. It is better to choose a material that is easy to wash.
The feeding table is assembled using the same technology as the chair. All surfaces after cutting must be sanded. After assembly is completed, the product is allowed to dry completely, after which it is varnished or painted.

Prepare the details. Secure 2 sides

Fix the backrest

Attach legs

Screw the cross bars

Attach the seat to the movable couplings

Add a tabletop and armrests
Stool for children's room
Such products are very similar to adult models. The main difference is the size. For children, the optimal height parameter is 20 cm, in rare cases - 25 cm. The seat should measure 250 x 250 mm. The classic stool does not have a back, but if used by children, an exception can be made. It is shaped, for example, into ears or a heart.
To make a stool with your own hands, you will need a board up to 5 cm thick. The work procedure includes several stages:
- The selected sheet of wood is treated with sandpaper No. 60 or 120 to remove nicks and chips.
- The material is cut according to size. Mark the places of fastenings.
- The cut areas and surfaces are treated with sandpaper or a grinding machine.
- The blanks are first coated with stain and then with varnish. If desired, before this procedure, the jumpers and supports are given a shaped shape.
- Based on the drawing, all the parts are fastened with wood screws.
If you place a stool on a low table, the resulting area can be conveniently used for feeding or playing with your child. The product must stand on a flat surface to prevent it from falling. For children under 3 years old, you can make a stool up to 15 cm high.

Prepare materials and tools

Make markings of parts

Cut out parts with a jigsaw

Sand the edges

Cut holes for legs

Glue the legs to the seat

Paint the product
In the form of a typewriter
This model is based on garden chair Adirondack. The image of, for example, Lightning McQueen can be easily created by drawing the hero’s face. Many people don’t know how to make children’s highchairs look as much like a car as possible. To do this, you should add plywood wheels and cover them with stain. For work you will need a pine board 20 mm thick. The manufacturing procedure includes the steps:
- According to the drawing, all the details of the future chair are cut out. Carefully treated with antiseptic.
- Drilling points are outlined, and the side supports are connected in turn to the front legs. Backrest crossbars and seat slats are added.
- Supports are fixed on the front legs, onto which the armrests of the chair are then attached.
- The backrest strips are secured.
- The final stage is tinting all surfaces of the chair.
The back of the chair can be slightly extended. This will provide an additional playing surface. It is also convenient to store books and toys.

General drawing of an Adirondack chair

Cut out parts

Before assembly, coat with antiseptic

Fasten the parts using bolts and screws, paint all surfaces

Chair in the form of Lightning McQueen
Folding chair
Request how to do children's table with your own hands so that it can be folded is common. Models of similar design are also popular. They will fit perfectly into a small child's room.
To get a folding chair made of wood with your own hands, follow these steps:
- All parts are cut out of wood and carefully processed.
- The slats are attached to the support bars. This is how the seat of the high chair is formed.
- The front legs and backs form a frame. The slats for the backrest are attached to the supporting legs, and a crossbar is installed in the lower area.
- Both crossbars are attached to the back legs of the chair.
- A bolted connection secures 2 frames.
- Connect the seat of the chair to the front frame. Through holes are drilled and secured with bolts, which ensure folding.
A children's chair is a furniture option that is mandatory. It is easy to assemble at home even with minimal knowledge. The quality of work is ensured by the accuracy of the drawing.


Prepare the bars and connect them with bolts and screws

For every parent, sooner or later the question arises of increasing the functionality of children's furniture. All interior items in the nursery must become real transformers in order to justify the money spent on them and not stand unused. In addition, modern inventions can partially free the hands of busy mothers, turning them into a chair, a swing, or a whole set of furniture.
The first step is to assemble the chair, and then you can move on to assembling the table, which will be much easier to assemble.
Often, such devices can complicate the life of parents while they figure out how to assemble them after purchase. An ordinary children's high chair will be no exception. Of course, it is easy to assemble a high chair as indicated in the instructions, but it is not always included, and even if it is, it is not always clear to the user.
How to assemble a children's high chair "Agu"
All children's stores sell children's furniture in disassembled form, except in cases where the last piece is left on the display. To assemble the Agu model high chair at home yourself, you need to remove all the components from the box, including the Euroscrews with a special key for them. Small parts are already assembled into large parts, which makes the task easier. The easiest way is to start assembling the chair and then move on to the table.

The chair has two armrests with triple vertical wooden rods. The edge to which the rods are closest is considered the front. Connect the armrests with a transverse wooden strip, screwing it with two bolts in front of the armrests, from below. After this, the base for the high chair will be stable. Next, you should install the soft seat of the high chair into the base so that the limiter strap is in front and below. The wooden slats are already screwed to the bottom of the upholstered seat.
Its seat is secured with four bolts, and the back to the armrests with two. Now all that remains is to install the plastic tabletop, which is placed on top and snaps into place with grooves in its bottom on the armrests. On the left armrest there is a plastic adjuster for the distance of the table top. It's time to move on to assembling the table or high chair stand.
To do this, you need to connect two identical parts, reminiscent of the Roman numeral II, perpendicular to each other. On them, the places where the bolts are connected are marked with dashes. Then place the resulting structure on legs and screw the remaining part with a solid wall to form a stable structure. Connect the legs with two jumpers and secure them with bolts. This completes the assembly.
To make the high chair higher, you need to turn the table with the table top backwards and place the chair and plastic table top on top. To make a set, lower the chair to the floor again, remove the plastic tabletop, and move in a table with a wooden tabletop.
Return to contents
How to assemble a baby high chair “Baby” with your own hands

Initially, you need to remove all the feeding parts from the box and lay them out on the table. It can be immediately noted that there are much more individual parts than in the previous example, but each of them is numbered - table parts with numbers from 2 to 9, chair parts from 11.
Euroscrews with a key should also be included in the kit. To start assembling a high chair, you need to arrange all the components in numerical order into table and chair parts separately. Then you need to align and bolt the parts with the holes numbered the same numbers, starting from 12. Then connect the parts with mark 13. Next, fasten the holes numbered 11 and 14, respectively. After this, you should get a part consisting of four separate elements.
Assemble the second part in the same way, alternately connecting the same configurations of numbers, then connect these parts with a crossbar.
Now you can assemble the high chair by screwing it to the received wooden base a soft seat, while the crossbar should be under the child’s legs, and the limiter strap should hang down. The seat is secured with six bolts. The last step in assembling the high chair will be screwing wooden table top two bolts to the armrests. An additional hole in the armrest will allow you to easily adjust the position of the tabletop in the future by moving it away or moving it closer to the child and twisting it.

Thus, the high chair is assembled, all that remains is a stand or table for it. The logic for collecting is the same. Select four elements with cell numbers 3 and screw them together. The result should be a part in the shape of the letter H. The second similar part should be twisted in the same way from four elements according to the numbering of cells 3. Only the attachment of the last element of the part will differ, it will be numbered 2 and will not be twisted joint to joint, but as a result of superimposing one strip on another.
All that remains is to assemble the feeding table by connecting all the large parts. First, you need to combine the table top with the leg, twisting the cells with numbers 5. Add the third part and twist the cells with numbers 6. Secure the resulting structure with two wooden planks with cell numbers 4. After assembly, be sure to check the strength of all connections, additionally tightening them with a wrench. It is not recommended to tighten the bolts too tightly, as this can shorten the service life of the product and increase wear on threaded connections.
To make a high chair for feeding a child, a chair with a soft seat must be placed on a table, and its table top should be under the legs in front or behind, as the parents wish. And to get a set of furniture, you need to lower the chair, for convenience, unscrew the small tabletop from it and move a large table on the floor.
With the birth of a baby in the family, parents strive to surround him with the highest quality and reliable things. This applies not only to toys and clothing, but also to furniture items.
A small child does not need as much furniture as adults. But he must have: , and for feeding. The stores provide a huge range of children's furniture for every taste. But most young parents prefer to make furniture items themselves.
They explain this not only by savings family budget, but also because children’s furniture made with your own hands will turn out to be more reliable, functional, practical and safe. In this article we will look at self-production baby high chair.
A high chair is necessary for children from seven to nine months. With it, they will be able to eat with adults at the dinner table. WITH correct design Using a high chair, the baby’s motor system and posture will be correctly formed.
There are special requirements for such a children's furniture item.:

As for the variety of designs, a children's high chair can be made:
- On high legs. On it the baby will be at the adult level. This is the most common model that is in demand among consumers.
- WITH soft case. This chair is attached to dining table. It is compact and ergonomic. The light weight of the product allows you to take it with you to the dacha or on a visit.
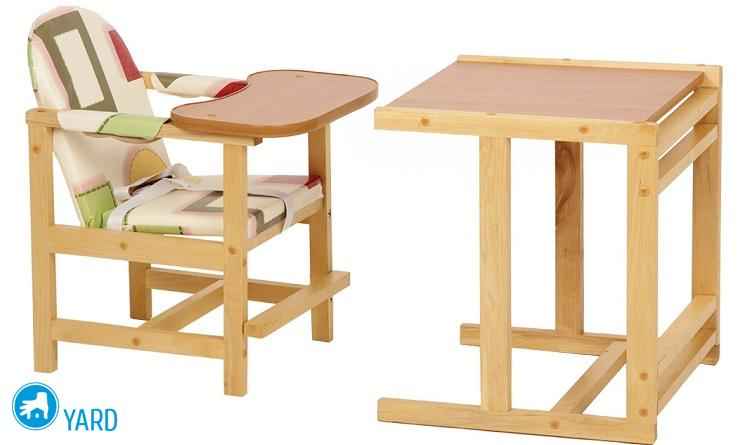
- Combination chair. It consists of a chair and a table that transforms into a high chair for feeding.
Advice: The chair should be made portable so that you can take it to the bathroom and wash it after a bad meal.
Wood or plywood?
Everyone knows that children's furniture should be made from environmentally friendly and non-toxic materials. Most suitable for these purposes:

In addition to lumber, to make a children's high chair you will also need to select varnish or paint. These must be hypoallergenic and safe materials, which do not cause irritation for small users.
 When choosing paint, it is better to give preference to materials based on acrylic base
. They do not emit a strong odor, are safe and have bright and rich colors.
When choosing paint, it is better to give preference to materials based on acrylic base
. They do not emit a strong odor, are safe and have bright and rich colors.
When choosing a varnish, opt for a turpentine-based material. It contains no toxic substances and will not harm the child's health.
If you decide to decorate furniture with fabric for more convenient use chair, then special requirements are also imposed on its choice. In addition to the fact that the fabric should be hypoallergenic, it should not stain.
It is better to choose wear-resistant materials that are resistant to negative factors. WITH inside You will definitely need to add a small layer of foam rubber or synthetic padding.
Advice: good choice Bologna fabric or raincoat fabric will be used for upholstery.
The filler is glued to the frame using wood glue or it can be attached with a furniture stapler. The upholstery is stapled to the frame of the product.
Diagram and drawing with dimensions
Once you have decided on the design of the table, its dimensions and materials of manufacture, you will need to make a competent plan and drawing of the future piece of furniture. This will not allow you to make mistakes in the work process and will guarantee that the baby feeding table will be assembled correctly and competently. You can make a drawing of furniture in different ways:
- Draw with a pencil on graph paper. To do this, you need to be able to calculate dimensions and have an idea of how the parts will look in different projections.
- Find suitable option furniture on the Internet. Such option will do for beginners in carpentry. Here you can ask questions on the forums to the same craftsmen in furniture making.
- Make a diagram using a special computer program. This option is suitable for people who know how to use a personal computer. In this program it will be possible to calculate the sizes of all individual parts and even calculate the total amount of lumber needed.
Which option to choose is up to you. The main thing is that the drawing of a high chair for feeding a baby is designed wisely.


Attention: To calculate the dimensions of a high chair, experts use a special table. If the baby's height is from 80 to 90 cm, the seat height should be 20 cm, and the width and depth should be 33 and 26 cm.
Tools
 To make a highchair you will need the following tools:
- grinding machine;
- a screwdriver or drill with different drill bits;
- electric jigsaw;
- hacksaw for wood.
Materials needed:
- hinges, screws, fastening elements;
- wood glue;
- furniture stapler;
- Fiberboard and plywood;
- brushes;
- upholstery fabric and padding polyester;
- paint and varnish materials.
Step by step instructions
You and I will make a combined high chair for feeding your baby with our own hands. That is, this model consists of a low table, on which a small chair with restrictive rings is installed. This is the most common and convenient option high chair.
During the work we will need to separately build a small table and chair. It can easily be transformed into a high-legged chair for dining, and when the baby grows up, it can be used as a table with a chair for playing games.
Manufacturing of wooden parts
So, the work of making a high chair begins with a blank necessary details . We will make them from:

To assemble the highchair you will need the following parts:
- legs (4 pieces, length 39 cm);
- cross bars (3 pieces, 20 cm long);
- 4 rounded elements;
- table top dimensions 20 by 34 cm
- top crossbars (2 pieces, 22 cm each);
- lower crossbars (2 pieces, 34 cm each).
To make the table we need the following parts:
- legs (four pieces, 50 cm each);
- cross slats (four pieces of 34 cm each);
- plates (four pieces, 41 cm each);
- tabletop dimensions 38 by 45 cm.
After preparing all the parts, they must be thoroughly cleaned with a grinder or sandpaper.. If desired, the parts can be stained and varnished or simply coated with water-based enamel.
Attention: You can round off the details of a highchair using special machine or using electric jigsaw. Under no circumstances should children's furniture have sharp corners so that the child cannot be injured by them.
The parts are fastened together with dowels (purchased at any furniture store) or self-tapping screws.
How to assemble?
After manufacturing the parts, you can proceed directly to assembling the product. The high chair is assembled in the following sequence:

Important: in places where individual elements are fastened, holes are made using a drill for fastening elements up to 3 cm deep.
How to make children's furniture soft?
To make the highchair more comfortable to use, its seat and back can be made soft:

That's the whole simple process of making a baby high chair.
Photo
Ideas for the final decoration of the resulting result can be seen in the following photos:


Useful video
The detailed process of manufacturing, assembly and upholstery can be seen in the following videos:
Conclusion
In conclusion, it is worth noting that some parents believe that it is much easier to simply buy ready-made option baby high chair. Moreover, they are sold in a wide range and are not so expensive. But with such a purchase you cannot be sure of the reliability and durability of the furniture item.
If you are very concerned about the safety of your baby, you have some free time and you know how to handle power tools, try making a quality piece of furniture for your child with your own hands. As a result, you will get a functional, stylish and very comfortable table and a chair made from environmentally friendly materials.