Caulking a log house with moss: which is better, jute, moss or tow - reviews. Do-it-yourself caulking of a log house Caulking a bathhouse from timber
Caulking the walls of a log house is labor-intensive process, which, if its technology is followed, will ensure the preservation of heat in the house during cold times. Detailed analysis work sequences, the right choice The tools and materials presented in this article will help you insulate the seams with your own hands.
Tools
The main tools for caulking seams are spatulas (caulkers) and a mallet. The blades are made of wood or steel. The wood of the caulk should be softer than the material of the logs, otherwise marks will remain on the walls. Over time work surface The wooden caulking becomes shaggy, then it is replaced with a new one.

Metal caulks are used for corner cuts, where it is especially important to fill interior space bowls. Using a mallet, gently tapping the caulk, compact the insulation bead and push it inside the seam.

Material selection
It is used for insulation and sealing of seams in log walls. natural material(moss, jute, tow, etc.) and modern artificial polyurethane foam, polyethylene foam, mineral wool and other inter-crown insulation.
Sphagnum moss
Moss was preferred in the past to insulate the joints of logs. Sphagnum and cuckoo flax (red flax) were laid in the seams of the log house. Sphagnum moss was fluffed up and laid across the logs in several layers (5-10 cm) with an overhang of up to 5 cm from the seam. Cuckoo flax was placed along the crown and also in several layers (5-10 cm) with overlapping joints.

Before laying, the moss is wetted, and it dries in the wall structure. Absorbing moisture, moss quickly releases it and does not rot. Due to its natural qualities, it is a very good antiseptic, therefore it also protects wood from biocorrosion. Its disadvantages include the difficulty of uniformly creating a uniform thickness of the seam.
Jute rope
Jute fiber is made from the jute plant, which belongs to the linden family. Insulation for caulking made of jute is stronger, more durable and moderately hygroscopic. Even with high humidity premises, for example, in baths, jute absorbs no more than 20% of moisture.


Tow
Tow is tangled flax fiber. It is made from waste obtained by scuffing and crushing flax. It should not contain foreign impurities; a small amount of brome (the woody part of the stem) is allowed. Tow for caulking can only be used when it is dry, soft and without a putrid odor. The inter-crown seam of tow should be 0.8-1.2 cm.

Hemp
Previously, hemp was also used for caulking log houses. It was obtained by soaking hemp stems for a long time in running water(up to 2-3 years). It is distinguished by its fiber strength, resistance to decay and exposure sun rays. Today, hemp products are also represented in the range of building materials.

Modern materials
The use of artificial materials for caulking seams is becoming increasingly widespread. These include mineral wool fiber, polyethylene foam, and inter-crown sealants. Their advantages are: bio- and moisture resistance, elasticity and vapor permeability, which is important for wood. Self-expanding sealing cords seal the seam almost perfectly.


Seam caulking technology
The entire process of caulking log walls can be divided into two stages. During the assembly of the log house, the first stage is carried out. The insulation is spread over the top of the mounted log. For the convenience of caulking, felt tape is used, the raw materials for which can be flax, jute, or hemp.


After installing the logs, the hanging ends of the seal are simply wrapped into their joints. Caulking of the seams of a log house is done in two ways: “stretched” and “set”. During construction log house The most commonly used method of compaction is “stretching”. To do this, the free edges of the insulation are rolled up with a roller, which is pressed into the seam. The width of the roller should be 1-2 cm.

In the case of loose fibrous insulation (moss, tow), when folding the roller, it is important to select adjacent hanging ends, constantly twisting them with the previous ones to obtain an even and durable seam.
“To set” the seam is usually sealed during the second caulking, which is done after the building has settled (after 1-2 years). Walls made of logs give rise to sediment due to compression of the insulation in the seams and shrinkage of the wood.

When the ends of the insulation are not enough to create a bead or the seams are too wide during the initial caulking, the “set” method is used. To do this, prepare a bundle in advance from the selected sealant; you can use a ready-made rope or rope required thickness. Loops are made into wide seams from the rope, which are driven into the space between the logs until the required compaction is achieved.
Work on caulking a log house always begins with lower crown and is carried out along the entire perimeter of the seam. First compact outer side pairing the logs, and then the inner one. You can move on to the next crown only when the entire previous one has been caulked.

The rope or roller is secured in the seam using caulk, which is tapped first top part insulation, then the bottom and only then the middle. If necessary, use a mallet, hitting the end of the caulking handle with it.
When sealing the seams of a log house, it is necessary to constantly check the horizontalness of the logs and the verticality of the walls. A seemingly simple compaction process may well distort the position of individual parts of the house structure, move them from their original place or lift them.
Secondary caulk
Modern technologies for protecting the connection of logs in a log house provide for sealing the seam (warm seam). The advantage of this solution for seams in wooden houses are:
- plastic;
- durability;
- resistance to sunlight and influence external environment;
- high thermal insulation properties;
- vapor permeability;
- biostability.

The seams are sealed like re-caulking. Device technology " warm seam» mainly consists of the following steps:
- Preparing the surface of the insulated seam. To do this, clean the logs at the work site from dust, dirt, and grease stains. The sealant may not adhere to walls coated with varnish, wax, or any oils. It is better to test the adhesion of the sealant to the treated surface of the log before starting work.
- Installation of a sealing cord, for example, made of extruded polyethylene. It cannot be glued to the wall, it is simply inserted into the seam.
- Applying sealant. Before starting to cover the cord and part of the logs with sealant wooden surface moisturize. You can stick masking tape on both sides of the seam to ensure the same width of the coating. Depending on the packaging, the sealant is applied either with a spatula or with a mounting gun. The layer thickness is allowed to be at least 4 mm, but not more than 10 mm.
- Seam formation. The seam is smoothed and formed using a suitable spatula within 15 minutes after applying the sealant. Then you can delete masking tapes. Excess substance is cleaned with a damp cloth or sponge.


Patience and thoroughness in performing caulking work will be fully justified by the durability of the structure and warm walls at home, so that you don’t have to seal the cracks later. Choosing an effective method of insulating the seams of a log house and a sufficient amount of material for this will significantly reduce heating costs in cold weather.
Caulking a log house is a painstaking process that requires patience and great effort. Everything matters here: the tool, the quality of the material, the sequence of work. Without the appropriate experience, not everyone can properly caulk a log house, so first you need to familiarize yourself with the technology, study caulking methods, and choose the right inter-crown insulation.
Caulking of a log house is carried out in two stages - immediately after construction and after some time, when shrinkage occurs. Primary (or rough) caulking can be carried out in two ways: with laying insulation during the process of assembling the walls or performing one-time work upon completion of construction.

1 way
Lay the bottom row of logs on the base.

Then the insulation is spread on top so that the ends of the material hang evenly on both sides. Next, lay the second crown, and again a layer of insulation. This is repeated until the very top of the log house. After all work on the construction of the log house is completed and the roof is installed, the protruding ends of the seal are driven into the gaps between the beams using caulking.

Method 2
Caulking begins after installation roofing system to the log house Insulation (preferably tape) is applied to the seam of the bottom row and, using a tool, is pushed into the gaps between the logs along the entire length, leaving hanging edges 5-7 cm wide. Then these edges are folded in, formed into a roller and hammered inside the seam. Repeat the procedure in the next row and so on until the top of the structure.


The second stage of caulking is carried out after shrinkage of the log house - after 1-2 years. The selected insulation is applied to the cracks between the crowns and driven tightly inside. You should always start work from the bottom row, and be sure to do it along the perimeter of the log house.

You cannot caulk one wall first, then the second, and so on. In addition, each row is caulked both from the outside and from the inside to avoid distortions in the structure. The insulation raises the frame by 5-10 cm, and its uneven distribution contributes to the vertical deviation of the walls. IN in some cases The log house is caulked for the third time - 5-6 years after construction. During this time, the wood completely shrinks and new gaps form.

There are two ways of caulking - “set” and “stretched”. The first is used to eliminate wide gaps between logs, the second is usually used during primary caulking, when the gaps are still narrow.
To work, you need tools - a set of caulking tools, a road worker and a mallet. As a rule, metal caulks are used, although many craftsmen make them themselves from hardwood.

| Name | Description | What is it used for? |
|---|---|---|
| Flat metal or wooden spatula. Blade width 100 mm, thickness 5-6 mm | The main tool for filling gaps between crowns | |
| Flat chisel with a blade width of 50-60 mm and a thickness of up to 5 mm | Used to seal seams in corners and rounded areas of a log house |
| Caulk triangular shape With longitudinal groove along the blade. Width - 170 mm, thickness 8-15 mm | Tool for forming even beads from twisted strands of compaction | |
| Thick and narrow wedge up to 35 mm wide | Widens narrow gaps, making it more convenient to fill with insulation | |
| Wooden hammer | Used for filling the seal with wooden caulks |

The caulking blades should not be sharp, otherwise when driving the material they will cut it. Pay special attention to the surface of the blades: if it is rough, the insulation fibers will cling and be pulled back out of the seams.
Caulking materials

The following materials are used as inter-crown insulation:
- red and white moss;
- tow;
- felt;
- jute;
- flax wool
| Type of material | Description |
|---|---|
| Ecologically pure material, which has antiseptic properties. If you independently procure raw materials, the costs of insulating the log house will be minimal. It is usually collected late autumn, when there are no snails and fewer insects. Immediately after collection, the moss is sorted, lumps of earth and debris are removed, and slightly dried. There is no need to dry it too much, otherwise the stems will become too brittle and unusable. Purchased moss must be soaked before caulking to make installation easier. Pros: durability, low thermal conductivity, resistance to temperature changes, environmental friendliness, antimicrobial properties, low cost. Cons: difficult to find on the market, requires protection from birds, requires pre-treatment before installation |
|
| Tow is suitable for the initial caulking of a log house and for sealing the crowns after shrinkage. It is made from flax fibers, and depending on their quality, it is divided into bale and roll (tape). Rolled fiber consists of shorter and stiffer fibers, which makes it difficult to stuff between the crowns. Tape tow better in quality, softer and more convenient for caulking. Pros: has low thermal conductivity, does not electrify, is highly absorbent and dries quickly, has bactericidal properties. Disadvantages: labor-intensive installation, unaesthetic appearance of seams after caulking. |
|
| Until recently, natural felt was widely used in the insulation of log houses. Now its composition is supplemented with synthetic and plant fibers, which significantly improve its individual properties. And yet, felt insulation without additives, it has a number of advantages: it has high vapor permeability, does not allow odors to pass through, provides good noise insulation, has low thermal conductivity, is easy to use, and environmentally friendly. Cons: susceptible to rotting, easily damaged by moths |
|
| Traditional insulation materials are increasingly being replaced by materials such as jute. It is available in the form of fibers, ropes of any thickness, and also in the form of tape. Tape jute is soft and pliable, compacts evenly, and is used for both primary and repeated caulking. It is more convenient to use jute fibers and ropes after shrinkage of the log house. Pros: it is durable, not damaged by moths and other insects, does not rot, provides favorable microclimate in the building. Cons: the material cakes quickly, short service life. |
Prices for tow

Primary caulking “stretched”
The whole process is divided into two stages - laying insulation between the logs during the construction of a log house and the caulking itself. The insulation is laid after installation of each crown. If moss is used, it should be slightly damp.
Take a large bunch of moss and lay it in fibers across the log so that the ends of the fibers hang down on both sides by 5-7 cm. The next bunch lies close together.

The fibers must be evenly distributed over the surface, forming a layer of equal thickness. The wood should not show through the moss, so make the insulation layer thicker. It is better to put too much than not to add, because a thin layer will not be able to effectively protect the seams from blowing.

If you use tape insulation, installation is much simpler and faster: the tape is rolled out along the crown and secured with the staples of a construction stapler. When the tape runs out, the new piece is overlapped by 5 cm so that there are no gaps at the joints. After the entire row around the perimeter is covered with insulation, the second crown is installed.

So, the log house has been erected, the roof has been installed, and the walls can be caulked.


The procedure for caulking and sealing cracks after shrinkage of a log house
It is more convenient if the insulation is tape, then forming a roller out of it is much faster. When twisting the material, it must be slightly stretched along the seam, which promotes greater compaction and uniform distribution of the insulation. Sometimes the thickness of the roller is not sufficient to fill the gap, then they take additional strands and wrap them in the hanging ends of the material. After this, the thickened roller is driven into the gap.

If during the construction process insulation was not laid between the logs, caulking is performed in the manner described above, only more material will be needed. It is necessary to apply it to the seams with the fibers across. The longitudinal arrangement of the fibers will not provide the required density; the material will not be able to be firmly fixed and will constantly crawl out of the grooves. When choosing a tape compactor, make sure that the width of the tape is several centimeters greater than the thickness of the log. Edges that are too short are difficult to tuck, and therefore the quality of caulking will be poor.
- The edge of the tape is laid on the ground near the corner of the log house and retreated along the wall, unwinding the roll. The material cannot be pulled, it should simply lie in an even strip on the ground. It is very important that the tape does not twist during the unwinding process. Having reached the second corner, the roll is also left lying, nothing is cut off yet.

- Return to the beginning of the tape, take it by the edge and place it over the seam. Using a caulking blade, press the tape in the middle, leaving the edges to protrude by 5-7 cm. In this way, the entire inter-crown seam is passed.

Insert insulation into the seam
- Measure out another 25-30 cm of tape and only then cut it off the roll. This reserve will allow you to hammer the grooves more tightly without adding insulation.
- Now, little by little, straightening and tucking the edges of the material, they begin to caulk the seam. The tape should completely disappear into the gap between the logs along with the reserve.

- As a rule, one layer of tape is not enough for high-quality filling, so everything will have to be repeated two or even three more times.
- The finished seam should protrude from the grooves no more than 3-4 mm and be of uniform thickness.

Prices for caulk
caulk
If the gaps between the crowns are very wide, caulking is used “in a set”. For these purposes, tow, hemp ropes or jute cords are used. Long strands are formed from tow and wound into a ball. Finished cords or ropes are also wound into balls for convenience.

Start from the edge of the lower crown:
- clear the gap, removing loose chips and debris;
- unwind a small amount of cord, fold it into loops and push it into the gap with caulk;
- seal the loops first in the upper part of the gap, then in the lower part;
- put another strand on top, now without loops, and straighten it with a road worker.

Further along the seam, the strands are laid in one layer until the next gap. The more densely the voids are clogged, the better the insulation. Try not to leave hanging fibers: firstly, they spoil appearance walls, and secondly, the seal can be pulled away by birds. Having finished caulking the first row, they move on to the second, and everyone repeats in exactly the same way.
To make the log house decorative, you can hammer a jute cord along the entire length of the seams.

Caulking corners
The corners are caulked separately after the work on the walls is completed. It is also more convenient to use tape insulation here.

Since the seams between the logs at the corners have a semicircular shape, you will need a curved caulk.

Step 1. The tape is positioned vertically. Take it by the edge, apply it to the corner seam and press it inward with caulk. They step back a little and drive the material into the gap again.
Step 2. As soon as the insulation has been secured a little, they begin to tuck the protruding edges and drive them deeper into the cracks.
Step 3. After filling and leveling the top seam, move on to the second. The material must be constantly straightened and stretched a little so that it lies more evenly.
This is how the entire corner is sequentially compacted. The seams should not protrude more than 5 mm, otherwise the appearance will be sloppy.

Video - How to caulk a corner of a log house
Caulking a log house with sealants
Caulking of log houses with special sealants, which are easy to apply, give the seams a very aesthetic appearance and reliably protect against blowing, is gaining popularity. If the log house is made of rounded logs or laminated veneer lumber, and jute is laid as insulation between the crowns, you can only use sealant and a rope made of foamed polyethylene. Sealing of seams is carried out no earlier than shrinkage of the log house occurs.
Step 1. The joints between the logs are cleaned of dust and clogged debris and wiped dry with a rag.
Step 2. A primer primer is applied along the perimeter of the seams using a brush or sprayer. If work is carried out in winter, the primer should be rubber-based; in summer, water-based.
Step 3. After the primer has dried, a rope of foamed polyethylene is inserted into the seams, the diameter of which is selected according to the width of the gap.


Step 4. Apply sealant. They use the composition in tubes, which is applied using mounting gun, in buckets and in the form of a tape. The last option is very easy to use: remove the tape from one side protective film, apply to the seam, press with your hand and roll with a roller.


Step 5. After sealing all inter-crown joints, remove the outer layer of film so that the sealant hardens. Finally, the joints are coated with colorless varnish or a tinting compound is applied, depending on the color of the sealant.

When applying the composition with a spatula or from a tube, the sealant should be smoothed and the excess should be removed with a damp cloth.
If the logs for the log house were harvested by hand, more uneven gaps will form during shrinkage. Here, one sealant and a polyethylene cord will not be enough. In such cases, caulking is performed traditional way, after which the seams are sealed with sealant. After such treatment, there is no need for subsequent caulking.
Video - How to caulk a log house
Comments: 0
IN modern world the meaning of the expression - my home is my fortress - takes on slightly different shades and is not limited only to the strength of the walls and the reliability of the castle. Increasingly, in order to increase productivity and reduce the cost of materials, manufacturers resort to dubious schemes, adding various fillers to their construction products, which, when decomposed, release harmful substances.
This factor, together with the unfavorable environmental situation of the current world, makes a negative contribution and can pose a real danger to human health.
To protect yourself and your loved ones, as well as to eliminate the possibility of harmful effects, you need to use proven and reliable materials that will help in the construction of your home and various outbuildings. Wood is not only an environmentally friendly product of nature, but its use will contribute to the long-term presence of any building on the list of fashionable and modern objects. The reason for this factor is that, despite centuries of experience in using wood, this material is a classic, and has long earned its place of honor, which cannot be influenced by either alternative opinions or fashion trends.
In addition to the environmental and external components, one of the main advantages of wood is its thermal conductivity. Houses made from this material are distinguished by the warmth of their rooms and internal comfort. But in order to achieve such indicators, it is necessary to carry out a certain type of work, this especially needs to be done when the construction of a log house is carried out using logs, since the cracks and various holes are a constant companion of such walls.
Despite the fact that most experts try to eliminate this issue during the construction of a log house, it still remains relevant for a long time. The reason for this phenomenon is the fact that the insulating layer laid between the wooden elements loses its properties and original advantages during the shrinkage of the house. For this reason, it is necessary to additionally caulk the entire building. It is better to carry out this process in 3 stages, which fit within the following time frame:
immediately after construction;
1-2 years after its completion;
4-6 years after the construction of the house.

The need for repeated actions lies in the tendency of wood to change its physical parameters under the action external influence. Wood can change its configuration not only due to pressure during the shrinkage process, but also due to changes in moisture levels, leading to the formation of cracks.
Among the many materials that can be used in these matters, the most frequently used and with a sufficient number of advantages is tow. So the question is: How to properly caulk a log house with tow? – quite often found among people who dream of their own home made of wood.
To successfully resolve this issue and do everything efficiently and reliably, you need to take into account several rules leading to achieving the desired result.
You need to caulk along the entire perimeter, starting from the lower levels. Intensifying the process in one direction can lead to displacement of the frame and aggravate the situation.
It is best to caulk before final finishing buildings because this process may raise it a little general level. This technique will allow for more rational use finishing material, and will eliminate the danger of having to redo such work.
After insulating the outer perimeter of the building, it is imperative to switch to inner side, which will strengthen the overall positive picture.

These points, in most cases, are the main guarantee of a high-quality result and solution to the question: How to properly caulk a log house with tow.
Besides general rules It is worth familiarizing yourself with the technology of insulation using tow. You can caulk with this material in 2 ways - in a stretch and in a set.
In the first case, a strand is made from tow, which is applied to the problem area. The strand is driven into the slot using special tool, called caulk. The caulking chisel, as this product may also be called, really has the shape of a chisel with a distinctive feature in the form of a wide and flat end. The tow should be packed as tightly and deeply as possible, without the possibility of self-extraction. The edges of the insulation should protrude from the wall at a distance of 5-6 cm, since they will serve as a connecting link for the next formation, the edges of which will need to be intertwined and driven into the gap.
Insulation in a set is used in cases where the size of the cracks is large enough, and the use of strands does not lead to a positive result, as a result of which it is impractical. In this case, the tow is divided into separate strands, from which a roller is subsequently formed. This roller is driven into the crack, and this process must be started from its upper part, and the lower part must be sent into the depth of the crack last. Thanks to this technique, a seal of tow will be formed on the surface of the tree, which will be difficult to remove and also to influence mechanically.
Caulk with moss
In caulking with moss, the main thing is no longer compliance technological subtleties- in this respect it is much simpler than caulk fibrous materials- and the procurement of material. More precisely, purchasing. Forest and bog building moss goes on sale, but self-harvesting of tree moss is possible only in certain places very remote from civilization, and self-harvesting of bog moss in most developed countries is prohibited and prosecuted by law: in recent decades it has been detected exclusively important role swamps as moisture accumulators and regulators of natural processes. In addition, mosses actively accumulate many useful and harmful microelements; swamp moss is a natural filter of radionuclides. By caulking with moss collected yourself, you risk not only infecting the log house with rot, mold and pests, but also yourself and your loved ones with something no better.

The best moss for caulking is bog sphagnum, or cuckoo flax, pos. 1 in Fig: it never wakes up in buildings and releases substances that protect wood from damage. But you can’t caulk it with bright green fresh sphagnum (item 2) - it will overheat, on the contrary, ruin the frame. You need to caulk with moss (both swamp and forest), dried until it withers without rotting, pos. 3. This moss is sold in bags (item 4). It must be stored in them until use, not allowing it to dry out completely: moss that is still slightly alive is suitable for caulking. Dried gray or brown building moss (item 5) is not caulk, but insulation material. By the way, very good.
Note: It is impossible to caulk with rock and ground moss - particles of the substrate with germs of wood pests will certainly remain in it.
Procedure for caulking with moss
They caulk with moss before winter. In the spring, when it gets warm but not dry yet, the hanging festoons are checked (see below) and the green ones are plucked out. Then the scallops are tapped into the grooves. It is very important to prevent the caulk from drying out: if the moss begins to crumble under the caulking tool, the entire caulk will never be intact, and every 2-5 years you will have to re-caulk, and the entire log house will not stand as long as it can. A year later, the building is checked and, if it is split, a secondary caulk is carried out with the same (!) moss.
Sphagnum moss is laid out in the grooves when assembling the log house as a mountain (item 1 in the figure below), because It cakes heavily under pressure. The festoons of bog moss should hang abundantly from the grooves, pos. 2. Immediately after assembling the frame, moss is added to the remaining cracks (shown by arrows in position 2), tamping with a scythe on top wooden caulk. Quite easily reviving tree moss, on the contrary, is laid out sparingly but tightly so that there are no empty cracks, pos. 3. Its festoons should protrude from the grooves of the assembled frame for approx. half the palm of your hand, but not hanging down, pos. 4. Hanging ones (shown by an arrow in position 4) are cut off.

Instead of moss
In coastal areas, you can find durable log buildings, caulked instead of moss with damask - eelgrass or eelgrass thrown ashore by storms. Kamka also good insulation and in this capacity it is now sold dried, but caulk can only be done with damp, fresh stone. But digging with damask turns out to be excellent: it releases salts into the tree, making it unsuitable for pests, and releases iodine into the air in the room. Which, as is known, among others beneficial properties, promotes the removal of cumulative poisons and radionuclides from the body. They caulk with damask like moss, with some differences: they take it apart into flat strands and lay them out in the grooves of the log house in a herringbone pattern without gaps so that the ends hang down half a log. Upon completion of the assembly of the log house, the ends are tapped into the grooves with wooden caulk.
Synthetics and sealants
Synthetic caulking is used in combination with rough jute tape, or, for “aesthetics,” with twisted white jute rope. The rough tape is placed in the grooves of the frame under caulking with sealants without wings, flush with the edges of the groove. If the logs have a Finnish groove, then the edges of the tape should lie exactly on the longitudinal cuts in the log under the edge protrusions of the groove of the upper log.
Sealants for wood are chemically neutral polyurethane: silicone is less compatible with wood in terms of mechanical and physico-chemical properties (in particular, in terms of the thermal expansion coefficient TCR), and is destroyed under the influence of even very weak acids. In turn, the silicone solvent - acetic acid– spoils the wood, so do not try to replace special sealants for wood with ordinary construction ones. Synthetics are used to caulk mainly log houses made of laminated logs and timber - their estimated service life is the same as that of glue seams re-glued lumber.
Caulking with sealants is done quickly and simply: the initial composition is squeezed out of the tube into the groove, pos. 1 in Fig.. When it has set, the seams are puttied on top with a finishing compound to match the wood, pos. 2.:

There is also an “ultra-modern” method of caulking log houses built without rough caulking at all: cuts are made along the seams, strands of self-expanding polyethylene foam are inserted into them and sealed with wood-like sealant, pos. 3. In essence, this is no longer caulking, because This method is suitable for buildings made of lumber without shaped grooves, assembled on dowels and impregnated with water repellents (water-repellent impregnations). In addition, it is only suitable for selected chamber-drying materials that are completely dried and settled. And then what will happen with warping from moisture during operation - we’ll wait and see: in practice, “caulk-free caulking” has so far been used for no more than 10-12 years.
Let's return to caulking, which is still caulking, albeit synthetic. Finishing compounds darken when dry, so they are selected to match the wood using test strokes on the container. But in the light, the finishing synthetic caulk fades and the walls of the log house take on the appearance shown in pos. 4. Some people, since such “decoration” cannot be avoided, order caulking seams to be glued or filled with white twisted cord. How much this adds “aesthetics and respect” to the building is a matter of taste for the owner. And there is no arguing about tastes. Moreover, about the tastes of people who believe that natural wood needs additional “refinement”.
It is much more practical to use synthetic caulk to seal gaping cracks in logs, pos. 5 in Fig. On top of the sealant, the cracks are filled with any wood putty for exterior use, and the entire structure is rejuvenated. The putty has to be renewed every 2-3 years - it also fades in the light - but this does not last long, it is not difficult and inexpensive.
The final touch - sanding
Caulking has not yet completed the construction of the log house until it is ready for flooring, installation attic floor, roofs, installation of windows, doors, partitions, for finishing and equipment - the log house is desirable, but the inside must be sanded. Especially - chopped from wild log, debarked by hand.
Sanding a log frame with sandpaper is extremely time-consuming, tedious, and this damages the outer most resistant layers of the wood. The log house is sanded manually using a universal grinder With nylon brushes. Worse - an angle grinder with them; drive is too powerful. But the main thing here is still brushes for sanding wood, see video review:
Video: review of nylon brushes for sanding logs
Sanding a log frame with a brush is actually a controversial issue: the brush removes the bead of caulk, see fig..
Caulking a log house raises many questions for beginners. You should first decide when to insulate the bathhouse and which heat insulator is suitable. You can caulk the cracks in the building with your own hands without the help of specialists. Let's consider the nuances of this process.
Content:
The insulation of a log bathhouse is carried out using the caulking method. To do this, a heat insulator is driven into the inter-crown gaps. This is necessary to prevent condensation and, as a result, wood rotting. Caulking a bathhouse is a long, labor-intensive and painstaking process. The first time the building is caulked is during the construction phase or immediately after it. The second time is after a year or two, when the logs shrink and additional cracks appear. The third caulk is made 5–6 years after construction. This is exactly the period that must pass for the final shrinkage of the structure.
Choosing material for caulking a log bathhouse

You can choose natural material or artificial. The main thing is that it must have low thermal conductivity, not emit odor, be environmentally friendly and resistant to temperature changes. For selection optimal insulation The thickness of the timber also affects.
For caulking use:
- Lnovatin. It is environmentally friendly and has high heat-protective properties. Absorbs moisture and releases it. Attach the tape with a construction stapler. The disadvantages include a short service life (up to three years). To prevent insects from infesting, it is treated with a special chemical solution. This has a negative effect on the atmosphere of the steam room.
- Hemp, linen, jute tow. Eco-friendly material. It is popular due to its thermal insulation and antiseptic properties. However, it absorbs moisture, and therefore its service life is up to three years. After which it is very difficult to remove it from the inter-crown gap. It is more convenient and faster to lay combed tow.
- Jute. Durable, moisture-resistant, environmentally friendly, heat-insulating and rot-resistant material. It is produced in several types. Jute tow is not dense and hard enough. Laying takes a long time and must be done several times. Jute felt is dense and flexible. Before caulking, you need to treat it with a solution to prevent rotting and the appearance of moths. Flax-jute has all the disadvantages of flax wool. Therefore, it is not recommended for insulation.
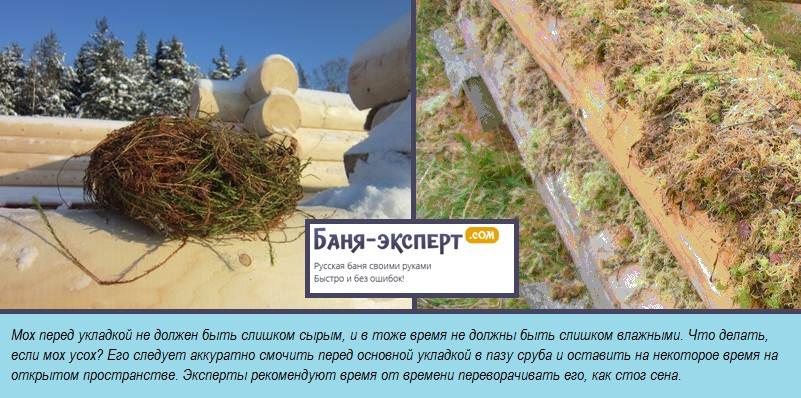
- Forest, white and red swamp moss. It has been used for several centuries due to its antiseptic and bioactive properties. It does not rot, does not promote the proliferation of microorganisms, quickly absorbs moisture and is environmentally friendly. The only drawback is the difficulty of installation. When choosing moss, pay attention to its moisture content. It should not be completely wet or too dry. Before caulking, the moss is moistened. The procedure for such insulation must be repeated 6 months after construction and after a year and a half.
- Hermetic composition. Working with such material is easy and convenient. It can be selected according to the color of the log house. It is produced in different types. The soft sealant is squeezed out of the tube into the gap. A cord made of foamed polyethylene is pushed into the inter-crown space and opened with varnish. The briquettes are also pressed into the gap with an electric sealing gun. One of the disadvantages is the transformation of the material into a monolithic substance. When the logs are deformed, it damages the fibers. This can be avoided by using flexible sealants.
Methods for caulking bath walls

To insulate a log house yourself, you will need a mallet, a road builder and a set of caulks - type-setting (with a narrow spout), split (to expand the seams), curved ( curved shape). It is better to choose tools made of wood to prevent damage to the logs.
There are two methods of caulking a bath:
- Stretch. We hammer a strand of insulation with one side into the gap. We bend the other side and tamp it inward.
- Recruitment. Strand thermal insulation material We put 1.5 cm thick into loops and hammer each one across the gap with breaking caulk. We compact the top with a road builder.
Technology of caulking baths with moss

You can reliably caulk a log house using moss (from 16 thousand rubles), vegetable oil, water, and soap.
The process of insulating a bath is carried out in the following sequence:
- Making a solution. Dilute vegetable oil (0.5 l) and soap (200 grams) in a bucket of water.
- Wet the moss in the solution.
- We twist the ends of the heat insulator into a kind of roller and compact it tightly into the gap.
- We apply a spatula to the insulation and tap it with a mallet.
- We start caulking from the bottom seam. We process it around the perimeter of the bathhouse and only after that we begin to caulk the second one.
Instructions for caulking baths with tow

To prevent insects from infesting the insulation, it must be treated with a disinfectant solution. To caulk a log house with tow, you will need an antiseptic (formalin), water, tow (from 40 rubles per kilogram).
Thermal insulation occurs step by step:
- We make a formaldehyde solution (antiseptic).
- Soak the tow in it for 30 minutes.
- We drive the insulation into the inter-crown gap using tools.
- Tap the spatula with a mallet to compact the material as tightly as possible.
Method of caulking baths with jute

This is the caulking method. First you need to decide on the type of jute. Then prepare it for insulation. To caulk the log house as efficiently as possible, we will need jute (about 6 rubles per linear meter), resin or bitumen (if we use jute felt), formaldehyde (if we use jute tow).
The process should follow the following sequence:
- We prepare the material for work. If necessary, soak it.
- We twist the jute into strands and hammer them into the inter-crown gap of the bottom seam.
- We caulk the edges.
- We straighten the seam using a road builder.
- We move on to each tier sequentially.
Please note that before work you need to clear 2-3 cm of space around the chimney pipe. When insulated, the structure rises to a height of about 10 cm. Therefore, it can damage the masonry.
Caulking the log bathhouse with synthetic sealant

Caulking work using sealants is carried out quickly. The main thing is to choose best option material. We will need a sealing cord, sealant (about 200 rubles), a brush or spatula for smoothing, and a mounting gun.
We insulate the log house in stages:
- Place sealing cord into the gaps and cracks.
- We fill all the cracks around the perimeter with sealant in layers. To do this we use a mounting gun.
- Carefully apply the mixture to the corner cuts.
- Spray all the inter-crown seams with water.
- Smooth out the sealant using a spatula or brush.
- Remove excess from the beams using a damp cloth.
All finishing work carried out after thermal insulation. The structure rises, and therefore can damage the cladding.
The bath caulking technology is shown in the video:
For high-quality insulation It is necessary to carry out both external and internal caulking of the log house. If you choose the right material and follow step by step instructions, then all the work can be easily done independently even without relevant experience.


