Lamps: home-made for apartments and streets. DIY lamp (58 photos): options for table, pendant and wall lighting design Creative DIY lamps
Materials
The most suitable and accessible materials are paper and textile. They are easy to transform, each of us is familiar with them and can be found in everyone. home. Wonderful lamps are also obtained from threads or yarn. Naturally, glass can also be used for lampshades. At home, these are ordinary or unusual, with an interesting shape, jars or bottles. In particular bold projects Plastic containers, coffee packaging, and plastic children's toys were also spotted.
In addition, do not discard options such as rattan, bamboo and rubber. Both raw materials and a finished product can serve as the basis for a future product. For example, designers have become adept at creating delightful lampshades from beads, globes, parts of sets, mirror shards and even crumpled sheets of music! You just have to take a closer look at the objects around you...
Understanding how difficult it is to move from thought to action, especially to see an exquisite accessory in an ordinary jar, we have prepared several master classes for you. Following step by step instructions, you can easily make hand-made new things dear to your heart for any room in the house.
Ideas and their implementation
Since we have already mentioned the materials suitable for making lampshades and lampshades, let’s start with paper.
Lamp with butterflies
For work we will need:
- white thin cardboard
- thin twine or fishing line
- glue gun
- wire for frame
- utility knife or scissors
- round pliers
Advice! Before you start work, decide on the dimensions of the lampshade in finished form. In our example, the diameter is 30 cm, which means we need a piece of cardboard 90 cm long.
- We make a frame. Cut a piece of wire 96-98 cm long. Roll the wire into a circle with a diameter of 30 cm and secure the ends with pliers.
- We cut 3 hanging elements from twine or fishing line. We measure the length of the pieces based on the height at which you plan to hang the lamp. We tie them to the wire in three places, evenly distributing the load.
- Draw butterflies of different sizes on cardboard and cut them out.
- We fold the cardboard, glue the joint with a strip of thick paper or staple it with a stapler.
- We fix the upper part on the wire. For this you can use both glue and thin wire.
- The places of joints and cuts can be decorated with butterflies remaining after cutting.
Look what an elegant lamp we have created. It will fit perfectly into both a children's room and a bedroom. You will see a special chic when you turn on the lamp and butterflies flutter along the walls.
Advice! Instead of butterflies, you can cut out snowflakes, stars or flowers. Decide for yourself what you like best.
60s style
If you ask our grandmothers, they will certainly remember floor lamps with lampshades in the form of an inverted bucket, tied with colored threads. We can do exactly the same thing with our own hands.
We will need:
- frame for lampshade – 2 pcs.
- decorative braid (3 colors, choose a combination to your liking)
- scissors
- crochet hook
Let's start production.
- We tie the first braid to the lower ring of the lampshade, leaving a tail of at least 5 cm.
- We pull it onto the top ring from the outside, throw it over it and pull it through inner side bottom ring. We alternate actions until the next sector of the frame begins.
- We fasten the first braid and take a braid of a different color to work. We knit it to the next sector, not forgetting to leave a tail on the first knot.
- We do the same with the third sector, filling it with the remaining braid.
- We stretch the tails along the bottom of the lampshade using a crochet hook.
Now our lampshade from the distant 60s is ready, all that remains is to insert the socket and assemble the chandelier in any order.
Fringed braid
Another original idea for a DIY lampshade also involves braid, but not a single layer, but with fringe. What do we need for this?
Prepare:
- two metal hoops or an embroidery hoop
- fringed braid
- fishing line
- acrylic paint, the same color as the braid
- glue gun
- scissors
Advice! Fringed braid can be purchased in stores that sell decor for curtains and furniture.
- We paint the hoops or hoops with acrylic paint. If they are already covered with varnish or other paint, it is better to sand and clean them.
- We wait until the paint is completely dry and make three marks on each ring of the lampshade, placing them at an equal distance from each other.
- I cut three identical pieces of fishing line.
- We tie them to the smaller ring of the lampshade, leaving the upper ends with a margin so that we can then tie them to the lamp cord.
- We measure the length of the fringe, subtract 2 cm from it, and tie the fishing line to the second ring using the resulting length. This way we can get a cascade.
- Heat the glue gun and carefully glue the braid along the bottom ring.
- We do the same with the upper ring, pulling it out from the lower one.
Advice! Please note that the hot glue may melt the line, so be careful not to apply it directly to the line. Drop glue onto the paper, let it cool a little, and then apply it to the fishing line.
Find out how to make a lamp out of wire and mesh so that flowers can grow inside it. How to turn a snag into a lamp, and tree branches into a floor lamp?
How to make an original lamp?

A very interesting design item comes from the most simple materials, most of which remains from the picnic. If you go out with friends or family, you definitely need to clean up the trash after you. This not always desirable task will become more enjoyable if you ask to stack the plastic spoons separately. If you have children with you, arrange a competition to see who can throw the most spoons and the fastest into a separate trash bag or bag.
You will also need water cans. After a fun picnic, when you arrive home, some time later, you can make original lamps from the containers left over after the feast. Give them to friends, keep them for yourself to hang in the hallway, kitchen or garden.
So, here’s how to create such a chandelier with your own hands or with the help of your family. First put next to each other:
- 5-liter oval-shaped plastic bottle;
- disposable plastic spoons;
- cable with socket and plug;
- low power LED light bulb;
- pliers;
- glue gun;
- screwdriver;
- stationery knife.
To prevent such original lamps from leading to a fire, take an LED rather than a regular Ilyich light bulb.
For information: 4–5 W of LED bulbs correspond to 40 W, and 8–10 W correspond to 60 W of conventional electric ones.

Carefully, so as not to cut yourself, remove the bottom of the canister with a knife.

Also, observing safety precautions to avoid injury, cut off the handles of each plastic spoon completely. Apply a little hot glue from a gun to the sections of the “blades” and glue them onto lower tier bottles. Usually 17 pieces go here. Then, overlapping, attach the second and subsequent rows, arranging the elements in a checkerboard pattern.

To cover the neck, glue 10-12 spoon blades together, forming them into a ring.

Pass the socket with the light bulb and cable through the cut bottom hole in the bottle. If this "electrical" part is a problem for women, call your husband. If you don't have one, buy a cable from a hardware store with a socket and plug already screwed to it. You can borrow this working part of the lamp from an old one.

Place a “ring” of spoons on the top of the canister and screw on the lid. To do this, let your husband drill a hole in it with a drill, and you yourself can do this manipulation with a hot nail or self-tapping screw, holding it with pliers. Original lamp ready.

3 models of designer lampshades with your own hands
Ideas are in the air. If you are at the dacha and don’t have this piece of furniture there, it’s easy to make it yourself from what you have on hand. Take:
- hollow dishes;
- wire;
- polyurethane foam;
- gloves;
- paint;
- brush;
- pliers.
You can use unexpected things as a base: an old saucepan, a flowerpot, an already unnecessary children's potty.
Turn any of these auxiliary items over and place them upside down on a flat surface. Wind the wire, its turns repeat the shape of the future product, they should be the same as the lampshade. With your own hands, but wearing gloves, take the can in your hands, squeeze the foam out of it little by little onto the frame, covering the wire, let it dry.
After this, use a knife to make the contours more even, cutting off the excess. Paint it in your favorite color, white looks airy and elegant. Such a lampshade, made with your own hands, will decorate summerhouse. You can make a few and hang them here. By avoiding big expenses, this way you decorate the space.

This lampshade looks stylish and modern, while the next one has a classic look. For it use:
- thick wire;
- pliers;
- small plastic bottle of water.
Now roll the wire into a large outer ring. We will fasten it. To do this, cut 4 identical pieces of wire with pliers, secure the first end of each to the small one, and the second edge to the big ring. Top part the lamp is ready.
The dimensions of the lampshade depend on whether it is being made for hanging from the ceiling or for a table lamp. The first one is larger than the second one.
Roll the bottom ring from the wire; it is the largest. Connect it to the second top five pieces of wire, distributing them evenly. All that remains is to decorate the frame of the lampshade. To do this, pass the wire through the second ring, curling it into waves and twisting it through the base. Also design the second ring.

All that remains is to cover it with fabric. Attach a flap from the second top to the bottom ring, cut to size, adding to the seam. Hem big sides the resulting rectangle. Sew the fabric on the side directly on the frame, decorating this place with braid. That's it, you've made a wonderful lampshade with your own hands.
If you want to get acquainted with the most modern ideas on this topic - please! In capable hands and construction mesh will turn into a stylish lampshade.

With your own hands or by calling a man, cut a rectangle from it with metal scissors. To secure the socket, twist a circle out of wire and secure it on top of the lamp with four pieces of wire.
If you don't have coarse mesh, use pliers to trim off the excess sections to create more space between the wire strips. Paint the lampshade and the frame is ready.
And now the magic begins. You can make an original lamp that will benefit not only people, but also plants. Attach a flower pot with a flower at the bottom of the lampshade. You can tie it, woven using the macrame technique, to the lower turns of the wire with a thick rope. Check that the fastening is secure.
If there is a man in the house and welding machine, call on this tandem to make a metal ring with “rays” that need to be welded to the bottom of the lamp.

If you have a home climbing plant, for example ivy, pass its lashes between the lattice cells. The original lamp will become a house for a flower. It is better not to use ordinary light bulbs, as they are very hot and can burn plant leaves. In addition, the air around the flowers will be too hot. Screw in an LED or fluorescent light bulb.
For such an original lamp, you needed:
- construction mesh or strong wire;
- brush and paint (optional);
- pliers;
- light bulb with socket;
- flower.
You can secure cups with seedlings well on such a lampshade, thereby finding additional space for growing them and conditions for lighting in the evening.
We make a floor lamp and a table lamp with our own hands
While walking in the forest, do not pass by a florid piece of driftwood lying around. Put it in a bag and take it with you. Wash it at home, if there is bark, peel it off with a knife. Sand the surface with fine sandpaper if necessary. Coat with wood varnish.

In order for the table lamp to hold well, the driftwood must be screwed to a durable pedestal with self-tapping screws. It should be quite heavy. Oak is suitable for it. If you find a broken branch of this tree in the same forest, saw off a circle 5–7 cm thick from the thick part.
It will also need to be sanded and varnished. When these wooden blanks dry, connect them with self-tapping screws of sufficient length, first passing them through an oak stand, and then plunging them into a piece of driftwood. You can also use bolts and nuts.
You already know how to make a lampshade with your own hands. Therefore, make it and attach it to the driftwood, wrapping it with wire.
If the old floor lamp stand is no longer pleasing or you just want to decorate it, also use wood for this. Look how good the birch stands look. Attach a branch of this tree to the lamp and see what kind of floor lamp you could make with your own hands.

How to crochet a lampshade?
If you are tired of the old floor lamp, you can transform it with your own hands, giving it a “zest”. Take the openwork braid and sew it onto the top and bottom of the fabric lampshade. You can decorate with glitter by gluing them in the form of a pattern, evenly or randomly.
A floor lamp or chandelier will turn out unique if you knit a lampshade for it with your own hands. This can be done with crochet or thin knitting needles. For the first option, you will need:
- hook;
- cotton threads;
- pattern for knitting napkins;
- water;
- starch;
- ribbons.

Measure the top circumference of the lampshade, we need its diameter. Knit a chain from air loops. Next, knit in the round, based on the napkin pattern. Measure the height of the lampshade and the diameter of its bottom circle. Based on this data, draw a trapezoid or rectangle (depending on the shape of the lampshade). Crochet this figure. Sew to the side.
Using single crochets, tie the top circle of the lamp and this trapezoidal or rectangular part.
Boil a glass of water, stirring, pour in 200 ml cold water, in which 1.5 tbsp is diluted. l starch. Boil for 1 minute, remove from heat, cool. Place a knitted lampshade here, wet it well, then wring it out, let the water drain, and the fabric will dry, but remain slightly damp.
Place it on the lampshade. To ensure that the knitted lampshade holds well, you can pass several ribbons or ribbons between the loops and tie them.
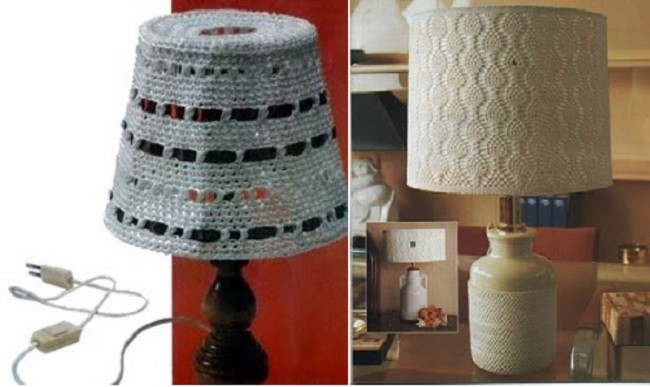
Lampshades look very beautiful if they are decorated with crocheted flowers.

A solution of starch or PVA will help give the shape of a knitted lampshade. Put it on the frame, apply glue, let dry.
In the second case (when knitting needles are used), you need to make calculations for knitting, draw a pattern based on the measurements of the lamp, and knit a trapezoidal or rectangular lampshade. Similar models are suitable for floor lamps and chandeliers of strict shape. If you need to crochet a semicircular lampshade, first make wedges and then connect them with single crochets.
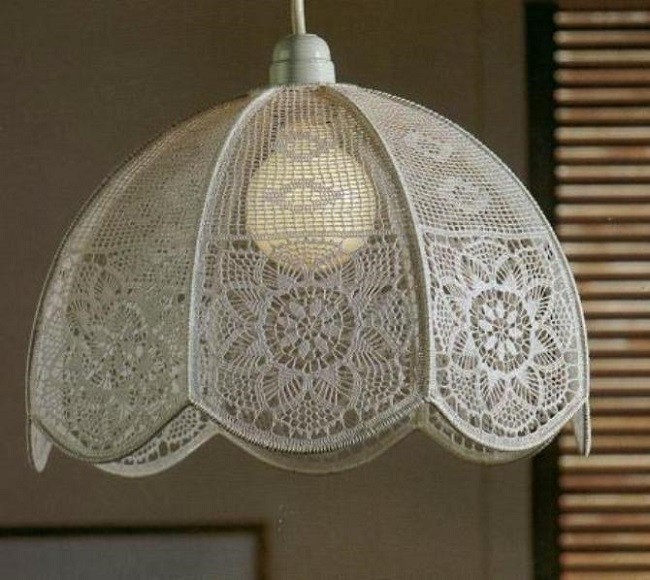
Here is another openwork chandelier. It’s nice to make muslin with your own hands and decorate the bottom of the product in a circle. But first you need to create the lampshade itself. The crochet pattern for this beautiful thing is presented right there.

On bedside table A table lamp will look amazing if it has a lampshade like this, the knitting pattern for which is also given.

If your son or daughter won’t let you finish your work, demanding your attention, invite the children to make a lampshade too, and let them roll strips of paper into tubes with their own hands. It’s better to wrap them around a thin pencil or a wooden sushi stick, and then glue the free edge so that it doesn’t unravel.
Now you need to glue the resulting blanks, using an object of a suitable shape as a frame, for example, a 5-liter canister. Having made the first inner layer, let the child move on to the second. There should be several of them to close the gaps. When the PVA has dried, cover a table lamp with this lampshade or hang it from the ceiling. It looks original and extravagant.

If you are interested in other ideas on this topic, watch the video:
A very interesting version of a lamp made from disks:
To create a lighting device, they use almost everything that can be found at hand: wooden sticks, pieces of plinth, containers, wood cuts, metal sticks and pipes, glass items, fabrics. Homemade lamps are made futuristic, classic, glamorous, minimalist. For each type, several step-by-step master classes have been created. Designer rooms it is customary to decorate unusual lamps. These can be products with slots, many individual fragments, in the form of a large ball or cube. The same lamps can be made with your own hands, from any material. This is done not only by craftsmen who sell their products, but also by ordinary owners of apartments and houses. Homemade chandeliers can be similar to store-bought ones or made in an unusual way: from trowels, tin cans etc. The form depends on the characteristics of the material and the imagination of the performer.
What can be used as materials
You will need:
- fat cream;
- PVA glue;
- cotton buckle;
- dye;
- balloon.
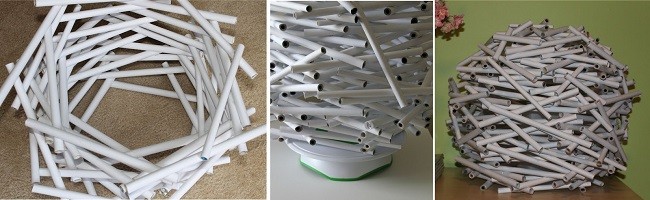
There are a few interesting options. From ordinary threads you will get a beautiful glowing ball. First you need to inflate the balloon and lubricate it with cream. It is placed in a container with water and PVA diluted in it. Then it is wrapped with threads. The structure is left to dry for 24 hours - all that remains is to place the product on the lampshade. The second method is to use straws. The sheets are twisted diagonally, the protruding ends are glued. You will need two hundred tubes: they are glued together into a round or triangular shape. The next option is a wire lampshade: it is twisted into a spiral or conical shape. You can also create a lamp from plastic bottles: the bottom and neck are cut off. You will need a wire acrylic paints, sealant and marker. There are many other techniques for creating a lamp with your own hands.
Options for creating wooden lamps
Making a lamp with your own hands is primarily an art, not an economy. Despite the fact that wood is simple and inexpensive material, products made from it can compete with others in terms of workmanship and aesthetics. The process of making them will not be the easiest. Will need to be carried out complex calculations, work with a lot of tools, remove a lot of garbage. Lighting fixtures are made from saw cuts, branches, veneer, wooden slats, wooden boxes and frames, wheels, logs, beams, etc. Wooden lamp - perfect solution for interiors decorated in antique style. It can be made from a piece of trunk or from processed materials, for example, in the form of a complex geometric structure of sticks, a ring, a cylinder or a square created from four or eight bars.
Master class: how to make a lamp from wood cuts
You will need a tree trunk, Grinder, hacksaw, LED Strip Light(2 m), brushes, wood varnish, glue, matte plastic pipe. First, the trunk is cut into slices of equal thickness - about 2 cm. Then a template is made in the center of one of the cuts. It and all other sections are drilled according to the markings. Measurements must be taken carefully; due to poorly marked fragments, the entire process will have to be started again. After this they need to be sanded. The next stage is strengthening with glue and laying on pads to dry. After this, the log houses are varnished. At the same time, you can prepare a matte tube - a rod for the structure. Its surface is processed to maximum effect dullness. The cuts are put on the tube and after that there is only one more step left to do. The last thing to do is install the tape. It needs to be folded in your hands and placed in this form in the tube.
The list of necessary materials and tools includes: self-tapping screws, drill, chipboard, brush, acrylic varnish, electrical block, 4 cartridges and 7 two-meter slats. You need to cut out blanks from chipboard, and paste over their edges with edging. The slats are assembled into a single structure in the form of a cross with a diamond shape in the center. A base is cut from a 5 mm sheet of plywood. In places where the slats create intersections, pieces of bamboo sticks or dowels are installed. It is necessary to drill 8 holes in the base: 4 are for the ceiling, and the same number for the main part of the lamp. From a tin you need to bend 4 corners with beveled edges. They are mounted with self-tapping screws so that the open parts of the corners are directed inside the lampshade. All wooden frame varnished twice, with a break for drying. At the end, the cross-shaped structure is screwed with confirmations.
It can be made from twelve strips. For the inner part, take a smaller one - 60 cm, for the outer part - 70 cm. The strips are made from sheets: they are cut along the fibers with a steel ruler and a knife. On a large sheet of paper you need to draw a circle with a diameter of 350 mm. It is divided into sectors of 30°. On the left and right sides of the lines separating the sectors, parallel lines are drawn along the perimeter of the circle to determine the desired position of the veneer strips. Then a disk with a small hole is prepared to place the strips. They are glued clockwise in the shape of snowflakes, first three short ones, then three long ones. After the glue has dried, you will need to make a hole about 1 cm wide in the structure of the strips. A wire is inserted through it, and a sleeve is attached to the disk. The hanging ends of the strips are fixed with a flange and bolts.
Lamps made of textiles and threads
To create a lampshade, you can use old clothes: jeans, knee socks, damaged dresses, etc. The products are decorated with bows, pockets, threads with beads. In almost all cases, the fabric must be placed on some kind of frame. You can also make it yourself. It is better to choose metal, sometimes wood, as a material. The basis for a homemade fabric chandelier can be factory lamps, both new and old. The fabric of a regular old lampshade can be removed and replaced with a modern one with stylish patterns. To create and decorate homemade chandeliers, threads of different thicknesses are used. They wrap various jars and frames, connect parts of the lamp and hang the structure. Lampshades made from hardened threads look interesting. In addition to them, twine or ropes are also used. They go well with different fabrics and papers.
Master class: spherical lamp made of threads
To create this product you will need:
- The base is from a table lamp.
- Glue.
- Thick threads (up to 4 balls).
- Air balloons.
First, the balloons are inflated. It's better to have several, because they can burst. Their shape should be perfectly round. On each of them, a ten-centimeter circle is drawn with a felt-tip pen. A stand with a light bulb will be inserted through a hole of this size. The ball is placed on oilcloth. An adhesive solution is being prepared. You need to wear rubber gloves on your hands to dip the threads into it. When they are saturated with the solution, they are taken out; then the glue clumps are removed. The end of the thread is tied to the knot of the inflatable ball. After this, it is wrapped around the entire ball; this must be done evenly over the entire surface, but chaotically. It is advisable to use several threads different colors. The ball is then suspended until the structure dries. Then they burst it and cut off the knot. The ball is removed through a large hole, into which you will then need to insert a socket with a light bulb.
DIY fabric lampshade
Will be needed thick paper, glue, fabric, threads to match the color of the fabric, pins, ruler, pencil, iron. You will need to make a template for calculation required quantity fabrics. If the frame for the lampshade should have a cylindrical shape, then measure the circumference and height and alternately draw the corresponding lines, creating a right angle. The opposite sides of the rectangle are drawn. The desired shape is cut out of paper. It is applied to the fabric. From it you need to get a rectangle bigger size. It is cut after the desired fragment is selected. Then the material is secured to the template with pins (its edges need to be folded). After this you need to use a sewing machine. The treated fabric is ironed. After this, it is glued to the base. Unprocessed sections are hidden. The seam is made so that the base is covered by the stitched edge.
Plastic chandeliers and lamps
Plastic has become one of the most popular materials in modern interiors. This also applies to lamps - a wide variety of models are sold. You can make a chandelier with your own hands, which will be in no way inferior to finished products. The lampshade of a lighting fixture can be constructed from anything. It can be disposable cups, various sticks, painted plastic bottles. They are sometimes decorated with decorative devices: figurines, luminous details. As auxiliary material You can use various metal frames. The easiest way to make a table lamp. You can use cut-out parts and shapes with holes. Instead of throwing away unnecessary plastic items (used disposable tableware, etc.), it is better to try making a small lamp out of them that can decorate the room.
Master class: making a lampshade from plastic spoons
You need to find a large number of identical plastic spoons, up to 200 pieces. It will be more difficult to construct a product from entire devices, but if you cut them, everything will work out quite quickly and simply. The handles of the spoons need to be cut off and removed, leaving only the scoop. Next, you can use the finished lampshade to cover the elements or cut it out of the eggplant. The lower part is made from it and a hole is made for the light bulb, or the top of the neck is cut off, leaving a fairly wide hole. Next you need to decide on the design. The upper surfaces of the cups will create a shell-like pattern, and the lower surfaces will create a “scaly” surface. If you choose the second option, then you need to glue jumpers to the eggplant. First, the top part is finished, laying out rows of spoons one after another. When the process reaches the open part, you need to calculate everything so that the last row hides the cut edge of the eggplant.
The following can be used as fastening:
- glue;
- office plasticine;
- scotch.
You will need steel wire for the frame, thin wire, a soldering iron, scissors, ten plastic bottles of various shades of green. You need to cut leaves of different sizes and shapes from the bottles. Fragments in the form of birch leaves and other leaves with a more or less compact shape are ideal. This will result in a larger number of elements. It is better to process sections simulating plates with a soldering iron to make them slightly bent. You also need to make veins with the edge of the sting: the leaves will take on a more natural appearance. Since the bottles are cylindrical in shape, the blanks will have a curvature. Holes for thin wires are pierced with a hot needle. You need at least two on each leaf, but four is even better to thread the wire through the figure eight. As many sheets as possible are put on each one. Then the flexible wires are securely twisted into a frame made of steel wires.
You need to handle the soldering iron as carefully as possible so as not to burn your fingers or burn the leaves.
You can make several types of such lamps. Materials needed: rubber feet, silicone sticks, fluorescent lamp, fiberboard circle, CDs. You will need tools such as a triangle ruler, pencil, compass, glue gun, screwdriver, pliers, pliers, drill. IN round shape A hole is made from fiberboard in the very center, twelve sectors are drawn on it. On the lines that separate them, one small hole is drilled. Steel wires will be stretched through them, each of which will house a stack of disks. The design will be quite heavy, so metal wires are needed. A wire with a socket is inserted into the hole in the fiberboard circle, and a light bulb is inserted into it. From the disks you can also make a polyhedron lamp, a lampshade in the form of a ball, petals, or a ring lamp.
Ways to create lamps from paper
This material is popular because of its flexibility. You can design an interesting figure or fold sheets of paper several times and make flowers. Folded paper sheets are joined into round shapes. Paper lamps are made in the form of plants, animals, abstractions. Some people like to make patterns and cutouts. In some Eastern countries, chandeliers made of rice paper are widely used. To make a lamp, you can use the origami technique. Paper lamps are created in two main ways, namely by using one or more large sheets or by gluing together a large number of paper elements. Over the past ten years, table and floor lamps have gained popularity. You can make lamps, carved pumpkins and houses from paper. This the material is suitable and to create a lampshade of a traditional shape:
- conical;
- cylindrical;
- elliptical.
Made from rice or parchment paper
Rice paper is useful for creating a Chinese lantern. Additionally, you will need thread, an awl, a stationery knife, a ruler and a pencil. First you need to make markings on paper. The flashlight design consists of many diamond-shaped sectors. Half of them are filled with vertical intermittent markings. After this, the sheet is folded into an accordion. He curls up into a circle. Painted lids can be glued to the top and bottom. To make a parchment paper lampshade, you will need a marking board, a compass knife, two sheets of parchment paper, two rolls of wax paper (similar to parchment paper), scissors, silk ribbon, and a hanging frame. Stripes satin ribbon 18-20 cm long and 40 cm attached to frame structure. The final stage consists of pasting circles of parchment and wax paper onto ribbons. They need to be attached with an overlap.
Origami chandelier made from paper bags
To make such a lamp with your own hands, you will need a wire with a switch, an LED lamp, and two paper bags with a pattern. First you need to learn how to make simple origami. The next thing to do is cut off the bottom of the bags and remove the handles. They are glued together into one large paper bag. It is folded in half. Both parts are “turned” into accordions. You need 16 identical stripes. The outer ones are folded diagonally. A hole is pierced with an awl. One of the two open sides is securely fixed with a thick thread. It is necessary to leave room for regulation. The second one will be open. The LED light bulb is connected to the socket, the top of the lampshade opens and closes back. This kind of lighting is necessary; incandescent lamps cannot be used. The wire is fixed on a high branch decorative tree- the product is ready.
Products made from corrugated paper look very original, which is why the material has become so popular. You will need an LED lamp, cable, thread, glue, knitting needle, ruler, fragment corrugated paper 44x88 cm. First of all, you need to take a ruler and a pen and mark the paper on a line with the same width. Using the drawn lines as a guide, you need to make an accordion out of a flat sheet of paper. Using a knitting needle, it is folded diagonally at one end, then returns to its original position and folds on the other side. The paper needs to be unfolded again - the diamond shapes should stand out on it. The entire sheet now consists of double shapes. The first and subsequent folds must be made corresponding to the width of the stripes, otherwise the appearance of the paper will deteriorate. The workpiece is twisted into a spherical shape, and its upper part is fastened with thread.
Butterfly chandelier
There are two ways to create such a lamp:
- One big butterfly.
- A “swarm” of small moths of different sizes.
For children preschool age I'd rather like the lampshade in the form of many hanging figures. Individual parts of the lamp can be lowered up to one and a half meters from the ceiling. An old lampshade or its frame is used as the basis. If there are no such blanks, then you can use a rim made of metal or wood or thick wire twisted into a circle. You need to prepare sheets with butterfly templates to select butterflies of the required sizes and shapes. It is recommended to make moths of at least five different sizes. Then the structure will be visually larger. Butterflies are cut out with small scissors or a stationery knife. It is advisable that the paper be thick. The cut out figures are painted with different colors and decorated with sparkles, but on some templates the butterflies may already be colored. To finish the product, the butterflies are fixed on fishing lines and attached to the base.
The finished Chinese lamp can be used as a basis for other products. They are cheap. You will need a perfectly round model. First option: cut circles from fabric different color and glue overlapping. From a Chinese ball you can make something like a round plate-shaped cone. Second method: circles are cut out of square-shaped sheets of paper. They are connected in the center, the edges are raised until the perfect flower is obtained. The elements are attached to the ball in ordered rows. Paper sheets make beautiful tartlets. They should be filled with something. The paper is also folded into square envelopes that can be turned into four conical ramekins. Some people use an old wall map instead of paper. A newspaper lampshade with printed images in gray or brown will look stylish in any interior.
Lamps made of metal pipes and tubes in loft style
Non-functioning water pipes with taps can be mounted into a single structure, equipped with light bulbs and thus create a stylish and useful thing. It is better to place it on the wall. This is a very popular finishing element in the loft style. Lamps in the steampunk style are created from large and small pipes. These are complex designs; they cannot be made without special training. However, it is possible to design a small robot with a “head” shaped like a light bulb. Beautiful ceiling chandeliers are made from pipes. In addition, there are various models of lamps from metal pipes. The material often used is brass. Chandeliers are created in the form of compositions from several tubes. Pipes, as a rule, are made in one piece, but lamps with various patterns and openings are also produced. They are not inferior in popularity to lamps in the loft style.
Can be made beautiful product in the form of diamond faces. In addition to the pipes themselves, you will need sandpaper, a jigsaw, twine or wire, and gloves. For creating original chandelier you will need 20 pipes: 10 short (6 cm), 5 medium (12 cm) and the same number long (25 cm). You need to find several long pieces, mark them and cut them with a jigsaw. After this, you need to start sanding with sandpaper so that the edges of the tubes are perfectly smooth. Then the fragments are collected onto thick wire or twine. First, horizontal rows are created: the bottom of five short ones and the middle one of the same number of medium tubes. Then they are connected by five more short tubes. The upper part of the structure is made of five long fragments that need to be combined with the already prepared part. Long pipes do not come together completely; the cartridge must be secured in this place.
Lamps made from plumbing pipes
You need to prepare such devices as an electrical cable, electrical tape, adhesive tape, different screwdrivers, two-core wire, cartridges, hinges, fittings that match the parameters of the pipes. One of the tubes should be larger - it will serve as an attachment to the ceiling. The assembly process is quite complex. You need to create a diagram on paper, and only then get down to business. At this stage, the design configuration is determined. The splitters must be connected correctly. All parts of the structure being prepared can be polished and painted. It is better to give preference to white, red, gold and black colors. You need to wait about a day for everything to dry completely. After this, all the pipes are assembled together. Light bulbs are screwed onto them. The last stage is connection. Since the scheme is complex, it is better to invite a specialist.
Using glass to create lamps
You can hang a composition of several empty liquor bottles on the ceiling. Three-liter jars can be hung by metal chains. Glassware is also suitable as a lampshade. A lamp made from many glass fragments can imitate a crystal chandelier. Broken glass objects find a new purpose in the form of an original lighting fixture. Glasses and wine glasses make beautiful table lamps. Various glass boxes, glass from old wall sconces, headlights, interior doors. A homemade glass chandelier can be painted with watercolor or stained glass paints. You will get beautiful stained glass windows. For creating pendant lamps craftsmen use a variety of decorative containers for oils and perfumes. Unlike wood and paper, glass has high fire safety.
Add to list necessary equipment includes wire cutters, screwdrivers, screws, glass cutter, silicone, rag or brush, stain, pine boards, hooks, chain, ten light bulbs, wiring, wine bottles. The first step is to process the containers. Labels and remaining glue are removed from the bottles. Using a glass cutter, you need to remove the bottom of each bottle: it rests at a height of 1-2 cm, and the bottle rotates around its axis. The cracks must be tapped with a hammer until the bottom falls off. After this, the electrical wires are placed in bottles and connected to the cartridges. Light bulbs are screwed into them. Now you need to prepare the boards. In the lower, larger one, holes are drilled for necks and wires. The top one will collect them in one bun. Hooks for chains are screwed into the bottom board, which will hold the structure. For the kitchen, you can make a table lamp with a bottle base and a wooden shade.
Wooden boards can be stained to give an antique effect.
Using old cans to create lamps
Old jars can find a new purpose. Lamps can be created using threads, electrical wires, and handles for cans. Containers must be equipped with handles. They will need to be tied with threads attached to the previously prepared iron frame. Electrical wires with sockets and light bulbs are lowered into the jars - the chandelier is ready. You can make an option for the dacha - threads are tied around tree branches, and candles or small lanterns are placed inside the jars. Containers wrapped in multi-colored threads or decorated with patterned napkins look beautiful. Inner part The cans can be painted white, and while it is still wet, apply a pattern in the form of chaotic lines. Some people paint the outside of the container with different paints, and paint an image on top using glitter shadows. Banks can also be lined with small broken glass.
Chandelier / lamp in shabby chic style
Beautiful decorative items are created from beads and fabric, including lamps characteristic of this style. Decorating in the shabby chic style means that the room is designed to accommodate a girl or woman. You will need beads, beads, threads, chains, a socket with a lamp, a finished wooden or metal frame. The first step is to paint the base in one of the soft shades. After this you can wrap it decorative elements or cloth. The top of the lampshade is wrapped with smaller beads, but in larger quantities - up to 40 beads need to be strung on one thread, while on the lower threads - about 20. This is an approximate proportion, it, like the tension of the threads, can be changed depending on the size of the structure. The lamp is usually covered with pink fabric. All decorations are hung so that they flow down.
Conclusion
Chandelier - the only one important element upper part of the room, it can create symmetry and other geometric accents. To hang a beautiful, stylish, designer lamp in your room, you don’t have to buy it in a store. Every home has enough items and tools to do everything yourself. In most cases, a blank, scissors, paper, glue, thread, frame, varnish and paints are enough. Sometimes you may need the help of a professional electrician. Most “handmade” lamps are made of wood, plastic, paper, glass, textiles or metals. There are also more exotic options using different designs, small parts, and molds. A homemade chandelier should not only perform an aesthetic function, but also provide high-quality lighting to the room. It should be designed wisely.
Handmade projects help us add brightness to the interior and make it individual. One option is to make your own lamp for your home. Unusual details, materials, ideas and a little creativity - and the designer product is ready.
DIY lamps: interesting ideas
There are many models of lamps that you can make yourself. They differ in design, style, and size. A wide variety of materials are suitable for their manufacture - paper, wicker, plastic cups, yarn, fabric, glass bottles, plastic bags, wooden hoops, wire, veneer, old things or what was left after renovation, etc. The easiest option is to make a lampshade with your own hands and purchase ready-made system electrical wiring with a socket. It is accessible even to the most beginners in needlework and creativity.
Wall lamps
You can install a beautiful homemade lamp on the wall near sleeping place, including in the children's room. Most often, unusual lampshades are made of wood, fabric, or wicker for this purpose. But there are also more original options.
At the dacha we made a lamp from two 0.75 liter cans and two pieces of boards with unevenly cut edges. The boards are connected to each other at right angles, and the entire structure is installed on the wall of the house under the porch. The lampshade jars have sockets screwed into them, into which LED lamps are inserted. A lamp of this style is ideal for a country house or a rustic-style interior.
Photo gallery: DIY wall lamps
Vine is an interesting material to create original lampshades  Lamps made from boards are very easy to make and look stylish at the same time.
  Threads, glue and balloons are all you need to create beautiful lamps
  You can make it from a board different variants lamps
  Snag weird shape- an unusual basis for wall lamp
  Clouds cut from plywood can be used to create a night light
  Even pallets can be adapted to create a beautiful lamp with your own hands
Table and floor lamps
Using scrap materials, it’s easy to update a floor lamp or make a new table lamp in ethnic, high-tech, or other styles. Beads, ribbons, and paper cutouts are used for decoration.
Photo gallery: interesting models of do-it-yourself table lamps
 An eco-style interior can be updated by making a floor lamp with a wooden lampshade
  Long and thin branches tied together into a bunch, attached to a stable support, are used to create a floor lamp
  The frame of an old lampshade can be decorated with beads to create a new lamp
  Ribbons and beads can be used as the main material for a new lampshade or as decoration
  Fabric lampshades are an ideal option for a table lamp in the bedroom
  The lamp can be made from water pipes
  A lampshade for a floor lamp is easy to knit
  The original lamp is made from aluminum can lids
Pendant lamps
Distributed ceiling lamps made from yarn that is used to wrap balloons, and then the entire structure is covered with glue. For many, such a simple option is their first attempt at this type of needlework. Chandeliers made from driftwood, bottles or hanging structures from plastic pipes.
Photo gallery: DIY pendant lamps
 A driftwood chandelier is a bright and stylish piece for the living room
  You can quickly and easily make beads beautiful chandelier
  Wooden material used to make lamps must be varnished
  You can decorate your kitchen or country house with a bottle lamp
  Made from plastic spoons beautiful lamps shaped like pineapple, ball or etc
  Lamp made of metal graters - stylish and functional decor for the kitchen
  Remains of water pipes and connecting fasteners - unusual material for ceiling lamp
How to make a lamp
Paper - corrugated, colored, geographic Maps, cardboard, wallpaper, bags and other types - one of the best materials for crafts. A simple lamp made from paper butterflies can be made quickly and without much effort. To do this, you will need a frame from an old lampshade, a metal ring or just wire from which the base for the product is made. Then all that remains is to simply cut out the butterflies and attach them to the frame using silicone glue or, for example, hang them on a wire. It doesn't take long to make a table lamp from plastic pipes or spoons, although the projects are more complex than paper chandeliers.
You can cut paper butterflies for a homemade chandelier according to a template together with your children
Lamp made from paper bags using the origami technique: step-by-step instructions
This lamp can be made wall, table or hanging. To work you will need:
- ready-made electrical base for the lamp - a wire with a socket and a switch, a plug (for a table lamp or floor lamp);
- stand for the lampshade (you can take it from an old one or use improvised materials for this, for example, a thick branch);
- paper bag with an interesting print - 2 pcs. (when gluing they must be at least 0.5 m long);
- LED lamp;
- thick thread and needle.
Operating procedure:
- Cut the bottom off the paper bags and remove the handles.
- Glue the resulting pieces into one, fold in half and then into an accordion. You should get 16 stripes of the same width.
The prepared bags are folded into an accordion
- Fold each strip diagonally. This part of the workpiece will subsequently be the top.
The paper blank must be bent accordingly in order to later make a lampshade out of it
- WITH opposite side, which remains flat, also bend each strip diagonally. This part is shorter in length.
All folds on bags must be symmetrical and even.
- Carefully unfold the bags and bend the blank along the resulting folds to form a lampshade.
Form along the folds of the paper three-dimensional figure resembling a berry
- On top (where the folds are longer) sew the workpiece with a thick thread.
To keep the lampshade in shape, it is fastened with thread at the top
- Then insert a socket with a wire inside the lampshade, screw in the LED lamp and hang the structure on the stand.
Since paper burns well, it is better to use LED lamps in the lamp
LED chandelier made from splitter sockets
An ergonomic and unusual chandelier in the loft style can be made from socket-splitters for diode lamps. Ready design painted in any color suitable to the interior of the room. It is important to securely fasten all parts. To work you will need:
- ceiling rosette - 1 pc.;
- splitter cartridges - up to 12 pcs.;
- lamps - up to 12 pcs.;
- spray paint;
- paper.
The shape of the chandelier can be any
If you want to change something in the room, you can simply connect the fittings differently to get a new chandelier shape
Video: how to make a lamp with shades from cups
Anyone can decorate their home with a new handmade lamp. All you have to do is choose an interesting idea and put in a little effort.
What could be more beautiful than the satisfaction of creating something with your own hands? original crafts which will become bright accent in the gray routine? We offer several simple models, the production of which does not require professional skills and financial costs. Let's get to work!
Every day we have to throw away empty tetrapacks, but meanwhile this is an excellent basis for an openwork chandelier. We cut strips 5 cm wide, fold them into the required shape and begin to carefully glue them together. To prevent the structure from falling apart prematurely, assembly can be done on a round piece of suitable size.


Disposable spoons make a pretty decent lampshade. Take a 5-liter plastic container and cut off the bottom. We break off the cuttings and the remaining parts using glue gun We mount it on a base, imitating a pineapple peel. It is better to use a low-temperature light bulb for safety reasons.


Regular wooden hangers transform when creative approach. Simply by cutting them in half and placing them in a circle, you get a modernist chic lamp from the 30s era. A completely surreal option is also possible - pass a strong thread through the suspension attachment point and simply string the hangers, unrolling them a little.


Funny Gummy Bears are the perfect solution for a nursery. The difficulty lies in the accuracy of the placement of individual figures, so we recommend making a template with radial holes through which we lower the white threads. Don't even think about using lollipops - these are acrylic figures!


The effect of a dense forest in the bedroom is achieved by whimsical chiaroscuro. Several stylistic roots, wire, skillful hands– and the original ball under the ceiling will plunge the room into the world of the unknown. Or collect the rhizomes, clean, dry and bind them however you like. It is better to varnish the finished product.


Has your drum kit lost its former appeal and is gathering dust in the garage? From boring musical instrument An extravagant chandelier can be mounted without any problems - fortunately, all fasteners are initially included in the kit. Original and beautiful, and most importantly – quiet!


If you are the owner of a bicycle workshop, then you probably have a container with unusable spare parts in the corner. A little creativity and a welding machine - you will get a unique product, similar to the ancient inventions of the crazy Mechanicus. Of course, you can’t hang it in the living room, but it’s just right for a nightclub.


A leaky galabash (African gourd bottle) lends itself well to engraving. Intricate patterns, contrasting transitions of textures from shiny to matte, elegant perforations scatter ethnic ornaments of the Dark Continent on the walls.


It's all in the bag - a funny tandem of a top hat and a bowler hat creates a solid ambience for a cigar club for gentlemen. If you're not an English dandy, don't despair - an old Stetson, a bright sombrero or a straw brill will work too. It is important not to be hostage to sanctimonious dogmas.

Paper cups for cakes will become an elegant accent to your interior. This is not at all difficult - we glue them together in two, straightening the bottom one, and connect the resulting “flowers” with a thread in a spiral. We cover the original night light with glue or varnish for strength.


Banal iron graters look very original above the bar counter. You need 4 tubes with electric sockets and a meter piece of 2-core wire. Don't forget about fire safety– metal shades get seriously hot.

Have your lace doilies served their purpose? Don't rush to part with them! We inflate a white balloon, find a brush and PVA, straighten the material on the surface and coat it generously. After an hour, the elegant lampshade is ready for use.


Cutlery can decorate a meal beyond just serving. Spoons gathered into a bun resemble a silver tulip. And connoisseurs of Kandinsky or Dali will appreciate the avant-garde cube constructed from knives and forks. Bon appetit!

An interesting effect in a children's room is created by small light screens in the form of a cartoon cloud. The light bulb located behind it dimly illuminates the walls without blinding the eyes. By adding some more funny clouds, we get a romantic sunset.


Several brightly glowing globes will dynamically enliven the space above the stairs. Oceans and continents will light your way - an original and charismatic solution with deep implications. Choose the right proportions for your unique installation and get charged with positivity.

Don't know what to do with the mismatched remains of the services? Drill holes in the cup and saucer, place the socket in the middle and connect with a hollow tie - just like in a regular lamp. White porcelain perfectly diffuses light - hang the composition above the coffee table and enjoy a fragrant drink.

A ball of yarn can be successfully used as a chandelier. Several skeins of thread, a white balloon, electrical fittings and glue - we randomly wrap the base and spread it generously with astringent. Wait until it dries completely - and your unique masterpiece is ready. They cannot play football, but the product is quite reliable.
Is it possible to make a table lamp from beer cans? It turns out yes! Only we will need a lot of them - after all, we only use valves for opening. We knit a frame of the desired shape from rigid wire and begin to braid the base. It turns out something like shiny chain mail. Unfortunately, exact amount raw materials are unknown.


This charming lamp in the shape of a cute alien animal is very easy to make. Most labor-intensive process– cutting narrow paper wedges. We connect several wire rings together to get something like a sphere, and use tape to attach the prepared parts in layers. All!


An option with pronounced charisma will appeal to confirmed bachelors and lovers of noisy parties. Having seen the impressive installation above the table, guests will immediately understand what awaits them in the next couple of hours. Cheap and cheerful, but with soul...

What to do with endless plastic bottles? If you are tired of fighting them, we suggest you turn their myriad of them to your benefit, at least partially. Cut off the bottoms, and you will have a lot of small parts in your hands. Connect them randomly with threads - there are no restrictions on the shape.


