How to knit a bath mat from bags. Knitted bath mat made from plastic bags.
Making a knitted rug for a bathroom or hallway from waste material polyethylene tapes. Master class with step by step photos.
Manya Tatyana Grigorievna technology teacher at school-lyceum No. 4 named after. Abay, Satpayev, Karaganda region, Republic of Kazakhstan.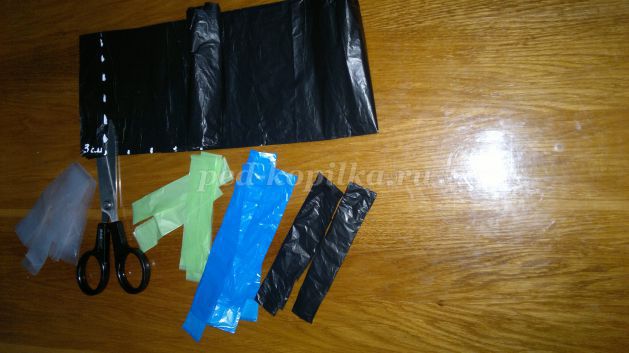
Purpose: knitted bathroom rug from plastic bags can become a piece of interior decoration, or can become a good an exclusive gift for friends. Plastic bags - available material for knitting and very interesting. The items from the bags are original and pleasant to the touch, comfortable and durable to use. This rug can be easily washed; after washing it does not change color or become deformed.
Description: The material is intended for middle and older students, parents, teachers, housewives and all creative personalities who know basic crocheting techniques - chain stitches and single crochet stitches.
Target: making useful household items from waste material of polyethylene tapes.
Three - four packs of packages + time + diligence and you are the owner of a unique rug for the bathroom or hallway.
Tasks:
- teach how to make a product from waste material, using basic knowledge of crochet;
- develop aesthetic taste, creative thinking, hand motor skills, perseverance;
- cultivate accuracy, creative initiative, and the desire for self-expression.
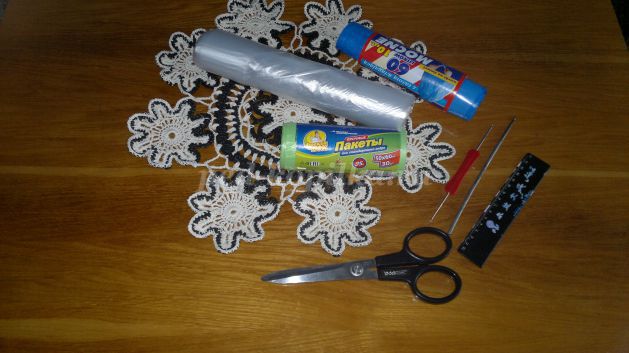
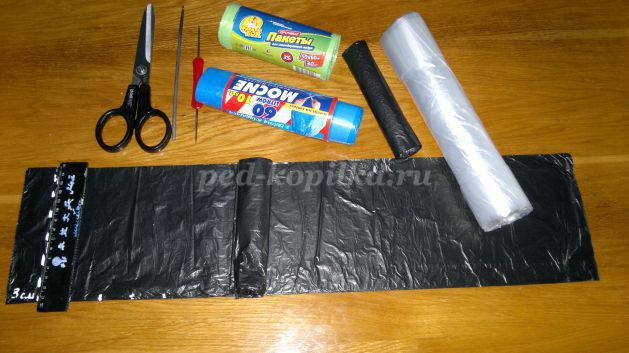
To complete the work you will need the following materials.
- packages for household waste(you can use different colors, but it is advisable large sizes) or packaging plastic bags;
- scissors;
- crochet hook No. 5; No. 4
- ruler;
- marker or pencil.
Progress.
Step 1
Lay out the bags, carefully placing one on top of the other (you can use 6-7 bags at the same time to save time on preparations), align them on all sides.
Step 2
Mark the width of the stripes, the approximate width is 2.5 -3 cm. The thinner the bag, the thicker you can cut it.

Step 3
Cut the bags along the marked lines; even if they are not very even, this will not be noticeable in the product.
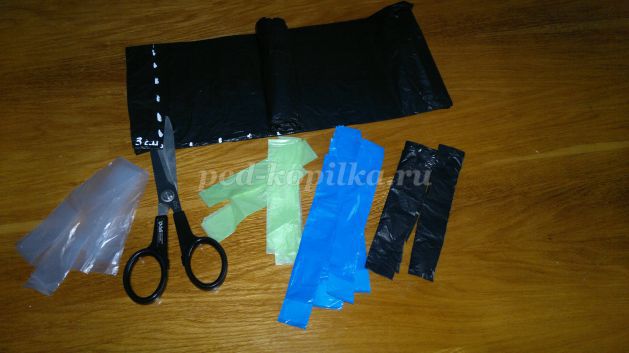
Step 4
Straighten the cut strips, this will be the “yarn” in the future.
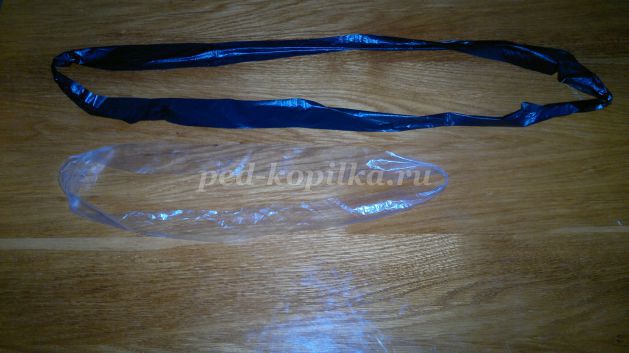
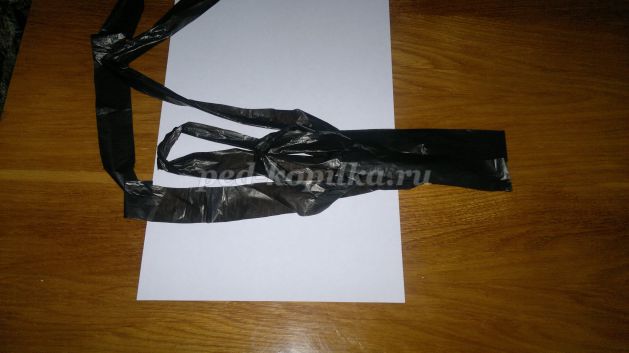
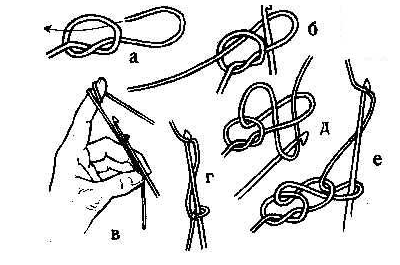
Let's start connecting the strips; to do this, we will place one circle (this is a straightened tape) on another, and then we will insert the ends into the resulting loop and tighten the knot.


Like this.
So we connect all the straightened strips. I advise you to straighten 2 strips and immediately connect them so that the rest do not get tangled.
Step 5
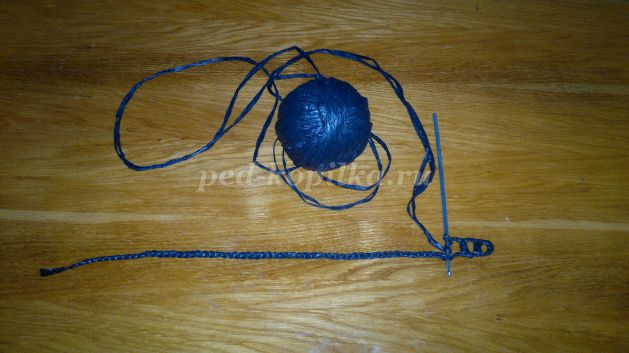
Roll it up into a ball. The activity requires time and perseverance. If the bags are dense, then while winding up you should slightly stretch the plastic strips, but if the bags are thin, then this should not be done. But even if the thread breaks, just tie the ends in a knot; it won’t be noticeable in the product.

Step 6
Let's start knitting.
Cast on a chain of air loops of the same length or width as you plan for the rug.
Air loop technology.
Make the first loop at the end of the hook, then loop the thread over the hook and pull it through the loop. All subsequent loops are knitted in exactly the same way, thus creating a chain of air loops.
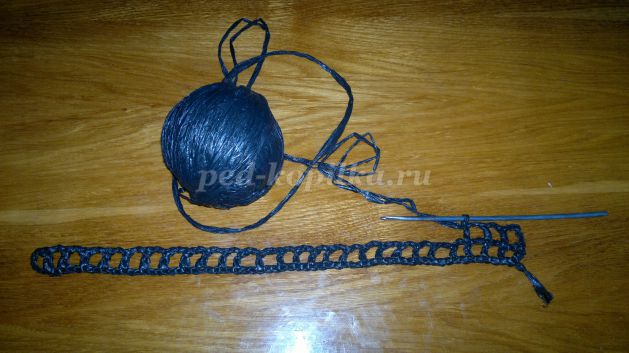
1 row. Make 2 chain stitches for lifting and secure them with a single crochet stitch into the cast-on chain, indenting 2 chain stitches on it. Continue knitting until the end of the row.
Double crochet technology:
Thread a thread onto the hook, insert the hook into the 2nd loop of the previous row or chain, yarn over and pull out 1 loop; put the thread back on and pull it through the loop and yarn over (2 loops) on the hook; Throw the thread over again and pull it through the last 2 loops hanging on the hook.
The 2nd and all subsequent rows are knitted similarly to the 1st row. You will get an ordinary mesh, this will be the base of the rug. Make sure that the mesh width parameters do not change during the knitting process; for this, the air loops must be the same. And so that the dimensions of the length of the rug do not change, you should make yarn overs of the same height. The mesh should be in the form of a rectangle or square (depending on the design) and always with smooth edges.
The grid consists of cells (cells). For this rug, the width of the mesh consists of 27 cells, the length of 39 cells. If you plan to highlight the middle of the rug with a pattern, then to maintain the symmetry of the pattern relative to the middle, it is advisable to take an odd number of cells in length and width Dimensions of my rug in centimeters (in finished form) 45x55cm. I knitted the mesh with black ribbons, since it turned out to be the densest and most cheap material. The mesh for my rug is 27 mesh long and 39 mesh long. Dimensions of the finished rug: width 37cm, length 55cm.
I went to Novosibirsk for a week, visited my parents, and received these gifts from my mother - I knitted bathhouse rugs from bags. And my needlewoman turned 83 in August!
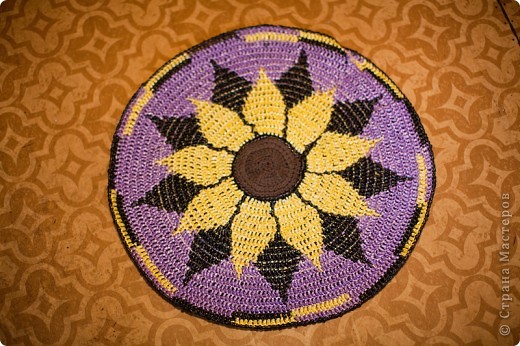
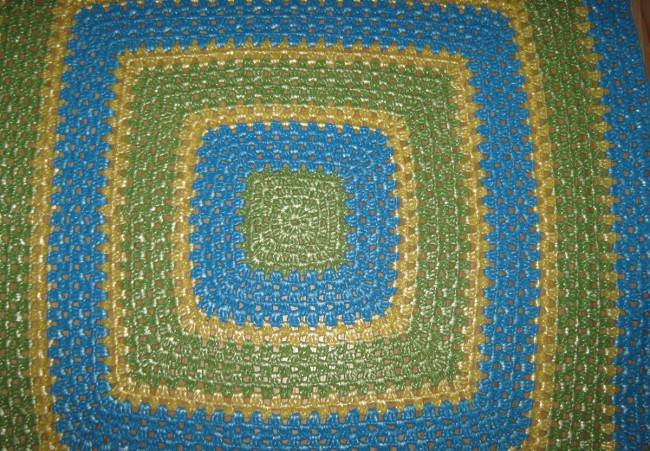
And for gifts, the drawing becomes more complicated.
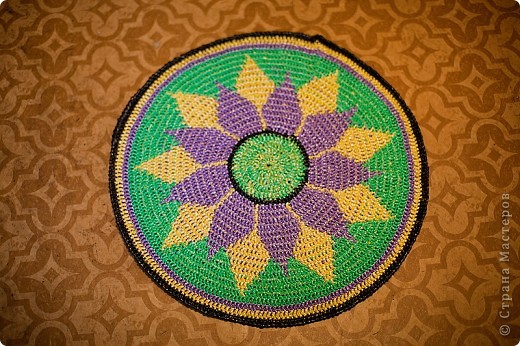
Colors vary depending on customer wishes.
And this is my favorite craftswoman! She is already 83 years old, but she knits one rug a week, and more orders have appeared; whoever sees it, orders it.
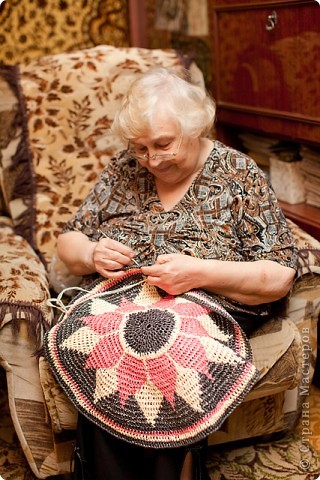
In the summer I was on vacation, showing my parents my page in the Land of Masters and various other crafts. They were surprised and admired the work of the masters, and after 1.5 months I come, and they are already doing handicrafts too. Dad goes to the store, buys packages different colors, helps to cut and wind, and then mom knits. Thank you to the Country of Craftsmen and all the craftsmen for the inspiration that even older people are creative and they are very pleased that their products are needed and they are also in business!
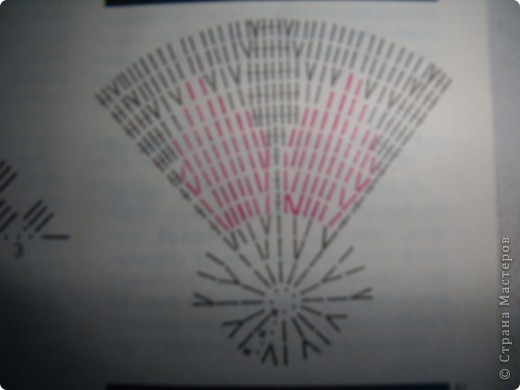
At the request of the craftswomen, I am posting a diagram of the rug.
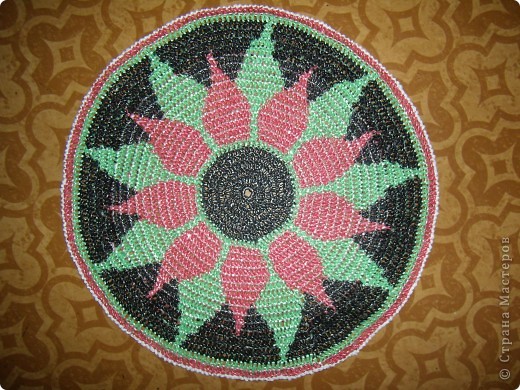
The photo is really not very good, but I think you can figure it out.
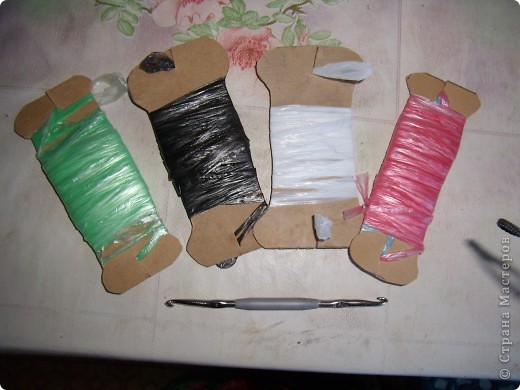
The threads are very soft and smooth, when you wind them into a ball, they do not hold on and fall apart, which interferes with knitting. Dad made these blanks from thick cardboard and the problem with the threads was solved, the tail is tucked into the slot and the threads do not unwind.
http://stranamasterov.ru/node/124165
Another one in a different color
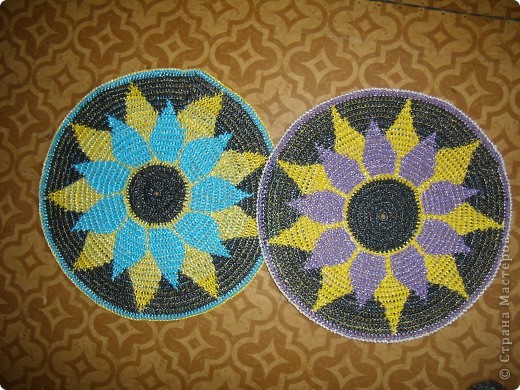
There are many relatives, there should also be many and different gifts.

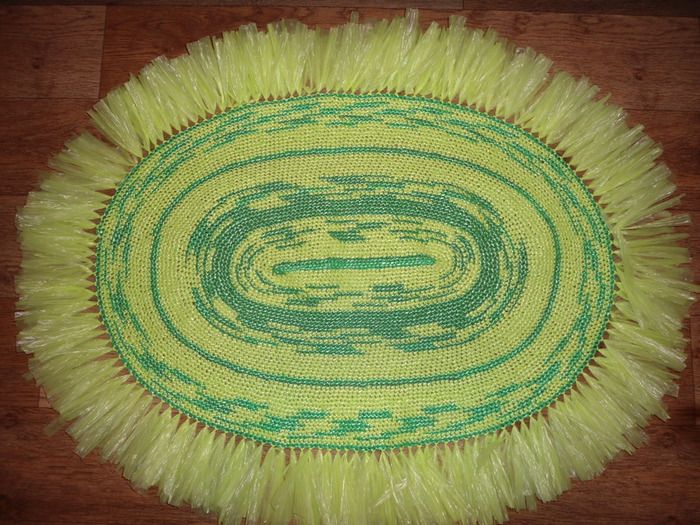
I forgot to write that the rugs are knitted from colored garbage bags.
The most important thing in the pattern is that before you start knitting the flower. there were 63 loops on the circle. Mom calculated this herself, then it is well divided into all the petals. And the length of the flower petals depends on the size of the rug, as many as you need.
The rug is knitted in the round. On the wrong side the transitions are not visible, the threads do not hang, she somehow tucks them in, so you can’t tell which is the face and which is the wrong side. When one color changes to another, the last stitch of one color is knitted in a different color, which will be the next one.
The bags are cut folded. And my mother knits the rug in the round, the first few rows are single crochet, and the rest are all rows with crochets. Sticks are double crochets, and a tick is adding a loop according to the pattern.
I cut the packages like this: http://stranamasterov.ru/node/84004
http://stranamasterov.ru/node/96838
My mother knits such wonderful rugs. And she uses ordinary plastic bags as material. How many of them accumulate in our homes - red, yellow, blue, black, orange... And if you remember cartons of milk, kefir and yogurt... It would seem that no one needs them, and even very harmful to nature. But no, you can create miracles from bags. Rugs that can be placed in the hallway, in the bathroom, on the balcony, or to decorate the cottage with them. Both beautiful and comfortable. However, judge for yourself.
Handmade things – great way give the interior design uniqueness and special comfort. One of possible options creating handmade details for the appearance of a room is done by crocheting carpets with your own hands. This can be used not only wool threads, it is quite possible to make a rug from old plastic bags.
A large number of colors of plastic bags allows you to knit a completely unique rug, giving it any look. Knitting rugs with your own hands is the widest scope for imagination. The process will only take a couple of days for a small rug.
Advantages of a polyethylene rug
What is good about choosing this material for creating a rug with your own hands? Polyethylene has many advantages:
- Easily available - polyethylene bags are cheap and found in every home. In addition, you can make a carpet from any garbage bags, which, like regular plastic packaging, are found in the most different colors. By combining different colors, you can achieve any possible color scheme.
- It accumulates heat and retains it for a long time, thanks to which such a carpet will always be warm and pleasant to the touch. In addition, it is soft and walking on it with bare feet is a pleasure.
- Resistant to moisture. Under the influence of water, it will not begin to collapse, will not absorb moisture and will dry quickly. Water does not accumulate under the surface of the mat either. Thanks to all this, it is quite possible to use a rug in the bathroom to ensure safety. A bath mat is also good because it protects your feet from the cold tiles.
- The elasticity of the polymer ensures the constant shape of the rug - its corners do not bend, its edges do not wrinkle, and folds do not appear. You can put such a carpet on the floor once and not worry about its position - most likely you won’t have to adjust it.
- No slipping. The coefficient of friction of even wet knitted polyethylene is quite high, making it impossible to slip on this carpet. And it itself will not slide on the surface of the floor, even if it is finished with smooth decorative material.
- Easy to care for - if it gets dirty, just dip the rug in a bathtub with soapy water, rinse a little and wash clean running water. In general, this material is quite resistant to dirt, so you won’t have to clean it often.
Preparing for knitting
The advantages of a rug made from plastic bags are undeniable, and if the choice has been made in its favor, all that remains is to find out how to make it yourself. For manufacturing you will need a very small set of materials and tools:
- any multi-colored polyethylene bags - packaging and garbage, thick and thin - whichever comes to hand;
- scissors or a knife with a sharp blade for cutting bags into strips;
- crochet hooks No. 4.
Thick bags need to be cut into narrow strips; thin garbage bags should be cut into wider strips.

Knitting a rug from plastic bags is a simple process and is completely similar to regular wool crochet.
The first step is to create multi-colored square blanks, from which the appearance of the rug will be formed. It’s okay if you can’t come up with a design right away - you just need to start knitting blanks, and ideas will appear in the process.
We will come up with a pattern, arrangement of square blanks, color scheme, edging method and everything else. You just need to find out the size in advance by measuring the area of the surface chosen for covering. Thus, knitting a rug from plastic bags with your own hands is very creative process, the fruits of which will be appreciated by all guests of your home.
To create a carpet you will need a strong mesh, which will act as a reinforcing frame. You can either make it yourself using strong threads or wire, or buy it in a store. The patterns will be knitted on this grid.
Factory-made meshes often have a multi-colored texture, which can serve as a guide for creating your own pattern. It is very convenient to adhere to such a grid, and this allows any craftswoman to create a high-quality handicraft item.
The technology of crocheting with your own hands is quite simple and quickly mastered, even if you have no skills self made. The procedure is carried out as follows:
- the first knitting loop is formed at any free end of the thread woven from polyethylene tapes;
- a crochet hook is threaded into the second loop, and a new loop is made at the free end of the thread;
- the thread is wound on forefinger hands to pull it;
- the stretched thread is grabbed with a crochet hook and threaded through the second loop;
- the hook goes through the new loop;
- The sharp edge of the knitting needle again grasps the free edge of the polyethylene thread.
Thus, step by step, you will develop the initial skills of manual work with threads and knitting needles. Having filled your hand, making a beautiful rug that will be an excellent addition to the interior of an apartment or house is not difficult.
Rugs made from bags can not only be knitted. A good option would be a composition from fluffy balls, which can also be made from scrap materials - for example, garbage plastic bags. The main thing is that the bags have a soft structure. In addition to the usual functionality of the mat, you can build a massage mat.
To work with your own hands you need to prepare:
- plastic tapes from bags;
- two small rectangular cardboards;
- strong threads;
- scissors.
The pompoms will be attached to the backing. It should be strong enough if the rug will be walked on frequently, for example, if it is placed in a hallway. You can use a regular mosquito net - its advantage is that after trimming you do not have to stitch the edges.
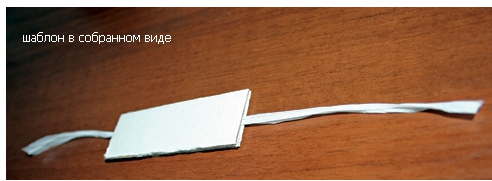
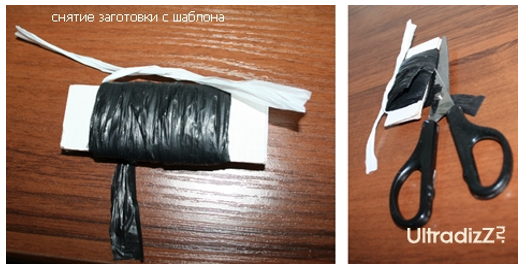
Pompoms can be made different methods. For the simplest of them, you will need two thick cardboards or two rectangular pieces of plastic; they will act as templates. The width of the rectangles will be equal to the radius of the polyethylene elements of the mat. DIY work includes the following steps:
Preparation of the workpiece. Cardboard rectangles are placed on top of each other, and a strong thread is laid between them to tie the polyethylene strips together. The length of the thread should be such as to not only tie the ribbons, but also attach the resulting pompom to the backing.

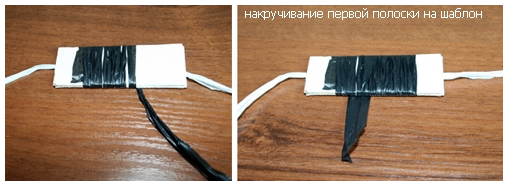
You should wind it carefully so that the turns lie close to each other. This first tape will hold the cardboard rectangles together and securely secure the thread between them. You can choose any width of the strip, optimally within 10-15 mm.
The remaining tapes are wound on top of the first, their number is selected based on the planned density of the polyethylene pile. The quantity depends on both the size of the tape and the density of the packages. It is best to select this parameter experimentally.
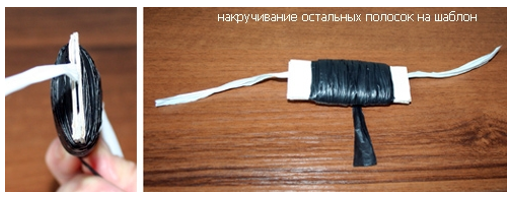
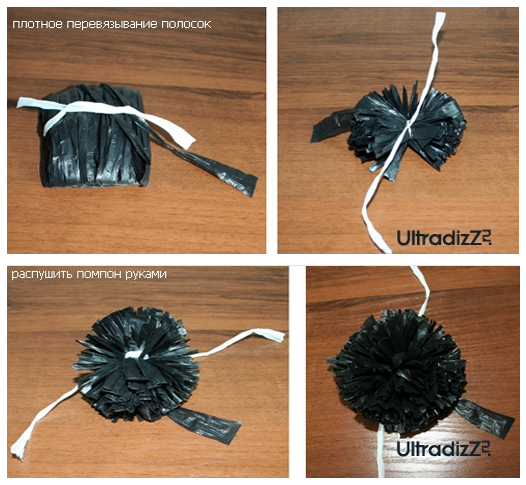
After winding all the strips, the ends of the thread are tied to each other on one side of the workpiece, and on the other side the strips are cut. After this, the cardboards are removed.
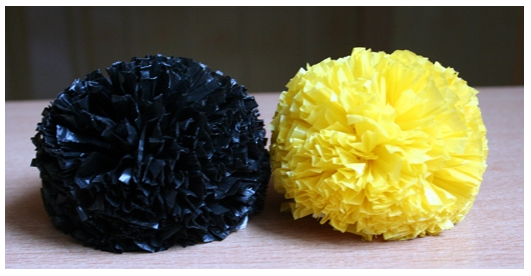
The thread is pulled tightly and the cut ribbons fluff up. When you get a spherical shape, the pompom can be considered ready.
Having made a sufficient number of these balls with your own hands, you can tie them to the substrate in any pattern.
It is worth noting that such a carpet is not intended for heavy traffic, since under the influence of mechanical loads large pom-poms are easily detached from the backing. You can get rid of this by experimenting with the thickness of the base and the diameters of the polyethylene balls. Smaller pom poms will eliminate most problems.
Handmade items are a great way to add uniqueness and special comfort to your interior design. One of the possible options for creating handmade details for the appearance of a room is knitting.
DIY crocheted carpets. You can use not only woolen threads for this; it is quite possible to make a rug from old plastic bags.A large number of colors of plastic bags allows you to knit a completely unique rug, giving it any look. Knitting rugs with your own hands is the widest scope for imagination. The process will only take a couple of days for a small rug.
Advantages of a polyethylene rug
What is good about choosing this material for creating a rug with your own hands? Polyethylene has many advantages:
- Easily available - polyethylene bags are cheap and found in every home. In addition, you can make a carpet from any garbage bags, which, like regular plastic packaging, are found in a variety of colors. By combining different colors, you can achieve any possible color scheme.
- It accumulates heat and retains it for a long time, thanks to which such a carpet will always be warm and pleasant to the touch. In addition, it is soft and walking on it with bare feet is a pleasure.
- Resistant to moisture. Under the influence of water, it will not begin to collapse, will not absorb moisture and will dry quickly. Water does not accumulate under the surface of the mat either. Thanks to all this, it is quite possible to use a rug in the bathroom to ensure safety. A bath mat is also good because it protects your feet from the cold tiles.
- The elasticity of the polymer ensures the constant shape of the rug - its corners do not bend, its edges do not wrinkle, and folds do not appear. You can put such a carpet on the floor once and not worry about its position - most likely you won’t have to adjust it.
- No slipping. The coefficient of friction of even wet knitted polyethylene is quite high, making it impossible to slip on this carpet. And it itself will not slide on the surface of the floor, even if it is finished with smooth decorative material.
- Easy to care for - if it gets dirty, just put the rug in a bath with soapy water, rinse a little and wash with clean running water. In general, this material is quite resistant to dirt, so you won’t have to clean it often.
Preparing for knitting
The advantages of a rug made from plastic bags are undeniable, and if the choice has been made in its favor, all that remains is to find out how to make it yourself. For manufacturing you will need a very small set of materials and tools:
- any multi-colored polyethylene bags - packaging and garbage, thick and thin - whichever comes to hand;
- scissors or a knife with a sharp blade for cutting bags into strips;
- crochet hooks No. 4.
Thick bags need to be cut into narrow strips; thin garbage bags should be cut into wider strips.
Knitting a rug from plastic bags is a simple process and is completely similar to regular wool crochet.
The first step is to create multi-colored square blanks, from which the appearance of the rug will be formed. It’s okay if you can’t come up with a design right away - you just need to start knitting blanks, and ideas will appear in the process.
We will come up with a pattern, arrangement of square blanks, color scheme, edging method and everything else. You just need to find out the size in advance by measuring the area of the surface chosen for covering. Thus, knitting a rug from plastic bags with your own hands is a very creative process, the fruits of which will be appreciated by all guests of your home.
To create a carpet you will need a strong mesh, which will act as a reinforcing frame. You can either make it yourself using strong threads or wire, or buy it in a store. The patterns will be knitted on this grid.
Factory-made meshes often have a multi-colored texture, which can serve as a guide for creating your own pattern. It is very convenient to adhere to such a grid, and this allows any craftswoman to create a high-quality handicraft item.
The technology of crocheting with your own hands is quite simple and quickly mastered, even if you do not have any manual skills. The procedure is carried out as follows:
- the first knitting loop is formed at any free end of the thread woven from polyethylene tapes;
- a crochet hook is threaded into the second loop, and a new loop is made at the free end of the thread;
- the thread is wound around the index finger of the hand to tighten it;
- the stretched thread is grabbed with a crochet hook and threaded through the second loop;
- the hook goes through the new loop;
- The sharp edge of the knitting needle again grasps the free edge of the polyethylene thread.
Thus, step by step, you will develop the initial skills of manual work with threads and knitting needles. Having filled your hand, making a beautiful rug that will be an excellent addition to the interior of an apartment or house is not difficult.
Rugs made from bags can not only be knitted. A good option would be a composition of fluffy balls, which can also be made from scrap materials - for example, garbage plastic bags. The main thing is that the bags have a soft structure. In addition to the usual functionality of the mat, you can build a massage mat.
To work with your own hands you need to prepare:
- plastic tapes from bags;
- two small rectangular cardboards;
- strong threads;
- scissors.
The pompoms will be attached to the backing. It should be strong enough if the rug will be walked on frequently, for example, if it is placed in a hallway. You can use a regular mosquito net - its advantage is that after trimming you do not have to stitch the edges.
Pompoms can be made using different methods. For the simplest of them, you will need two thick cardboards or two rectangular pieces of plastic; they will act as templates. The width of the rectangles will be equal to the radius of the polyethylene elements of the mat. DIY work includes the following steps:
Preparation of the workpiece. Cardboard rectangles are placed on top of each other, and a strong thread is laid between them to tie the polyethylene strips together. The length of the thread should be such as to not only tie the ribbons, but also attach the resulting pompom to the backing.
You should wind it carefully so that the turns lie close to each other. This first tape will hold the cardboard rectangles together and securely secure the thread between them. You can choose any width of the strip, optimally within 10-15 mm.
The remaining tapes are wound on top of the first, their number is selected based on the planned density of the polyethylene pile. The quantity depends on both the size of the tape and the density of the packages. It is best to select this parameter experimentally.
After winding all the strips, the ends of the thread are tied to each other on one side of the workpiece, and on the other side the strips are cut. After this, the cardboards are removed.
The thread is pulled tightly and the cut ribbons fluff up. When you get a spherical shape, the pompom can be considered ready.
Having made a sufficient number of these balls with your own hands, you can tie them to the substrate in any pattern.
It is worth noting that such a carpet is not intended for heavy traffic, since under the influence of mechanical loads large pom-poms are easily detached from the backing. You can get rid of this by experimenting with the thickness of the base and the diameters of the polyethylene balls. Smaller pom poms will eliminate most problems.
What to do if you want to diversify the design a little hygienic room without spending a lot of money on it? Some may say that the situation is hopeless, but it is not. With a little imagination, you can make cute rugs from colorful plastic bags with your own hands. They will add a touch of elegance to the bathroom and at the same time serve their intended purpose.
Is the game worth the candle?
Why waste time making rugs that don't inspire confidence at first glance? To dispel doubts, it is worth giving some arguments in favor of this choice:
Knitted carpet
- Such products do not absorb moisture, so dampness in the room when using them is excluded.
- They are very easy to wash and clean, and to dry polyethylene mats, you just need to hang them on the balcony.
- They are warm and soft to the touch. You can put them in front of the bathtub and leave it without fear of slipping.
- These rugs are easy to care for. Apply a soap solution to them, rub it with something like a washcloth and rinse with a stream of water.
- And of course, the decorative component. You can make original rugs with your own hands to decorate your room.
Needless to say, crocheting will allow you to pass the time watching your favorite movie.
Among other things, a rug made from old plastic bags can be placed not only in the bathroom. It will also fit in the toilet or front door. And when it becomes unusable, you won’t mind throwing it away and replacing it with a new one.
In a word, such rugs are not only in a practical way decoration, but also when the right approach can bring a little aesthetics to the room. At the same time, making them is quite simple. You just need to stock up on materials, turn on your favorite movie and start making a rug.
But first, let's talk about how to do it correctly and how much material is needed.
Two ways to weave rugs
Pom pom method
In this knitting option, small balls are made from plastic bags and tied together. The result is a pretty cute rug. Such an instance will not only fulfill its intended purpose, but will also slightly transform the room. Such products look interesting in their own way due to the volume of the knitting.
To prepare the pompoms, you need to cut the bags into strips about 1 cm wide. Then one strip is taken, wound onto a small template and tied in the middle with a strong thread. The edges are then trimmed and the resulting product is fluffed up like a pompom.
To make a rug, you will need at least 30 polyethylene balls. When you have prepared the pompoms in the right amount, you need to sew them onto a special mesh for carpets, which is sold in stores. Or you can make it yourself from scrap materials.
Method two - crochet

Crochet
Now let's talk about the second method of making rugs from bags with your own hands. In addition to being easy to care for, they can also be made with a variety of patterns. To work, you will have to cut the bags into strips 2.5–3 cm wide and then crochet them.
For those who decided to make such a rug with their own hands for the first time, this process will seem long and a little tedious. But once you get the hang of it, you can knit a uniquely beautiful rug in just a couple of hours. The patterns can be used standard or for openwork weaving. If this is difficult for you, then you can knit one continuous fabric.
By the way, you can knit not only rugs from plastic bags, but also slippers, bags and even decorative vases.
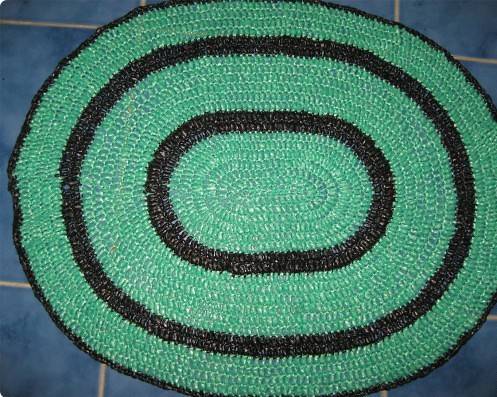
Knitting a round rug
This is the easiest method, and beginners should start with it. Don't experiment! After all, to begin with, the main thing is to learn how to knit correctly, so use stripes of different colors. Let it be a kind of avant-garde of color.
The diameter of the rug that we will make is 50 cm with the width of each woven strip being 5 cm.
Let's start knitting
Knitting a round rug is not that difficult. Main- add loops in time, otherwise the product will curl and take the shape of a concave bowl.
So let's get started:

Type of mating
- For example, let's make the center of the rug red. To do this, take one strip and knit 5 air loops from it, which are closed into one ring. Then we knit another loop and unfold the knitting in the opposite side. We make all single crochets in each of the 5 loops of the previous row. At the same time, we thread two additional stripes into the 2nd and 4th loops. Having knitted to the end of the turning loop, we again unfold the weaving in reverse side, thereby closing the circle.
- Next will be the yellow row. Everything is knitted in exactly the same order as the middle, in small stitches. Only here there is a little decorative trick. In order for the circles to increase from the center to the sides, at equal weaving intervals it is necessary to add 5 or 6 loops, knitting 2 single crochets.
- After the yellow stripe, start knitting, for example, green rows. It will turn out to be a kind of traffic light. The width of this insert should also be 5 cm, and it is knitted similarly to the previous ones.
The entire mat is made in this way. That is, every 5 cm you weave stripes of a different color. Now you can knit a round rug from polyethylene strips with your own hands. Place it in the bathroom, and its diversity will please the eye.
Variety of crafts
You can find a large number on the Internet different ways how to make beautiful accessories from old waste materials with your own hands, ladies' handbag and much more.
Garbage bags, old plastic bottles, CDs - from all this, with the right approach, you can make various educational toys for children and original crafts.
In addition, you can involve your child in the process and believe me, he will gladly take part in this new activity for him.
Women's handbag made of plastic bags
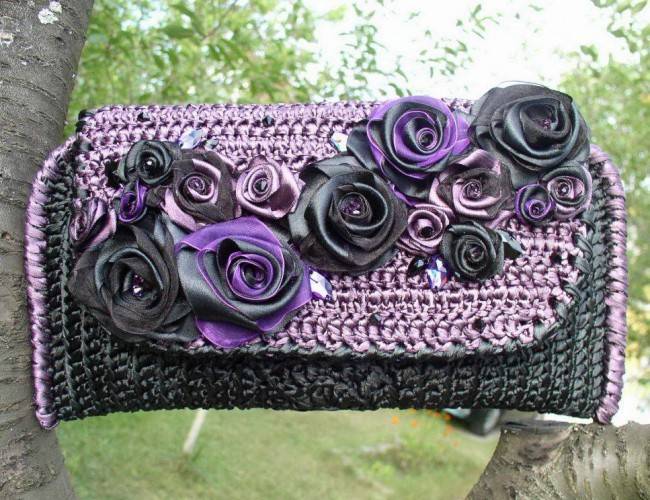
Handbag
This accessory is considered the most popular among home needlewomen after knitting bath mats. But unlike the latter, here you will first have to prepare the so-called yarn.
It’s quite simple to make, and the process of knitting a handbag itself is not too complicated. Handbags knitted from waste material turn out to be quite cute, fashionable and completely free.
What materials to choose for “yarn”
You, of course, know that garbage bags come in different forms. The first parameter indicated by the manufacturer is the total volume. Typically it is 20, 25, 30, 60 and 120 liters. The second parameter is the density of the material, that is, polyethylene. Packages with a higher percentage of density are a little rougher to the touch.
Here you need to adhere to certain recommendations - the higher the density, the thinner the strips for the “yarn” should be cut. With experience, everything will come, and you will learn how to choose the right hooks for knitting materials of different densities, and for starters, a medium-density bag will do.
If this is your first time taking up this task, then first try to knit a small sample of fabric so that you know approximately what you need to do later.
We also advise beginner knitters to take yarn bags with a less dense structure and a capacity of no more than 50 liters. The “yarn” from them will be softer, and knitting will be easier. In addition, pay attention to bags with a minimum density, because products made from them hold their shape very poorly.
We prepare high-quality yarn for crafts
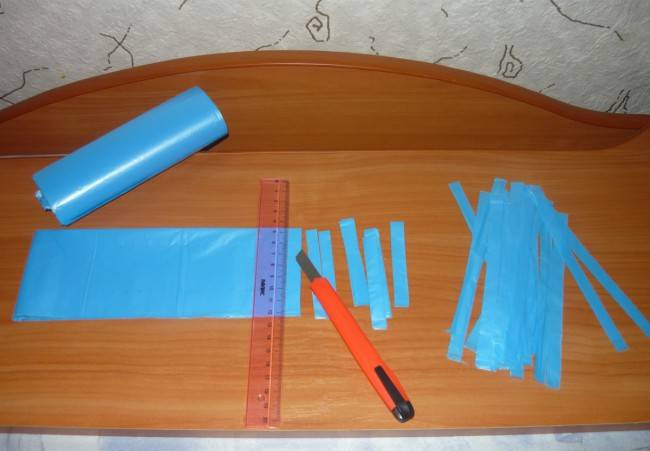
Cutting strips
We figured out which bags to choose for making bags or rugs with your own hands. Now let's look at how to cook required amount"yarn":
- To form knitting threads, you need to cut garbage bags into even strips in accordance with the hook number - best option 4–5 cm.
Try to keep the strips even and the same width, then when knitting the surface of the rug will be uniform in thickness.
- To speed up cutting, place several bags in a stack on the table and cut off the strips with a stationery knife along the ruler attached to them.
- Once you have everything cut, straighten one strip and you should have a ring.
From such blanks you will form yarn. There are two ways to do this. Let's look at both options.
Option one
In the first case, all the elements are connected immediately into a ball.
To do this, take one ring, insert another into it, connecting the two edges together, and pull the next strip through them. In this way, all the rings cut from the bags are tied together.
The resulting thread is wound into a ball. In this option, the “yarn” will be thicker and the rug will be more fluffy. But the length of the thread will be slightly shorter.
Option two
Waterproof carpet
Here the length of the yarn will be longer, but the thread itself will be thinner. Which method to choose is up to you.
The principle of preparing knitting thread is as follows. One ring is taken and another is threaded through it. A loop is formed from the second strip by passing one ring through the other, tightening one edge moderately. All other rings are connected in the same way.
In this way, you can prepare yarn of various lengths and individual colors in balls. Everything is limited only by your imagination and desire to make an original rug.
Carpets made from old T-shirts
These hand-made rugs will also look good in the bathroom. To knit them you will need several old cotton T-shirts different color, thread and a strong piece of fabric for the base.
The process of knitting rugs from old things is simply simple:
- First, we cut the T-shirts into equal strips 2–3 cm wide for yarn.
- Gently stretch each one so that the edges curl into tubes.
- Cut them 10–15 centimeters long.
- After this, you need to measure the floor in front of the bathroom and make an allowance on each side of 1–2 cm - to make a base for the rug.
- We lay the tubes on it in even or, on the contrary, chaotic rows and carefully sew each of them in the middle.
- All stripes are stitched in this way.
If you get a little creative and arrange all the stripes differently, you will end up with an original shaggy rug.
- Once you have attached all the pieces, fold the edges of the rug and stitch them.
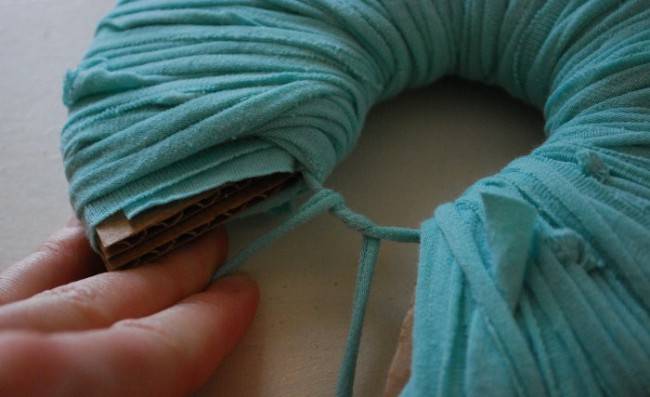
Winding a T-shirt on a cardboard base
That's all. A beautiful and original bathroom rug is ready. What distinguishes it from the option with garbage bags is that such a product will have to be constantly dried after acceptance. water procedures. But this in no way reduces the feasibility of making such rugs with your own hands.
Conclusion
If you need to make an original rug for a children's room, try to use the original material bright colors. If you use the preliminary selection method and practice a little, you will be able to create simple patterns from stripes of different colors. So all subsequent rugs will be different from each other.
Publications on the topic
 Ruslan Vasiliev


