Wooden trims: step-by-step instructions for selecting and installing them yourself (90 photos and videos). Do-it-yourself window trims, wooden, carved - types and methods of production The most beautiful window trims
The platbands on the windows perform not only an aesthetic function, they protect the house from dust and serve as insulation, so their installation is recommended in wooden house. We will tell you how you can make cashers and carvings with your own hands.
A little bit of history
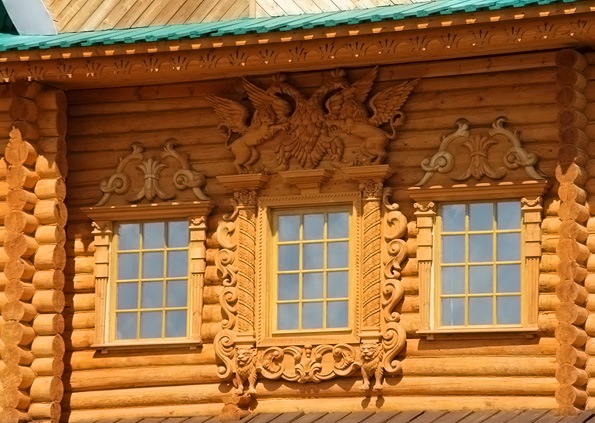
Protective symbols were used on the platbands
So, the decoration of the platbands is amazing. They depicted symbols that had hardwired properties. Our ancestors attached great importance to them. But unfortunately for a long time the art of creating platbands was forgotten. And a large number useful information lost. Today, many craftsmen are restoring this craft with great difficulty.
Manufacturing technologies
As mentioned above, the Russians attached great importance magical properties wood. Moreover, these properties were different for different breeds trees. Even the place and conditions in which the tree grew were taken into account.
Traditional old way
Therefore, in the old days there were a great many signs. If, for example, a tree grew at a crossroads, then the objects made from it will not be useful.
From the patterns of the ornament one can determine which province a particular master came from. At the same time, the principles of working with wood were different everywhere. Types of wood, too, for example, blind, sculpted, applied, slotted.
Traditional wood carving methods
Over time, a mixture of styles occurred. This gave the buildings a special originality and uniqueness. Many examples of ancient carpentry can be found in museums, and in some places buildings have been preserved that have delighted with the beauty of their frames for many centuries.
Modern methods
Today modern masters work not only with wood, but also with synthetic materials. For example, PVC, metal, plywood.
You can't argue with that. Modern technology can work wonders. Many companies offer a wide variety of platband options from a variety of materials.
You can buy budget or expensive ones. This is a matter of taste and financial capabilities.
But not everyone is happy with this option. Therefore, there are companies working on individual project, with every customer. At the same time, you will be offered a lot of catalogs and sketches so that you can choose a platband to your taste, color and with the pattern you like.
When ordering, the size of the window and the color of the facade of the house will be taken into account, and after that you will only have to admire the beautiful frame of your window.
But the fact is that no machine will transfer the warmth of the human soul to its product. And many people have now begun to understand this. Therefore, those who appreciate real carpentry art are happy to turn to carpentry workshops. Of course, the cost of a carpenter's work is quite expensive. Prices for these types of services start from 5,000 rubles, but it's worth it.
Types of thread
Carved platbands- rich window decoration
Since ancient times, four main types of carvings on platbands have come down to us.
- Flat grooved thread. When performing this type of carving, lines are cut along the contour of the pattern. As a rule, such carvings are combined with other types, the ornament is diluted with wedge-shaped cuts. There are two options for this type:
- Geometric. As the name implies, its elements have a characteristic geometric shape. It is performed as follows: with a knife - a jamb at a certain angle to the surface with pressure - an incision is made. The cut is made on the other side. Despite its apparent simplicity, and despite the fact that only a couple of tools are needed to perform such work, it is not possible to acquire such a skill right away. This will take two months. Moreover, such work is very responsible, it is very difficult to correct mistakes. Contour. To perform this type, the contour is drawn with a notch line. The thickness of the groove may vary depending on the ornament. In order to make this type of carving, you will need the following set of tools: chisels, cutters, the main requirement for them is that sharpening must be done strictly at different angles.
- Flat relief carving. This is somewhat more complex look threads. Edges of the drawing in a special way processed, giving the ornament a relief appearance. In this case, the depth of the pattern becomes the same as the depth of the background. The main elements are plant motifs, animals. This ornament is considered one of the most complex. He demands more various instruments. Let's look at three varieties of this type of carving:
- With cluttered contours. When performing this type of work, the contours of the pattern are rounded. A weaker collapse occurs on the side of the groove, while it is stronger on the background side.
- With pillow background. When performing this technique, the edge of the recess, which is closest to the pattern, is made round, and the background is chosen to be sloping. The bulge becomes pillow-like, hence the name. You can slightly lower the level of the surface being treated.
- With a selected background. The main secret of this technique is a completely selected background, at an equal depth around the pattern. The master strives to create the impression that all the details of the pattern are pasted on.
- Slotted carving. A very delicate look is created on the surface of the wood. This is achieved by almost completely removing the background. This platband resembles a beautiful light napkin. The workpiece is attached to a wooden or fabric base. In this case, contrasting colors are selected. This type of pattern is considered overhead. We can say that this type of carving is the most difficult, and only a professional can do it. Saw threads can have a very rich range of themes. These can be either simple geometric shapes or elements depicting people or animals.
For this type of technique, you will need a brace for slots, a mini hacksaw, and a jigsaw. A drill with a feather attachment may come in handy. The finishing of the slots must be very fine, so it is done only by hand. To do this, use chisels, cutters, and jambs.
The combination of different types of carving allows you to create a real work of art. Due to requirement high level skill, it is rarely tried on in practice. Although individual elements can be used to decorate facades.
Photo gallery: window trim - do-it-yourself templates (stencils)
How to make wooden carved window frames with your own hands
In order to learn how to make platbands, you will have to study for a long time. If you have at least basic skills with a hacksaw and drill, then you may have a chance to get the job done.
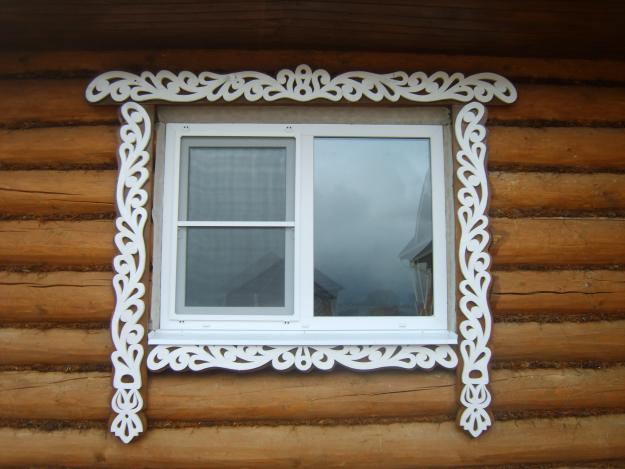
You can make platbands yourself
It may not be possible to immediately complete the platband with slotted thread, but a simpler one is possible.
Required materials
To make the platband you need wood. Choose one that is known for its long service life. However, it should not be too hard. Tree species such as oak or beech are unlikely to be useful. You will have to prepare a small supply and be patient, as the work will be long and painstaking.
The best material for a beginning carpenter would be birch or pine. Why are they good? The wood itself is, of course, a bit harsh, but the cuts are beautiful and neat. If you plan to add overlay elements to your pattern, then apple or bird cherry will work well for this.
After you have finished your work, you should impregnate the platband with a special composition. To do this, you can purchase varnishes or impregnations. Stain will help highlight the beauty of wood texture. If you make small mistakes, it’s not scary that they can be disguised with paint, white or sky blue. Common, usually white or sky blue.
Tools
It depends on what type of carving you are going to do. Depending on the complexity of the pattern, you will need either only the essentials or a full set of tools.
Choose the degree of difficulty based on your existing skills and experience in similar work. For example, in order to make the simplest openwork ornament, you do not need the skills of a professional carpenter. And if you use your imagination, you can turn any minor flaws into an element of the pattern.
If you do not have experience, do not choose patterns that have many small elements and a lot of details. The idea of the drawing should be clear to the viewer, but a complex pattern will take you a lot of time, and you just need angelic patience.
One of the right tools for making platbands - drill
Main stage
To work, you will need a drill, drill bits, preferably several sizes, a jigsaw, manual or electric, sandpaper, drying oil and wood.
- At the initial stage, you need to clean the surface with sandpaper, preferably until it is completely smooth. Now the blanks for the side connection are made. There are two ways to do this. If the end part is cut at an angle of 45º, then this is called “tenon and groove” or “half-wood”.
- If you do not have much experience, then start with a pattern with large elements. You can apply the outline directly to the tree.
- If it is difficult for you to draw an ornament, prepare a stencil with which you can transfer the elements of the ornament to the work board.
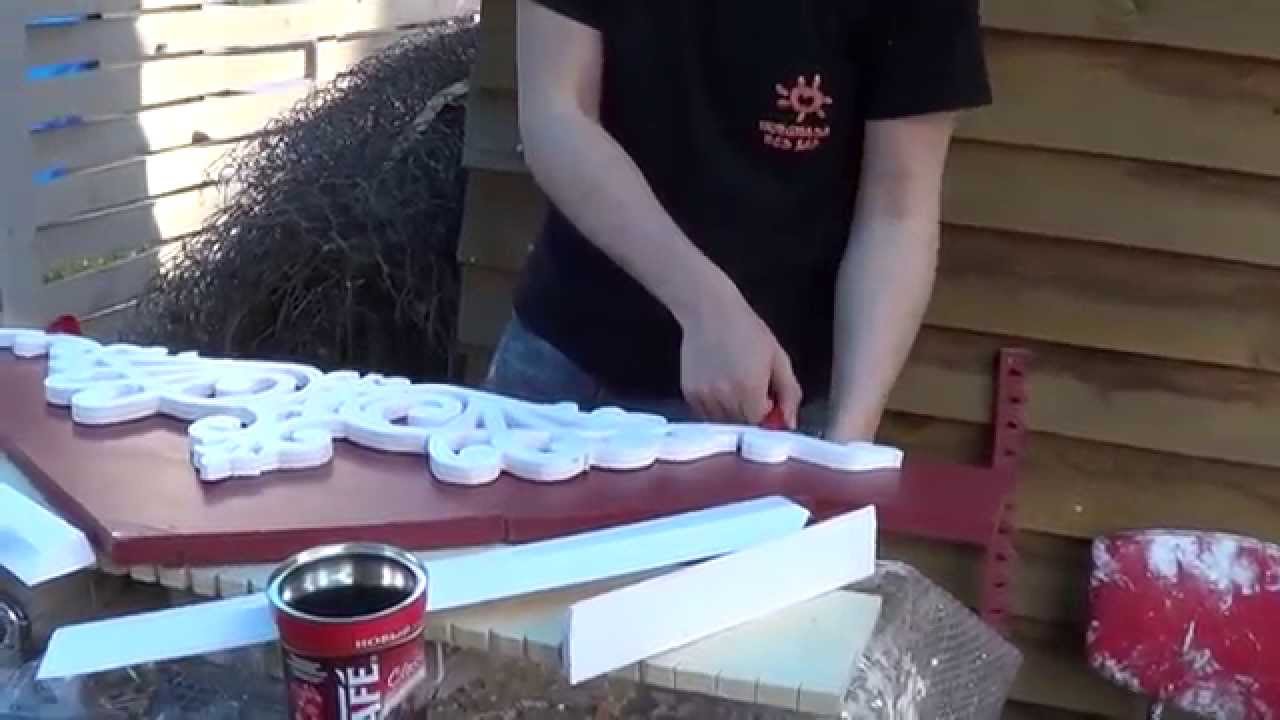
Video: making a simple carved wooden cash register
Work with your soul, the tree is alive, and if it feels your love, then the work will turn out amazing. And if you like this kind of work, then you will be able to perform real miracles of carpentry. The experience gained is always valuable.
Who knows, maybe our wise ancestors were right when they protected their homes by installing carved frames on the windows.
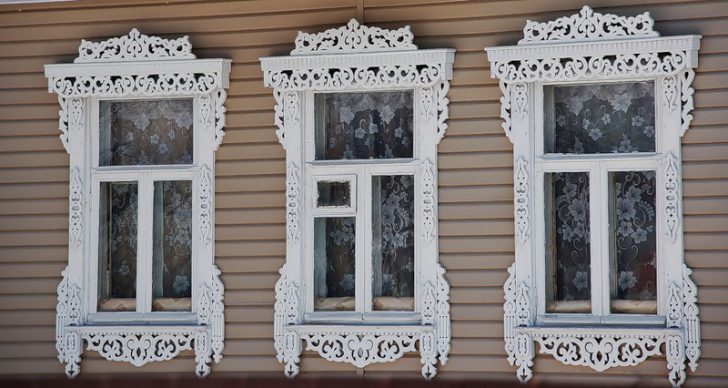
Platbands are a decorative part of a window or door design, which allows you to transform it and make it original. They have been used since ancient times and still have not lost their relevance. Even if we take the old Russian huts, not one of them could do without a window casing. They complemented the design and created some color. In addition to the frame, the wooden frame looked impeccable. Look at the photo to see this.
What is the advantage of such platbands? What functions do they perform? How to make window frames with your own hands? All this can be found out by reading this article.
Let's start with getting acquainted
These products appeared quite a long time ago, along with glazed windows and mica. Initially, they were intended to cover insulation and windproofing. And here are the products decorative type, which had patterns and were distinguished by beauty, were found among the ancient Celts. But the true dawn of window frames is the period of the revival of Rus', which was marked by the overthrow of the Mongols. Russian woodcarving masters were famous throughout the world. Platbands on windows in a wooden house photo
But at the same time, window frames were unrecognized by the Bolsheviks, who considered them relics of philistinism and intended to destroy them. Although in our time, such decorative elements, which allow us to improve the house, are being revived. What are they like now? What are their features and pros and cons? Now it is difficult to overestimate the demand for platbands for windows and doors. They allow you to create traditional decor and protect window design. Here are the main advantages of the products:
- They serve as a decorative element, decorate the building and visually expand or stretch it.
- Complement the architecture of the structure. And it is simply impossible to imagine the Russian style without platbands.
- They protect the space between the wall surface and the window opening. With them, dust and humidity are not a problem.
- Allows you to reduce heat loss and noise levels.
But, in addition to obvious advantages, window frames in a wooden house also have their disadvantages:
- tree - beautiful building material. But, it requires proper processing and protection from external influences;
- during operation, platbands require regular treatment and maintenance;
- don't quite fit with metal-plastic windows.

Pay attention! There is an option to combine wood with metal-plastic windows. However, then everything will need to be done in one color so that the window frame looks harmonious.
If we highlight the functions of window frames, then they perform decorative and protective functions. It is noteworthy that there are different types platbands. Let's look at them.
Types of products for wooden windows
Why many people love this or that material is the large number of options that differ from each other in materials, design, price and other parameters. After all, the more choice, the easier it is to choose exactly what everyone likes. Not everyone remembers the era anymore Soviet Union, when there was no way to boast about diversity. Today, users have access to a variety of types of platbands. In fact, they are similar to each other, only they differ in the installation method, material and price.

So, let's start with installation. You can find two types of platbands on sale:

How are they different? The first option is the simplest and, so to speak, classic. It has been used in construction for a long time. It's quite easy to work with. Installation is carried out on top of the window frame. It will protect the structure from the sun, moisture and dust.
But telescopic platbands are considered more modern. Their installation is carried out in the space between the wall and the window opening. For fixation, additional fastenings in the form of screws and bolts will be required. But thanks to this, the platband is more securely attached to the height and width of the window.
For wooden houses Telescopic platbands are better suited. The advantage is their convenience and reliable protection premises and preventing deformation of the window opening. The catch is that installation requires removal of the window frame. For wooden house this can be problematic. For self-installation It is better to resort to the use of overhead products.

The trim for windows in a wooden house can also vary in material used. Here are the types of products:
Let's start with wooden products. The advantage is their simplicity, versatility and practicality. They can be installed for any interior. You can also make them yourself. Products can be ordinary or carved with patterns. To do this you will have to use templates or stencils. Then a beautiful ornament will decorate the window.

This is the type of platbands that are most amenable to processing. You can use them to make a work of art or just create simple products. This is why designers love them so much that they introduce them into their projects. After all, the same plastic trims there's no way to process it. But wood also has some disadvantages. It does not tolerate temperature changes and high humidity. The structure may change and the casing may become deformed.
The same cannot be said about plastic products for windows. They are also used for wooden houses. The material has many advantages. It is practical, convenient, cheap, lightweight and durable. In production, plastic frames are created in various shapes and color range. One cannot help but rejoice in the fact that the surface can imitate natural wood and other materials.

Plastic is less susceptible to deformation and is not afraid of moisture and temperature changes. Thanks to this, products can last longer than wooden ones. If we talk about installation, then everything is also simple. No additional fasteners are required. The platbands are simply fixed to the built-in elements. Due to this, the front side has no holes or visible marks from nails.
One cannot fail to mention the main disadvantage of plastic. We are talking about artificial components in the composition of the material. If the building is wooden, then few people want to introduce a touch of artificiality into a natural and environmentally friendly house.
And finally, let's look at MDF trim. We can say that MDF products are something in between the first and second options. The MDF board itself is made from waste wood and its residues. This means that the products will be natural. And thanks to the special compositions in the impregnations, the product can last long service and is not afraid of moisture.

As for the disadvantages, one can note one - low strength. Plastic and wooden window frames are much stronger. But everyone decides for themselves which type of platbands to choose for their windows. We need to build on available funds, advantages and disadvantages of the material and personal preferences. But, when your goal is to make window frames with your own hands, then the choice is obvious. You need to stop at a tree. How exactly can you make them? This is what we will consider.
A few points before creation
You need to understand that platbands on windows in a wooden house should not prevent the sashes from opening, at least not less than 90 degrees. As for other parameters, everything is chosen according to personal preference. Fastening occurs using spikes or the half-tree method.

If the design requires it, then upper part the platband is further expanded. It is popularly called kokoshnik. To create a specific pattern on it, you need to use templates. With them the work will be done much faster and easier. The lower part is made according to the same principle. Only now it must be made with a bevel so that water flows down it.
Advice! The thickness of the upper and lower parts should be different, namely the upper one is 1 cm thinner.

Small slats are placed on both sides of the opening, which will hide differences in the walls, of course, if there are any. The final fastening is carried out after precise adjustment of the joints. By the way, in the case when the shutters open towards the street, the platbands will have to be mounted 3 cm above the window.
Selecting a pattern for the platband
The first stage of creating platbands with your own hands is choosing their appearance. It directly depends on the pattern of the products. They are the ones who help create that Russian flavor. It is clear that complex and intricate patterns can only be created by qualified craftsmen. But, in our era of accessibility of information and auxiliary tools, everyone can do this. Templates will become irreplaceable assistants for beginners.
It is noteworthy that now even professionals use templates and stencils, because they do their job perfectly. A stencil or template for the platband consists of several elements:
- Bottom bar.
- Top bar.
- Vertical slats.
In addition, sometimes the template has additional decorative details, such as hangers, flowerpots, etc. Some of the templates can be seen below.
All that remains is to choose best option for yourself and prepare for the next stage.
Creating a Frame
First of all, a frame is created from the prepared elements. Its installation is carried out using spikes fixed in the hole with dowels. To create these spikes, a jigsaw is used, but if you don’t have one, you can use a regular hacksaw with fine teeth. A knife is used to remove sawdust. The frame is the basis of our platbands. Next we will transform it.
Do not forget that the width of the finished casing should allow the doors to open freely. The platband frame is made 2-4 cm larger than the window frame. Now let's talk about making the platband. Let's look at the step-by-step instructions:


That's all the work. All that remains is to install the platbands. Creation is not as difficult as you might think at first. You just need to make high-quality markings and carefully cut everything along the contours. We invite you to watch a video that will help you create platbands for a wooden house with your own hands.
Mistakes to Avoid
It is impossible not to consider some manufacturing errors that lead to common problems. Here is the list:


I would also like to remind you that before starting a task, it is better to calculate in advance all production costs (time and money). This will show whether it’s worth doing everything yourself. If you do not have the proper skills, it would be easier to buy window casings.
Let's sum it up
Those who own wooden houses have some advantages. One of them is the possibility of creating original Russian design in combination with wooden platbands on the windows. These are excellent products that help protect the window structure and make it more attractive. At the same time, everyone has a choice - to make them with their own hands, or spend from 2.5 to 15 thousand on average on ready-made platbands. And to make it easier for you to install them, we have prepared visual video on this topic.
Platbands are not only a beautiful decorative element, as many are accustomed to believe. Often their functionality is much more than just nice view and aesthetics. And they don’t always have bright look, immediately noticeable.
Trims are needed primarily to protect the window from adverse influences and improve insulation in the house. Therefore, in fact, they are often necessary.

Nowadays, platbands, for the most part, are also a beautiful component in themselves that makes the house more beautiful and lively. But defense is still their main purpose. The window frame is subject to various damages, and installation work when inserted into the wall of the house, they leave behind an unpleasant-looking gap.

Platbands hide all defects. They are also able to provide heat in the house, since their presence greatly prevents its loss.


Perhaps a structure made of brick or concrete is not so susceptible to this, but wood tends to deform over time. Cracks may appear for precisely this reason. Platbands are extremely helpful in this regard: the process slows down.

Species
Platbands today are very diverse in appearance. They can be distinguished based on the material from which they were created. But basically there are two types.

Invoices
This option is older, but should not be neglected now. The method of installing it is quite simple: it is done on top of the frame.

Little effort is required, but this type of platband helps enough: it prevents penetration as sun rays, and precipitation. The joints are reliably protected thanks to this.

Telescopic
This modern type, which lately used quite often. You won't need additional materials in the form of screws or the same nails. Such platbands are placed just in the cracks. This ensures a secure fit as a whole.

Priority should still be given to the second type. But to install it you need to remove the windows. Doing this is not always convenient, if not even impossible, so they often resort to the first option. But, we must admit, the telescopic casing is much more convenient to use.

Materials
The first thing that comes to mind is wood. Wood is practical in itself, and it always looks natural and beautiful. This platband is universal and can be designed in different ways.

Plus, in private homes, wood usually looks most welcome. Any photo of window frames in a wooden house will confirm this fact. Moreover, if the structure itself is made of wood, then the same material can be used for the platbands. This will help to combine one with the other well. You can change the color a little if you wish.


And indeed, this option is often used. Others require additional costs in the form of special processing. And they rarely decorate. But in fact, platbands can be made of either plastic or MDF.

Let us still remember the disadvantages of wood. Moisture won’t make it any better, and it doesn’t have much frost resistance. But plastic is much more reliable in this regard. Now you can do anything you want: including giving it the appearance of wood to make it look more natural.

Such material will not deform and will last for a long time. more wood. And it’s much more pleasant to attach it: the platbands won’t need to be rammed with screws. But still plastic - artificial material no matter what it looks like. Not every owner will want to use it, as this will reduce the environmental friendliness of his home.

And here you can turn to the third option, MDF. Essentially, this is the same wood, only treated with a certain composition. Such platbands are distinguished by their naturalness, but at the same time they are also reliable. Accordingly, they can last much longer than wood.

However, there is also a minus here - they are not durable. Both plastic and wood have much higher strength in comparison. You need to decide what material to use based on your own wishes.

Preparation for installation
First you need to accurately measure the window. The size is very important here and it must be measured with extreme precision so that the frame is hidden from view. Only then, when you have taken the necessary measurements, can you begin to prepare the materials.

If you have chosen wood, you should first cut out the blanks. Here you can arrange them according to your wishes. The other two types do not need additional processing, but the wood must be saturated with a protective solution.

Use only dry lumber. You can seriously damage your own work if it is not dried.

Next, you will need to make notes on the platbands, with the help of which you will need to indicate where the joints and fasteners will be placed. The holes must be drilled in advance. And then immediately sand the platband.


The place of work should also be given special attention. Remember that you won't be able to reach the joints later. If there are any plans that will require them, be sure to do everything necessary before installation begins.

Overlay trims can be attached in several ways. It is possible to do this with the help of nails, or perhaps with the help of various spikes.

Nails are easy to use, but can damage the overall picture, so spikes are usually preferred. There is a blind tenon and a through one. The technology for their use is similar, only the holes when using the second option in the platband are end-to-end.

Installation
Now you can begin the actual installation. First you need to assemble the platband, fastening all its parts together. You can use either spikes, nails, or regular glue. The latter, however, is recommended to be used only in addition to the other two.

If you have chosen spikes, you will first need to take care of measuring their location and making the necessary holes in advance.

Initially, you will need to mark the perimeter. It is necessary to know exactly the placement of all fasteners, as well as evenly arrange them throughout the entire structure. Remember that the load should not be uneven.

The installation itself is simple: the platband is placed so that the holes for the tenons coincide with them. The work simply requires precision. A lot depends on the placement of the fasteners, which needs to be taken care of long before. Accordingly, preparation for installation will greatly influence the overall result.

You may need glue when working. When using it, the risk that the entire structure will simply fall is significantly reduced. Plus, the insulation of all holes made is improved.


After the installation is completely completed, all that remains is to use a certain composition for the holes. This is necessary to prevent moisture from being absorbed.

It is important to remember that you need to monitor the design after. If she demands it, then even devote time to additional care for her. Only in this case will you get a decent result.

Photo of window frames in a wooden house


The exterior decoration of a house (we are, of course, talking about private buildings) cannot be considered complete if the window openings are not decorated. Ready-made window frames can be purchased, although some articles indicate that they are rarely found on sale. No, there are enough of these protection and decorative elements on the market, and in large assortment and at a reasonable price. Even carved samples cost no more than 300 rubles per linear meter.
But upon careful examination, you will notice that they are all made somewhat monotonously, and the sizes are mostly the same. standard parameters and configuration of openings. If the house is being built according to a special project, and an original one, taking into account all the preferences of the owner, it makes sense to install unusual trim on the windows, emphasizing the individuality of the home. This article will tell you how and what to make beautiful trims on the windows with your own hands.
Material for platbands
On this point, all experts have a clear opinion - if you do it yourself, then only wood. Firstly, the material is the most affordable. Secondly, it is easy to work with wood with the simplest tool, that is, in the full sense of the word, you can independently make platbands from scratch, with the most complex pattern. Thirdly, wood goes well with any construction and finishing material. Consequently, such platbands are equally suitable for various buildings, regardless of their features and the overall design of the facade.

What to consider:
- Samples for platbands (board or plywood) should have a minimum of knots. Therefore, you should purchase lumber high quality, although it costs more. Otherwise, when cutting out patterns or grooves, the tool will constantly come across such problem areas, and it is not a fact that the board will not have to be rejected as a result.
- The thickness of the samples is chosen arbitrarily, depending on the characteristics of the jigsaw and the type of wood. As a rule, for platbands ranging from 5 (overhead) to 50 (slotted) mm. How they differ will become clear as the presentation progresses.
Wood species
If you approach this issue seriously, and not just set yourself the goal of making strips with your own hands that close the gaps between window frame and an opening in the wall, then many points should be taken into account.
In cases where it concerns standard version in the form of a solid narrow plank, it is advisable to focus on hard wood. This parameter is directly related to the porosity of the material. Consequently, such platbands will last much longer, since they will not intensively absorb liquid, unlike soft rocks. Recommendations that they can be protected by painting with a moisture-resistant composition are hardly worthy of attention. Firstly, the naturalness of wood is lost, especially if the house itself is made of the same material. Secondly, updating the coating layer, taking into account the complexity of the patterns, is such a painstaking job and requires a lot of time that there are few people willing to do this regularly.
Of the affordable wood species, oak, ash, birch, and pear deserve attention. With all their advantages there is significant drawback– such workpieces are difficult to process with your own hands. Even the simplest selection of grooves is already a problem. If you lack experience hand tool will not help, and you will have to look for the possibility of using machine tools. That is, pay for the service.
For carved frames, you should focus on wood with a lower density. Mainly larch, pine, ash, linden, and spruce are used in construction and finishing. The last 3 species, although convenient for processing with your own hands, are not suitable for platbands, given that they are attached to the facade of the house. Such boards (planks) are characterized by hygroscopicity and insufficient strength. Therefore, difficulties will arise with protection from moisture (additional drying of workpieces, repeated impregnation) and fastening. Consequently, the durability of such platbands is questionable.

Climate Features
This factor cannot be ignored. It is better to immediately abandon soft wood for platbands if:
- humidity in the location of the house is constantly excessive (for example, near large natural reservoirs) or vice versa, minimal (that is, the air is too dry);
- even during the day, the temperature varies widely (significant differences).
The best option for platbands is pine or larch. These types of wood are equally well suited for making any platbands with your own hands, regardless of the shape, size and pattern of the planks.

Drawing up a drawing of the platband
Any finished drawing can be remade to fit your window openings, respecting the scaling. Or design patterns of your own.

Necessary tools and equipment
As a rule, " home handyman» uses what is at hand. But some tools are not in demand in everyday life, so you will have to purchase some.
- Electric jigsaw. There is no point in working manually. To achieve high quality patterns, you will have to spend a lot of time. In addition, it has limited use, since the platbands differ not only in the thickness of the board, but also in its width. This is the main difficulty of using a simple jigsaw.
- Screwdriver.
- A set of chisels - corner, cranberry, caesar, semicircular, and so on. Just one will not be enough. Even in a solid plank, you will need to make a selection of materials with different widths grooves, at different angles.
- "Thorn cutter." A specific tool, but it is extremely necessary for making eyelets and seams in platbands.
- Knives (cutter, joint).
- Set of drills (feather).
- Grinding machine. Even with great diligence, it will not be possible to make wood absolutely smooth using sandpaper manually. Yes, and this will take a lot of time.
The procedure for assembling the platband
Since there are enough varieties of platbands, one of the simplest options is being considered. Its peculiarity is the symmetry of the samples located on opposite sides windows. Having understood the principle of manufacturing individual parts of the casing and assembling them into a single structure, it is easy to choose any of those described on the Internet or develop your own.


Decorative elements
Next is the algorithm of actions for making a figured platband. No comments are required regarding solid strips. Selecting longitudinal grooves using a chisel(s) is all that is needed. You can perfectly decorate windows with simple, monolithic trim and in other ways. In addition to selecting grooves in wood, there are other options: artistic painting of the planks (with a brush, soldering iron tip) or firing.
- Based on the drawn up sketch, a stencil of the frame element is made. For example, which will be mounted to the left of the window.
- The corresponding pattern is transferred to the back (back) side of the selected plank.
- Holes are made along its contour. Their locations depend on the specifics of the pattern. It is into them that the electric jigsaw file will be inserted for further cutting out fragments in the designated segment. The picture explains everything well.

The final stage of this part of the work is cutting the board along the outer contour.
The second “sidewall” is made similarly, but in mirror image. To do this, it is enough to turn the same stencil 180 0. This procedure is also followed to obtain the second pair of elements - the top and bottom of the casing.
No matter how interesting and original the design you like is, you should not choose patterns with small details or complex patterns for window trims. Firstly, the work of making individual figures is so painstaking, requiring perseverance and extreme precision, that not everyone will be able to complete it. Secondly, miniature elements are beautiful only when viewed up close. At a distance they merge, so for exterior finishing For window openings, it is impractical to use such complex, small patterns.

Cleaning the front surface of samples
There are grinders different types. That's why general recommendation– the grain size of the abrasive (skin or disc) is selected to be about 80. . Sufficient grinding quality will be ensured regardless of the type of wood.
Assembling the platband frame
Even if the casing is made in a shaped form, it makes no sense to attach such wooden patterned elements directly to the walls. There is no need to talk about strength, and it will not be possible to connect them reliably. What should I do? Each master has his own opinion, so the author is just sharing own experience. It is up to you, the reader, to decide whether to accept these comments for management or not.

As a rule, when measuring the geometry of a window opening, it turns out that all its cuts do not lie in the same plane. That is, during the construction of the walls some distortions appeared. When building a house, especially with your own hands, small tolerances are common. They are not critical if they do not exceed established limits. But for the installation of the platband, this fact is important. Therefore, for additional leveling purposes, you will have to make a subframe. Essentially, these are boards (slats) that close the gaps between the frame and the end parts of the wall along the perimeter of the window opening. It is on them that the platband is fixed.
The dimensions of the platband are selected so that on each side (external) it overlaps the window frame by at least 20 mm. In this case, you need to check whether the doors will open at an angle of 120º (generally accepted norm).
Conventionally, all platbands can be divided into 2 groups (according to the specifics of the frame assembly): monolithic, that is, when the pattern is cut directly into the board (plank) and overhead. These are separately made figures that are attached to the sides of the frame by gluing, mounting on tongues or in another way. The technology described above (slotted) refers to the first option.

Wood processing
Soil impregnation
This is rarely done, but such preparation of the material provides advantages. Firstly, the pores are filled with the preparation, which reduces the hygroscopicity of the wood. Secondly, with the subsequent application of a protective layer, the consumption of paint and varnish composition (any of which is more expensive than a primer) is reduced.
Finishing
As a rule, varnish, especially if we are talking about a log house. In other cases, you need to focus on the general design of the facade and shutters. .
The author hopes that this article will help the reader make the best choice and will provide step-by-step instructions for making decorative elements with your own hands. For those who are more interested complex options window frames, we recommend that you deal with such structural parts as “kokoshnik”, “towel”, “tiara”, “shoulder”. The work is much more difficult, but it is worth it - exclusiveness is guaranteed.
Platbands are the overhead strips that frame the window. They have an important function - they hide the gap between the window frame and the wall of the house, thereby protecting the home from drafts, heat loss and moisture ingress. They often serve unusual decoration at home, and in ancient times they were even a talisman against evil spirits.
Carved window frames were popular in our country before the arrival of the Bolsheviks, who considered home decoration an excess. Now the popularity of decorated window frames has begun to increase again.

Types of platbands
There are many types of platbands, which differ in design, material and installation method. Based on the type of installation, they are divided into overhead-type and telescopic platbands.


The invoices are attached directly to window frame synthetic glue, special spikes, using nails, and telescopic ones are fixed in the space between the window frame and the wall.

Materials
For the manufacture of platbands, materials such as wood, plastic and MDF are used.

Wooden window frames are very practical and will easily fit into any interior. Natural wood It lends itself well to processing and a carved pattern will look great on it.

Plastic trims are practical, convenient and can replicate the texture of wood. They are very budget-friendly, do not require such careful maintenance as wooden trims, but they also do not look as impressive. Their advantage is their resistance to temperature and humidity changes, which saves them from deformation and increases their service life. The downside will be the paucity of choice of color, shape and texture of the trim.

Platbands made of MDF (fibreboard medium density) combine the environmental friendliness of wood and the strength of plastic thanks to a special water-repellent impregnation. Unfortunately, disadvantage of MDF is the low strength of the material compared to plastic and wood.

There are also metal trims on sale, but they have a purely functional meaning and have no artistic value.

Wooden frames will look harmonious on the windows of wooden houses, metal frames go well with plastic and metal-plastic facade panels, plastic ones are suitable for plastic siding, and MDF products are more often used inside the house.


The advantage of using platbands on windows in a house is the ability to visually expand window openings and increase the height of the building. By choosing the same ornament of the platbands, you can create a complete architectural ensemble on your site.

Making platbands with your own hands
To get a high-quality result of the work, you need to choose the right wood from which the casing will be made. For this purpose, timber made of pine, oak, birch, linden, walnut or alder is used. Wood from fruit trees is also used.

For the first experience in making a platband with carved pattern Linden, aspen and alder are better suited - they are soft-leaved trees, so even inexperienced people can easily cut out a pattern on them. Important correct processing clypeus - this wood is very hygroscopic and subject to rapid rotting.

A more suitable choice would be deciduous or coniferous species tree. Birch and pine have a sufficient margin of safety and are quite easy to process.

Platbands made of oak and ash (hardwood) are very difficult for beginners to process due to their increased hardness. They are very reliable and durable, but it is better to entrust the manufacture of platbands from these types of wood to professionals.

Fruit species are well suited for making small details of the casing.


timber
To choose the right timber, a few tips will help you:
- Do not buy timber with a blue or black tint - this indicates the presence of fungus in the wood
- Do not buy third-grade wood, the savings will be insignificant, but the quality will be noticeably lower, which will affect the durability of the final product
- Do not take a curved beam - it is very difficult to straighten it.


Typically the thickness of the platband is 20-35 mm. Try to select the right thickness of timber immediately, so as not to waste a lot of time on cutting and processing

The standard length of the timber is 220 cm, so buy wood with a reserve - you will be left with a lot of trimmings that are better not to use - constituent elements platband will only ruin it appearance and functionality.

Dimensions
The width of window casings ranges from 100 to 250 mm. To cut a piece of the required width, nail timber of different thicknesses around the perimeter of the window and see from a distance which thickness will look more harmonious.

Please note that the platband should extend onto the frame by 5-10 mm and its upper part can significantly exceed the width of the side and bottom parts.

To ensure that your product does not interfere with opening the windows, during installation you need a distance from the hinges of about 10-20 cm, take this into account when taking measurements.


Thread
To make a pattern on a workpiece yourself, you will need a set of wood carving chisels, saws and many other tools. Their set depends on the complexity and type of pattern you choose. On at the moment The advent of modern power tools makes the job much easier.

The most commonly used carving techniques are:
- Through type of processing. In this case, the design is sawn or cut through the wood. These patterns are made using a saw and jigsaw. This technique helps create openwork, lacy-looking products.
- The flat creased type is characterized by the creation of a pattern that will be lower in level than the main background. When choosing this technique, you will need a knife, semicircular chisels and cutters.
- Relief type. The elements in it are somewhat raised above the rest of the background. To create it, you need chisels of various shapes.


Patterns
To create interesting design platbands, you should look for photos of window platbands on the Internet. This will allow you to decide on the color, texture and pattern of the intended product.

Nowadays it is easy to find stencils for window frames in the public domain. You should not choose complex patterns for your first wood carving experience. It is important that all products must display the same pattern.

After you find the wood and stencil that suits you, print out the desired pattern in full size and place it on the workpiece, attaching it with thumbtacks.


When placing the stencil, make sure that the carving will go along the grain of the wood and not across it. Transfer the pattern to the workpiece and you can start carving. Don't rush, it may ruin the workpiece.

Be sure to thoroughly sand the resulting pattern, and then remove wood shavings and dust from hard to reach places vacuum cleaner.


Installation
Attach decorative trims to wooden frame You can use self-tapping screws, nails without heads and special spikes. For plastic frames Only liquid nails are used.

Care

As for plastic, metal and MDF trims, they are unpretentious in maintenance. Just repaint them occasionally and protect them from corrosion.

Photos of window trims


