What do strawberry seedlings look like? How to grow strawberries from seeds at home into seedlings - step-by-step instructions. Benefits of seed growing
Strawberry - how much is in this word summer warmth, sun and joy! Yes, food gives a person pleasure, especially something as fragrant and light as strawberries. Adults and children love them, and there’s nothing to say about the taste of jam and jam from strawberries - these are favorite delicacies in winter time year. Growing this garden crop is not an easy task, but there are special tricks that experienced summer residents know about, and now you will learn about it too.
Experienced gardeners know that at least 50 percent of success in growing strawberries depends on the right choice seeds and varieties of this crop.

If you are new to gardening, then it is best to go shopping for seeds with an experienced summer resident - no one will understand the variety of seeds and varieties on the market better than him. But if such a person is not around, and you are left to your own devices, then follow these instructions:
- decide what kind of berry you want to get: large or small, sweet or sour, plan to make jam from it or just eat it throughout the summer. Strawberry varieties are divided into remontant varieties (bearing fruit several times during the summer) and those that bear fruit once per season;
- it is believed that remontant strawberry varieties are inferior in their taste qualities berries of those varieties that bear fruit only once per summer period. But you can eat such berries all summer long;
- Look carefully at the packaging in which the seeds are located: it must be intact, and the expiration date of the seeds must be indicated on it. Attention: the fresher the seeds, the more germination they will have, so do not take those that will soon expire;
- look at the price of seeds: those that are more expensive are usually considered elite, and there will most likely be fewer seeds in the package than in the cheap option. In order not to “break the woods”, buy seeds of the middle price category for the first time: if you fail, you will not lose a lot of money. In addition, simpler varieties have fewer care requirements, and the number of seeds in a pack is about 25, while expensive ones have no more than 12 seeds;
- do not buy seeds on the street: it is best to go for them to a specialized store, where a sales consultant will not only help you choose best option, but will also advise how to properly care for the selected variety. And in this case, the chance of running into a fake is lower than with market “traders”.

Container for seedlings and soil with your own hands
Having purchased the seeds, we begin to prepare for sowing them. First, let's decide what to plant in. First, we need a container for seedlings. Can be used as “houses” the following types containers.
| Capacity | Pros and cons |
|---|---|
| For the purpose of growing seedlings, boxes made of thick cardboard are suitable, which you can get in any store. Pros: easy to get. Cons: quickly deteriorate from moisture. |
| These are juice and milk boxes. They are made of cardboard on the outside and covered with a special waterproof material on the inside. Pros: easy to get, do not get wet when watering, do not lose shape from moisture. Cons: usually used for only one season. |
| This category includes jars of yogurt, processed cheese, and other products. They do not require preparation before use - just wash and disinfect them. Pros: easy to get, do not lose shape, do not get wet or fall apart. Can be used for several seasons. Cons: you need a lot of them. |
| Plastic bottles for various drinks are an excellent alternative to store-bought cups for seedlings. Trim them, and the “home” for the seedlings is ready! And from the top cut part of the bottle you can make a lid for seedlings. Pros: functional, can be used for several seasons, do not lose shape from moisture. Cons: none, except for spending some time preparing containers. |
| Containers for cakes, others confectionery and other things. Pros: easy to get, don’t take up much space, have lids right away. Cons: quite fragile, so they are usually used for no more than one season. |
| You can easily put it together yourself from boards. Pros: strong, reliable, used for many years, easy to make. Cons: they require thorough disinfection, and you will have to purchase a board to make them. |


Don’t forget to make drainage holes in each container so that excess moisture can escape when watering and does not accumulate in the soil.

So, we’ve sorted out the seedling container, now it’s time to prepare the soil in which we will plant the seeds of our strawberries. You can buy ready soil in the store, or you can make it yourself. For this you will need:
- option 1: vermicompost, non-acidic peat and coarse sand, which are mixed in a ratio of 1:3:1;
- option 2: coarse sand, peat, turf land in a ratio of 1:1:2.
Whatever option you choose, add a little humus and ash to the soil.

Now let’s prepare the resulting soil mixture:

The final touch: pour the soil into the container options you have chosen.
Sowing seeds: easy and simple
Having prepared the boxes and soil, we proceed to preparing and sowing the seeds. By the way, it is best to plant strawberry seeds in February-March: then the bushes will delight you with ripe fruits earlier, especially for remontant strawberries. The only disadvantage of sowing seeds at this time is the short daylight hours, and strawberries love a lot of light.
So, seed preparation includes stratification, which improves seed germination. But the process of stratification and sowing can be successfully combined.

Germination will help evaluate the germination of seeds and facilitate planting. To do this, soak the strawberry seeds in melted or settled water for several days, changing the water periodically. Soak the seeds for 2-3 days. When the seeds swell, remove them and place them on filter paper, which you first place on a saucer. Place the saucer with seeds in a plastic bag and place in a warm room. We sow the seeds in the ground after they hatch. This method will help to immediately identify “dead” seeds.

Keep the container with the sown seeds covered with plastic, glass or cellophane to create favorable conditions for germination.
Tricks when caring for seedlings
Having sowed the seeds, we look forward to the germination. And after our young strawberries have sprouted, it is important to provide them with proper care.
| Factor | Conditions for strawberries |
|---|---|
| One of the main factors for strawberries. Provide the seedlings with long daylight hours (12-14 hours). If it is still the middle of winter outside, then you can highlight the strawberries with a regular table lamp. |
| Monitor the humidity - the lid that covers the seedlings will help you with this for a while. If there is condensation on the lid, then everything is in order with the humidity, if the condensation collects in drops, then the seedlings need to be opened a little so that there is no excess moisture. If there is no condensation, then the sprouts need to be watered. The lid is removed from the plants when they get a little stronger, that is, 3-4 days after germination. |
| Watering tiny plants is very difficult. But even here you can cheat: use a medical syringe or spray bottle for watering. Do not overwater tiny plants; carefully assess the soil moisture level. |
| In the room where the seedlings are located, the temperature must be maintained at least +20 degrees. If the seedlings are standing on a window, then it is important to close all the cracks so that cold air does not blow on the sprouts. |


Picking - otherwise called “seating” or “thinning out.” It is done only when the sprouts have two full-fledged leaves. Please note: the plants are still very fragile and can be easily damaged if picked carelessly. The picking technology is as follows: dig up the plant with a small shovel and carefully remove it from the ground with tweezers or your hands. We plant plants in 9*9 cm pots or boxes at a distance of 8-9 cm from each other. After a few days, we carefully “hill up” the stems.

Planting in the ground: how to do it better
After 1.5-2 months, our seedlings will grow leaves and turn into strong plants - it’s time to plant them in open ground in your garden.

Before strawberries go outside for permanent residence, you need to harden off the plants. To do this, the boxes with seedlings are gradually taken outside, first placed in the shade and gradually accustomed to the sun.
Seedlings are usually planted in late May-early June (depending on your courage and climatic conditions) in the evening. If you planted strawberries in May, it is advisable to cover them with film at night to prevent them from freezing.
By the way, strawberries planted in the spring will most likely delight you with a harvest in the first year!

Planting seedlings is simple: dig up the ridge so that the soil becomes soft and lush, and then make holes in it. Add a little fertilizer into each hole, and plant a strawberry bush on top along with a lump of earth. Gently sprinkle with soil - you're done!


How to collect strawberry seeds
Having grown several varieties of strawberries and chosen the one you liked best, you can try to collect seeds from it, so that you can sow them in your garden. next year.

- Take a well-ripened strawberry (dark red, soft).
- Place the berry in a cup of warm water and cover with a lid. Leave for 4 days.
- Then put the berry in a strainer and grind with a spoon - this way, separate the seeds from the pulp. It is important to grind carefully so as not to spoil the seeds.
- Rinse the seed sieve with water and remove the seeds.
- Spread the seeds on a cloth and dry for several days, then collect them in a paper envelope and put them in a dark place.


Choose a variety that has not been grafted and is not a hybrid, otherwise you will not get results even with careful plant care: either there will be no fruit at all, or they will not be as tasty as those of the “parent” plants.

Video - Planting strawberries with seeds
Video - Sowing strawberries in a “snail”
Video - How to grow large strawberries
Now we'll talk about propagation of strawberries by seeds.
This method can be used when propagating beardless strawberry varieties. Seeds can be collected either from your own berries or bought in a store.
Technology for growing strawberries from seeds
To visualize the whole process of growing strawberries from seeds, we present an algorithm of actions that you can use as instructions.
- Obtaining seeds
- Stratification
- Soil preparation
- Sowing seeds
- Picking seedlings
- Growing seedlings
- Transplanting seedlings to the garden bed
The overall picture is clear, now let’s look at each point in more detail.
How to get seeds from strawberries
Berry selection. You can get seeds from existing plants in your area. If you have several bushes of the desired variety, select the most productive and largest bush to obtain seeds. Berries for seeds should also be selected as large and ripe.
For sure germination, take the seeds from the base and middle of the berry, in these places they are the most developed.
Strawberries bought at the market or taken from neighbors are also suitable for propagation. If it is not possible to get seeds from the berry right now, simply freeze it until a convenient time.
Obtaining seeds. The seeds in strawberries are very small and are not so easy to get. There are several ways to do this.
- Using a toothpick
- With a blade
- Using a blender
Seed storage. The resulting seeds must be thoroughly dried and stored. The seeds do not like hot and wet areas, this reduces germination. Excess light and air are also useless. Store seeds in a dark, cool place in covered containers.
When the strawberry seeds are ready, proceed to the next step - stratification.
Stratification of strawberry seeds
What is seed stratification? Seed stratification is a pre-sowing treatment technique that artificially creates reduced temperature environment.
Stratification increases germination and reduces the time of seed germination.
You will find complete information about this procedure in the article. Stratification can be warm or cold. Strawberries require cold ones.
Stratification of strawberry seeds takes place at a temperature of +4 +6 degrees.
At home, this procedure is most conveniently carried out in the refrigerator on the bottom shelf. This method creates an artificial winter for the seeds; during this period, due to the low temperature, the formation of the embryo is activated.
How long does it take to stratify strawberry seeds? To stratify strawberry seeds, it is necessary to place the seeds in a moist and cool environment 2-6 weeks before sowing. Sowing seeds in seedling boxes occurs at the end of January and beginning of February; accordingly, stratification should begin in the period from mid-December to mid-January.
The stratification period for strawberry seeds is from 2 to 6 weeks.
There are two ways to stratify seeds.
- Stratification before sowing.
- Stratification after sowing.
In the second case, stratification occurs together with the soil and the container in which the seeds are planted. The containers are also placed in the refrigerator for the same period. The disadvantage of this method is that it requires more space in the refrigerator.
Stratification can also be carried out outside the house, for example, in a barn or cellar, where the temperature does not fall below zero and does not rise above +5 degrees. In this case, you will have to more closely monitor environmental conditions.
The first method, which involves placing the seeds in the refrigerator, is more convenient. It doesn't require much space, and the temperature is always stable.
Stratification is carried out only in a humid environment.
To do this, place strawberry seeds on a cotton base and cover with the same material on top. You can use fabric or any other material that can retain moisture for a long time. Moisten the cloth or cotton base well, wrap the package with seeds in a bag, place it in a container and put it in the refrigerator. Throughout the stratification period, make sure that the seeds do not dry out and moisten the material in time, if necessary.
At the end of January and beginning of February, the seeds will be ready to be planted in seedling boxes.
Preparing the soil for planting strawberry seeds
Soil quality. The choice of soil should be given due attention. A lot depends on its quality. Even in poor quality soil good seeds may produce poor seedlings. Fungus and mold may appear in such soil, which will negatively affect germination.
High-quality soil is the key to high germination.
Where to get it good soil? Not suitable for germinating strawberry seeds ordinary land from the garden. More precisely, you can use it, but the result will not be the best. For good germination and rapid growth of seedlings, a nutrient mixture is needed. You can get it in two ways:
- Improve the soil from your own plot
- Buy universal garden soil in the store
Any soil requires disinfection.
Own soil. Gardeners are wondering how to improve the soil from their own summer cottage so that it is suitable for growing strawberries from seeds? To do this you will need:
- Sod land - 2 parts
- Peat - 1 part
- Large river sand— part 1
Mix all ingredients until smooth. You can additionally add a little rotted manure and wood ash.
Soil from the store. For sowing strawberry seeds universal will do garden soil. What's good about it? The fact that it includes everything necessary for high-quality cultivation of strawberry seedlings. These are leavening agents, macro and microelements, everything is balanced in the right proportions. The soil has the required density. The cost of such soil in the store is not high, but purchasing it can save a lot of time and effort.
- Freezing
- Steaming
- Calcination
- Chemical treatment
- Biological treatment
Any of the listed methods is available for home use.
Container for growing seedlings. After treating the soil against pests, find a container of suitable volume. It could be either special boxes for seedlings without cells, or plastic food containers, so-called lunchboxes.
The drawers should have holes to drain excess moisture.
Be sure to organize an outflow excess water. If there are holes in the seedling boxes and excess moisture drains into the tray, then you need to make such holes in the food container yourself and provide it with a tray.
It is important to understand that the soil should not be dry, there should be a lot of moisture, but it should not stagnate, otherwise fungus and mold will begin to develop.
How and when to sow strawberry seeds
When to sow strawberry seeds. The process of growing strawberries from seed to finished seedlings takes approximately 100 days. During this time, the strawberries have time to sprout, grow stronger and gain green mass. They are transplanted into open ground after 5-6 leaves appear on the plants. As a rule, this is mid-May. Count back 100 days - this will be the beginning of sowing the seeds.
The end of January and the beginning of February is the time to sow strawberry seeds.
By this time, the seeds should have already undergone stratification and be ready for sowing.
How to sow strawberry seeds. Fill the prepared seedling box first drainage layer from gravel or expanded clay, a thickness of 1.5-2 cm is sufficient. Then the soil is poured. The thickness of the soil layer is 10-15cm. The soil should be dense; lightly compact it before planting the seeds.
Next, make grooves 0.5 cm deep with a thin board at a distance of 2-3 cm from each other, moisten them and plant the seeds using tweezers or a toothpick soaked in water. You can also sow in bulk by taking a pinch of seeds with your fingers; in this case, try to sprinkle the seeds evenly into the furrows.
There is no need to cover the seeds with soil, this will reduce germination.
Actually it's frequently asked question gardeners when sowing strawberries, whether to cover the seeds with soil or not. There is no need to sprinkle the seeds with anything. It is enough to simply press them to the ground with the same board that was used to make the grooves. Seeds must be visible.
Germination of sprouts. The box is covered with film or glass and placed in a warm and well-lit place. You've got a mini-greenhouse. If the sun is very active, then it is better to artificially shade the mini-greenhouse, but under no circumstances hide it in a dark place.
Ventilate the mini-greenhouse every day for 2-3 minutes.
Ventilation can be combined with watering from a spray bottle.
The temperature should be about 25 degrees. Once sprouts appear, provide as much light as possible, otherwise the plants will stretch out.
How to water strawberry seeds. The soil in the seedling box should always be moist, watch this carefully.
Avoid drying out the soil, moisten it daily.
Excess moisture is also harmful, water in moderation, otherwise mold may develop. And in order not to wash the seeds out of the soil, watering should be done using a spray bottle, spraying water at the maximum distance.
Picking up strawberry seedlings
When to dive. You can see the first shoots 7-10 days after planting. When the first true leaves appear on the plants, the seedlings need to be picked and transplanted into a more spacious seedling box. You shouldn’t pick immediately after the first leaves appear; the plants are still very tender and picking will require some fine work. Give the plants a few days to grow and strengthen the stems and leaves, and then dive.
Preparing for a dive. For diving, prepare in advance a narrow spatula, saucer or tray, small pots or cassettes for seedlings, soil, and a container for watering with a convenient narrow spout.
In addition to the equipment, you need to stop watering the seedlings a day before the dive. The soil will dry out a little and become loose and pliable. This will allow you to carefully transplant the strawberry seedlings to a new, more spacious place.
How to dive. Strawberry seedlings must be planted in separate cells. Dividing plants will play a role positive role when planting in open ground. This way, when growing, they will retain as much tenderness as possible. root system and the seedlings will experience the least stress during transplantation.
The volume of cells for picking is from 50 to 100 ml.
Prepare the cassette for transplantation. In individual cells, the soil should be moist and dense. Lightly compact it with a spatula and make a hole for the strawberry sprout.
Weak, lagging sprouts can be removed during diving.
Now select clods of earth along with strawberry sprouts and place them on a saucer. Carefully separate the plants and, together with a lump of earth, transplant them into separate cells in pre-prepared holes; if necessary, add soil, but do not cover the growing point. After transplanting the seedlings into the cells, water them well.
Transshipment. Transshipment is, in fact, the second picking of plants. The first picking occurs in small-volume cassettes or cups. Over time, the root system fills the entire volume of the cells and it becomes necessary to transplant the plant into a more spacious glass.
The volume of pots for transfer is from 200 to 300 ml.
The question arises, why not immediately plant the seedlings in a large glass? The fact is that a tiny plant does not require large volumes of land when first picked. If you plant such a plant in a large seedling glass, then problems will arise with soil moisture, and this is a very critical factor for the growth and survival of seedlings. All moisture will go to the bottom, and its excess can provoke the development of mold and mildew. Therefore, for better absorption of moisture, small plants are planted in small cells and, as they grow, transplanted into larger ones.
Strawberry seedlings need one such transfer before planting in open ground.
Growing strawberry seedlings
Now all that remains is to wait for the seedlings to grow and get stronger. From the moment you transfer them into large pots, place them on the window. There should be a lot of light, but it should be diffused. If the midday sun shines directly through the window, it can burn the strawberries; take care of artificial shading of the plants.
Transplant into open ground in mid or late May.
By mid-May, the seedlings on the bushes will have grown to 5-6 leaves and now they can be planted in open ground, and until that time, moisten as necessary and monitor the lighting.
Advantages and disadvantages of propagating strawberries by seeds
This method has some advantages over others.
- You can propagate any strawberry variety you have with seeds, except hybrids.
- Absence of diseases, which cannot be avoided when propagated by a mustache or by dividing a bush if the donor plant is sick.
- Low cost of seeds if you decide to get them from plants you already have. In this case, you can get as many seeds as needed. After all, seeds from the store will cost some money; there are usually small quantities of them in a bag and there is no guarantee that all of them will sprout.
The disadvantage of this method is that it is very labor intensive, because the seeds must first be obtained from the berries, dried, then properly prepared, planted in a nutrient medium and seedlings grown. All this will require more time and knowledge.
Everyone is familiar with small-fruited strawberries, and no one will refuse to eat this super-sweet berry. Those who have their own land plot, I should definitely plant strawberries on it. Small-fruited strawberry seedlings can be purchased, or you can grow strawberry seedlings yourself.
Growing strawberries from seeds
Usually, remontant varieties of strawberries that do not form mustaches are propagated by seeds. The process of growing strawberries from seeds cannot be called easy, but efforts are always rewarded.
Propagation of large-fruited strawberries by seeds gives us seedlings that do not have the characteristics of “parents,” especially when collecting seeds on a private plot, where different varieties can grow nearby. There are no guarantees that the characteristics and characteristics of the variety will be preserved when propagated by large-fruited strawberry seeds.
Remontant small-fruited strawberry presented modern varieties, I especially like it, because its formation flower buds and fruiting can last forever warm time, until frost. The aroma and taste of such strawberries is no different from wild strawberries, but their berries are almost 5 times larger than wild strawberries.

Growing strawberries at home
We can talk a lot about the characteristics and features of small-fruited strawberries, but now let’s look at growing small-fruited strawberries with seeds. The growing process usually begins in February-March.
Choosing strawberry seeds
It is better to buy small-fruited strawberry seeds of proven varieties. If you are not familiar with them, then let's get acquainted.
Varieties of beardless remontant strawberries
I would like to highlight the following varieties of small-fruited strawberries:
- Gross Fraser;
- Yellow miracle;
- Rügen;
- Regina;
- Baron Solimacher;
- Alexandria;
- Ali Baba;
- Pineapple;
- White Soul;
- White Swan;
- Renaissance.
Beardless small-fruited strawberries can grow well at home in pots and bear fruit even in winter.
Soil for strawberries and containers
In this case, it is very important to pay attention to the soil; it must undergo disinfection from harmful microorganisms. Best to use peat tablets or peat plates, but if you choose soil, it should consist of 5 parts humus and three parts sand. This mixture should be heated for 3-4 hours at 90-100 ºC in the oven.
Growing strawberries in peat tablets
Pour peat tablets with warm water for 5-10 minutes. After the tablets swell, they should be placed in a plastic (fungus does not spread in it) transparent container. This could be a plastic container for salads, pastries, pies, etc. You can also take a five-liter plastic bottle, lay it on its side and split it in half with a knife.
Any container must be thoroughly washed and disinfected with a solution of potassium permanganate.

Growing strawberry seedlings from seeds
Soaking strawberry seeds
This issue is very controversial; some gardeners recommend soaking the seeds in a growth stimulator, while others consider this unnecessary. Soaking the seeds in a growth stimulant will not hurt if the expiration date of the seeds expires.
Stratification of strawberry seeds
Seed germination using stratification is accelerated, as it gives the seeds a boost to growth, bringing them out of hibernation. Stratification of strawberry seeds is carried out in the following way.

Caring for strawberry seedlings
The container is filled with soil, leaving 1-2 cm to the edges, then compacting it a little, pouring snow on top tightly, compacting it. We distribute the seeds of small-fruited strawberries over the snow and place the container in the refrigerator on the bottom shelf for 2-3 days. The melting snow will pull the strawberry seeds into the soil to the required depth. After three days, remove the container from the refrigerator and place it in a warm place.
Germinating strawberry seeds at home
The most exciting stage, the duration of which can be 7-30 days. After removing the container with the sown seeds from the refrigerator, it should be covered with glass, or possibly film, and placed in a warm, illuminated place.
Condensation formed on the film or glass indicates optimal humidity inside the greenhouse. This moisture must be removed both from the walls of the container and from the lid using paper napkins or toilet paper. It is also necessary to ventilate the greenhouse 1-2 times a day by opening it (1-2 minutes). Do not allow direct contact sunlight onto a container with crops, since the ground will be dry and moisture will form.

Growing strawberry seedlings in cassettes
Most often, during the germination period, additional watering is not necessary, but if fog and drops do not form, and the temperature in the greenhouse is 22-25 ºC, then wetting the soil is indispensable, preferably with an antifungal drug. Observe temperature regime! If the temperature is below 20 ºC, then you may not get seedlings, but mold will definitely form on strawberries.
Lighting strawberry seedlings
Remember - strawberry seeds germinate in the light! In winter, there is not enough natural light, so you can’t do without additional lighting of strawberry seedlings. For this you will need either phytolamps or fluorescent lamps. It is advisable to provide additional lighting from 6:00 a.m. to 11:00 p.m.
Diseases and pests of strawberry seedlings
Mold on strawberry seedlings
You are lucky if thirty days have passed and shoots have appeared and the soil has not become moldy. The first sign of fungus is the appearance of cobwebby fibers of mold on the ground, which urgently need to be gotten rid of. To do this, take cotton wool or soft paper, soak it in potassium permanganate and remove any pockets of mold. Next, we spill the soil with an antifungal agent and constantly ventilate the seedlings.
When real leaves (2-3 pairs) appear, remove the glass or film. You need to water the plants very carefully, without touching them, using a spoon or syringe.

Growing strawberries in a container
Caring for strawberry seedlings
Strawberry seedlings in peat tablets are watered only through a tray. You should not overwater; sufficient watering is indicated by the appearance of a dark spot on the peat column. Overflows are sources of the development of unpleasant diseases, the main one being “blackleg”. First, check whether it needs to be watered by testing the soil from the outside and deeper with your finger.
Strawberry shoots are a thin stalk that branches higher from the ground into small leaves. We need to help the strawberry seedlings develop; to do this, we will sprinkle them under the very cotyledons of the soil. After this, additional roots will begin to grow. It is easier to do this if the seeds were sown in small depressions, then you just need to “press” the soil towards the sprout.
Picking strawberry seedlings
When real leaves (3-4 pairs) appear, you can begin planting strawberry seedlings into separate containers. It could be disposable cups made of plastic (with drainage hole). When picking, do not cover the growing point of the strawberry. If the roots of the seedlings are intertwined, then you need to soak the soil in water and untangle the roots with a fork, carefully separating the plants. Plastic cup will be enough for the strawberry seedling before planting in the soil. Remove the first strawberry flower stalks sparingly so that the plant develops well.

The success of growing any crop in the garden, garden or home depends on correctly selected and prepared planting material. This is especially important for strawberries, because it is very difficult to germinate seedlings from their seeds. Our article will tell you how to grow strawberries from seeds at home.
Sowing time
When planning to grow strawberry bushes on your windowsill, you need to decide on the sowing time at the very beginning. It should be noted that the choice of sowing time seed material determined by the plant variety. Strawberries and strawberries today are represented by a wide variety of varieties, among which there are both remontant and large-fruited species.
The method of planting them is no different from each other. However, many prefer to choose remontant varieties for the following reasons:
- during the growing season, the bushes are capable of producing crops several times;
- abundant fruiting;
- better seed germination;
- affordable cost of planting material.
Often sowing seeds when home growing Strawberry harvesting occurs at the end of February or beginning of March. However, earlier sowing of the seed is quite acceptable. But in this case, the plantings will need to be additionally illuminated using phytolamps. With lighting, planting seed at home can be done at any time of the year. Without lighting, it makes no sense to sow seeds for seedlings before March.
Video “Growing Secrets”
From the video you will learn how to properly grow berries from seeds.
Seed preparation
Once you have decided on the strawberry variety and the timing of planting seeds to obtain seedlings, you can begin preparatory stage. Strawberry seeds, like most other crops, must be prepared for planting. This preparation will allow you to achieve significantly better germination. 
It is worth noting that the seed of large-fruited varieties of strawberries and wild strawberries germinates very slowly. Therefore, in order to speed up the process of seed germination, a preparation procedure is carried out in order to accelerate the growth of sprouts. This procedure involves the following manipulations:
- The seeds should be soaked first. For this, a plastic transparent container is used, which is equipped with a lid. But you will also need rags or cotton pads;
- Make holes in the lid of the container using a needle. They are needed for plant respiration;
- then we wet the disks with water and place them in a single layer at the bottom of the container. When all the seeds are spread out, cover them on top with a second layer of damp cotton pads or a cloth moistened with water;
- if you plan to plant different varieties strawberries, then they will need to be signed so as not to get confused in the future;
- Cover the container with the seeds with a lid with holes and place it in a warm place. The seeds should stay here for two days;
- then the container for the stratification process is sent to the refrigerator for two weeks. The seeds must be moistened periodically. The container should be ventilated every day.
However, such an algorithm for preparing strawberry seeds for planting can hardly be called universal. There are several preparation options. For example, some experts advise soaking seed for three days in natural (snow or rain) water. After this, the seeds are laid out on a layer of filter paper and slightly moistened. They are then transferred to plastic bag. For convenience, the seeds can be laid out first on a plate, and only then placed with it in a bag. Next planting material put in a warm place. However, you should not place them in direct sunlight. When the first shoots hatch, it is recommended to transfer them to a container with soil. To do this, use matches or toothpicks. 
Many experts advise to carry out stratification, since thanks to it you can achieve simultaneous and high-quality germination.
Land preparation
The second stage of preparation for growing seedlings from strawberry seeds is preparing the soil. For this berry culture Suitable soil has the following characteristics:
- crumbly;
- easy;
- simple;
- no fertilizers.
According to experts, the best solution in this case there will be a soil mixture prepared from forest and garden soil. Be sure to add sand to it. 
The following options are available soil mixture, suitable for growing strawberry bushes:
- the first soil option contains the following components: coarse sand, vermicompost and non-acidic peat. The components should be taken in a ratio of 1:1:3;
- the soil of the second option should contain components such as peat, sand and turf soil. Here the components are taken in a ratio of 1:1:2.
Some experienced gardeners It is recommended to add a little wood ash and rotted manure to the soil. 
After the soil has been properly prepared, it is poured into a container. This is one of effective ways grow strawberry bushes at home. When using such a container, seeds from the refrigerator can be planted in the soil after two weeks. Planting in containers looks like this:

At first, until the first shoots appear, it is better not to open the lid. This will create a warm and humid microclimate in which water will condense on the lid and drip back into the ground, thereby watering the plantings.
Please note that the container must be closed with a transparent lid. Through it it will be easier for light to penetrate inside the container. In addition, the transparent lid will allow you to control the processes occurring inside the container.
It is worth noting that in this case, seed stratification can be carried out directly in the soil. To do this, the container is not completely filled with wet soil. There should be 2-3 free centimeters left on top. We put snow on top of the ground and press it down. Place the previously soaked seeds on the snow and close the lid. In this form, the container is sent to the refrigerator for two weeks.
Instead of a container, strawberries can be grown at home in wooden boxes. In this case, a small box is filled with soil. Next, it is leveled and small furrows are formed. We plant seeds in them in increments of 2 centimeters. When planting seeds different varieties, you need to sow them in such a way that one variety is in one furrow. In this case, it is necessary to make a beacon opposite each such furrow, where to indicate the name of the variety. 
After planting the seeds in wooden boxes, they are moistened with a spray bottle and then covered with film. It should be noted that optimal temperature for germination of seed material is +18 degrees. With more high temperature germination of sprouts slows down.
Diving seedlings into separate cups
When growing strawberry seedlings at home, you must remember that picking must be carried out for them. This process carried out when the young seedlings have three true leaves. After their appearance, the plants should be transplanted into separate cups. The diameter of the new container should not be less than 5x5 centimeters. It is interesting that in such a familiar container as a juice carton, strawberry seedlings will grow worse than in a plastic cup. 
When picking into separate cups, before planting the plants, you should make holes in their bottom and also put in drainage. River sand, nutshells or pebbles can act as drainage. After this, the soil is only filled up and young plants are planted. Then we moisten the soil with water and form a small hole in it. We plant young plants in it. At the same time, remember that the heart with leaves should remain above the surface of the ground.
It is worth noting that remontant varieties of strawberries can be sown 2-3 seeds at once and without picking.
Sowing in peat tablets
There is a method by which strawberry seed can be planted in peat tablets. In this case, one seed is planted in one tablet. But due to the fact that the seeds of this crop do not germinate well, it is recommended to germinate them in a container and then replant them in peat tablets. Before use, peat tablets must be filled with water. The moisture should be well absorbed. 
Peat tablets should be placed in a tray. You can use any cardboard box. Place the hatched seed into the special recesses on the tablet and press it. We put an oilcloth or cardboard cover on the box or pallet. The entire structure should be placed in a bright and warm place. After this, all that remains is to monitor the humidity in the peculiar beds. When adding tablets, they are moistened by watering. Don't flood the plantings too much.
Planting in open ground
When the seedlings grow and become stronger, they are transplanted into open ground. Typically, a grown bush can be replanted approximately 6-7 weeks after the start of growing seedlings. However, in order to increase the adaptive properties of young plants, they must first be hardened. To harden, the seedlings are taken outside for several hours every day. Plant containers should be placed in the shade.
Interestingly, seedlings grown early spring, already some time after planting in open ground it can form a small harvest. You can pick it immediately after the berries turn red. 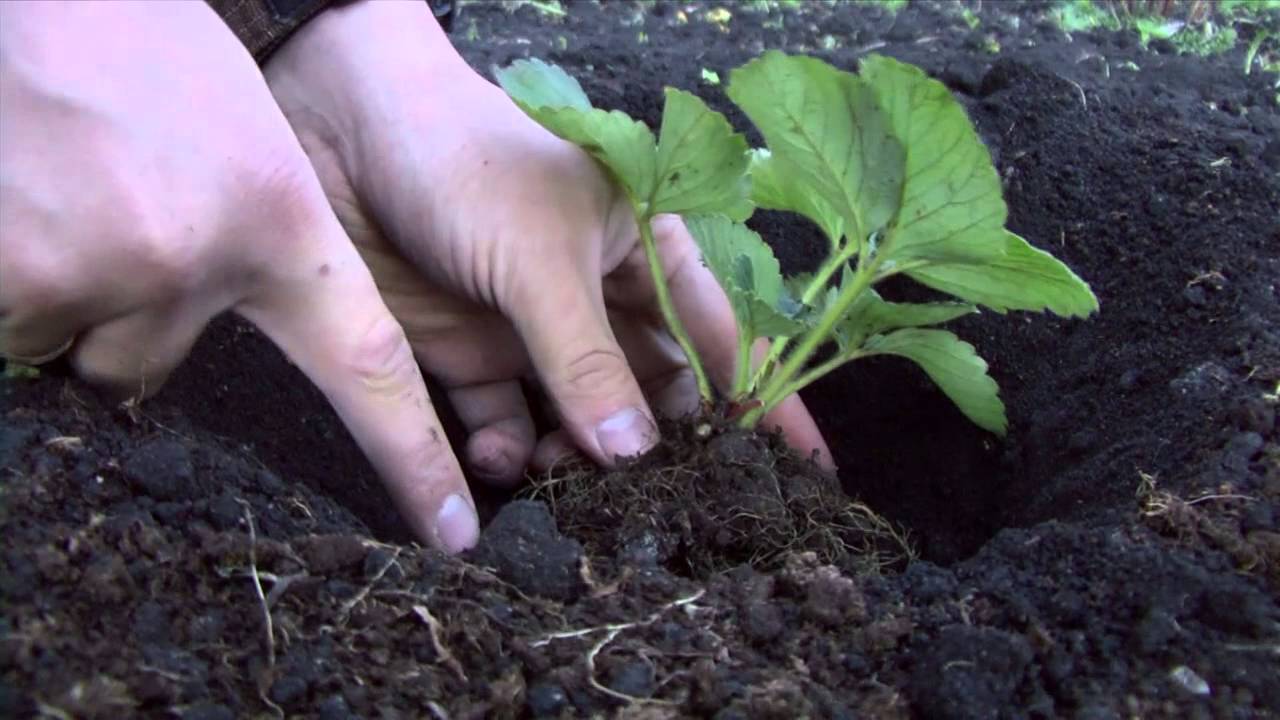
When growing seedlings in the summer, transplant into soil open type should be held at the end of August. The harvest from these plants will only be available next year. But for this, young strawberry bushes need to be insulated during the cold season.
Typically, seedlings begin to be planted in the garden or vegetable garden at the end of spring (in the second half of May) or at the beginning of summer (throughout June). Planting strawberries in open ground occurs according to standard scheme. To increase plant productivity, experts recommend picking off the first flowers. This will allow the young bushes to get stronger, grow leaves, and also lay a bountiful harvest for next year.
To obtain a high-quality harvest, planting strawberry bushes requires proper and timely care. Without it, plants may suffer from lack of moisture, various diseases and pests, as well as from incorrect soil ratios. useful substances, necessary for the growth and development of bushes.
Video “Growing seedlings”
From the video you will learn how to grow strawberry seedlings.
Growing strawberries with seeds has many advantages. That is why this method is loved by both professional gardeners and those who grow small crops for their family. According to gardeners, Chinese seeds germinate well, and the result is a harvest of excellent quality.
And if you want to get the most environmentally friendly harvest, then collect the seeds with my own hands, it’s very simple, just leave a few berries for the seed.
 Firstly, if you grow strawberries with seeds, then you know for sure that the berries will grow of the exact variety you chose.
Secondly, this is a fairly common method that you can read about on the Internet or in specialized books. After all, we study seed germination even in biology lessons at school.
Thirdly, strawberry seeds are sold everywhere; for example, they can now be ordered from online stores directly from China.
Fourthly, strawberry seeds are stored for a long time. They are resistant to various diseases and pests.
Fifthly, the material for planting can be selected in such a way as to produce berries of certain varieties in different time periods. This way, you can pick strawberries from your own garden all summer long. The only drawback this method- this is that the seeds may have low germination, but this can be dealt with by studying the nuances of planting technology.
Varieties for growing in a greenhouse
 To plant strawberries with seeds, you first need to decide where they will grow - in a greenhouse or in open ground. One more important point is the choice of variety, which depends on the timing of ripening. The strawberry bushes give fruit all year round, for which remontant varieties are used. It is possible to get about 1000 berries from one bush, after which this bush is removed and replaced with another. Varieties grown in greenhouses are divided into early and mid-early. The most common early varieties for greenhouses are Sonata, Dorenko, Alba, Baron von Solemacher, as well as Octave and Honey (mid-early).
 Choosing a variety for planting in open ground depends on what purpose you want to grow strawberries for and when you want to harvest. If you want to make preparations from berries for the winter and or store them for a long time, then you should choose the average and late varieties. And if you need fresh strawberries as a dessert, then early varieties that produce a harvest in May are better suited.
From early varieties experts call Rusalovka, Desna and Zarya the best, among the later ones - Zengana, among the mid-season varieties, Festivalnaya, Pocahontas, and Talisman are common.
 It is recommended to sow strawberry seeds for seedlings in February or early spring. Perhaps you want to grow seedlings for sale, then you can sow them earlier, but in this case you must use lighting.
Perhaps organizing lighting is not part of your plans, then you can’t plant strawberries before March, because they will die from lack of light.
 When planning to plant strawberries with seeds, you must remember that varieties with large fruits germinate very slowly.
However, the seed germinates faster after soaking, which must be done.
It is advisable to use a plastic container for this rather than a glass container. First, holes are made in its lid to allow air to enter.
After this, you need to moisten the cotton pads with water and place them in a layer on the bottom of the container, place the seeds on this layer, and cover them with another layer of discs. If you want to grow several different varieties, it is better to write the name of the variety on each box.
After this, the containers need to be closed with lids and placed in a warm place for 2 days. Next plastic containers need to be refrigerated for stratification. The layer of cotton wool should be constantly moistened so that not a single seed dries out, and the plastic container should be removed from the refrigerator every day and ventilated. After about two weeks, stratification ends, after which strawberry seeds must be planted in cups (peat cups are possible) or in a common container. Strawberries feel equally comfortable in individual cups and in a common box. Please note that seeds can only be planted in containers with drainage holes.
Soil preparation
To sow seeds, you can purchase ready-made soil mixtures or prepare them yourself. If you want to make the soil mixture yourself, you can choose one of the options:
- humus, sand – 5:3 respectively
- peat, sand, turf soil – 1:1:2
- sand, vermiculite, peat – 3:4:3
Before sowing, the soil must be disinfected. To do this, you need to heat it in the oven at a temperature 150 degrees. If for some reason this is not possible, then the soil can be watered with a solution of manganese or taken out into the cold for a while. After this procedure, the container with soil is placed and kept in a warm place for several weeks so that beneficial microorganisms can multiply in the soil.
How to plant seeds correctly
First, you need to thoroughly moisten the soil in the container or pots by spraying it with a spray bottle. After this, using a toothpick or match, place each seed on the surface and press it lightly. There is no need to bury the seeds in the soil, since they germinate well under the influence of light. Next, you need to close the container with a lid, since strawberries require high air humidity, and place them in a warm place. The lid of the container must have holes so that fresh air.
Important! The container should not be exposed to direct sunlight, otherwise the seeds will dry out and there will be no germination.
While the seeds have not yet sprouted, there is no need to remove the lid, since the necessary microclimate is created inside, and condensation forms on the lid, which falls on the ground and provides the seeds with the necessary watering.
Features of caring for seedlings
In the initial period the temperature should be approximately 20-25°C. You will see the first shoots within 2 weeks (but some varieties germinate in about one month). Once this happens, move the pots to an area where there is more light, such as a windowsill. The container lid must be removed: it is no longer needed. If there are a lot of sprouts and they grow too densely, then the seedlings need to be thinned out.
7 days after seedlings appear, the temperature must be reduced up to 15-18 degrees. This provides the plants with hardening and they do not stretch upward.
At this stage, you may encounter a problem such as wilting of seedlings. To prevent this unpleasant phenomenon, the sprouts need to be planted as soon as the first ones appear on them. 2-3 true leaves. The gaps between plants should be no less than 3 cm.
For watering, it is most convenient to use a medical syringe, which allows you to water the plants very carefully, at the root of each sprout. Excess moisture should not be allowed, as this can lead to fungus (called blackleg). But you shouldn’t allow too long breaks in watering either, since the seedlings may dry out. Be careful not to get water on the leaves, as this can cause sunburn and spots. It is best to water with settled water at room temperature.
Lighting rules
If you grow seedlings in winter, then they need additional lighting. For this purpose you can use:
- led lamps
- special phytolamps
- fluorescent lamps
Daily time artificial lighting should be from 12 to 13 hours, that is, approximately with 6:00 am to 11:00 pm. Thanks to this, the plants do not stretch, and beautiful and strong leaves are formed.
How to prepare strawberries for planting in the soil
Plant seedlings in the ground only after they have formed 5 true leaves. The choice of place where the strawberries will grow is also very important. Ideal option - these are shaded areas, where plants can easily adapt without suffering from direct sunlight. The following rules must be observed:
- you need to water the plants with water heated in the sun using a watering can
- the distance between the bushes should be not less than 10 cm
- the growing point does not need to be buried, it should be located at soil level
How to get your garden strawberry seeds
You can also get strawberry seeds yourself. To do this, you need to select several large berries and let them ripen a little, that is, leave them for seed. Then you need to cut them off top layer with grains. It needs to be placed on a piece of cloth and covered with cloth on top as well. After this, carefully rub the two layers of cloth apart so that the seeds are separated from the film, but none of the seeds are damaged. After this it is necessary wash the seeds in water and dry a little. Now they can be stored for several years and planted in the spring to grow seedlings. Gardeners note that the germination of their own seeds is usually noticeably better than the germination of purchased material.
This way strawberries can be grown various methods. The seed method is considered the easiest and most rewarding, so you should definitely try it!


