After laying the underlayment, waves appeared. Correcting mistakes: laying the underlay carpet correctly. All of the above statements are incorrect
During operation soft roof swelling may occur on its surface various diameters. The reason for their formation is a violation of the technology for installing soft roofs in terms of vapor barrier. This may be the lack of a vapor barrier or its improper installation during roof installation. The heat flow that rises from the premises upward towards the roof carries a significant amount of moisture. During the passage roofing pie it condenses and accumulates in the gap between the roofing materials and their substrate. IN winter period throughout the year, this moisture freezes and thaws repeatedly, which leads to delamination of the soft roof and its gradual destruction. IN warm time year, the moisture is converted into hot steam and increases its volume up to 40 times. For this reason, swellings with a diameter of more than one meter can form on the surface of a soft roof.
To eliminate swelling, they are cut in the shape of an envelope, and the corners are turned away and the contents are thoroughly dried. The inner and outer sides of the corners are cleaned of adhering dirt and moisture. After this, they are lubricated with a special mastic and glued back to the roof surface. A patch is fixed on top of the damaged area, the size of which should cover the incision sites by a distance of at least 100 mm. The edges of the patch are puttied, and the top is carefully treated with mastic. If the soft roof was made of fused materials, then you can refuse to use mastic. In this case, all gluing operations are carried out using blowtorch or gas burner.
Roof repairs in Moscow are carried out in this way by most construction companies who have extensive experience in this field and qualified personnel.
The roof is the face of the house. That is why this part of the structure needs to be given special attention, but you may have considerable difficulties in the selection process roofing material, since there are many “rumors” about soft roofing. Let's still find out what is “truth” and what is “false” regarding.
Myth No. 1: Soft roofing is the same roofing material only more expensive
In factcomparison of these materials causes indignation among specialists.
In order to understand the differences or similarities between these roofing materials, you must first find out what is the basis of the material. The basis of roofing felt is recycled waste paper - paper! The basis of the soft roof is fiberglass. Fiberglass, unlike paper, does not rot - this is the first and most important difference!
For production, high-quality bitumen is used with the addition of an innovative SBS polymer, which is used to cover fiberglass on both sides, which makes it durable material compared to roofing felt, for which ordinary bitumen is used.
Top layer roofing felt - the surface is not protected from ultraviolet rays, which is why the service life is only 5 years. The top layer of the soft roof is stone granulate, which protects the bitumen from any external influences, thanks to which the service life is more than 50 years.
Myth No. 2: Soft roofing is a very expensive roofing material that only very rich people can afford.
In factone of the most common myths.
Firstly, “very rich people” are ready to purchase roofing materials for their home such as slate, copper, and, of course, soft roofing... right?
Secondly, yes - flexible tiles are not cheap, but compared to the roofing materials listed above, they stand out for their affordable price.
Most likely, this rumor was generated by owners of houses with outdated roofs, who know only one roofing material - slate. So, after a certain time, everyone who owns a house is faced with the problem of choosing roofing material. Often the choice falls on flexible tiles, because they are a beautiful and reliable material. Comparing the price of outdated slate or low-quality roofing felt with flexible tiles, the difference becomes so obvious that it is difficult not to notice. In this case, of course, flexible tiles are an expensive roofing material. Unfortunately, it doesn't happen that way cheap roofing can be of high quality, reliable and durable.
Remember that saving on the roof is just as absurd as saving on the foundation. The service life of the entire building depends on the quality of the roofing material.. The question of “cheap or expensive thing” is individual for each person.
Myth No. 3: In the cold, flexible tiles crack and break.
In factThis assumption is partly correct.
The fact is that each of the materials presented on the market has its own production characteristics and technical specifications so to speak, “recipe” flexible tiles. Some soft roof manufacturers use oxidized bitumen, which is main reason the fragility of the roofing material, it cracks in the cold and cannot withstand mechanical pressure (you cannot move on such a roof).
However, if flexible tiles are made on the basis of polymer-modified bitumen (SBS), then they can easily withstand the conditions of the harsh Russian winter. SBS is styrene butadiene styrene or artificial rubber. The unique molecular structure of polymers interacts with bitumen, increasing its flexibility, elasticity and strength over a wide range of temperatures and reducing the sensitivity of bitumen to extreme temperatures. The bending of such a material at sub-zero temperatures shows flexibility and absence of cracks at very low temperatures.
Myth No. 4: Flexible tiles deform in the sun and the boards are visible
In fact, unevenness will occur on the roof only if low-quality (raw) boards, plywood or OSB boards. We recommend using quality slabs OSB or moisture resistant plywood, and if still used edged board, then it should be naturally dried!
Myth No. 5: Flexible tiles fade
In fact, the color of Katepal flexible tiles is ensured thanks to the surface of stone granules, which are colored thermochemically, i.e. the coloring enzyme penetrates into the structure of the stone, and is not simply coated on top, so the granules do not lose their original color. This is also protection against ultraviolet rays.
This is a misconception that homeowners have when inspecting their roof. If you bend (raise) the top row of shingles, the color of the granulate underneath will be much darker and richer. There is a very simple explanation for this: it is not those granules that are visible that are subject to change, but those that are covered with subsequent shingles.
The difference in the color of the tile granules on the upper “petals” and “under the petals” occurs due to the fact that bitumen, which has an oily dark structure, is absorbed from the upper layer by granules of the lower, which is why the upper shingles appear “faded”, more faded. This is where the misconception arises that roofing material fades.
Myth #6: Very difficult installation in cold weather!
Really difficult - but possible!
It cannot be installed in rain and snow; the presence of an SBS modifier allows work to be carried out at subzero temperatures, but certain conditions must be observed:
- Before installation, tiles are stored in a warm room for 2-3 days.
- For better adhesion, the adhesive layer of the tile is heated construction hairdryer, as a last resort, it is glued with a hot-melt gun.
- All metal elements that require bending, bend only in a warm room.
Bitumen adhesive for work must be heated in a water bath (it is strictly prohibited to dilute it with acetone and other additives).

Myth No. 7: The need for additional expenses due to a solid foundation
In fact, a solid base - design feature flexible tile roofs.
Just as a house needs a foundation, so does a roof, for example, from natural tiles- powerful sheathing and reinforced truss structure, for the proper functioning of the under-roof space, proper ventilation is necessary. Neglect these requirements, perceive them as unnecessary waste money, at least incorrectly. Each material has its own prerequisites, without which its use is impossible.
We hope that your choice of roofing material will be based on solid facts and not on the misconceptions of the majority.
List of common mistakes and frequently encountered problems when installing flexible tiles
1. Laying bitumen shingles on a roof with a slope less than the maximum permissible
Such cases are characterized by frequent occurrence of leaks. They occur due to increased rain and wind loads on the joints of the shingles.
2. The length of the roofing nails is less than the thickness of the wooden base
Short nails that do not penetrate through the boardwalk gradually come out due to the natural deformation of wood under the influence of humidity and temperature.
3. Fastening with staples
– soft material, so some believe that it can be attached to the slope using a construction stapler. However, this tool is not suitable for this operation. The depth and uniformity of driving staples will depend on the hardness and uniformity of the wood layers, which may differ significantly depending on the different areas. Because of this, according to the experience of Stroymet engineers, it is impossible to ensure a tight, uniform fit of the tiles to the base.
4. Low level of ventilation of the under-roof space
Accumulation of water vapor and condensation on wood and metal structures leads to their gradual destruction.
5. No vapor barrier
It causes moisture to enter other elements of the roofing pie, significantly worsening their performance characteristics.
6. Laying a solid base is done without gaps
Due to the swelling of wood in wet weather, the surface of the flooring becomes uneven and can be damaged. At the same time, not only does the level of tightness of flexible tiles and the roof as a whole decrease, but it also worsens appearance roofs.
7. Shingles will not stick to underlayment or valley carpet.
This causes serious leaks of flexible tiles during rains and during snow melting.
8. The solid base is made of boards or sheet materials insufficient thickness. There are no supports under the joint lines of the boards
It is dangerous to move along the slope; the base may not support the weight of workers installing flexible tiles, as well as the snow load.
9. Leaky connections to vertical elements (for example, chimneys)
Lead to regular occurrence of leaks.
10. The shingles are secured with roofing nails along the top edge
This prevents the fastener from reaching the previous shingle below. The joint area becomes especially vulnerable to wind loads.
Common misconceptions when installing soft roofs
- Roofing nails should not be pierced wooden base through.
- A solid base should be installed without gaps.
- For normal ventilation of the under-roof space, the gaps in the eaves overhang area are sufficient.
- Application vapor barrier materials when installing a soft roof is not mandatory.
- Soft roofing can be used on roofs with any slope.
ALL OF THE STATEMENTS LISTED ARE ERRORAL!
Today, soft roofs not only occupy a leading position in the market, but have become a real discovery for designers and architects. Many styles, individual solutions and the possibility of easy implementation on complex roof structures - what more could you ask for? The main thing is to achieve absolute tightness between the shingles, on which the durability of the entire coating depends. And the installation of flexible tiles itself will be within your power, believe me, even if this is your first time encountering this type of work!
Therefore, if you carefully read our tips, you will be able to cover even a large roof with the help of one more person. The fact is that even in the factory, shingles are prepared for gluing by applying a special solution to the bottom layer, and they even make four holes so that you know exactly where to drive in the roofing nails. And now we will tell you about all the intricacies of working with soft roofing.
Once the roof frame is complete, install the vapor barrier as a continuous carpet with inside roof, without gaps, and secure to the rafters using wooden planks. You will then attach them to the same strips interior lining attics.
Now take care of the vapor barrier. If the attic is cold, then all the moisture will come out of it on its own, using natural ventilation. But in the case of a residential attic, a vapor barrier is necessary. For this purpose, an additional strip is stuffed on the rafters, rolled out vapor barrier film with an overlap and glued with special tape (regular tape is not suitable!).
Next, with outside Place the selected insulation on the vapor barrier film, preferably staggered. Cover the top windproof membrane and secure with bars, which will also later serve to create ventilation ducts.
As a result, you should end up with a “layer cake” like this, as roofers like to call it:
We have prepared for you detailed master class, how and in what order everything should happen:


As you noticed from the photos above, laying flexible sheets on the curved lucarnes was not difficult!
Step 2. Installation of continuous flooring
To install flexible tiles, a rigid solid base is required. Therefore, mount a solid carpet of plywood or OSB boards on the prepared sheathing, with a gap of 3-5 mm, which is necessary for deformation from temperature and moisture, and secure it to the rafters with self-tapping screws.
The main requirement for a base for flexible tiles is a flat area and the ability to fix the shingles with nails. For this purpose, sheets of glued wood shavings similar to plywood or tongue-and-groove boards laid end to end are suitable. Only the board should be as dry as possible so that waves do not form during drying. But it’s a big mistake to use only the sheathing itself, albeit more frequently, for a soft roof, because already in the first season the entire roof will simply go in waves. And photos with such problems become a real asset for manufacturers who scare their customers with such errors.
Once the base is ready, reinforce the eaves overhang with metal strips. These are laid edgewise on the edge of the base and secured with roofing nails, in increments of 150 mm, in a checkerboard pattern:

Step 3. Selecting and installing the substrate
Now is the time to take care of waterproofing. It is necessary in such difficult places, such as abutments, joints and valleys. Here the canvases are laid from bottom to top with an overlap of 10 cm in the longitudinal and 15 cm in the transverse direction:

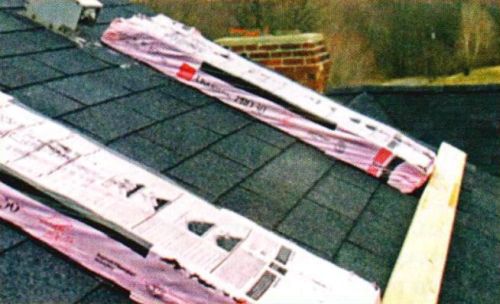
We recommend that you use a specially designed underlay rather than roofing felt or similar material, as is sometimes done. The fact is that they also have a finishing roofing covering - different terms operation, and even conditions of use!
And such an attempt to save money will soon lead to swelling of the entire roofing carpet. In addition, no manufacturer will provide a guarantee for a roof that contains materials from third-party manufacturers.
By the way, until recently, lining carpets were practically not used in Russia, and even today many people try to cheat. This is logical, because by the time the roof is built, it often turns out that the planned budget for the entire house is not enough, and concessions have to be made. But if you want to lay roofing from flexible tiles and forget about it for many decades, then do not give up such an important element.
There is always a risk that water will penetrate into the under-roof space, especially in such difficult places as crawl spaces chimneys or contact with an installed antenna. There are also emergency situations when strong winds lift shingles during a rainstorm.
Moreover, choosing a roofing carpet is not difficult, because... it is subject to the same requirements as tiles: to be resistant to temperature changes, provide reliable waterproofing and last a long time. A modern market provides many options, both imported and domestic. Moreover, many factories in Russia today operate on European equipment and the quality of their products is not inferior to their foreign counterparts.
In general, underlay carpets come in two types: self-adhesive and with mechanical fixation. Self-adhesive ones are laid mainly in valleys, and mechanical ones are rolled out over the remaining roof area and fixed with galvanized nails:

Here is the process of installing a regular roofing carpet that will need to be fixed bitumen mastic:

Here is an example of working with a more modern self-adhesive roofing carpet:

So, a self-adhesive waterproofing carpet is ideal for a valley. And, if the slopes have a slope of more than 18 degrees, then consider laying the carpet in all places of probable leaks, and these are: ribs, ridges, gable overhang and all exits of roofing elements.
But on a roof with a slope of 12 to 18 degrees you will need a continuous waterproofing carpet. Before this, we recommend placing a self-adhesive bitumen-polymer material, for example, “Barrier”, on the eaves overhangs, and at the same time strive to ensure that the carpet itself is without overlap - continuous along the entire length:

Also insulate ventilation passages and areas around them in advance. skylights and chimneys. Before installing the flexible tiles, coat all the passage elements with bitumen mastic yourself - it’s not difficult.
Before you start laying shingles, you will also need to reinforce eaves overhangs. They need to be fixed with roofing nails in increments of 10-15 cm. Here is an educational video lesson from the company on this topic:
Step 4. Selecting fasteners
To secure shingles, you will need special nails with wide heads. It will be extremely important to nail them so that the head is in the same plane with the surface of each shingle, and at the same time does not “crawl” into it. In addition, nails for soft tiles must be galvanized.
Nails for installing soft tiles are divided into the following types:
- Tar paper nails. Their edge is so sharp that when deepened into bitumen layer they do not violate its integrity. Such nails are produced galvanized or without a protective layer at all. Of course, unprotected ones are the cheapest, but at the same time they are not at all practical and quickly begin to rust. These are only suitable for assembling furniture or constructing temporary sheds.
- Rough nails. They have special teeth on the working rod that are directed towards the cap. These are not easily driven into wood, although it is quite difficult to pull them out even with a nail puller. And most often, during the dismantling process, the heads of rough nails are simply cut off - and that’s it. They fix the roofing so tightly that they are more often used for slate than for soft roofing.
- Club nails They have longitudinal grooves and jumpers on the working rod, and they are less suitable for soft roofing.
We recommend that you use galvanized rough nails with a head diameter of 8-9 millimeters as roofing nails specifically for flexible tiles. They also produce special nails for bitumen shingles, and they differ from their standard counterparts.
These are made from strong steel wire, which is automatically cut into equal pieces, then the workpiece is sharpened on one side, and riveted into the shape of a hat on the other. If you find these on sale, you can buy them.
But it is important that the nails themselves comply with GOST 4030-63: the diameter of the rod is 3.5 mm, and the diameter of the head is at least 8 mm. The thing is that when working with concrete shingles, the most unpleasant moment is when the nails, with the next blow, simply sink into the bitumen layer and thereby violate the integrity of the coating. But the expanded cap will not be able to “sink” so easily. And the larger it is, the better it will hold the shingles, which is why high-quality nails for flexible tiles resemble a pushpin. Moreover, for single-layer and two-layer tiles you will need nails with parameters of 30x3.5 mm, and for three-layer tiles - 45x3.5 mm.
By the way, some would-be builders don’t understand why they can’t just heat up sheets of soft tiles and glue them to the flooring, why exactly nails and all the fuss associated with them? In fact, the use of open fire on such a roof is prohibited due to basic considerations fire safety. So, forget about this risky idea and rent an automatic appliance.
Step 5: Place the starting strip
Now let’s move on directly to laying flexible tiles. It starts from the starting line. As such you can take:
- a pattern from ordinary tiles, for example, shingles with cut petals, if you are working with collections " Tango" or " Trio»;
- universal ridge-eaves tiles, especially if you work with “ Chord», « Sonata" or " Jazz».
If you prefer to start with eave shingles, lay them on top metal strip, stepping back slightly from the inflection point. Next, nail it down, but keep in mind that the longer and steeper the slope, the greater the indentation from the point of inflection should be:

Here's what laying the starting strip looks like in practice:

Step 6. Installation of different types of shingles
Now let's unpack the shingles. The main requirement for their installation is dry, warm weather, because it is undesirable to install bitumen shingles at temperatures less than +5°C, because in areas where it will need to be bent, it will be difficult to avoid cracks.
If you still have to fasten shingles in such conditions, then preventive maintenance will be needed: the sheets are heated with a construction hairdryer and bent to metal pipe about 10 cm in diameter. But it's better not to do that.
Calculate required quantity shingles are not difficult: take one sheet, measure the area that will be visible, find out the area of the slope and divide the second by the first. Here valuable advice on how to calculate and prepare flexible tiles for installation:
Of course, if you have a diamond eye, you can get by with detailed calculations, but marking lines serve as excellent guides along which you can align the tiles both vertically and horizontally. Especially if you are laying soft roofing for the first time.
Believe me, tearing off several sheets and reattaching them to fix a jamb is not the most fun. And absolutely without markings, if some element is embedded in the roof or the overall geometry of the slope is broken. Tools such as a hammer, a plumb line and a level will help you in this matter.
As we have already said, usually, for convenience, ready-made shingles are marked with small holes in the factory so that you know exactly where to hammer the nails. If there are none (for example, in the cheapest collections), then simply step back 2-3 cm from the edge and be guided by this illustration:

In each case, the place where the nail is driven will directly depend on the shape of the cut of the tile itself. It is only important that each nail simultaneously pierces both the lower and upper edges of all sheets, and if you are laying flexible tiles on slopes with an angle of 45°, then the upper corners of the shingles also need to be additionally fixed.
The entire procedure for laying flexible tiles is not complicated, here are the instructions for the process itself:
- Before installation, mix shingles from several sticks to minimize color variations. The fact is that even in one mail the color can differ so much that you will be surprised, and such incidents will be very noticeable on the roof.
- If the slope is long enough, start laying the tiles from its center and level it horizontally. And the second row - already shifting the shingles to the left or right by half a sheet. Shift the third and all subsequent rows relative to the previous one, also half the petal, left or right, depending on which direction you initially chose.
- You need to start laying tiles on a slope with a lesser slope, and you should approach a steeper slope by at least 30 cm. On a steeper slope, it is recommended to knock off the chalk lines so as not to get lost. Now cut the tiles on a more slope along this new line, and after fixing, coat them with bitumen mastic where there is no self-adhesive layer on the back side.
- Lay the tiles from bottom to top, moving away from the edge of the drip edges. Here you will need to lay special ridge-eaves tiles. By the way, you can replace it with a regular one if you cut the petals.
Now secure the shingles. An automatic tool is good for this, especially if it works from electrical network. The main thing is that when choosing a model, take care of your own safety: the trigger mechanism should be comfortable, with protection against an accidental shot and the ability to remove a stuck nail without any risk. After all, usually a hammer is more intended for minor works By household, And professional roofers it is used extremely rarely.
The only point: if the special roofing nails do not fit the gun, take a ready-made clip of nails with a wide flat head. They differ in that they are connected to each other by a thin wire. This kind of tape is inserted into the chamber and the nail is fed one after another. This is much more convenient when working at height: you don’t need to look for bunches, you don’t need to expose your fingers to the blow, and the fastening itself will be of better quality than when you are already too tired on the 501st nail. The main thing is to follow the basic technology: the nail must be driven in strictly perpendicular to the plane of the shingle.
Remember, if some shingle was not securely fixed, then over time it will loosen its fastening and fly off with a gust of wind. And the nail itself, lifted by the wind, will tear the sheet, shaking the neighboring one. And all this will lead to leakage and necessary repairs. Of course, it will not be possible to completely avoid problem areas, which is why periodic inspection of such a roof is necessary.
Now let's look at the features of installing shingles different types. So, from a single-layer tile before installation you need to remove protective film, which is always located on both sides of the shingle. Why is she? The fact is that this roofing covering is transported by ordinary trucks both in the heat and in the heat, but we are still talking about bitumen.
But in collections with such cuts as “ Dragon tooth", there is no film, it is only important to choose a beautiful pattern or lay it chaotically, simply mixing shingles.
And how exactly to work with each type of shingle cutting, the following illustrations will help you:


Further, if you have to work with complex roof, you have two ways to install asphalt shingles: segmented and seamless. In the first method, divide the corner or cone into equal segments, and lay each of them separately. And in this way, cover the entire roof. The seamless method is more complicated: here it is important to make the correct marking of the slope and navigate according to it. Think and choose the one that seems more convenient to you.
Step 7. Fastening the tiles in the valleys
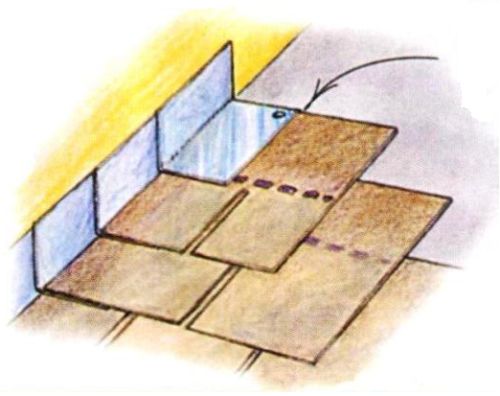
And now - about the most problem areas roofs. You can organize valleys, namely the internal curves of the roof, in two ways: open and closed, which is also called the undercut method. The main thing is then to make a triangular strip at the junction of the roof and the wall and place tiles under it.
In addition, if the wall is brick, it must be plastered and treated with a bitumen primer. Upper part the junction must then be covered with a metal apron, which must be secured and inserted into the grooves, and then sealed:

Step 8. Laying ridge and spine tiles
Next, we will understand the concepts of ridge tiles. As you might guess, these are the shingles that cover the ridge of the roof. All other tiles are called ordinary tiles. By the way, spine tiles are obtained when the ridge-cornice tile is divided into three parts, or they are cut out from ordinary ordinary tiles using the perforation method.
To correctly lay the spine tiles, use a cord to mark off the dimensions of the future ridge - these are two stripes along it, and lay the spine tiles from the bottom up. Then secure the shingles with nails on each side and make sure that the overlap of the overlying shingles overlaps the nails by 5 cm.
The ridge tiles are laid on the side opposite to the so-called wind rose (you can find out about this from your neighbors or from the wind map). Then everything is the same as during the laying of the ridge. If there is no self-adhesive layer in the right places, coat it with mastic.
Now let's move on to the ribs. Here the ordinary tiles should be cut so that there is a distance of 3 to 5 mm between adjacent slopes:

Here's another great tutorial that walks you through the details of the process:
And finally finishing work. The installation of flexible tiles is always completed by installing a ridge aerator. To do this, a special groove is cut along all the slopes, and an aerator is inserted into it. It is fixed with nails and covered with special ridge tiles.
Also, special additional elements are made for soft roofing - these are the lower parts roof passages, which are popularly called “skirts”. And to prevent snow from accumulating behind ventilation and chimney pipes, especially when their cross-section exceeds 50x50 cm, you need to organize a groove. In short, you will need the following elements:

So, your roof is ready, and all that remains is to properly care for it. To do this, once every six months, use a soft brush to sweep away all small debris, leaves and branches, from the roof. The main thing is not to use sharp tools, because it is important not to scratch the basalt chips. And clean your gutters and funnels from time to time.
Fortunately, a roof made of flexible tiles is highly repairable: it is enough to heat the damaged area, remove it and lay new tiles. It's just a matter of one day!
When examining leaky roofs made of bituminous shingles, it is not surprising that it often turns out that most problems are not a consequence of wear or other operational damage, but the result of errors in installing a soft roof. Some of these flaws are difficult to correct, while others can be corrected even several years after the roof is installed.
When a customer reports a leaking roof, he often has his own (not always correct) ideas about the causes of the leaks. After listening carefully, we begin our examination with a series of clarifying questions. How long does it take for a roof to leak? Have there been leaks in this location before? How long has the roof been in use?
If a leak comes and goes over a long period, the cause is most likely due to design flaws or poor choice of materials. If the roof is 20 years old, the problem is most likely due to its disrepair. If the house is new (2-3 years), then the reason usually lies in roof installation errors. First of all, we ask you to show traces of water in the house and try to determine whether the roof is to blame. Sometimes leaks that seem to be related to the roof turn out to be problems with the sheathing of walls or windows.
Having examined the house from the inside, we go to the roof, where we narrow the search to an area with a radius of 3-4 m with the center in the area where the leak appears inside the house. Then we check the coating - assess its condition, look for punctures from nails or tree branches.
Inaccurately installed ventilation risers and chimneys, cable entries, satellite dish mounts - all this may be among the possible reasons leak. We especially carefully check valleys that are prone to leaks. If the problems lie in the valley, we replace it entirely, without even trying to do minor patching of holes.
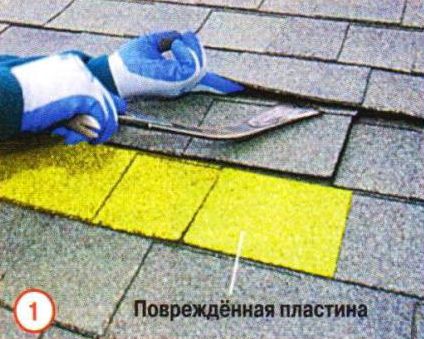
Poorly secured flooring
The most common problem I encounter when inspecting a building. If the flooring sags, the fasteners “pull themselves out”, as a result of which protruding nail heads damage soft tiles and cause leaks. However, pushing out nails is quite possible over time and on a well-made roof. When I find the problem nail, I pull it out and then replace the damaged plate.

The first row of bitumen shingles is not laid correctly
It's surprising how often I find leaks because the plate joints in the starter and first rows match. This arrangement will certainly cause leakage along the lower edge of the slope and lead to rotting of the ends of the rafters and other structural elements.
If the structure is not damaged, then the repair in this situation is simple: you need to pull out a few nails and insert metal inserts between the roofing plates of the starting and first rows, covering the unprotected joints. These plates can be secured with nails or drops of sealant.
Of course, if the decking is damaged, you will first have to remove several rows of roofing plates and replace the damaged ones wooden parts, lay a waterproof membrane covering and only then restore the roof rows.

If roofing plates are not securely fastened, the wind will lift their edges, allowing water to penetrate under the roofing. Cases of improper fastening include a lack of fasteners, their location on the plate being too high or low, and other defects. Always follow the recommended fastening pattern for the plates and fasten them “storm style” on all roofs in windy areas and on roofs with a slope greater than 10:12.

Place nails correctly. They should pass through the fastening strip directly under the adhesive strip, where they will be covered by the tabs of the next row of plates. Exposed nails are a sure way for water to enter the roof.
The causes of leaks are often roof design flaws, which usually arise at the design stage. Project errors include incorrect placement of gutters or valleys directing water to the walls, poor location dormer windows, illiterate choice of location for the chimney, which obstructs the flow of water, and unnecessarily intricate outlines of the roof.

It is almost impossible to correct such design flaws, since the house has already been built, but you should definitely pay close attention to areas where leaks are likely due to this.
It may seem strange, but sheets with a continuous adhesive strip can themselves cause leaks. Water, having got under a plate with a continuous adhesive strip on the side, will not be able to flow down and will move to the side until it finds an exit point, which is usually at the junction between the plates. This is where the leak starts. Valleys, chimneys, internal drains, vents are the most vulnerable places for water, allowing water to penetrate under the roof. Such leaks are very difficult to detect and eliminate their cause. Therefore, it is better not to take risks and use plates with an intermittent adhesive strip. If you must use continuous adhesive strips, make sure that the valley and chimney flashings do not direct water into areas where it can find its way under the covering.

Avoid using plates with a continuous adhesive strip. Water that gets under the plate from the side has no way out. Intermittent adhesive strips allow water to drain at each interval.
"Fracture" of the package
Some roofers make a big mistake when loading a package of plates onto the roof, stacking it with the package folded over the ridge. This can cause the plates to fracture and separate their layers, which will certainly affect the service life of the new roof.

Always place packages on flat surface roofs. And one more thing. Since cold plates are more prone to cracking, try to avoid roofing works in cold weather, except in emergency cases.
Do not bend the roofing plates over the ridge. This can damage the base material and reduce the lifespan of the roof. Place packages on flat roof, and to prevent them from slipping, use a stop.
Errors in arranging connections
One of the causes of leaks may be incorrectly installed connecting elements. For example, if the apron covers adhesive strip roofing plate, then the plate of the next (upper, above the junction, row) will not be glued to the bottom.
|
The flashing, when a nail is driven into its top edge, lifts the bottom edge of the next row of roofing plates. An additional nail securing the bottom edge of the apron is a potential leak point |
The flashing should be positioned flush with the top edge of the roof plate and secured with only one nail in the top corner. The adjoining elements should overlap each other by approximately 5 cm |

Sometimes they try to solve this problem by moving the apron slightly upward so that its upper edge is higher than the edge of the roofing plate. When a nail is driven into the junction element, the upper edge of the roofing plate becomes a fulcrum. As a result, the flashing lifts the bottom edge of the next row of roofing plate, creating a gap where water can penetrate. The roofer tries to fix this by driving a nail into the bottom edge of the flashing piece, which will not be covered by the next row, which can also cause a leak.
The cause of many leaks is poor waterproofing of chimneys. However, before fixing this problem, check the condition of the masonry and make sure that there are no loose bricks. The most common mistake when waterproofing chimneys, the problem is that roofers do not embed apron flanges into the masonry.

The junction here should be made only from a strip curved on the machine sheet metal, strictly L-shaped in profile, carefully embedding the apron into the mortar between the rows of masonry. An abutment made without the use of bending machine, is a serious signal indicating the master’s inattention to detail. If you find a roof with poorly executed chimney insulation, immediately look for other defects nearby.
Waterproofing a chimney is a job for a professional. The interface between chimneys and roofs are potential areas for leaks. If the masons did not embed the aprons into the mortar between the rows of masonry, and the junction was made using nails and putty, this is very bad. The seams must be grooved with an angle grinder so that the apron can be securely sealed between the rows of masonry.
Leaks can easily occur due to operational damage to the roof. Television or satellite antennas, skylights and ventilation hatches cannot be installed at random, but this happens quite often.

Overgrown tree branches can also destroy the integrity of the coating, and excessive shading of the roof promotes the growth of moss on its surface, which also leads to damage to the roof.
Careless covering of valleys
One can only be surprised that most valleys do not leak, given the widespread use in roofing practice of self-adhesive waterproof films as coverings in valleys. Some inexpensive films have warranty period Service is only 5 years. Roofing plates with a service life of 50 years on top of a film with a service life of 5 years are nonsense. The only one reliable way eliminate the leak in the valley - completely block this problem area. When repairing valleys, always use not only a waterproof film, but also a metal apron.

Repairing a valley usually means completely covering it. Starting at the top, remove one entire roofing plate from each side of the valley. Accuracy here is extremely important, since the thoroughness of dismantling the roof determines how well it can be reassembled.

Roofing with undercut plates in valleys is often done incorrectly (left). Valleys with a metal apron are reliable (right).
Removing a damaged plate without harming its undamaged neighbors is not an easy task. This work is best done when the plates are cold enough so that they do not bend underfoot, and at the same time warm enough so that they do not crack during the work. In summer, it is better to do such repairs early in the morning. In winter, such work should be avoided, except in urgent cases.
 |
Separate the glued plates in the row below and two rows above the plate to be removed. This may not be an easy task. Roofing plates, whose service life is up to 50 years, are glued together very firmly. In such cases, the adhesive strip will have to be cut. |
 |
Once the plates are separated from each other, the nails holding the damaged plate can be removed. |
 |
Before removing the plate, you need to pull out four more nails in a row |
 |
Now you can pull out the damaged plate, slip a new one in its place and re-fasten the previously released plates with nails. |
When attaching the repair plate, you should not drive new nails into the holes from previously pulled out ones - they will most likely be squeezed out. Hammer nails next to the old holes, and drop a little sealant into the last ones. Also seal all torn edges of the plates with sealant.