How to cut an inside corner on a miter box. Ceiling plinth: how to make the corner beautiful and even. How to clean up corners
Repair is a responsible and costly undertaking. Although you can save a lot if you do the work yourself. Cosmetic finishing of premises is carried out using certain technologies. You can decorate the interior using the most different materials.
Today, a very popular technique is the use of ceiling skirting boards to hide unevenness between the walls and ceiling. In order for the contour to be aesthetic, it is necessary to do the work carefully. Tips will help you understand how to cut corners on ceiling plinths experienced craftsmen construction and repair business. They will tell you how to use various instruments perform the necessary manipulations with decorative finishing various types.
General characteristics of finishing
When studying the question of how to correctly cut a corner on a ceiling plinth, you should familiarize yourself with the features of such finishing. The stucco molding between the ceiling and walls is now made from artificial materials. It can be polyvinyl chloride, polystyrene foam or polyurethane. From natural materials wood can be used.
In the construction industry it is called (scientifically) a fillet. Of all the materials from which such finishing elements are made, polyurethane is considered the highest quality. Therefore, it is better to choose it. Next, let's try to figure out how to cut a corner. Expert advice will help you do this job well.
Skirting material
Experts agree that polyurethane is the best material for the presented finishing products. But even it has a number of disadvantages. These should be taken into account before cutting corners on ceiling plinths. Polyurethane is susceptible to temperature changes. Therefore, it is not used for finishing in the kitchen or bathhouse. Otherwise, the baseboards will quickly crack and lose their aesthetics.

Expanded polystyrene has almost all the positive characteristics inherent in polyurethane. But it is still a more fragile material. It is easy to break.
PVC skirting boards are relatively cheap. But it is very easy to leave dents or gouges on them. Therefore, you should work with such products very carefully.
Wood looks very beautiful, but not in all interiors. In addition, it is quite difficult for a non-professional craftsman to work with such material. Do you want to do the renovation yourself? Then you are better off choosing polyurethane or expanded polystyrene.
Shape, accessories
When studying the question of how to correctly cut a corner on a ceiling plinth, you should pay attention to its shape and related products. There are embossed and smooth fillets. Their width and length may vary significantly.

When choosing the size of skirting boards, take into account the type of interior, as well as the height of the ceilings. For small room where the distance from floor to ceiling is no more than 2.75 m, wide baseboards will not work. They will look out of place. For the same reason, a narrow fillet should not be used for high ceilings. In such rooms, a 45 mm plinth looks good.
For installation, you can purchase shaped corners from the same material as the fillet. They are external and internal. But quite often the skirting boards are joined without them, directly. In this case, it is necessary to perform an even, beautiful pruning corners
Preparatory work
To make the process quick and simple, use a tool such as a miter box. This is a template that has a U-shape. There are slot patterns in its side walls. They have different angles of inclination.

There is another technique that allows you to evenly glue the ceiling plinth. It is possible to cut corners without a miter box. But still, using such a tool makes the work much easier.
First you need to mark the baseboard. If you need to create an external corner, the length is measured along the ceiling, the internal one - along the wall. For fillets, a line slope of 45 and 90 degrees is used. Since this is a fairly small number of slot options, it is quite possible to make the template yourself. All you need is a sheet of paper or cardboard.
If the repairman has significant experience in carrying out such operations, he can cut corners without additional tools. The craftsman places the fillet against the wall, and then makes marks on the product right there. After that, he trims off the excess. An inexperienced craftsman will most likely not be able to cut it the first time. straight corners. Therefore, it is better to use a miter box or cover the unevenness with decorative corners.
Internal corner
First of all, you need to consider the technique of how to cut internal corner ceiling plinth. After all, they are in every room. If the external angles are in ordinary rectangular rooms are missing, then these varieties will have to be cut out in any case.

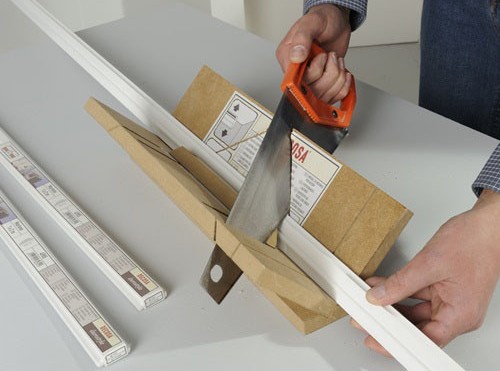
A plinth is placed on the bottom of the miter box with the side that will be adjacent to the ceiling. The lower part of the fillet will be pressed against the wall of the tray.
If the material is hard, it is cut with a metal saw. Soft products are easy to handle sharp knife. The angle should be 45 degrees. If the pressure when cutting is too strong, snags and chips will form on the baseboard. cut according to the same pattern.
Before gluing, they are applied to the wall and, if necessary, minor unevenness is corrected. There should be no gaps between the baseboards. If this is the first time you are doing this kind of work, you can practice on small pieces.
External corner
Quite often the outline of the walls in a room has complex shape. In this case, you will need to figure out how to cut the outer corner of the ceiling plinth. To do this, it is placed on the bottom of the miter box in the same way as in the previous version, with the side adjacent to the ceiling.

For these corners, different slots are used. They also have a slope of 45 degrees, but are on the other side. Next, after marking and trimming, 2 skirting boards are applied to the corresponding place on the ceiling. Adjustments are being made.
Difficulties may arise if it is necessary to cut the same plinth on one side for an external corner, and on the other for an internal one. This is where many people make a mistake. First you need to cut out the inner corner. Otherwise, too short a plinth will not fit together in any place.
Work without a miter box
Polyurethane looks very nice. How to cut corners on such a product so as not to spoil its appearance? And here the advice of experts will help an inexperienced master. Not always home handyman There is a tool such as a miter box at hand. You can do without it.

To do this, markings are made directly on the wall. First measure the required length decorative item. It is cut at a right angle. Next, each piece is applied to the ceiling. Their outline is outlined with a pencil. This creates an intersection. It is applied to both baseboards.
An inclined line is drawn from the intersection point to the edge. This is the trim limit. It is corrected before gluing by placing both skirting boards against the corner. This is a fairly simple method, but even it requires a good eye and accuracy in work.
Homemade instrument
Don't have a miter box? No problem! You can do it yourself. When performing pruning for the first time, it is better to apply it in your work. To do this you will need a plywood board, paper or cardboard.
If you are interested in how to cut the outer corner of a ceiling plinth, as well as its internal varieties, you need to adopt this approach. Two parallel lines are drawn on the selected material. Next, using a protractor, angles of 45 degrees are made along the edges.
A homemade tool is applied to the baseboard, making appropriate notes. The cutting technique is the same. The miter box is not used if the walls in the room are very uneven. When creating an angle of 45 degrees, such discrepancies result in gaps between the joints. Therefore, pruning is done in the previous way. Before installation, the edges must be adjusted.
Relief plinth
So, we already know how to cut corners on ceiling plinths. But we have considered the procedure for performing work if there is simple shapes. Now you should pay attention to the relief varieties. There are increased requirements for their installation. Due to the presence of decorative elements, cutting such products is a little more difficult.
The corners are joined in those places where stucco or other volumetric elements protrude more than the surface. The angle then becomes expressive. It is better to take into account the components of the design and do the cutting in the appropriate place.
The joints of volumetric ceiling plinths must be carefully glued. When working with relief products, it is allowed to use the tool listed above. It is allowed to mark on the wall. But using a miter box will make it easier to cut out voluminous skirting boards.
If you do the work carefully, the result will exceed all expectations. Having studied all the intricacies of the technique and figured out how to cut corners on ceiling plinths, you can begin to practice. Don't worry: the process will go quickly and easily. This finish will fit into almost any interior. If all actions are performed carefully, carefully gluing the joints, decorative effect will be amazing. The interior will please the eye for a long time.
The ceiling plinth not only performs a decorative function, visually separating the walls from the ceiling, but can also hide the joints of various finishing materials ceiling and walls. Not every interior design involves the use of ceiling plinths, but most often general view the room seems incomplete without it. There is nothing complicated in attaching this element - fillets - almost all types of skirting boards are attached with glue. But the question of how to properly trim ceiling plinths in the corners of rooms can confuse many. After all, even in the very simple room There are internal corners where the ceiling plinth strips must be joined precisely and beautifully. And in more complex configuration the room will also have to join the skirting boards, making the outer corner. In this article we will look at various options, how to cut a ceiling plinth using available tools and without them.
First, you need to figure out the question of how to cut the ceiling plinth; the answer to it depends on the material from which the fillet is made. On at the moment We sell ceiling plinths made of polyvinyl chloride (PVC), expanded polystyrene (foam), polyurethane and wood.
PVC ceiling skirting boards are the cheapest. They easily form dents and creases that cannot be removed, so the product has to be thrown away. Also, their disadvantage is electrostaticity - the ability to attract dust. You can cut them with a sharp construction knife or hacksaw.
Ceiling plinths made of polystyrene foam are also considered cheap. This material is very fragile and easily crumbles during processing, so it is necessary to cut polystyrene foam with a sharp knife or a hacksaw, without applying too much pressure.

Ceiling plinths made of extruded polystyrene foam A little more expensive than polystyrene foam, they are denser and more difficult to cut. However, they crumble less, so they are easier and more convenient to work with. Cut with a construction knife and a hacksaw for metal.
Ceiling plinths made of polyurethane are the most expensive at the moment. They are durable, elastic and moisture-resistant, easy to cut with a construction knife and do not crumble. The disadvantage of polyurethane skirting boards is their dependence on temperature changes. For example, over gas stove The polyurethane baseboard will acquire residual deformation and begin to crack slightly. If you try to process or trim such a skirting board, it may bend or deform in other ways.
Wooden ceiling plinths They are dense, heavy products that can only be cut with a hacksaw, preferably with small, frequent teeth. You can also use a metal blade.

Before moving on to listing the ways to correctly cut a ceiling plinth, I would like to note that it is possible not to cut the plinth with particular precision. Available for sale special corner elements, into which the edges of the plinth are inserted. In this case, it is enough to cut the plinth strip at an angle of 90 °, and the corner element will hide all the flaws. But this method is not always used, since the dimensions of the corner elements are slightly larger than the baseboards themselves, so the corners in the room will stand out against the general background. Sometimes it can look clumsy. However, if the design of the room allows the use of corner elements for ceiling plinths, it makes sense to use them. Further instructions will be useful for those who still decide to precisely cut the baseboards to a given angle.

A miter box is a simple carpentry tool that allows you to cut the workpiece at the required angle. Most often it is a tray made of plastic, wood or metal with vertical slots for cutting at an angle of 90° and 45°. There are also more complex designs miter box - for cutting at angles of 90, 60 and 45 degrees. For more professional work a miter box with rotating mechanism, where the hacksaw can be fixed at any angle to the workpiece.

How to cut ceiling plinth using a miter box - inner corner:
- We apply the plinth to the ceiling and measure the required length.
- Then we install the plinth strip in the miter box so that the position coincides with the position of the plinth on the ceiling.
- The plinth strip should be pressed against the far wall of the miter box.
- We hold the plinth with our left hand.
- We choose the position of the hacksaw when the angle is 45 degrees and at the same time the handle of the hacksaw is as close as possible to the left hand.
- We cut the workpiece without putting excessive pressure on the saw.
- The next step is cutting the baseboard striker. We also install it to the far wall of the miter box.
- Press and hold with your right hand.
- We choose a position for the hacksaw when the angle is 45 degrees and the handle of the hacksaw comes closer to the right hand.
- Cut off the baseboard.

Next, we join the cut plinth strips and check the cutting accuracy. For more accurate orientation, they also say that to make an internal corner, you need to start cutting from the front part of the plinth. After cutting, wooden skirting boards will most likely have to be adjusted with a file.
How to cut a ceiling plinth using a miter box - outer corner:
- In order not to make a mistake with the dimensions, it is better to start by marking the inner corner, and then cut out the outer corner. Otherwise, there may be a situation where the bar may not be long enough.
- It is necessary to attach the plank to the ceiling and outline the dimensions.
- We install the ceiling plinth strip and press it against the nearest wall.
- We hold with our left hand and select a position for the hacksaw at an angle of 45 degrees, when the handle approaches the left hand.
- We cut off the workpiece.
- We install the counter plate to the nearest wall and hold it with our right hand.
- We install the hacksaw at an angle of 45 degrees, when the handle approaches the right hand.
- We cut off the workpiece and join the corner.
Trimming the workpiece using a miter box is only suitable if the angle between the walls is even - 90 degrees. If the accuracy leaves much to be desired, you will have to use other methods.
How to cut the corner of a ceiling plinth using markings on the ceiling
Marking the plinth on the ceiling also allows you to cut the corner smoothly and accurately. The only drawback this method is that it is difficult and inconvenient to hold the plinth strip suspended during the cutting process. Otherwise, you can mark the angle for cutting in this way even more accurately than in other ways. When applying the plinth to the installation site, all flaws in the walls and deviations in the size of the angle are immediately taken into account.
Cutting the corner of the ceiling plinth:
- First of all, two blanks must be cut at an angle of 90 degrees.

- Then we first apply one plank, resting its end against a perpendicular wall. We draw a line on the ceiling outlining the contour of the plinth.

- We remove this plank and attach a counter plank, also resting its end against the wall. We draw a line.

- The intersection point of the outlined lines will be the mark at which it is necessary to cut the baseboard.
- Again we apply each strip one by one and mark the cutting point on them.
- Draw a line from this point to the other edge of the plinth.

We cut the plinths along the marked lines, join them and apply them to the installation site. Please note that using this method it is more convenient to cut internal corners.

Something resembling a miter box can be made by applying the required cutting angles to paper, cardboard or wood. You need to draw two parallel lines, determine the center, and then mark the necessary angles using a protractor. The advantage of this method is that you can set any angle, including more than 90 degrees. Of course, before cutting the corners of the ceiling plinth, you need to check the angle between the walls in advance using a corner and measure it with a protractor.
The technique for cutting a ceiling plinth using a painted miter box is exactly the same as using the miter box itself. Press the plinth strip against one of the parallel lines, then set the hacksaw at the desired angle, which is already outlined, and cut it off.
Makeshift miter box tray with your own hands
Making a miter box with your own hands is also not difficult.
Method 1. You will need three wooden planks or boards, which must be knocked together into a U-shaped box. Then the necessary angles are marked on the walls of the box, and the cut is made with a hacksaw. The result should be a wooden miter box with grooves cut out in it.

Method 2. A combination of a makeshift miter box and a template with outlined lines. To make cutting easier, it is necessary to build something that will conveniently hold the ceiling plinth strip, since it is difficult to hold it suspended. It is enough to put together a corner from two wooden planks or boards. On paper you need to draw lines with angles for cutting at 45 degrees or any other. Then we apply the plinth blank to the corner, press it with our hand, as described in the technology for using a miter box, move the paper with the template under the edge where we are going to make the cut, and cut it off. During the cutting process, we focus on the line drawn on the paper.
Method 3. You can use anything as an improvised miter box, anything that forms a corner. For example, a table pushed against the wall.

Important! Please note the rule for taking measurements for cutting ceiling plinths. To mark an internal corner, you need to measure the length directly from the corner itself. To mark the outer corner, you need to be aware that the plinth will protrude into the room at a distance equal to its width.
You should not fix the ceiling plinth strips before you have cut the counter strip and tried out their location. Only after the two strikers fit perfectly in the corner can you begin to attach them to the ceiling. Minor flaws can be corrected with a file or nail file in the case of wooden and polyurethane skirting boards. To adjust the foam products, you will have to use a sharp knife.
If suddenly, even after adjusting the baseboards, a small gap remains between them, do not despair, it can be repaired with putty. Cutting the ceiling plinth yourself is not difficult. But in order not to spoil a lot of products, it is better to first practice on small pieces.
A practical decorative element - a ceiling plinth or fillet - can be made from:
- polyvinyl chloride - the most affordable;
- expanded polystyrene - have a low cost;
- polyurethane - are an order of magnitude more expensive than others;
- polystyrene - cost a little more than expanded polystyrene and polyvinyl chloride.
The wooden fillet is very popular, giving the interior strict elegance. To make a corner cut wooden baseboard, you should use a hacksaw with frequent fine teeth or a hacksaw for metal.
Advice! If you need a moisture-resistant and durable ceiling plinth, then you should choose a polyurethane fillet. It is important to remember that it does not tolerate sudden temperature fluctuations at all - it quickly deforms, therefore it is not suitable for use in the kitchen interior.
Each of the materials used to make skirting boards has its own advantages and disadvantages. For example, polystyrene and expanded polystyrene are easy to break, while polyvinyl chloride has increased electrostaticity.
Regardless of the material from which the plinth is made, cutting it into corners has its own difficulties, since the walls of the room do not always have angles of exactly 90°. Sometimes, especially in older buildings, the walls can have an angle of 88° or 92°, so cutting the baseboard at an angle of 45° when joining will definitely create a gap. To avoid this, use the presented method.

3 ways to make an internal or external corner
To complete the angle you will need:
- ceiling plinth;
- pencil;
- a sharp knife or file with fine teeth.
Advice! When cutting, you should not rush; it is better to double-check everything again - this will avoid damage to the material.
Method 1. To make the correct internal corner you need:
- Attach the baseboard to the corner.
- On the ceiling, along the attached baseboard, make a mark in the form of a line using a pencil.
- Place the plinth on the other side - in a mirror image.
- Make a pencil mark on the ceiling, exactly the same as the first time.
- The intersection of the lines on the ceiling is the mark of the top cut point.
- Taking the plinth again and placing it against the corner, move the mark of the intersection of the pencil lines.
- Using a pencil, draw a perpendicular line on the baseboard - from the mark down.
- Cut the edges strictly along the line.
- Repeat pp. 6-8 for the second plinth.
Attention! Before gluing cut skirting boards, you should double-check the quality of the cut. To do this, attach prepared skirting boards to the corner; if there are no cracks at the joint, you can glue it. If unevenness in the joint is noticed, the cut must be corrected.
Trimming the skirting boards should be done carefully, without applying much force, so as not to wrinkle the edge, otherwise it may become deformed after drying.

Method 2. If the internal angle in the room is 90°, trimming the baseboards can be done using a template. To do this:
- Draw 2 parallel lines on the cardboard with a distance greater than the width of the plinth.
- Mark the center between them.
- Using a protractor and pencil, mark the angles = 45°.
- Double-check the accuracy of the marked angles to ensure they match the real ones.
- Transfer the marks to the plinth and cut it or make a cut by placing the bottom edge of the plinth against one of the parallel lines, and placing a knife or file at the marked angle, cut.
Method 3. Another option for cutting the inner corner of the plinth at 45° without using a miter box:
- Measure the end width of the baseboard.
- Make a mark along the bottom edge of the plinth at a distance equal to the end width of the plinth.
- Connect the top corner with the bottom edge mark with a diagonal line.
- Cut the baseboard along the line.
- Execute p.p. 2-4 on the second bar in a mirror image.
When cutting an outside corner, use the following method:
- Place the ceiling plinth on the right to the corner, so that the plinth extends beyond it.
- Use a pencil to make a mark along the ceiling.
- Place the ceiling plinth on the left to the corner, so that the plinth extends beyond it.
- Using a pencil, make a mark, drawing it along the ceiling with a pencil until it intersects with the first line. Mark where the lines intersect.
- Transfer the marks to the baseboard, connect them with a line, and cut them off.
- Check the clarity of the joints by placing the cut skirting boards against the corner.
- If necessary, correct any cutting inaccuracies and stick them on.
Attention! To form an external corner, the cut should look inside the baseboard.

The tips presented will help you cut the corners of the skirting boards as correctly as possible.
- It is recommended to try on small pieces before cutting large parts. Once you have mastered the cutting technique, you can begin cutting the actual parts of the baseboard.
- As an improvised version of a miter box, you can use a table pushed up against the wall.
- To mark an inside corner, the length of the baseboard should be measured straight from the corner.
- To mark the outer corner, the baseboard must extend beyond the corner to the width of its end.
- When cutting the baseboard along the marked line, you should lay it on a hard surface, the unmarked side down.
- It is recommended to fix the skirting boards to the ceiling only after both parts have been cut out and their joints have been checked. You can attach it to the ceiling if, when checking, the corners fit together without gaps.
- Minor inaccuracies in joining wooden or polyurethane ceiling plinths can be corrected with a file. U foam baseboards- using a sharp knife.
- The gap resulting from unclear trimming can be hidden using putty.
If, when creating interior decor in the form of a plinth on the ceiling, you did not have a miter box on hand to cut the corners correctly, use one of the methods presented and you will get a clear and neat corner without gaps.
How to cut a corner of a plinth - video
How to make the outer corner of a ceiling plinth is one of the most common questions. Ceiling finishing often ends with the installation decorative plinth along the perimeter of the room. It reliably masks the joints between ceiling surface and walls, helps to hide small defects formed during the work. At first glance, the installation of this ceiling plinth is not difficult. But often when independent work The question arises of how to make the outer corner of the ceiling plinth and make high-quality joining of the inner corners so that they turn out smooth and neat.
Material for making fillets
Modern construction market offers a wide range ceiling fillets made from different materials. These include:
- polystyrene skirting boards are produced from polystyrene masses through the extrusion process. The main feature is a clearly defined relief. Such fillets are inexpensive, look impressive, and after painting they resemble the real thing. plaster stucco. Disadvantages include fragility, rigidity and low strength;
- fillets, completed polyurethane, due to the plasticity of the material, ceilings are often finished indoors non-standard forms, which are characterized by a large number difficult angles, broken lines and curved sections. Such skirting boards are not afraid high humidity and temperature changes. The only drawback is that their cost is higher than that of polystyrene analogues;
- ceiling polyvinyl chloride baguettes rightly called the most budget option. At the same time, they produce products in a wide range color shades, with different patterns and designs on the surface. PVC fillets are easy to install, have increased hygroscopicity, but cannot be painted;
- wooden skirting boards are in high demand among buyers, despite the high cost and complexity of fastening. Qualitative characteristics material, its naturalness, attractive appearance, strength, durability, environmental friendliness - the main advantages of wood moldings for finishing ceilings;
- gypsum fillets They will help make the room individual and emphasize the beauty of the interior. Thanks to the plasticity of gypsum, craftsmen make real works of art from it. Gypsum skirting boards have not gone out of fashion for many years. Their high cost is fully compensated by their service life and the effect produced. A significant disadvantage is the increased fragility of gypsum, so the material requires careful and careful handling.
How to cut ceiling plinths

Before answering the question of how to make the outer corner of a ceiling plinth, you need to understand how to cut the plinth. When installing any of the listed types of plinths, it is very important to make a high-quality corner joint, and to do this, make correct pruning fillets.
Depending on the material from which the ceiling plinth is made, work with the products is carried out using special devices. So, for example, cutting a wooden baguette should be done using a hacksaw.
Skirting boards of other types are cut using metal sheets or files. Thanks to this, it is possible to obtain a perfectly even cut and angle. Such canvases are most often used for working with miter boxes.
More pliable materials, such as foam fillets, are cut with an ordinary stationery knife with a very sharp blade. If polyurethane or polystyrene baguettes are cut with a hacksaw, it is important not to apply excessive force when pressing, otherwise the material will be deformed.
Note! Before you cut a corner on the ceiling plinth, practice on a scrap piece of material. Then during your main work it will be easier for you.
How to cut a corner correctly

If you are completely new to this business, it is better to carry out the work using special tool– miter boxes and hacksaws. This way you can cut the plinth strictly at an angle of 45 degrees, and also achieve perfect joining of adjacent elements. During the process, pay attention to the following points:
- first measure the length of the ceiling along the fillet installation line;
- using a miter box, you can trim corners of different sizes;
- If the baguettes have irregularities and edges, it is better to use a stationery knife.
Cutting a baguette at an angle is carried out as follows:
- set the necessary parameters on the instrument;
- insert the first element and a hacksaw into the tool;
- cut off the excess part of the baseboard;
- insert the second part into the miter box, which will be joined to the previous one;
- choose opposite holes, but do not change the cut angle;
- cut off the fillet.
If you do everything correctly, then when joined, the parts will fit perfectly together.

Experts say that without a miter box, cutting the ceiling plinth will be better, especially in the inner corners. The only drawback is working with fillets made of wood or polyurethane. Due to their massive weight, it will be quite difficult to hold them with outstretched arms while taking measurements.
The procedure will be as follows:
- first, two workpieces that need to be joined are cut at an angle of 90°;
- now take one part, attach it to the ceiling, rest the end part of the element against the wall located perpendicular to the fillet;
- use a simple pencil to outline the outline of the plinth on the ceiling;
- do the same actions with the second element;
- examine the result. The intersection of the lines will correspond to the place where the plinth is cut. To be safe, attach the elements to the ceiling again and mark on them the places where trimming will begin. From this place, straight along the baseboard, draw a line along which you will make the cut;
- Now cut off the excess parts of the parts and proceed to their installation.
If, after gluing the plinth to the ceiling, you see that the corner is not very even, the resulting gap can be covered with putty or sealed with sealant.
How to make corners for ceiling skirting boards

When finishing external corners operate as follows:
- First, measure the length of the fillet from the nearby wall to the outer corner, and draw a line on the underside of the baseboard with a simple pencil. In this case, part of the part should extend out a little;
- cut the baguette using a miter box;
- the second corner element must also be measured and cut to mirror image in relation to the first part with a small margin.
After the elements are cut, you should check the connection by placing them against the ceiling. The joint must be level. If you are not satisfied with the result, carefully trim the corners with a utility knife.

With non-standard corners in the room, joining the plinth in them is a little more difficult. To do this you will have to take construction knife, attach the fillet to the wall, cut off the excess part by eye.
If you have an excellent eye, do independent drawing. Draw a regular rectangle on thin plywood. Using a protractor, mark the points corresponding to 45°, and connect the edges with lines. With this layout you can easily join the fillets in the corners.
If you act carefully during the work, carefully thinking through each step, the result will certainly please you. Study the intricacies of installing ceiling plinths in theory, and you can safely move on to the practical side of the issue. Such a finish will look original in any interior, and the decorative effect obtained with its help will be amazing. The room will take on a finished and harmonious look.
Video on how to cut a baguette on the outer corner without tools
Ceiling plinth is decorative element, giving completeness to the decoration of walls and ceilings. It is glued at the junction between the walls and the ceiling with a special glue, and the greatest difficulty is usually caused by the corners, both internal and external. How to correctly cut a corner on a ceiling plinth so that there are no cracks or dents left? This question has probably been asked by everyone who has ever tried to glue a ceiling plinth with their own hands.
Types of ceiling plinths
Ceiling plinth - otherwise called fillet - can be made of different materials: wood, plastic, polyurethane, polystyrene foam or polyvinyl chloride. In addition, they differ in width and shape of the relief - it can be simple or figured. A simple-shaped fillet can be easily joined in corners without special fittings; for a wide plinth with stucco molding, it is better to spare no expense and buy special corner elements - internal and outer corners from the same material. Wood and polyurethane plinths are cut with a metal file or a strong, sharp knife. Polystyrene and PVC skirting boards are easily cut with a regular stationery knife; thanks to the thin blade, it does not crush this fragile material.
How to cut a plinth for a right angle
Most convenient way, which virtually eliminates the appearance of inconsistencies is to use. This device is a U-shaped template with slots in the side walls made under different angles. The plinth is marked in place, noting its maximum length along the ceiling for external corners and along the walls for internal ones. The plinth is placed in a miter box, leveled and cut at an angle of 45 degrees.

If you don’t have a miter box, you can make a template from cardboard or thick paper by drawing lines on it at a 45 degree angle using a protractor. The fillet is applied parallel to the edge of the sheet to the marking lines and cut along the ruler with a sharp knife.

If on one piece of plinth you need to cut a corner on both sides at once, then it is recommended to start with a more complex one - an external or uneven corner.
What to do if the internal angle is not right
The walls in our houses are not always perfect, and the angle may be more or less than 90 degrees. In this case, the standard template will not work, and it is better to use local markings. For this you will need a hard pencil - it leaves less marks on the ceiling.
The plinth is applied alternately to each of the walls forming an angle, and a line is drawn along its edge on the ceiling. A mark is made at the intersection of the lines on the baseboards. Connect it to the bottom edge of the plinth at an angle and cut off the corner with a knife using a ruler. Skirting boards cut in this way lie flat in any corner.

It is difficult to fit a fillet with stucco in the corners without the use of special corners, but if you were unable to match the fittings to the embossed plinth, you should not despair - using the above methods you can correctly cut a corner on a ceiling plinth of any shape. It is better to join the plinth in a place with the most protruding elements of the stucco molding so as not to disturb general drawing, and carefully glue the joint. In this case, the fillets will look neat and fit perfectly into the design.


