Wooden benches (45 photos): a variety of shapes and styles. A simple and original do-it-yourself bench or bench for the garden, made from scrap materials
A light and comfortable garden bench can be placed on a cozy veranda or placed in the shade of trees so that you can hide from the heat and enjoy reading a book or a pleasant conversation. So, let's describe the main stages of its manufacture.
Whatever material you decide to make a bench from, to make it as comfortable as possible, certain proportions should be observed when constructing it:
- height: the seat is always located at a level of 0.5 m from the ground;
- width: at least half a meter;
- back height: 0.45 m;
- its tilt angle: ideal 45°;
- Armrest height: calculated from the seat level and should be 20 cm.
If the bench is dug into the ground, the length of the legs increases by at least 70 cm. In this case, its legs are lowered into the prepared holes, covered with stones and filled with concrete. Do not forget to pre-treat the wood with a solution that protects against rot and mold.

DIY bench step by step
Back and seat garden bench It’s better not to do it with a solid sheet, but to make a small distance between the boards. In this case rainwater the boards will drain completely, the boards will be better ventilated, and the product will be less susceptible to rotting:

You can replace the stain with a strong solution of potassium permanganate. Wood treated with a similar composition acquires a dark and rich color. Depending on the amount of manganese, you can get a walnut shade or a rich mahogany color.
Wide plank bench

Bench made of flexible vine or willow twigs
Eco-friendly garden furniture, not only a bench, but also chairs and even a table, can be made from pre-soaked willow or vine twigs. You can also use branches of hazel, willow, aspen or even birch, but in the latter cases the product will last much less and will look rougher. 
To collect raw materials, it will be necessary to wait until the shoots “ripen”. The optimal season for harvesting branches is from September to March. It is at this time that the rods acquire the required flexibility:

Types of benches
We have described only the simplest options for making a garden bench. It can be made from practically any materials:


If you are planning to make a wooden outdoor bench, it is better to use conifers or larch, which is difficult to rot. Left by inheritance old furniture oak or hickory can also be used as a material to create a durable and very original garden product.
Should I buy a bench or make it myself?
Buying a bench for the garden is, of course, much easier. Moreover, the simplest of them are quite cheap.
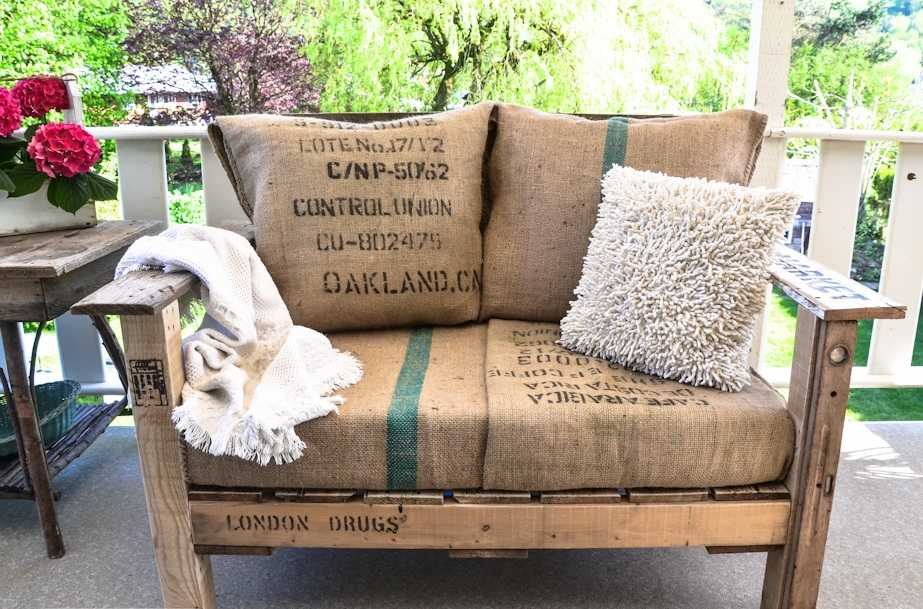
But still, work done with your own hands will bring more satisfaction. And with a certain patience and dexterity, even made from improvised materials, it can become an exclusive work that you won’t be ashamed to show off to your friends and neighbors. For example, on next photo The bench is made of ordinary pallets, painted with bright paint and decorated with decorative pillows. 
Bench - essential attribute summer cottage or local area. Often there is room on the site for not one, but several benches. One in the yard, another in the garden, the third at the gate. A bench with a backrest is probably the simplest and most useful project which can be done at the dacha.
The beautiful wooden texture of the bench will look harmonious in any garden, especially if you use not just boards for the bench, but all parts of the wood that are available to you in the garden.
In order to do a simple bench, you don’t need special skills or expensive tools, and wood in the country is one of the most affordable materials.


We hope these beautiful benches inspire you to create your own.

DIY bench with backrest
To begin with, we suggest mastering a simple design that is easy to manufacture and has good rigidity and stability.

Wooden bench. Preparation of materials
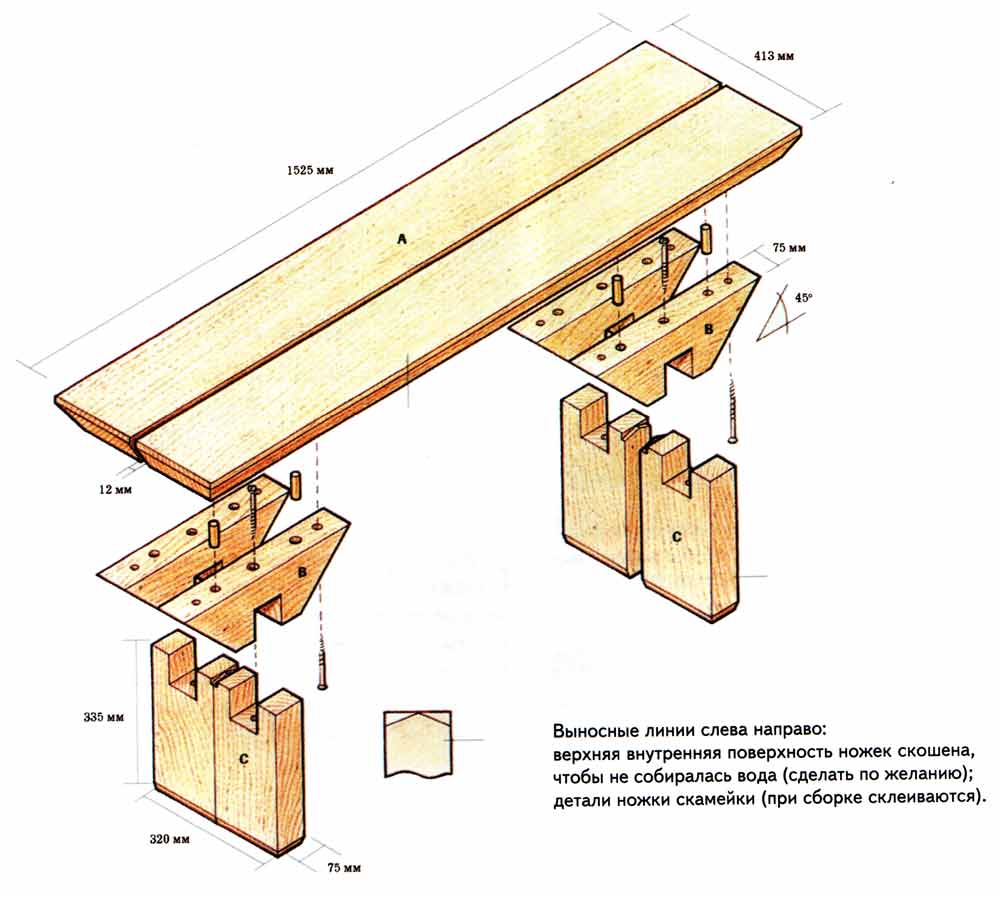
In order to make a bench, you will need:
- 2 short front supports [A];
- 2 long rear supports (the backrest will be attached to them) [A];
- 8 short crossbars for tying supports and adding rigidity [B];
- long boards for the seat and backs (their number depends on their width and the desired size of the bench) [C].

If you are planning to make a long bench with a backrest with your own hands, then make sure that your boards that you have prepared for the seat will not bend under the weight of the people sitting on it. And if the boards really sag, then this can be corrected - you can assemble another support and place it in the middle.

Every detail needs to be polished so that after relaxing on the bench you don’t have to pick out splinters from various interesting places.

Remember also that if you want to dig in a bench, your supports must be at least 40cm longer.

Garden bench. Execution of work
Once your parts are cut to size and sanded, you can begin assembly. For this it is better to use self-tapping screws, but if you do not have a screwdriver, then the bench can be knocked down with nails.

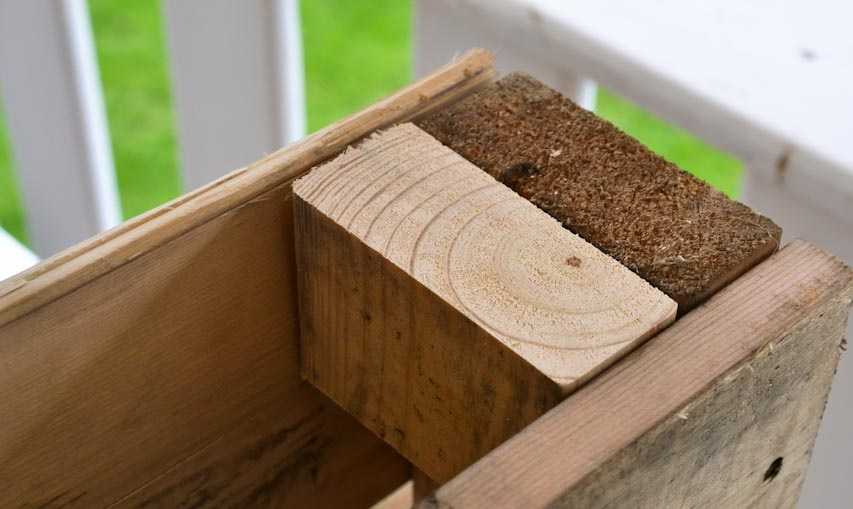
It is important to screw the crossbars with at least two self-tapping screws to each support as shown in the picture. And the greater the distance between the screws, the stiffer the structure will be.

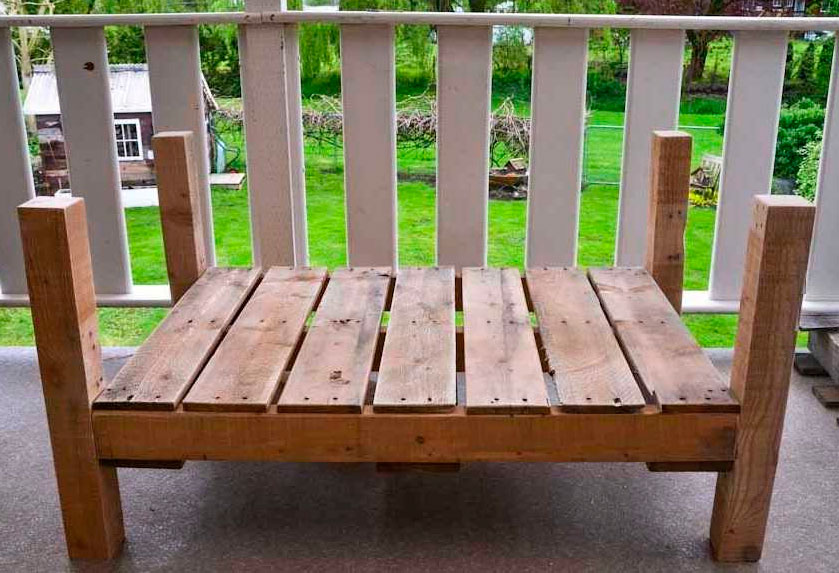
Now all that remains is to paint and let the paint dry.

And this is what you can get. You can give the bench a different look without changing the design. Just use rougher wood and it's a completely different thing! Although structurally its differences are minimal, and it is done in exactly the same way.

DIY bench
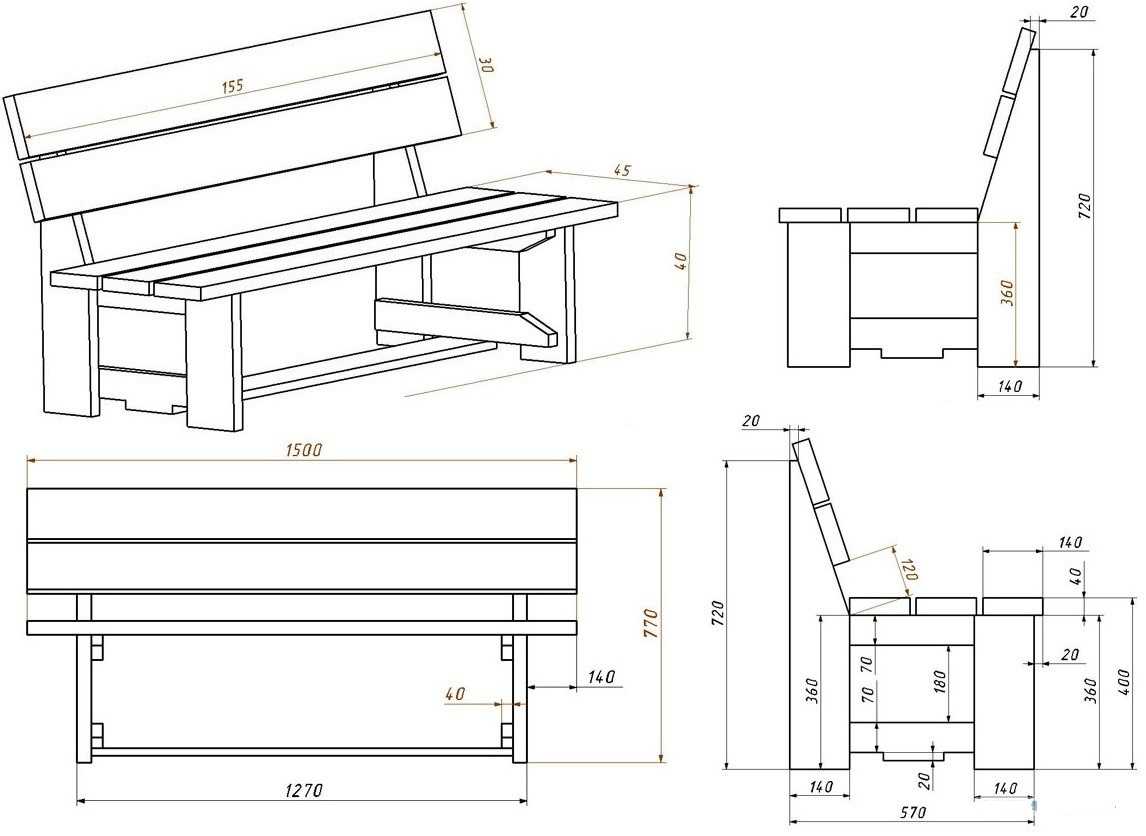
But even if this seemed too complicated for you, then there is a design for you for a bench with a backrest, which can be done with a hacksaw and a hammer in literally a matter of hours.

All you need is six boards of the same thickness (preferably at least 40mm).

Its scheme is elementary simple.

Once all the pieces are cut to size and sanded, it comes together in minutes!

It’s better to drill holes for the screws in advance so that the board doesn’t split during assembly.

This bench looks laconic and modern.  And this is not surprising, because there is nothing superfluous in this design. Each structural element is absolutely necessary and at the same time minimally sufficient. Your bench with backrest can be made in any way, we have shown only the two simplest ones.
Benches photo
If you enjoy working with wood, you may want to expand your skills and add some new original pieces to your bench.

If you are uprooting stumps in your country house, consider that you have become the happy owner of a unique material for your next bench, which you will make with your own hands.
 Often those of us who love and know how to do something with our own hands are simply embarrassed to waste our time on this “nonsense” - it is more important to dig up the garden on time.

The pleasure you will get while working on your garden bench project will give you truly happy moments.  And those around you who were puffing about why you are busy with frivolous things will be proud of your bench, which you made yourself, and tell everyone that you are so unexpectedly talented.
 And we are sure that these successes will inspire you to try new ideas, because benches made by yourself are always more practical and comfortable than ordinary standard ones.
Comfortable and beautiful garden bench will always find its place on a summer cottage or near a luxurious cottage. Sitting on a bench you can admire beautiful nature surrounding you, or you can sit down to rest after long work on a summer cottage. In the article we'll talk about what types of benches there are and how to build this useful product yourself.
Types of modern garden benches
Today there are many types of garden benches that can be purchased in stores. It could be:
It will take a long time to list the types of benches that we are offered to buy in stores today. But the best option for a summer cottage would be a bench made with your own hands. In this case, you can be sure that it will be strong, reliable and will serve for a long time.
Basic elements of a bench
You can make a bench from different materials, but are more popular wooden or wrought iron benches. Plus they are more practical. Basically, all benches consist of the following elements:
- the support on which the bench stands;
- sitting;
- back;
- armrests;
- fastenings
Types of supports for benches
Bench supports can be made from different materials. For example, quite popular are steel or forged supports. People often think that such designs are from constant contact with the environment will become rusty or easily worn out. But this is not so, because today there are metals that do not corrode and practically do not oxidize.
There are also benches with concrete supports. Of course, it may seem rough and short-lived, but in order to add zest to appearance such a bench, you need to use your imagination. For example, if the bench supports are made of concrete, then the back and seat can be made of rods. The disadvantage of such a bench may be its big size and fragility.
If possible, you can purchase supports for the bench from natural stone . Such a bench will look luxurious on a personal plot or near a cottage. The disadvantages of this type of support include the rather high cost and heavy weight. In this case, you will need to immediately determine the place where the bench will be installed, since moving it will be very difficult later.
Will be no less popular wooden supports. They are quite strong and durable. In addition, the tree can be used to make garden benches with your own hands. This material is cheap and available. A bench made entirely of wood will decorate the area. But this material has its drawbacks: wood can swell and rot. Therefore, a wooden bench needs proper care.
Materials for making the back and seat of the bench
Popular materials for making the seat and back of a bench today are: plastic and wood. You can, of course, buy a completely stone bench, but it will be quite cold. There is also an option to make the back and seats of the bench from carved sheets, but this is quite difficult and can cost a pretty penny.
Important elements in benches are fasteners. They can be bolts, nails, metal corners, metal screws.
Wooden bench option No. 1
If you do not have much experience working with wood, then the best material To make a bench with your own hands, you will need pallets. They can be purchased anywhere they sell them. wooden beams, boards, etc.
 To make one bench you will need two wooden pallet, saw, paint, screws, screwdriver, metal plates for fastening. One pallet will be the seat, and the second will be the backrest. First you need to place one pallet horizontally and move the second pallet towards it, which will located vertically. This will create the back and seat of the bench. They need to be connected to each other. To do this, you can use metal plates or corners. Such elements are fastened using self-tapping screws and a screwdriver.
Next to finished design you need to attach the legs. They can be cut out from small beams. The bench should have 4 legs. Moreover, the rear legs can be made long so that they can fasten the back and seat together, and the front legs should be short. To give the bench a complete look, you can make handrails and sew cushions on the seats.
Street bench option No. 2
The bench will be located between two tree trunks. The distance between them should be 160−180 centimeters. The height of such a bench will be 55-60 cm. For such an outdoor bench you will need to purchase 3 boards made of durable wood. Two boards will be longer and the middle board will be shorter.
First you need to make a blank from the middle board. To do this, cut both edges of it in a semicircle. In the future, it will need to be installed between two trees, and such cutouts will help to insert it tightly. To beautifully trim the ends of the board in a semicircle, you can use jigsaw.
 By installing a horizontally cut board, you can mark where the supports for the bench will be installed. The rest of the boards will be attached to them. It is worth considering the fact that the bench must be secured in such a way that the trees are not damaged. Each tree will need to be installed two each support boards
. Next, you need to make a mark in the center of the board. There will be fastenings there. Two support boards will be located on both sides of the tree, and they can be connected to each other using a long threaded rod, onto which nuts will then be screwed.
By installing a horizontally cut board, you can mark where the supports for the bench will be installed. The rest of the boards will be attached to them. It is worth considering the fact that the bench must be secured in such a way that the trees are not damaged. Each tree will need to be installed two each support boards
. Next, you need to make a mark in the center of the board. There will be fastenings there. Two support boards will be located on both sides of the tree, and they can be connected to each other using a long threaded rod, onto which nuts will then be screwed.
When such supports are ready, you can put the previously prepared middle board on them. Next, using self-tapping screws and a screwdriver, we connect the middle board with the fasteners. It turns out to be a bench. But it will be quite narrow. Therefore, the prepared two boards can be attached to the other two sides of the trees. For this too you will need screws. When these boards are attached to the supports. Then you can cut the long rod. That's it, the street bench between two trees is ready, such benches are convenient to make in the garden and where trees are planted close to each other.
A bench on a summer cottage or personal plot is, first of all, place to relax. Therefore, it must be comfortable, stable and functional. But also about beautiful design benches should not be forgotten. This item landscape design should fit beautifully into the overall design of the summer cottage or yard where the bench will stand.
Good afternoon, today we will make a variety of benches with our own hands. I have collected in this article all the EASIEST WAYS make your own comfortable and beautiful bench. I will give detailed explanations and illustrative photographs, and will tell you as clearly as possible about how to make a bench made of wood(timbers and boards) and scrap materials(pallets, old chairs, boxes, etc.). I will also provide drawings, assembly diagrams, and step-by-step workshops.
All assembled models country benches I will post them according to their complexity - that is, we will start with the simplest and most concise methods - and end with real professional products worthy of the hand of a master. After this article, you will feel that you have become the same master who knows a lot about his craft and can easily make a bench from absolutely any material, even if it is not much. And the bench will stand firmly on its legs and serve your family for years. And who knows, maybe you will even be able to sell your benches to your neighbors - after all, they will also want to have such country benches on their site. And later you will start doing the same according to my article-lessons.
In this article, as well as in the next articles in this series, we will look at...
- Benches made from old chairs.
- French-style chaise longue bench
- Beautiful benches made from bed headboards.
- Master class on an elite bench from a chest of drawers.
- Country benches with backrest - made of timber and foam blocks.
- Benches for summer cottages - panel supported on a solid sidewall.
- Simple drawing benches from edged boards- in 15 minutes.
- Country benches with a curved side part.
- Slatted benches for the dacha - with curved shape seats.
- Timber benches with backrest and armrests – 23 models.
- Benches under a canopy or a classic pergola.
So, let's figure it out. And let's start with the EASIEST WAYS to make a country bench with your own hands.
Model No. 1
Bench for a summer residence
FROM OLD CHAIRS.
In the photo below we see an original and very simple bench - which can be easily made with your own hands from unnecessary chairs. Everyone at their dacha has old, shabby chairs. Once upon a time you left one chair in the rain, varnish coating they were swollen, soft upholstery It has long since crawled into shaggy holes. It’s a shame to throw it away; you put it against the wall of the garage or in a shed - and it continues to deteriorate. Then another chair was added to it - but it’s still okay, and you hold it on summer veranda. And sometimes you see shabby chairs with lopsided legs at the entrance (someone took them to the trash).
All these old robbers can be given a new brave life. Paint them a bold, rich color. And cover with a wide board - screw it on with self-tapping screws (so that they hold on to the leaky bottom of the chair, it can be strengthened wooden overlay). Or screw it not to the bottom but to the frame of the chair.

By the way, if you don’t have old chairs, IT’S NOT A TROUBLE. Go to any flea market website - many of them sell old chairs for mere pennies. They are happy that they sold it. You are lucky that you found it.
If wooden chairs will have different heights seats - this can easily be solved by filing the legs of high chairs (or stuffing additional thick boards onto the frame of the seat of a low chair to raise the seat to the desired height.)

Chairs can be connected not only in the seat area, but also along their backs. Here on step-by-step master class making such a bench (photo below) we see how it is done:
- The attachment points along the rear line of the seat are a long wooden strip.
- The fastening points along the front line of the seat are fastened with screws (or simply a butt, which is held in place by the fact that the back bar prevents the chairs from moving apart).

We adjust the side rails of the bench. Cutting it out corner groove on the handrail so that it fits into the frame of the back of the chair.

We sand the varnish coating from the chairs (preparing them for painting). We prime before painting - a special primer for wood. We impregnate with a moisture-resistant coating.
And attention – we add elements of strength. From below and above between the backs of the chairs we nail short wooden holder strips. They will combine the backs of the chairs into a single common back of a country bench.
Cut out the board for the seat. Please note that special square cuts are made in it (so that the high “humps” of the chair legs pass through them.

This is how we get an elegant garden bench. It can be placed on the garden lawn in a place with a table - under a canopy, in a recreation area, on a veranda or terrace. And for the winter and rainy season, bring it into the house.

But here is an idea of how we can arrange the chairs DIFFERENTLY under our future bench at the dacha - WITH ROUNDING.

You can also make a round garden bench around your favorite tree or lilac bush in your dacha - also from chairs placed in a circle with their backs.

Even if you found only 2 chairs at a flea market, you can still make an original bench with them - which only you will have.

Moreover, there is still one hiding here exclusive idea– just right for TWO chairs.
In the photo below we see exactly how you can make an elegant one out of two old chairs with your own hands. French bench-chaise.

In the photo diagram below we see a master class - where it is shown how two backs of chairs become the side elements of the frame of a garden bench.
- First we do rectangular seat frame(light wood in the photo below) - also scientifically it is called TSARGI (frame elements under the seat of a chair, or under the table top). We nail this drawer frame to the lower slats of the chair back.
- And then, so that our bench does not wobble back and forth, we make an additional screed frame already in the lower part of the legs of the future chaise lounge. Scientifically, such a frame-screed at the bottom of the legs is called a FOOT FRAME.
- We paint the entire product in White color and we get a solid French bench for a beautiful holiday in the country.

If desired, you can attach a backrest to such a garden chaise bench. Simply nail the boards to the side of the chair frame. How this was done is shown in the photo below.

Model No. 2
Country benches
FROM AN OLD BED.
Here are ways to create a beautiful bench for your garden using the backs of an old bed.
One back is sawn in half as is. The halves will be used as side elements of a country bench.

Even if the headboard of your bed is not made of a solid board, but is decorated with carved balusters, you can still make a bench according to this design.

The seat can be covered with a solid wooden panel. Or upholster it with slats as in the photo below.

The second headboard can be used under the FOOT part of the bench– from the front edge. How this was done is shown in the photo below. The bottom frame of the bench can simply be paved with edged planed board and paint. Or you can cut out a solid shield and place it on top of the frame.

You can use only one backrest to create a bench.

You can make a FRESH FRAME for a country bench from an edged board.

Or the frame for the seat - the bench frame - can be taken from the same material as the bed frame. How this was done is shown in the photo below.
And pay attention. Here part of the bed frame is PADDED ON TOP - to increase the level of the seat.

A beautiful country bench can be made even using modules from any other furniture. For example, from an old buffet. Let's say you have a buffet, part of which cannot be restored (drunken guests fell and broke the line of drawers).
Then fate itself tells you to make an exclusive bench out of it. It's unusual to beat the rest of the buffet. And create cozy corner for family privacy.

And you won’t want to expose such a designer bench to the rain. You will find it a place of honor in your country house. And sew blue pillows for her with embroidery of snow-white patterns.
Model No. 3
SHIELD garden benches
WITH YOUR OWN HANDS.
To immediately explain the term “panelboard”, I’ll show you such a simple design - a mini-bench made from kitchen cutting boards. This is the classic panel design of a bench. That is, the product is ASSEMBLED FROM SOLID SHIELDS.
In the photo below, the boards are connected using a groove method. The seat board fits into the grooves on the stand legs.

Here below the bench is made EXACTLY THE SAME - using the panel method. Only the material of the shield is rougher and unhewn. And here they added a back - it was also cut into grooves cut into the support panels.

- The fastening of the shields to each other can be GROOVED (as in the photo above) - where in some shields grooves are cut out, and other shields are moving down. Such fasteners are used only in panels made from a SINGLE PIECE OF WOOD. Glued boards are not suitable for this - they can delaminate in the places where they are glued.
- ADDITIONAL FASTENING ELEMENTS are also used for fastening – wooden(tsars, corner jibs, pro-legs), metal(angles, staples and perforated plates).
Village benches are made using the panel method. 2 side panels (these are the legs) - connected to each other by a long board (these are the legs). The board can be located in the lower part of the interleg, or in the upper part of the interleg - immediately under the seat board. In the photo below we see both of these methods of positioning the leg under the bench.

As you understand, the shields you work with do not have to have a name correct form. These may be fragments of an old gnawed board - in which you cut flat support lines for SEAT AND BACK REST.
In the photo below, the solid shield acts as a support for both the seat board and the back board.

The principle is the same here - a solid support for the seat and back of a country bench.

And this beautiful white bench for the dacha is made according to the same principle. Only it is made from evenly cut panels and painted.

Below we see a panel model of a bench with a back, where 2 panels play the role of support for the seat and back.
And these supporting SIDE PANELS are made at a slight angle of inclination. And so the bench turned out to have a seat with an inward slope and a slightly reclined back. It is very comfortable to sit on such a bench.

And agree to do it, cutting out such a bench with your own hands is very easy. Here the drawing does not have to be accurate. Just do it to your heart's content. Easy side angle choose by eye.
- The side support of the backrest is in the form of a long triangle (choose the angle of inclination yourself).
- The leg support for the seat is in the form of an elongated trapezoid (can be tilted or not).
- A piece of thick timber is smoothed under the leg supports so that the bench has height. But if you have a wide board, then the legs will be higher on the bench, then you can do it without timber supports
All parts can be mounted on ordinary nails.
So that the bench isn't so low(if you wish) you can make the foot beams higher - knock together several pieces of timber at once - put them on top of each other like a tower and fasten them on the inside with a board (to keep them all together) or without a board just on nails.
And such a bench can also be PUT ON LEGS - also in the shape of an elongated trapezoid. The pads are stuffed on the inside of the seat support.

BENCH SHIELDS may be KNOWN (that is, not solid, but consisting of boards connected to each other with a bridge). The simple country bench with the photo below demonstrates this method.

And this garden bench from thick boards is also made according to the same principle.

Model No. 4
Benches FROM EDGED BOARDS
Do it yourself for the dacha.
And here's another simple model country bench. It is simple not only in design, but also in material. From one long edged board you can make a garden bench like this quickly and easily with your own hands.

It can be supplemented with armrests, covered with noble dark stain, or paint in a bright rich color.

On the sides of this type of country bench you can make stands for books, beer, those things with which you like to relax in the country.

Let's look at the drawing of this country bench. We see that all the corners of the board scraps have an inclination of 30 or 60 degrees. Dimensions in the drawing are in inches. One inch is equal to 2.54 cm.
We see the drawing from the side. The length of the back and seat is your choice.

We cut the board into the pieces we need. And we assemble the bench using bolts, screws or nails.

You can also make a table for provisions with such a bench at the dacha. Or a regular shield shop.

Model No. 5
Panel benches for summer cottages
WITH CURVED SIDE SHIELD.
The shields that you cut for the SIDEWALLS of your bench at the dacha can have SMOOTH ROUNDED LINES. Then the bench can become a real work of art - your creative work.

The seat in such a bench is supported by STRAPS padded underneath it on the inside of the sidewalls.
The back rests at the bottom - on the same bar as the seat, and at the top on a bar padded vertically along the back part of the curved sides.

The boards from which you cut out the figured sidewall can be processed along the edge, giving it roundness and smoothness (left photo below).
You can also cut out the curly sides not from an ordinary shield, and from carpentry with relief - the front part of a cabinet or an old paneled door. You don’t even have to remove the door handle - but leave it for beauty (in the right photo of the bench below).

Model No. 6
Slatted bench for a summer residence
How to do it yourself.
You can also make an interesting SLATT BENCH from the carved sides. They have a round seat with smooth outlines and a curved back line.
In the photo below we see just such a bench, convenient for a summer residence.
The curvature of the bench is obtained due to the fact that narrow slats are stuffed along the CURVING PERIMETER of the shaped side parts.
In the photo below we see a master class on making such a bench for a summer house. To ensure that the slats do not sag under the weight of a sitting person, another frame figured element is made for such a bench - in the center. All three parts are connected together into one common frame - simply by FITTING THEM ON THE SLOTS OF THE BOTTOM RACKS (as in the photo below).
And then on this frame along its upper perimeter we put slats on the screws.

If you want such a bench to be longer, then you just need to make not three figured models of the frame - but four, or five, or six. And of course, the padded slats should also be long.
Model No. 7
Quick bench –
from foam blocks with a cavity.
Foam blocks (or gas silicate blocks) are sometimes made with through holes inside. This is done to save material and also to enhance the heat-shielding properties of such a building material.
And we can use this “leaky” feature of gas silicate blocks - for the good purposes of creating a bench for the dacha.

To do this, we install 2 two rows of foam blocks WITH THE HOLES DOWN, and on top we put more foam blocks WITH THE HOLES TO THE SIDE. And we insert timber of a suitable cross-section into these holes. To make it more comfortable for your butt to sit on top, you can adjust it foam pillows. It is better to choose those that are lined with waterproof fabric. Or sew it yourself from oilcloth and thick foam rubber (sold in hardware stores and construction stores).
You can simply hammer the planks into a solid one to create a flat seat without holes.
It’s also good to coat the foam blocks with regular paint to create a bright, beautiful bench.

Here are some ideas for making country benches with your own hands. But that's not all the models wooden benches which I would like to tell you about. So wait for the continuation - we will do interesting benches made of wood (timber, boards and logs).
Your professional growth will not end here...
You will see how easy and quick it is to make a real building with your own hands - a large summerhouse. How to install poles, how to make a roof yourself (without any construction education), how to cover it with a roof (polycarbonate, slate, tiles). Stay with our “Family Bunch” - and we will give you “golden hands”.

Good luck with your dacha construction.
Olga Klishevskaya, especially for the site
If did you like this article
And you want to thank our free author for this painstaking work,
then you can send any amount convenient for you
on his personal YaD wallet - 410012568032614
A bench is simply necessary in a country house or garden. Its main purpose is a place to relax. Anyone who knows how to work should also be able to rest. Some people simply install a bench, while others create an interesting corner that will certainly invite you to have a good rest. You can just relax, or you can just enjoy surrounding nature and from the results of your labor. There are many ideas worth considering. Of particular interest are conventional designs, which can be repeated by anyone familiar with wood and owning a primitive set of tools.

Everyone can imagine what the most ordinary bench looks like, but not everyone likes simplicity and most opt for original solutions. Everyone wants to have something that, for example, a neighbor in the country does not have. Almost all summer residents start by decorating their country house or personal plot, and there are just as many options here. Alternatively, you can start designing the area by installing a bench, having previously decided on a resting place. After all, a place of rest is not needed later, it is needed now. Therefore, the design of this place should be tackled at the first stages of the process of decorating a summer cottage or personal plot, and only then proceed to the design of the rest of the territory.
As a rule, summer residents are very keen on growing various green spaces and flowers. Especially, there are a lot of them near buildings. Alternatively, you can combine plantings with a recreation area by installing a bench not far from the dacha. In this case, everything will look organic: green spaces, flower beds, and an original bench.
 Two flowerbeds made of boards and a bench between them
 There are a huge number of options: from the simplest to the most sophisticated. The simplest option may consist of two wooden boxes, in which flowers are planted, and two boards built between these boxes. The boards must be planed and well sanded. This structure can be placed directly next to the wall of the dacha. You can attach a couple of the same planed boards to the wall, which will serve as a kind of backrest. Instead of wooden boxes, you can install concrete cabinets, which can last much longer than wooden elements.

It is very simple to build such a structure, and most importantly quickly. As for the boards, you can buy them ready-made or make them to size yourself using untreated boards. But in this case, you will have to work hard, but the bench will not cost anything, and the result will definitely please you. If used concrete flowerpots for flowers, then the boards can be secured using metal corners. The only problem is the difficulty of drilling holes in concrete. Under no circumstances should you use a hammer drill, as a flowerpot, even a concrete one, will easily split, especially if it is made independently.

You can not fasten the boards, but instead of the boards put a huge log, which does not need to be fastened if it is installed correctly.
As mentioned above, there are many options, and they are created on the basis of the real possibilities that the owner of the dacha has. Alternatively, you can simply install a bench for relaxation away from flowers and green spaces. After all, it’s no secret that they hide in flowers and between the leaves of plants. various insects, which do not in any way encourage relaxation, but on the contrary, force you to leave behind the worst memories of your vacation.

As a bench, you can use hollow blocks, into the voids of which treated boards are simply inserted, which can serve as seats.

To make sitting comfortable, the sharp corners of the blocks should be rounded. It's good if these blocks turn out to be heavy and large. If the blocks are small, they can be pinned together into one piece.
Log bench
The site can be decorated in any style, but almost everyone moves away from standard approaches to solving the problem. Everyone wants to have something of their own. But not everyone knows that what is new is an improvement on the old. As an option for a new, but somewhat improved old one, this is the option of using a log as a bench. You can use a log as a seat large diameter, sawn lengthwise. A log of smaller diameter, also sawn lengthwise, is used as a backrest. Or a trunk with a smaller diameter, but cut closer to the edge. Narrow sections of logs are used as legs.
 Log bench - quick and easy
 The legs and seats are connected to each other using metal pins. Holes of slightly smaller diameter are drilled for the pins. The pins must fit into the holes with force. In this case, half of the pin is driven in by hitting the pin, and the other half is driven in by hitting the wood. As a rule, they do not hit the wood itself, since marks from the hammer may remain, but with the help of a wooden point. Such a connection must be reliable, although there are many mounting options.

In the photo just above, you can see another option, in the “ethnic” style. Its organization is associated with the presence of stone, although this option is quite feasible if there is a log. A fairly thick log is used as a seat, and a part of a large diameter log is used as legs. In one and the other part of the deck, grooves are cut out for the seat. An ax or grinder is used as a tool. Alternatively, you can use a chainsaw. These are not post-Soviet “Friendships” or “Urals”, which have significant weight, and are, perhaps, convenient for felling pine trees in Siberia. If you take the Calm chainsaw into service, then with its help you can make even lesser works of art.
It is possible to make a table from logs, which is simply necessary in the country. In the photo you can see the results of such actions. The tabletop is made of boards, and the rest of the ensemble is made of logs of different diameters.
 Table with log benches
 The next bench, built in this style, has a completely original design. Here, the legs and armrests are made of branches of various thicknesses, and the seat is made of processed, high-quality unedged boards.

Another bench is made in the same style. The only difference is that the boards and branches have the opposite direction. The result is a completely different look. As for execution, no special skill is required. The more careless the final result, the more valuable it is. In any case, this is how others perceive this approach. Most likely, people are tired of imaginary perfection and they prefer handicraft and primitivism.
 Wicker back - not seen often
 Alternatively, you can organize a rest area around the tree and install a bench.
 Relaxation area under a tree
 This is not at all difficult if you install a swing and a gazebo nearby. It is better to build a pergola, similar to an arch, above the bench itself. For good rest All that is missing is a pond, fountain or waterfall.
Benches made of metal and wood
As a rule, no one decided to build a bench out of metal. IN summer period they can heat up to such temperatures that it makes no sense to talk about rest at all. In case of cold weather, the picture is the same. The bench becomes so cold that it is impossible to sit on it. But benches using a combination of metal and wood are the most in demand. As a rule, the frame is made of metal, which ensures high reliability of the structure, and the seat and back are made of wood, which provides a certain comfort.
 Bench made of profile pipe
 If the design is improved and soft armrests are made, soft seats and backrests, as in the photo, then similar design can compete with the most modern options benches for rest. To make the seats, armrests and backrests soft, just cover suitable material furniture foam rubber. In this style it is possible to build a tabletop.
On a note! When using wood, it is advisable to leave gaps of up to 5 mm between individual elements. This is due to the fact that when humidity changes environment, the sizes of the elements also change.
 Stylish benches made of metal and wood
 In the process of creating a recreation area, care should be taken to ensure that there is no sharp corners, especially in metal structures. This is very important if you have children. All elements of the ensemble, such as benches, tables, garden chairs, are made from round and square pipe, bending them so that smooth transitions are obtained.
 Table and bench made of pipes and boards
 The presence of metal allows you to bend structures of any shape, although this cannot be done so easily and you need a special device. The presence of such capabilities allows you to bend structures in one go, without using other tools, such as a grinder and welding machine. The main thing is to think through the design down to the smallest detail. If wood is used, then only well-processed wood. Wooden elements should not be allowed to have burrs or chips.
Benches made of boards
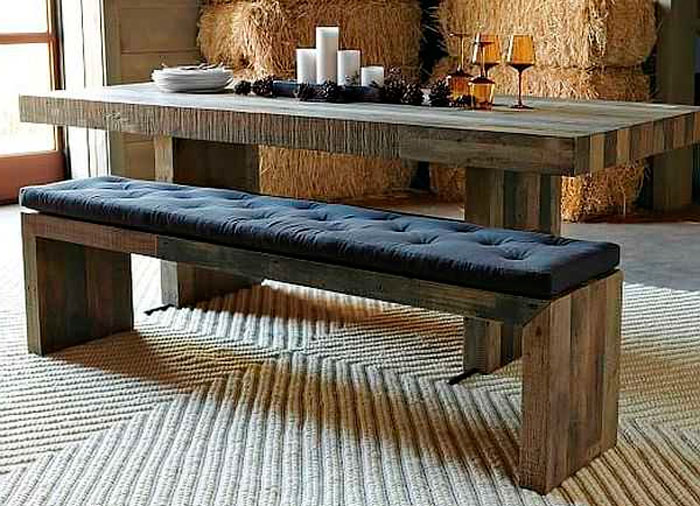
The most popular option is benches made of boards. There are quite a lot of execution options. There are even designs that look like sofas. If you put them on soft pillows, then you can lie down.
 This garden bench is more like a sofa: when sufficient size and you can lie down
 Garden furniture designs based on modern approach, assembled simply. As a rule, they consist of rectangles with partitions made of thinner wood, connected together into one whole.
If you stretch your imagination and put it to work, you can build a work of art from an ordinary bench if, for example, you install wooden wheels instead of legs and armrests.
 A bench made of boards with a back and wheels instead of sides - looks interesting
 One of the most simple designs The country bench consists of one board, to which legs are attached in the shape of the letter “X”. Our ancestors built similar shops, although they can still be found today.
 Traditional bench design
 Using wood, you can build a bench in the shape of the letter “P”. In this design it is very important to ensure reliable fastening seat and legs. This option involves the use of a thick board or timber for reliability. As an option, you can install the board “on edge” for greater rigidity, and for greater reliability it is recommended to fasten it using metal corners.
This photo shows an option where the cut is made at 45 degrees. By using special tool it's not difficult to do. If you connect all the parts, you get an angle of 90 degrees. If the board is thick and the seat does not sag, then the bench will last quite a long time.
In the photo below you can see another option interesting solution, which is characterized by increased reliability. Boards of different lengths are used as legs. The difference in length is the thickness of the board: every second board should be shorter. The structure is connected using nails. Moreover, through one board, the nails are driven either into the board for the seat or into the board for the legs.
 Modern style bench
 Original solutions
Along with the classical approach to the process of making benches, there is also an original one, although solving such a problem requires appropriate materials and tools.
For example, you can also build a bench from a large stone if you attach an appropriate wooden platform to it.
 Bench made of stone and boards
 If bamboo is available, a seat is also made from it, which will take on a more exotic look.
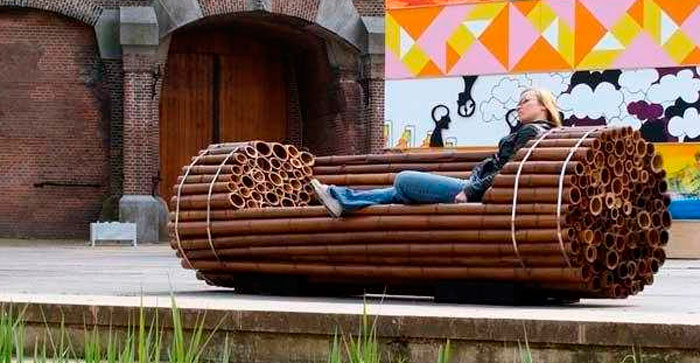 Made from bamboo, and whole
 Or a stone.
 Sitting in winter will be unpleasant, but beautiful...
 It all depends on the flight of fancy. A real owner does not have unnecessary things or materials in his dacha. With a reasonable approach, you can attach any thing, and it will not just lie around in the country or lie like a dead weight in the garage or shed.
How to make a bench: photo reports
Naturally, not every owner has a set of tools for making stone benches, but everyone has minimum set tools for working with wood, especially since they are very simple and available tools. Therefore, it makes sense to consider wood structures. Everything that is done with one's own hands is ultimately a source of pride.
Bench without back
The design, although simple, has quite spectacular look due to the material used. The legs are made from timber with rounded edges. As a last resort, such a beam can be prepared independently from round logs of small diameter, trimming them on 4 sides. The result will be the same timber. Therefore, there should be no problems with the construction of the bench. The legs of the bench will be made from this material. To do this, you should lay the cut beams flat (horizontally) one on top of the other. It is this design solution that brings a certain exclusivity to the design.
 Simple shop looks interesting due to the material
 The bench without backrest is 120 cm long, 45 cm wide and 38 cm high. It is permissible to round the edges of the beam in any way. In order not to strain too much, you can already find a ready-made, profiled beam. Although it will cost much more, it is a pleasure to work with it.
Depending on the size of the bench, it is not difficult to calculate how much timber is required. If you take a beam with a cross-section of 70x70 mm, then with a height of legs of 380 mm, it is enough to place 5 beams on top of each other. We calculate: 45 cm multiplied by 5 pcs. and you get 2.25 m of timber. Since there are 2 legs, there will be 2 times more timber, which means 4.5 meters of timber. A board 40 mm thick and 90 mm wide is used as a seat. Given the width of the bench, you will need 5 boards, 1.5 meters long. If you calculate more accurately, you will need 1.2 m x 5 pcs. = 6 m of board.
At the first stage, boards are cut according to size. In this case, it is necessary to round off all sharp edges. To do this, you can take a plane or just coarse sandpaper and carefully process the boards. In order not to have to do much yourself, there is another option: you can simply negotiate at the sawmill and get a well-processed board, especially since they have all the capabilities for this. All that remains is to take them and coat them with varnish.
 Treated boards
 After this, they begin to manufacture the legs, for which the beams are cut into identical sections, 45 cm long, after which they are stacked one on top of the other in 5 pieces. The next stage is connecting the legs for stability. In this case, the beams can be fastened with metal pins or wooden dowels. The distance between the fasteners is 7-10 cm. As a rule, such a connection is made using glue, then the connection is more reliable.
 Lines where the pins will be installed
 The pin connection requires precise drilling of the holes, otherwise the beams will not be on the same line. For this, it is better to use a template. In addition, the dimensions of the leg elements must be the same, then it will be possible to accurately mark the location for drilling holes. For those who are familiar with drawing, tape measure and pencil, it will not be difficult to do everything correctly.

The pins should be installed in a staggered pattern, so it is necessary to mark with this feature in mind. In the same way, the boards are attached to the legs at the rate of two holes per board.
If you look from a technological point of view, this is not a bad connection option, but it requires some skill and experience in working with wood. The connection stage can be simplified if the bars for the legs are stacked one on top of the other and firmly connected them using a clamp. Then drilling accuracy will be ensured. Alternatively, the beams can be connected using long metal pins and nuts with washers. In this case, it is enough to drill 2-3 holes through.
The seats can be nailed to the legs, which greatly simplifies the entire manufacturing technology of such a bench.
 The bench was made by hand. Finishing work remains
 When using nails, it is advisable to hide the heads, as they will then rust, which is completely undesirable. To do this, hammer the nails so that the heads are hidden almost 5 mm deep into the wood; for this, you can use a guide. After this, putty is taken, a little sawdust is added to it to match the color, and the recesses are puttied. After complete drying, the areas are carefully sanded with sandpaper. So that the place where the nails are driven does not stand out against the general background, they are coated with a suitable varnish.
Varnish opening technology wooden surfaces quite simple, especially since it is described in detail in the instructions for use.
Bench for a summer house made from broken chairs
If you have two old chairs and don’t have enough imagination to adapt them somewhere, then you can make a bench out of them. Only the same ones and strong enough will do. If they are loose, they will have to be repaired. The chairs are disassembled so that the backs and legs remain. After this, two chairs, or rather what is left of them, are installed side by side and their backs are connected using slats of the appropriate thickness.
 Bench made from old chairs
 To make the structure rigid, at a height of 20 cm from the floor, the structure is tied with the same slats along the entire perimeter. Subsequently, these slats will serve as a footrest, and if the bottom is sewn up, for example, with plywood, then you can store some things here.
 We paint the completed structure
 After the structure has been strengthened and sanded, it can be painted. In this case regular one will do paint that can hide some flaws in the entire structure and especially in old chairs. All that remains is to cut out a sheet of plywood, lay foam rubber on it and cover it with some fabric. At the same time, one should take into account the fact that the bench will mainly stand outside until the coldest weather. Therefore, it is better to opt for, for example, leatherette. In any case, the material must be moisture resistant.
 Finished bench made from strusses
 Garden bench chair made from pallets
For a reasonable owner, any material has its own value. Garden furniture can be easily made from cargo pallets. Moreover, there is no particular need to disassemble them: the back is made from one pallet, and the seat from the other. All that remains is to think about what to make the armrests and legs from.
 This is what should happen
 One of the pallets is reinforced with additional bars, which are secured with self-tapping screws.
 Strengthening the corners of the pallet
 After this, a beam with dimensions of 100x100 mm and an arbitrary length is taken, after which 4 identical sections are cut, up to 80 cm long. They are attached in those places where the reinforcement bars, placed in advance, are located. As a result, legs 20-25 cm long will be sufficient. Self-tapping screws with a length of at least 150 mm are used for fastening. During the work, you need to make sure that the bars are screwed correctly so that you can install legs of the same length.
 Screwing the legs-supports for the armrests
 If after these steps it is not possible to obtain a completely flat structure, then the legs can be filed at the end if the bench does not sit level.
 The legs are screwed
 The second pallet is attached to the rear pillars, and on both sides there are boards for the armrests.
 Almost done
 If there are no such plans, then you can simply carefully process wooden elements sandpaper, after which the bench is simply painted with any paint, any color.
 Finished product: pallet chair
 Working drawings of wooden benches