Homemade tools for the workshop. Homemade instrument. Homemade machines and devices for the home workshop - a detailed review Useful do-it-yourself mechanisms
Any owner of a workshop, even if it does not have a separate room and is simply organized in a garage, strives to equip it with everything necessary for comfortable, productive and, most importantly, high-quality work. But nowadays you can’t “get far” with a hand tool. A great variety of power tools, various multifunctional or narrow-profile machines, auxiliary equipment. There are no problems with supply - the main difficulty is that high-quality products cost a lot of money, and not everyone can afford it.
But craftsmen find a way out of the situation by making such machines and devices on their own, some of which may well compete with factory models. Moreover, to create such equipment, quite accessible materials are used, often just collecting dust in the barn. And running power tools, usually found in any workshop, are widely used as drives.
This publication will discuss only some homemade machines and devices for the home workshop. It should be correctly understood that it is simply impossible to cover all the available variety of such equipment within the framework of one article. It’s time to give this topic a separate site altogether. So it will be given basically general review. But the production of two models, very important, probably, for any workshop - a pendulum saw and sharpening machine for a cutting tool, we will consider it step by step, with all the nuances, from the first outlines to testing.
The basics are a convenient workbench and organized storage of tools and accessories.
The comfort of working in the workshop depends on many important conditions. If we take the issues of heating, ventilation and lighting out of the picture (these are topics for separate consideration), then the rational, convenient organization of the main workplace always comes to the fore.
We are talking about a workbench and a well-thought-out storage system for tools, accessories, consumables and other small items necessary for work.
The workbench is selected or made independently, depending on the main direction of work in the workshop.
“Classic” carpentry workbench
If the owner is more focused on wood processing, then he will need a carpentry workbench. There is a long-used and extensively tested general concept for such a workplace. It probably makes sense to stick to it when making your own workbench.
The workbench is based on powerful wooden legs (item 1), which at the bottom, at the base, are usually connected in pairs by support bridges (item 2). There is a cover on top - a workbench board (item 3). As a rule, a recessed area is provided - the so-called tray (item 4) so that during work the tools or components necessary at hand do not fall on the floor.
Usually with right side there is a side or rear clamp (pos. 5). In essence, this is a screw vice, which has a wedge that extends upward (item 6). Along the line of this wedge along the bench board there is a row of slots (item 7) for similar wedges (they can be hidden in these slots or stored separately and inserted as needed). This allows for rigid fixation for processing. wooden blank between the wedges of the table and the side vise.
To secure a long part that cannot be secured between the outer wedges, use the front clamp (item 8). This is also a screw vice that is capable of clamping the workpiece between the front end of the workbench and a movable wooden jaw. And in order for the long part to have the necessary support points from below, fingers or retractable supports hidden there in the grooves extend from the end of the workbench (item 9).
The lower area of the workbench is called the underbench (item 10). As a rule, there are powerful crossbars (legs) that connect the legs of the layout in pairs in the longitudinal direction. These crossbars often contain shelves for storing tools or workpieces, or even, as shown in the diagram shown, a closed cabinet.
Below is a drawing of the workbench. Anyone who knows how to read diagrams and has carpentry skills will be able to make such a model on their own.
To begin with - general wiring diagram carpentry workbench with dimensions.
Now - a series of drawings for individual parts and components of the structure.
For the manufacture of underbench (base) parts, as a rule, high-quality coniferous wood with a residual moisture content of no more than 12% is used.
The bench board (cover) is mainly made from hardwood - it can be beech or oak, ash or maple. Making such a massive dimensional panel yourself is an extremely difficult task, so often a ready-made laminated board is ordered or purchased from a carpentry workshop. This is unlikely to seem like an overly expensive solution, given the cost of the material and the complexity of the process. So it’s more profitable to purchase a finished product, and then modify it for a workbench.
By the way, when performing various processing operations, one way or another, the surface of the desktop will be damaged. To maximize the life of the workbench, the lid is often covered with a plywood or fiberboard sheet (naturally, according to the size of the table and with all the necessary grooves and sockets). As this coating wears out, it can be replaced with a new one - this is not so difficult and inexpensive.
Particularly difficult is usually the installation of the front and rear (side) clamps. In order to get truly functional and convenient devices, it is better to purchase the screw mechanism of the vice itself in a ready-made, assembled form. There are many models suitable for this purpose on sale.
To assemble these clamping units, you can use the following drawing as a guide:
Vise jaws must be made exclusively from hardwood, the dimensions and location of the holes are shown in the drawing. (It should be correctly understood that the location and diameter of the holes must correspond to the purchased screw mechanism).
And finally, the last diagram shows how to attach the rear fixed jaws of both vices to the workbench lid.
Of course, an example is shown here, and it may suit many in its “pure form,” that is, without changes. But if other dimensions are required (based, for example, on the available space), then you can draw up your own drawing, taking the demonstrated diagrams as a sample for assembling certain components. The principle still remains the same. If necessary, no one bothers to make improvements, which, of course, should not negatively affect the strength of the structure.
Video: mechanic's workbench with his farts
If the master plans to mainly engage in metalworking operations, then he will need a completely different workbench, designed specifically for such purposes. Here, in contrast to the carpentry “classics”, there is an innumerable amount possible options. As a rule, steel profiles (angles, channels, profile pipes) and sheets are used for production. One of the quite worthy options is shown in the video below:
An important component of comfortable work in the workshop is always an optimized arrangement and storage system for tools and accessories. But we will not dwell on this, since a separate article is devoted to this topic on the pages of our portal.
How to make the workshop as comfortable as possible for work?
It’s convenient when you know where everything is and when the necessary tool is always at hand. So you should pay close attention to the system of cabinets, racks, cabinets, and intelligently organized storage areas Supplies. This is especially important in cases where the size of the room does not allow for “clearance”. There is a special publication dedicated to questions on our portal.
Homemade machines and equipment
As already mentioned, the variety of homemade machines is extremely large, and it is simply impossible to talk about them all. Therefore, in this section of the article the reader will be offered several video reviews. And, in addition, the manufacture of two models of machines will be considered in detail, step by step.
Video - miniature wood lathe based on an electric drill
On the farm, there is often a need to turn one or another wooden part with a round cross-section. If you don’t do this professionally, then purchasing a real lathe is completely unprofitable. And it will take up a lot of space. But having at your disposal a miniature machine that can be stored in a closet and assembled as needed will never hurt. Moreover, its manufacture is not such a difficult matter.
You can verify this by watching the proposed video. Despite the fact that the author speaks English, all his actions are shown in detail and are quite understandable. And such a machine, guided by this video tip, is within the power of anyone to make.
Video - a circular saw based on a manual vertical electric saw
If there is a need to prepare a considerable number of wooden parts of the same size, then you can’t think of anything better than a stationary circular saw. And it is quite possible to make such a machine, and, again, in a collapsible version, which, due to its uselessness, does not take up practically any space at all.
All you need is a sheet of plywood, a few blocks and screws. And the main element of the design is a hand-held vertical saw
In the plot shown, the master removes a part protective fence manual circular saw. This is not always necessary. It is quite possible that the free exit of the saw will be enough if you plan to cut not too thick workpieces.
Pendulum saw from an angle grinder - DIY production step by step
When cutting workpieces or wood or metal, including profile or round pipes, high precision is often required. Moreover, the accuracy is not only in linear dimensions, but also in the cutting angle. A typical example is when it is necessary to accurately cut blanks for a frame in which the joining of parts is either strictly perpendicular or at an angle of 45 degrees.
A pendulum saw allows you to perform this operation. The diagram above shows in a simplified form the principle of its structure and operation.
In any case there is solid foundation(bed, frame), ensuring the stability of the machine (item 1). In many models, a work table with a system of guides, stops and clamps is organized on top of the bed, allowing you to accurately align the workpiece. There must be a slot (item 2), exactly into which the rotating circle or saw is lowered.
The support (item 3) of the swinging part of the machine is rigidly attached to the frame. It is equipped with a bearing block and an axis (pos. 4), relative to which the swinging platform-rocker arm (pos. 5) rotates. An electric drive (position 6) is located on this platform, transmitting rotation directly or through a transmission system (position 7) to the cutting tool - cutting wheel or circular saw(pos. 8). A lever (item 9) or handle is provided, with which the master can smoothly lower cutting disc down onto the workpiece mounted on the work table above the slot.
But the capabilities of this tool will become immeasurably wider if a special one is made for it. milling table. One of the options for such a homemade machine is in the proposed video.
Homemade machine for sharpening cutting tools - step by step
In the workshop, in the kitchen, and just around the house, a lot of cutting tools are used that need regular sharpening. Walking disc knife sharpeners provide a very short-term effect of sharpening the cutting edge, since they remove metal along the edge of the blade, and according to all the rules it is required - perpendicular to it. When sharpening manually using whetstones or on a rotating sharpener, it is very difficult to accurately maintain the optimal angle, especially so that it is equal along the entire length of the blade. By the way, this full sharpening angle is different for various types cutting tools - there are many separate publications on this topic on the Internet.
This means that in order to sharpen, for example, a knife with high quality, a device is required that would allow applying force with the translational direction of a flat abrasive perpendicular to cutting edge consistently along its entire length with a single, pre-inserted angle of inclination. And to provide visual control over the progress of the formation and sharpening of this cutting edge.
There are many such devices available for sale. But if there is a desire, then a similar machine can be made independently, using materials that may be found in a workshop or garage. Yes, if you buy what you need, it will be quite inexpensive. An example is shown step by step in the table below.
| Illustration | Brief description of the operation performed |
|---|---|
| The entire structure of the machine, all its parts and components will be attached in one way or another to the base - the bed (frame). A profile pipe is well suited for its manufacture. square section 20×20 mm… |
|
| ...with a wall thickness of 2 mm. As will be clear later, there are no strict proportions of sizes - they are based on considerations of common sense, the strength of the structure being created, and the availability of certain materials. |
|
| Blanks for the frame are cut from a profile pipe using a grinder: two pieces 250 mm long, and two more - 130 mm. | |
| In this example, the master will adjust the joining sides of the frame at an angle of 45 degrees. This requires a precise cut, so it is best to do it using a cutting machine. If it is not there, nothing prevents you from making the frame simpler, that is, placing its sides end-to-end. Then, instead of 130 mm, the small parts will be only 90 mm, since they will fit between the large ones. This will not affect the functionality of the sharpening machine in any way - the only thing is that there will be some loss of aesthetics. |
|
| This is the frame we got after preparing the parts. | |
| The cut edges can be slightly adjusted, deburred, and a small chamfer for the weld seam can be cleaned. | |
| Then the frame is assembled on one side and welded along short vertical joints with a continuous seam. The seams are cleaned of slag and sanded with a grinder. |
|
| Welded frame corner after cleaning. You can, of course, immediately boil it on both sides, but the master simply decided to supplement the frame with height-adjustable legs and stands. The operation is optional - it is quite acceptable to install the machine simply with the frame on a flat surface. But with stands, of course, it’s more interesting. |
|
| This adjustable leg with a nut is easy to find in any furniture hardware store. The nuts will just be welded into the corners of the frame. |
|
| Holes are drilled in the corners into which the nuts will be placed before they are scalded. | |
| The nuts are inserted into the holes - this operation is carried out at all four corners of the frame. | |
| Now on one side of the frame (on its small side) you need to weld nuts into which the vertical stand of the machine will be screwed. To do this, at an equal distance from the corners, initially thin (3÷4 mm)… |
|
| - and then the upper wall of the frame is drilled with a drill of 10 mm diameter. | |
| What is important here is stability, the stability of the assembly’s fastening, that is, you can’t get away with just a few turns of thread. Therefore, extended M8 nuts will be welded into the holes made. It is advisable to first machine their lower edge under the cylinder so that it fits tightly into the drilled holes. |
|
| In fact, only one such socket is required to install the machine. But it is better to provide two symmetrical ones - who knows, perhaps in some cases it will be more convenient for the user to move the stand to a different position. This will take no more than a couple of minutes. | |
| After this, all the nuts are scalded. When tacking, you must ensure that the nuts do not move and are level. To do this, they can be held with a temporarily screwed-in long pin, controlling its position perpendicular to the plane of the frame. In addition, this measure reliably protects the thread of the nut from splashes of metal. |
|
| Here's what happened: on the top side of the frame there are two welded nuts for the struts... | |
| ...from the bottom there are four welded nuts in the corners for screwing in the adjustable supports. By the way, if the master has threaded rivets at his disposal required diameter(M6 for the supports, and M8 for the rack), then you can get by with them, that is, avoid the operation of welding the nuts. |
|
| The next step is to make a shelf on which the cutting tools will be fixed with a pressure plate. It can be made from a thick steel plate. But the master decided to give it a slight reverse slope, so he cuts it out from a corner with a 63 mm shelf. The length of the part is the width of the frame, that is, 130 mm. |
|
| First, the required piece of corner is cut off. Then it is clamped in a vice to cut one shelf evenly with a grinder. |
|
| This is how this platform will be welded to the frame. | |
| After welding, the seam is thoroughly cleaned. | |
| Knives and other cutting tools will be fixed to this area with a pressure plate. And for this you need to prepare two holes with M8 threads. It is advisable to space them wider so that you can, for example, clamp planer knives and other similar cutting parts between them. First, holes are drilled with a small diameter drill - 3 or 4 mm. |
|
| Then - with a drill for M8 thread, that is, with a diameter of 6.7 mm. | |
| After this, the thread is cut with a tap. | |
| The next operation is the manufacture of the pressure plate. For it, it is better to take thick, 3÷4 mm, stainless steel. It is less susceptible to deformation than conventional carbon steel. The size of the plate must correspond to the dimensions of the supporting platform. |
|
| The edge that will face the cutting edge of the tool is ground beveled to prevent it from being touched by the abrasive during sharpening. Next, two holes are drilled on the plate for M8 screws - strictly aligned along the axes with threaded holes in the support area. These screw holes can be modified to be countersunk. |
|
| The frame is completely ready, and after cleaning and degreasing it can be coated with paint from an aerosol can. While the paint dries, you can work on other components and parts of the machine. |
|
| A steel rod with a diameter of 8 mm will be used for the stand and working rod of the machine. First you need to clean it thoroughly - polish it with sandpaper. The master suggested this option - with clamping the rod into the drill chuck and holding the paper in your hand. Let's be honest - it's not a completely safe way. |
|
| Rod after polishing. It is divided into two sections - one 450÷500 mm long, the second 250÷300 mm. |
|
| An M8 thread is cut from one end of each rod. On a short rod there is a threaded section approximately 20 mm long - this is for screwing into the welded nut of the frame. |
|
| On a long rod there is a thread 40÷50 mm long. It is necessary for screwing the handle. | |
| The next step is to make the clamps that will hold it on the rod abrasive stone. They are made from extended M10 nuts. First, you need to use a core to mark the center of the through hole, with a distance of 12 mm from the edge. |
|
| Then, very carefully, strictly perpendicular to the nut axis, a through hole with a diameter of 8 mm is drilled. | |
| You need to cut a quarter off the other edge of the nut. This is done with a hacksaw for metal in two steps. First, a transverse cut is made to the center... |
|
| ...and then - longitudinal. You need to prepare two of these nuts. |
|
| Short M10 locking bolts are screwed into the nuts - and the clamps are ready. This is what they will look like. |
|
| After this, the clamps are put on the bar. Between them fits into the cut out quarters whetstone, and this entire assembly is fixed with clamping bolts. That's it, the rod is assembled, you can move on to the next unit of the machine. |
|
| There should be a unit on the rack that provides an upper point of support for the rod. In this case, the translational movement of the rod back and forth, and a degree of freedom left and right, should be ensured. In a word, this is a kind of hinge, the height of which on the stand will precisely set the sharpening angle of the cutting edge. This unit will again be manufactured on the basis of an extended M10 nut. To begin with, a through hole with a diameter of 8 mm is drilled in it - exactly the same as on the nuts that were used for the clamps. |
|
| Then comes a rather complicated operation. It is necessary to first drill a hole with a diameter of 6.7 mm through the head of the M10 bolt, and then cut an M8 thread in it. The bolt itself will be screwed into the nut, and the ring from the anchor will be screwed into the hole. This ring will act as a hinge. |
|
| This is what the unit looks like assembled. From the side of the through hole, an M10 bolt is screwed into the nut, with the help of which the unit will be fixed to the vertical stand. |
|
| It must be said that such a hinge in the “light version” is not the most successful, and is justified only by the availability of parts. But the working rod produces quite a significant amount of play, which can affect the accuracy of maintaining a single sharpening angle along the entire cutting edge of the knife. A more perfect solution would be to use a ready-made fish-eye joint - such details in large assortment are presented in online stores, and their cost is not so high. It is quite possible, probably, to do without complex operation drilling a hole in the head of the bolt and then cutting the thread - if you are lucky enough to purchase a hinge with a suitable threaded part. Then for the connection it will be possible to get by with a short hairpin. But for now we are considering it as the master suggested. |
|
| All parts are ready - you can proceed to assembling the machine. | |
| Support legs are screwed to the bottom of the frame. Their height is immediately adjusted so that the machine stands stable - on all four points. |
|
| The vertical stand is screwed in. | |
| A hinge assembly is placed on the stand and secured at a certain height with a clamping bolt. | |
| A pressure plate is placed on the support platform. Two screws are attached that will secure the cutting tool in this clamp. | |
| All that remains is to thread the free end of the working rod into the hinge ring - and we can assume that the machine is ready. | |
| The master decided to immediately try it at work. To begin with, sharpen this knife with a completely “dead” cutting edge. |
|
| The knife is placed between the support platform and the pressure plate. The cutting edge is approximately parallel to the short side of the bed. Fixation is carried out by tightening two screws. |
|
| The working rod is inserted into the hinge. The hinge itself is adjusted in height to ensure the required sharpening angle. The sharpening process begins - first with the first, large block. As you work, you can observe how a uniform cutting edge is formed along the entire length of the blade. |
|
| Then the block can be replaced with another one, with a fine abrasive, to bring the sharpening to the maximum sharpness of the cutting edge. | |
| The result of the work is first visual... | |
| ...and now with a demonstration of the degree of sharpening of the cutting edge. A loose sheet of paper can be easily cut into strips. |
|
| By changing the height of the hinge unit, you can sharpen the plane iron in the same way... | |
| ...or even an ax blade. If it is temporarily not needed, the machine itself can be easily disassembled by removing the bar and unscrewing the stand. In this form, it will take up very little space in the closet or on the shelf. |
It makes sense to add a few more touches.
- Many factory-made models are equipped with a scale on which the required sharpening angle of the cutting edge is set. It’s not difficult to come up with a similar device yourself, for example, like the one shown in the illustration. A plate perpendicular to the plane of the supporting platform, and a removable ruler with a protractor screwed to it.
After clamping the knife in the clamp, it is enough to apply a ruler to the cutting edge and to the hinge point, align the central mark of the protractor with the platinum, and take the angle readings using the same platinum, counting it from 90 degrees.
Important - the full sharpening angle is made up of the angles on both sides of the blade. That is, if an angle of 30 is required°, then sharpening on one side should be carried out at an angle of 15°.
They do it differently - instead of a protractor, you can fix a sector on which signed marks have been made in advance, for example, “ kitchen knife", "table knife", "chisel", " ", etc. That is, it will be enough to select the height of the hinge so that the bar coincides with the applied mark.
Another option is marks on the vertical post. True, in this case, uniformity in the placement of knives in the clamp is required - so that the cutting edge always protrudes at the same distance from the edge. Not quite convenient.
And the simplest option is to make several templates from thick cardboard or thin plywood, labeling them which cutting tool this corner is intended for.
In a word, by showing intelligence it is not difficult to significantly simplify bringing the machine into the desired working position.
- You can also make a note about fastening the bars. If they are supposed to be changed during sharpening, then they must have the same thickness, otherwise the angle will change. Many masters advise other approaches. Instead of bars, they have several steel plates of the same size prepared. Abrasive paper is glued to the plates. The two sides are already two different levels of grain. That is, you can prepare a kit for all stages of sharpening: from rough shaping of the cutting edge to polishing it.
Another one interesting idea in this regard - not a plate, but a section of a profile square pipe 20x20 mm. The four sides are four different abrasives. As you work, just turn it over to the right side...
- One more nuance: it doesn’t hurt to ensure your safety at work. It will be very unpleasant if, during a forward movement, your hand falls off - and carefully with your fingers along the cutting edge. So some kind of protective guard will not hurt here, which you can come up with to your taste.
A home-made tool sharpening machine will certainly be very useful in any household.
* * * * * * *
We can say that in this article we have only scratched the surface of the topic of homemade machines and devices. We will be glad if readers send their wishes: whichever tool they would like to see in detail - we will try to satisfy their requests. And it’s even better if one of the amateur craftsmen shares their secrets on the pages of our portal. Published reviews from visitors are required to be paid.
The master is not distinguished by greed, which some masters suffer from, who do not want to share their finds with others and, like a dog in the manger, neither to themselves nor to people. And this self-taught inventor came up with a great device with which you will always be at your best and can even improve your standard of living. Why, you can put such a tool into production and sell it to everyone. Maybe this is too strong a word, but it’s worth thinking about automating and mechanizing all routine work at home.
8 tools for craftsmen.
You probably haven't seen many of them. Cool instruments are created by DIYers. These devices will help you work more comfortably in the workshop. The video was filmed on the “Hands from Shoulders” channel.
Folding table for the master
1. Let's start with folding table, which will be an excellent assistant in a small workshop. It will help save an already small area. The table has a compartment for all small things. A shelf on which you can lay out the necessary tools. Thanks to the large number of holes, a clamp can be used to quickly and conveniently fix the workpieces. Stops are inserted into them. It is convenient to fix the parts in a vertical position. If we insert it into the guide bolts, we get additional stops. Having a set of clamps and such a table, you can comfortably perform a variety of jobs.

Homemade folding stand
2. A very original idea for a folding stand for hand tools. Everyone is in their place. It doesn't take up much space. The design is based on furniture guides. The stand is held in the upper position. Neodymium magnets prevent instruments from falling out of their stocks. Great idea for DIYers who love to do everything with their own hands.

Apple puller
3.Gardeners will be interested in the fruit puller. Its advantage over analogues is that it is absolutely free and easy to manufacture. Not hard to find at all plastic bottle, rope and cut the stick. 5 minutes and you can go for apples.
Homemade apple press
4. If the harvest is large, then the question arises, where to put it? Great option - Apple juice. For store-bought juicers, apples need to be cut and peeled, which is inconvenient. The grater shown below can handle whole apples. All that remains for Dali is to squeeze out the resulting mass under pressure. As a result, we get natural, tasty juice and almost dry cake.

Tool trolley
5. The mobile tool cart is very convenient for the workshop. When, for example, the workbench is littered with parts. Or it doesn't exist at all. By loading everything you need at the moment into it, you get the entire tool in one place at hand.
What can you make from an electric planer with your own hands?
6. Another interesting planer design is based on an electric planer. With the help of guides it moves in 2 planes. The movement takes place using an elevator. For precise adjustment, there are rulers on each side of the device.

Grinding device
7. Having a jigsaw, you can get a cool sanding tool. Interestingly, it is not the abrasive that moves, but the workpiece itself.

Cheap homemade grinder
8. The most budget version of the grinder, created by the Samodelkins. Plastic bottles are used as rollers. They are mounted on bearings. The belt on the rollers is adjusted using thumbwheels. The tension is adjusted with a bolt. The structure is driven by a drill. You can slightly improve Samodelkin’s design by replacing plastic bottles with polypropylene tubes.

The self-taught self-made man rocked the network with his video

The self-taught inventor captivated the online community of craftsmen with his video, in which he presented a fundamentally new utility model for improving the efficiency of work for craftsmen and those who like to work in the garage. The best part is that it doesn't require you to buy an idea. And what’s more, you can do all this yourself and even a novice master can handle it. All this is to the benefit of every resident of the cities in which the masters have settled, because with such a high level of skill, now you won’t want to hammer the walls of your house on weekends or rattle some kind of ultra-decibel grinder unknown purpose. With such a device, you can safely create your own separate workshop and live the rich life of a Russian craftsman.
Homemade tool rocks the internet

This video shook up the community of invention lovers on the world wide web. The master thought about this idea for years and finally brought to the public discussion an idea that was ingenious in its simplicity and radically profitable for those who used to chisel walls with a hammer drill, realize their inclinations as a woodpecker and a brilliant builder-grinder, and now can make themselves rich for free, working in silence a workshop in a garage or even in a separate building.
And at the same time, you don’t have to spend money and take money saved for beer out of your stash. All this is free - the master loves to show the whole world the useful things he comes up with.
Uprooting of seedlings and weeds from a square for homemade people
Good afternoon My long absence from the channel was not in vain; during this time I managed to do a lot of household chores. And of course, I stocked up on a bunch of homemade products that I will show you, my dear subscribers and guests! There is no point in posting everything at once, because this also takes a lot of time, but if possible I will try to post at least one per day. Not only am I sitting at the computer, I can’t leave my workshop. Messing around in the garden is another hobby of mine; I spent a lot of time there in the summer. Caring for plants and weeding, although a pleasant activity, however, also requires a lot of effort. And how I would like to make a lot easier. Wanting alone is not enough, so you need to make useful things yourself that will make your work easier and make it a pleasure, rather than hard labor with a farmhand.
Today I’ll show you a device that I successfully used almost all spring and summer and will, God willing, last for more than one season. Do-it-yourself uprooter To make it, I took a square with walls 40 by 40 mm, 220 mm long. I didn’t cut this length on purpose, I had a lot of such scraps left over from others construction work.  I drew two oblique lines along the walls to the corner of the square. Having cut it out, it turned out to be such a spear. In inner part welded a pipe with a diameter of 25 mm using an angle. From the outside I welded a square right in the middle of the square. Instead of a square, you can weld a square, but it seemed to me that it would be more convenient.
  A metal handle was installed in the pipe so that it would not break under load, because the force falls mainly on the handle. When working with a flat cutter, some types of weeds still germinate after a certain time, especially after rains. And having ripped it out by the roots, I eliminated this possibility and my garden became well-groomed and beautiful. Without damaging the root system, they can also remove seedlings for replanting, which is what I did at the beginning of the season with strawberries and other plants.
A simple cheap homemade device for picking berries

Gooseberries are a tasty and healthy berry. The plant itself is quite unpretentious and does not require any special care. The berries grow large and are quite convenient to pick. And everything would be fine if it weren’t for the prickly gooseberry branches. Because of these garden “cacti,” my hands used to constantly have small scratches. And several times you will think “do you need it - there are so many berries” before you climb deep into the bush for the harvest. But a few years ago my husband made my life easier. He spotted something very simple on the Internet, but useful device for picking berries. What is it used for and how is it useful? 
In fact, such a picker can be used not only for collecting gooseberries. I also use it to pick any other berries/fruits. hard to reach places oh, where you can’t easily reach with your hand. For example, to remove plums, cherries or apples from high branches. How to make a device for picking gooseberries? Everything ingenious is simple! Take a plastic bottle and cut a droplet-shaped hole on the side. Depending on what berries/fruits your picker is intended for, this is the diameter of the drop. For gooseberries, 5-7 cm is enough, for apples and plums, more so that you don’t have to aim for a long time and try to hit the fruit. The volume of the bottle will also depend on what you are collecting. For berries would be better suited bottle 0.5 l. 
The droplet's nose should be directed towards the bottom of the bottle. You can also make a cut a couple of centimeters in continuation of the spout so that the branch can be better grasped. That's it, our device is ready! We will pick berries by holding it by the neck.
It really is much easier to do this with him. Not only do your hands remain scratch-free, but the work also goes faster. After all harvested will be poured into top part bottles. Accordingly, there is no need to “climb out” from the bush after each berry, put the harvest in a can or jar and climb again. Plus, we can get berries even from the most inaccessible places. And the most important thing is that such a device is made in 3 minutes, does not cost a penny, and makes life much easier. If it gets lost or gets dirty, no problem – we’ll do another one without any problems! So, gardeners, take action! If the article was useful to you, give it a “thumbs up” and subscribe to the channel for summer residents and gardeners “SADOёZH”.
Order in the house depends not only on whether every thing is in its place. Every home needs periodic maintenance. If every mechanism in the house works like a clock, then we can say that the owner is fully fulfilling his duties. To maintain order, you cannot do without a workshop and tools. Some of them you can make yourself. The article will talk about the process of assembling tools that will allow you to equip your workshop.
What you can collect with your own hands
With proper skill, you can assemble almost any machine that is needed for processing wood or metal. They will differ from the factory ones in the assembly method, as well as in dimensions. Most often for home use no large units required. There is no problem in building it yourself milling machine, with which you can beautifully design various slats. To others the right machine, which can be assembled at home is a drilling machine. You can’t do without it if there is a need to drill precise holes in small workpieces. In some cases, assembling a machine involves making a holder for a hand tool, in others it can be assembled from scratch using motors from other devices.

Before you begin assembling any products for your home workshop, you need to clearly define what tasks are assigned to the workshop and what scope of work will be performed. On the one hand, this will allow you to decide what machines will be needed, and on the other hand, it will make it possible to find out whether the available space is enough or whether the workshop needs to be located in another room. It's good if it happens separate room, because noise from operating machines can irritate residents. The easiest way to build a workshop is in a private house, where you can use a basement or garage. U good master Everything is organized and in its place, so it is important to take care of practical shelving.
Storage items

Almost any surface in a home workshop can be used to store tools. Based on the location of organizers, the following types can be distinguished:
- wall shelves;
- shelving;
- shields;
- floor organizers;
- ceiling shelves.
They can all be located in one workshop, which will make it possible to significantly expand the total area of the room.
Wall shelves

This home workshop design is the most common and frequently used. Building wall shelves is not difficult. The first step is to determine the wall where their placement will be most practical. For example, it could be a wall near which it would be impossible to place a shelving unit. You should not place a wall-mounted shelf in the workshop where you plan to build a shield for hanging hand tools. In some cases, a wall shelf can be placed right under the ceiling. Since shelves in a home workshop are designed to store heavy objects, and not soft toys, the structural strength should be higher than those used at home. For assembly you will need:
- corner 40×20 mm;
- board or chipboard;
- Bulgarian;
- welding machine;
- roulette;
- marking tool.

The first step is to draw up a sketch-drawing indicating the exact dimensions of the structure for the workshop, which are determined based on the free space on the wall. The sketch also indicates the number of tiers that one shelf will have. The next step is to prepare the corner pieces for assembling the frame. A shelf for a home workshop in which the ends of the racks will be cut at 45 degrees will look neater. This can be achieved using a square or a special holder for an angle grinder. The first step is to assemble the side faces of the workshop shelf, which can be represented by rectangles or squares. It all depends on the chosen shape of the shelf.

The elements must be absolutely identical so that the design of the shelf for the home workshop is without distortion. After this, the sidewalls are connected to each other by four horizontal crossbars. In this case, the corner must be placed in such a way that the part with a length of 20 mm is at the bottom. It will serve as a support for the board. There is no need to rush to the workshop when welding the shelf frame. It’s worth starting with tacks so that the structure doesn’t move, and then weld it with a solid seam. An excellent assistant when assembling the frame will be corner clamps, which will keep the angle straight.

When the frame is ready, you need to determine how it will be attached to the wall in your home workshop. This can be done by drilling holes in the corner or welding special ears. The first option is more reliable. Next, the seams of the structure are cleaned in the workshop and the metal base is painted to prevent corrosion damage. The last step is to cut out wooden stands that are placed inside. The shelf is fixed in place in the workshop and is ready for use.
Shelving

Workshop shelving can be assembled in several ways. It all depends on the material used, and this could be:
- metal;
- wood.

Each of these materials is practical in its own way. At the right approach Wood can withstand significant pressure and weight, but the dimensions of such a rack in the workshop will be larger than that of a similar one made of metal. Assembling the entire structure into a home workshop begins with a drawing. In this case, it is necessary to correctly determine the depth of the rack. A comfortable depth is considered to be such that it is possible to reach the edge of the shelf in the workshop by simply extending your arm. Typically, this size does not exceed 50 cm. If the shelving in the workshop will have a ceiling height, then it would be appropriate to have a small stepladder that will allow you to safely remove the necessary tools from the upper shelves.
Note! On sale you can find ready-made shelving for the workshop that has a modular design.
This means that the number of shelves can be varied depending on needs. Often their purchase is cheaper if you take into account not only the cost of materials for self-assembly, but also the time that will be spent on this.

The number and height of shelves in a home workshop are determined by what will be stored on them. Each shelf can have its own purpose. For example, on the lower ones you can place devices or workpieces with a large weight. If it is a power tool, then it makes sense to make the height higher than the highest element that will be stored on the shelf. The assembly principle is similar to that used for wall shelves to the workshop. In this case, it is better to use a corner with large sizes for greater strength. At the same time, it is important to correctly calculate the width of the rack for a home workshop, so that when using corners with smaller dimensions for shelves, they do not sag.
Shields
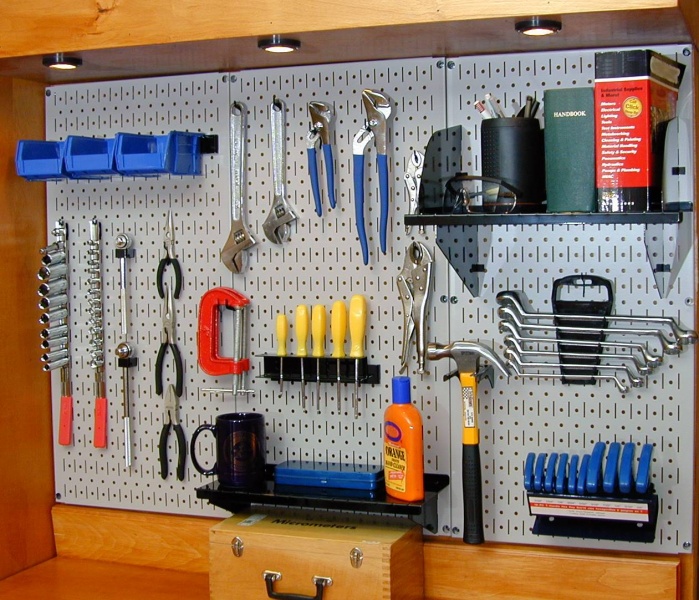
Shields are one of the most convenient items you can use in your home workshop. The advantage over other storage methods is that each element has its own place and is in plain sight. The only disadvantage of such a system is the inefficient use of space. Compared to shelves, more of it is required, and fewer tools fit. This is why shields are best suited for storing the tools that are used most often. The advantage of shields for the workshop can be considered their certain versatility. On the shield you can place not only hooks for hanging, but also various small drawers for storage.

There are ready-made shields for sale for the workshop, based on which you can assemble your own version. For this you can use:
- sheet metal;
- plywood

The assembly principle in each of these cases is similar, only the way of working with the material is different. If plywood was chosen as the base, then there are several ways to proceed. The first step is to mark the sheets that will be used in the home workshop. After that, they are laid out on the surface and the tool is laid out, which will hang on the shield. A fastening in the form of a self-tapping screw is screwed under each tool or it is outlined along the contour to make it easier to navigate later. Next, the sheet is fixed to the wall using self-tapping screws. For fastening, it is better to use bolts with hexagon heads and clamp the sheets through washers.

There is another version of the shield for the home workshop, which uses hooks instead of screws. This design can be considered more universal, since its configuration can be changed depending on needs. The best solution will purchase in advance the metal hooks that are used for shields in workshops. Depending on the distance at which the fixing tendrils are located on the hooks, the sheet is marked. Holes are drilled at the marked points. The shield is fixed on the wall in the home workshop at a short distance from the wall so that you can freely remove and put the hooks in their place.
The metal shield is assembled according to the model of the second wooden version. In this case, the work also comes down to drilling holes at the indicated points. In this case, it is better to use metal with a wall thickness of 0.8 mm. The weight of the tool can cause the metal to bend. There are several ways to solve the problem. One of them is to install additional spacers in the form of corners on back side rack. You can also assemble several separate smaller panels and install them side by side.
Ceiling shelves

Certain areas in home workshops are practically not used, or the ceiling height exceeds 2.5 meters, which will allow free placement of storage items on the ceiling. The easiest and most convenient way is to secure containers in which you can put small things. This is quite easy to do. To implement the entire project in the workshop, you will need to make wooden boxes of any size. The easiest way would be to purchase plastic containers that are perfect for these purposes. In addition to plastic containers, you will need metal ones I-beams. If these are not available, then a U-shaped profile can be used for the workshop. As a last resort, you can remove one wall from a square pipe to achieve the desired result.
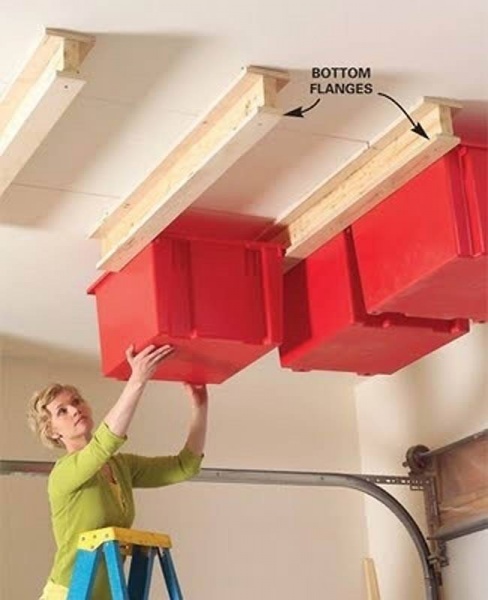
Plastic containers for the home workshop have special edges along the edges, which can be used for fixing. Therefore, it is enough to simply attach the prepared profile to the ceiling in the workshop at such a distance that the containers fit between them. This design is not suitable for storing heavy objects, but a lot of material or tools that are rarely used can be placed there, freeing up space on shelves and racks.
Note! Floor organizers for the workshop can be represented by ordinary boxes, which will have inserts divided into a certain number of cells. It is convenient to store fasteners in such inserts. But if there are enough shelves and racks in the workshop, floor organizers will not be needed.
Crafting table

This design is essential for any home workshop. It is on the workbench that all the magic of repairing and constructing any products happens. It is better to make a workbench for a workshop universal, since it will require processing not only wood, but also metal, but if the workshop area allows, then you can make two separate workbenches, which will be more convenient, since wood requires the most careful handling, and metal often requires force. Manufacturing process wooden workbench for the home workshop will be described in detail in several videos below. It is worth noting right away that to assemble such a structure for a home workshop, you will need some skill in working with power tools. The finished workshop workbench will support a variety of mounting systems.
Simpler, but no less functional design for a home workshop can be assembled from metal. At the same time, it is easier to build additional holders for shelves and drawers on it. Above is a drawing that can be taken as a basis. Dimensions are adjusted depending on how much space is available in the workshop. The height of a workbench for a home workshop is selected individually, but most often 80 cm is enough, which allows you to work with objects at waist level. It is better if the workbench is securely fixed to the floor. It is also worth setting it according to level. If wood processing is planned on a metal workbench in the workshop, then a special carpentry vice is additionally mounted where it will be convenient. You can use a portable version of the vice, which is fixed with clamping clamps.

Advice! Great option there will be production wooden table top to the home workshop, but metal can damage it.
To protect wooden surface workbench, a metal sheet can be laid on top through a gasket made of OSB boards. The thickness of the metal that will be used as an overlay should not be less than 1 mm.
Workshop machines
It will be described below general principle assembling machines for the workshop, which can be taken as a basis, and assembly can be done from available materials.
Wood and metal lathe

It is worth saying right away that on such a lathe in a home workshop it will be possible to process only small metal workpieces. An important part of the machine for the workshop, which will ensure stability of processing, is the bed. You can make it yourself or use a factory one. For self-made you can use a profiled pipe or a strong corner. The two elements are placed at a suitable distance and securely secured to each other by transverse elements. Examples of machine designs for a home workshop are visible in the photos above and below.

As a motor that will rotate the part, you can use the unit from the old washing machine, pump or any machine. A powerful drill chuck can be used as a tailstock. In this case, it will be possible to insert a cone or drill into it, if required during processing. The headstock can be purchased factory-made or made according to the model in the photo.

In this case, a metal axle will be required, it is better if it is made of hardened steel. You need two holders with bearings for the axle. On one side, a pulley is fixed, and on the other, a chuck into which the workpiece will be clamped. The engine on such a workshop machine is installed next to the headstock, and the force is transmitted through a belt. The speed can be varied by using a frequency module or by moving the belt over a pulley. You will also need a support element, which is made according to the schematic drawing below.

DIY video lathe on the tree there is below.
Milling machine
A milling machine for a home workshop is also quite easy to assemble. One option is to use a ready-made hand router, which is indispensable for an owner who likes to make something out of wood in his workshop.

For manual machine You can make a special workbench for your home workshop. The photo shows an example of such a table. At its core it is small table, in which there is a hole for the cutter and a mount for the router itself. If you wish, you can do this in the workshop and on a ready-made workbench. It is important to choose the most comfortable spot for fixing the router. During fastening, it is necessary to correctly calculate the maximum overhang of the cutter. When working this way, you will need to lift the factory support completely on a hand router. Switching on and off can be done via an extension cord with a switch. The disadvantage of this method is the need to manually adjust the speed directly on the router itself. A video about a homemade milling machine is below.
Advice! If you have an engine of the required power and a frequency converter, you can build a stationary milling machine in the workshop.
To do this, the motor is attached to the bottom of the table. A cutter chuck is mounted on the motor shaft. The connection is made through a frequency converter, which will vary the speed.
Drilling machine

As drilling machine You can use a drill in the workshop. But for this it needs to be fixed correctly. This can be done using a holder, which can be stationary for the workshop or portable. There are many different options for assembling this drill holder for your workshop. One of them is shown in the video below. Assembly will require materials that are within walking distance in every hardware store.
A circular saw

A stationary circular saw for a workshop can be made in a similar way as a holder for a hand router. It is enough to make a slot in the countertop for the slab sheet and mount it when required. The only drawback of this solution is the reduction in cutting depth. This can be corrected by installing it on a metal tabletop that is smaller in thickness. A video of the assembly of this design is below.
Summary
Each master strives to maximally equip his sphere, saturate working space machine tools and fixtures. Homemade machines and devices for the home workshop are of great benefit for running a private household.
Among the homemade household crafts and equipment are:
- joinery;
- Workbench;
- stool;
- shelves;
- racks.
Crafting table
Workbench dimensions
The height of the tabletop surface must be such that a worker can operate tools and equipment while standing. The workshop owner determines the height of the workbench himself - according to his height. The height of the desktop ranges from 75 cm to 80 cm.
The size of the tabletop is determined by the area utility room. The table should not impede free passage around it.
Workbench material
Tree
Often used wooden table. The workbench is made of timber and boards. The legs of the table are secured with diagonal crossbars for reliability.
The table top is made in the form of a shield from knocked down boards using pieces of timber. The shield is rested on the legs of the table and fastened with nails or screws. The connection parts are made from angle steel.
The options for assembling a wooden workbench are different, but they have one thing in common - the table structure must be stable and withstand static and dynamic loads.
If the surface of the workbench will be subject to accidental impact from cutting and sharp tools, then the tabletop is covered with tin or a metal sheet is placed on top.
Metal
The most reliable workbench design is a workbench welded from a metal profile. Manufacturing a welded product requires having a welding machine and experience working with it.
The supporting frame and table legs are welded from steel angle and strip. For auxiliary parts, pieces of reinforcement are used.
The tabletop is made from metal sheet, thickness 8 – 12 mm. A thick sheet will significantly increase the weight of the workbench, which will make it difficult to move.
Stool

Making a stool with your own hands is quite simple:
- 4 supports, 50 cm long, are made from timber 40 x 40 mm.
- The legs are fastened at mid-length with crossbars.
- Grooves are made in the supports using a chisel.
- At the ends of the transverse planks, protrusions are cut out using a chisel to fit the grooves.
- The protrusions are lubricated with wood glue and inserted into the grooves.
- While the glue dries, the supports are tightened with a belt.
- The seat is cut out circular saw from a wide board 30 mm thick.
- A seat measuring 300 x 300 mm is nailed or screwed to the legs of the stool.
Shelves
Shelves are made of boards, chipboard or MDF. They can be open or with side walls. For fastening, furniture hinges are used.
Holes are drilled in the wall into which dowels are driven. The screws are not screwed into the dowels completely so that the hinges of the shelf can be placed on them.
The hinges are screwed to the back of the shelf. The shelves are hung on the wall by placing the hinges on the heads of the screws.

Shelving
Racks are a whole complex of shelves of different sizes. They are good to make from chipboard. The lattice structure is supported on a pedestal or simply placed on the floor. For stability of the rack, corners are screwed to the sides of the furniture. Free shelves of corners with holes are nailed to the wall with dowels.
Vertical tool holders
Every craftsman strives to organize his workplace so that the tools are at arm's length. This is facilitated by vertical holders.

Wrench holder
- A wooden plank is attached to the wall above the workbench. The rail is screwed with screws into dowels installed in advance.
- Small nails are driven into the strip at intervals equal to the width of the wrench handles.
- The keys are hung on the rail.
- Nail heads hold keys horizontally and vertically.
Screwdriver holder
- In a piece of timber 40 x 40 mm, holes are drilled corresponding to the diameters of screwdrivers, at a distance of 30 - 40 mm from each other.
- A piece of timber is nailed to the wall with dowels so that the holes are located vertically.
- Screwdrivers are inserted into the resulting sockets. Now you can quickly get it the right tool without leaving your workplace.
Chisel belt
- The plank is secured to the wall with dowels.
- The belt or belt is nailed to the bar so that unique through pockets are obtained.
- Chisels are lowered into the pockets, through which only steel blades pass. The handles are held in place by a belt.
The device can hold hammers, pliers, pliers and other tools.
Homemade soldering iron stand
When working with a soldering iron, a situation arises when you need to put the tool down. Placing a soldering iron with a hot tip on a tabletop or on any object is always risky. Homemade stand will solve this problem.
An example of making a stand for a soldering iron
- The holder is made of wire in the form of a spiral. To do this, unbend a wire clothes hanger.
- The wire is wound around a cylindrical object with a diameter of 1.5 - 2 cm. The handle of a chisel or other tool will do.
- On one side of the spring there is a free end of the wire.
- The end is bent into a loop with pliers.
- For the base of the stand, take a board 200 x 100 x 20 mm.
- A through hole ø 4 mm is drilled at the base.
- A hole is drilled from the back of the board with a large drill for a countersunk screw head.
- The screw is threaded from bottom to top.
- Place the spring loop on the screw and tighten the nut.
- Circles are cut into the board using a crown to fit the size of a cup for candles or similar products.
- Using a chisel, make a sample of wood in 3 recesses.
- Cups are inserted into the openings, which are filled with solder, tin and a napkin to clean the tip.
- The soldering iron is inserted into the spring.
- A small hole is made in the board for attaching a flexible steel cord from a lamp.
- A clamp is attached to the end of the cord, which is used to secure various parts for soldering.
The design may have a different look - it all depends on the imagination and ingenuity of the author.
The simplest mousetrap in the world

This name can be assigned to many homemade mousetraps invented by craftsmen. They have one thing in common - humane treatment of animals caught in a trap. The device does not kill the animal, but isolates it. A few examples of how to make a simple mousetrap:
Plastic funnel
Cut plastic 3 liter cylinder in half. The cut neck is turned over and inserted into the bottom of the bottle. Bait (seeds, grain, etc.) is poured onto the bottom.
The trap is placed close to an object that the mouse could climb. A rodent, having fallen into a funnel, can no longer get out of the bottle.
Console
The design is a tilting platform. It is made from a piece of cardboard or plastic. The bar is placed on a plane so that half of it hangs in the air.
The bait is placed on the edge of the console so that the bar is on the verge of balance. The animal, having reached the bait, overturns the bar and falls along with it into the substituted bucket.
Suspension
An empty plastic bottle with bait at the bottom is placed on the edge of the table. A cord is attached to the neck by piercing the plastic with a hook made from a paper clip. The other end of the cord is tied to some support.
The mouse, attracted by the smell of food, enters the container. The bottle tips over under the weight of the rodent and hangs on the cord.
Mini vise made of metal loop

When performing small operations, small parts often need to be clamped. To do this, use a mini vice made from a one-piece door hinge.
Matching holes are drilled in both hinge flaps.
A bolt of suitable diameter is threaded through them. On the other side, a wing nut is screwed onto the bolt thread. The parts are inserted into the opening between the doors and clamped by tightening the nut. The device can be used as a clamp.
Portable beer box
Box for drinks in glass containers – convenient device for carrying several bottles at once at the cottage or picnic. To make such a box with your own hands, you will need the following tools and materials:
Tools
- jigsaw;
- wood saw;
- sander;
- drill-driver;
- drill;
- hammer;
- chisel;
- feather drill.
Materials
- edged board – 1050 x 170 x 15 mm;
- fruit box slats - 5 pcs.;
- handle ø 36 mm and length 350 mm;
- stain;
- screws;
- nails.
Step-by-step instructions for assembling the box
- The edged board is sawn into three identical parts (bottom and two sides), each 350 mm long.
- Two boards are cut with a jigsaw so that the sides taper from the middle and end in an oval top.
- At the tops of the sidewalls, holes ø 36 mm are drilled with a feather drill.
- All wooden parts clean with a grinder and an emery wheel. The cuttings are sanded manually with emery.
- Using a thin drill, drill 4 holes along the edges of the bottom. The nests of holes are countersinked from below.
- The sidewalls are installed on the sides of the bottom. Screws are screwed into the bottom of the bottom. The heads of the screws are “hidden” in the sockets of the holes.
- Two strips are nailed to the sides with nails on each side of the box. They will become a vertical fence for bottles.
- Cuts are made in three planks so that by folding them, you get a sheathing with square openings for glass containers.
- The sheathing is laid on the bottom between the sidewalls.
- The nails are nailed in those places where the ends of the sheathing rest against the sidewalls and fencing strips.
- A ø 36 mm handle is inserted into the holes in the tops of the sidewalls.
- Driving the nails in at an angle, fasten the sides to the handle.
- The entire surface of the box is treated with stain.
The box is ready for use. The portable container can easily accommodate 6 bottles of beer or other drink. The crate's lathing and guards will prevent bottles from breaking or falling out while being carried.
Hammer upgrade
A common occurrence is a wooden handle falling out of the hammer socket. One of the ways to create a reliable handle fastening is to make a cut in the upper end of the handle. The holder is inserted into the hammer socket. The cut is filled with Moment glue. A wooden wedge is driven into the groove.
In order not to look for nails while working, and especially not to hold them with your teeth, a round magnet is glued into the bottom of the hammer handle. Magnetic nails will always be at hand for the worker.
It is dangerous for the hammer to accidentally fall out of your hand at height. To prevent this from happening, a hole is drilled in the handle through which the cord is threaded. The worker's belt is threaded through the loop.

Homemade tools and machines
Pipe bender
Bending device metal pipes It is a metal rod welded to the frame. I make the rod from a piece of reinforcement. The pipe is placed on a pin, and on the other side a long piece of reinforcement is inserted into the pipe. By pressing the lever, the pipe is bent at the desired angle. The device is suitable for small sections of round pipes.

Device for bending profiled pipes
Greenhouse owners know how important it is to have a device for bending long lengths of profile pipe. The curved profile is used as arched design for the formation of polyethylene coverings of greenhouses.
Pipe bender allows you to save considerable cash on the construction of a greenhouse. The design consists of 3 rollers - two are guides, and the third roller performs the leading function.
The profile pipe is inserted into the opening between the two wheels and the roller. The roller has a stop and a rotating device in the form of a lever or an electric motor drive.
Making a pipe bender with your own hands
- Two axes from segments are welded to the metal frame smooth reinforcement, on which old car hubs are put.
- Protruding chamfers are removed from the hubs so that the side surfaces of the rollers are smooth.
- The channel is placed in the opening between the hubs with the shelves facing up.
- The same profile, smaller in width, with the flanges down, is placed into the channel.
- An axle is welded to the top of the inner profile, onto which the third hub is placed.
- A vertical shelf made of steel sheet is welded to the frame.
- A hole is cut in the vertical bar and the bearing is pressed into it.
- A nut is secured to the middle channel by welding.
- One end of the screw rod is screwed into the nut.
- The screw shank is threaded through a bearing in a vertical bar.
- A rotary handle is welded to the shank on the back side of the bar.
- A swing arm is welded to the axis of the drive hub.
The machine is ready for use. They get started between the rollers profile pipe and tighten it with a screw. The rotary lever drives the rollers, which pull the pipe, bending it. The bending radius is set using the rotary handle of the screw.
A pipe bender made from car hubs is one of the device options. There are many designs of bending devices. In some models, the drive roller is coaxially connected to the motor shaft.
Impact screwdriver from starter
There are situations when it is impossible to unscrew a rusted bolt or screw with a conventional tool. An impact screwdriver does a great job with this. The tool is made by hand from parts of a car starter:
- The shaft and bushing are removed from the starter housing.
- Part of the shaft is cut off, leaving a splined rod.
- A piece of pipe of suitable size is placed on the sleeve.
- A piece of bolt of equal diameter is welded to the end of the pipe.
- The end of the shaft is ground into a tetrahedron shape onto which the heads are placed the right size. For screws, a bit is inserted into the head.
When you hit the head of the bolt with a hammer, the shaft slides with beveled splines inside the sleeve, performing a rotational movement. The stronger the blow, the more force the shaft rotates.

Homemade circular saw machine
A do-it-yourself cutting machine made from an angle grinder is not inferior to some factory-made samples. The grinder is a fairly powerful hand-held circular saw.
The grinder-based machine performs precise cuts of lumber and metal profiles. To make it you will need the power tool itself, a welding machine and a metal profile.
Step-by-step instructions for assembling the machine
- Two metal strips are welded to the pipe section, in which mounting holes are drilled.
- Accordingly, two holes are also made in the casing of the angle grinder.
- The strips are bolted to the casing.
- The machine bed is made from a metal sheet with support corners welded to the bottom.
- A vertical section of a corner is attached to the frame by welding, in which a hole is drilled.
- A piece of angle is welded to the lower end of the lever and drilled through along with the pipe.
- The bolt is threaded through the holes and the swivel joint is tightened with a nut. vertical stand with a lever. Additionally, install a lock nut.
- In a vertical position, the angle grinder lever takes a stable position.
- At the point of contact saw blade a cut is made with the bed so that the disc can completely cut the workpiece.
- The handle of the power tool is moved to the end of the lever.
- As additional devices, a transverse and angular stop are installed on the frame.

If necessary, remove the power tool from the machine and use a circular saw in manual mode.
Homemade bow saw
Bow saw handy tool for sawing tree trunks and lumber. The design of the saw is simple, make hand tool easy to do with your own hands. To do this you need to prepare tools and materials:
Tools
- drill;
- hacksaw;
- chisel;
- hammer;
Materials
- cord;
- wooden slats 20 x 40 mm;
- cotter pins – 2 pcs.;
- stalk ø 10 mm;
- saw blade;
- stain;
- wood varnish.
Step-by-step instructions for making a bow saw
- The lath is cut into three parts (two vertical side strips and a middle horizontal strip).
- Grooves are made in the side handles using a chisel.
- At the ends of the centerpiece, protrusions for grooves are cut out with a chisel.
- The centerpiece is connected to the side handles.
- Through holes are drilled at the joints. Wooden cotter pins are driven into them.
- Cotter pins form hinge joints. This is necessary for the mobility of the lower ends of the side slats when the canvas is tensioned.
- Cuts are made at the lower ends of the sidewalls - parallel to the middle.
- In the holes saw blade insert short bolts and tighten them with nuts.
- The blade is inserted into the cuts so that the bolts are on the outside of the structure.
- Circular grooves are cut out at the upper ends of the handles.
- Loops are made at the ends of the double cord, which are placed on the grooves.
- A handle is inserted between the strings of the cord, the long end of which rests on the mullion.
- The saw string is twisted using a handle, achieving the desired degree of tension on the saw blade.
- The wood is covered with stain and two layers of varnish.
- After the varnish has dried, the saw is ready for use.
Conclusion
Homemade devices, tools and machines bring not only significant benefits to the garden, garage and household, but also significantly save the family budget. When making and using homemade products, one must not forget about safety rules.
Excellent selection of tools and technical installations, created by the minds and hands of craftsmen. The times in which we live are rapidly developing, and largely thanks to ordinary people who have creative thinking and are a little lazy and strive to save energy, money and time. If only they had been given a decent budget, they would have advanced civilization and accelerated evolution.
A selection of devices that will be useful in the workshop
This collection contains a lot of interesting and useful things. I am sure that many of the ideas shown in the video will be useful to craftsmen or will prompt a line of thought for their own invention.
Thanks to the rotation of the mesh drum, the process is greatly facilitated and accelerated. Video with all the ideas at the end of the post.
2. Use of a tractor wheel as a winch unit for lifting construction loads.

These and other inventions on the AT channel video
A selection of homemade tools
This is indeed a very successful selection of homemade tools and machines and practical advice, which will be useful to any master and ordinary person. The special advantage of these devices is that their implementation does not require much time or great skill. Everyone will find something that is useful to them. Although the author of the video indicated 14 stories about devices, in reality there are many more.
Let's show two tricks first, the rest are in the video at the end of the publication.
1. No need to buy a knife sharpener for the kitchen.
Screw two lighter wheels onto the block. And the device is ready! 
A few movements and the knife is razor sharp! 
2. A device for stripping cables from a clothespin and a pencil sharpener

Removing the insulation from a TV cable has become easy

These and more than 20 other wonderful tricks and machines are on the video of the “5-Minute Crafts” channel. It's worth finding out. The author tried his best.
Thank you for watching! Good luck!
These devices will be useful for speed and quality of work.
1. To avoid crawling on your knees while tiling, the master came up with a mobile seat.
This is a prefabricated structure that is convenient to transport or move from one site to another. It comes together in a couple of minutes. Electricians will also like the idea. The ideas behind the design can be applied to the design of seats for other types of work, for example, for working in garden beds.


2. A bucket for grouting joints during tile laying work.
The master proposes a Chinese approach - to adopt an idea that was implemented in factories and do the same thing with your own hands at an order of magnitude cheaper. What is sold in stores for 2000 rubles can be made for 115 rubles and in addition a grater from composite panel for 150 rubles. 
There are holes in the panel. The pallet allows you not to raise the dregs.

3. A mixer, with which it is much easier and faster to mix concrete than with a shovel


4. Third hand with clamping pliers for working with small parts

All this and other devices are in the video “Hands from Shoulders”.
Thank you for watching!
Device for a workbench made of fabric for metal
Sometimes a simple and even primitive action can solve many everyday routine problems. Make a simple device for a workbench or any other work table in the workshop from an old or new hacksaw blade in 5 minutes.
Take the canvas and attach it to the edge of the table from the end with the teeth up and secure it on both sides with screws.


Please note that there is a washer between the table and the canvas.
That's all. The device is ready for use. With its help you can trim skins or other similar materials. The device copes well with electrical tape or adhesive tape.


