How to make a seat for a walk-behind tractor trailer. Do-it-yourself dump trailer for a walk-behind tractor. Main parts of the cart
A walk-behind tractor is a pretty useful thing on the farm. It becomes an even greater help if it is equipped with a trailer in which you can transport various things, tools and materials. Some models of walk-behind tractors on the market do not meet the buyer's requirements. By purchasing such a powerful assistant, their owners plan in advance to begin manufacturing an additional towbar for the walk-behind tractor themselves.
Such attachments significantly save costs rather than buying a finished product. So, how to make a trailer for a walk-behind tractor with your own hands?
You can make a trailer yourself
Assembly
The process of assembling the structure is simple, and you can do it yourself, having at hand the tools and materials necessary for the work, as well as a little knowledge in plumbing. The work is carried out in the following order:
- Creation of working documentation (project) with installation diagrams of trailed equipment for a walk-behind tractor.
- Selection of material for the manufacture of the frame and other devices of the future design.
- Selecting the workplace where the trailer will be assembled.
- Performing preliminary marking of mounting elements and components of the trailer mechanism.
- Laying out finished parts and combining corners.
- Connection of elements of a mounted device.
In this video you will learn how to make a trailer yourself:
Required tools and materials
To ensure high-quality performance of trailer assembly work, prepare the following tools:
- apparatus for welding work;
- grinder for cutting material with a set of cutting wheels;
- tape measure and ruler, protractor and square;
- marking tools (chalk, ink, marker);
- impact tool (hammer), chisel and pliers;
- yew for fastening parts, clamps and clamps;
- electric drill with a set of drills of various diameters for working on metal;
- equipment for installing rivets in the trailer body.
To make a trailer frame, use a square or rectangular metal profile, small diameter steel pipe, angles, channel. The trailer pallet is a steel sheet up to 2 mm thick. Bolts, nuts and rivets are used to connect parts of the structure. Springs and a beam are added to the trailer to attach the wheelset. Car wheels from Moskvich or Zhiguli are suitable as wheels.
 Don't forget about the appropriate trailer tool
Frame
It is made from square pipe, which is cut into separate sections. The pipe sections are welded together, forming a frame with cross members. Each angle is carefully measured. After the frame is ready, it is boiled around the perimeter again. Finished product primed and painted with paint and varnish material.
The trailer should not be overloaded, otherwise it will quickly become unusable. The service life of the entire structure depends on the quality of the frame element. Therefore, before starting work, you should determine what maximum load the tow hitch will carry and for what purposes it will be used.
There are three main trailer models:
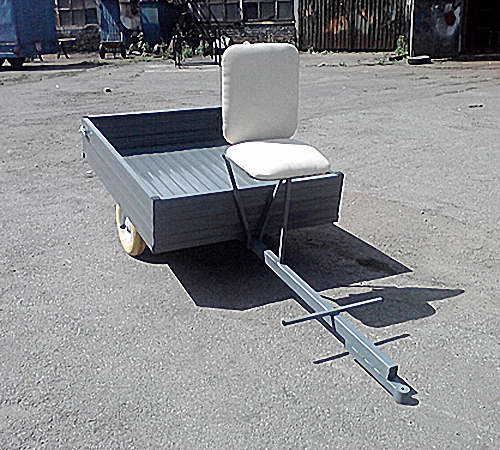
- Easy. Designed for a load of no more than 70 kg. Typically this is a lightweight cart with one axle on which the driver's seat is mounted. A trailer for transporting goods is welded to the axle.
- Universal. It can transport small loads up to 120 kg over rough terrain. For greater strength, an I-beam is used as a material for making the frame.
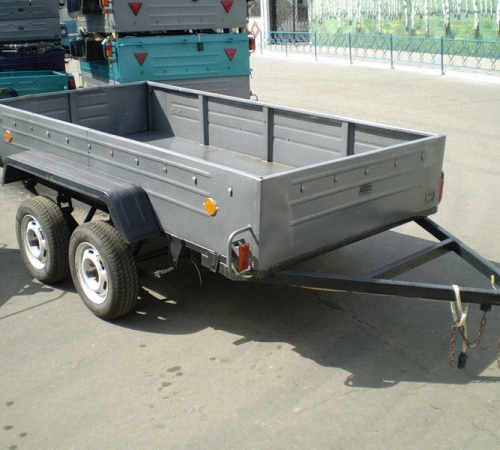
- Heavy. These examples use a metal profile and elements of an automobile chassis with rubber running. Heavy trailer options are more reliable and durable, although a little more expensive than other designs.
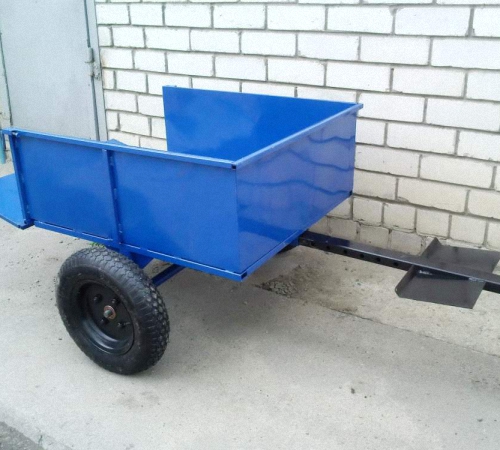
Some craftsmen make a dump trailer for a walk-behind tractor. In operation, it resembles the body of a dump truck, but to make such a structure with your own hands, you need to strictly adhere to all the dimensions of the drawing. There are no standard sizes for a trailer; the main thing is that it is not too wide and that it is convenient to maneuver while moving behind the walk-behind tractor.
Chassis
The design of the trailed part of the walk-behind tractor itself is not particularly difficult, but the chassis is a completely different matter. It is based on a beam, at the ends of which hubs are placed. The channel is welded together to form a square. The welding seam is continuous for structural strength. Hubs are welded to the bottom of the square (beam), trailer wheels are put on the walk-behind tractor and their parallelism is checked. If the condition is met, then the structure is welded correctly.
The beam and the trailer frame are connected using springs installed in special brackets on the frame, pre-provided in the diagram. The entire assembly of the towed part is checked for stability; it should not tip over.
Advice. In order for the transport to last a long time and not break down, it should be carried out periodically maintenance, which consists of daily cleaning after work and lubricating the joints.
Don't forget about the trailer chassis
Body frame trim
They are installed on the base (platform) of the trailer vertical racks, to which the sides are welded. It is worth noting that the front and side sides are made non-removable, and the rear side is fixed on hinges for further opening and closing if it becomes necessary to load various oversized cargo. The body elements are a frame structure, which is made up of metal corners. They are butt welded to each other and the seams are cleaned.
Stages of board assembly:
- the frames of each side are prepared separately;
- take a sheet of galvanized sheet and transfer the dimensions of the sides onto it;
- the side is cut to size.
A bottom made of 2 mm metal sheet is placed on the frame of the towbar and welded around the entire perimeter. The distance between the welding points is approximately 4-6 centimeters. The installation procedure begins with the front side, then the side ones, tightly connecting them to the front. The tailgate is secured to hinges mounted on the trailer frame.
Brakes
To ensure that the trailer does not accidentally roll on a slope and stands firmly on the road, a simple braking system is provided for it. How to make brakes on a trailer for a walk-behind tractor? It is best to use a parking structure from a car or motorcycle and secure the mechanism near the driver’s seat with bolts.
As in any vehicle, the braking system is one of the factors of road safety. You can make your own brakes using a cable, rod and drum:
- A drum is attached to the hub of one of the wheels.
- They take brake disc and weld a small piece of pipe to it.
- Place the mechanism on the axle.
- The brake pads with a cable are secured to the axle, the cable is pulled to the lever near the driver’s seat.
Brakes are usually not installed on two wheels. One parking brake for a trailer attached to a walk-behind tractor is also sufficient.
Other details
In addition to the main driver's seat, a simple folding bench is installed, which is mounted on the front side of the body and rests on the side ones. Some trailers for walk-behind tractors are additionally equipped with a spare wheel. It can be placed on the side or bottom of the trailer on the metal bottom using special fasteners.
Near the driver's seat, for the convenience of storing small tools that may be needed on the road and during repairs, small homemade metal boxes or special bags are secured.
Hitch
The drawbar is a system of welded pipes that are attached to the side members of the trailer. A coupling device is installed at the front where the pipes meet. The connection should be simple, strong and ensure easy rotation of the trailed trolley behind the walk-behind tractor. Often, for such a hitch, the standard mechanism of factory trailers to car towbars is used.
To hitch a walk-behind tractor trailer with your own hands, you need to:
- At the junction of the drawbar pipes, a piece of forty pipe 10 centimeters long is welded.
- Two bearings are installed inside the pipe.
- A washer is installed on the pipe on the side of the towed cart, into which the threaded axle of the towed device will subsequently be inserted.
- The hitch is made from a piece of square pipe. A through hole with a diameter corresponding to the fixing pin is drilled through two opposite surfaces.
- The square pipe can be additionally reinforced with a sheet of metal; the edges of the pipe are bent.
This system reliably ensures structural stability and ease of control. Using a hitch, the walk-behind tractor trolley can be adapted as a passenger car trailer.
Do I need a license for a walk-behind tractor with a trailer?
There are many auxiliary jobs that use walk-behind tractors. And today, nowhere in official documents is it stated that operating walk-behind tractors requires rights. According to the law, walk-behind tractors do not belong to vehicles that, like other categories, participate in road traffic. Therefore, you can safely travel to fields and country roads that are not controlled by the traffic police.
When driving on roads public use It is necessary to take into account that this vehicle does not have the right to move along them. This should be clearly stated in the data sheet for the walk-behind tractor. However, there are times when you have to cross such road sections. If you get caught in a traffic police car, you can get some pretty unpleasant consequences. The inspector can check any equipment located on a public road, and has the right to issue a fine for such driving, because a walk-behind tractor is classified as equipment, even for cultivating land.Also, the driver of a walk-behind tractor must know the rules of the road, even if he does not have a driving license. Therefore, the traffic inspector has the right to demand at least one open category for use vehicle to ensure your knowledge of the basics of traffic, but this only applies to public roads.
It turns out that you don’t need a license for a walk-behind tractor; at the same time, you need a document that confirms your knowledge of the rules of behavior and traffic on the road.
Advice. In order to avoid any problems with the traffic inspector, the owner of the walk-behind tractor must know the rules of the road, have at least an open category A, and do not forget his license when it is necessary to go on the road.
For drivers homemade walk-behind tractors It is not at all recommended to drive from trailers onto the roads, so as not to catch the eye of the traffic police. Otherwise, it threatens with a large fine.Designing a trailer for a walk-behind tractor with your own hands according to the drawings and dimensions is not very difficult. The main thing is to have the desire and be able to handle the tool. On our website you can select a diagram and view photos taken by trailer owners. Having such an assistant on your farm, you can get the job done several times faster and get great pleasure from it.
Which can be used for any work: plowing the garden, transferring crops, seedlings, and so on. In order to be able to transport even more contents on a walk-behind tractor, you need to do self-production trailer for walk-behind tractor.
So, first we’ll look at how to make a simple walk-behind tractor with a trailer. You will need steel pipes, wheels, springs, sheet metal, a “five” channel, and fasteners. Of course, you need to have some tools, welding and be able to use it all.
The frame will be in the form of a solid structure. It will be installed on a frame mesh. To do this, we make traverses from corners. We make spars from pipes. They are connected by crossbars to form a lattice.

We will weld the racks to the longitudinal pipes by welding. A corner strap will be installed in the upper part. You can also make the sides of the trailer that will recline. Using a duralumin sheet we will create a platform. For the sides you can use thinner sheets.
To create a beam, you need to connect two channels. At one end there will be a wheel axle.
The resulting beam will be connected by springs to the side members. The ends of the spring are placed on the shackle axle. We will make a drawbar from rectangular pipes. If desired, the trailer can even be equipped with side lights and headlights.
Homemade trailer for walk-behind tractor, video
Now we’ll tell you how to make a trailer with great functionality. It is worth saying that it is best to carry out all work on the basis of pre-prepared drawings. Once the size of the trailer is determined, you can start counting materials. This work is very important because it will save a significant amount of money. You definitely need to find a welding machine, since self-tapping screws alone will not be able to ensure the strength of the product.
 Do-it-yourself walk-behind tractor trailer dimensions, drawing
 In order to create a strong frame, you will need profile corners. We also take rectangular pipes of square or rectangular cross-section. In order to make the body, we use inch boards and racks.
Note that the created structure will have one axis. Therefore, in order to properly distribute the load, it must be placed closer to the center of the axle, and not towards the drawbar. However, folding sides cannot be made. But if you really want, you can make folding sides.
The chassis is the main part of the trailer that will be attached to the walk-behind tractor. In order not to think about where to find wheels or how to make them, we simply buy ready-made wheels from other small equipment. A console is made to connect the walk-behind tractor and the trailer. It is attached to the bracket of the hanging system. The drawbar is inserted into a tubular body and secured with a thrust ring. This will allow you to easily control the created equipment on all types of surfaces.
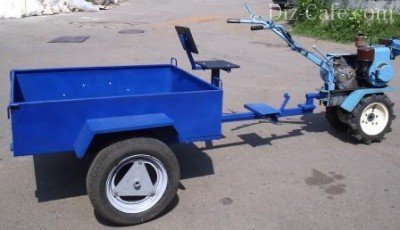
In the front part of the trailer, there is a seat on the walk-behind tractor, on which the driver will sit, rest his feet on a specially made platform and direct the ride.
Watch the video: do-it-yourself cargo trailer for a walk-behind tractor
Well, now a little humor:

- How and when to clean white cabbage to…
This single-axle mini-tractor (one of the common names for a walk-behind tractor) is more versatile than its “relative”, the cultivator. But the scope of application of the walk-behind tractor can be further expanded by equipping it with a trailer. In this case, the functionality of the unit is not limited to mechanized cultivation of the land plot.
It becomes possible to organize transportation around the site and surrounding area of tools, soil, garbage, and so on, that is, everything that every owner faces with the need to move. It’s easy to make a small trailer for a walk-behind tractor with your own hands if you follow certain instructions and focus on standard drawings, dimensions and recommendations of professionals. This article will tell you how to do it correctly and what to consider.
The design of the trailer is developed based on the modification of the walk-behind tractor. These mechanisms are classified into classes depending on engine power. But even the weakest unit is capable of transporting up to 400 kg of cargo. For summer cottage or a small household plot, this is usually quite enough.
In principle, a trailer can be purchased. But the minimum cost of a simple cart with sides is 18,400 rubles. And it’s not a fact that the dimensions design features products will satisfy the user. Making a homemade trailer on your own is not difficult. And if you consider that you can independently develop its individual drawing to suit your own needs, the feasibility of such a solution is obvious.
Trailer design features
Some points need to be thought through in advance, even before drawing up the drawing. What issues should you pay attention to?
- Connection methods. This applies to individual units and moving elements (bushings, axles and a number of others). What to choose - fixation with bolts, rivets or welding - is decided in advance.
- What to make trailer parking supports (legs) from.
- Seat option - rotating or stationary. The first one is more convenient, the second one is easier to make with your own hands.
- Body modification. In terms of universality of operation of the walk-behind tractor, a tilting design is preferable, but its manufacture is much more complicated. And such a trailer will cost much more.
- A type of connecting unit (trailer - walk-behind tractor). It can be hinged, on bushings, bearings. The same is something to think about.

Without taking these nuances into account, it is pointless to start developing a project and drawing up a drawing. You should also take into account such aspects as your own capabilities, the availability of the necessary materials (parts) and personal experience in assembling something on your own (practical skills).
Features of the design of the trailer for the walk-behind tractor
Even to make it yourself, you will have to choose from several options.

But if you understand what main parts a trailer consists of, then draw up a drawing of it, decide on the dimensions of the “cart” and select necessary materials simple enough. Yes and any step by step instructions not needed - the master himself, depending on the conditions, chooses the sequence of technological operations and the method of their implementation.

All dimensions indicated, unless otherwise stated, are in mm.
Trailer frame and body
In fact, this is the base that supports part of the entire structure. Therefore, only metal is suitable for the trailer frame. Using wood blanks to assemble the frame of a homemade cart (which is sometimes practiced by “home” craftsmen with little experience) is impractical for several reasons.

Firstly, any tree contains a certain percentage of moisture. Consequently, material shrinkage, twisting, and the like cannot be avoided. As a result, the trailer will be repaired more than it will be used.
Secondly, wood has many “sworn” friends - ultraviolet radiation, dampness, wood-boring insects. Such a trailer for a walk-behind tractor will not last long.
Thirdly, the insufficient bending strength of wood limits the load-carrying capabilities of the cart.

Consequently, in this case, saving on materials is more than impractical. The easiest way is to mount a frame from profiled pipes. In terms of ease of assembly for the trailer, it is advisable to use blanks with a rectangular or square cross-section. They are stiffer and less susceptible to deformation when the trailer is overloaded. In addition, you can most of connections (if not all) should be made without welding machine, bolted; The process of covering the trailer frame with the selected material, be it sheet iron, corrugated boards or boards, will also be significantly simplified.

The drawbar is easy to make from the same pipes and channels. For ease of use, it can be composed. For example, from sections of 2 pipes (channels) different diameters(numbers). Actually, your imagination itself will tell you exactly how to make everything.
For a small trailer to a walk-behind tractor, they are enough following parameters: 50 (60) x 30 for the frame and 25 x 25 for the racks. As an option - a small profile channel (for example, No. 5). A 15-gauge board or 1.5-gauge sheet iron (duralumin) is suitable for lining the sides. For the bottom, the metal should be thicker, at least 2, otherwise deflections cannot be avoided. To give the trailer strength, after assembling the entire frame, it is necessary to make the upper frame of the racks. Suitable for these purposes. Depending on the size of the cart - 15 or 25.

Wheel set
To attach the axle, you will have to install special supports at the bottom of the frame. They are welded to it (in the form of scarves), so in this case bolted connection unacceptable. The photo explains how everything can be arranged (option).

The axle is taken either ready-made, from used equipment, or used metal rod. Minimum diameter– 30. The dimensions of all elements are selected based on what wheels the trailer will be equipped with. For a do-it-yourself walk-behind tractor, both “Zhigulevskie” (often a used rear beam from a “nine” is taken) and a simple garden cart are suitable. By the way, it can be used as a basis when designing a trailer. Only a small modification of the circuit is needed.

Hitch
When developing its design, you need to take into account the features of this walk-behind tractor unit. Models different manufacturers- their differences. Here are some acceptable DIY options.

Since the mobility of the connection is ensured by bearings, they must be protected from the ingress of foreign fractions. Therefore, you should think about how to correctly execute the anthers.

In principle, a skilled person is more detailed instructions and not needed. Having grasped the essence, it is easy to create your own version of the trailer for the walk-behind tractor, develop its drawing and assemble the cart with your own hands.
Walk-behind tractor - self-propelled technical means, indispensable assistant in the private sector. Adding special equipment with axles, a box and a driver's seat expands it functional characteristics. A walk-behind tractor with a tow hitch can work like a mini-truck.
Characteristics and cost of industrial trailers for walk-behind tractors
An industrial, ready-made trailer for a walk-behind tractor is characterized by a loading capacity of 0.3 t - 1 t and different dimensions. The trolley is selected according to the power of the walk-behind tractor and its technical parameters:
- Trailer with overall dimensions body 1 m x 0.85-1.15 m, with a load capacity of 300 kg, designed for light walk-behind tractors. The cost of the body is from $200 and above.
- Adapters for medium-power walk-behind tractors from 5 liters. With. have dimensions of 1x1.4-1.5 m, load capacity up to 500 kg. Average price trailer from $250.
- For heavy walk-behind tractors, two-axle trailers with dimensions of 1.2 m x 2-3 m and a load capacity of up to 1000 kg are sold. The cost of the cart is from $500.
It’s not difficult to make a trailer for any walk-behind tractor with your own hands. Next we'll look at everything fundamental points and the manufacturing technology itself.
Preliminary drawings of a walk-behind tractor trailer
The trailer body is usually made of galvanized, painted steel sheets or durable plastic. Metal sides and a metal bottom will last longer than plastic ones, but in terms of cost, the second option will be cheaper.
Having decided on the material for the trailer, start drawing up drawings or technical diagrams for load-bearing elements:
- connecting frame,
- carrier carrier,
- working body.
The skill of a mechanical designer is not required; it is enough to sketch a sketch of the future cart.
Why is the preliminary stage necessary? The model visually appears in the figure, visible difficult areas, the dimensions have been clarified, the connecting node elements and their possible connection or connection have been drawn. Example drawing:

The drawing shows the method of coupling load-bearing running elements. The carrier is connected to the walk-behind tractor module by a rotation unit and a console element, the second edge of the carrier is connected to the frame using a central pipe. Connection to the walk-behind tractor is made through consoles and blunt ends. An axial rod is made according to the size of the coupling mechanism of the walk-behind tractor. The upper axial end acts as a support, the carrier rotating assembly rotates around it on bearings. The ball bearings are covered with an anti-duster, and the voids are filled with a special lubricant.
An experienced craftsman will not find it difficult to select parts, elements, tools and spare parts in accordance with the drawn up drawing. For the most simple option The trolley requires the following spare parts:
- Wheels. Most often they take wheels from a motorized stroller or from a car. They are bought secondhand or acquired at a disassembly site. The size and strength of the rim correspond to a load of more than 300 kg.
- Wheel axle. It is made from a steel rod with a diameter of at least 30mm. The length of the rod is calculated independently, based on the width of the body. The optimal size of the rod does not allow the trailer wheels to protrude beyond the contour of the body.
- Thrust ring. A 58 x 4 tube is suitable for these purposes.
- Bolts M 8.
- Beam for support - 3 pcs.
- Boards for the box.
- Frame for coupling with a walk-behind tractor.
- The driver's seat is made from scrap material.
- Footrest.
- The simplest carrier.
- Console made from pipe cuttings.
- Brackets to size.
Manufacturing and assembly of the chassis of a homemade trailer
To make a carrier you need:
- Overlays 25x4.
- Flanges size S 4.
- Supports made of 58x4 pipes.
- Corners 25x25x4 for the footrest.
- Drawbar pipe.
The carrier of a simple design consists of a minimum number of elements welded according to the scheme. The most loaded parts - the drawbar and the turn signal - are reinforced with stiffeners. The carrier engages with the walk-behind tractor frame in a hinged manner. Structural model“pipe in pipe” forms a kind of long hinge and allows the wheelbase of the trailer to change position independently, regardless of the wheelbase of the walk-behind tractor. This solution protects the trailer structure from deformation and makes it possible to easily overcome holes or bumps.
The carrier is attached to central pipe using bolts, locknuts and studs. An elongated hole is machined in the central pipe so that the fixing bolt rotates along the axis of the coupling without longitudinal displacement.
The wheelbase is constructed from parts of any domestic vehicles, wheels, springs, and attachments are selected. Parts and elements are welded to the beam, and the ends are attached to the spar.
The drawbar is made of a 60x30 mm pipe welded to the front parts of the side members. The edges of the beams are joined and welded to the traction mechanical coupling. It turns out to be an analogue of the factory two-beam drawbar.
Material and design of the frame of a homemade trailer
The frame serves as the main supporting structure. It is necessary to carry out calculations of all dimensions and component elements according to the drawing, with high accuracy, excluding any inaccuracies that arise when cutting out, connecting channels, pipes and angles.
A simple, lightweight, durable frame is made from pipe with rectangular cross-section 60 x 30 mm. It will amount to load-bearing structure. The role of the traverse will be performed by steel squares measuring 25 x 25 mm. For reliability, all elements are welded together and reinforced with several cross-sections, leaving protrusions above the side members. For racks on front part outlets are welded longitudinally to a pair of pipes on both sides of the structure. The top trims made of pipes with cross section 25 mm.

The material of the supporting frame is selected according to characteristics that can provide conditions of strength and rigidity, and prevent deformation of the structure under the maximum permissible load. The frame for a homemade trailer for a light walk-behind tractor can be made from any available material: metal corner, steel pipe with rectangular, round cross-section.
The medium-power walk-behind tractor trailer is mounted on a frame using the following elements:
- brace 20x20.
- corner 20x20 for the driver's seat
- seat stands made from corner 40x40.
- front struts made of 40x20 pipe.
- frame trim profile from angle 40x40.
- corner 32x32 for the wheel axle stand.
- rear braces made of 40x20 pipe.
- transverse reinforcement from a 40×40 corner.
- axial rod 30 mm.
- solid triangle.
The intricate design of the frame will provide an excess margin of safety and will allow you to transport heavy, bulky loads and materials in the body. It is worth making a reinforced frame in case of frequent off-road use of a loaded trailer. Welding machine. It will be needed to firmly connect all parts. Self-tapping screws in this case will not be able to impart strength and durability to the structure.
What can a frame for a trailer truck be made from?
The trailer for the walk-behind tractor is made of corrugated sheets, sheet metal with a thickness of 1 mm, boards with a thickness of 2 cm, an old car body, a motorcycle stroller or from painted galvanized sheets. Any material that is available to the manufacturer and does not increase the cost of construction is suitable for the body.
For a wooden body, the corners are reinforced with metal plates. Fastening to the frame is carried out with bolts and three support frames.
For a body made of corrugated sheets or galvanized sheets, a metal profile is used. It is stamped onto the bottom along the length and width to protect the bottom material from sagging, deforming or bending.
Medium walk-behind tractors. Homemade trailers made of rolled metal. Step-by-step assembly instructions
The first stage of manufacturing begins after developing the drawing and calculating the dimensions of the trailer structure. The average walk-behind tractor allows you to transport a load of up to 500 kg, therefore, the load capacity of the trolley will be large. For the structure, it is worth choosing rolled metal that provides the calculated load capacity with a safety margin. Based on the overall dimensions of the trailer, the footage of rolled metal and the number of channels acting as a coupling frame are calculated. Accurate calculation helps you save on consumables and facilitates the assembly of complex structures.

Materials for the cart:
- Rolled metal. Length is individual, calculated.
- Steel corner 50x25mm.
- Steel corner 40x40mm.
- Cutting pipes of rectangular and round sections.
- Boards with a thickness of 2 cm for the body.
- Beam 50x50 mm for support beams.
Second stage. To speed up the project, use ready-made circuit structural part presented in the chapter “preliminary drawings”.
Make the body from wooden planks, reinforce the corners with steel corners. Attach the body to the frame using support beams made of wooden beams. On the body, if desired, make side loops and straps to secure the cargo during transportation. The finished trailer is presented in the form of a single-axle structure. The disadvantage of such a body is that the center of gravity is shifted to the front of the trailer; during operation, you have to ensure the correct distribution of the load. The second disadvantage of the single-axle trailer design is the lack of a folding side.
Third stage. The chassis is assembled from available spare parts and materials. These could be wheels from a motorized stroller complete with a hub. The ends of the axle rod must be sharpened to the diameter of the hub bearings.
The wheel axle will be a steel rod with a diameter of 30 mm. The length of the rod is calculated so that the wheels do not protrude beyond the outline of the body. The rod is welded to the side members and the body of the longitudinal hinge through the gusset and the corner support.
Heavy walk-behind tractor. How to make a trailer from car parts
A heavy-duty walk-behind tractor, such as the Zirka, is equipped with a high-quality, inexpensive towbar made from auto parts. The assembly time according to a pre-drawn drawing and prepared parts is 1-2 days.
Trailer materials and parts:
- Channel 65 mm along the length of the body.
- Front axle shafts from Moskvich or Zhiguli.
- Profile pipe 60x40 mm. Length 3.5 m. Quantity 1 unit.
- Pipes 2 m long. Quantity 2 units.
- Corners 60x60 mm.
- Welding machine.
The main load-bearing part will be an axis made of a channel. Its length is chosen at your discretion, depending on the expected width of the body. The front axle shafts from the vehicle are welded to the channel on both sides. Stacked on top profile pipes according to the following scheme:
- One pipe is placed exactly in the center. Length from the axle to the rear of the trailer = 1 m, length at the front = 2.5 m.
- Two-meter pipes are placed along the edges of the channel, at the junction of its end with the axle shafts. The channel joint should divide each of them in half.
- The pipes are laid parallel to each other.
- The ends of short pipes are attached perpendicularly with corners.
The central, long pipe acts as a drawbar. The length is adjustable in accordance with the dimensions of the tow hitch. Profile pipes or angles are stretched from the front corners of the trailer, providing rigidity and strength to the structure. The joints are welded or bolted together.
A simple wooden body with a seat for the driver is installed on the finished frame, and the towbar is attached to the drawbar.
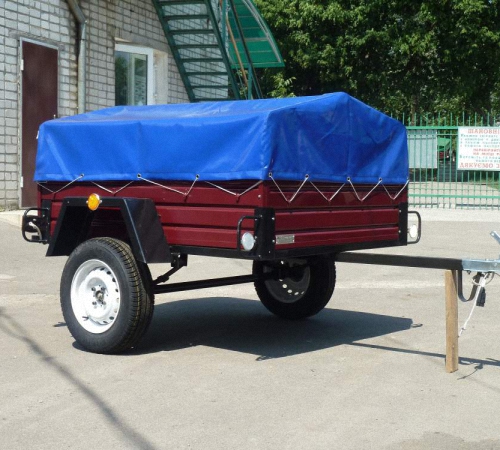
The box is equipped with brackets, like loops. If necessary, a homemade awning is attached to the hinges.
A self-made trailer for a walk-behind tractor will not be in vain. Funds will have to be allocated for the purchase of auxiliary and main parts. Not all materials can be found on the farm. To compare costs for own production and the costs of purchasing a new factory trailer, make an estimate. Enter all expense items into it. At the end of home production, take stock and get satisfaction from your ability to do useful, necessary things, with beneficial savings for the family budget.
The need for a trailer for a walk-behind tractor in homestead farming difficult to overestimate. It can be useful for many things: transporting seedlings and harvested crops, as well as necessary tools and even garbage. By spending just a few days making a trailer for a walk-behind tractor with your own hands, you can make your future work much easier.
The simplest trailer model
To build the structure needed on the farm, you need to prepare:
- Steel pipes 60x30 mm and 25x25 mm;
- Springs and wheels (can be from a Moskvich car);
- Duralumin sheet 2 mm thick;
- Cut of sheet steel 0.8 mm thick;
- Channel No. 5;
- Fastening elements;
- Tools (jigsaw, grinder, welding machine and screwdriver).
The trailer frame is a one-piece structure placed on a frame grid. To equip it, you need to make two traverses from a 25x25 mm corner, which will act as front and rear cross members, and spars from a 60x30 mm pipe. All elements are connected using five crossbars so that the result is a lattice.
A simple trailer model with folding sides is a very necessary thing in the household. With its help you can not only transport boxes and bags of harvested, but any long cargo
When arranging the lattice platform, you need to place the cross members and traverses relative to the side members so that small outlets remain. Longitudinal pipes will subsequently be welded to them.
Four racks are attached to the longitudinal pipes by welding, and strappings from a 25x25 mm angle are welded to the top of them. To equip a trailer with folding sides, the frame of the structure is made separately from the frame. The platform grille is covered with a duralumin sheet, secured with bolts. To sew the sides, you can use thinner ones. metal sheets, securing them to straps and racks by welding.
To make a beam, two channels of the same length are inserted into each other, equipping one of the ends of the structure with wheel axles. The finished beam is connected to the side members using springs. To do this, the ends of the springs are put on the bracket axis and the shackle axis, and the central part is welded to the beam with stepladders.
The drawbar is made from rectangular pipes 60x30 mm. To manufacture a two-beam structure, the front ends of the pipes are joined and welded to the body of the unit’s towing device, and the rear ends with an overlap of 200 mm are welded to the front ends of the side members.
The trailer is ready. If desired, it can be equipped with brake lights, turn signals and side lights.
Manufacturing a multifunctional trailer
When planning to make a trailer yourself, you must first develop a drawing in which to calculate the dimensions of the structure and imagine its future appearance.

When thinking about the dimensions and load-carrying capacity of the structure, you should expect that with the help of a trailer in one trip you can transport an average of 6-7 bags of vegetables, the total weight of which is about 400-450 kg
Having decided on the size of the trailer, you need to calculate required quantity meters of rolled metal. You also need to calculate the number of channels that will act as a frame for the hitch. By paying enough attention to this stage, you can not only save costs by protecting yourself from the possible costs of purchasing extra screws and corners, but also be confident in the correctness of your actions.
When making a homemade trailer, there is no way to do without a welding machine, since on self-tapping screws functional design won't last long.
Material about proper storage power tools:
To build a strong trailer frame, steel angles with a cross section of 50x25 mm and 40x40 mm, as well as cuttings of rectangular and round section. To make a trailer body, you will need 20 mm thick boards and 50x50 mm timber for the support beams.
Stage #2 - production of basic elements
As a basis for manufacturing, you can take a ready-made design of the structural part.

The trailer has an increased safety margin, which allows it to be used on difficult terrain surfaces
The design has four main components: body, carrier, frame and wheels. All of them are connected by welding.

To increase the strength of the structure, four stiffening ribs are provided in the area where the drawbar meets the body of the rotary unit
The body represents wooden structure, assembled from 20 mm boards, the corners of which are equipped with steel corners. The body is attached to the trailer frame using three wooden beams - support beams.

The trailer frame is made from a set of steel elements: pipes, angles and rods
Since such a trailer is a single-axle structure, the load distribution must be in such a way that the center of gravity is shifted to the front, without going beyond the axle of the wheels. The only drawback of this body is that there are no folding sides. If desired, the design can be slightly improved by installing folding walls. It is also advisable to make side loops with straps on the body, which will be necessary to secure the cargo during transportation.
Stage #3 – arrangement of the chassis
The chassis of the structure is one of the key ones in the manufacture of a homemade trailer for.
You can purchase new wheels and springs, but it is much easier to use used parts of a domestic car, for example, from a Moskvich or Zhiguli.
In our case, the trailer is equipped with wheels that were removed from the SZD motorized stroller and used as an assembly with the hub. To match the axial rod with the diameter of the hub bearings, it is necessary to sharpen its ends.
When arranging the wheel axle, it is enough to use a steel rod with a diameter of 30 mm. The length of the rod should be such that when the structure is assembled, the wheels do not protrude beyond the rims of the body. The rod is attached by welding through gussets and corner supports to the side members and the body of the longitudinal hinge.
To connect the trailer to the walk-behind tractor, you need to make a console. It will be attached to the bracket attachments, therefore its upper part should follow the contours of the holder. The lower part of the console is an axis around which, with the help of angular contact bearings in a fixed position, the rotating assembly of the carrier rotates freely.
How to make an adapter for a walk-behind tractor yourself:

The drawbar is inserted into the tubular body of the longitudinal hinge and secured with a thrust ring. This constructive solution makes it easier to operate the unit uneven surfaces, since the wheels of the trailer will work independently of the wheels of the walk-behind tractor itself.
The trailer is almost ready for use. All that remains is to place a seat for the driver in front of the body and attach a footrest in a special frame to the drawbar of the driver, which you can lean on while driving.
Other options for making trailers: video examples
The driver will control the unit from the seat, holding and manipulating the levers. It is advisable to equip the seat soft pillow so as not to turn working with a trailer into a real test of the body’s endurance to shaking.